Round ridge for metal tiles sizes. Connecting ridges on a hip roof. How to calculate the height and length of the ridge strip for metal tiles
Read also
A ridge for metal tiles is an important decorative element that has irreplaceable practical value: protecting the roof and the material underneath from precipitation, thermal insulation and ventilation of the roof. This term is also called wooden beam, fastening the slopes at the junction. However, today we will look at the first option - a coating to eliminate the gap between metal tiles. Installing any ridge on a metal tile is almost the final stage in roof construction. But at the same time quite responsible, because the safety of the entire roof depends on correct installation.
In this article
Main varieties of skate
To understand how to attach a ridge to a metal tile, you should consider the existing varieties that correspond to the types of roofs themselves.
- Straight (rectangular). Planks for this type are easier to install, they are much cheaper than the options below, however, they are much inferior to them in aesthetics. Preferred for simple gable and hip roofs. A straight ridge requires a sealing lining so as not to lose its thermal insulation properties. Somewhat limited in additional features by the manufacturers themselves. There are simple and figured straight skates.
- Semicircular. Almost universal. In addition to its interesting appearance, it differs only in the installation of special plugs that protect free space between materials from dirt, dust, small debris.
- Mortise and intersection. Highly specialized materials for hip and half-hip roofs. The first ones cut into the slopes, while the second ones are located horizontally and do not have a characteristic angle. Often their geometry is used to create a roof drain.
- Decorative models. They can be of absolutely any shape. As the name suggests, these planks do not fully fulfill all construction needs. Still they are wonderful architectural solution on many types of buildings.
- A ventilated ridge for metal tiles is the key to a long service life of the materials. Due to the temperature difference between the space under the roofing material and external environment, condensation is inevitable. Since the main “skeleton” of the roof consists of wood, the consequences of this can be dire.
It would be better to choose roofing material, ridge and additional metal parts (drains, abutment strips, end and cornice strip, valley and its overlay) from one manufacturer.
- You will certainly be sure that the colors match. In addition, most popular manufacturers initially prepare such construction “kits”, designed in the same style and fully compatible with each other with fastening systems.
- The difference between semicircular and rectangular functional features are insignificant, so there is no point in spending extra money if there is no increased requirements to the appearance of the house.
- Installing a ridge on a metal tile is not a complicated process, but very precise: any gap can lead to extraordinary financial losses in future.
Additional materials
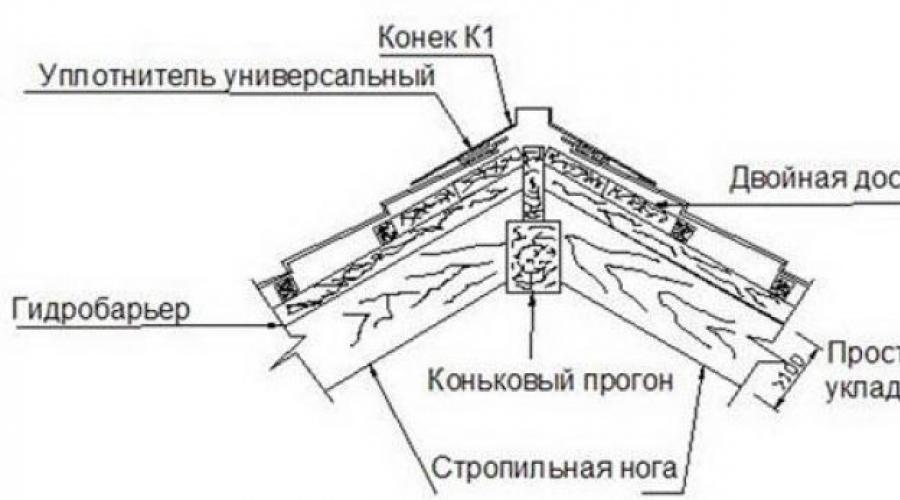
First, we need a seal that fills all the empty space between the metal tile strips and the wooden beam.
There are three main types: universal, profile and self-expanding.
The first is designed for lasting protection, sufficient ventilation and filtration of dust and small debris. The second is when ventilation is more important than protection from moisture. The third is relevant in areas where there is constant precipitation. How to choose the right sealant for metal tiles? It all depends on the area, manufacturer’s recommendations, and personal preferences. The main rule is that you should not skimp on the sealant.

Secondly, the ridge tape is a waterproofing element. The mounted ridge experiences temperature changes every day and, as a result, moisture accumulation in its cavity.
Thirdly, the ventilation strip. The main purpose is to create a through space for roof ventilation.
Stages of installing a ridge on a metal tile
To install the entire metal roof, it is advisable to have at least one assistant, since the work is meticulous and requires increased attention from the builder.
Before installation, you should make sure that the line at the junction of the slopes is even (up to 2 cm).
Possible “deviations from the norm” will significantly reduce the service life of the skate.
- We calculate the required number of slats using the simple formula N=Lс.÷(Lп. – А), where Lс. – length of all slopes in mm, Lп. is the length of one plank, and A is the overlap of the planks at the joints (from 5 to 10). It is important that the length of the bar is not less than 15 cm. Otherwise, you will make a fatal mistake and there is no point in carrying out complex installation will not be.
- We install the seal. It should not be compacted, otherwise the roof will lose ventilation. We can also use ordinary glass wool for these purposes.
- Let's try on the first extreme bar of the skate. It should be installed as level as possible. As they say, measure seven times. Next, you need to secure the structure with self-tapping screws with rubber or rubberized heads.
- By using taut rope create a horizontal level along the junction of the slopes, under which all other elements of the ridge will be leveled.
- We continue fastening the ridge of the metal tile with an overlap, aligning each subsequent element with twine. When screwing, we make the pitch of the screws 5-6 cm to prevent the ridge elements from “slapping” in particularly windy weather.
- At the very end, all the plugs included in the kit are installed into the fixed material.
High-quality installation the ridge of metal tiles can extend the life of a house by ten years, and, if a residential attic or attic is planned, protection from heavy rains is almost the main task the entire roof.
To install a metal tile roof, it is not enough to secure sheets of material to the sheathing. In order for the roof to acquire a finished look and the necessary functional properties (including protective ones), its structure is supplemented with various additional elements.
One of them is a roof ridge for a metal roof, which is an essential part of any pitched structure. Without it, the roof will leak, mold will grow in the insulation, and the rafters will rot. The outlook is bleak. Therefore, you should think about choosing a ridge and its proper installation at the first stages of creating a metal tile roof.
The term “roof ridge” means top element roofing, installed along the edge of the intersection of the slopes.
For a metal tile roof, ridges are made from a metal strip in the form of an outer corner. A flange is made on its edges (the metal is bent into the structure 1.5 cm on both sides) to prevent moisture from seeping under the ridge. Ridge wall thickness ( metal sheet) is usually 1.5 mm, less common are designs with a metal thickness of up to 2.5 mm.
The main purpose of the ridge part is to bridge the gap between the slopes. This provides protection against atmospheric moisture, debris, and insects entering the under-roof space. Also, covering the joint performs a decorative function, that is, it makes roof covering complete and harmonious.
In addition, a ridge strip, installed correctly, becomes the key to high-quality under-roof ventilation. Since, thanks to the profile of the metal tile, structural gaps are formed between it and the planes of the ridge, it becomes possible for air to escape from the under-roof space through them.
Types of skates for metal tiles
As a rule, companies that produce metal tiles also offer components for them. Therefore, choosing a ready-made ridge strip that matches the color of the purchased roofing material is not difficult.
The main thing that you have to choose in any case is the form ridge strip. The following varieties are found:
- Triangular models (flat)- the simplest and cheap way decorate the edge of the slopes. In this case, the ridge strip at the end has the shape of a triangle, that is, it repeats the geometry of the angle of connection of the slopes.
- Rectangular models (also referred to as flat, their other name is curly)– have a more complex, broken shape. Just like the triangular parts, they repeat the shape of the angle between the slopes, but at the top they have a U-shaped break.
- Semicircular (or round) models- the most decorative and expensive. In section they have the shape of a semicircle. At the end sides of the ridge assembled from such planks, plugs are installed that have a semicircular or conical shape (for hip roofs). To connect semicircular ridges on roof slopes of complex shapes (for example, hips), T- and Y-shaped tees are used.
When choosing ridge element In addition to the shape, you should pay attention to its width. In installation and further exploitation Products with a width of 200 mm or more are most preferred. Less than 150 mm are already risky options that require special care during installation and mandatory markings.
It is easier for atmospheric moisture and dust to “get” under a narrow ridge, especially during windy weather. The choice of such a skate is usually determined by small in size slopes, on which a wider part looks too massive.

The gap under the ridge: how to close it?
Any ridge strip has a flat sole, with which it is attached to the wave surface of the metal tile. As a result, gaps form at the joint. On the one hand, this is a positive point, allowing air to circulate in the under-roof space and provide high-quality ventilation.
On the other hand, precipitation (rain and snow) can get into the open gaps under the ridge, the accumulation of which leads to rotting wooden structures, wet insulation.
Therefore, in order to protect the under-roof space from atmospheric moisture, debris and insects, but not to block air exchange (ventilation), either a seal or a special ridge aero element is installed between the strip and the metal tile. Let's consider the types and properties of each of these materials.
Types and properties of seals
Seals are produced in the form of tapes with different properties, which are laid along the joint line between the ridge parts and the metal tiles. They come in the following types:
- Profile (hard). They are made of foamed polyethylene, capable of taking the form of roofing sheets. Profile gaskets completely repeat the profile of a specific metal tile. To ensure that tight closing of the gaps under the ridge does not cause ventilation problems, special holes are provided in the profile seals. Thanks to them, this type of seal is characterized by the best degree of breathability (compared to other options). Their service life is about 15 years.
- Universal (soft). They take the form of strips of polyurethane foam, which, due to their softness, after installation, independently take the required shape and fill the available free space in the gaps. The cellular structure of this type of seal works like a filter: it allows air to pass through (although the degree of transmission leaves much to be desired), but retains raindrops, snow and debris. Manufacturers indicate the service life of products made from polyurethane foam around 15 years.
- Self-expanding (PSUL). Initially they are compressed polyurethane foam tapes impregnated with acrylic. After installation, such seals expand, their thickness increases up to 5 times. The period for complete expansion and acquisition of final size is about 2-5 hours. Sealing tapes of this type have one self-adhesive side with a protective strip. During installation, the strip is removed and the tape is glued in place under the ridge. Self-expanding seals are air and water tight. Therefore, to maintain sufficient ventilation of the roof when installing the seal, gaps of 1-2 cm should be left for every 1.5-2 lm. The service life of self-expanding seals is about 20 years.
Despite manufacturers' assurances that the seals allow sufficient air to pass through high-quality ventilation, empirically it has been confirmed that this is not the case. Therefore, with gentle slopes, when it is impossible to do without a seal under the ridge, it is recommended to combine ridge ventilation with the installation of point “mushroom” type pitch aerators.
Ventilation can also be enhanced, if there are seals, by installing special ridge valves on the ridge.

A sales consultant at a hardware store talks about the types of seals and the specifics of their use:
An alternative to seals is the ridge aero element
Instead of seals, to bridge the gaps, you can use a special aero element - ventilation tape rolled into rolls. The middle part of the tape is made of polypropylene fabric (or mesh). The side strips are made of pleated aluminum with a self-adhesive surface.
Unlike seals, ventilation tape does not become a barrier to ventilation, thanks to the polypropylene layer with high vapor permeability.
Installation of the ventilation tape does not require special construction skills. The roll is unrolled along the ridge line, the protective film is peeled off and the material is pressed tightly against the roof surface. If there is a ridge beam, the tape is initially secured to the beam using nails or construction stapler. Then the side strips are glued to the metal tiles.

Information about the characteristics of the ridge aerator (using the example of the Delta-Eco Roll aero element) and the features of its installation on the roof can be found in the video:
After fastening, the ventilation tape is covered with a ridge, which makes it completely invisible. The appearance of the seal is not important for the same reason - the ridge element, after fastening, will hide all its “filling”. Of course, in case of proper installation, which is not difficult to do even on your own.
Technology for installing a ridge on a metal roof
Installation of the ridge strip is carried out on last stage roof structures, when the last shortened rows of metal tiles are laid along the slopes. The installation of the ridge (building up the elements) is carried out towards the direction of the prevailing winds.
In most cases, to attach the ridge strip, you should make additions to the sheathing and install additional ridge boards above the top boards of the step sheathing. The gap between the ridge boards of adjacent slopes should ensure the process of under-roof ventilation; usually it is 70-100 mm (the figure depends on the specific metal tile and the recommendations of its manufacturer).
The thickness of the ridge boards is increased by 10-15 mm compared to the sheathing boards. This is done so that the ridge does not end up sagging downwards in relation to the end strip after fastening.
There is no clear answer to the question of how to make a ridge on a metal roof. The process of fixing (installing) the ridge element on the roof is carried out according to the instructions of the manufacturers of specific metal tiles. These recommendations do not always coincide exactly, and usually represent a kind of “average” option, more or less suitable for any type of ridge strip and any metal tile profile.

Typically, the following steps are performed during the installation process. First, check the straightness of the ridge axis of the roof (for example, using a stretched cord). The permissible deviation is 2 cm. Large curvature will negatively affect the mounted element, since the walls of the ridge will have to be “adjusted” to the unevenness of the joint of the slopes. Therefore, defects beyond the scope permissible deviation, correct.
Then the ridge elements are prepared. The angle of the ridge strip is adjusted to the angle of connection of the roof slopes. To do this, bend or straighten the plank so that, when free, its mounting flanges correspond to the angle of inclination of the slopes. If the angle of inclination is higher than 45°, the bar will have to be bent too much.
This especially affects semicircular skates, the shape of which changes significantly with such “refinement”. In this case, the standard end cap will have to be adjusted to the modified shape or a homemade cover made of a flat sheet of steel will have to be mounted.
Installation of the ridge begins from one of the ends. The ridge element is mounted on top of the end strip, extending its edge outward by 20-30 mm. Parts of a flat ridge (triangular, rectangular) are joined, overlapping each other with an overlap of at least 100 mm. The parts of the round ridge are joined along the stamping lines. On hipped roofs Y or T-shaped pads are installed at the junctions of the ridges of adjacent slopes.

At the same time, the sealant is laid, fixing it under the ridge. If the seal is self-adhesive, then to fix it it is enough to remove protective film from the adhesive layer and press it to the surface of the ridge or metal tile. If there is no adhesive layer on the seal, then you will have to apply the glue yourself.
When using a ventilation roll (ridge aero element), the installation changes slightly. The ventilation tape with side self-adhesive parts is laid and glued to the metal tiles first, before installing the ridge strips.

The ridge elements are secured to a sheet of metal tile or to the sheathing using self-tapping screws, screwing them into the wave crest through the wave. It is impossible to violate these recommendations and screw self-tapping screws into the deflection of the wave due to the risk of deformation of the ridge, which will entail a sloppy appearance of the entire roof. During installation, 4.8 x 35 mm self-tapping screws are used - when attaching the ridge to the metal tile, and long screws 4.8 x 80 mm – when attached through metal tiles to the sheathing.
Attaching the ridge strip directly to the sheathing is considered a more reliable option. In this case, the ridge detachment, which is possible in areas with high wind loads, is completely eliminated. At the same time, most metal tile manufacturers in their instructions recommend fastening only to roofing sheets. In any case, the choice of one or another mount is yours.
Some metal tile manufacturers recommend installing the ridge on a pre-attached ridge beam. This ensures a more reliable installation and absolutely level positioning of the ridge strip. Timber is stuffed along the edge of the roof (sometimes it is installed on special metal fastenings), 40-50 mm wide. The ridge elements are put on it and screwed to the metal tiles.
After fastening all the elements, check the evenness of the assembled ridge. If there are no deviations, the work is considered completed.

Useful video on the topic
The skate is not an element that should be underestimated. His correct installation guarantees:
- decorative appearance metal roofing;
- dry under-roof space;
- no condensation;
- adequate ventilation;
- protection against leaks through the ridge.
Therefore, the installation of the ridge must be carried out in compliance with the technology described above, without the slightest disregard for detail. If you are not confident in your abilities, it is advisable to seek help in installing the ridge from qualified roofing specialists.
Nowadays, metal roofing is in great demand, as it is a reliable and durable coating. Choosing this material is the right decision. The system of such a coating includes the material itself and complementary elements. A significant element of the roof is the ridge, which provides roof ventilation.
Skate types
 According to its design characteristics, the ridge is divided into the following types:
- Additional strip
- Semicircular ridge
- Mortise ridge
- Y and T skates or crossed
- Decorative ridge
Ridge strip or rectangular ridge is used to cover joints of any type of roofing material and is a good decorative addition to the roof. The ridge elements can be matched to the color of the metal tile, which will have a good effect on the integrity of the roof.
The semicircular ridge is used in a similar way; it is also mounted at the joints of gable and hipped roofs, but special plugs are installed at the ends to prevent the entry of debris and moisture.
The principle of installing a mortise ridge is slightly different from the previous ones, in that it cuts into the roof slope, and its horizontal part is located below the main one.
Narrow decorative ridges are used more for aesthetic rather than protective finishing. They are mainly installed on spiers, hipped roofs or gazebos.
The crossed ridge, or Y and T-shaped, is an additional element of a rectangular ridge strip and is intended for attaching them to each other.
Accessories
If the choice fell in favor of a metal tile roof, then it is recommended to purchase all the ridge components and fasteners in one place and from one manufacturer.
 The skate kit includes the following items:
- Ventilation strip
- Lightning rod holder
- Sealant
- Sealant
- Additional aero elements
With the help of these parts, you can mount them efficiently and firmly, as well as fasten the ridge elements and ensure reliable functionality after that.
Sealant
An important element when installing a ridge is the seal, which carries protective function from penetration under the roof of precipitation, debris and dust.
If the seal was installed poorly or deformed, then such a roof will leak, which will negatively affect the operation and its condition.
 Specialized stores and construction markets are pleased to offer several types of seals:
- Universal
- Self-expanding
- Profile
The self-expanding seal includes polyurethane foam, which is impregnated with polymer compounds such as acrylic. The main purpose is to cover the upper part of the edges of the roofing sheets and firmly connect the roof slopes, thereby providing additional.
The profile seal is made of a foamed polyethylene composition, which is resistant to moisture, but is able to pass air, thanks to these qualities it is widely used for ventilation system roofs. This material has its own characteristics - it repeats the configuration of the roofing shape, which has a beneficial effect on sealing.
In the manufacture of universal seals, a polyurethane film is used, which is capable of filtering dust and debris, and at the same time does not allow air to pass under the roof.
It is recommended to install seals after fastening the metal tiles, between the ridge and the roofing material. It is especially important for roofs with a hipped slope and areas where the ridge is installed diagonally in relation to the roof.
Tools used when installing the roof and ridge:
- To cut metal products, use mechanical hand metal scissors
- Fine tooth saw
- Electric jigsaw
- Circular Saw
We must not forget that after cutting sheets of metal, it is necessary to sweep away sawdust, which can subsequently rust and damage the coating.
Fastening the ridge of metal tiles
- Before installation, the first thing you need to do is make sure that the ridge axis is level - this is the junction of the entire upper edge of the roof. But if there is a slight curvature (up to 2 cm is allowed), it will not affect the installation of the skate, but if there are more maximum deviations, they need to be corrected
- A layer of glass wool is placed in the ridge grooves; this will protect the roof from snow blown into the roof by the wind. winter period. But it is important not to overdo it, otherwise you may interfere with ventilation.
- It will not be possible to cope with the installation alone, so you will need at least two people. Next, to lift the skate, the first assistant must give one end of the skate, and then the other must help pick up the opposite end
- Next, you need to lay the ridge on the outer edge of the roof, exactly along the edge of the metal tile. In this case, proportions must be respected and unnecessary vertical gaps must not be allowed.
- On the opposite side, an assistant should control the edge of the element so that there is no distortion with respect to the axis
- If the ridge has been installed correctly, it must be secured with screws along the outer edge. Next, a cord is pulled along which will be aligned and fixed. internal sides ridge corners. By pulling the cord, it is secured to the edge of the skate at the zero point
- The next step will be the installation of the remaining planks at this level
- When attaching a ridge to a metal tile, the screws should not be screwed in often, but nevertheless, periodically you need to check the corners so that they do not come loose
 Installation diagram of the ridge of metal tiles
 - A ridge that does not have a trim is not rigid enough and does not look aesthetically pleasing after installation.
- Before preparing the material, it is necessary to calculate the required quantity, but taking into account an overlap of 5 cm
- When starting roofing work, you need to prepare a ladder and insurance, and pre-prepare the following materials: construction cord, screws, screwdriver
For ease of installation, it is better to carry out the work with two or three people, since moving on the roof is very difficult.
 After installing the ridge, you can proceed to installing other elements. You can implement. This element on the roof ensures safe snow removal. They are also necessary to prevent the roof from deforming under the mass of icy snow.
 Installation skylights in metal tiles must be done before installing the ridge. Incorrect installation or poor waterproofing of such windows will negate all efforts to build a roof. Take on the installation of roof windows the better who already has experience construction work, and only if you follow the instructions and rules.
Video about installing the ridge of metal tiles
The video clearly shows the procedure for installing the ridge.
The roof, made of metal tiles from the eaves to the top, consists of a main covering and additional elements. Some can be dispensed with without installation, but there are those that are integrally connected with the roofing system and are its integral part. The latter includes a ridge for metal tiles. Its installation is best left to to an experienced master- roofer. However, by following some recommendations, you can handle this work yourself. By carefully studying the process of installing a ridge under a metal tile, you can avoid many mistakes when installing it. If you install this important element incorrectly, the roof will not be able to fully perform its functions, that is, protect the roof of the building from negative influence environment.
What is a skate
The concept of ridge implies the upper edge of the roof, which is a gable horizontal intersection of its slopes.
With its help, ventilation and air removal from under the roof are provided. It is a sheet of metal with a rectangular profile, edged at a distance of 15 mm. The ridge for metal tiles is equipped with various accessories - fastenings, sealing washers. They contribute to its tightness and prevent roof leaks. Fastenings and additional parts are made from the roofing material, taking into account its shade and style. When done correctly, the ridge for metal tiles practically does not stand out on the roof and is often installed with ventilation equipment.
When laying metal tiles from the eaves, one condition must be observed - ensuring good ventilation. It is necessary to build the base of the roof in such a way as to ensure good air circulation from the eaves to the top, which in turn will lead to normal ventilation. If climatic conditions, in which the building will be operated, are characterized high humidity, then you will have to take more serious care of the ventilation of a metal roof. When installing the base under the metal tiles, it would not be superfluous to provide and leave a gap between them, and raise the sheathing by approximately 50 mm, then lay the insulation on it.
Skate design

The ridge for metal tiles is the very top of the roof, through which the space under the roof is ventilated. Its angle is at least 180 degrees. It is the very first element of the roof structure, taking the brunt of the influence of bad weather, including gusts of wind. Therefore, installation of this element it needs to be done quite scrupulously and efficiently, without skimping on fasteners. Many residents of private houses are faced with the problem of roof leaks. Some believe that this is due to poor quality roofing installation. However, this problem may arise due to poor-quality installation of the top rib and its unreliable sealing. This is what seals are used for. Thanks to their use, the service life of not only thermal insulation, but also roof structural elements is extended.
The interior decoration of the house will also last much longer. The seal is fastened before installing the ridge. Currently, 3 types of seals are used. Depending on the base, they are self-expanding, universal and profile. Today, the construction market offers several types of ridge for metal tiles, the main ones being - ridge strip or straight ridge; semicircular ridge; crossed and mortise structures.
Main types of skate and its components
Another name for the ridge strip is ridge profile. Its main purpose is to close the junction of two roof slopes. She is also decorative element roofs. When making a roof from metal tiles, its ridge can always be harmonious combination choose by color. As a rule, all roofing elements from the eaves to the top are purchased from one manufacturer. When choosing a straight ridge design, when installing the roof, a special insulation must be placed under it.

The semicircular appearance of the ridge serves to perform similar functions. It has a more attractive and interesting appearance. Mortise and crossed ridges are used for hip roofs. The first ones crash directly into the roof slope. Their common element is the valley. Crossed ridges are always positioned horizontally, so they are often confused with roof hips.
The most profitable and optimal option is to purchase metal tiles, a ridge, its components and fasteners from one manufacturer. You can also buy insulation here. The ridge consists of the following elements - the ridge strip itself, the seal, the lightning rod holder, the ventilation tape and the sealant. In addition to those mentioned, some aeroelements can be used. With these functional parts, correct and reliable roofing is possible. They protect not only its joint, but also provide good ventilation.
Ridge installation tools

The ridge for metal tiles has only one purpose - to close the upper edges of the sheets, securely connecting the roof slopes. It is recommended to choose the edges of its shelves at least 15 cm wide, otherwise, in winter, the wind will sweep snow into the attic room. You should also pay attention to the trim. In its absence, the rigidity of the ridge for metal tiles will not be sufficient, and the view from below will be ugly. The length of these additional elements is calculated in accordance with the length of the roofing sheets, taking into account the “overlapping” installation method. Requires a small set of tools. You will need a screwdriver to tighten the screws. It is convenient to measure the length of the material using a tape measure. It can also be used to measure insulation. You can use a marker to mark the required length when cutting the material. When performing roofing work, you need to have a ladder and insurance. It is considered most advisable to perform them together with a partner.
Installation of a ridge for metal tiles: basic rules
Installation of the ridge is the final stage of roofing work. It is performed after all roof slopes - from the eaves to the very top - are covered with metal tiles. By the way, it is best to lift ridge elements onto the roof with a winch or using a rope. The very first thing that needs to be done is to check the axis, that is, the place where the upper edges of the roof connect. Please allow slight error when measuring curvature. Its maximum value should not exceed 20 mm. If the deviations are more significant, the curvature will have to be corrected.
Even if the straight ridge under the metal tile has shelves more than 20 cm, glass wool should still be placed in its grooves. Its quantity should be such that ventilation is not disturbed. The first step in installing a ridge is to attach a special bar with a minimum cross-section of 70x90 mm. Next, a pair of sheathing beams are attached along its edges. To make it convenient to work, you can attach brackets to the central bar and hang bridges on them, along which it is convenient to move from the cornice itself, performing.
The next step is to attach the ridge strip to the central beam. Experts advise rounding the top of the ridge before this operation. This will ensure a tighter fit of its elements. To prevent the appearance of mold or mildew, it is recommended to cover the entire surface of the timber with roofing material or a special sealing material and lay insulation, which will help extend the service life of not only the ridge itself, but also the entire roof from the eaves to the ridge. Additionally, these places need to be painted with enamel or paint.
Straight and round ridge: installation
To prevent the penetration of moisture or steam into the under-ridge space, and to maintain the optimal temperature in it, heat, sound and waterproofing are performed. Warm roof assumes that there is insulation under the waterproofing layer. The ridge should be fastened to the beam using screws (4.8 x 80) mm. In this case, the ridge covering is formed by the ridges located on the roof slopes. The main straight line of metal tiles is extended by approximately 10 mm. The remaining skates are installed in such a way that their widened ends are located in the direction of the pediment.
Attaching a skate requires compliance with some rules. Professionals recommend simultaneously drilling holes on both skates: on the flat side of the bar and the longitudinal axis of the bar hump. The important point is that these holes pass through the crests of the metal tile waves. The installation of the ridge begins from one of its ends, mounting it on top of the end strip and extending the outer edge by approximately 20 - 30 mm. All parts of the flat ridge are laid “overlapping” with a size of at least 10 cm.
To connect the parts of a semicircular ridge, it is necessary to fasten them along stamping lines. To avoid mistakes during installation, it is best to model the ridge assembly for a metal tile roof in accordance with the slope of the roof. This measure will also be possible if the roofing sheets are ordered correctly. To fit the ridge to the roof slopes, it can be unbent and bent in different sides. But it is always necessary to remember that the ridge shelves that are in a free state must correspond to the angles of the roof slopes from the eaves itself. To prevent snow from getting under the straight ridge, insulation is laid between the ridge strip and the metal tile and an aero roller is installed. The ends of the ridge are closed with decorative plugs, and the joints are treated with a special sealant.
Horse- this is a horizontal rib located at the highest point of the roof, which is formed by the joint roof slopes. The ridge also includes various elements attached to the rib. Through this point, ventilation occurs for both the roof itself and the space under the roof. Installing a ridge is also creating ridge girder: it connects the slopes of the rafter system.The very essence of the skate indicates that it is an element in the first place gable roofs, however, it is also present in structures of a more complex configuration - for example, broken hipped ones. There are also roofs irregular shape with different slopes with a displaced ridge. The construction of these varieties is a more complex process than in the case of the standard form.
During installation of the ridge Special attention need to pay attention to two points: to produce accurate calculations height of this part and arrange good ventilation roofing pie and attic spaces.
Previously, asbestos cement was used to decorate the ridge. Currently, galvanized iron is becoming increasingly popular. Construction market offers many options ready-made corners based on galvanization, cut into parts approximately two meters in length. Similar corners can be made from sheets yourself.
Types of skates
The ridge can be made in different options. In some cases, it is laid on vertical racks beam that serves as a support for rafter legs. The vertical posts themselves rest on the ceiling beams or on tie rods.
The second option for the ridge is the connection through longitudinal connections of the exposed triangles of the rafter system. In this case, boards are sewn onto the rafters on both sides at a certain angle to one another, resulting in the formation of a ridge.
The roofing ridge is made on the basis of materials used as roofing: metal profiles, slate, ceramic or bitumen shingles etc. Today you can purchase the following types of skates in stores:
- ridge strip;
- semicircular ridge;
- mortise;
- crossed skates.
Another name for a ridge strip is a ridge profile. Its function is to connect the junction areas of two opposite slopes on the ridge. The ridge also performs a decorative function. On sale you can find ridge elements that are identical in color to the roofing covering, which allows it to organically fit into the overall design of the roof. During installation, a special sealant must be placed under the ridge strip.
 Semicircular ridge performs the same functions as the ridge strip, while looking more aesthetically pleasing. As a rule, manufacturing companies produce skates that differ in color and texture. It is better to purchase roofing elements from one manufacturer: in this case you can achieve quality device skate and its high functionality.
Mortise skates used for device hip roofs. Based on the name itself, you can understand that this part cuts into the roof slope. Moreover, its horizontal level in all cases is lower than the main one (at the upper ridge).
Valleys are joint elements of a mortise ridge.
Crossed ridges are also used to create hip-type roofs. This variety has intersections and is always located horizontally. For this reason, they are often confused with roofing hips.
Important points when installing a skate
- When working, it should be taken into account that for free access of air into the under-roof space, the roof covering being installed should not be tightly connected at the ridge.
- The ridge is installed at the final stage of roof installation work. Ventilation material is laid to protect the ridge beams (boards) from moisture that can penetrate during rain or snow. Protective layer It also performs another function: it prevents insects and small birds from entering the attic. It can be created from a special seal, glass, mineral wool, some other materials.
- It is necessary to ensure that the space located under the ridge strip is not tightly filled. – otherwise it will be disrupted or even eliminated natural ventilation. This can happen due to the filling of the ridge space polyurethane foam or sealed material that prevents free air circulation. This problem often appears in the case of mansard-type roofs.
Accessories
 Having decided on the choice of material for the roof, you need to purchase the roofing covering, the ridge itself, components and fasteners. The main components of the ridge element are:
- ridge ventilation strip;
- ventilation tape;
- holder for lightning rod;
- sealant;
- ridge seal;
- some other aeroelements.
All of them are necessary for durable installation and fastening of the ridge to the roof, ensuring its high functionality. Only under this condition will the ridge be able to protect the joints and provide good ventilation.
What will you need for work?
All necessary tools and equipment should be prepared in advance. To install the ridge you will need:
- a ladder with triangular projections at the upper ends for attachment to the roof;
- level;
- roulette;
- special screwdriver for roofing screws(with a special head shape);
- lace;
- metal scissors;
- drill with different attachments.
Determining the height of the ridge
When installing a roof, a mandatory point is to determine the height of the ridge for further calculation of the amount required to create rafter system and roofing building materials. The necessary calculations are carried out in accordance with the rules of geometry after determining the angle of inclination of the roof. A special table has been developed that can be used for quick calculations if there is data on the width of the building and the slope angle.
 Let’s assume that the width of the building is 8 m, and the roof slope is 40 degrees. To calculate the height of the ridge, use the following scheme:
the width of the house is multiplied by the coefficient
The result is the height of the ridge element from the ceiling. In the case of the example given, it will be 3.35 (4 x 0.839).
Types of roofing and ridges
 The method of constructing a ridge girder is directly dependent on the type of roofing. Therefore, it is necessary to think about installing the ridge already at the stage of choosing a roof covering.
When performing roofing based on asbestos cement sheets you need to purchase commercially available special shaped elements in the form of a gutter, laid on boards or ridge beams and attached to them using slate nails with a rubber gasket. It is imperative to waterproof wooden roofing elements. Before installing slate-based ridge elements, the ridge beam should be covered with roofing felt tape.
Ridge elements made of asbestos cement can be incorrect geometric shape– namely: they are slightly narrower at one end. This end must be covered with the subsequent slate element. In this case, the overlap is at least 7 cm. An anti-wind bracket is used to strengthen the first element.
If the roofing material is clay tiles, you also need to purchase ridge parts in the form of gutters and corners.
When creating roof ridges using ceramic-based fragments, you must use mortar and wire (used for fastening).
The installation of a ridge for a roof made of rolled materials is carried out by gluing these same materials. The method of laying the panels is determined by the slope of the roof slopes. If the slope is small, the panels are laid parallel to the ridge with a significant overlap. With a large slope angle, the panels must be laid parallel to the drain. When installing the ridge, it is recommended to lay the rolled materials in a direction perpendicular to the ridge. In this case, the minimum overlap of the sheets should be 25 cm.
If galvanized iron roofing is chosen, you will generally need to make the ridges yourself, although it should be noted that construction stores They also offer ready-made elements up to 2 meters in size.
If you make your own ridge, you should determine the exact parameters of the roof. After this, the desired strip is cut out of a steel sheet with a galvanized surface, which is given an angular shape. In this case, a wooden hammer (mall) is used. The use of a conventional metal hammer is impractical, since it damages the zinc coating, which leads to the ridge being unprotected from moisture and its rapid deterioration.
Rules for installing a ridge element
 The installation of the ridge begins after the installation of the roofing covering on the surface of the slopes is completed. Ridge piece elements are lifted to the installation site using a winch or rope.
- To secure the ridge elements, a special beam is first installed, the minimum cross-section of which should be 70x90 mm. Then 2 sheathing bars are attached to it on both sides. To facilitate the work of laying parts, you can attach special brackets to the central beam and hang specially designed walking bridges on them.
- The ridge beam is attached to the central one. For ease of fastening, the top edge of the ridge beam should be rounded. Thanks to this shape, a much stronger fit will also be ensured for all ridge elements used. To prevent decay, the development of fungus and mold, the ridge beam should be upholstered along its entire length with ordinary roofing felt material or a sealant intended for this purpose. Such prevention significantly extends the service life of the ridge element and the entire roofing structure. When installing the ridge and other ridge parts of metal tiles, they must be fastened directly to the ridge beam. Screws are used for this.
To prevent the process of rotting of the ridge beam, the areas covered with a layer of roofing material must be additionally treated: apply a layer of enamel or oil paint.
The ridge ceiling is formed using two ridges laid on adjacent slopes. Then the longer (main) ridge is fixed - it should be extended by 10 mm.
The remaining skates are installed in such a way that their widened ends are directed towards the pediment.
Skate attachment process
 As an example, we can take the fastening of a ridge to a metal tile roof. To ensure its functionality and reliability, the following actions must be taken:
- At the same time, holes must be drilled on both skates.
- The hole should also be on the flat side of the block.
- Two holes must also be drilled on the line of the timber hump located longitudinally.
- During work, it is necessary to ensure that the holes on the lapels pass through the crests of the waves of the material.
- The process of installing the ridge must begin from one of the ends, installing the element on top of the end strips.
- The edge of the ridge should extend outward by at least 2-3 cm.
- The process of installing a flat ridge requires the indispensable joining of all parts with an overlap of 10 cm or more. It is also possible to use tin technology.
- When connecting the parts of a semicircular ridge, the joining is carried out along the stamping lines.
- The specific location for strengthening the ridge board and the methods of fastening are directly dependent on the slope angle of the roof.
- To avoid possible errors, during the installation of the sheathing, you should model the assembly of the future ridge, while paying attention to how the model of the ridge strip and the roof slope angle are combined.
- Then you need to adjust the angle of the ridge strip to the angle of the roof slope. For this purpose, you can bend and unbend the skate (as necessary).
One important point: the free ridge mounting flanges must correspond to the slope angles of the roof slopes.
- In many cases, it may be necessary to additionally install a ridge board. It is installed above the level of the top sheathing board, while an 80-mm gap is maintained between adjacent slopes and the ridge boards of these slopes, which ensures ventilation of the under-roof space. The ridge board should be 10-15 cm thicker than the step sheathing boards.
- The final fastening of the ridge strip is carried out by tightening it with self-tapping screws to the very high areas metal tile sheets. The pitch of the screws should be within 0.8 m.
- To prevent snow from getting under the ridge, an aerial roller should be installed between the ridge strip and the metal tile.
CONCLUSIONS:
- A ridge is a horizontal edge at the highest point of the roof, formed by the junction of the roof slopes.
- Mounting the ridge is the last and one of the most important stages roofing works.
- During installation, attention must be paid to making accurate calculations of the height of this part and ensuring good ventilation of the roofing pie and attic space.
- The ridge is made from materials used as roofing.
- There are several types of ridges: they are used for different roofs.
- For free access of air, the roof covering should not be tightly connected at the ridge.
- After choosing the material for the roof, you need to purchase a ridge, components and fasteners.
- You should first prepare the tools and equipment for work.
- It is necessary to determine the height of the ridge.
- The method of installing the ridge is determined by the type of roofing.
- The construction of the ridge begins after installation of the roof covering.
- In the process of attaching the skate, it is necessary to follow the sequence of actions.
- The specific location for strengthening the ridge board and the methods of fastening depend on the roof slope angle.
Look below detailed video instructions for attaching the ridge to the roof.