Houseplant red pepper. Multi-colored decorative peppers. Decorative pepper in a pot care
Read also
The miniature indoor pepper grows well on the windowsill and is an excellent source of spices for preparing amazing dishes in the kitchen. Often used at home different kinds and varieties decorative culture. Decorative pepper is loved by many for its original look and ease of cultivation.
Description of the plant
The biological name of indoor pepper is capsicum. Often decorative indoors, although it is also possible to grow it in open ground. Such species are used as food and have some medicinal properties.
Ornamental peppers were brought from America and Asia. It contains a large amount useful substances and vitamins. In our country, peppers are mainly grown to obtain ornamental plant with beautiful leaves and less often for edible fruits.

Peppers in a pot come in a variety of shapes:
- small;
- large;
- pointed;
- rounded;
- pear-shaped;
- elongated.
Depending on the varietal qualities, the fruits can grow up or down. Growing ornamental peppers requires time and careful care.
Important! Ornamental peppers in pots can bear fruit at home for four years with proper care.
When growing peppers, there are some requirements for indoor conditions:
- The temperature in the room should be within 25 degrees Celsius.
- Air circulation.
- Sufficient lighting.
- Regular watering.
- Trimming.
Important: When flowers form, it is necessary to pinch the sprouts; this has a great effect on the formation of a beautiful, strong bush.
Caring for decorative peppers also involves pruning, which is carried out after flowering. Peppers are very demanding when it comes to fertilizing, so they should be fertilized about 2 times a week. In winter, the plant does not require additional feeding and therefore regular watering and lighting are sufficient.
To stimulate the plant to grow, develop and bear fruit, it is recommended to replant it approximately once a year.
Selection of planting material
To obtain healthy plants First of all, you need to make a choice seed material. Ornamental peppers are best propagated by seeds; in order to understand how to grow plants from seeds, you need to take into account some points:
- Seeds are collected from dried fruits.
- Seeds should be collected from the bush you like, taking into account the shape of the fruit.
Hot pepper seeds, as a rule, can be stored for five years, but seeds collected a year before planting have the best germination rate. Therefore, it is better to plant seeds from last year, as this will ensure a good harvest.
Important! Seeds collected for storage should not have mechanical damage or signs of disease. Benign seed material should have a yellowish color.
Varieties differ in terms of ripening:
- early ripeness;
- medium ripeness;
- late ripening.
Early ripening varieties bear fruit 70–95 days after planting in pots. Peppers from mid-season varieties appear after 110 days, late ones - after 130 days.
The pepper bushes, which reach a height of 35 centimeters, amaze with their splendor. In general, the height of peppers grown in pots can vary from 20 to 100 cm in height.
Agrotechnics of cultivation
One pot is enough for planting. Planting consists of the following steps:
- Filling the bottom of the drainage container. Small expanded clay stones can be used as drainage.
- Backfilling soil with neutral acidity; specially purchased soil is best, since soil collected from the site may contain disease microbes or pest larvae that negatively affect seed germination.
- Before planting, the seeds are soaked in water at room temperature for about 2 hours. This time will be enough for swelling; biostimulants such as “EPIN” or “ZIRCON” can be added to the solution. These drugs stimulate the germination of healthy shoots.
- Distribution of seeds on the soil surface, observing optimal distance between them. Seeds are planted in moist soil, but not wet.
- Sprinkle the seeds with soil to a depth of 50 millimeters.
- Moistening the soil with a spray bottle.
- Cover with film to create a greenhouse effect.
After the emergence of seedlings, they need to be regularly inspected and moistened, avoiding overwatering.
Every day the film should be lifted for some time, ventilation should be increased every day, and after strong young shoots appear, the greenhouse effect should be eliminated and the plants should be allowed to adapt to normal conditions.

As the above-ground mass of plants increases and when 2 true leaves appear, the peppers are transplanted to permanent place. If the plant is planted in a separate pot, then it should be transplanted into a container with larger area nutrition, this will ensure the full growth and development of ornamental peppers.
In general, when growing ornamental peppers, you need to adhere to the following rule: “one plant - one pot.” Mass plantings are unacceptable for indoor peppers.
Stimulating flowering and fruiting
Care to stimulate peppers to produce flowers is the following:
- to increase the number of ovaries, the pot with the plant should be shaken periodically;
- providing access to sunlight;
- ensuring systematic irrigation.
Important! Usually the first flowers on the peppers fall off, but then new ones appear that bear fruit, so you should not despair and continue to provide care.
Growing conditions
Ornamental pepper is demanding on the sun; if there is not enough, the leaf plates suffer and are damaged, as a result of which the plant may not develop and become deformed. Do not place pepper pots on shelves, refrigerators or cabinets. If there is not enough light, additional lighting should be provided.
Be sure to moisten the plant every day by spraying it with a spray bottle. The water should be at room temperature; the pepper does not tolerate refrigeration.
Between March and October, peppers should be fertilized; special fertilizers for nightshade crops are suitable for this plant. Fertilizers can be purchased at a specialty store and used according to the instructions on the package.
Around the end of summer, pruning can be done, but only if the pepper has formed rather long branches. The pepper bush should be pleasing to the eye and compact. When pruning, you do not need to touch the main trunk, otherwise this may lead to the death of the plant.
Caring for miniature peppers in winter
Decorative according to biological characteristics indoor pepper is perennial plant, which at good care can bear fruit for 4–5 years. The main care during this period is transshipment of plants in order to renew the soil. The soil needs to be updated every spring. For comfortable overwintering, there are three growing options:
- after fruiting, collect seeds for propagation, and mature plant throw away;
- to preserve it, it should be placed in a bright place and provided with regular watering;
- to preserve an adult plant and obtain a harvest in winter time Additional lighting should be provided; for this, lamps are installed and fertilizing continues.
Conclusion
This paper discusses the main points of caring for and growing ornamental peppers at home. A bush of such a plant will delight you with its appearance and piquant taste.
In order to grow fresh vegetables yourself, you don’t have to have a country house. Decorative indoor pepper – unpretentious plant, taking up minimal space on the kitchen window sill or on the balcony. Planting and growing vegetables is not difficult and can be done independently if you follow the recommendations and advice of experts.
Varieties of indoor peppers
Potted peppers, like their counterparts for open ground, are divided into many varieties. Greater value when choosing, as a rule, the fruits of the plant are given - size, color, taste: spicy or sweet. No less important factors are the time of flowering and ripening, fruitfulness. Some varieties require special care and conditions. The most popular varieties of decorative indoor peppers for growing yourself:
- Ogonyok;
- Chile;
- Small miracle;
- multi-colored indoor pepper - Garda Firewax;
- Purple bullet.
Indoor peppers are interesting not only for the fresh vegetables grown on the windowsill of the apartment, but also for their interesting, enchanting appearance. The leaves and fruits on the bushes of each variety have their own shades, structure, shape, abundance of flowering and appearance flowers. Some housewives keep indoor peppers on their windowsills exclusively for the interior. A correctly selected plant variety complements the design of the room, especially such as the kitchen.
House pepper Ogonyok
The most common type of hot indoor pepper is Ogonyok. It is widely used in apartments for winter growing. It has a relatively short ripening period - the bush begins to bear fruit 3-4 months after the first shoots appear in the pot. The size of the plant is small - the bush grows up to 30 centimeters, but it is covered with fruits. During one flowering period, about 50 peppers ripen on the bush.
Indoor hot pepper Ogonyok is a long-term culture: when proper care the bush lives up to 6 years. The plant does not require special care; regular watering is enough for it in an apartment. IN summer period and in warm spring days It is recommended to take the plant to the balcony. The flame reproduces by seeds; they are collected in the fall, when the fruits turn bright scarlet.

Indoor chili pepper
Varieties of hot indoor chili pepper or cayenne pepper came to us from Bolivia. They are successfully grown in apartments and houses in any region, but they require special soil - a mixture of peat, sand and earth. Fruits in 90 days after germination. Ripe fruits bright red, oblong, up to 5 cm in length. The height of the bush is 30-40 cm. Indoor chili pepper is used not only in cooking, but also in folk medicine. Various tinctures for headaches and colds are made from mature pods. Chili pepper contains vitamins A and C and is especially useful in winter.

House pepper Little Miracle
The Little Miracle variety of hot indoor pepper is unpretentious; it does not require fertilizers; it grows and bears fruit well in ordinary soil. The bush reaches no more than 30 cm in height, the fruits are blunt-conical, and when ripe they are light red in color. Often the houseplant Little Miracle pepper is used only as a decorative element: the bushes, although not tall, are very lush, with small spiky dark green leaves. The fruits do not grow at the same time, so at the moments of their ripening the bush is decorated with a motley ripple of multi-colored pods: red, orange, green, yellow.

Sweet indoor pepper Peak
Almost all types of indoor peppers have a spicy taste, but Peak is an exception; its fruits are sweet, with a soft and delicate skin. The bushes grow up to 50 cm, the leaves are dark green, wide at the base. With proper care, pepper can live in a room for 2-3 years. At the same time, up to 15 fruits ripen on the bush - 2-4 chambered cone-shaped peppers, weighing 100-150 g. Indoor pepper Peak is resistant to many diseases characteristic of plants of this species. He needs minimal care, does not require pest prevention. It grows fully even in rooms with poor ventilation.

Potted colorful peppers
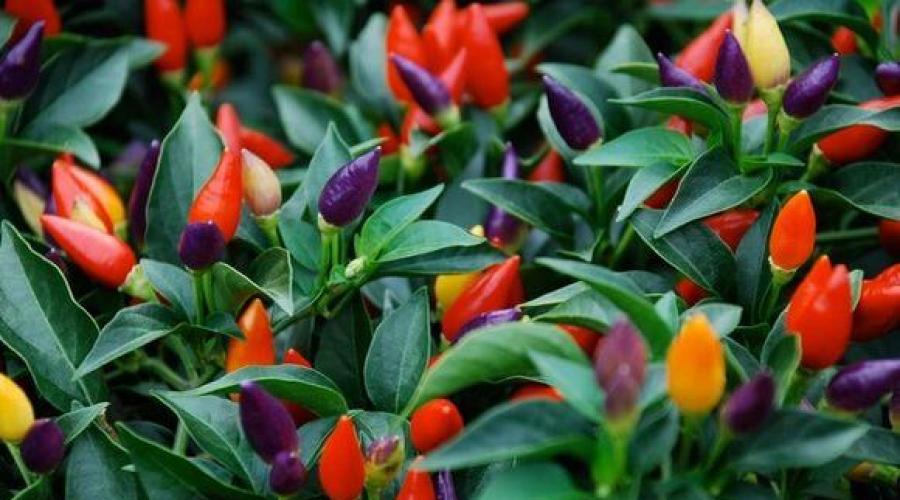
Multi-colored indoor pepper Garda Firewax is one of the most extravagant types. The bushes are low 25-30 cm, but very lush branches with foliage begin close to the base. The leaves are long and narrow. The fruits are thin, oblong, up to 5-6 cm, they, like the foliage, stick out in different sides. The pepper pods are spicy with a slight sourness. During their ripening, the fruits change color several times: green, yellow, purple, orange, red. During fruiting periods, pepper in a pot as a houseplant is especially attractive, so its bushes are often decorated with balconies and cornices.

Potted purple pepper
Most popular variety purple indoor pepper is Explosive Amber. When ripe, its fruits are red, but during ripening they change colors: from soft lilac to dark purple. main feature of this variety is the color of the leaves of the plant. The foliage of an adult bush has an unusual purple tint, scattered in the center, and saturated at the edges. The bush grows no more than 30 cm, the fruit size is 2.5 cm, 10-15 g. Purple pepper in a pot is a houseplant, but it grows better on windowsills with sunny side. In summer it is recommended to expose the pot to fresh air.

Potted pepper - planting
Growing and caring for indoor peppers is not difficult, and every housewife can do it. Planting a plant at home can be done in two ways: purchase ready-made seedlings, or grow a pepper bush from seeds yourself. Taking seedlings will be faster and more convenient, but there is a risk of buying the wrong variety as promised by the seller. Another advantage of seed cultivation is that it can be done at home at any time; seedlings, as a rule, are sold only in the spring. Recommendations from professional vegetable growers when planting:
- For planting, it is better to take seeds from ripe pods of indoor peppers than from bagged factory ones.
- Use only natural ingredients as fertilizers - plant compost, bird droppings, manure.
- House pepper loves water, but overwatering It is also harmful to him: the soil must be moist and loosened.
- If landing is in winter period, then you don’t have to fertilize the soil, but plant the seeds in ordinary soil taken from the garden.
One of the main advantages of this indoor plant is that peppers can be planted in a pot all year round, but planting in winter and autumn periods has its own nuances. When there is short daylight outside, the root system of the sprout develops more. The stem of the bush will begin to actively grow with the arrival of sunny days in spring. Therefore, it is recommended to place the pot of pepper in rooms on the sunny side.
How to grow indoor peppers from seeds?
Seeds for growing indoor peppers need to be soaked in warm water: Wrap in a wet cloth overnight. While the seeds are soaking, prepare the container: place drainage (expanded clay) on the bottom, fill it in and moisten the soil well. Place the seeds in the soil to a depth of 0.5-1 cm. A distance of at least 7-10 cm from each other so that future bushes do not intertwine and die if it is a permanent container, and it is more convenient to replant them if it is a common box. Be sure to moisten the soil above again, for example, with a sprayer. You can cover the pot with a plastic cup to speed up the growth of the pepper.

How to care for indoor peppers?
Caring for indoor peppers at home does not take much time, but you still need to pay attention to the plant, regardless of the age of the bush. Potted pepper – heat-loving crop and grows better in the sun, but direct midday summer rays are dangerous for it: the leaves will burn. In constant shade, the development of the bush will slow down and there will be less ovary. Therefore, it is recommended to keep indoor pepper on the windowsill on the sunny side, but in hot weather hide in the shade or shield from the rays. As the plant grows, it is transplanted into a larger pot, if this has not been provided for in advance.
Indoor decorative peppers easily tolerate pruning; you can shape its branches at your discretion. Pruning is carried out only at the end of summer, when the plant has gained strength, or in the spring, when it has emerged from dormancy. Long branches are trimmed; the main trunk cannot be touched: the pepper will die. The inflorescences of indoor pepper do not necessarily require artificial pollination, but to speed up the process, you can lightly shake the pot while the bush is flowering or help the flowers to pollinate with a soft brush.
How to water indoor peppers?
Basic rules for watering indoor peppers:
- In winter, the main thing is to make sure that the soil in the pot is moist; water the indoor pepper once a week.
- In summer you need to water every day, and bushes in small pots and young shoots a little 2 times a day.
- It is beneficial for the bush when its leaves are sprayed daily with water from a spray bottle.
- After pruning, the bush requires abundant watering to regain its strength.
- Do not over-water the soil or water the plant. cold water. Such actions can lead to rotting of the root system and death of the plant. Moreover, the disease will appear so late that it will be impossible to save the bush.
- Plants placed above heating radiators need to be watered more often. In such cases, it is recommended to place a container of water on the battery to humidify the air.

How to feed indoor peppers?
Indoor pepper is a hardy and not capricious bush without special requirements to the ground, but, like every plant, with regular fertilization it shows much top scores. Feeding indoor peppers begins two weeks after transplanting the seedling, and then is carried out once a month, depending on the condition of the plant and the conditions of its maintenance. As fertilizer, both mineral factory fertilizers are used - superphosphate, potassium sulfate, and organic components - 100 g of bird droppings diluted in 2 liters of water.
How to pinch indoor peppers?
That was more abundant flowering and buds formed faster, pinching is carried out. Such care for indoor peppers is usually necessary at an early stage of cultivation before transplanting the seedling into a pot in a permanent place: the top bud is cut off as soon as 8-12 leaves have formed on the stem. So the bush will grow not in height, but in width, sending out fruitful shoots. It is not uncommon for mature plants to be pinched; if the bush is developing poorly or is sick, useless branches without inflorescences are removed in order to save the plant’s resources.
Our grandmothers, growing garden strawberries, or strawberries, as we used to call them, did not particularly worry about mulching. But today this agricultural technique has become fundamental in achieving High Quality berries and reducing crop losses. Some might say it's a hassle. But practice shows that labor costs in in this case pay off handsomely. In this article we invite you to get acquainted with the nine the best materials for mulching garden strawberries.
Succulents are very diverse. Despite the fact that “little ones” have always been considered more fashionable, the range of succulents with which you can decorate modern interior, it’s worth taking a closer look. After all, colors, sizes, patterns, degree of prickliness, impact on the interior are just a few of the parameters by which you can choose them. In this article we will tell you about the five most fashionable succulents that amazingly transform modern interiors.
The Egyptians used mint as early as 1.5 thousand years BC. It has a strong aroma due to the high content of various essential oils, which are highly volatile. Today mint is used in medicine, perfumery, cosmetology, winemaking, cooking, ornamental gardening, in the confectionery industry. In this article we will look at the most interesting varieties of mint, and also talk about the features of growing this plant in open ground.
People began growing crocuses 500 years before our era. Although the presence of these flowers in the garden is fleeting, we always look forward to the return of the harbingers of spring next year. Crocuses are one of the earliest primroses, whose flowering begins as soon as the snow melts. However, flowering times may vary depending on the species and varieties. This article is dedicated to the earliest varieties of crocuses, which bloom in late March and early April.
Cabbage soup made from early young cabbage in beef broth is hearty, aromatic and easy to prepare. In this recipe you will learn how to cook delicious beef broth and cook light cabbage soup with this broth. Early cabbage cooks quickly, so it is placed in the pan at the same time as other vegetables, unlike autumn cabbage, which takes a little longer to cook. Ready cabbage soup can be stored in the refrigerator for several days. Real cabbage soup turns out tastier than freshly prepared cabbage soup.
Blueberry – a rare and promising berry crop in the gardens. Blueberries are a source of biologically active substances and vitamins, have antiscorbutic, anti-inflammatory, antipyretic, and tonic properties. The berries contain vitamins C, E, A, flavonoids, anthocyanins, microelements - zinc, selenium, copper, manganese, as well as plant hormones - phytoestrogens. Blueberries taste like a mixture of grapes and blueberries.
Looking at the variety of tomato varieties, it’s hard not to get confused - the choice is very wide today. Even experienced gardeners He's annoying sometimes! However, understanding the basics of selecting varieties “for yourself” is not so difficult. The main thing is to delve into the peculiarities of the culture and start experimenting. One of the easiest groups of tomatoes to grow are varieties and hybrids with limited growth. They have always been valued by those gardeners who do not have much energy and time to care for their beds.
Once very popular under the name of indoor nettle, and then forgotten by everyone, coleus today is one of the brightest garden and indoor plants. It is not for nothing that they are considered stars of the first magnitude for those who are primarily looking for non-standard colors. Easy to grow, but not so undemanding as to suit everyone, coleus require constant monitoring. But if you take care of them, bushes made of velvety unique leaves will easily outshine any competitor.
Salmon backbone baked in Provençal herbs provides tasty pieces of fish pulp for a light salad with fresh wild garlic leaves. The champignons are lightly fried in olive oil and then poured over apple cider vinegar. These mushrooms are tastier than regular pickled ones, and they are better suited for baked fish. Wild garlic and fresh dill get along well in one salad, highlighting each other’s aroma. The garlicky pungency of wild garlic will permeate both the salmon flesh and mushroom pieces.
A coniferous tree or shrub on a site is always great, but a lot of conifers is even better. Emerald needles of various shades decorate the garden at any time of the year, and phytoncides and essential oils, released by plants, not only aromatize, but also make the air cleaner. As a rule, most zoned adults coniferous plants, are considered very unpretentious trees and shrubs. But young seedlings are much more capricious and require proper care and attention.
Sakura is most often associated with Japan and its culture. Picnics in the canopy flowering trees have long become an integral attribute of welcoming spring in the Land of the Rising Sun. The financial and academic year here begins on April 1, when the magnificent cherry blossoms bloom. Therefore, many significant moments in the life of the Japanese take place under the sign of their flowering. But sakura also grows well in cooler regions - certain species can be successfully grown even in Siberia.
I am very interested in analyzing how people's tastes and preferences for certain foods have changed over the centuries. What was once considered tasty and was an item of trade, lost its value over time and, conversely, new fruit crops conquered their markets. Quince has been cultivated for more than 4 thousand years! And even in the 1st century B.C. e. About 6 varieties of quince were known, and even then methods of its propagation and cultivation were described.
Delight your family and prepare themed cottage cheese cookies in the shape of Easter eggs! Your children will be happy to take part in the process - sift the flour, combine all the necessary ingredients, knead the dough and cut out intricate figures. Then they will watch with admiration as pieces of dough turn into real Easter eggs, and then with the same enthusiasm they will eat them with milk or tea. How to make such original cookies for Easter, read our step by step recipe!
Among tuberous crops, there are not so many decorative deciduous favorites. And caladium is a true star among the variegated inhabitants of interiors. Not everyone can decide to own a caladium. This plant is demanding, and first of all, it requires care. But still, rumors about the extraordinary capriciousness of caladiums are never justified. Attention and care can avoid any difficulties when growing caladiums. And the plant can almost always forgive small mistakes.
We have prepared a hearty, incredibly appetizing and simply easy-to-prepare dish for you today. This sauce is one hundred percent universal, as it goes with every side dish: vegetables, pasta, or anything. Chicken and mushroom gravy will save you in moments when you don’t have time or don’t want to think too much about what to cook. Take your favorite side dish (you can do this in advance so everything is hot), add some gravy and dinner is ready! A real lifesaver.
I am a city dweller, but I have a rural soul: I love germinating seeds and caring for various plants. Unfortunately, we live in a small two-room apartment, and buying a dacha is so far only in long term plans. But I have perfectly mastered the art of growing vegetables on the windowsill.
Cucumbers, tomatoes, herbs - all this has been producing fruit in our house for many years. One of the last crops I mastered was hot pepper. We almost never eat it (there are children in the family, so I only prepare dietary food), but the multi-colored photo on the bag of seeds looked very tasty...
The hot fruits of this pepper can be added to marinades, rolls, soups, and meat dishes. Don't have time to consume the entire harvest at once? Peppers can be dried petals or whole, and then ground into powder.
My husband likes mead with pepper (per liter of vodka - 3 tablespoons of honey + several large pepper pods, leave in the dark for more than a month, the longer the better).
A stronger alcoholic pepper tincture (with big amount pepper) can be used as a rub for rheumatism or colds. Moreover, if there is a viral infection in the family or colds, such a pepper should be kept on the windowsill of the patient’s room - doctors assure that it cleanses the air of dangerous bacteria.
But! Not only the fruits of this plant have a pungent taste - even the leaves and stems of the pepper are caustic and poisonous. So if your cat gnaws on flowerpots, it’s better to grow not chili, but ornamental grass: your beloved animal will have a treat, and you will have a peace of mind.
The best types and varieties for the windowsill
Different peppers are different different colors and the shape of the fruits, as well as the time of their appearance. It is best to buy varieties whose height is no more than 45 cm... Or seeds whose bags are labeled “Balcony” or “For growing in an apartment.”

Annual pepper
This is indoor paprika - these varieties are not the hottest, on the contrary, they are even somewhat sweet.
The bushes of this pepper rarely grow larger than half a meter, but often the maximum growth of such plants is 35 cm.
The most popular varieties:
- "Redskin."
- “Tepin” (he’s the one in the photo above).
- "Siberian Prince"

But probably the most interesting variety can be called a “Little Miracle” - a small traffic light. At first these peppers are green, then yellow, then (you won’t believe it!) purple, and only at the end of ripening the standard peppery red color.
The bushes grow compact - no higher than 25 cm. They can grow outdoors, but all manufacturers recommend growing this variety in pots.
Cayenne (shrub)
A perennial that will gratefully bear fruit on your balcony or windowsill for up to six years.
This is a compact plant: this pepper grows up to 15-45 cm in height. Each bush can bear up to 50 peppercorns.
The most interesting varieties:
- "Firework".
- "Carmen" (pictured).
- "Bride".

Berry-bearing
The species is named so because of the interesting shape of the peppers - they are flattened, like squash. You will like the taste - in addition to the characteristic spiciness, they have sweetness.
The bushes grow up to 80 cm, so they should be grown not on a window, but on an insulated balcony.
You can buy seeds of the following varieties:
- "White Crystal"
- “Lemon lollipop” (pictured).
- "Bishop's Crown"

Chinese
Half-meter bushes grow very slowly, so this type It is not very popular here - it does not withstand competition with other species.
Peppers come in different shapes; you can even find a variety with lantern fruits.
The most notable varieties:
- "The Devil's Tongue" (pictured above).
- "Santa Lucia"
- "Devil's Yellow"

pubescent
A tall species that can sometimes be seen on balconies. But more often these meter-long peppers are grown in greenhouses or open beds.
The species is named so because the stem, leaves, and even flowers have a slight edge.
More about choice indoor varieties with an overview of already fruiting bushes you will hear here:
Remember! When purchasing seeds of any variety, look at the date of manufacture! Seed storability is not the highest. Some manufacturers may write that seeds can be stored for up to 5 years. But it is not a fact that they will germinate well for all 5 years.
Buy seeds that have been packaged for a maximum of 12 months. After all, they were probably stored somewhere for some time before packaging.
How to properly grow this fiery miracle
If you sow peppers at the end of February - at the beginning of March, you will wait for the harvest from June to August (or even December, it all depends on the variety). The ripening period of each plant is written on the seed packet.
- Soak the seeds in water.
- Sow them in nutritious, loose soil. A good option: sand + humus + leaf soil.
- Deepen the seeds by 0.5 cm. Between the seeds, leave 5 cm of free space on each side - this space is needed for future roots.
- Grow them under a greenhouse ( clear glass, film). Don’t forget to ventilate this greenhouse every day, opening it for 10 minutes. At the same time, spray the soil.
- Make sure there is plenty of light near the pot. In winter, it is better to place an ultraviolet lamp next to the pot - there is no need to replace it with a regular incandescent lamp, it will dry out the soil and burn the leaves of the seedlings.
- Pepper seeds and sprouts also need warmth. A regular battery will do the job. But remember: while warming the tender sprouts, it regularly steals moisture from the soil, evaporating it. So water or spray the soil more often. It should always be slightly damp.
- Grown sprouts should be planted in separate pots. Are you worried whether it will work? For the first time, you can germinate seeds in peat tablets. They can then be planted in a pot together with the sprout - the peat decomposes, turning into light and nutritious soil.
- When picking, you can pinch off a third of the root. After this, you need to grow the sprouts under greenhouses (put a transparent bag on each pot).
- The pot for the plant should be spacious.

Remember: after purchasing different varieties capsicum, you can grow them both in separate containers and in a common box. But in the latter case, you take a risk - the peppers will generously share pollen with each other.
So not only can the shape and shade of the fruit surprise you, but it will also be impossible to collect seeds for propagation (they will not bear all varietal characteristics its mother plant).
But if the variety is really interesting and rare, it can be propagated by cuttings. It will take root in water within a month.
Bonchi: pepper bonsai
The photo shows the Bolivian Rainbow variety. Although bonsai can be grown from any other variety of pepper.

You can start working either with seeds (they need to be germinated) or with an adult plant (it is trimmed as much as possible and planted in a shallow “bowl”). To make the trunk thick, the plant should be grown in a large pot, and then cut off (not only the branches, but also the roots) and planted in the pot.
You can see the work with a pepper dug up in the garden and transplanted into a bonsai pot here:
Caring for adult decorative peppers
- Lighting still needs to be great. If flowers bloom on the pepper and then begin to fall off, this is a sign that the bush needs to be moved to a more illuminated room.
- The plant needs regular watering. Take warm water.
- In summer, the plant does well at 25 degrees and above (so feel free to place it at open balcony, even under direct sun - just not at midday, this is still too much). In winter, the room should not be colder than 16 degrees.
- During the active growing season (until the ovaries appear on the bush), apply fertilizer. Good decision - mineral fertilizers(during the period of growth of green mass - with nitrogen, later - with potassium and phosphorus). Don't trust store-bought formulas? Dissolve the ash (1 tablespoon per 1.5 liters of water), but do not forget to leave this solution for a couple of days and then strain.
- At the end of January, think about nutrition again, and maybe you will be able to “persuad” the pepper to bloom again. But don't forget that it must receive enough light!
- After harvesting, prune by removing a third of all branches.

Pest Control
- Ornamental peppers may be attacked spider mites. You can get rid of them traditional methods: Spray the bush with soapy water. You can make the medicine “more vigorous” by adding ground powder of the fruits of this very plant. Peppers will not harm their native fruits, but insects will be repelled forever.
- Aphids are another enemy. Save yourself from it with the same soap solution. Of course, a flower shop may offer to buy an insecticide... But you should not spray poison on a plant whose fruits will be used for food, much less for treatment.
To prevent pests from sticking to the pepper, do not keep the bush in dry air. In winter, when the radiator is drying out the apartment, spray it (but try not to get it on the flowers - it’s rare that any flower likes such procedures).
And when the pepper yields, part of it can be used to prepare medicines or hot spices, and part of it can be dried to collect seeds. An experienced indoor gardener will tell you how to do this:
To those who love spicy dishes, you should definitely plant Ogonyok pepper on your windowsill. This popular, among other things, is also very beautiful. Growing it is not at all difficult. In order for the pepper to develop well and actively bear fruit, it should simply be watered and fertilized on time.
general description
There are several varieties of indoor pepper Ogonyok. If desired, you can plant as small plant(20-30 cm) and higher (up to 50 cm). Particularly popular among fans indoor flowers I use the low-growing, compact domestic pepper Ogonyok.
The decorative value of this plant is represented by both dark green, sharp small leaves and bright fruits. The shape and color of the latter can be very different. On the windowsills of indoor plant lovers, varieties with round, plum-like, cone-shaped fruits are grown. Both yellow and red or purple peppercorns look very beautiful. As the fruits of this plant ripen, they change color. Therefore, fruits can grow on the bush at the same time different shades. It looks very impressive. The taste of pepper can also vary. There are varieties with both very hot fruits and those with not too hot fruits.
Ogonyok is a pepper whose flowers are not particularly beautiful. Most often they have white or purple, small sizes and they look a little rough. Their value lies only in the fact that they subsequently grow into bright fruits with seeds suitable for self-planting. Up to 50 peppercorns can ripen on a plant at the same time. At the same time, the bush does not stop blooming. So it can be harvested almost all year round.
Disembarkation dates
Indoor pepper Ogonyok is propagated mainly only by seeds. This is the easiest way to get a strong, effective, productive plant in a fairly short time. Previously, in the specialized literature there were advice on planting seeds homemade pepper at the same time as ordinary garden seedlings, that is, at the end of February - beginning of March. However, recently, on related forums, experienced indoor plant lovers can often hear a recommendation to carry out this procedure a little earlier. The fact is that if you plant Ogonyok in November, by summer it will grow much larger and brighter fruits.

Caring for Ogonyok pepper: what soil to use
The advice found in the literature to plant this pepper in special purchased soil is many experienced flower growers today they also reject it. Fans of this beautiful and, moreover, useful plant it was noticed that it feels best when planted in a regular garden soil. The only thing is that it is advisable to first lightly fertilize such land with rotted manure. This fertilizer should be steamed. Otherwise, the pepper may become infected with blackleg. When overheated in manure, all pathogenic bacteria die (due to exposure high temperatures). However, during storage, microorganisms can settle in the organic substrate again.
How to plant correctly
Ogonyok is a pepper whose seeds can be purchased at a specialty store or taken from a familiar amateur gardener. The pot for this plant is usually small. Flower dishes with a volume of 1 liter will be quite enough for the first time. In the future, the pepper will most likely have to be replanted two or three times. This indoor plant can bear fruit for 5 years. However, they usually grow no more than two or three. Then the pepper is replaced with a new one. The fact is that by this time he is losing part of his decorative properties and begins to produce much smaller yields.

To avoid rotting of the roots, you need to lay drainage made of pebbles and broken shards at the bottom of the pot. Next, prepared soil mixed with manure is poured into the container and slightly moistened. 3 seeds are usually planted in one pot (to a depth of no more than 1 cm). Subsequently, you can leave the strongest pepper in the container. After planting, the soil in the pot should be carefully watered with not too much water.
Transplanting a plant
Transshipment of pepper Ogonek in big pot do as soon as 60-65 days have passed after planting. Drainage should be placed in the container. It is better to use the same soil composition as was in the small pot. The lump of earth in the old container should first be separated from the walls with a knife. The day before transshipment, the plant needs to be watered abundantly. Then this procedure will be much easier. Then the pepper is carefully removed and transferred to new pot. The latter should first be filled with drainage and 3-5 cm garden soil. Once the pepper is installed in the pot, free space Between the ball of roots and the walls of the new container you need to fill it with soil.

Where to put the pot
Immediately after planting, the container with the seeds should be covered with film and placed in a warm place. When loops appear, the pot is transferred to the windowsill. After 2-3 true leaves appear on the plants, the excess seedlings are removed.
Ogonyok is a photophilous pepper. Even very strong sun rays he is not afraid at all. Therefore, install a pot with these burning bright plant best on a south window. In winter, peppers should be illuminated, if possible, using a fluorescent lamp.
During the cold season, the heating radiator should be covered with a blanket or a piece of some thick fabric. Pepper Ogonyok does not like overheating on the windowsill, just like in any other place. Optimal temperature for him in winter it is 19-22 °C.

How to water correctly
In the summer, you should moisten the soil under the Ogonyok pepper quite often. Watering is carried out after the soil in the pot has dried out by 1 cm. Of course, it is not worth creating a “swamp” in the container. Otherwise, the roots of the pepper may rot. In winter, watering is reduced. Once a week during this period will be enough.
Of course, if the Light is on a south window, watering should be done carefully, trying not to get on the leaves. Otherwise, burns will definitely appear on them. For watering, use only settled water. Chlorine can be very harmful to peppers, like most other indoor plants.
How to fertilize
Ogonyok is a pepper that can be fed with manure and complex universal purchased funds. In the latter case, you can use, for example, nitrophoska (1 box per 10 liters).

A very good solution would also be to carry out foliar feeding pepper wood ash(Infuse 2 tbsp in 3 liters of water). The plant should be sprayed generously. This procedure is carried out exclusively in the morning or evening so as not to burn the leaves.
For the first time, pepper is fertilized before it actively begins to grow. Feeding should not be done too often. In winter, it will be enough to fertilize the plant once - in January. In summer, fertilizing is done more often - about twice a month.
Diseases and pests
This is how Ogonyok peppers are grown on the windowsill. Caring for it is relatively easy. Moreover, diseases do not often strike him. If the air in the room is too warm and dry, aphids may attack the plants. You need to fight it with insecticides. This could be, for example, “Fitoverm” or “Agromertin”. These products can be used no later than two weeks before harvest.
What can it be used for?
Most often, the fruits of the Ogonyok pepper are used to add a piquant taste to various kinds of pickles. A three-liter jar of tomatoes or cucumbers usually contains 2-3 pods. You can also use the fruits as medicine by adding them to vodka.

Ogonyok pepper contains a huge amount of vitamins. In addition, they can add a unique taste and aroma to almost any dish. Many housewives use the fruits of this plant for frying borscht, adding them to stews, salting them with lard, etc.