Make a Ferris wheel with your own hands, electronics. “Ferris wheel” made of colored paper and cardboard. Thank you for watching
You can do it with your child, because there is nothing complicated about it. And your baby will enjoy turning intricate figures out of colored paper.
You will need colored paper (it is better to take two colors), glue, scissors, a little patience and about 15 minutes of time.
First we'll make the wheel itself. Take a square (21cm by 21cm) sheet of colored paper and fold it in half, and then in half again and unfold it.
Then bend both sides of the sheet towards the middle, as shown in the photo.

We bend the ends to the middle at the top and bottom.

We expand our sheet. It turns out divided into square sections. We make a transverse fold of the second outer section from below and from above. On both sides of the sheet.

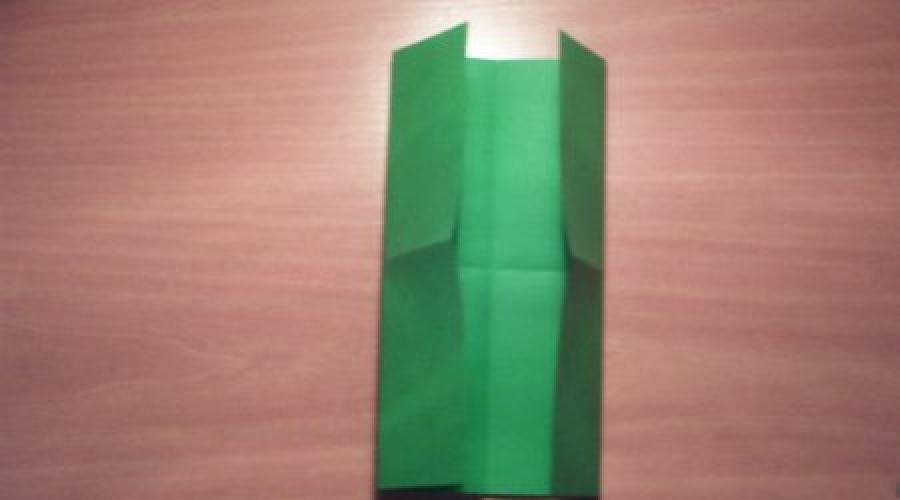
We fold our figure (as in photo 3), and then unfold the lower part along the folds.

This is what should happen.


Now we unfold the corners and fold them towards the middle, we get a square.

We bend one edge of each section of the square towards the middle and unfold it.

We do the same with the second corner of each section.

We bend the edges, giving the Ferris wheel a rounded shape.

We make a stand for the wheel. Take a rectangular sheet of paper (21cm by 10.5cm) and fold it in half.

Fold each side towards the middle.

We fold the corners at the top and bottom once towards the middle, and then a second time.


Fold the resulting figure in half, make a fold in the middle and bend it back.

Fold it vertically, take scissors and cut out a piece in the shape of half a triangle.

We unfold the part, take glue and glue our Ferris wheel in the middle, to the legs of the stand.
This is what happened. The paper amusement park has begun!

A little more and the winter holidays will come. And it’s already worth thinking about where and how to spend the next New Year 2015. Why not celebrate this holiday with friends or family in the best establishment in the city, where a New Year's program will be prepared especially for everyone. It is also worth taking care of gifts; in the year of the goat they should be original. Well, the main attribute of New Year's Eve is table setting, here you need to show your imagination. The main thing is that the holiday is unforgettable.
“What do you know about squirrels,
In wheels rushing madly...
Their souls asked them to run,
But it turned out that only the body is rushing..."
And in our review you will read about the Ferris wheel).
Ferris wheel- this is our second model.
I think it will be much more interesting to assemble such a puzzle, since it has more details and many small elements. The seller says that such puzzles are intended for people 14+, if in the last review the model was light and could be used as a gift for a child under 14, then this time it is not a fact that the child will master it.
The packaging with the puzzle has the same appearance as last time, with a circle on the back indicating the model lying inside. 
Inside we have instructions and two steel sheets with parts.
The words “Ferris wheel” are stamped on the side of the sheets. 

If there is relief on the front of the sheets, then there is none on the back. 
Some parts were difficult to get out because they were bent. I had to do this more carefully so as not to spoil the future wheel.
The square-shaped part is the stand on which our wheel will be placed. 
They did everything exclusively according to the instructions.
Fastening parts, the same as last time. If anyone hasn't read it, I'll repeat it.
Parts are attached to each other in two ways:
1. Pull the small protrusion into the required hole and turn it 90 degrees - this mounting method is indicated in the instructions with a green triangle
2. Pull the small protrusion into the required hole and bend it to the part - this method of fastening is indicated in the instructions with a blue square.

Let's start collecting.
Following the assembly diagram, we first assemble two identical parts needed to hold the wheel.
Then from two parts of the wheels we take out 20 parts each that we need to assemble the booths. The remaining 20 parts are on the steel sheet.
Assembling 20 booths was not an easy task. They are too small. It was necessary to bend the two sides a little with a pen/pencil to give the desired shape.
If you buy such a puzzle, then we warn you
, that when assembling booths, you need to be careful. There is a possibility of damaging or even breaking off a part that will later be needed to attach the cabin to the wheel.
I marked this part on several details so that you understand what we are talking about. 
Assembly in full swing:
It took us a long time to assemble these booths. We even got a little bored). 
There's just a little bit left to do. Place the wheel on the stand. 
Regarding the sizes. The website indicates the sheet size is 11x11, but this size is of little importance to us. There is nothing said there about the size of the finished wheel, in principle, just like on the page with the airplane.
Actual sizes, approximately:
- full height, with stand 9cm
- stand 3.3x3.3cm
- wheel diameter 7.6 cm
- wheel width 0.9cm
Photo of a wheel with objects familiar to people
Little finger batteries. 


It’s very good that there were spare parts on the sheet. There were 6 “sides” for the cabin (as in the photo below) and 1 common body for it.
The “sides” were not needed, but the body was needed, since two fasteners were broken off in the process, which I described above. It turns out we replaced one, and the second required additional repairs. We had to use wire, but in reality no traces of modification are visible, since we hung this particular booth at the very bottom of the wheel.

Well, as usual, small photo session. Enjoy watching.


I had to take off on yesterday's plane to take a photo from above))).


These guys asked to take their picture again. Well, okay, I don’t mind the staff).

Our tourists made their mark here too). They have love).

Summarize. Advantages and disadvantages.
+ all parts fit together
+ a lot of parts, and therefore more interesting to collect
+ slight heaviness to assemble
+ in the end a beautiful figure
Delicate parts, you need to be careful not to bend/break them
- necessary means at hand
This wheel is clearly more complicated than an airplane. What did it cost to assemble 20 booths?
And the confusion and disappointment when a part breaks and there are no spare parts left...). But we are people, and we are capable of finding a way out of any situation.
I spent, I think, 3 hours without a break, although it would seem that there was nothing to collect?).
In general, the process is engaging.
By the way, the booths are not sitting dead, they move a little))). And the wheel is capable of scrolling 5-10 milliliters in each direction.
And now our Simka says hello to you). 

This product was provided free of charge for review.
Thank you for watching.
I'm planning to buy +9 Add to favorites I liked the review +25 +57Try cutting out a Ferris wheel like this.
The work is difficult.
Your loved ones will surely like this craft by placing it in a visible place, for example, on a shelf. To make this craft you will need the following:
Sawing tools.
Preparing your desktop
First of all, you need to prepare your table on which you will work. There should be no unnecessary things on it and every tool should be at hand. Not everyone has their own desktop and has probably already thought about creating one. Making a table is not difficult, but choosing a place for it in the house is difficult. The ideal option is an insulated balcony, on which you can do crafts at any time. I have already written about preparing the table in a separate article and tried to describe in as much detail as possible the entire process of creating it. If you don’t know how to prepare your workplace, then read the following Article. After you have completed the process of creating a table, try to start choosing your future craft.
We choose quality material
The main material is plywood. The choice is always difficult. Each of us has probably encountered such a problem as delamination of plywood from the end part and asked the question, what causes this delamination? Well, of course, this is mainly due to low-quality plywood. If this is not the first time you have picked up a jigsaw, then you can select plywood from the remnants of a previous craft. If you are new to sawing and you don’t have plywood, then buy it at a hardware store. Choosing material for sawing is always difficult. You should always choose plywood carefully, often look at the defects of the wood (knots, cracks) and draw conclusions. The difficulty in choosing plywood lies in the fact that no matter how you guess at its defects and shelf life. For example, you bought plywood, cleaned it, translated the drawing and suddenly it began to delaminate. Of course, this has happened to almost everyone and it’s oh, how unpleasant. So it is better to pay attention when choosing and choose good plywood. I wrote a special Article in which all the principles of choosing plywood are described step by step.
Stripping plywood
We clean our plywood with sandpaper. As you already know, “Medium-grained” and “Fine-grained” sandpaper is used for cleaning plywood when sawing. You've probably seen sandpaper in hardware stores, and that's what we'll need. In your work you will need “Coarse-grained”, “Medium-grained” and “Fine-grained” sandpaper. Each of them has its own property, but a completely different coating, by which it is classified. “Coarse-grained” sandpaper is used for processing rough plywood, i.e. which has many defects, chips, and cracks.
“Medium-grained” sandpaper is used for processing plywood after “Coarse” sandpaper and has a slight coating. “Fine-grained” or otherwise “Nulevka”. This sandpaper serves as the final process for stripping plywood. It gives the plywood smoothness, and therefore the plywood will be pleasant to the touch. Sand the prepared plywood in stages, starting with medium-grain sandpaper and ending with fine sandpaper. Sanding should be done along the layers, not across. A well-polished surface should be flat, completely smooth, glossy in the light and silky to the touch. How best to prepare plywood for sawing and which sandpaper is best to choose Read here. After stripping, check the plywood for burrs and small irregularities. If there are no visible defects, then you can proceed to the process of translating the drawing.
Translation of the drawing
For me, drawing translation has always been the main process in my work. I will tell you a couple of rules, as well as tips for high-quality translation of a drawing. Many people transfer the drawing onto plywood not only using a pencil and copying, but also using “Black Tape”, glue the drawing to the plywood, then wash off the drawing with water and the markings of the drawing remain on the plywood. In general, there are many ways, but I will tell you about the most common method. To transfer the drawing onto prepared plywood, you must use a copy, a ruler, a sharp pencil and a non-writing pen. Fasten the drawing in plywood using buttons or simply hold it with your left hand. Check if the drawing fits the dimensions. Arrange the clock drawing so that you can use a sheet of plywood as economically as possible. Translate the drawing using a non-writing pen and ruler. There is no need to rush, because your future craft depends on the drawing.
Drilling holes in the parts
As you have already noticed, the parts contain parts of the grooves that need to be cut out from the inside. To cut out such parts, you need to drill holes in them using a hand drill or, as in the old fashioned way, make holes with an awl. By the way, the diameter of the hole must be at least 1 mm, otherwise you can damage the elements of the drawing, which, alas, are sometimes difficult to restore. To avoid damaging your work table when drilling holes, you must place a board under the workpiece so as not to damage the work table. It is always difficult to drill holes alone, so ask a friend to help you in your task.
Sawing parts
There are many rules for cutting, but you need to stick to the most common ones. First of all, you need to cut out the internal parts, only then according to the external pattern. There is no need to rush when cutting. The main thing is to always keep the jigsaw straight at a 90-degree angle when cutting. Cut out the parts along the lines you precisely marked. The movements of the jigsaw should always be smooth up and down. Also, do not forget to monitor your posture. Try to avoid bevels and unevenness. If you go off the line while cutting, don't worry. Such bevels and irregularities can be removed using flat files or “coarse-grained” sandpaper.
Rest
When sawing, we often get tired. Fingers and eyes, which are always tense, often get tired. When working, of course, everyone gets tired. In order to reduce the load, you need to do a couple of exercises. You can view the exercises here. Do the exercises several times during work.
Cleaning Parts
You should always clean the parts of a future craft carefully. At the very beginning of the work, you already sanded the plywood with sandpaper. Now you have to do a small part of stripping the plywood. Using medium-grain sandpaper, sand the edges of the parts and the back of the plywood. “Fine-grained” sandpaper is considered the final stage of cleaning parts. It is better to clean the front part of the parts with fine sandpaper. When processing plywood, take your time. You can also use a rounded file, which is convenient for cleaning the inside of the holes. Try to ensure that the parts come out without burrs or irregularities.
Assembly of parts
Assembling the parts of our craft is not so difficult here. In order to correctly assemble the parts, you need to read the following Article, which describes in detail all the details of the assembly. After the parts are assembled into one common craft without any problems, then start gluing them.
Gluing the parts
The shelf parts must be glued using PVA or titan glue. You don't need to pour a lot of glue. It is better to tie the assembled craft with glue with a strong thread, tighten it and lay it out to dry. The craft glues together in about 10-15 minutes.
Burning out crafts
To decorate our craft with a pattern (for example, along the edges of the craft), you will need an electric burner. It can be very difficult to burn a pattern beautifully. To burn patterns, you must first draw the pattern with a pencil. You can read how to work with an electric burner and add patterns to a shelf here.
Varnishing crafts
If desired, you can transform our craft by covering it with Wood Varnish, preferably colorless. Read how best to varnish a craft. Try to choose a quality varnish. Varnishing is carried out using a special brush “For glue”. Take your time. Try not to leave visible marks or scratches on the craft.


How a 70-meter Ferris wheel is assembled striker_truda wrote in September 7th, 2015
At the end of August, work on the assembly of a huge Ferris wheel was completed in the port of Malaga (Spain). The Mirador Princess Ferris wheel reaches 70 meters in height, weighs 600 tons, and has 42 air-conditioned cabins, each of which can accommodate eight people. The Mirador Princess is the largest mobile Ferris wheel in Europe and requires 25 workers, two weeks of work and a 300-tonne crane to assemble. The wheel can carry about a thousand people per hour, and the visibility range from the wheel in good weather is up to 30 kilometers.

Wheel assembly in photographs. First, the area for installing the wheel was cleared.

Then they began installing bored piles under the base of the wheel to strengthen the soil.

Well drilling machine.

A concrete mixer is a pump that fills a drilled well with solution. After hardening, the column of solution will turn into a pile.

The preparatory work is completed, the base frame is assembled and the delivery of parts for the wheel support structure begins.


Start of assembly of the support structure.


Start of assembling the wheel itself.

Second week of work. On Monday morning, the brace bearings were attached to the base.

By Monday evening the braces themselves were already in place.


On Tuesday morning, all the supports were simultaneously extended, the wheel was raised to the design position and secured.

Inside the wheel supports there are hydraulic cylinders, and in the bases of the supports there are hydraulic connectors, which are connected to the hydraulic station through high-pressure hoses during lifting.


Tuesday evening.

And mid-afternoon Wednesday.

On Thursday morning, drives were installed on the wheel, a total of 4 assemblies with 4 motors each.

By evening, cabins began to arrive.

On Friday morning the booths were already being hung up.

We assembled the wheel entrance fencing and landing pads.

By Friday afternoon the wheel had already acquired its finished form.
And most importantly, they brought the cash register!

At the beginning of the third week the wheel opened. The wheel can glow beautifully in the dark, because... There are air conditioners in the cabins, there is a clever system of slip rings and current collectors all over the wheel, through which power is supplied to the cabins for the air conditioners, and it is not difficult to find power for the lighting.

If you are in Malaga, come and ride, the wheel will remain in the port according to plan until April 2016, and then it should be dismantled and taken to a new location.
If you are interested in Spain in general and Malaga in particular, then add the author’s magazine