Brick extension to a wooden house projects. Construction of an extension to a wooden house: types of extensions, creation of projects, construction of a foundation and wiring of communications. Advantages of frame technology
Read also
Many owners country houses and dachas from time to time carry out redevelopment of plots with their own hands. But sometimes you have to touch the house too. If it needs expansion, then an extension - perfect option increase usable area. At the same time, it can perform completely different functions and be located not only at the main entrance. Projects for extensions are developed taking into account the specific features of their operation.
Types of buildings
Before choosing an extension project with your own hands, you should decide on its functional purpose. Usually attached to the house the following types buildings:
For each type of extension, it is necessary to calculate the amount of materials and draw up a plan.
Types of residential extension structures
There are several basic options for DIY home extensions:

The first option is considered not only the easiest from a technical point of view, but also the most budget-friendly. He assumes that the roof of the main building remains in place, only slightly extending by the size of the extension to the house. The main building is being completed on one side or both. Then a passage is made between them so that total area buildings increased by the amount of the new building.
Room mansard type it will be more expensive, since it is supposed to carry out an add-on.
The third option for adding a house extension with your own hands involves your own roof. Otherwise, the structure resembles a side structure. Separate roof increases material consumption, so the extension will cost more and will take a little longer to build.
An extension to the second floor is carried out only if the foundation of the house allows it. If the building was not initially planned to be multi-story, then problems with its completion are possible. The foundation may simply not be able to withstand the additional load. In some cases it can be strengthened.
Designing a new premises
By law, any functional room is considered a do-it-yourself addition to a house. A balcony, loggia, winter garden or extra bedroom - all this will be considered an extension. Required elements its designs are:
- foundation;
- walls.
Unlike the main building, there may be no ceilings. Constructive decisions for roofing an extension with your own hands are the following:

It is recommended to build the foundation of the building separately, since the structures are operated under different loads.
At the design stage, it is very important to consider the compatibility of the new building with the old one. A do-it-yourself extension should not create obstacles to the communications that run through the site. If you plan to make multi-level buildings, then you need to take into account that this will delay snow masses. Therefore, they should be further strengthened to avoid subsidence of the foundation.
Base design
When increasing usable area existing building in the horizontal direction, it is unprofitable to build a slab or strip buried foundation. The most economical designs reasons are:

If preference is given to a pile or columnar foundation, then it is necessary to additional protection the lower part of the structure from freezing. For this purpose you can use basement siding With inner layer insulation in the form basalt wool
or expanded polystyrene.
Wall design When drafting an extension, you should decide in advance on the material for the walls. For frame or panel construction
- use a sandwich:
- OSB sheets with a layer of expanded polystyrene or stone wool;
- internal membrane for vapor barrier;
external film for waterproofing.
Laying lightweight blocks - aerated concrete or foam blocks - will cost a little more. If preference is given to the latter, then it should be taken into account that even walls made of the highest quality foam concrete are often covered with a network of cracks. Therefore, the facade will need to be plastered over the reinforcing mesh with a special compound.
Roof design
Most often, the roof slope of the house closest to the extension is dismantled. Elements of the rafter system are replaced with new ones that are longer.
Alternatively, you can disassemble roofing pie, but do not dismantle the rafters. They are erecting for a new building pitched roof. Enhance rafter system possible with racks.

If you wish, you can build a veranda for your dacha yourself without involving professional builders. To do this, you need to familiarize yourself with the basic principles of construction of structures and prepare necessary materials. Some owners of country houses create a veranda not only for relaxation, but also to increase thermal insulation.
Planning
To build a secure veranda, you need to think about several important factors:
- the amount of money you are willing to spend,
- will the veranda be summer or winter,
- what design of the extension is suitable for a particular house,
- What is the best material to build a veranda from?
Even if you have decided exactly what you want to see as a result and have drawn up a plan, it is better to coordinate it with a professional designer who can point out mistakes made. It is also worth thinking about which side of the house it is best to attach an extra room and whether it will be a passage room or not.
Features of wooden extensions
After looking at the photo summer verandas in the country, many owners of country houses choose wood, as it is traditional material and has a lower cost. To evaluate this material, it is worth considering its advantages and disadvantages. Advantages of a wooden veranda:
- Ease of installation. When constructing a wooden extension, even a non-professional builder can handle the work.
- Light weight. A wooden extension does not require construction solid foundation, therefore, material costs are significantly reduced.
- Suitable appearance for many country houses. Most often, cottages are built from wood, and if you create an extension, then the best option is a structure made from the same material.
- Environmental friendliness and safety. Wood is one of the most harmless materials to health.

But besides the listed advantages, the material also has disadvantages. One of them is fire hazard. If the owner of the house is going to build a barbecue, then for this it is necessary to take into account many little things and spend additional funds.
Important ! All wooden elements need processing special compounds And constant care during operation. Otherwise, the extension begins to slowly collapse.
The material becomes unusable due to the influence of:
- weather conditions,
- fungi,
- insects,
- microorganisms.
Features of brick extensions
One of the significant advantages of a brick veranda is that this material allows you to retain cool air in the summer, which allows the owners of the house to enjoy relaxation even on the hottest days. Also, the extension does not require constant maintenance. After committing finishing works You can forget about working with this material for a long time.

If you thoroughly insulate this part of the house, then brick walls can save comfortable temperature indoors even on the coldest days. But it is worth remembering that for a winter veranda it is necessary to install double glazing.
If we talk about the disadvantages that a brick structure has, then it is worth mentioning heavy weight designs. Because of this, it is necessary to build a solid and heavy foundation, requiring considerable investment.
Construction of an extension made of polycarbonate
Polycarbonate is not used as often as brick and wood, but is a material that allows you to create an inexpensive and lightweight extension to country house. It has the following advantages:
- transparency,
- good thermal insulation,
- plastic,
- attractive appearance.

Thanks to these characteristics, such material is suitable even for a winter veranda, which will serve winter garden. But polycarbonate also has disadvantages. One of the main disadvantages is the rapid heating of the material, due to which in hot summer days Without good ventilation it is very difficult to be on the veranda.
Foundation
When building a veranda at the dacha, a photo of which can be seen below, it is used strip foundation. But when choosing a base for an extension, it is necessary to take into account the features of the future building and choose the most suitable option. When constructing a wooden veranda, for example, you can build columnar foundation.
The choice depends on:
- the material from which the veranda will be made;
- type of foundation of the main building;
- soil slope;
- type of soil.

Many people are interested in the question: is it necessary to tie the base of the veranda to the foundation of the house? It depends on what kind of soil the building is located on. After looking at the photo country houses with an attic and a veranda, you will notice that the extension can be built either together with the main structure or separately.
Most often, a columnar foundation is constructed, so it is worth considering in more detail. This option is suitable for building wooden verandas, the weight of which does not require a heavy base. To create a foundation, it is necessary to use brick or reinforced concrete pillars, which are placed on a sand bed. They are placed on top of them wooden joists, and then the floor is laid. IN winter verandas it is insulated.
When building such an extension from wood, you need to remember that this material needs a special coating that will protect it from moisture and other adverse factors.
Veranda walls
During construction wooden structure It is worth paying attention to the construction of walls. Usually created wooden frame made of timber, which, if desired, can be sheathed and insulated so that the veranda can be used in winter time. All racks and other elements made of wood require special treatment protective compounds. To attach them to the wall of the main building, you need to use anchor bolts. After installing the racks, they are fastened with the top trim.

Important ! When attaching the rafters, their upper ends must be brought under the roof of the house and connected to a horizontal beam passing under the slope.
The choice of a certain type of wall depends only on the preferences of the home owner. If construction is planned summer version verandas, then you don’t have to build them at all, building only railings. If you want to get a room that is comfortable even in winter, you should make good insulation or replace the walls with large double glazed windows, so guests can admire the beautiful winter landscape.
Roof construction
The roof of the veranda is made flat and to cover it it is best to use the same material that was used in the construction of the house. The flooring can be created continuous or with intervals. It depends on the type of veranda. If it is winter, then the boards are placed closely, and if not, at intervals. But it is worth remembering that this also depends on the type of material used. An example is roofing felt, which is best nailed to tightly fitting boards.

Before using any coating, you should first understand the features of its fastening. If, for example, a flexible covering is used, then it should be bent along the lower edge of the sheathing by about 10 cm. When slate is used, when laying it, you must follow correct sequence preventing moisture penetration.
Arrangement of the veranda
After the structure is completely ready, you need to start decorating it. It is at this moment that many owners of country houses cannot decide what exactly they want. To get an idea of what design will be better, you should look at the photo, which shows how to arrange a veranda in the country.
The most popular options:
- with glass roof,
- use in registration natural stone and wood,
- design in light colors,
- arrangement of a place for reading.
The first option is suitable for small rooms, as it helps to visually expand the space and add light. When arranging such a veranda, a variety of furniture can be used, since it all depends on the material from which the frame is made. If, for example, it is metal, then the extension can be decorated in a “minimalism” style.

The use of natural stone in combination with wood allows you to create an impression of harmony between the structure and surrounding the house nature. Moreover, this combination allows you to visually make any structure strong and massive. One of good options is to place a fireplace or barbecue on the veranda.

Another way to decorate an extension is to decorate it in light colors. This allows all visitors to the room to lift their spirits and visually expand the space. This design allows you to create classic design and give it a unique touch. After looking at the photo of this option for arranging a veranda at the dacha, you can choose the most suitable example.
Who doesn't dream of spacious housing? Even the owners big houses They often want to have even larger properties, to say nothing of the inhabitants of small dwellings who really do not have enough space. Building an extension to an already used house is a great solution this problem. The fastest and budget option are wooden extensions based on a frame. They are valued for their ease of construction, as well as for their convenience and comfort.
They are especially suitable for houses built from various types tree or . Such structures can be successfully combined with any type of housing. Thanks to the simple and original technology you can expand your home. Such actions are usually taken to arrange another room, utility room, expansion or large comfortable bathroom. Or maybe it will be a wonderful, roomy room where the whole family can gather so comfortably?
Simple lintels and racks are made from ordinary boards. They are also used to outline future and extensions. The thickness of the racks and the layer must be equal. The width of the step between the individual racks depends on the width of the insulation.
For example, if we are making an extension to wooden house in the north of the country, it is recommended not to be thinner than 15 cm. This means that the estimated size of the lumber should be 0.15 m by 0.15 or 0.10 m. The pitch is approximately 0.6 m, since the insulation board has a thickness of 0.6 m.
Purpose of extensions
Living room
An extension to a house made of timber for a living room is reminiscent of the actual construction of a standard residential building, only of reduced size. This is explained by the fact that during the work it is also necessary to reliable insulation and high quality of all walls and surfaces of the room. This applies to the floor and walls. The foundation must also be solid to prevent the appearance of dampness in the new room.
Particular attention should be paid to proper waterproofing and quality. The choice of foundation should also be approached with all responsibility.
Step-by-step instruction
Strip foundation
Frame walls
Let's consider the production technology of frame-frame type walls. For this you will need:
- floor beams 0.10x0.15 m;
- wooden beams 0.15x0.15 m;
- anchor bolts, self-tapping screws;
- adhesive-sealant for wooden products.
Exist different technologies roof equipment. Those wishing to make a frame extension often prefer the option pitched roof. Similar design It is made from rafters, and it is important to choose the right angle slope.
The slope of the corner can be 25-300: having marked it, a horizontal line is drawn on the surface of the main wall.
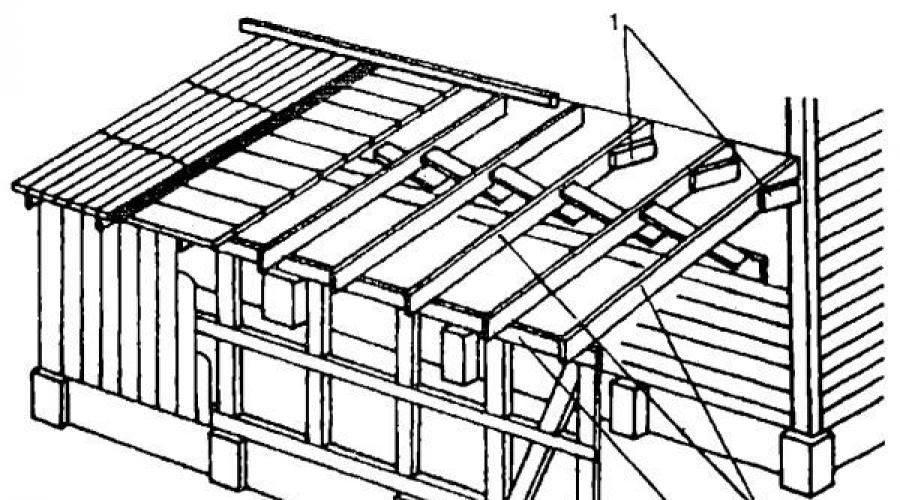
A block is fixed along this line, which will support the upper part of the rafter. And the end of the wall, or beams from already made frame floor, will become the lower support of the rafters. It should protrude about 30 cm beyond the lower support - this will prevent precipitation from falling on the walls of the building. For installation of rafters, galvanized steel corners are used.
 A more complex option for attaching a frame extension by hand is possible: in the video you can find an option in which the roof slope of the main house is directed towards the built extension. In this case, there will simply be nothing to fix the extension beam to. You will have to remove part of the roof from the lower row of roofs, and after that use the exposed beams in the work.
A wooden extension to a house is often built to expand the space in a residential building, and requires relatively small financial costs. This article is for those who are going to build a wooden extension to a brick house with their own hands, while minimizing financial costs.
We will tell you about the sequence of work on installing a wooden extension, about the choice quality material, about the pitfalls that may await you, as well as the advantages and disadvantages of this type of construction.
Repurposing a wooden extension
The extensions to the house, which we will talk about in this article, can be different.
It can be turned into an excellent or dining room; also, the room is well suited for a living room, a place for family gatherings and relaxation with family or friends.
Operation options may vary, so the owners of each individual house can use the extension at their discretion
Types of extensions to a wooden house
They are different, and each of them has its own advantages and disadvantages.
- Side extension with common or separate roof.
- Extension in the form.
- Extension as a second floor.
Side extension with shared or separate roof
It is used most often because it requires little money. To construct it, you only need to lengthen the roof, combining it with the extension.
With this type, a private house It's just being built up a bit. It is important to take into account one nuance - in any case, the foundation must be poured thoroughly, even if wood is used to build the extension.
It is also important to maintain proportions during construction. wooden outbuilding to a brick house, since massive-looking structures will not fit into the overall picture of the building.
Usually, the option with common roof, is suitable for those home owners who do not have the opportunity to build common roof on one's own.
Attic view
 This kind wooden extension to a brick house with your own hands - a modern type of structure that allows you to save space on the site of a private house, creates a unique appearance of your home, and also fits harmoniously into the environment.
DIY house extension
Planning
When planning a wooden extension to a brick house with your own hands, you should evaluate the capabilities of the foundation. After all, not every foundation made in advance for a specific house is able to withstand the weight of an additional structure.
In any case, before you start work, consult with specialists who can help with calculations and give advice on strengthening the foundation on your own.
Selection of materials
To build a wooden extension to a brick house with your own hands, timber is most often used, frame base, or . There are other types of materials, but they are not as in demand as those mentioned earlier.
The simplest, most reliable and inexpensive material is timber of any type: glued, planed, rounded. Work on installing an extension to a brick house made of timber can be completed in an extremely short time.
Advantages of adding a wooden house extension

Legitimation
A wooden extension to a brick house must be legalized in advance without fail.
Failure to fulfill this obligation may result in problems in the form of sanctions imposed by regulatory authorities. It is from this moment that you need to begin the process of installing a wooden extension to a brick house, so as not to go through the courts later.
First, you need to obtain a permit for the construction of an extension from the local authorities, which will indicate all the nuances and recommendations for the construction of the structure.
Your next step will be a visit to the organization that does the design. There, experts will help you do it required project taking into account requests for the material of the extension and its design.
In addition, advice will be given on the installation of electricity and drainage in the annex (if these communications are planned there).
On final stage After visiting various regulatory authorities, contact the local department of architecture and construction and coordinate the extension project there.
There are times when, after completion of work, a commission to inspect structures may appear in the form of supervisory authorities monitoring compliance with construction standards.
The extension project can be approved within two months.
Stages of constructing a wooden extension to a house
Selection of materials for construction. Their choice depends on the financial capabilities of the home owners, taste preferences, quality of wood, their size and color palette.

To prevent drafts from occurring, it is necessary to install a door on the front side of the extension, not opposite front door to the house.
The design of a wooden extension to a brick house with your own hands can be done differently, based on your own preferences and tastes.
As successful examples we can offer the following:
- Wooden structures with supporting elements that harmonize with the overall tone of the house in the form of glass inserts.
- Creation of platforms to expand the area for recreation, games, and barbecues.
- Clear or frosted glass inserts ( sliding doors etc.)
- Glass roof.
The most popular way to connect a wooden extension with brick house– introduction of a timber structure into the base of a brick façade. This is done by gating the wall and partially erecting the wooden structure. Next, the structures are connected with mounting brackets.
To increase the usable area of the house due to such an addition as a frame extension (or several extensions), you can use two options: frame-panel construction or frame-frame assembly. The difference between them is clearly visible in various photos, describing the technology of installation and construction of extensions.
In the first case ready-made panels with door and window openings assembled on site into a single structure. You first need to coordinate the designs with the manufacturer, make the foundation exactly to size, and then make the roof. Log house Such an addition will not add beauty, but it is quite suitable for stone or brick.
The second option is often chosen for a veranda or small extensions to the house, planning to do most of the work with your own hands. Frame extensions of this type leave the owner complete freedom in choosing sizes, materials, timing, etc.
It is easier to attach a frame box to the main house, brick or log, and it is easier to adjust its dimensions so that the structure sits exactly on the foundation. Possibility to do it yourself necessary projects and then build a small frame house economical and DIY gives the idea an extra edge.
Step-by-step instructions help you take everything into account important points future construction and distribute the work into stages, as well as monitor the correctness of the work - preparatory, construction and finishing.
Tools and materials
- Electric: electric saw, electric drill, grinder, electric screwdriver.
- Other tools: shovel, axe, hammer, sledgehammer, building level.
Prepare the necessary materials, check their quantity and purchase what you need:
- Wood: cut boards (for stuffing the sheathing), slats (for the roof structure on the surface of the roof slope), wood panels (you can buy ready-made or make it yourself), wooden wedges.
- Foundation: gravel (crushed stone), broken brick, concrete mixture, hot bitumen.
- Other: steel angle, nails, screws, cord, dry tow (jute), gypsum mortar.
Plan your site

Prepare for construction work the site chosen for the extension. Take enough time to make quality measurements and calculations, draw up projects for each stage of work (foundation, frame construction extensions, roof) or one common one, and also mark the ground. Take a photo as a souvenir of the house without the extension and get to work.
Build the foundation

To build a strip foundation with your own hands, dig a trench of the planned depth and width according to the marked marks. Fill and evenly distribute the sand and crushed stone cushion along the bottom and lay the reinforcement frame on top.
Install the formwork in the trench. Prepare concrete mortar from crushed granite(5 parts), sand (3 parts) and cement (1 part) and fill the formwork with it.
The hardening time of the solution is determined by the manufacturer’s instructions for the selected cement, adjusted for temperature and weather. Wait until the foundation is completely dry. Bulk or clay soils under a frame extension will require additional time for shrinkage.

Various projects provide various ways, allowing you to combine the foundation on which the house stands and the new foundation adjacent to it, which carries frame building. Therefore, when arranging formwork for a strip foundation, be sure to provide expansion joint at the point where the extension joins the house. In this way, the base and walls of the veranda are protected from the formation of cracks during seasonal soil movements.
The construction of the foundation may also include the installation of supports under the floor joists. Mark a distance of 1.3-1.5 m to mark the holes for supports. It is enough to leave a gap of 0.9 m between the logs. Dig holes and fill the bottom with a layer of sand (at least 0.1 m).
For waterproofing, wrap all surfaces of the base with roofing material (rubemast) in two layers. After this, you need to make a solution and fill the holes with concrete with supports installed in them. The foundation will harden and securely secure the supports.
Install the strapping beam

Lay the strapping around the entire perimeter. The construction of a veranda requires the thickness of the timber used to be at least 0.15 m for sufficient thermal insulation, although according to the standard 0.1-0.2 m is allowed. Process bottom beam suitable antiseptic. When carrying out work with your own hands, you can even use used automobile oil, which in its properties is often not inferior to many special means. Make the fastening at the corners halfway up the tree (another term is “in the paw”) and level the harness.

Choose flooring material: wood or concrete
Think about and decide which floor to give preference to for the veranda - wooden or concrete; the projects can be very different. Start construction by laying the subfloor. Place a 5.0 x 5.0 cm cranial block on the sides of the floor joists, and lay edged boards on it. Cover the boards with two layers of glassine, placing insulation between them. When completing the construction of the floor, lay the finished floor on top of the subfloor.

For wooden floors good option There will be a milled board, convenient for ventilation and air circulation, as well as tongue-and-groove boards, which are laid taking into account the multidirectionality of the annual rings on the wood.
The concrete floor is made in layers: insulation, insulation and concrete screed.
If the extension is planned as a living space, install a “warm floors” system - electric or water. As flooring Suitable for an extension are linoleum, laminate, tiles, panel board parquet board or parquet.
Assemble the frame
Dry all parts well and treat each with fire-retardant impregnation against combustion and bio-protection against insects. You should assemble the frame with your own hands consistently and carefully. Install corner posts, using timber 0.15x0.15m as the most suitable.

Use a plumb line or level to ensure they are correct. vertical position and using improvised boards, temporarily secure the racks with technological braces. The posts adjacent to the house must be made below the roof overhang. The outer posts must have an even lower height to ensure a sufficient slope of the veranda roof.
Along the entire frame perimeter of the extension, install additional racks at a distance of 0.9-1.0 m from each other. Strengthen the corner posts with inclined braces (standard angle 45˚), and dismantle the technological braces. Throw a ceiling trim made from 150x50 edged boards along the top of the racks.

To frame structure was strong and stable, a sufficient step for vertical racks will be 0.6 m (if you plan to use mineral insulation), and for horizontal jumpers 1.0 m. Hardware fastenings will give the wooden frame of the veranda additional strength.
Use boards to mark openings for doors and windows. Using a level and plumb line, ensure that the horizontal and vertical surfaces are accurate.
Install the walls
After assembling the frame, insulate the walls to make the extension comfortable to live in. Even for a veranda, the issue of hydro- and vapor barrier should not be ignored. Place glassine or foam insulation with the mirror side facing the expected appearance of moisture and secure long screws. You can insulate the ceiling of the veranda with expanded clay by pouring a layer of 10-12 cm on top.

Mineral boards, expanded polystyrene, liquid insulation ecowool and even sawdust They are also successfully used as thermostats, and for protection from wind it is possible to use traditional roofing felt or glassine.
Perform rough wall cladding using DSP sheets, OSB or SML. This shield gasket has the advantages of a solid coating. Economy option for external cladding verandas can serve edged board“25”, and it is better to decorate the inside of the house with clapboard, which will last for several decades.
The walls of the veranda should be a “pie” with alternating internal lining, air gap in 1-2 cm, vapor barrier, insulation layer, wind insulation and exterior finishing. Special attention pay attention to the places where the edges frame walls adjacent to the house.
Use jute (hemp or linen, but without felt, to prevent moths) or liquid insulation in the form of hardening foam in such places.
Install doors, windows, window sills, skirting boards, trims, etc., glaze windows, cover wooden surfaces varnish or paint.
Assembling the rafter system

Place rafter boards on the top trim. Install the boards on the edge with a 0.3 m extension beyond the crown and cover them with sheathing boards 2.5-3.5 cm thick. To ensure wooden base protection from moisture, lay one layer of glassine, always laying it with an overlap of 5-7cm. This precaution will protect the roof in case of leakage of the outer roof covering.
Roof
Roof on frame extension It can be placed under a common roof with the main house, or it can be made separate. Having chosen the material for the roof, calculate the required amount with a small margin (up to 5%), always taking into account the required overlap.

Bend the apron at an angle corresponding to the slope of the roof. One side of the apron goes over the roof overhang and is secured, and the second is laid on the roof of the extension and is also attached. Take enough time to view photos and videos describing this important stage installation