Do-it-yourself Berendey cassette pavilion. How to build a bee pavilion with your own hands
The pool pavilion is installed in order to make the swimming season longer and protect the artificial reservoir from clogging.
Even the smallest artificial reservoir built on suburban area, provides an opportunity to have a great rest after a busy day, restore physical strength, and simply cheer up on hot summer days by plunging into cool water. As a rule, owners of dachas and private houses outside the city build outdoor swimming pools. The construction of such structures requires a minimum of money and effort. But open reservoirs are not very convenient to use.
Firstly, you can swim in them only in the warm months of the year and only in ideal weather (no rain, the sun is not too hot, no wind). Secondly, outdoor pools require constant (and, note, quite labor-intensive) care. Their bowls get clogged every day. As a result, instead of pleasure, a person receives a lot of inconvenience. It's easy to avoid such problems. It is necessary to build a special structure - a pavilion for the pool, which has many advantages.
Pool pavilion
Shelters for artificial private reservoirs will allow you to:
- spend less funds for heating water;
- devote a minimum of time to caring for the bowl;
- extend the swimming season;
- reduce the amount of water that evaporates from the bowl;
- reduce heat losses related to cooling the pool at night.
Since less debris will end up in the bowl with a cover, the water quality in your pool will always be excellent. Children can safely swim in such a spotlessly clean pond. And you will have to buy much less chemicals. We think you understand that construction hanging structure over the pool is a worthwhile endeavor. Moreover, it is quite possible to do such work on your own, without resorting to the help of specialists.
All the structures that we describe are divided into two large groups. They can be telescopic (usually called sliding) or stationary. The former refers to structures consisting of several sections. Their individual parts easily move and open the entire pool or a certain part of it for sun rays. That is, sliding structures allow you to turn the bowl into a completely or partially closed structure.
The shape, height and number of sections are selected depending on geometric dimensions swimming pool The number of individual parts of the structure, of course, determines the overall functionality of the shelter. Sliding canopies are most often moved along the sides of the pool using small wheels (a fully mobile option) or along specially laid rails.
Telescopic structures resemble swimming pools closed type. Such canopies perfectly protect the reservoir from debris and precipitation. Basically, they make it out of a regular swimming pool separate room– a full-fledged recreation area. You can relax in it with friends or family in any weather. It is easy to equip a stationary pool pavilion with a heating system. In this case, the artificial reservoir can be used all year round.

Telescopic structure
Based on the height, pool covers are divided into low and high. The first ones are recommended for installation in cases where you plan to use the reservoir from time to time - irregularly. The height of such structures is about 100 cm. They cope with their tasks adequately and protect the bowl well from debris, rain, and sunlight. A low canopy is sometimes made higher (up to 200 cm). In this case, it is built according to the principle of a greenhouse. A door is placed at the end of such a structure. People get into the pool through it. But there is one nuance here. This constructive solution limits the possibility of swimming along the sides of the bowl.
High-type protective structures (up to 300 cm) are built when a private pool is turned into a year-round recreation area. If you want to build just such a structure, immediately decide on the type and heating system of this building. The shapes of the shelters that interest us are very diverse. Fantasize. You can make a pool pavilion with your own hands with original arched elements, with a strict rectilinear contour, trapezoidal or rectangular.
The most popular are pavilions in the form of a half-cylinder divided into several sections, installed in a horizontal position. For round bowls, experts advise building spherical shelters with sliding panels. And the most durable and durable are rectangular canopies, the upper part of which has an arc bend. On the roof similar designs Snow never accumulates, which increases the service life of the structure.
For those who want to make a pool pavilion with their own hands, it is important to immediately decide on the material for constructing the canopy. Traditionally, double-glazed windows are used for these purposes. It is recommended to use it if you plan to use the pool as a relaxation area, greenhouse or luxurious winter garden.
Double-glazed windows guarantee excellent protection structure. They have a presentable appearance and a lot of operational advantages. But the cost of such material is high, and the work of constructing double-glazed windows is not for everyone home handyman on the shoulder. Therefore, now pavilions are more often built from polycarbonate.

Double-glazed window covering
This modern material allows you to build luxurious structures of any configuration and level of complexity with a minimum of money and time. If construction measures are carried out correctly, polycarbonate canopies last up to 9–10 years. They also have other advantages:
- ease of care;
- fire resistance;
- excellent light transmission;
- lightness and strength of the structure.
Note! Polycarbonate canopies are installed on swimming pools that are used exclusively in summer. For winter operation they are not intended. And the second point. Professionals recommend building shelters from polycarbonate with a thickness of at least 8 mm. In this case, the canopy will be truly durable and functional.
As was said, you can build a polycarbonate canopy with your own hands without serious difficulties. Please note the following before starting work:
- The concrete foundation for the shelter should have a thickness of 0.5–0.7 m. Total weight finished structure it turns out to be quite impressive (sometimes up to several tons), so you should take care of a reliable foundation for it.
- The width of the pavilion foundation is determined by the parameters of the guide rails used. The length of the base is always taken to be 60–70 mm larger than the dimensions of the canopy being built.
- It is advisable to protect the foundation from moisture. This is achieved by laying tiles or porcelain stoneware on it.
- The joints between polycarbonate sheets must be sealed using a special tape or colorless silicone compound.
It is possible not to build a separate foundation if there is already an equipped recreation area around your pool (tiles have been laid, other work has been carried out). In other cases you need to fill strip foundation and perform concrete reinforcement (usually square cells with dimensions of 0.2 by 0.2 m are laid out).
Next, you begin to install the frame of the structure. Skeletal arches are usually made from profile steel pipes. Polycarbonate sheets are subsequently attached to them. The length of the arc is calculated using the formula - the width of the pool plus one of its heights. It is quite difficult to bend a profile pipe product at the required angle. Therefore, it is better to entrust this matter to specialists.
The bent arched elements must be stretched in the form of arches over the bowl of the reservoir. The distance between the individual arcs is taken to be about 100 cm. Be sure to install special stiffeners between them. The latter are recommended to be installed according to this scheme:
- two ribs between the 1st and 2nd arc;
- three ribs between the 2nd and 3rd;
- two between 3rd and 4th and so on.

Arc-shaped elements of the pavilion over the basin of the reservoir
The specified number of stiffeners is quite enough to ensure the stability of a polycarbonate structure. Then you should bolt the base of the manufactured skeleton of the structure to the foundation (if you are building collapsible canopy). In cases where you are building a stationary pavilion for a pool, fastening can be done not with hardware, but with the help of a welding machine.
After assembling the skeleton into one whole, apply an anti-corrosion compound to all its elements. Processing must be done carefully. Do not forget that the structure will constantly be in conditions high humidity. When the anti-corrosion agent has dried, paint the frame in the desired color.
The final work is covering the completed skeleton with polycarbonate sheets. Everything is simple here:
- drill holes in sheet products;
- insert universal screws into them;
- fix the sheets on the pipes.
At the end installation work Apply sealant to the connection points of the canopy elements.
In order to save space and time in the apiary, simplify preparation for winter, increase productivity and generally simplify the maintenance of honey plants, every beekeeper will need a bee pavilion. In such a structure, a dozen bee families can live simultaneously, separated from one another by wooden sheets. Many beekeepers wonder how to make such a pavilion with their own hands? More on this later in the article.
A mobile bee pavilion is a mobile room for bees, which can vary in size and design. For example, for pollination in difficult conditions movement or not large areas the best option There will be arrangement of small single-axle mobile hives for 12–17 bee colonies. For pollination over large areas, on the contrary, it is more advisable to have a building that can accommodate 30 families of bees or more. A mobile pavilion can be built, taking into account transportation on skids or wheels (see photo).
With this mode, the apiary becomes mobile - it can be transported a large number of times throughout the season. This is done in order to make more complete use of honey-bearing vegetation and completely free yourself from the work of unloading and loading hives. The movable pavilion has a more comfortable mode for little workers, and also makes it easier to protect the apiary. In such structures, hives can be maintained year-round, so there is no need to build winter huts.
Caring for bees in such a mobile structure is not very different from the usual keeping in single hives. However, you need to get used to working with limited space and keep the number of jobs to a minimum. During the season it is necessary to produce:
- sanitary and hygienic treatment, spring inspection, checking the supply of food;
- installation of magazine extensions or installation of a second body;
- form layering and select brood;
- select honey and select varieties for wintering.
The video “Beekeeping in Pavilions” shows in detail how bees are kept in a mobile hive.
To begin building a mobile pavilion with your own hands, you need to prepare a well-designed drawing (for example, as in the photo below), which will meet the basic conditions:
- required dimensions for trailer or van;
- equipment with household and work compartments;
- the presence and necessity of folding platforms and ladders;
- availability of ventilation;
- possibility of heating a mobile pavilion;
- lighting of the working passage between the change house and the hives;
- the presence of a luggage compartment where you can store the necessary equipment.

The number of sections must be adjusted to the size of the mobile structure. However, experienced beekeepers do not recommend making more than 20 sections, due to the fact that the bees will interfere with each other.
It is not easy to make a pavilion for bees with your own hands, since this requires knowing how to use metal cutting equipment, fastening and tightening tools. What you will need:
- welding tools;
- jack;
- levels;
- project drawing;
- cargo trailer, preferably not heavy (preferably ZIL, IF);
- wooden bars;
- metal for the frame of the bee pavilion;
- fiberboard sheets;
- boards (can also be replaced with disassembled pallets);
- roofing felt;
- nails, screws, paints, door and window hinges.
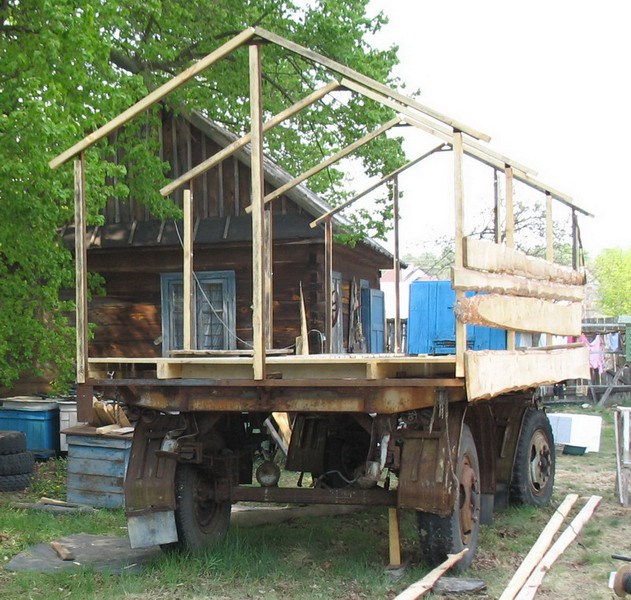
- We make a sketch of the drawing of the future trailer. The pavilion should be built in such a way that the roof does not touch the beekeeper's head, not higher. The width must be at least 80 cm. This is done so that a standard 4-frame honey extractor fits freely between the hives. The length of the bee pavilion depends on the location of the hives and their number.
- We level the trailer using a level and a jack, since after construction is completed it may turn out that the pavilion is crooked.
- We remove the floor, if it is wooden, and the sides.
- We lower the floor in the passage between the hives, if the design of the trailer allows, in order to reduce the height of the pavilion (see photo).


Video “Hive for a mobile apiary”
After watching this video, you will see how easy it is to make a hive for your mobile apiary.
Beekeeping in pavilions: all the details of the process
Natural and comfortable house for bees - hive deck
We make bee trailers for apiaries
Need some advice?
The problem is not how to make a pavilion for bees. The problem is the paperwork for the pavilion, I mean the mobile one. There are so many obstacles when it comes to registration that you won’t even want honey. Well, the last obstacle is the local traffic police. What’s interesting is that everyone acts strictly according to the law.
I would advise making a pavilion based on modern technologies, i.e. using three-layer sandwich panels. On the outside, such a panel consists of a metal profile made of 0.5 mm steel sheet, then filled with polystyrene foam or polyurethane. Inner layer from flat steel sheet or the same metal profile with a ridge height of 8 mm. If someone is confused by the metal from inside the pavilion, you can use or cellular polycarbonate or plastic panel or OSB panel (this is a little heavier). With this design, no spacers, heavy steel or wooden beams for the frame.
Having a loading platform with such a design made of ready-made panels can be assembled in 1 day. If you assemble and glue from semi-finished products, it will take a little more time. But the design will be rigid, durable and light.
- Expenses and income for laying hens
- Meat chicken diet
- Diet of productive geese
- Diet of breeding turkeys
- Guinea fowl diet
- Quail diet
- Diet of pheasants for meat
- Income from the sale of eggs
- Baby rabbit
- Farrowing sow
- Sheep lambing
- Calving cow
- Foaling mare
- Lambing of a goat
In order to save space and time in the apiary, simplify preparation for winter, increase productivity and generally simplify the maintenance of honey plants, every beekeeper will need a bee pavilion. In such a structure, a dozen bee families can live simultaneously, separated from one another by wooden sheets. Many beekeepers wonder how to make such a pavilion with their own hands? More on this later in the article.
Features of the pavilion
A mobile bee pavilion is a mobile room for bees, which can vary in size and design. For example, for pollination in difficult conditions of movement or in small areas, the best option would be to arrange small single-axis mobile hives for 12-17 bee colonies. For pollination over large areas, on the contrary, it is more advisable to have a building that can accommodate 30 families of bees or more. A mobile pavilion can be built, taking into account transportation on skids or wheels (see photo).
With this mode, the apiary becomes mobile - it can be transported a large number of times throughout the season. This is done in order to make more complete use of honey-bearing vegetation and completely free yourself from the work of unloading and loading hives. The movable pavilion has a more comfortable mode for little workers, and also makes it easier to protect the apiary. In such structures, hives can be maintained year-round, so there is no need to build winter huts.
Caring for bees in such a mobile structure is not very different from the usual keeping in single hives. However, you need to get used to working with limited space and keep the number of jobs to a minimum. During the season it is necessary to produce:
- sanitary and hygienic treatment, spring inspection, checking the supply of food;
- installation of magazine extensions or installation of a second body;
- form layering and select brood;
- select honey and select varieties for wintering.
The video “Beekeeping in Pavilions” shows in detail how bees are kept in a mobile hive.
How to make it yourself?
To begin building a mobile pavilion with your own hands, you need to prepare a well-designed drawing (for example, as in the photo below), which will meet the basic conditions:
- required dimensions for trailer or van;
- equipment with household and work compartments;
- the presence and necessity of folding platforms and ladders;
- availability of ventilation;
- possibility of heating a mobile pavilion;
- lighting of the working passage between the change house and the hives;
- the presence of a luggage compartment where you can store the necessary equipment.

The number of sections must be adjusted to the size of the mobile structure. However, experienced beekeepers do not recommend making more than 20 sections, due to the fact that the bees will interfere with each other.
Tools and materials
It is not easy to make a pavilion for bees with your own hands, since this requires knowing how to use metal cutting equipment, fastening and tightening tools. What you will need:
- welding tools;
- jack;
- levels;
- project drawing;
- cargo trailer, preferably not heavy (preferably ZIL, IF);
- wooden bars;
- metal for the frame of the bee pavilion;
- fiberboard sheets;
- boards (can also be replaced with disassembled pallets);
- roofing felt;
- nails, screws, paints, door and window hinges.

Step-by-step instruction
- We make a sketch of the drawing of the future trailer. The pavilion should be built in such a way that the roof does not touch the beekeeper's head, not higher. The width must be at least 80 cm. This is done so that a standard 4-frame honey extractor fits freely between the hives. The length of the bee pavilion depends on the location of the hives and their number.
- We level the trailer using a level and a jack, since after construction is completed it may turn out that the pavilion is crooked.
- We remove the floor, if it is wooden, and the sides.
- We lower the floor in the passage between the hives, if the design of the trailer allows, in order to reduce the height of the pavilion (see photo).

Then you need to weld the metal frame. To do this, first cut out the corners, the length of which should be the same, and weld the doorway (see photo of the frame).
We screw the bars to the frame and fill them with boards. It will be cheaper and easier to nail unsanded boards: they should be tightly fastened next to each other on the bars.
- We cover the pavilion with solid fiberboard sheets over the boards.
- We put roofing felt on the roof.
- We make doors and hatches.
- There remains a gap around the entire perimeter of the floor for the landing verandas. We place the hive tightly to the frame.
- We nail bars of the same width as the frame elements that protrude into the structure, on top of the gap left. Then we move the hive close to these bars.
- We make hatches in the ceiling to match the size of the nomadic mesh from a sixteen-frame hive.
- We weld the steps to the trailer drawbar for convenience.
Photo gallery
Small mobile bee pavilion
Inside the bee pavilion

12 Frame Extendable Row Trailer

Video " Hive for a mobile apiary»
After watching this video, you will see how easy it is to make a hive for your mobile apiary.
Most kiosks are frame metal structures consisting of profile pipes, angles, and channels. The frame is a kind of skeleton of the kiosk. It must be rigid to withstand the load during construction and transportation.
Bottom chord of the frame (base). With a kiosk width of 3 or less than a meter corners are used. When the width of the kiosk is more than 3 meters, a channel is used. At the base there is an additional crossbar for every meter for greater rigidity.
Frame racks (pillars). The most commonly used are corners. The main ones are placed in the corners - 4 pieces. Connecting everyone metal structures produced by welding.
There are two types of frame, depending on what the walls will be made of. First type: wall made of factory-made sandwich panels - frameless. Second type: prefabricated sandwich panel - frame (layer-by-layer production). First, a timber frame is installed, then the outside is sheathed with any facing material. A wind-moisture-protective film is stretched under the cladding. WITH inside insulation, which is covered with a vapor-insulating film. It's all closing down interior decoration walls
When installing walls using layer-by-layer assembly, additional racks from profile pipe to stiffen the doorway. When installing walls using sandwich panels, the frame is made up of corners with installation at the device locations window openings- frames from corners. A closed frame is made from corners covering the entire window. Also done on the door.
Upper frame chord (roof base) It is made from a corner or channel depending on the size of the kiosk (pavilion). Beam - jumper of the upper chord. Placed on every meter. Most often it is made from a profile pipe. Additional timber beams are also installed. Acts as a lathing, and is a support under the prof. flooring.
Floor. The lowest layer of the floor is galvanized professional. sheet. Insulation – expanded polystyrene – is laid on it. Next, a board is laid as a subfloor. There is a leveling screed made of chipboard on it. A coating is laid on it - linoleum, laminate, etc. All this is secured with a plinth.
Overlap. Cladding material – professional flooring, plastic panels. Next comes the timber frame on which all this is attached. The beam cells form a beam network and are filled with insulation. On top everything is covered with a profiled sheet, galvanized or painted.
As you can see, making a kiosk or pavilion with your own hands is not the easiest thing. You need to purchase a large amount of materials, find a suitable place for manufacturing, protected from precipitation, so that during assembly water does not get inside, which makes the insulation unusable. You need to have some experience in order to qualitatively weld all the seams, properly insulate the walls, roof and floor, and install wind protection. All this work must be done with high quality, as this is the guarantee that in winter your kiosk or pavilion will be warm, and therefore economical.
But the most valuable resource is time. Experienced craftsmen can make a kiosk in less than 10 days, but for an inexperienced builder it can take a month or more. Time is very important in any business, and when building a kiosk, it is very expensive, since faster kiosk starts work, the sooner it will begin to make a profit.
What other advantages might there be in working with professional company"Babylon-Omsk"?
A correctly drawn up project for a mobile structure is a guarantee that you will receive exactly the project that will meet your requirements. For each object there is a technical certificate. In addition, if shortcomings are identified during operation, or for some reason a double-glazed window breaks - competent service maintenance will help you quickly fix all these problems.
Therefore, making a kiosk or pavilion in our company will ultimately cost you more than making it yourself.
We offer you to buy ready-made drawings of pavilions of various sizes.
Order a drawing of the pavilion or kiosk you need!
What are the benefits of a bee pavilion? How to build it yourself and how to equip it for cold weather? You will find answers to all these questions in our article!
Such pavilions are made to save space and work in the apiary. One can replace a dozen hives. Accordingly, a dozen bee families live in it, separated from one another by wooden sheets.
This design not only saves space in the apiary and simplifies the process of servicing bees and pumping out honey, but also does not require additional insulation before winter.
So, bee pavilions can be mobile or non-mobile. In general, their differences are not fundamental, except for the presence of a wheelbase. You can make them yourself or buy them.
Cassette pavilions are especially popular. They can also be mobile or non-transportable. The latter, of course, are still possible to move, but it is very difficult.
Cassette pavilion
A cassette-type bee pavilion is extremely useful for its ability to carry out anti-varroa measures, in the absence of brood, even late autumn. And such an event can be carried out directly in the hive compartments.
Even the winter huts of bees are excellent in it, because when using ordinary hives you have to acquire special winter hives. In addition, this design is convenient when moving and installing in the area of honey plants. And even one person can prepare for the move, without resorting to the use of a smoker or a face mask at all. It is enough to simply close or open the tapholes after installing the cassette pavilion on a flat area.
Honey yield
What is also noteworthy is the yield of honey. Even a non-transportable cassette bee pavilion provides one and a half - double equivalent of honey, in comparison with individual hives. A separate issue is the use of such a structure for content.
It is an excellent means of pollinating plants during their industrial production.
This design is very compact. This is especially clearly visible when compared with an apiary of individual hives, with an equal number of bee families. In addition, to inspect any bee home, simply pull out the desired cassette. This allows you not only not to disturb other families, but also simplifies the maintenance of the selected one.
How to make it yourself
Before you start assembling a bee pavilion with your own hands, you should decide on the type and carefully study its drawing.

Decor
You should not make a pavilion for bees with more than twenty sections, because the insects will interfere with each other.
First of all, to create permanent pavilion mark the place where it will be placed. The housings and sections in which the frames are placed are assembled in accordance with the available drawings. They connect with each other, after which they acquire common roof. But in such a way that there is a passage behind them, for comfortable servicing.
Compartments
Compartments for keeping bees can be placed either in one direction or in two opposite directions. The inventory compartment is adjusted at the request of the beekeeper, depending on the location of the pavilion. After all, if it is placed near own home, then you can store everything you need for work in it without bothering yourself with unnecessary work.
Lighting
Lighting is provided in advance. If needed, wiring can be done from a nearby transformer. However, some beekeepers do not complicate this process and use ordinary flashlights and lamps.
Design

To construct a mobile pavilion for bees, biaxial covered trailers of military vehicles are often used. But other large trailers may also work. In general, we can limit ourselves to regular trailer, and he can build the ceiling later, after installing the sections. The basis is a frame with steel struts attached to springs. And connected multi-section blocks for bees with magazine extensions are attached to the frame. A passage is built in the middle so that individual sections can be conveniently serviced.
Beekeeper's Closet
Don’t forget about the beekeeper’s closet, where all the necessary equipment will be stored. IN in this case This is freedom for the designer. However, it is worth thinking about arranging a cabinet for storing bee feeding products, dishes, and spare frames. Inventory, after all, also needs to be stored somewhere.
The cassette mobile pavilion has a number of features. In it, the beekeeper's room can be located almost anywhere if the trailer is lengthened a little. Otherwise, it would be best to place it at the back. This will allow you to place more than 30 bee families in 2 tiers. In any case, the room needs to be made through so that you can easily pass through it to the hives themselves.
Insulation

Particular attention will need to be paid to insulating the pavilion for bees. This is not as important for the beekeeper himself as for the insects, since they still have to spend the winter in this building. For this, two layers of plywood will be enough. And between them you can place a thin layer of roofing material.
If it is a military KUNG, then it will be enough to put a layer of roofing material or cellophane inside. It is extremely necessary to inspect the condition of the windows and seams through which cold air can be drawn into the bee pavilion, especially if the KUNG is very old. Cracks can be repaired using regular construction foam.
Materials
Making such a pavilion with your own hands is not at all easy, since you will need to use metal cutting equipment, tightening and fastening tools. And the KUNG itself is not so easy to find, but an inordinate amount of time is spent on its arrangement. But the benefits of such a device are difficult to overestimate.
The only thing that should be given special attention after the construction of any pavilion, regardless of the degree of its mobility, is Fire safety. The structure is usually made of flammable materials, so it is advisable not to bring fire inside.
Blueprints
To build a pavilion for bees, you can use the following drawing. This is what one column looks like; to get a structure with several columns, you just need to make as many of them as needed. And connecting them together is no longer so difficult.

The assembled mobile pavilion will look something like this.

From the video you can understand how bee pavilions are made by experienced beekeepers. It is quite natural that some may have other methods of construction.