The cornice of a house is made of siding. Instructions for covering the eaves with siding yourself. Features of vinyl soffits
Read also
-
Lining the roof eaves with plastic allows you to finish the roof firmly and beautifully. Among those used PVC materials siding is recognized as one of the best. With its help, you can create a structure designed in the same style if you cover not only the eaves overhang, but also the walls.
How to choose roof siding
In the photo, finishing the roof of a house with siding
Siding is a building material widely used for decoration. various surfaces houses: facade, walls, basement and cornices. It is impossible not to particularly note the decorativeness of the finishing, but its main purpose is still to protect the house from the harmful effects of various natural factors.
To find out how to line a roof eaves with siding, you first need to find out which type of material is most suitable for this purpose. Let's look at the most common of them.
- Vinyl. Each panel of material represents monolithic sheet. Among their advantages are not heavy weight, low cost, fire safety, ease of installation, corrosion resistance. However, hand-drilled vents usually don't look very good on roof eave trim. But these panels can successfully cover the facade.
- Galvanized siding. Metal panels siding, like vinyl, is not very suitable for finishing the eaves of a house. It's all about moisture, which accumulates on the eaves and leads to corrosion of the cladding, which, naturally, does not paint the building. Still magnificent specifications materials appear on the cladding of walls and curtain facades.

in the photo there is siding and soffits
- Soffits. This is one of the types of siding, which was originally designed for operation in more difficult conditions. It is believed that this The best decision for covering roof overhangs. So why do professionals strongly recommend finishing roof eaves with soffit.
The advantage of roofing soffits
Roof sheathing today is carried out using soffits of different categories depending on operating conditions. The market offers very attractive panels made of vinyl, aluminum and copper, allowing you to choose a material that goes well with the look of your home.
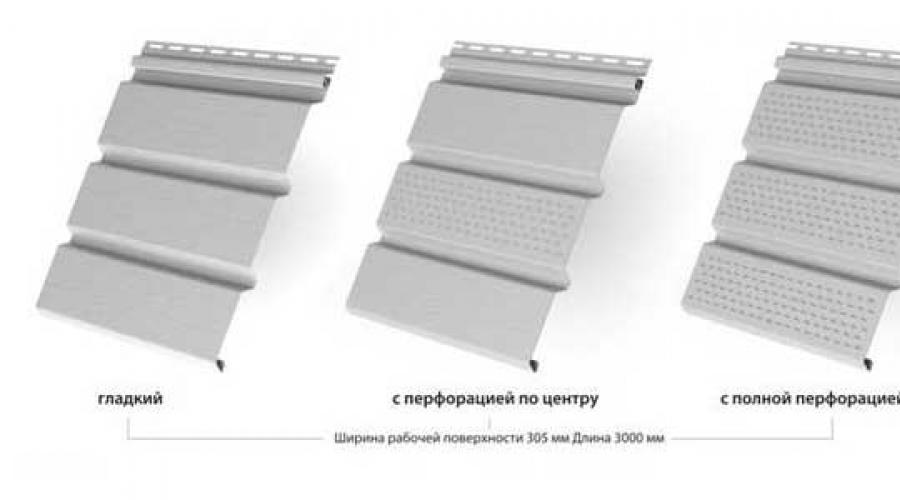
According to their design, soffits are:
- non-perforated solid. This option is usually used when hemming the gable overhangs of the gable;
- partially perforated. The perforation on these panels runs strictly in the center. Due to this, the under-roof space is properly ventilated and excess moisture is removed;
- completely perforated. They are used to finish the roof canopy with siding and other roofing parts that protrude beyond the roof. Such soffits are perfect for covering gazebos, verandas, and porches. Thanks to this type of perforation, air constantly circulates, ventilating the inner layers of the roofing cake.
Thus, they are all free from those disadvantages that limit the scope of use of the panels.
On a note
Partially perforated panels are used most often. They do their job very well. With their help, you can hem almost any area, and installing these elements is quite simple.
Among the advantages of spotlights are the following:
- The coating composition of these vinyl or metal panels contains durable polymers, which eliminates the need to apply an additional reinforcing layer. This is why it is convenient to cover the cornice with soffit (photo below);

- they are resistant to biological and mechanical damage: the panels do not rust, mold does not form on them, the soffits are easy to care for - they are simply washed with water.
- installation can be performed even without special skills and tools.
How to cover a roof with siding

If, when covering the roof with siding, there is a certain freedom in choosing the material, then the frame of the roof eaves sheathing is assembled taking into account certain rules.
Frame design
The choice of the type of frame structure for finishing the roof of a house with siding depends on the type of roofing system. Before installing it, the rafters must be prepared for installing the box. ends rafter legs that protrude beyond the façade must be cut off. They should form a line in vertical plane. The starting board for the frame structure is sewn onto them, and the cut points are covered with box lining.
Frame installation is carried out:
- in the direction of the rafters. In this case, the frame is made at the same slope as that of the slope. This option is more suitable for single-pitched roofs, having a slight slope of the slope. In this case, the filing is done directly along the rafters. From their lower side to the inside, leveling bars (section 100x40 mm) are filled from edged boards. To ensure the horizontality of the resulting plane, start with the outermost bars and stretch the cord between them, after which the rest are stuffed.
- horizontal box for the cornice. It is assembled from a couple of boards. One of them is attached to the wall, and the other - along the bottom of the rafter legs. Additionally, cross bars are filled, passing them from the bottom of the rafters to the wall. It is on them that the panels will be attached during installation of the roof siding. In the frame for siding, at the corners where two slopes connect, the board is placed on the wide side, and not on the edge. The two boards are joined in a straight line that connects the corner of the roof to the corner of the house. The resulting structure is not connected to the wall of the house. It is fixed for reliability on metal corners or plates.

- If the roof siding does not have ventilation holes, then in finished frame insert ventilation grates.
- The roof must be insulated before finishing.
- A control line drawn on the wall will help you lay the timber evenly in the corners.
- Of the huge number of different profiles, only two strips are needed for installation: the starting strip, which is fixed from the beginning of the cladding, and, accordingly, the rigidly fixed finishing strip, and the J-trim profile.
- The profiles are attached very rigidly to self-tapping screws, screwing them in at a distance of no more than 350 mm from each other.
- The installation of the sheathing begins after completing the installation of the profile around the entire perimeter.

- Installation profiles are filled along the edges, into which the siding is then inserted, but first it is necessary to measure the plates of the required length. The sheathing material is cut according to the width of the frame box. To insert the plates into the profiles, they are slightly bent. Each subsequent one is hooked to the previous one, then nailed down. The plates are assembled tightly, but without much tension. The entire cornice is assembled in this manner.
On a note
The profiles hide uneven edges in the areas where the cornice board and siding meet.
In this case, you need to follow certain rules:
- Hardware is hammered strictly into the center of the hole for fasteners in the form of an oval, so that nothing interferes with possible thermal deformation.
- When fixing the panel to the sheathing, the cap should not be pressed too hard. Between them you need to keep a small gap of about 1 mm.
- To prevent the skin from deforming in the future, it is necessary to reduce the size of the plates included in the corner profiles.
As already noted, most often the cornice is finished with soffits, so we will dwell in more detail on the features of lining the cornice overhang with this material.

- Two strips are installed along the cornice: on the wall and on the side of the cornice overhang. J-profiles are attached to the planks.
- The cut plates are inserted into the profiles. To prevent them from breaking when bent, the set of plates begins with the installation one.
-
As you move towards the corner, the size of the panels is reduced. To change the direction of the panels at the corners, the edge of the plate is filed down, dividing the right angle in half, and installed in a J-rail driven diagonally. To do this, either carefully bend the panel, or slightly bend the J-profile, and the panel will fall into place.
When joining two sides of the sheathing, two J-profiles are required.
After completing the installation of the roof covering, the question often arises of how to line the roof eaves with siding. The work of creating a roof is quite difficult; it consists of creating a frame, stuffing rafters, laying coverings, installing gutters and filing eaves. Thus, creating a frame for the rafters is almost impossible to do yourself; filling the rafters requires special skill and is also difficult to do by one person. Installation drainpipes- a process that requires professionalism and accuracy, therefore in this case It is better to seek help from a specialist. Hemming the roof overhangs is a fairly simple stage of work, so in order to avoid unnecessary expenses on hiring people, you can do this work yourself. Let's look at how to do this correctly.
The importance of hemming and the advantages of the material
When designing houses, all architectural bureaus provide for the roof covering to move away from the wall by 0.5-0.7 m. This will ensure protection of the walls of the house from precipitation and streams of water flowing from the roof. This protrusion is often called an overhang. In some cases, it is not hemmed at all. However, this is wrong.

Hemmed overhangs save heat and provide additional protection from blowing wind and precipitation, which extends the service life. Hemming the eaves also allows you to install under the roof cozy attic or living space. In the latter case, when covering the overhang, it is necessary to consider ventilation.
To ensure ventilation in the attic, several areas that are not tightly sewn up are left, which will create a draft of cold air from below, while warm air will rise and go out through the ventilation holes.
Even if you refuse to build an attic, ventilation attic space required.
After the overhangs are formed and the house is formed, you should think about the materials with which you can cover the eaves. The problem is that many building materials are suitable for these purposes.
Selecting the most suitable building materials

- Lining. It has a short service life due to the fact that it is made from untreated compressed wood. Overhangs are regularly covered with condensation, which causes destruction of the material.
- Galvanization. Galvanized overhangs look flashy and expensive (because they give a metallic shine in the sun). This is where the advantages end, since it will quickly rust when exposed to moisture.
- Vinyl soffits. They are intended specifically for covering overhangs. They last a long time because vinyl is resistant to aggressive influences. external environment. Main disadvantage– price: soffits are an expensive pleasure.
- Another worthy material is wood. Wooden boards impregnated with special liquids against rotting, fungi and water-repellent agents. However, these materials are very expensive, and the preparation procedure is long and labor-intensive.
- Vinyl siding (panels). If you don't have money for soffits, you can use leftover vinyl siding panels to line the eaves. Vinyl siding panels are of much higher quality than vinyl soffit panels and are therefore more durable. In addition, cutting panels for cladding is not difficult. Important point: not required special fasteners– covering the eaves with siding is done with ordinary self-tapping screws. Another plus is that you can cut or drill holes in the siding panels for ventilation, so as not to buy vinyl ventilation soffits. The main disadvantage of this type of finish is its not very beautiful appearance. This flaw is only noticeable upon close inspection. The fastenings also look ugly. It should also be noted that the color of the panels does not always match the colors on the roof. But despite these shortcomings, vinyl siding is one of the best and quality materials for roof cladding.
Fitting eaves with siding or soffits is practically the same thing. The only difference is in the fastening - special fasteners are required for soffits.

Another material - metal siding. It is sometimes used, but decorated with it extremely rarely. The reason is that metal bends poorly, and in the event of any inconsistencies or miscalculations (where the material needs to be slightly deformed), it can completely collapse (perhaps not immediately, but over time). Attaching such material to the roof is also quite problematic - the mounting holes of the material will not always coincide with the frame.
It is clear that the most economical and durable material vinyl siding panels will be used to finish the eaves. It is worth noting that to carry out the work of upholstering the overhang, you need to stock up on scaffolding or high sawhorses. If they are missing, there is a high risk of falling and serious injury.
Before covering the roof eaves with siding
The first thing to do is put scaffolding. If they are not there, then you can make a pair of trestles yourself (their height should be 1-1.2 m below the level of the eaves). The goats are installed at some distance from each other, and boards are placed on them. The boards must be wide and strong, capable of supporting the weight of a person with additional load - tools and materials. Life and health depend on the correct manufacture and installation of the structure.
The next stage is to make a frame (sheathing) for lining the cornice. It should be made only from wood, preferably 40x40 timber, but thinner boards (at least 25 mm thick) sawn lengthwise into approximately even beams are also suitable for vinyl siding. It is important to remember that all wooden parts should be treated with Aquastop, antifungal and antiseptics. An important point: if hemming the cornice is planned along with finishing the walls with siding, then first the walls are finished, and then the cornice is hemmed. The sheathing can be made from metal profile. Such a frame will be less durable, but cheaper and lighter. The latter is especially important for roofs that cannot withstand heavy loads.
In order to maintain the planes when filling the sheathing and when installing the cornices, markings should be made with an easily erasable pencil or marker. To apply it, meters, levels and plumb lines are used. Marking and subsequent filling of the frame are carried out based on design features roofs of a single house.
After filling the sheathing, you should wait about 12-24 hours for possible subsidence or deformation of the frame to appear. If a drawdown occurs or any fastener, then these shortcomings are eliminated and the test is performed again.
If there is no possibility (financial or time), vinyl siding is screwed to the frame with ordinary self-tapping screws.
Installation of siding on eaves
To install any siding panels on eaves, you must install a special “J” shaped fastening strip. It must be from the same manufacturer as the panel, otherwise the fasteners may not fit. Such strips are needed for both starting and finishing fastening. However, the decor of the corners can be anything to suit the owner’s taste.
Fastening strips (“J”) must be installed to secure the end panels. This is due to the fact that the installation of siding under the eaves will be carried out across the frame. When installing the starting strip and after installing the finishing strip, they should be additionally strengthened either with nails or self-tapping screws.
When the perimeter of the cornices and the fastening strips are strengthened, proceed to the installation of the panels. The panels are cut to the width of the overhang, but cannot be cut or damaged when cutting perforated tape. After this, the siding is installed according to the manufacturer's recommendations. It is important to remember that vinyl deforms under the influence of temperature (shrinks in the cold, expands in the heat), so it is necessary to leave a free play of 2 mm on the fasteners along the width, 1-2 mm for the movement under the fastener heads (nails or screws).
When installing siding, do not forget about ventilation. You should select several pieces of panels to be mounted and drill holes in them over the entire area or purchase a ready-made ventilation panel. It is better to mount such “leaky” elements in the corners - this way they will look beautiful and not be particularly noticeable.
1.
2.
3.
After the final work on the construction of the roof frame, after laying the roofing material and insulation, you can think about finishing the frame or overhangs. Our article will tell you what lining a roof with siding is and how to carry it out in practice.
It should be noted that such filing is entirely related to general view your facade. In addition to siding, you can use other materials for filing.
Selection of materials for filing cornices


If eaves siding can be selected depending on your preferences, then the overhang frame requires special rules to be taken into account. We will look at them below.
Frame and its design
As you know, the frame design is related to the type of roof.
There are two options:
- Hemming along the rafters pitched roof. Before installation work, it is necessary to take into account the angle of inclination - it must exactly coincide with the pitched angle. In this case, it is very important to ensure that the lower rafters have flat surface. As a rule, to do this you need to screw a 4-centimeter board to the rafters. The first step is to set the outer boards to size, then pull the rope and screw everything else along it. There is a small nuance when working with pitched roofs. You must attach two boards on both sides at the junctions of the two slopes.
- Horizontal box - you will need two boards for it. You must secure one of them at the bottom of the rafters, and the other part to the wall. Before doing this, it is very important to lower the starting bar. Where the slopes connect to each other, place the board on the wide side. This will be the joint of the boards. It is important to remember that it must run exactly in a straight line, from the corner of the roof to the corner of the house. This design does not depend on the walls of the building. It is recommended to use the following fastening materials - metal corners and plates.
Tip: The first option is suitable for constructing boxes on roofs with a small slope. The second option is universal. It is suitable for all types of roofs.

The ends of the rafters should be cut in a vertical plane. Hide the ends that remain in the lining of the box. Having cut the rafters, apply the starting board of the sheathing. It is attached to the edges of the rafters. The best option There will be an OSB sheet for such a procedure.
Only after the walls of the structure have been insulated can the cornice frame be installed.
After making the frame, take care of ventilation. Insert ventilation grilles into the frame. All work should be carried out before the scaffolding is removed. After completing these types of work, the cornice is finished with siding.
We install siding
Necessary materials: siding cornices, components (profiles, various angles), hammer and nails.
The work begins with the installation of the sheathing. Instead, we have boards for the frame of the box. The roof eaves are finished vertically and horizontally. In the case of - it is recommended to choose the first option. The parts are fastened using galvanized nails.

Installation rules:
- The nails are driven in the center of the oval hole;
- The nail head should not be pressed tightly onto the panel against the sheathing. Leave a gap of 1–1.5 millimeters;
- The panel should not be positioned tightly against the corner profiles. Experts advise producing plates 10 millimeters smaller than the standard size required.
If these rules are not followed, you may encounter deformations of the siding.
How to line a roof with siding, video example:
Choosing siding to match the color of the roof is not so difficult. You just need to take into account certain parameters. If unscrupulous installation of the filing is carried out, then appearance buildings may be damaged.
Selecting the color of siding and roofing takes a little time. At the same time, do not forget about installing ventilation. Since this is a very important component of cornices and overhangs.

You can find a lot of photo and video materials on the Internet. They will help you select siding to match the color of the roof. You can also contact specialists who will help carry out all the measuring work on your roof, and also do everything installation work on roof siding.
Siding for roofing has been used for quite a long time. In this article we will tell you how to line a roof with siding.
This is not such a difficult question, but it must be approached comprehensively and at the same time adhere to certain rules. You can watch the video and see with your own eyes how the roof overhangs are covered with siding.
The photo will show the entire installation process.
Why should you hem the roof?
Covering a roof with siding is not just for beauty. There is also a practical approach here.
To do the job correctly, we need to know what we are trying to achieve:
- Covering the roof with siding will help create the desired microclimate in the interior of the room;
- Thermal insulation will also be greatly enhanced;
- Roof siding will reduce the influence of the atmosphere. Protects against cold air entering winter time. And it will not let in excess heat in the summer;
- Covering the roof overhangs with siding will decorate the appearance of the building itself and make the look complete.
Below are instructions for performing this work. You can do all this completely with your own hands and without outside help.
Moreover, the price of the material is not so high, almost everyone can afford it.
Completing of the work
Roof sheathing is necessary for protection rafter system from wind, humid air and atmospheric influences.
There are such options for filing the box:
- Hemming in the direction of the rafters;
- Horizontal filing.
The second method is the most common; it can be used on all types of roofs. The first method is only suitable for those roofs that have small angle stingray
Things to consider
It’s worth saying a little about the rules for doing the work:
- Before work, all the material must be brought to the work site, but must be stored in the shade. You should never place it in the sun;
- Never fasten panels rigidly. The fact is that the vibrations of the panel when heated reach 2 cm. And therefore there should be some play during installation;
- For fastening, purchase self-tapping screws, just do not go overboard with their thickness, they should fit freely into the groove;
Attention: Some “experts” advise applying sealant to the corners of the panels and at the joints. Under no circumstances should this be done.
If you apply a hard sealant, then the panels will simply turn out and warp as they expand. If it is elastic, then moving the panel will simply tear it off.
Hemming in the direction of the rafters
So:
- It is necessary to ensure that the angles of inclination of the box frame and the slope coincide exactly.
- You need to check the location of the rafters. They must be in the same plane. We do this using a board, which we stretch according to the installation level and then check using a building level;
- There is another option: you can attach a 10 cm wide and 4 cm thick rail to the rafters. First install the outer boards, and then pull the rope and, focusing on it, attach the rest.
Attention: On pitched roofs, at the junction of two slopes, one board must be secured on both sides of each corner.
Horizontal filing
To install the box, you need to prepare two boards:
- The first will need to be secured to the underside of the rafters, and the other to the part of the wall where the rafters fit. Starting bar in this case it must be omitted;
- In the corners formed by the intersection of two slopes, the board is installed not with an edge, but with a wide part. This is where the junction of the two boards will take place.
It will run in a straight line from the corner of the roof to the corner of the house. As a result, you will have a structure independent of the walls of the building.
It is better to use metal plates and corners as fasteners; they are more reliable than other materials.
No matter what roofing material you have chosen - lining or siding, you need to make preliminary preparation rafters to the box fastening.
Rules to follow when making a frame
So:
- The frame begins to be made only after the rafters are installed. In this case, everything must be checked carefully. There should be no distortions;
- After completing the work related to the installation of the rafters, they will protrude slightly beyond the line of the facade; you need to take a nylon thread and beat off one straight line and then cut it with a hacksaw;
Attention: This action must be performed in a vertical plane. Hide the remaining ends in the lining of the box. Be sure to check the parallelism of the rafters. The distance between the walls and the edge of the rafters should not differ.
- After trimming, you need to attach the sheathing starter board to the edge of the rafters. OSB sheet will do.
- Having insulated the walls, you can begin attaching the cornice frame;
- Then you need to take care of the ventilation of the house. Place ventilation grilles in the frame. Once you have completed this task, begin installing the siding.
Siding installation
You will need galvanized nails for fastening parts, a hammer, siding and components - internal, external corners, profiles.

Installation of siding begins with the sheathing; in our version, a box frame made of boards is used instead. Horizontal and vertical installation possible.
For the cornice the most suitable option is the second option, which involves a vertical arrangement.
Please note the following rules:
- Be careful not to let the panel fit too tightly into the corner profile. To avoid this situation, when manufacturing plates, it is recommended to reduce the required size to 10 mm.
- Fastening is done only in the center of the provided hole;
Attention: If for some reason you cannot make a fastening in the provided hole, then you need to pre-drill the panel. Moreover, make the hole larger than required. There shouldn't be much play.
- To prevent the panel from being pressed too tightly against the sheathing, leave a gap of 1-1.5 mm between the cap and the panel. This will save you from troubles during the expansion of the material at elevated temperatures;
By neglecting these rules, you increase the risk of siding deformation.
Next you need to do the following:
- Attach the installation strips to the edges of the roof, and then insert the siding into them.
- Prepare the plates of the required length and, bending them slightly, insert them into the installation profiles. Connect each subsequent panel to the previous one. As a result, all panels should be tightly interlocked, but without tension.
Cornice filing
Nowadays, more and more often, not siding is used for finishing the cornice, but soffits - plastic panels.

In order to install soffits, you need to perform the following steps:
- Fasten two strips along the entire length of the cornice: one on the wall side, the second on the overhang side;
- Attach F-profile or J-profile to these strips;
- Now we measure the width of the roof eaves, taking into account the thermal expansion of the material. In order to determine the required length of the spotlights, subtract 6 mm from the resulting number;
- Cut the plates to the required size and place them in the profiles.
Attention: For convenience, they are slightly bent and inserted into the slats. But since the length of the cornice is short, this is not worth doing. Because the plates may break.
Soffits should be placed from the side of the installation profile:
- Approaching the corner, the size of the spotlights must be reduced. One of their edges needs to be filed down, maintaining an angle of 45 degrees.
- For correct execution To connect the two sides, a pair of J-profiles is used. There don’t have to be two of them; you can use one, but as a result of such installation, the end will need to be covered with a chamfer or a frontal strip.
As mentioned earlier, finishing the roof with siding is the final stage of its construction. But this stage is no less important.
There are also high demands on roof finishing. Incorrectly chosen material for lining or poorly performed installation can ruin not only the appearance of the roof, but also the entire building.
You can find detailed articles on all these topics on our website.
The roof is almost finished, but it doesn't look finished yet. There is very little left. You need to line the roof eaves with siding, and along with it the roof overhangs.
What material should you prefer for this type of work? How should all stages of the work be completed? In this article you will see answers to all your questions.
How much does siding installation cost?
Recently, home owners are increasingly choosing siding. This material can be used without any problems.
Of course, some use wood, metal profiles or other materials of their choice, but cornice siding is best suited for these purposes.
So:
- Now available in markets and stores a large number of siding. Its cost varies. It all depends on what material it is made of.
- So, for example, finishing the roof eaves with siding can cost any amount. average price varies from 70 rubles per piece to 1300 rubles.
- When ordering siding for eaves, you can give preference to any size in which it is produced.
Note. When starting a conversation about what kind of siding covering the eaves should be, it is necessary to take into account that in addition to the price of the material itself, there are other points. They are presented in the table below.
How much will it cost to install a cornice using siding?
What siding material should I choose for the cornice?

Before on the market building materials siding appeared on the eaves; overhangs and cornices were hung mainly with clapboard or ordinary planed boards.
Note. But they had one significant drawback. Such materials rotted very quickly. This is why they lost their good appearance, and in the end homeowners had to paint them very often.
It should be remembered that not every siding is suitable for finishing the cornice; the cornice board should also be selected with special care:
- For example, vinyl siding should not be used, because it is designed so that it can be used to cover the facade.
Conclusion. It will not look very good on eaves overhangs. Among other things, moisture (condensation) will accumulate under it in huge quantities, and this in turn will cause rotting of those elements of the roof that are made of wood.
- It is for these same reasons that you should not purchase metal siding to cover the eaves with siding. It will be covered with rusty spots, and this does not look very nice.
In order to learn how to cover the eaves of a house with siding, you must first find out which material should be preferred. The industry has been producing for a long time special material, called soffit.
The advantage of spotlights

This is the same eaves siding, but only much better. It can be made of metal and vinyl.
So:
- Soffits, similar to double slats, are produced both in solid form and in perforated form.
- For the latter, perforation can be performed either along the entire center of the part or as a whole part.
- One-piece types of soffits are used to line ceilings in rooms not intended for residential use or cornices running along gables. And with the help of perforated materials, the cornices are hemmed under the rafter outlet.
Advice. Experts recommend covering the eaves with siding, where the material has a profile along its entire length, for roofs that do not have gaps for ventilation.
- Such panels have a beautiful appearance, they are not at all difficult to cut and process. This means that cornices and pediments can be used for building facades without any problems.
- Vinyl soffit is not very heavy, this material is durable, does not corrode, is inexpensive and easy to install.
- The aluminum soffit is made from a single sheet, and its coating is in the form of a decorative protective layer.
Conclusion. Its advantage over a soffit made of vinyl is that it is quite durable, resistant to temperature changes and light from the sun. In addition, it has a wide color spectrum.
What you will need for self-cladding
If you intend to attach the siding along the eaves with your own hands, you need to purchase the following tools and materials in advance:
- Scissors for working with metal.
- Electric saw.
- Punch.
- Knife.
- Tool special purpose in order to dismantle the panels.
- Hammer.
- Cornice boards.
- Cornice siding.
- Special profiles.
- Start and end bars.
- Gutter.
- Hooks for gutters.
Making a box for roof overhangs:
- In order for the eaves to be finished with siding, it is necessary to install a “box”. As for the frame, it is most often made from wooden blocks or profiles made of aluminum.
Advice. If it is necessary to hem the bottom using lining, the frame is made of wood. It is treated in advance with special liquids - antiseptics.
- If the roof has an insufficient slope, then lining the eaves with siding should be carried out to the rafters themselves.
- In order for everything to work out normally, special blocks are nailed to the bottom of the rafters for leveling.
- The cross-section size is 10 by 4 cm. This is done so that in the future there will be a horizontal plane.
Advice. Before this procedure, you need to tighten the cord, which should pass between the bars located on the edge. All remaining blocks will be nailed along this cord.

If the slope of the roof has a strong slope, then in this case finishing the roof eaves with siding will not do without a box consisting of two boards.
So:
- One of these wooden parts nailed to the bottom of the rafters. As for the second board, it is attached to the wall of the house, where the rafters protrude beyond its edges.
The part of the board that is below should have one horizontal level. Next, you should fill the transverse bars on these boards.- As for the overhangs on the pediment, either a wind board or the ends of the blocks are sewn onto them (you can take sheathing boards for this purpose).
- In order to be correct installation To install a cornice with siding, you need to nail a board to the wall of the house, which should run parallel to the slope. You should know that the boards, inside and outside, should be on the wall of the house, as if in a single plane.
Note. This is necessary so that an even overhang of the cornice can be achieved.
- The horizontal overhang of the fonton, which serves to separate the attic from end wall, must have an inclined overhang.
- This is necessary so that the wall of the house is protected from the effects of precipitation, which is then converted into water. It will be best if you purchase materials for this purpose that are resistant to moisture.
Advice. Sheathing the roof with siding is carried out after all the work on insulating the facade has been completed.
Details for working with soffit
Instructions for installing this type of siding begin with the installation of parallel profiles.
Let's take a closer look:
- One of these parts should be attached to the house, and the second to the lower plane of the chamfer (wind board).
- The cornice siding (soffit) itself will be inserted directly into these profiles. Depending on the configuration of the chamfer on the building, choose the option of profiles for siding (soffit) and chamfer.
- Factories produce two types of profiles - J and F. The receiving profiles are nailed every time after 3 dm or 4 dm.
- Before finishing the cornice with siding, you need to install a J profile that will run along the frame board. It must be remembered that it must be one level with the edge located below the chamfer. After all this, you need to insert a pre-cut soffit according to the size.
Note. To install a siding cornice, you need to remember one feature. It is installed before work on the entire roof covering begins. After this, special hooks are installed that will support the gutters for receiving water.
- This strip will serve to protect the wall of your home from accidental water ingress from the gutters. In addition, this is a very beautiful decorative element. The plank is secured to the rafters using self-tapping screws, which are matched to the main shade of the plank.
In order to ensure ventilation when covering the eaves of a house with siding, it is necessary to leave a certain amount of gaps of approximately 30 or 50 mm. They should be between the plank and the wall around the perimeter of the entire house.
For more detailed information, we suggest watching the video in this article.This type of siding has one feature. It can change its size during temperature changes. Size variations vary, but generally they are almost 1 cm.
Rules when working with this siding:
- The material should be stored in places where the temperature will be less than 60 degrees Celsius in the open air.
- The mounted panels must have freedom of movement in a horizontal direction.
- To cover the cornice with siding, you do not need to put in a lot of effort to secure the panels in the locks.
- The nails should be driven into the very center of the hole.
- In no case should you hammer the nail heads into the siding surface; to do this, you need to apply a little effort to secure them in the locks.
- To ensure correct filing eaves overhangs siding, nails should be driven into the center of the hole
- The nails do not need to be buried completely into the siding. It is best if you leave a small gap between the nail and the soffit panel. This gap should be approximately 1 mm.
- There is no need to apply sealant between the outer and internal corners and panels, in addition, there is no need to do this between the panels and the J-profile.
Attention! There is no need to drive nails directly into the siding. This is fraught with the fact that subsequently the soffit will be completely covered with cracks and the vinyl panel will begin to collapse
- Before covering the cornice with siding, you need to take care of the wood. It should be dry.
Siding for attaching to vinyl eaves is more practical than other materials.
During the operational period it is not whimsical:
- To keep your home looking beautiful and tidy, your siding needs to be washed from time to time. It can be perfectly cleaned with ordinary water.
- If the pollution is strong enough, take any of detergents, commercially available.
Be sure to use a rag or soft-bristled brush to remove dirt. In order to clean siding, experts do not recommend cleaning abrasive substances that contain chlorine or organic solvents.

