Wooden gate frame drawings. Wooden fence with gates and wicket. We make country gates from wood
Read also
All photos from the article
Is it difficult to make antique wooden gates? What types of wood are preferable for their creation? What retro style attributes can be used and how can you give the wood surface the look of an antique product?
Let's figure it out.

Selection of lumber
Types and volume
First, let's decide what materials we will have to purchase.
- A wide (15 - 20 centimeters) board with a thickness of 25 - 30 mm will be used to sheathe the frame of the future gate.
- A beam measuring 100x50 mm will become the basis of this frame.
- For pillars (if they are needed, of course), we use timber with a section of 100x100.
Let us clarify: for the construction of pillars, you can, of course, use a round or profile steel pipe. However, our goal is to make future gates not only durable, but also stylish; wooden supports in this sense are more appropriate.
To calculate the volume of lumber, willy-nilly you will have to sketch a sketch indicating the dimensions that are relevant to you.
Some meanings, however, are universal:
- The optimal width of double-leaf gates is 3.5 - 4 meters. A sash width of more than 2 meters will mean excess load on poles and canopies, as well as greater windage in the wind; a significant reduction in size will not allow the car to enter the yard at an angle other than straight, which is not always convenient.
- A reasonable maximum gate height is 2 meters. It will hide your yard from indiscreet views from the street and, again, will not make the doors excessively heavy.
- The poles on which the doors are hung must be four meters high. One and a half meters will go into the ground; an elevation of half a meter above the gates will make it possible in the future to build a canopy resting on pillars over the gates, protecting them from rain.

Wood species
Traditionally, pine is used for the construction of wooden structures: it, along with spruce, is one of the cheapest species and, unlike spruce, is not replete with knots.
In our case, however, it will not be the best option:
- Light pine wood is not characterized by mechanical strength. Gates should still not only perform decorative functions, but also prevent intruders from entering the yard.
- Pine is not very resistant to rot. Meanwhile, she will have to constantly withstand bad weather and come into contact with moisture.

Even more advantageous solutions are oak and ash. The substantial cost of both species (about 40,000 rubles per cubic meter) is compensated by their highest strength, excellent texture pattern and almost unlimited service life.
Not by tree alone
Along with solid wood gates, metal gates can provide an excellent antique stylization - only the filling of the gates is made of wood. Above, we did not recommend using steel pipes with a wooden structure due to the fact that they will go out of the retro style; however, metal poles and other structural elements decorated with artistic forging will fully correspond to it.
The connections between wood and metal are made with bolts with semi-countersunk uncut heads: the frame is drilled, after which the boards are attracted to it with two to four fasteners. The nut, as you might guess, remains on the inside of the gate.
To better suit the chosen style, forged overhead awnings, bolts and door handles are used.
Many owners of summer cottages who take care of their development sooner or later are faced with the issue of building new gates and fences or reconstructing worn-out fences.
These elements of private property, in a sense, act as an indicator that determines the level of economic management of any owner. That is why many men prefer to make such products entirely with their own hands.
The best option for this is to make a fence for the dacha. This material is less expensive and more convenient to process, unlike metal.
The fact is that to manufacture any metal gates you will need not only expensive materials in the form of steel beams and sheet metals, but also expensive tools for processing and combining them into a single structure. So, you will need to purchase a welding machine, an electric hacksaw for metal, and, if necessary, a grinding machine.
In the case of wood products, the situation is much simpler. Here you can get by with hand tools that do not require significant financial costs.
The main thing is to find a suitable material from which a good-quality gate will come out. A product made of natural wood: cedar or oak, with proper care, will last at least 10 years.
Main types of country gate designs and their features
If you do not want to spend effort and energy on building a wooden fence and gate for your dacha yourself, you can purchase ready-made products at a specialized hardware store.
Their range is quite extensive. You can opt for gates with carved patterns or choose standard models made of solid wooden blocks. The first option, of course, will be the most expensive.

When choosing ready-made designs, carefully look at their appearance. The durability of the gate depends on the quality of the wooden parts, so they should not have any damage or depressions. Also, carefully select the size of the product according to the parameters of your summer cottage.
All gates for arranging a dacha can be divided into several types, depending on the design. The main ones are:
- Products with a gate and swing doors. This type of country gate is the most common. The design of the product is so simple that any owner can build it with his own hands, even without special carpentry or construction skills. The standard width of the gate is about 1 m, and the size of the doors directly depends on the practical needs and characteristics of your site. If you have a passenger car, it is enough to install doors with a total width of up to 2.6 m. For large trucks, the size must comply with the standards and be at least 3.5 m. And the optimal height is 2 m.

- Wooden sliding gates in the form of a continuous sheet. This design for a dacha is used in rare cases. The principle of operation of such gates, of course, is much more convenient than the previous type, since with a slight movement of the hand you can instantly open them. However, their cost is much higher. They are often equipped with a special sliding mechanism with built-in bearing rollers and automation. Most often, such products are made from elite wooden beams, and are installed not for arranging summer cottages, but for private home lands.
Also today, there are varieties of country gates depending on the type of laying of the wooden covering:
- Gate based on a wooden picket fence. This type of construction is a simple arrangement of evenly spaced planks that are attached to the supporting frame beams at specific intervals. From the front side, such a fence looks aesthetically pleasing, requires few materials and is very easy to make with your own hands. Often, gates and picket fences are used to fence off dacha areas.

- Products with a continuous coating of wooden boards located closely. This method of covering the frame of a fence or gate with wooden panels is more reliable in terms of security and masking a private area from prying eyes. This design is often reinforced with a metal frame and is used for arranging homesteads, rather than summer cottages.

As you can see, there are several different types of gates that can be used to install in your garden. The choice of a suitable design depends only on your preferences and financial capabilities. Having decided on a specific model of the product, you will need to think about how best to build it at home with your own hands.
We make country gates ourselves
Before starting any DIY work, you will need to carefully measure the entrance opening between the ends of the fence with a tape measure, if it is already installed. Having received the necessary parameters, begin to think about the design and create a detailed drawing.
For a dacha, it is best to choose the simplest option in terms of making it yourself - this is with a gate based on a picket fence.
If you have drawing skills, you can draw a diagram yourself, but in any case it is best to use a ready-made drawing: the most complete and understandable one is presented below.

Based on this diagram, you will need to substitute the corresponding numbers obtained as a result of measurements. Having created a high-quality drawing, collect all the necessary materials and tools. To make your own gate you will need:
- building level and tape measure;
- electric hacksaw or jigsaw;
- screws or dowels;
- welding machine (if necessary);
- screwdriver;
- plane and sandpaper;
- brushes;
- wood varnish or oil paint;
- shovel, crushed stone and cement mortar (for installing pillars);
- wooden boards 2m high, 2.5cm thick and about 10cm wide;
- support pipes made of metal or beams made of natural hard wood with a diameter of at least 10x10cm (for forming pillars);
- wooden beams with a diameter of at least 5x5 cm;
- metal loops.
Having collected all these tools and materials, you can get to work. First, you need to install gate support posts along the edges of the fence. To do this correctly, you need to take two or, in the case of a structure with a gate, three oak beams of at least 10 cm in diameter.
For greater strength, you can use metal supports, but for reliable installation of picket gates, wooden posts will be sufficient.
Dig holes in the designated areas up to 1 meter deep. Install supports in them, check the vertical position with a building level. Then fill the bases of the depressions with crushed stone and, for greater strength, cover the top with cement mortar. Compact the foundation and wait about a week until the mixture dries completely.

Now you can start making the doors and gates. To do this, you will need wooden beams, which should be cut to the required size using a hacksaw. Lay out the parts on a flat surface in the form of rectangles in accordance with the drawing.
Connect the corner joints of the wooden beams with self-tapping screws or dowels. Strengthen the resulting frames of the gate and doors with transverse beams, installing them diagonally.

When the frame is ready, begin installing the gate covering. For a country house option, it is better to use a wooden picket fence. Take the required number of wooden boards, cut them to the required size with a jigsaw and attach them evenly, at intervals of about 1-2 cm, to the frame part. Use self-tapping screws for fastening.
After this comes the final stage, which consists of installing the hinges. Take the 6 lower metal hinge pieces and install them in the desired locations on the support posts.
Attach them to wooden supports using self-tapping screws, and for metal beams use welding. Using the same principle, attach the upper bases of the canopies to the frame part of the sashes and install them on the support pillars.

Finally, install handles, additional locks and open the product with natural wood varnish or oil paint that matches the color of the fence. To add an unusual shade, you can use stain before opening the gate with clear varnish.

So, taking into account all these features, you can make a good-quality country gate based on a wooden picket fence. The main thing is to remember to take care of them. If the hinges creak, lubricate them with grease, and tint the doors themselves from time to time.
.
Gates are not only an integral part of protection, but also a decorative element of the site. Independent production of structural elements and direct installation can significantly reduce the cost of work. Various materials are used for production, new processing methods and methods of functioning appear. Wooden gates are suitable for a cottage, country house, house, garage. If you decide to make the gate yourself, below is information on how to prepare and protect the wood, how to calculate the consumption of materials, draw up a work plan, install and sheath the structure.
Advantages and disadvantages
Until recently, wood was the most common and affordable material. Wood is easy to process and has a low cost. Basic skills in using tools were enough to make wooden structures - fences, wickets, gates. Nowadays, fencing made from untreated wood is rare. Typically, they are used as temporary site boundaries during site improvement and house construction.


Wood is a universal material that is used for sliding, swing, lift-and-turn structures. The gate is the first thing guests pay attention to. Therefore, they became an indicator of the status and impeccable taste of the owner. Garage doors made of wood are usually made of the up-and-over type. The only limitation in the use of the material concerns lamellas in roll mechanisms. The wooden canvas has low strength in this case. Often a metal frame is sheathed with wood. Wooden sliding gates with this method of covering the base increase the thickness of the gates and the overall weight.
Wood as a material for gates has the following advantages:
- ease of processing;
- speed of installation;
- affordable price;
- beautiful texture;
- reliability.
Buying wooden blanks will cost less than metal ones. Various types of wood and sizes of boards are presented in construction stores to customers with any financial capabilities. In addition, in the Russian Federation you can get 50 cubic meters of timber for free, depending on the region; you can learn more about this from the video:
Woodworking tools are available and do not require special skills. While for processing metal parts you will need a welding machine and an angle grinder. Properly treated high-quality wood will last for decades, even in harsh weather conditions. If a wooden panel breaks, it can be easily repaired by replacing the board. The easiest to manufacture and install yourself are swing wooden gates.
There are also disadvantages to using wooden gates:
- low mechanical strength;
- if processed poorly - short service life;
- high flammability.
For gates, they usually do not use valuable types of expensive wood, but larch and pine that are resistant to moisture and rot. The internal metal frame will increase the strength and durability of the structure.
Preparatory work
Before starting to process the material, you need to draw up a schematic structure of the structure, taking into account the location of the elements. Preparing a diagram and accurately measuring the opening are important when calculating the expected material consumption and will save time during installation. It is possible to make wooden gates and gates yourself. You will need basic knowledge in wood processing, skills in working with carpentry and joinery tools, and patience.


After measuring the gate opening, you need to draw up a drawing of the future structure, observing the proportions of the height, length of the leaves, the distance between the supports, and the location of the gate. It is taken into account in the diagram of the place of fastening of constipations, awnings, and decorative elements. The boards for the gate leaf are suitable in size 100 by 25 mm, the frame - 80 by 60 mm. The workpieces will decrease in size as a result of processing by 5-10 mm. In the calculations, it is necessary to take into account technological gaps of 10 mm, possible deformation, and expansion of the material. When purchasing boards, you need to clarify their purpose and degree of drying. For making gates with your own hands, a carpenter's edged board is best suited. Such lumber is less susceptible to deformation and delamination. It is enough to dry fresh boards for one year in a well-ventilated area.
Preparatory work should include the manufacture of special supports from logs or wooden beams. Reliable supports are deepened into the ground to a depth of 1 m.
It is recommended to leave a distance of 200 mm from the longitudinal elements of the frame to the edge of the board. Canopies are attached at the same distance. Gates with a height of more than two meters are additionally reinforced with a middle vein. If the gate frame is made of wood, be sure to use braces to maintain strength and geometry. When sewing the fabric, the boards should not be placed closely. Leaving gaps will prevent bulging and deformation of the canvas due to increased humidity. If the gaps between the boards are unacceptable, you need to buy a tongue and groove board.
Required Tools
You will need wood for the gate:
- bars for the gate frame with a section of 40 by 40 mm;
- slats for covering the frame 20 by 40 mm;
- round or square timber for supports with a diameter of 100 mm.
For processing lumber, assembly and installation you need:
- wood saw or electric jigsaw;
- plane;
- drill with a set of drills;
- garden drill;
- plumb lines;
- rasp;
- hammer;
- screwdriver, screwdriver;
- self-tapping screws;
- components for concrete mixture (cement, sand, crushed stone);
- basin for mixing concrete;
- roulette, level;
- pencil for marking;
- sandpaper;
- blowtorch;
- primer;
- brush;
- antiseptic for impregnation.
Required metal construction parts:
- gate canopies – 2 pcs.;
- hinges, latch for gate;
- loops for a padlock (if the gate will be closed from the outside).
Manufacturing and installation process
In order to make wooden gates with your own hands, you will need careful preparation. Only after drawing up a design diagram and collecting the necessary materials and tools can production and installation begin.
Installation and erection of poles
Pole installation steps:
- Clearing the site and determining the location of the holes.
- Digging holes with a drill or bayonet shovel to a depth of at least 1 meter, with a diameter 10 cm larger than the post.
- Cutting pipes with a grinder and inserting them into prepared holes.
- Filling the gaps with crushed stone.
- Checking the verticality of the support with a plumb line.
- Compacting crushed stone to strengthen the foundation.
- Mixing a liquid solution (1 part three hundredth cement to 3 parts sand).
- Pouring mortar into holes. Wait for it to dry completely.
- Covering supports with bricks. If you add washing powder to the solution when laying, this will prevent the composition from settling. Check the correct angles periodically with a plumb line.
- After installing the pillars, their tops are equipped with caps (finished or cut from galvanized steel). This improves drainage characteristics and looks aesthetically pleasing.
- After drying, the stacked brick rows are embroidered.
Parts of wooden supports that will be underground must be treated with water-repellent resin or bitumen mastic to prevent destruction.
The gates are mounted on supports. Therefore, they need to be installed correctly, securely, with rigid fastenings. For normal functioning of the structure, sagging is unacceptable. To prevent violation of the gate geometry, it is important to maintain the perpendicularity of the supports in relation to the ground. Strengthening them with half a brick will prevent the pillars from skewing. This width must be taken into account when drawing up the preliminary drawing.
Instead of wooden poles, you can install metal, brick or concrete supports. As an additional stiffening rib at the top of the support, it is recommended to fasten it with a horizontal beam.
Construction of the frame
The basis for the frame can be made of wood or metal profiles. In the second case, you will need a welding machine to connect the parts. If the gate frame is made of wood, the timber is cut into the required parts and laid out on level ground in the shape of the future gate. After checking the verticality and horizontality, holes are drilled in the beams. The parts are fastened with self-tapping screws. It is fashionable to further strengthen the center and corners with the help of a cross beam and metal corners. Beams for reinforcement are attached crosswise across the frame at an angle of 45 degrees.
For fastening, you can take self-tapping screws or use dry wood dowels. The pins must first be coated with epoxy glue. To secure the sheathing, an additional jumper is installed in the center of the frame. Jib beams are attached in the corners - 30-40 cm bars. When erecting a frame, its size should take into account the protrusion of the sheathing boards by 20-25 cm. It is convenient to assemble and sheath it in a horizontal position on the ground.
Manufacturing of sashes
The sheathed frame must be hung on installed supports. After preparing the sashes, metal hinges are attached. They are hung on a frame or on support posts. The optimal location of the loops is calculated in this way. A distance of ¼ of the total height is marked from the top and bottom of the support. After marking, lancet hinges are attached on which the sashes are installed.
The lower edge of the gates must be at least 5 cm away from the soil. Otherwise, fallen snow or formed ice will prevent the gate from opening. To prevent the doors from opening from the wind, they need to be adjusted. When marking fastening points, it is advisable to use a level.
Gate installation
Before installing wooden gates, the hinges are screwed to the leaves. At the same time, the capcaillie are inserted. Before screwing in the bolts, holes are drilled to a depth of several centimeters in pre-marked areas. Their diameter should be less than the diameter of the screw. This trick will make it easier to screw in the bolts. It is important to maintain a distance of 5 cm from the ground to the sashes. After installation, the closed sashes are secured with a padlock or a metal pin. The coating is applied to the wooden surface after installation of the gate structure.
Sheathing of the structure
The frame is covered with boards, slats or picket fences. The elements are fastened to the base with self-tapping bolts. Various options for fastening elements are used. For example, a picket fence is attached vertically without gaps, or boards with a gap diagonally.
Sheathing elements are cut to the required dimensions in the required quantities. Pine boards are often used for cladding. This type of wood is most protected from climatic influences. After trimming, the elements are planed on all sides and attached to the frame.
When installing gap boards, a piece of wood is used as a template. The rail is taken to be equal to the length of the board and the width of the gap step.
The boards secured with self-tapping screws are cut in a straight line. The cut area and unevenness on the surface are sanded with sandpaper. The edges of the sashes can be insulated to provide a better seal and better thermal insulation.
Impregnation and coloring of wood
The installed sashes must be coated with a primer, antiseptic solution, and varnish. Wood coating products must be designed for outdoor use. Sequence of processing work:
- Sanding wood with sandpaper or a sander, including sanding the side surfaces.
- Seal the pores with putty and sand again after drying.
- Tinting to reveal the shade and texture of wood.
- Applying primer.
- Coating with the first layer of varnish.
- After drying, apply a second layer of varnish.
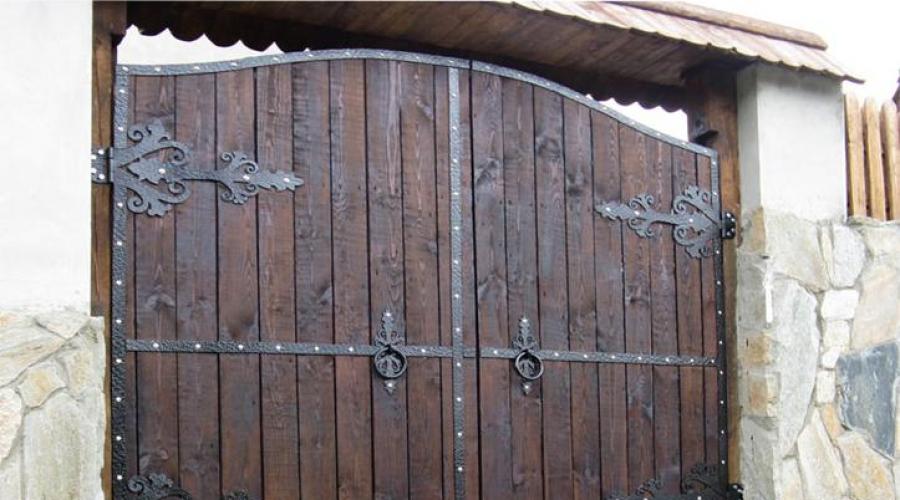
If iron forging is used as decor, the decorative elements are attached before grinding and painting. To protect the wooden panel during the fastening of forged parts, a thin sheet of tin is used. After varnishing, the joints between iron and wood are treated with sealant.
Finally
To make and install wooden gates yourself, you will need minimal skills in working with construction tools and your patience. All steps are simple and can be done with your own hands if desired. Like any construction work, a high-quality result is a combination of strict adherence to the recommendations of professionals, high-quality materials used, and accurate measurements. Wooden gates, like the face of your home, will last for many decades with proper care and periodic maintenance.
Wooden gates and wickets are the calling card of the owners of a country house. From the way a wooden gate looks, one can judge the owner’s tastes, his well-being and complaisance. The neater the gate with a wicket looks, the better the impression the owner makes on his neighbors and acquaintances.
Today we will tell you how to build wooden gates and wooden gates with your own hands. You can find photos of similar objects on the Internet, and some are also present in the article. Thanks to these photos, you can decide what kind of wooden gate you would like to make for your suburban area.
Wickets and gates with your own hands, of course, can be made not only from wood, but also from other materials. Here the choice is yours, which suits you more. But if you do not have experience, and you are planning to make a gate with a wicket with your own hands for the first time, then it is better to choose wood, because this the material has a number of advantages:
- the tree is unpretentious in terms of processing;
- availability of material;
- ease of use;
- finished wood products always look elegant and beautiful.
Below are several photos of samples of what wooden gates and gates can look like, and how you can decorate them with your own hands.
We select tools and tools for the job
Almost anyone can make a wooden gate or gate with their own hands, even without such experience. However, before you get to work, you need prepare the following set of tools:

In addition to the tools, we will need the following to install wooden gates and wickets with our own hands: Construction Materials:
- wooden beams with different sections for pillars and frames;
- slats or picket fences for covering the frame;
- metal bolt;
- awnings;
- loops.
Preparatory work before assembly
 Before purchasing lumber, be sure to decide what height your gate will have and what the size of the gate will be. Remember that for reliability, support pillars need deepen into the ground about a meter.
If you want to build a gate “for centuries” with your own hands, it is better to make the supports not from wood, but from concrete, brick or metal. And in order to maximize the service life of wooden poles, before installation they are impregnated with an antiseptic, and the underground part with resin or bitumen mastic.
The area for installing gates and wickets must also be prepared in advance:
- remove large stones;
- loosen hard clods and level the soil;
- if necessary, mark the placement of supports using a cord stretched between the pegs.
It will be very difficult to install poles with your own hands, so It is advisable to invite an assistant so that the pillars can be held and concreted at the same time.
The shutters are hung on the gates only after the concrete has completely dried, and the supports at the top are best fastened horizontally with a common beam, which will prevent the pillars from warping under the weight of the shutters.
How to properly install wooden posts
The pillars are installed in this way:
- Using a drill, we dig a hole a meter deep;
- the distance between the planes of the pillars placed “facing” each other should be slightly greater than the width of the gate, this is within the range of about 120 cm;
- pour 5 cm of sand into the bottom of the hole and spill a lot of water for shrinkage;
- add 5 cm of crushed stone;
- we burn the underground part of the pillars with a gas torch or blowtorch, or you can treat the entire pillar with an antiseptic to protect it from rotting;
- Place a pole along a plumb line, fill the hole with crushed stone and compact it;
- the base must be filled with liquid cement mortar and sand. The stronger the solution, the faster you can start installing the gate.
Assembling gate leaves
 Swing gates include two doors and a gate, which needs to be placed on the side of the doors or be one of its parts. Depending on your project and dimensions, you need to make a frame.
To assemble the frame of the doors, you need to cut pieces of timber of the required length with a jigsaw. The wooden quadrangular frame is fastened with wooden nails by drilling holes in the ends of the beams, into which the treated dowels are inserted.
When the frame frame is ready, use galvanized self-tapping screws to attach the jumpers that are located horizontal or diagonal.
How to make a wooden frame for a gate
To assemble a gate with your own hands, you must first assemble its base. First, install the frame, then cover it with slats, which will create rigid triangular platforms that are needed to counteract the wicket's sagging and deformation.
The bars are laid out over the entire flat surface, then markings are being made. Cut to the correct length that matches the length of the gate and check the frame for placement. We connect all parts of the wooden frame; they will be fixed using slats. If there are burrs or uneven surfaces on a wooden panel, they can be corrected with a plane.
Features of the wicket covering
The gate can be made solid or lattice. If you want a solid one, then wooden boards with slats are placed on the frame, then cutting lines are drawn. If the gate has a semicircular shape at the top, you can use a compass to make marks.
And to make a lattice wooden gate, each slat is cut individually using a ruler or tape measure. Cuts must be made as smooth and clear as possible. And in order to assemble all the structural elements at the end, it is advisable to take special wood screws.
Features of installation of fasteners and valves
 The last stage of our work is the installation of fasteners and valves. So, the canopies need to be attached directly to the frame.
Check that the gate can close securely. If it opens on its own, it means something was done wrong. Fix the problem and you can install door latches and hinges.
To fasten gates and wickets, it is best to use factory fittings made of stainless steel or anodized.
To attach the gate to a brick post, you need to leave two hinges on the outside during its manufacture. And the overhead part of the hinge must be attached to the horizontal crossbars on gates or gates using bolts.
To attach a wicket or gate to a post made of metal, asbestos cement or concrete, you need to use a suspension unit from a hook, clamp and nuts. To hang wooden gates with your own hands, you need two such knots.
Gate valves for wooden gates
 As a latch for wooden gates, you can use a simple beam, which at one end needs to be inserted into an eye on one post, and at the junction of the leaves you need install two brackets. At the end, the beam must be inserted into the eye of the second post. The gate can be completely closed from the inside using a padlock.
If you want to provide a more rigid connection between the gate leaves or one part with a wicket, then you can take sections of galvanized pipes, but they must be of different diameters so that one can fit into the other:
- the length of both segments should be equal to 20 cm;
- the diameter should be approximately three quarters to one;
- a cut welded into the holder will serve as the handle of the valve;
- and the clips themselves need to be fixed on the horizontal crossbars using clamps based on steel rods.
If you want to put a lock on the gate, next to the latch handle need to put a loop, you can take the same rod as for the clamp. It is important that the locking shackle can also cover the latch handle.
The valve can also be equipped with a unit that will fix one leaf closed. If the gate is equipped with a frame, the unit is attached to it; if not, then the pipe is driven into the ground and a clamp is attached to it.
To make gates and gates look more attractive, they can be painted. First, they need to be treated with an antiseptic solution, and then coated with external varnish. It is best to use yacht varnish that has a polyurethane base; it is more durable compared to cheaper analogues. The surface should be covered at least two coats of varnish.
As already mentioned at the beginning of the material, the advantage of wood as a building material is its affordable cost, the speed of manufacturing products based on it, and the minimum number of tools used for processing wood.
Of course, all this makes wood the most common building material used in suburban construction work. From the photo we can also see the aesthetic side, because wooden gates look very beautiful and attractive.
But along with the obvious advantages, wood has its drawbacks as a building material:
- short service life of wooden products. Thus, gates and gates made of wood can last no more than 5 years, it all depends on temperature changes and weather conditions;
- high level of fire danger;
- wooden gates are not too serious an obstacle for thieves who want to get into your property.
Of course, in the photo, wooden products are very attractive, but wooden gates will not be durable and are not always practical. Everything is at your discretion, and if you are not afraid and want to equip your yard with wooden gates with a gate, you can safely get to work.
Do-it-yourself wooden gates and wickets
