Which putty to choose for drywall: selection and finishing of the coating. How to putty plasterboard for painting: correctly putty plasterboard walls for painting Is it possible to putty plasterboard with cement putty
Read also
Putty is a building material that is used to level walls and hide defects (grooves, cracks, seams, gaps). This article describes: what finishing putty to choose for drywall before painting and what primer to choose for drywall before puttying.
Manufacturers produce it in two forms: dry powder or ready-made mixture in a container. They are also distinguished by composition: universal, cement, gypsum, polymer, finishing.
| Type of putty | Main features |
|---|---|
| Plaster | The main component is gypsum. The color is snow-white, different - elasticity. Easy to use and can be sanded without any extra effort. Not moisture resistant. Suitable for rooms with minimal humidity. |
| Cement | Cement based. Moisture resistant, used for rooms with high humidity. Not afraid of temperature changes. Suitable for interior and façade walls. |
| Polymer | eliminates errors on the walls. Most often used for finishing work. Suitable for painting. |
| Universal | Compared to the above putties, it has high strength. Easy to sand. The finished walls are painted. |
| Finish | Copes well with minor defects at the finishing stage. The applied layer should be thin. It is allowed to apply 2-3 layers, but after each application the surface should be dried. Layers should not be more than 2 mm. Otherwise, cracks may occur. The finished surface is smooth and does not require sanding. |
What kind of putty should I use to putty? How to choose putty? (video)
Dry mixture or solution?
Before you begin the repair, you need to decide on the putty. Which is better, ready-made or dry? In order to understand, let’s consider and compare both types.
The dry mixture has the consistency of white powder. In order to obtain the finished solution, it must be mixed with water. The proportions are indicated on the manufacturer's packaging. The advantage of the dry type: you can choose the consistency yourself. You need to mix it right before applying it to the wall, using a construction mixer.
Tip: to get a small amount of material, you need to knead in small portions. The dry mixture is stored for a long time.
In terms of pricing policy, it is a budget option. There are also negative aspects: manufacturing requires extra time. The solution should be mixed only according to the instructions. Otherwise, it may not work. The solution must be applied quickly, as it can be stored for a couple of hours in its finished form.
The finished mixture is produced in buckets of different volumes. The main components are latex or innovative substances. They cost an order of magnitude more than dry ones, but do not require time to prepare. Once opened, it can be stored for a long time. There are acrylic, latex, and decorative putty. Apply to walls using a spatula.
Gypsum mixture is an ideal solution for drywall
Today, all construction markets have a large selection of putties. But not all of them are ideal for working with gypsum boards. Which putty should I choose for drywall, Kanuf or another? After all, the further quality of drywall depends on the selected material.
Probably everyone knows that plasterboard boards contain gypsum, which is the main material. This means that gypsum putty is perfect for working with them. One should take into account the fact that gypsum material does not like moisture. Therefore, special moisture-resistant substances should be added.
Plastering a plasterboard ceiling for painting can be done with different materials, but which one should you choose? High-quality work requires two types of mixtures. The first serves to eliminate seams, cracks, and joints between sheets. The second is to level the entire area at the finishing stage. Coarse-grained material contains the first type, fine-grained material contains the second, finishing type.
Some manufacturers produce a universal type that does all the work. One such manufacturer is knauf. You can find out which putty to choose for drywall on the ceiling from the video. Now you know which putty to choose for drywall.
Features of cement putty
Cement mixture is considered the best sealing material for seams, cracks, and joints. Moisture resistant, used in rooms with any humidity. Not afraid of temperature changes. There are several types of cement mixture:
- Decorative;
- Sokolnaya;
- Facade;
- Thermal insulation.
Produced in dry and liquid form. Suitable surfaces: wood, concrete, drywall, brick.
Polymer putty is the key to a durable finish

Craftsmen prefer polymer putty. It is elastic, even a beginner can handle it. The shelf life is 12 months. You don’t have to rush when working; it stays open for 24 hours. Adhesion to wood, concrete, stone. After drying it does not crack. Moisture-resistant, putty on the bathroom, kitchen, balcony. Suitable for painting and wallpapering. There are different types of mixture:
- Acrylic;
- Latex;
- Two-component with additional substances;
- Polyester.
Thanks to such a variety of putties, everyone will choose the one they need.
Drywall puttying technology

To get started you need:
- Stationery knife;
- Roller;
- Brush;
- Large, small spatula;
- Mesh or sandpaper;
- Putty mixture;
- Primer;
- Duct tape.
The work consists of the following stages:
- Priming the seams, sealing with adhesive tape.
- Applying putty to joints and screws.
- After drying, a second layer of material is applied.
- Grouting with sandpaper.
- Prime the surface using a roller.
- Apply the mixture in a thin layer.
- If necessary, prime and putty again.
- Sanding with mesh or sandpaper.
The surface dries after applying the material.
Types of putty
There are a large number of types of products that have certain quality characteristics. They differ in the methods of application and application.
There are two types of putty: starting and finishing, I use the first at the first stage, and the second is applied after drying on top.
Putty for gypsum board joints can be starting and finishing. They are used at certain stages of finishing work. There are also differences in their structure and technical properties.
The composition of the putty can be of the following types:
- cement;
- polymer;
- plaster.
The methods for applying them are almost the same. The difference will only be in the structure and operational characteristics.
How to putty drywall?
After all the main installation work has been completed, it is time for finishing work. the most scrupulous and requiring a lot of attention and patience.
Before the surface is painted or decorated with beautiful wallpaper, it is puttied; this is necessary in order to get rid of minor defects and to ensure easy removal of the wallpaper during the next repair.
It is very important to remember the order of putty - work on the walls begins only after putty work on the ceiling.
At the first stage, they get rid of all the seams between the gypsum boards, which arose both due to natural boundaries and as a result of cutting the sheets, for this purpose special gypsum plaster is used, after filling the seam, a reinforcing tape is glued over the solution, which prevents the appearance of new cracks as a result of vibration.
The outer corners are protected using a perforated steel corner; it is attached to the gypsum board with several self-tapping screws, after which it is covered with the same gypsum plaster.
If there are large enough gaps at the internal corners, then a plastic corner is used to cover them. fixed with a stapler.
When these preparatory works have been completed, the surface is primed and after the primer has dried, a starting putty is applied. it has a larger grain size and a grayish color; with its help, minor defects are removed, and, if necessary, several layers of starting are applied.
After drying, a thin layer of finishing putty is applied. the spatula should not have defects, as they may remain on the solution. The dried surface is treated with sandpaper or mesh until ideal evenness is achieved.
Also watch the video with expert advice on puttingtying drywall.
We distinguish between types: putty for drywall
How to choose putty for drywall? Putty for drywall has its own varieties, which must be known and distinguished not only by a professional drywaller. If, while doing renovations at home, we decide to level a wall or assemble a gypsum board box, finishing work awaits us. In order not to trust this matter to professionals and save your home budget, it is better to do the work yourself, knowing about the types of putty mixtures.
Puttying walls made of gypsum plasterboard is one of the types of finishing the formation of the wall surface, that is, its leveling. Regardless of the soil of the plasterboard surface, the putty must be applied in one or several layers. Some types of work require several stages of putty, and therefore it is simply necessary to putty a plasterboard wall at least once.
Putty is a special material for this type of work, which is a universal composition with the ability to harden quickly. Putty is intended for leveling walls and, at the moment, it is simply impossible to exclude it from some works. Since puttying of plasterboard walls and other surfaces occurs before the final finishing of the wall with decorative finishing materials, such as paint or wallpaper, putty is applied to the walls not only to level the surfaces, but also to increase its adhesive properties.
To decide which type of mixture is best for you and which variety to choose, for example, for moisture-resistant gypsum plasterboard, you need to know the selection criteria.
Putty can be sold in two versions - dry (powdery), which is diluted according to the instructions before applying to the wall, and ready-made - a gray or white mixture of approximately creamy consistency, which can be used immediately.
The choice of product depends on the following factors:
- room humidity;
- type of subsequent finishing;
- skill of a repair specialist.
The latter plays a significant role, since inexperienced finishers are recommended to use polymer putty mixtures. They are much easier to apply and level on the surface.

Finishing the ceilings and walls with plasterboard made it possible to simplify the leveling processes to a minimum. But, as practice shows, even such even and smooth material must be brought to a certain degree of evenness. Therefore, puttying drywall is a necessary and even paramount process when it comes to finishing it with painting or wallpapering.
First of all, the plasterboard surface is treated with a primer using a roller. After drying, the putty is applied to the entire surface of the plasterboard structure in a not very thick layer. It is important to equalize the differences here. As practice shows, one layer is always enough to get rid of defects.
Two spatulas are used to apply putty to drywall. Using a narrow tool, the solution is lifted out of the container where it lies. Then it is applied to the work surface with a wide spatula. Here it is important to stretch the mixture along the working edge of the tool. After that, the solution is applied to the drywall with a wide spatula. Most often, craftsmen use transverse application of the material. Although in this regard, it is as convenient for anyone.
Putty for drywall has its own varieties, which must be known and distinguished not only by a professional drywaller. If, while making renovations at home, we decide to level a wall or assemble a gypsum plasterboard box, finishing work awaits us. In order not to trust this matter to professionals and save your home budget, it is better to do the work yourself, knowing about the types of putty mixtures.
Puttying gypsum plasterboard walls is one of the types of finishing the formation of the wall surface, that is, its leveling. Regardless of the soil of the plasterboard surface, the putty must be applied in one or several layers. Some types of work require several stages of putty, and therefore it is simply necessary to putty a plasterboard wall at least once.
Putty is a special material for this type of work, which is a universal composition with the ability to harden quickly. Putty is intended for leveling walls and, at the moment, it is simply impossible to exclude it from some works. Since puttying of plasterboard walls and other surfaces occurs before the final finishing of the wall with decorative finishing materials, such as paint or wallpaper, putty is applied to the walls not only to level the surfaces, but also to increase its adhesive properties.
Putty can be sold in two versions - dry (powdery), which is diluted according to the instructions before applying to the wall, and ready-made - a gray or white mixture of approximately creamy consistency, which can be used immediately.
Manufacturers usually indicate in the instructions how to prepare the composition. Standard packaging - 25 kg bag. It is recommended to add 2 liters of water for every kilogram of mixture.
Experts say that the best putty for drywall is a gypsum mixture. This material is based on natural components and fillers that improve the characteristics of the mixture. This is a natural project, absolutely harmless and, so to speak, “understandable” to the buyer.
Among the advantages of gypsum putty:
- It does not shrink;
- The material lends itself well to leveling;
- This putty dries out quite quickly;
- It's easy to make a solution - you just add gypsum to water in the right amount.
As you can see, the properties speak for themselves, which forces masters to make a choice in their favor.
But gypsum putty also has disadvantages - and, above all, it is poor water resistance. The fact is that gypsum quickly absorbs moisture. And when it dries again, the coating will crack.
Finishing putty for drywall
The finishing putty should be applied in a layer of up to 3 mm, or rather 1-3 mm. Here, the choice is richer. Both dry polymer putties and ready-made putties in buckets are suitable.
To be honest, I don't like ready-made putties. Firstly, they have an expiration date, secondly, I don’t know how they were stored, and thirdly, ready-made putties interfere in factories, which means the quality of the putty can vary from series to series. Still, for the second layer , it is better to choose a dry putty designed for a layer of up to 1 mm. It is called finishing polymer putty or simply finishing putty.
Recommendation 2. For the finishing layer when puttingtying a plasterboard surface, we buy dry polymer putty, for example, Weber-Vetonit LR. (pay attention to the letters) or ready-made putty in buckets (for example, vinyl-based Rotband Pasta putty).
Puttying and sealing plasterboard joints is not complete without the use of starting and finishing mixtures. The first is the basis for further surface treatment. It has a dense structure with large fractions of the feedstock.
The finishing putty is applied to the pre-dried layers of the starting putty. It is subjected to subsequent processing with fine-grained sandpaper. Unlike the starting putty, which is made only in powder form, the finishing putty can be of several types - solution and powder.
As practice has shown, the products are distinguished by their practicality. Which putty should I choose for drywall? The solutions are ready for use and do not require additional dilution with water. A certain amount of liquid must be added to the powder, which is indicated on the product packaging.
Which putty should I choose for drywall?
Today you can find any mixtures in construction stores; you can use either ready-made putty or a mixture that still needs to be diluted. The ready-made mixture is good if you are sure that you bought it and immediately run to putty the wall. But if repairs have to be delayed, or the mixture must be used in doses, such a product will not work - it will quickly deteriorate.
![]()
According to the type of binding element, putty mixtures are:
- Plaster;
- Cement;
- Polymer.
All three types of compositions are suitable for puttying, but it is very important to know the conditions of the process - where to putty, what exactly, under what conditions, etc. For example, in certain rooms only moisture-resistant putty is needed. Of course, a lot depends on financial capabilities. There are recognized brands, for example, building materials from the Knauf brand, the quality of which goes without saying. But little-known brands can also be of a good standard, so the choice becomes even more complicated.
Some people believe that it is not necessary to putty the entire drywall, especially for wallpapering. since they will hide all defects, however, this is not wrong.
The next time you need to change the design and put up new wallpaper, you will find that it is almost impossible to remove. after all, in essence, paper was connected to paper.
It is pointless to wet it with water, just as it is pointless to rip it off with a spatula, since the surface of the plasterboard is quite soft and as a result, dents will remain from the tool.
One of the most commonly used materials for interior decoration is plasterboard, which allows not only to level walls, but also to create partitions, niches and other structures in the shortest possible time. However, it is not enough to just build the required structure; it also needs to be brought into decent shape. As a rule, plasterboard structures are finished with the same materials as load-bearing walls: painted or covered with wallpaper. And if previously light paper wallpaper was used, which was often glued overlapping, today the use of modern materials requires special attention to the smoothness and evenness of the wall surface being finished. Therefore, we suggest considering how to putty drywall with your own hands. Step-by-step instructions will be presented below.
Why putty drywall?
Despite the fact that drywall has a fairly smooth surface, before finishing it, it is necessary to smooth out all the flaws that formed on the material during installation. In addition, you will need to seal the joints of the sheets both along the wall area and in the corners. For this, two types of preparatory finishing are used: plastering and puttying.
Plaster is a rougher material and is used to level the surface of large defects, so it is usually used on concrete walls. The putty has a fine-grained structure, which allows you to almost perfectly level the drywall for finishing. This point is most important during subsequent painting and wallpapering. If the wall does not have a perfectly smooth surface, the wallpaper will begin to peel, and even the slightest irregularities will be visible on the painted drywall.
In addition, do-it-yourself putty on walls (plasterboard) provides additional protection, which is important during finishing. For example, if you paste wallpaper directly onto gypsum board, there is a high probability that it will swell from the glue and the new wallpaper will be warped. In addition, when changing the finish, you are guaranteed to remove not only the old material, but also a layer of drywall.
Features of puttying
The puttying process is quite complex and requires special care and thoroughness. Therefore, many people prefer to order these works from professionals. However, in order to save money, you can perform a procedure such as puttying drywall with your own hands. To do this, you just need to be patient and learn some of the subtleties of surface treatment in each specific case. And also master basic puttying techniques, since puttying drywall under wallpaper, done with your own hands, differs from work on preparing a wall for painting. This must be taken into account.

Puttying joints and corners deserves special attention, since this work requires preliminary laying of sickle tape (a special building material for strengthening seams). It will prevent the appearance of cracks that may appear from vibration or expansion of drywall under the influence of moisture.
Material selection
Today there are quite a large number of different ones on the market that differ in structure: coarse-grained starting and finer-grained finishing.
The starting one, the price of which is the lowest of all the options, is used to level out unevenness with surface differences from 0.5 to 2 cm. Therefore, it is practically not used for drywall. As a rule, this material is immediately coated with finishing putty, which has a finer-grained structure. With it you can immediately level the surface to a perfectly smooth state, suitable even for painting. However, in case of improper installation of drywall or visible damage, it is recommended to first apply a layer of starting putty and wait for it to dry completely. Then prime and then treat the surface with a finishing agent.
Varieties
In addition, they make a difference in the composition of the putty. It comes in gypsum, cement and polymer bases. Depending on the room in which the repair work is being carried out and the operating conditions, the most suitable finishing product is selected. Each type has its own advantages and disadvantages:
- Gypsum putty has a very fine structure, so it is often used as a finishing material. However, the use of this material in rooms with high humidity is not recommended, since this composition absorbs moisture from the air well, and in this case even priming the surface will not help.
- For areas constantly exposed to high humidity, it is preferable to use cement-based putty, which is very resistant to such exposure. In addition, this type is characterized by high strength and durability of the coating.
- The polymer type is the most plastic and is best applied to the surface, so putty is most often performed with this material.
Which putty is better to use?
Another difference in the material is the form in which it is sold. There are two options: dry mixture in bags and a ready-made solution, similar to sour cream, in buckets.
On the one hand, the most convenient is ready-made putty, which can be applied without prior mixing. While preparing a dry mixture requires certain knowledge and skill.
On the other hand, the ready-made solution is 1.3-1.6 times more expensive. Therefore, it makes sense to carefully select the material. It should be borne in mind that cement putty is produced only in the form of a dry mixture due to the peculiarities of its composition.

If we talk about drywall, then in living rooms it is preferable to use gypsum putty, and in rooms such as a bathroom, kitchen or bathroom - polymer.
How to putty drywall: step-by-step instructions
Before starting work such as puttying drywall with your own hands, the base must first be thoroughly cleaned of dust and dirt after installation work. If there are material peelings in some places, they must be removed and cleaned with fine sandpaper. Also, do not forget to check how the screws are tightened. Ideally, they should be slightly recessed into the sheet of drywall and not protrude above the surface.
After this, the surface is primed, leaving no untreated areas. In this case, it is best to apply 2-3 layers of primer. This is necessary for good adhesion of the material. When applying the composition, it will not only additionally clean the surface of dust, but will also saturate the pores of the drywall. After applying each layer, the primer must be left until completely dry. Drying time can be found on the packaging of a particular product.
By the way, it is worth knowing that the technique of putting drywall with your own hands involves finishing the entire surface of the wall. You should not skimp on building materials and only process corners or joints. Subsequently, when painted or uncoated drywall will stand out strongly.
Preliminary preparation of drywall
At the next stage, it is necessary to repair all more or less noticeable depressions on the surface of the drywall. These include holes from unsuccessfully screwed screws, damage received during installation, and other defects. For these works, a small spatula is usually used.

You can also putty drywall joints with your own hands, and it is preferable to choose a composition specifically designed for these purposes. First we lay the serpyanka tape. To do this, tape is applied to the putty, previously applied to the drywall, and covered with another layer of the compound. After which the material is carefully leveled with a wide spatula and further puttying of the drywall is done with your own hands.

The corners are processed in a similar way, the only difference is that special plastic or metal corners are used for these joints. They will protect the edges of the drywall from mechanical damage. This is especially true for external corners, such as partitions or niches. For internal corners, if the sheets are tight and there are no large gaps, it is permissible to use the same sickle tape.

Applying putty material to the wall
In order to properly apply putty to the surface, two types of spatula are used: the material itself is applied and leveled with a large spatula, a small one is used as an auxiliary tool.

If it is initially intended to apply starting putty, then, depending on the condition of the drywall, it is applied in a fairly thick layer within 0.5-2 cm. If a thicker layer is required, theoretically it can be done in two stages. However, the cost of such repairs will be quite expensive. Therefore, it is better to use plaster for the first leveling layer. This material is much cheaper.
In any case, the first layer must be left until completely dry, after which it is primed and dried again. Then you can apply the next leveling layer. Do-it-yourself starting drywall putty is done until the surface is as smooth as possible. After this, it is dried and primed.
Features of applying finishing putty
After a layer of starting putty (if it was necessary), the finishing composition is applied. This work is more painstaking, as it is done in layers of literally a few millimeters. The finishing putty is applied very carefully and in small portions. Level as much as possible and dry. Then you need to carefully check the smoothness of the surface. The fact is that sometimes small bumps remain or, when drying, the material, on the contrary, collapses somewhat. It is permissible to cover the depressions with some more of the compound; the bumps can be removed quite easily with fine-grained sandpaper.

Once a perfectly flat surface has been achieved, it must be sanded with zero grade sandpaper until it is completely smooth.
Ceiling treatment
Plastering the ceiling is considered a particularly difficult undertaking, which is recommended to be carried out using a polymer elastic putty. Despite the fact that the material is quite plastic, applying the composition to a horizontal surface will require a lot of effort. Puttying is performed with smooth movements towards you. This process is quite complicated for those new to construction. Therefore, it is better to first watch how someone else puts up a plasterboard ceiling with their own hands. A video of professionals working will clearly show all the nuances of this procedure.

All preliminary and subsequent operations, such as sanding, are carried out in the same way as in the case of a vertical surface.
How to putty for different finishes?
There are several nuances of processing drywall, which depend on the subsequent finishing of the walls:
- If you subsequently plan to stick light paper wallpaper, puttying the drywall under the wallpaper yourself must be done especially carefully, with the obligatory leveling of all defects. Otherwise, after finishing work, all flaws will appear on the material.
- For heavy wallpaper, on the contrary, it is preferable to use only the starting putty, which will create a rough coating. It will be easier to stick wallpaper on this base due to good adhesion of the material.
- The most difficult thing is to putty drywall with your own hands before painting; in this case, the surface is smoothed to an ideal state. Professionals even use a lamp for this purpose, under the light of which they reveal the slightest flaws in the coating.
Despite the perfectly flat surface, drywall must be puttyed before any type of finishing in order to hide the joints and improve the adhesion of the base, reduce the consumption of finishing materials - paint, wallpaper glue, glue for decorative tiles, etc. And here a reasonable question arises: what putty to choose for drywall?
Putty is a building solution intended for leveling surfaces, which after hardening creates a durable layer on them that protects the base from external influences and facilitates subsequent finishing. Different types of work require different compositions, so it is impossible to say for sure which putty is best for drywall.
These materials differ in composition, purpose, and degree of readiness for use. To make the right choice, you need to understand these varieties.
Selection by purpose
The standard technology for finishing plasterboard structures consists of sealing joints, corner junctions and fastening points, after which the entire surface is leveled. It can be done in one stage if the walls are intended for cladding or wallpapering, and the sheets do not have obvious surface defects.
Or several - if perfect alignment for painting is required.
What kind of putty is needed for drywall in each of these cases:
- Starting or leveling - for sealing seams, deep cracks, chips, areas with damaged paper coating. These are coarse-grained mixtures intended for rough primary leveling. It can be any color from white to gray and brown.
- Finishing fine-grained putty is used to apply the final layer and smooth out minor defects. It is predominantly white, which allows you to use light shades of paint or thin wallpaper in the future without fear of the walls being visible through them.

- Universal putties have the functions of both starting and finishing compounds and can be used at any stage, including when leveling bases made of other materials. This is their main advantage.
You can purchase either a starting and finishing putty so that you can eliminate large defects and cover up seams first, and stretch out the entire surface with the second. Or simply use a universal composition for each stage.
Selection by composition
When choosing a putty, it is important to consider the conditions under which it will “work”:
- For dry rooms it is best to use gypsum-based compounds. They are not highly moisture resistant, but have good quality and no shrinkage when drying.

- For finishing wet rooms - bathrooms, bathrooms, kitchens - the instructions require the use of cement-based mixtures. They will protect the base from water and fumes, as well as from various mechanical damage.
Note. When drying, cement putty shrinks and may develop cracks that require repair before finishing.

- The easiest way to work is with polymer putty, which has a wide range of applications, excellent moisture resistance, strength, no shrinkage and ease of application. Its only drawback is its high price compared to the types listed above, which leads to a significant increase in the cost of rough finishing.
Selection by readiness for use
There are materials on sale for leveling plasterboard walls in the form of a dry mixture, which must be diluted with water immediately before use, and in finished form, which requires only thorough mixing. Each of them has its own pros and cons, so you will have to decide which putty is best for drywall.
So:
- The main advantage of dry powder mixtures is their low cost. The downside for inexperienced finishers may be the need for independent preparation using a special tool (construction mixer or drill with an appropriate attachment) and difficulties in determining the optimal consistency.
Disadvantages also include the rather rapid hardening of the finished solution. Nevertheless, many masters prefer just such compositions. - The finished putty can be used immediately, you just need to mix it until smooth. In a hermetically sealed container, it does not harden for a long time, maintaining elasticity and other properties; it is not afraid of long breaks in work. But you will have to pay more for such convenience.

How to properly prepare putty from a dry mixture
If the question of which putty to putty on drywall has been resolved for you, and you have chosen a dry mixture, it is important to prepare it correctly.
As a rule, each manufacturer prescribes on the packaging recommendations for preparing a putty solution. The standard proportions are approximately the same for everyone: 2-2.5 liters of water are added for every kilogram of powder. Usually the solution is prepared in a large bucket from half a bag of putty (25 kg bag) and 30 liters of water.
But it is difficult for a beginner to use up such an amount in the half hour during which the solution retains its viscosity and elasticity. And weighing the powder is quite problematic.
Therefore, masters use the following method:
- Pour water into the mixing container, the temperature of which should be about 25 degrees;
- Carefully pour the dry mixture into it so that it gradually pours into the center of the bucket, and does not “splash” in a heap;
- When a hill of powder appears above the surface of the water, continue pouring so that it grows by 1/3 of the height of the liquid;
- Wait until all the powder is saturated with water and settles, after which the mixer is immersed in a bucket and the putty is kneaded at a speed of 500-600 rpm;
Note. Do not increase the speed of rotation of the mixer, otherwise the mixture will be saturated with air bubbles.
- After mixing the putty until smooth, leave it for a couple of minutes, then mix again and use immediately.
To seal joints and rough leveling, the mixture must be thick enough. Its suitability is determined in a simple way: the solution is put on a spatula and it is lowered with the working surface down.
The putty should slowly slide off the tool, and not flow off it or fall in its entire mass.

For finishing work, a more liquid solution is made to make it more convenient to stretch it into a thin layer.
Conclusion
From the huge range of building mixtures offered on the market, without sufficient experience, it is difficult to choose those that will be easy and pleasant to work with, and the result will be satisfactory. Therefore, do not take risks by purchasing inexpensive and little-known putty; give preference to proven brands, among which the most popular are Vetonit, Fugenfüller or domestic Volma.
If this is your first time trying to putty drywall, first watch the video in this article to learn all the intricacies and nuances of the process.
3540 0 0
Putty for drywall: selection, preparation, application
Greetings, comrades! Are you interested in how and what to putty drywall? I will introduce you to my own rating of putties, the correct technology for their preparation and application, sanding and painting the putty surface. So, let's go.
How to choose
First, a few general questions and answers to them:
- Which putty is best for filling seams between sheets of drywall?
All main types of putties are fully compatible with this material:
- Cement;
- Plaster;
- Acrylic;
- Oil (on drying oil);
- Adhesive (on organic glue).
However, gypsum putty is usually used on drywall. There are several reasons:
- Low price material (from 10 rubles per kilogram of dry mixture). For comparison, ready-made acrylic putty costs 5 times more;
- Strength at the level of the gypsum plasterboard core, which greatly simplifies grinding;
If the sealing of the seams is noticeably stronger than the finishing sheets, after sanding the seams will inevitably begin to stand out on the plane of the walls or ceiling.

- The same coefficient of linear expansion when heated and the level of hygroscopicity, that of drywall. This means a minimal likelihood of cracks appearing at the seams due to fluctuations in temperature and humidity.
- What type of putty should I use to putty the fastening screws?
Same as seams.
However: if you need to seal several caps on a surface that has already been finished and painted white, use acrylic concrete putty, then the seal will not have to be tinted.

- Is it possible to putty drywall immediately with finishing putty, without applying the starting putty?
It is possible and necessary. Universal or finishing. The starting one is needed to correct relatively large surface defects, but in the case of finishing with plasterboard, this function is taken over by the gypsum board sheets themselves.

- What putty should I use for drywall in wet areas (bathroom, toilet and kitchen)?
Still the same plaster. Moisture-resistant cement or acrylic does not provide any advantages: the gypsum plasterboard itself will still remain hygroscopic, will swell and soften upon direct contact with water. Protection from moisture is provided by a fine finish.
Help: even moisture-resistant drywall does not tolerate prolonged moisture. It is called moisture resistant due to antifungal additives in the gypsum core material and the low hygroscopicity of the shell cardboard.
- What brands should you pay attention to?
Experienced finishers can argue endlessly about which putty is better. Here is my personal rating:
| Image | Name and features |
 |
ABS Saten: viability of the finished mixture is about 45 minutes, lumps do not form when mixed correctly, dries within 12-18 hours. |
 |
Eurogips Saten: the viability of the finished mixture is up to an hour, there are no lumps, but the seams dry for a very long time (more than a day). |
 |
Fugen from Knauf: The putty lasts for about half an hour; when mixing, small lumps often form. But the seams dry no more than 12 hours. |
How to cook
What is better to putty - we have decided. However, the result of our work will depend not only on the choice of putty, but also on its proper preparation. How to prepare finishing putty for drywall?
For mixing you will need:
- Wide capacity of 3-5 liters. I use a plastic jar of water-dispersion paint to prepare gypsum putty;

- Putty knife 10-12 cm wide.
The volume of a single portion of drywall putty is no more than three liters. If you prepare too large a portion, you simply won’t have time to process the material before it sets.
Mixing looks like this: you pour water into a container at the rate of 1 liter per 1.6 kg of dry gypsum mixture, and then fill in the putty, distributing it as evenly as possible over the surface of the water surface. After a pause of 3-5 minutes, when the plaster is saturated with water and swells, the mixture is thoroughly mixed.
As is customary, there are several very important subtleties that greatly influence the result:
- Never pour water into dry plaster mixture. The instructions are due to the fact that in this case you will get dry lumps at the bottom that cannot be broken up with the most thorough mixing;

- Before preparing a new batch of putty wash the dishes and all the tools. Otherwise, the seized lumps from the previous portion will, falling under the spatula, leave grooves on the finish and force you to apply an additional layer;
- Don't be lazy to measure the right amount of water and mixture. When cooking by eye, you risk getting a mixture that is too dry or too runny. In the first case, the result will be rapid setting and lumps, in the second, all the putty will drain from the spatula.
How to apply
Tool
How to putty drywall using a tool?
You will need:
- Steel spatula 10-12 cm wide (yes, the same one you used to mix the putty). You will use it to fill seams and recesses from fasteners;
- Steel spatula 30-35 cm wide for applying a covering layer that hides the reinforcement of the seams. You will also have to use it if you need finishing putty of drywall over the entire surface;

- Stationery knife for sewing seams;
- Scissors for cutting serpyanka (reinforcing fiberglass mesh).
Preparation of seams
It consists of three stages:
| Image | Operation description |
 |
Joining: the edges of adjacent sheets, cut in place, are chamfered to half the thickness at an angle of 45 degrees. Jointing will allow you to fill the seam with putty to the maximum depth, thereby making it stronger and reducing the likelihood of cracks. Jointing is not required for factory edges of the PLUK type (semicircular with the sheet thinning towards the edge). |
 |
Padding penetrating primer. It will glue the remaining dust, improving the adhesion of the putty. It is not necessary to prime the seams, but it is advisable. |
 |
Reinforcement: a self-adhesive sickle tape cut in place is glued along the seam. Thanks to the relatively large cell, it does not interfere with filling the seam. |
Puttying
How to seal seams with your own hands?
- First pass: Fill the seam through the serpentine using a narrow spatula. It is better to use oblique, crosswise movements rather than longitudinal ones: in this case, it is guaranteed that there will be no cavities left near the edges;
- Second pass: Apply the putty with a narrow spatula onto a wide one and cover the seam with sliding longitudinal movements. The texture of the serpyanka should be completely hidden, while the height of the seam relative to the surface of the sheet should remain minimal.

How to fill in depressions from self-tapping screws? Each hole is filled with two sliding movements of a narrow spatula in a crisscross manner. After the putty has dried (in small holes it dries in a couple of hours), the sealing will have to be repeated: the gypsum gives a small, but still noticeable shrinkage.
How to apply finishing putty on drywall if you need to cover the entire surface of the sheet (for example, so that the seams do not stand out)?
The technique is the same as when applying the second layer along the seam: the mixture is applied with a wide spatula to a narrow one and applied with sliding movements in a layer about a millimeter thick. In this case, the putty consumption per 1 m2 will be equal to one kilogram of dry mixture.
It’s easier not to try to get a uniform coating of constant thickness in one pass, but to successively apply two as thin layers as possible. During the second pass, the movements of the spatula change to perpendicular: this way there is less chance of leaving grooves and irregularities.

Grinding
How to rub putty on drywall? But nothing. Gypsum finishing materials are not rubbed down, but are sanded after complete drying: if you try to grout a wet coating, you are guaranteed to ruin its surface.
For sanding I use an oscillating sander; You can just as easily use a hand grater. Sanding is not done with sandpaper, but with grids: No. 80 for the first pass and No. 100 for the second.
A few subtleties:
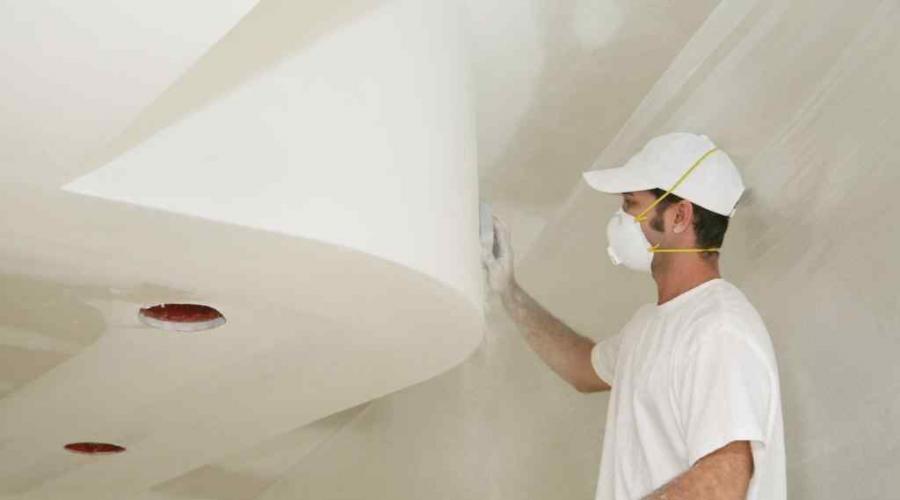
- Turn off and cover all consumer electronics with plastic. When sanding, dust will literally be everywhere;
- Do not neglect a respirator or gauze bandage and goggles;

- Sand under bright, oblique light. It won't let you miss any bumps.
Painting
Which paint to choose for gypsum boards? I like any water-dispersed one. Personally, I use latex, acrylic and rubber paints. The latter was used to protect against dampness in the bathroom: it is absolutely waterproof.

The photo shows the plasterboard walls and ceiling of the combined bathroom in my attic. To protect against dampness, they are painted with a “rubber” water-based emulsion.
The paint is applied in 3-4 layers. They are applied perpendicular to each other at least 2 weeks after filling. Hurry - get translucent seams.