What materials are needed for an attic roof. Do-it-yourself attic roof: drawings and stages of how to build an attic roof for a house. In addition to the advantages, there are also disadvantages
Read also
Using all possible space, giving the house originality and significantly reducing heat loss through the roof - these are the tasks that the attic solves. If there is a certain margin of safety at the foundation, in this way you can turn a one-story house into a two-level one. Another attractive thing is that you can build an attic roof with your own hands even without special construction skills. It is important not to make a mistake with the choice of materials and do everything according to the rules.
Windows on a regular floor are located in the walls. In attics there are no or almost no walls. They are replaced by a roof. That’s why windows are made special: they not only must let in sufficient light, but also withstand wind and snow loads, which are much greater on the roof than on the walls.
Dormer windows
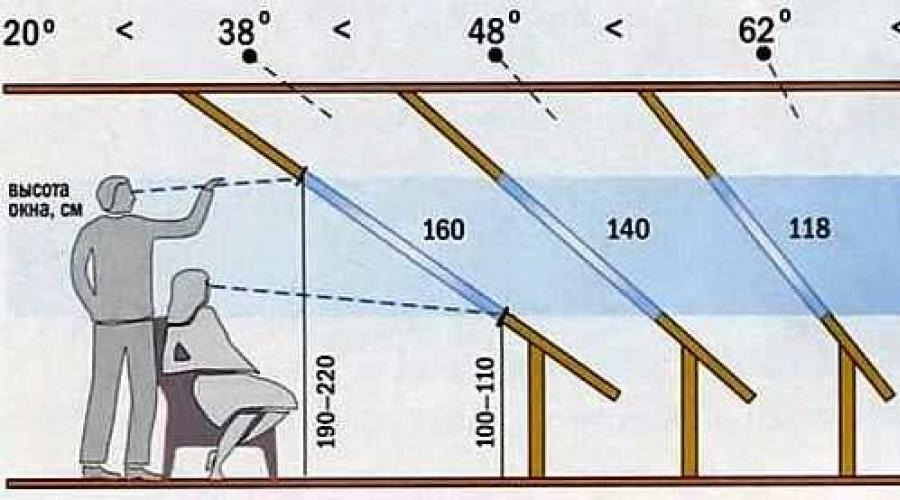
When planning an attic, you should take into account the recommendations of SNiP. They recommend making the window area no less than 10% of the floor area. So if the attic is divided into several rooms, each should have a window.
Of all the methods shown in the photo for installing skylights with an attic, inclined installation is the easiest to implement. In this case, it is necessary to ensure the proper degree of waterproofing of the junction, and also to use special models with reinforced frames and reinforced glass - the load on the surface can be significant.
Advantages of a sloping roof window:
- more light, less sharp boundaries of light and shadow;
- the roof surface remains flat, its relief is not complicated;
- relatively easy installation.
When planning such a window, it is necessary to remember that its area increases with increasing angle of inclination. At what height is it more convenient to install such a window and how its height increases in centimeters depending on the inclination, look at the photo.

The steeper the slope relative to the floor, the smaller the window height should be.
The width of the window frame should be 4-6 cm less than the pitch between the rafters. Then it can be easily installed without disturbing the structure of the frame. If the window is wider, it is necessary to make a reinforced beam above it and calculate the load.
If you need to have a larger window, it is easier to place two narrow ones side by side. They look no worse than one big one, and there will be fewer problems.

When installing a dormer window, the roof geometry becomes more complicated: a valley appears on top and on the sides. Because of this, the rafter system becomes more complex both during planning and during assembly. The complexity of laying the roofing also increases. All valleys are the places where leaks are most likely to occur. Therefore, everything needs to be done very carefully. In regions with a lot of snow, it is advisable to install snow guards over such windows so that they are not blown away in the event of a sudden meltdown.

Installation of a vertical dormer window in an attic roof
The advantage of such a window is that you can stand next to it at full height. But they let in less light, the terrain becomes more complex and the roof becomes more problematic.
A recessed window is usually used if there is access to a balcony through it. In other cases, this method of arrangement is not the best option: little light gets in, the shadows turn out to be very deep, which is tiring for the eye, the geometry also becomes more complex, although not to the same extent as in the previous version.
The easiest way is to make a window at the end of the attic. In this case, a reinforced frame or reinforced glass is not needed. Just high-quality glass is quite enough. It is this option that can most often be seen in country attics: this is the most inexpensive option that can easily be implemented with your own hands.
Rafter system
When independently building private houses with an attic, they usually choose a broken roof. It allows you to get a room of significant area, larger than under a gable.

With the same width of the base (of the house), the attic space under a sloping roof is larger than under a regular gable roof. The rafter system is becoming more complex, but a gable roof with an attic under a sloping roof is still more popular
The design of the sloping mansard roof is such that the overhangs can be lowered quite low, giving the house an interesting look. But the long overhang of the roof serves not only a decorative role. They also cover the upper part of the wall from precipitation and divert the bulk of the water away from the foundation. Although when planning you need to keep in mind that in strong winds they increase windage. Because of this, it is necessary to use more powerful boards and beams. Therefore, the size of the roof overhang is chosen based on several considerations, the main one of which is weather conditions.
Tilt angle
Depends on the roofing material, but most of all - on the region and weather conditions. The classic version is shown in the figure: the lower slopes in relation to the plane of the attic floor are inclined by 60°, the upper slopes by 30°. Based on these data and the parameters of your building, you can calculate all lengths. Just take into account that according to SNiP, the ceiling height in the attic cannot be less than 2 m. Then, by definition, this is an attic. A person will feel comfortable if the ceiling is raised to a height of at least 2.2-2.3 m. Based on this, according to the rules of geometry, calculate the required lengths.

In the classic version, the load from precipitation on the side surfaces may not be taken into account. Precipitation can only be retained on the upper part, the angle of inclination of which is less than 45°.
In general, the inclination of the side surfaces usually varies between 45° and up to 80°. The steeper the slope, the greater the windage it has, this must be taken into account: in regions with strong winds it is better to make flatter roofs. Then wind loads will be perceived much better.
Types of rafter systems for sloping roofs

The design of a sloping mansard roof is one of the options for the rafter system (the most common)
To make the frame of a sloping roof with your own hands, they most often use pine lumber, grade no lower than 2. The choice of cross-section of timber and boards depends on the size of the roof, the selected roofing covering (its weight), wind and snow loads in the region, and the installation pitch of the rafters. All these parameters are taken into account in the calculation. The methodology is prescribed in SNiP 2.08.01-89 and TKP 45-5.05-146-2009.

One of the options for constructing a frame with hanging rafters
The figure above shows a drawing of a frame with hanging rafters. It can only be implemented if the base of the upper triangle is no more than 4.5 meters (in this case, this is the width of the attic room). If more, you will have to make layered rafters, which should rest on the load-bearing wall in the middle (the attic will be divided into two parts by a row of beams).
Another version of the upper part is shown in the photo below (the picture is clickable). In this case, the side rafters are reinforced with struts. They significantly increase the rigidity of the system.
There is a second way to achieve a similar effect - to establish contractions - in the figure they are only outlined with barely visible lines. The length of the side rafter leg is divided by three, and contractions are established in these places. They will be needed if the roofing will have a significant weight.

Option for installing a sloping roof truss system - with struts that increase the rigidity of the system
For a building that is small in size, the roof frame can be generally simple: at the top there are two hanging rafters, a tie rod, floor beams, racks and side rafters (pictured below).

Installation of a rafter system for a broken mansard roof for a small house
How to calculate a sloping roof
The attic sloping roof of a small house (no more than 6-7 meters wide) has been built so many times that, based on experience, we can say what materials should be used. Many parameters are dependent on other materials. For example, the installation step of the rafters is tied to the parameters of the insulation. To ensure that there is as little waste as possible during insulation and installation is simpler, it is necessary that the distance from one rack to another be slightly less than the width of the insulation (20-30 mm). So, if you are going to use mineral wool, its width is 60 cm. Then the racks need to be installed so that the gap between two adjacent ones is 57-58 cm and no more.
The width of the board for the rafter leg is again determined based on the insulation. For the central zone of Russia, the required thickness of basalt wool is 200-250 mm. That's not all. In order for the thermal insulation to dry, a ventilation gap of 20-30 mm is required (without it, condensation will gradually rot the wood and render the mineral wool unusable). In total, it turns out that the minimum width of the rafter leg should be 230 mm. The thickness of the board is at least 50 mm. This is in regions with light winds and not very heavy snowfalls. To summarize, for all rafters - ridge and side - a board of 230 * 50 mm is required.
If lumber with such characteristics turns out to be too expensive, it will be possible to do the insulation in two directions: partly along the rafters, partly, filling the sheathing, across. You can lay a minimum of 100 mm of basalt wool, therefore you can take a standard board 50*150 mm and leave a 50 mm ventilation gap, or order a non-standard 130*50 mm. It's up to you to see which is more profitable for the money.
For racks and beams, it is better to take a beam of at least 80 * 80 mm, better - 100 * 100 mm. Especially in areas with difficult weather conditions - heavy snowfalls or strong winds.
Order a more accurate calculation from specialists. This is a long process consisting of collecting loads from the roofing material, the structural elements themselves, wind and snow loads. After which, according to a certain formula, elements are selected. For more detailed information on how the calculation is carried out, see the following video.
Do-it-yourself mansard roof: installation procedure
The design of the Mauerlat on mansard roofs is no different from the standard version. If or logs, you can use the upper crown as a mauerlat. It is only pre-treated with impregnation with high protective properties.
If the wall is made of foam blocks, a reinforced monolithic belt is placed on top of it. On a brick wall or made of shell rock or other similar materials, the installation of such a belt is not necessary. Waterproofing is laid in two layers on the wall, and on top is a timber treated with an antiseptic - 150 * 150 mm or a log. It is secured with embedded studs.

When assembling all elements, long nails are used - at least 150 mm long. In the most critical places, it is better to connect three or more elements using bolts or studs with double-sided threads. It is advisable to reinforce all joints with steel plates or corners.
First way
Installation of attic roof rafters is done in two ways. First: they assemble the parts on the ground, then lift them up in finished form. There, the outer structures, which will become pediments, are put up first. They are placed vertically and secured. It is often more convenient to secure them with long bars nailed to the wall (temporary). The following assembled structures are inserted into the prepared recesses in the Mauerlat (they are made at the required pitch). They are positioned strictly vertically and carefully secured. If necessary, additional temporary spacers are installed to fix them in the desired position. Side beams are installed.
How to build a sloping roof in this way and assemble the nodes, see the video below.
Second way
The second method - the construction of a sloping roof is carried out sequentially by assembling elements directly on site. This method is more convenient if the structure is large and when assembled it can only be lifted using special equipment (crane).
First, the floor beams are laid. Stands and ties are attached to them, and temporary spacers are installed to hold them in the vertical direction. Next, the upper and side rafter legs are assembled, and the tie rods and jibs are installed.
During installation, the following sequence of actions is observed: first, the outermost elements are installed and adjusted to the desired position, and securely fastened. If necessary, use temporary spacers. A fishing line, rope, and cord are stretched between them, which will serve as a guide for the installation of all subsequent elements. This simple move allows you to get the ideal geometry (don’t forget to check the slope angle, verticality or horizontality).
On top of the racks, tie-downs are attached - bars, to which the side rafters are then fixed and onto which the tie-down of the upper triangle is installed. The ties are secured using metal corners. Since the beams are long, they sag. This is later eliminated - after installing the upper rafter legs - with the help of vertical beams of fixed or adjustable height. And temporarily they can be supported with racks (so as not to pull the entire system).

To make it easier to maintain the desired angle when installing the side rafter legs, templates are made according to which cuts are made. But since the geometry of buildings built with your own hands is rarely ideal, adjustments may be necessary. To check the resulting angle of inclination, another template is knocked down from several boards, which is used to check the correct installation.
If the standard length of lumber - 6 meters - is not enough, either order the required length (expensive) or increase it. When building up, two boards measuring at least 0.6 meters (30 cm on each side of the joint) are nailed to the joint. They are nailed on both sides or bolts are used.

A reliable way to build rafters. The length of the “patch” is at least 60 cm
After installing the side rafters, all that remains is to install the top ones. A template is also made for them, pre-cut on the ground, and installed on top.

The top part can be made in different ways. Its structure depends on the width of the base. How to make it, look at the photo below.

Since the structure of an attic sloping roof does not provide for the presence of a ridge, a beam is placed in the middle to tighten it, to which the slopes are attached, fixing the triangle in the required position.

Nodes and their drawings
When installing a rafter system, questions may arise regarding the assembly of nodes—the intersections and connections of several structural elements. In the photo you see drawings of key connections.

The second option for connecting the side layered rafters and the upper triangle. Bolts are used for more secure fastening.

How to make a do-it-yourself fastening of the upper tee and rafter leg on an attic roof
Methods for attaching rafter legs to the mauerlat or, as in this case, to the side beam are shown in the figure below. To make it easier to mount a heavy element, a thrust board (bar) is nailed to the bottom of the rafter, which limits its movement: the board rests against the edge and does not allow it to sink lower.

The installation of an attic roof allows you to significantly increase the usable area and rationally organize the space of a low-rise building. However, its construction often frightens home craftsmen because the process is too complex and labor-intensive.
There is no need to be afraid, because the result will provide a beautiful roof and comfortable additional rooms. And in order for the result of the work to please the owner and household members, you need to know what rules are used to construct the rafter system of an attic roof, and what is the easiest and best way to arrange it.
When we mention mansard roofs, we immediately recall a pentagonal gable structure of impressive size over a log house, concrete or brick walls. Visual memory suggests that its slopes must certainly have different slopes, i.e. the bottom of the roof simply has to be much steeper than the top. Due to the difference in the angles of inclination, a convex fracture is formed, which gave the roof the popular name “broken”. The term has justifiably migrated to the technical definitions of attic structures. It reflects the essence of the usual standard in the device, but often has nothing in common with the configuration. Despite the fact that the design of all mansard roofs necessarily includes two parts, their presence cannot always be determined visually.
Purely based on external indicators, the predominant number of attic structures can be divided into:
- Triangular roofs, the lower and upper parts of which have an equal slope. Outwardly, they resemble traditional gable structures without kinks in the plane of the slopes.
- Pentagonal roofs with slopes having convex corners. This category clearly demonstrates the presence of two joined parts in the design.
In both of these varieties, the rafter system consists of two tiers stacked on top of each other. The lower structure forms the useful space of a residential attic with a height of 2 to 2.5 m, so that moving inside it is not difficult. The second tier creates the shape of the roof top and is allowed to be of arbitrary height.

By varying the angle of inclination of the upper and lower rafter legs, you can obtain the optimal roof shape in your own opinion. It is believed that a pentagonal attic, the corners of which are in contact with an imaginary circle, looks best.

Note that the principle of constructing a sloping roof is suitable not only for gable rafter systems. Interpreting the basic method, the attic can be organized in hip, single-pitched, hipped and other roofing structures.
Sometimes an existing structure is converted into an attic, the construction of which did not use “broken” technology. However, these roofs cannot a priori be classified as attic. True, if the rafter legs have sufficient power, no one bothers to use the crossbars of pitched rafter systems as ceiling beams, and the supports of additional purlins as beams for cladding the attic.

We found out that the main feature of an attic roof is the presence of two adjacent rafter structures connected into a triangle or pentagon of a shape that is attractive to the owner. In their construction, standard ones are used:
- Layered, according to which the lower tier of the attic is built and used in the construction of the upper part.
- Hanging. In accordance with it, only the upper part of the structure is built.
If, to simplify, the section of the attic roof is divided into two halves, you will get a trapezoid at the bottom and a triangle at the top. The inclined sides of the trapezoid are allowed to be exclusively layered, and the sides of the triangle are layered and hanging.

Basic diagrams of rafter systems
A “classic of the genre” is rightfully considered to be the pentagonal diagram of the rafter system of an attic roof with support posts forming the walls of the interior. Its section is conventionally divided into simple geometric shapes. In the center there is a rectangle, on the sides of which there are two mirrored rectangular triangles, and an equilateral triangle on top.
Standard attic construction
The layered rafters of the lower part of the structure rest at the bottom on the mauerlat, and with the upper heel on the right or left purlin. The part of the mansard roof frame that crowns the structure is made up of hanging rafter arches. They are supplemented with a suspension headstock in the middle if they are intended to cover a span of more than 3 m. The headstock cannot be connected to the arch tightening with a notch, like a support post. Its job is to prevent the tie from sagging - it is not a support, but a suspension.
The supports-racks of the layered rafters of the lower part rest through the beam on the ceiling. If it is necessary to increase stability, struts are installed under the supports. The posts are connected to the frame and purlins by notches, the joints are duplicated with metal corners and toothed plates. If the floor is concrete, bitumen waterproofing is laid under the floor. The bed can be laid not on the ceiling, but on brick pillars or on leveling boards. When constructing an attic on a wooden floor, you can do without the beams altogether and embed the racks directly into the beams.

The rather steep lower parts of the slopes of attic roofs are practically not affected by the snow load; precipitation does not linger on them. However, steeply installed rafters have another problem - gusty winds will tend to overturn and tear off the roof. Therefore, attaching the system to the Mauerlat must be taken very seriously. In an attic situation, each rafter is tied to the walls with twists, and not through one, as in conventional pitched structures.
Method of moving rafters beyond the wall line
It often happens that the planned attic structure creates too narrow an internal space. It can be expanded by moving the rafter legs outside the walls. Those. the rafter leg will rest not on the mauerlat, but on the beams of the upper floor. This case, in theory, does not need a Mauerlat at all. But reinforcing struts in the scheme with the removal of rafters are used without question, because there is no support at all under the extreme part of the side triangles.
The installation of the Mauerlat can be eliminated, but pouring a monolithic reinforced concrete belt for attaching beams to brick walls is highly desirable. The floor beams are attached to the monolithic belt with anchors, and support posts are driven into them to a maximum of 1/3 of the thickness of the beam. An important point: moving the rafters outside the wall is simply required to form a cornice for wooden houses with a width of at least 0.5 m, for concrete and stone houses at least 0.4 m.

Technology for constructing a rafter structure with the rafter leg extending beyond the wall:
- We install the outermost floor beams that define the contour of the eaves overhangs. Because the ceiling will be loaded, the section of the beams is taken from 150x200mm. If, when laying the starting beam, it turns out that the walls do not form an ideal rectangle, we try to correct the flaws by changing the position of the beams.
- We lay and fix the remaining bars along the laces stretched between the fixed outer beams. We control the height and pitch of the beams before fastening. The distance between the floor elements is equal to the step between the rafter legs. For insulated roofs, the optimal installation pitch for rafters is 0.6 m, because it is equal to the width. If the rafters will be installed with a similar frequency, they can be made from 50x150mm boards.
- From the left and right edges we set aside a distance equal to the length of the short leg of the right triangle. At the marked points, carefully use a chisel to select nests a third of the height of the beam under the outer supports.
- Let's make supports by cutting out tenons. They need to be made according to the size of the selected nests. For the manufacture of corner supports, a beam with a cross-section of 100×150 mm is suitable, and two load-bearing supports for the gable sides of the roof should be made from it. For ordinary racks, 50×100 mm timber is sufficient. The material for the supporting elements should be longer than the design height by the length of the tenon, but it is better by 10 cm in case of errors during cutting.
- We install the corner posts and fasten them with temporary spacers. We connect the posts with lace.
- We use a plumb line to check the points in the beams for selecting nests for row supports and select the indicated holes.
- We install row posts and two load-bearing supports in the centers of the attic gables.
- On the installed supports we lay purlins - boards with a section of 50x150mm. We fasten the purlins with corners. It is not necessary to use as many nails as in the corners of the holes. Two or three are enough for each plane. As a result of laying the boards, the frame of the walls of the future attic is obtained.
- We connect the supports installed opposite each other with bars, attaching them to the purlins with corners. These elements will serve as tensile crossbars. Therefore, for their manufacture you will need 1st grade lumber with a section of 100×150mm. For each installed crossbar, a temporary support from a 25x150mm inch is needed.
- We temporarily fasten the crossbars on top with the same inch, retreating 20-30cm from the edges of the frame. Temporary thin flooring of one, two or three boards is needed for ease of installation of the upper part of the rafter system.
- We make a template for the rafters of the bottom row from an inch. To do this, we apply a blank board to the end of the purlin and beam. Then we outline the lines of the grooves along which the excess is to be sawed off. We try it on and trim the excess if necessary.
- We make rafter legs using the template. If there are doubts about the flawlessness of the construction, then it is better to cut out only the upper groove first. By placing the rafter in its proper place, you can then adjust the lower groove after the fact without unwanted damage to the material.
- We install the end rafter legs, which will need to be connected again with lace.
- Using the lace as a guide, we install the rafter legs of the lower tier of the attic.
- Similarly, we make a template for the upper part of the rafter system. In order to find the line of the top cut, we temporarily sew a board onto the gable support.
- Let's make a mirror version of the previous template. The rafters of the upper tier will rest against each other.
- Let's try both templates on the roof. If everything is normal, we use them to make the required number of upper rafters from 50x150mm boards.
- We are constructing the upper tier of the rafter system.
- To prevent the crossbars from sagging, we install headstocks of the required size to each upper truss. We firmly sew them only to the ridge area; the bottom should not be rigidly fixed.
Next, the rafter legs are screwed to the walls with wire ties. Then the pediment frame is installed, along which it needs to be sheathed. Finally, the sheathing is installed at a pitch corresponding to the characteristics of the roofing material.

Method with frame modules
The technology differs from the previous method in that not individual supports are installed on the floor, but modules-blocks of the side walls of the future attic, fully prepared for fastening.
The block method of constructing a rafter system allows you to optimize the construction of an attic roof, because the construction of modular elements is carried out on the ground. In quiet conditions without a sense of altitude, it is easier to achieve precision node connections.

The process of installing a block mansard roof:
- Based on a pre-made design, we manufacture the frames of the attic walls. Using this method, longitudinal beams play the role of purlins and beds. We lay them out together with the racks on a flat area and use a square to mark the sockets for the supports of the side walls. We make cuts along the measured lines.
- We cut out spikes on the racks, the size of which must correspond to the size of the sockets.
- We connect the longitudinal beam with vertical posts, we get two modular frames - these are the walls of the attic.
- We lift the frames up and install them in the intended place. We temporarily fix the position of the walls with spacers, then attach them to the floor beams with brackets.
- Using a chisel, we select sockets at the edges of the beams for installing the lower row of rafters. They need to be placed in one line. To maintain the geometry, it’s easier to first mark them with a chainsaw, then modify them with a chisel.
- We perform the upper rafter tier of the attic on the ground, having previously fitted the blanks to the installed elements. To ensure an accurate fit, we temporarily nail a board to the end of the future roof so that one of its edges clearly follows the central axis of the rafter system. The base of the upper attic triangle serves as a stretcher. Its length is equal to the distance between the outer vertical planes of the installed frames. We select nests along the edges of the guy wires, and spikes on the lower heels of the rafters.
- We assemble the trusses of the upper tier, for reliability we install an additional crossbar, and we reinforce the ridge assembly with a triangular wooden overlay.
- Before we move to the roof, we make preparations for the rafter legs. We try them on to the frames laid out on the ground. It is more convenient to “cut” them in one fell swoop, grabbing several pieces with a clamp. We cut out only the upper bevel, taking into account the fact that it will rest partly on the wall post, partly on the stretch of the upper rafter trusses.
- We try on the bottom rafter to the end. In the area of its lower heel we draw the shape of a spike, repeating the configuration of the nest in the beam. We cut out the thorns.
- We move the trusses of the upper tier and the rafters of the lower tier to the roof. We first install the trusses, attaching them to the upper frame of the walls with staples, then the rafters of the lower part, attaching them to the floor beams with the same staples.
The subsequent stages of roof construction are carried out according to standard rules. Drawings for a mansard roof, clearly representing the structure, will introduce you in detail to the described principles of constructing a rafter system. Thanks to the production of joints by cutting half a tree, the strength and rigidity of the frame as a whole increases, which will eliminate the need to install additional struts.

The disadvantage of this method is that the finished modules are quite difficult to transport to the roof. To transfer the assembled blocks there without the use of lifting equipment, a minimum of 4 people will be required.


Board and nail rafter system
It is impractical to build a powerful attic over small country houses, but you still want to save space on a small plot. For owners of small buildings there is an excellent option - a lightweight board and nails layered structure. The method should appeal to those who love saving, because the construction does not use solid timber.
For the manufacture of each of the supporting elements, two boards are used, between which spacer sections of the bar are installed. The cavity formed by the bars explains why the system is lightweight compared to its solid counterparts. To ensure spatial rigidity, wind braces are installed connecting the supports to the rafter legs. The lathing, in turn, will make its contribution to strengthening the structure.

The popular way to develop a layout
For a successful work result, a project is very desirable. It is not a fact that the presented drawings with dimensions are suitable for furnishing a particular home. Typology in construction is now not at all welcome. If there is no documentation at all, it is better to make at least a sketch of the future roof, not forgetting the height of the ceilings in the attic. Wherein:
- Proportions must be observed, because an attic that is too large can turn a small house into an awkward, mushroom-like building.
- It must be remembered that the lower part of the attic roof is built using layered rafter legs, and they optically lower the overhang and overlap the upper part of the high windows. There will be no noticeable overhanging effect when constructing an attic according to the scheme with the rafters removed.
- Do not forget that the height of the attic room must ensure freedom of movement. It is this landmark that is required to correctly determine the height of the racks of the attic walls.
You can select the best roof proportions using the traditional template-layout method. According to it, bars or boards are laid out on a flat, spacious area, repeating the contour of the building in real size. By changing angles and moving components, you can achieve the optimal configuration. The elements need to be fixed with nails and immediately measure the lengths of beams, rafters, tie rods, and posts. The resulting dimensions will help in making templates.

The video will demonstrate the calculations and layout of the rafter system for an attic roof:
The basic options and diagrams for the installation of an attic rafter structure that we have given will help you decide on the choice of the optimal type of rafter structure.
Attempts to use attic spaces as living spaces have been made by our compatriots for a long time. But in those days there were no effective and easy-to-install insulation materials, modern innovative membranes to maintain optimal parameters of relative humidity in the room and reliable insulation materials were not produced, roofing materials did not allow the creation of roofs with the required operational parameters. As a result, attic spaces were used for living quarters only during warm periods; in winter, the microclimate became uncomfortable. Today the situation has changed for the better; mansard-type roofs have become widespread.
Developers have the opportunity to significantly increase the living space of a building with relatively small capital investments. And a wide variety of architectural projects allows you to choose exactly the style that is considered relevant and in demand at a given time. If desired, you can order an exclusive mansard roof project; this approach allows you to build a prestigious building.

It is strictly not recommended to begin construction of a mansard-type roof without the full availability of all building materials and components. Shortages cause work to stop, and this always has a negative impact not only on the overall construction time of the house, but also on the quality of architectural elements. To purchase materials, financial resources are needed; their specific amount can be calculated only when the developer has completely decided on the type of roof and the list of additional elements.
What affects the estimated cost of an attic roof?
| Name | Brief description and performance characteristics |
|---|---|
| The mansard roof can be single-pitched, gable, broken or hip of varying complexity. The hip roof is the most expensive, but this does not mean that it provides the maximum size of the attic space. From an economic point of view, it is more profitable to build an ordinary or broken gable roof; this is not only simpler, faster and cheaper, but also allows you to equip attic rooms with the largest usable area and volume. Flat rafter systems are used quite rarely for such purposes. As for hip structures, only wealthy developers can afford them. |
| For attic roofs, two types of insulation are mainly used: mineral (basalt) wool or various types of foam plastics. Ecowool, bulk insulation and other exotic materials are used extremely rarely. Mineral wool slightly increases the cost of an attic roof, but it is characterized by low thermal conductivity, high environmental friendliness and fire safety parameters. As for foam insulation, this is a budget option with quite acceptable performance characteristics. |
| Modern industry produces a wide range of windows and doors directly for attic roofs. These elements significantly increase the comfort of living in the premises, improve the appearance of the building as a whole, and make it possible to create a zonal breakdown of the attic spaces. Installing roof windows and doors can increase your roof estimate by about 10%. |
| A roof made of pieced natural tiles looks best on a mansard roof. But this material is considered one of the most expensive among all existing ones and is used only on prestigious buildings. It is not recommended to use cheaper coatings made of galvanized metal sheets due to their high noise level - for residential premises this factor is of great importance. Professional builders recommend using bitumen shingles for mansard roofs; based on the totality of all technical and operational characteristics, this is the optimal choice for most developers. |
| The colder the climate, the more attention should be paid to the insulation of the attic roof. Errors in choosing the type and thickness of insulation cause very big problems. And it’s not just that it’s difficult to maintain comfortable temperatures in rooms. The main problem is that condensation is constantly present in insulation that is too thin, and high humidity has an extremely negative effect on all wooden structures of the rafter system. Even the most modern impregnations do not help. The roof quickly loses its original load-bearing capacity and requires major repairs; such work can cost more than new construction. |


The qualifications of the performers have a significant impact on the cost of the attic roof. Oddly enough, it will be to learn that the relationship is the opposite of what was expected - the higher the professionalism of the roofers, the cheaper the construction will be, despite the fact that you will have to pay increased wages. This is due to several factors.
- Savings in building materials are achieved. Experienced roofers have minimal amounts of unproductive waste, which has a positive effect on the roof estimate.

- The quality of work increases. The higher the quality, the longer the service life, the lower the risk of leaks and other unpleasant situations while living in the house. Eliminating problems requires not only time, but also significant money. Conclusion - the increased funds invested during construction pay off many times over during the operation of the building.

- Time frames are reduced. The complexity of the work on the construction of a mansard roof lies not only in the technology itself, but also depending on climatic conditions. A period of stable good weather is selected, but no one can give an accurate forecast. The longer the roof takes to build, the greater the risk that the weather will worsen. Wetting of the structures of a house under construction never occurs without negative consequences; significant sums are required to eliminate them.

Prices for construction boards
Construction boards
Types of mansard roofs
It is impossible to give a complete classification; individual changes are allowed in each project; specific decisions are made by the developer. Let's consider only the main types of mansard roofs according to the generally accepted classification.
Single-pitch
The simplest designs are rare. Attic rooms have limited dimensions due to their low height; opposite walls are located at different levels. It is recommended to install such mansard roofs on small cottages, bathhouses, garages and other outbuildings.

Gable
The most common ones have a huge number of options; they can be symmetrical (the ridge in the middle of the building) or asymmetrical. The pediments are on the line of the facade walls or shifted into the attic to create an attic balcony. The angle of inclination of the slopes should ensure that the height of the premises is comfortable for residents. Gable roofs can be simple or broken.

Broken ones have a more complex design, but make it possible to significantly increase the useful volume of the attic space. This type is currently the most popular among developers. Broken attic roofs are used not only in the construction of cottages, but also in relatively small buildings.

Hip (hipped)
The most complex roof designs are installed on houses with a large area. They are distinguished by increased parameters of resistance to wind and snow loads, and can be simple four-slope or complex multi-gable. These types of roofs are used only on prestigious buildings; the most qualified roofers are involved in the construction.


Mansard roofs with balconies
Recommends installation on large houses; internal attic spaces are somewhat limited. Balconies can be open or closed; the size and material of the platforms depends on the material of the façade walls.


If you have taken into account the above factors, purchased materials and additional components, and resolved issues with the builders, then you can begin building the attic roof.
The attic roof must be strong, and its rafter system must be able to withstand heavy loads. We invite you to familiarize yourself with detailed information about the design of mansard roofs on our website. You can study the drawings and step-by-step instructions for installing rafters.
Prices for timber
Step-by-step instructions for building an attic roof
For example, we will consider the simplest version of a mansard roof - a gable roof without special windows and exits to the balcony. The rafter system has already been installed, it is no different from the usual one.
Eat two options for arranging living spaces in the attic, each of them has its own strengths and weaknesses.

The first stage of building an attic roof is the installation of an insulating pie. Extremely responsible work, carry it out in strict compliance with building codes and regulations.
Insulation of attic roofs
Step 1. Nail slats approximately 4–5 cm thick to the rafters.


The fact is that during the construction of the roof, boards 150 mm wide were used for the rafters; this size is not enough for a warm roof. Even if the thickness of the insulation is 15 cm, you need to provide a gap between it and the vapor barrier to remove excess moisture.
Important. An insulation thickness of 150 mm is considered the minimum for the average climate zone; in regions with colder climates, this parameter increases to 200–250 mm. There is no need to save money on the thickness of the insulation; this always has very negative consequences.
Step 2. Soak all wooden elements of the rafter system with an antiseptic.

For an ordinary roof, this is not necessary; it can only get wet from natural precipitation, and there is protection against it. In addition, there is always effective natural ventilation in a non-residential attic. The situation is completely different on an attic roof. The warm layer is closed on both sides; when moisture gets in, it evaporates very slowly. Prolonged exposure of wooden structures to conditions of high humidity accelerates the decay process by an order of magnitude; they require additional protection.
Not all types of impregnation are noticeable on the wood after drying; this complicates the process, and there is no way to control the quality of the work. To make the work easier, it is recommended to add color to the solution; it can be purchased at any hardware store.

You can process lumber with a pneumatic remote control, roller or brush. The choice of tools depends on the amount of materials and the preferences of the master.


Step 3. After the impregnation has dried, attach a vapor barrier to the rafters. This is very important work; the effectiveness of the thermal insulation of the attic roof and the longevity of the building depend on their quality. The task of vapor barrier is to prevent the penetration of warm and humid air from the attic into the mineral wool. The fact is that wet mineral wool conducts heat well, which dramatically increases heat losses. In addition, prolonged contact of wet wool with wooden structures increases the likelihood of fungi and rot, and these processes are considered the main enemies of the rafter system.

It is attached to the rafter legs from top to bottom, due to this the amount of moist air entering through the overlaps is reduced, it moves up and does not enter the cracks. To increase the density, the joints need to be glued; modern vapor barrier materials have special strips coated with a substance that increases adhesion. If you use cheap materials, then you can use ordinary double-sided tape to glue the joints.

Pay special attention to the exits of chimneys, roof windows and doors; it is very difficult to make airtight insulation in these places. Take your time, do some operations twice.

Important. Pay careful attention to which side the vapor barrier should be nailed on. The manufacturer indicates the recommended position on each package. If it is not followed, the protection does not work.
Step 4. Nail the slats; the materials for the interior decoration of the attic rooms are fixed to them. Another function of the slats is to hold the insulation material. In our case, this is mineral wool, and it has a fairly large mass and requires reliable support.


The process of fixing slats along the slopes of the attic

Step 5. Reinstall the drip pipes and the waterproofing will be glued to them. If there are no factory ones, then you can make them yourself from galvanized sheet metal.


It is not a problem that the elements have an unattractive appearance; in the future they are completely covered by the gutter and are invisible from the ground. The drip edges are nailed to the outer battens of the sheathing, the lower edge should fall into the gutter, and the edge of the waterproofing film will be glued to the upper horizontal one.

Now start laying the insulation.
Prices for vapor barrier materials
Vapor barrier material
Laying mineral wool
If the mineral wool has been in the package for a long time, then it is recommended to empty it, let it lie in a free state for several hours and take its original shape.
Practical advice. On sale there are insulation materials with thicknesses from 5 cm to 20 cm. If the thickness of the wool on your roof is 15 cm, then it is recommended to buy material 5 cm thick and lay it in three layers. During installation, the joints of the lower layers are overlapped by the upper ones, due to this technology the overall heat losses are reduced.

Step 1. Lay the first layer of cotton wool, the length of the strips is factory-made, the thickness is five centimeters. Make sure that there are no cracks anywhere; if there are problem areas, they need to be sealed with sections.
Step 2. Lay the second layer of mineral wool. To move the joints, cut the first strip in half and start working from half. In the future, use whole stripes.

Step 3. The third layer begins with a whole strip, due to this the joint will again shift by half the length.
To make it easier to move on a pitched roof while laying insulation, it is recommended to fill the rafters in various places with bars measuring approximately 50x50mm. Once the work is completed they are deleted.
Step 4. Start laying, the first strip is fixed from the bottom, it must be positioned so that the edge is attached to the drip. The material is fixed with a stapler to the rafters. Do not tighten it too much, leave about 2–3 cm of slack between the rafters. Condensation will flow down it, and the counter-lattice slats will remain dry.


Step 5. After the waterproofing is done, nail it with slats at least 5 cm thick - the minimum gap to ensure ventilation of the under-roof space. This is an important parameter and must be followed.

Waterproofing is secured with slats
Step 6. Install the counter-lattice. The distance between the boards is selected depending on the parameters of the metal tiles; in most cases it is 35 cm. Condensation flows freely through the waterproofing into the gutter, the counter-lattice elements remain dry, and warm air from the mineral wool is not blown out.


The arrow in the photo shows a template - an ordinary block, which is used for the convenience of attaching horizontal slats. The template for controlling the distance between the slats looks like an ordinary piece of board of the required length; insert the template between the slats before screwing them

Counter-lattice. Gap between slats and waterproofing
If everything is done correctly, then thermal insulation effectively copes with its tasks; the attic roof allows you to maintain a comfortable microclimate in the rooms with little loss of thermal energy. This is very important nowadays with constantly rising energy prices. The counter grille is ready, you need to start installing the roof.
Don't forget to leave a pocket at the skate for ventilation. Do not add horizontal stripes until the very end, leave about 20 cm. It is then covered with a longitudinal piece with slots of at least five centimeters along the entire length of the slope. The piece is nailed onto the counter-lattice, thereby creating a gap for the removal of moist air from the insulation.


Prices for mineral wool
Installing a roof on an attic roof
Before starting installation, you need to attach some. The specific list depends on the feature and manufacturer; in most cases, brackets for attaching the gutter and curtain rods should be fixed.

Do not forget to maintain the minimum slope of the gutter, it should be about a centimeter per linear meter.
A mesh should be installed between the drip line and the counter-lattice; it protects the under-roof space from the penetration of birds and large insects.


You can start from any side of the slope, but it’s better from the leeward side. The edges are aligned along the eaves line with an overhang of ≈ 5 cm. To align, you need to attach the first sheet to one self-tapping screw, snap the second one to it with a lock and turn them together for final alignment. Some roofers recommend installing a third sheet for guarantee and verification, and only then fixing the roof. Each master chooses technology at his own discretion, taking into account personal experience.

Installation of roofing material
Practical advice. Screw in the screws correctly. Control the right angle, do not pinch the rubber gasket and do not leave it loose. Hardware is screwed in in a checkerboard pattern, at least seven pieces per square meter.

After completing the installation of all sheets, the ridge is finished; for this, there are special metal additional elements. At the final stage, wind (end) strips are attached. The roof is ready, you can finish installing the drainage system, check the functionality and hand over the work.

Video - Construction of a mansard-type gable roof
Surely, sooner or later, every owner of a private house comes up with the idea of arranging an attic roof - the so-called attic. It allows you to expand the space of the building, thereby preserving the treasured meters of the site itself. In addition, if you show a little imagination when building and decorating this part of the house, then the non-standard and attractive appearance will delight not only guests, but also ordinary passers-by. You can learn how to correctly combine all construction safety requirements and an individual design concept from this article.


What it is?
Many people associate the image of an attic with the bohemian creative life of Paris, whose representatives - writers, musicians and artists - lived on the highest, dimly lit and unheated floors. In the literal sense, these were utility premises that only the poor could afford.
Today, the presence and design of an attic roof speaks of the owner’s wealth and sense of taste. The architectural geometry of the roof, unusual combinations of window openings and balconies will not only distinguish a private house from others, but will also functionally increase the living space, eliminating the cost of another floor.


The room can also affect the reduction of heat loss in the building. Officially, according to all standards, the attic must have a height of at least 2.5 m from the floor level, otherwise it will be considered an attic.
When building an attic roof in Russian conditions, one should remember the peculiarities of natural conditions - rather frosty winters with frequent temperature changes require special attention to the quality of insulation of the attic room.


Device Features
The design features of the attic require adherence to certain rules:
- soundproof;
- reliable insulation and vapor barrier;
- no stretch marks or bevels;
- ventilation gap;
- functional and aesthetic combination with the overall exterior of the house.


At the same time, compliance with all the rules does not limit the choice of various designs of the structure itself: single-pitched, gable, broken, two-level, conical roofs, with or without a balcony, mid-turn or balcony dormer windows. There are many variations. For reliability and safety, it is important to choose the type of roof, calculate the dimensions, and the amount of insulation and roofing materials.

Comfortable living in the attic directly depends on thermal insulation, which will allow you to enjoy a slight coolness in the summer and keep warm in the winter. Let's consider the method of laying the “pie” of the attic roof, which will serve not only as insulation and the base of the roof, but also as protection from the roof. All surfaces inside the attic floor - the ceiling, floor and walls - must be insulated. It is important to first draw up a plan for the attic with all communications and an indication of the thermal conductivity of the materials from which the building and load-bearing coverings are constructed. Only after this is the selection and calculation of insulation made.


Particular attention should be paid to the indispensable presence and exact sequence of each layer of the attic insulation “pie”:
- vapor barrier layer;
- insulation;
- ventilation gap;
- waterproofing material;
- roofing covering.
In this list, a layer of insulation and ventilation are especially important. The following materials can be used as insulation.
Styrofoam
A modern, sought-after material with low density but high strength. It is soundproof, does not corrode and does not attract dust. However, a significant drawback is the high flammability and release of toxic substances. If we choose this insulation, then the foam layer must be protected by at least 3 cm of a fire-resistant structure, for example, two-layer plasterboard. In addition, polystyrene foam is susceptible to rodents.


Mineral wool
The most common material for attic insulation. Among its characteristic features are resistance to temperature changes, fire safety, high sound and heat insulation, and harmlessness from an environmental point of view. You can purchase it in the form of a roll, slab or mat. The latter is recommended as attic insulation. The material definitely needs good ventilation.


Polyurethane foam
The main advantages are strength, long-term use, not susceptible to moisture, mold, suitable for any surface, non-toxic. But all the advantages hide the high cost and the work of exclusively specialists with the equipment.


It must be remembered that the thickness of the insulation layer is determined depending on the climate zone.
To insulate the attic you will need:
- waterproofing film;
- insulation material;
- vapor barrier;
- mounting tape;
- cord (nylon);
- nails;
- hammer;
- pliers;
- sharp knife.


Thermal insulation of a room is directly related to the quality, type and size of roof windows; their structures are usually placed between the roof rafters in order to avoid expensive reconstructions. Therefore, when choosing, it is important to focus on the available dimensions. Among other things, you need to take into account the height of the slopes, the total area and purpose of the room.
The standard sizes of dormer windows are considered to be 78x118, 78x140, 78x160 cm and larger sizes - 94x140, 114x118 and 114x140 cm.


If the rafters are set closer than the established frame standards, it will likely be necessary to have the window made to order, which will of course have an impact on costs.
According to the method of opening, roof windows are divided into:
- mid-rotation structures;
- with side axis;
- raised axis of rotation;
- with lower axis;
- a combined axis that allows you to rotate the sash 180º.
The most popular option among Russian summer residents is with a central axis of rotation. The advantages are ease of use (such windows are easy to clean).


A separate variety is represented by remote-controlled windows, which will be convenient if the location does not allow you to reach them yourself. They are often equipped with rain sensors.

Depending on the model, several types of windows can be distinguished.
- Vertical. They are mounted in a special so-called attic “birdhouse”, which is why you have to slightly change the roof structure. However, they guarantee a large amount of light.
- Balcony attics. They are two doors, when opened, one rises, the lower one moves forward, forming a miniature parapet. Just like the previous model, they require high costs.


It should be noted that, if load-bearing walls are possible, you can also make a hanging balcony, which can be located either on columns that serve as a decoration in front of the entrance, or you can move the pediment (part of the end wall between the roof slopes and the eaves) of the attic floor from the load-bearing wall, and the roof of the ledge done by extending the roof to the level of the outer wall.


- Extensions. Decorative window top elements. They fit perfectly into the design and most often have a round, semicircular or triangular shape.

- Light tunnel. It combines a reflective tunnel into the room and a lampshade directly in the room itself, which evenly diffuses the light.
- Cornice models. They are located at right angles in the gap between the wall and the roof.
- Glazed bay window. Quite an exotic and expensive glazing model. The structure extends beyond the plane of the wall.


Leading Russian manufacturers of high-quality roof windows are Velux, Fakro, Roto. Velux models are slightly more expensive. For example, a window measuring 78 cm will cost 21-24 thousand rubles, a wider window will cost from 26 thousand.

Also, don’t forget about some additional useful accessories:
- blackout curtains;
- roller shutters, blinds;
- heat-absorbing mesh;
- mosquito nets.


According to established standards, the glazed area must be at least 10% of the floor area.
Advantages and disadvantages
The advantages of the attic floor can rightfully be considered:
- Economical. The attic allows you to reduce the cost of heating the room. The air space between the floor and ceiling of the attic prevents generated heat from escaping through the roof. The low thermal conductivity of air allows more heat to be stored on the ground floor.
- Savings on adding another floor or increasing living space by expanding the foundation are also obvious. The attic allows you to get constructive additional space at minimal cost.
- Aesthetic appeal. Undoubtedly, the attic, with its complexity and expressiveness of the roof, gives the building a harmonious, architectural and complete look.
- Construction speed. Such an extension will not last for several years, as often happens with the expansion of the foundation. Installation can be completed within a week.


In addition to the advantages, there are also disadvantages.
- Savings on heating and replacing the second floor with an attic will cost a pretty penny in the future. The premises require the installation of specialized windows, which are much more expensive than regular ones.
- Sloping ceilings reduce the height of walls.


- The vulnerability of the structure is due to the fact that the attic takes on all the main “blows” of nature, and therefore requires increased attention and periodic inspection. If repairs or replacement of insulation are necessary, damage to the finish along with the vapor barrier cannot be avoided.
- A complex coal roof leads to the formation of difficult-to-ventilate areas, which negatively affects the quality of the coating.
- Individual requirements for hydro- and thermal insulation.

Problems that you may encounter when building an attic:
Undoubtedly, the ideal option for an attic would be to include it in the project drawing even before the start of construction work on the house. But often the idea of an attic comes with the need to expand useful living space after a certain period of use. In this case, one has to face the choice of the type of structure. There are different types of mansard roofs.

Single-pitch
An ordinary, simple attic with one roof corner and one full wall, which allows you to expand the area. The most successful tilt angle in this option is in the region of 35°-45°. Otherwise, this may lead to the accumulation of large amounts of snow. The ramp is placed on the windy side. In this case, window frames can be placed both on an inclined roofing surface and on the main vertical wall. However, this design is not used so often, since due to the norms for wall heights of more than 2.5 m, the slope turns out to be very steep. And this requires strengthening the rafter frame and, therefore, extra costs. However, such a roof looks rather unconventional.


Gable
A more rational and optimal option due to the uniform rise of the ceiling, in contrast to the lean-to model. The two roof slopes are located at the same angle to the walls. For a rational distribution of space, 45° is enough. It is also divided into subtypes: symmetrical with a ridge above the middle of the house and asymmetrical with an offset relative to the center. The pediments in this version are straight, and the room takes the shape of a trapezoid. Such an attic can be equipped with a balcony at the end, and the design of the structure itself allows you to get rid of the “cubism” typical of the house. However, this also seems to be a significant disadvantage, limiting the area of the attic space on the sides. As an exit, you can provide this space for storage rooms or cabinets.


Broken
The most common type when building an attic without the involvement of specialists. In fact, it is the same gable structure, but constructed from two parts located at different slopes. An advantage of the broken shape is the ability to avoid the formation of uninhabitable “dead” zones at the junction of walls and ceiling, as in a gable structure. By reducing the angle of inclination, the height of the walls increases. And the presence of two slopes allows you to reduce the load on the roof.

When choosing this option, it is important to pay attention to the special fracture rafter system.
With remote consoles
This design provides for the displacement of the vertical wall of the attic to the edge of the facade of the house or beyond. This feature allows you to significantly expand the area of the room. The rafters are reinforced with struts and rest on floor beams that protrude beyond the load-bearing walls. The vertical wall provides freedom for imagination in choosing window design.


Two-level
This type of attic is designed exclusively together with the dwelling and is considered the most complex structure. It consists of several rooms at different levels and is not some separate part of the building, but a full-fledged room in the structure of the whole house. With this design, you get not a one-story attic, but two additional mini-floors. A preliminary calculation of the load on the walls and rafter system requires special attention.


Multi-gable roof
The intricacy of the design is expressed in a whole complex of angular protrusions. The non-standard appearance, the strength of the truss structure and the absence of precipitation accumulation take precedence over design difficulties and increased calculations. However, such characteristics require the work of exclusively specialized personnel. And the cost of such a mansard roof significantly exceeds the prices of other types of structures.


Four-slope
This type of roof design is considered the most attractive. In addition, it is very convenient to maintain - almost no precipitation accumulates on it, and due to the inclined structure, the wind does not carry a large load, as a result of which such a roof will last longer. However, during construction you will have to spend a lot of money on insulating such an attic. But there won’t be much useful living space due to the sloping ceiling on all four sides.


hip
They are a typical variant of a hipped roof type. A comfortable and spacious space is obtained by increasing the area of the two facade slopes of the house, made in the shape of a trapezoid. Hips are the slopes from the end of the building in the form of triangles. The half-hip design consists of slopes that do not reach from the ridge to the cornice. This type of roofing is used infrequently, since the rafter system is one of the most expensive and complex.


Tent
A suitable option for a square shaped house. The roof in this design consists of slopes with identical parameters and requires installation by specialists. Among the options are 4 or more slopes, in the shape of a dome or pyramid.

Asymmetrical
It is obtained by lengthening one of the roof surfaces. This attic looks very unusual both outside and inside. Behind the seemingly simplicity of shifting the roof lies a detailed calculation of the load parameters on each wall. The living space in such a room will be distributed unevenly depending on the side and angle of the roof.


With "cuckoo"
“Cuckoos” in this case are small protrusions in the shape of a triangle, where windows are most often located. Moreover, on one slope there may be several such structures with individual rafter systems. The shape of the structure can be completely different, both single- and four-slope.


L-shaped
A completely inexpensive roofing option with a non-standard appearance. Most often, two gable roofs are used for this, joining each other at a right angle, which is the most difficult part of the structure. Of course, such models are mainly used in buildings of a similar shape.


Having listed the main forms of attic structures, it should be added that combinations of such roofs are also possible. For example, a single slope can be erected as a broken line. The most important thing is to comply with all operational and design requirements during construction.
Shapes and sizes
The construction of the attic floor also has variability in terms of implementing the various architectural forms of the room itself. The geometry of the attic room can be triangular or broken, cubic or L-shaped, symmetrical or asymmetrical, one-story or two-level, occupy the entire space of the house, only part of it, or even moved beyond the load-bearing walls with support on columns. There are many alternatives. A complex design requires correct calculations of dimensions and drawing up a construction plan.


Calculating the exact parameters of the attic floor area involves a number of preliminary calculations. To draw up a project, you need to schematically divide the space into simple geometric shapes: trapezoids, rectangles, parallelograms, squares, triangles and, having calculated the area of each of them, add up the results. This principle applies to almost all attic structures. And if all height standards (at least 2.5 m) for the attic are met, then the floor area must be at least 16 m².

It should be noted that in addition to the established height parameters, where such calculations are possible, there are attics of other sizes:
- attic ranging from 0.8 to 1.5 m;
- semi-attic less than 0.8 m.
In such cases or when the slope of the roof is quite significant, the following formula is applied:
P = AxL+2Bx0.7L
P = L (A+1.4B),
where P is area;
L – length of the attic plane;
A – floor width for walls above 1.1 m;
B – floor width for walls above 0.8 m.
Useful living area is calculated by points on the ceiling located 90 cm perpendicular to the floor. The remaining part is considered a “dead” zone.

Such formulas allow you to both calculate the strength and weight of the structure and determine the amount and type of material used.
Thanks to modern technologies, today it is quite possible to calculate the parameters of a mansard roof online. To do this, you will need to enter data about the type of attic, the rafter frame diagram, roofing material and insulation.


Rafter system
The transformed rafter system is the key difference between mansard roofs and others. This already heavy structure can withstand the weight of the roof, floor beams, the load of the attic floor, and precipitation. Therefore, only one that meets all requirements can be considered a reliable and durable system.


One of the basic rules is that the system must provide for uniform distribution of pressure on the base and load-bearing walls.
Only high-quality, well-dried and antiseptic-treated wood is used. The optimal parameters of the rafters are 100x100 mm in cross-section; they will create a structure resistant to weather conditions.


Inserting a tree into the lower crown is strictly prohibited. The slope of the rafters is in the range from 30°–60°. To secure them, exclusively hard metal materials (corners, staples, nails) are used.
Particular care should be taken to calculate the pitch of the rafters, since the choice of the width of the insulation and the size of the windows located between the two rafters depend on this. It is worth adding that the width of the step between them should be 3 cm less than the width of the insulation to reduce waste.
All of the above requirements are met regardless of the choice of one of the types of rafter system design, which comes in the following types.
Hanging
It is economical and practical. This design rests on the side walls of the structure, and the rafter legs are fastened with horizontal jumpers for rigidity - crossbars, which also serve as the basis for the ceiling. The advantage is the location of the main elements of the system outside the used part of the room, which allows you to expand the usable space.

When installing such a system, you should pay attention to the following:
- the supports of the roof overhang should not fall on the bottom, extended beyond the load-bearing walls, rafters;
- to stiffen the roof, a wind board should be nailed between the ridge and the mauerlat;
- The moisture content of the rafter wood should not be more than 15%. Otherwise, the system may lose stability. If such material is still used, then it is better to connect it using bolts, which can be tightened if necessary.
Layered
Used in attics with a load-bearing partition in the center of the room, which provides additional support. Most often, this system is used for large areas of the house and heavy roofing materials. The design principle consists of laying a plank on the internal walls, protruding instead of a mauerlat, and installing a special rack to support the ridge girder.

Features of the arrangement of the layered system:
- the thickness of each element is from 5 cm;
- all nodes are smooth and located exclusively in the proper places according to the design;
- the connection of the Mauerlat and the rafter leg is strictly horizontal;
- symmetry in the position of racks and struts;
- reliable and high-quality ventilation;
- waterproofing at the junction of nodes and masonry;
- the length of the rafter leg without support is up to 4.5 m.


The independent design of the rafter system requires the fulfillment of a certain order and requirements:
- Fastening the mauerlat (the base of the rafter system according to the area of the house). The strength of the fastening with the lower slings will protect against “roof failure” in the literal sense of this expression. The material used is dry treated timber with a cross section of 150x100 mm. The Mauerlat transfers some of the load of the rafter system onto the walls.
- The base of beams is laid horizontally, always using a level. Attaches to walls using bolts or brackets.
- The waterproofing layer is located on the crowns, columns of the frame building or on the brickwork. You can use roofing felt, roofing felt, bitumen.


- Frame posts. Ideally even vertical and horizontal posts are fastened with staples or nails to long beams, and insulation is laid between the vertical ones. Before continuing work, it is necessary to check the racks for mobility - they should not become loose. Otherwise, they are strengthened using braces or ties.
- The purlins hold the rafter legs together. There is a ridge girder on top, and side girders on the side. If the length of the rafter legs is less than 8 m, it is not necessary to install a ridge. An element that performs its functions can be guy ropes that secure the attic ceiling.
- The final stage of constructing the system is attaching the sheathing.
Of unconditional importance for the roofing system is the sheathing, which takes on its entire load.
It consists of beams laid perpendicular to the legs of the rafters. Moreover, different materials are used here depending on the type of coating: boards, timber, plywood, timber. Although usually a 40–50 mm edged board is used for this. Soft types of cover require a continuous sheathing, and with harder materials a distance between boards of 25–40 cm is provided.


All rafters are connected at the highest point of the roof - the ridge. The ridge gives the entire structure rigidity and stability. Therefore, it is obvious that the duration of operation of the entire roof depends on the reliability of this part of the system.
The connection of the rafters, and, consequently, the formation of the ridge, occurs using the following fasteners:
- overlap is formed by laying rafters on top of each other and connecting them with through fasteners;
- cutting into half a tree as a result of laying rafters, in which half the thickness and fastening are selected at the edges;
- Trimming the end sides of the beams involves laying the rafters on top of each other and trimming them in a mirror image at one angle.


In the ridge area, the rafters are secured with plates made of wood or metal, metal corners, staples, staples, wooden wedges, and nail plates. During the construction of the rafter system, such an important part of the house as the cornice is installed. To do this, either the length of the rafters is increased, or a filly is used.
Among his primary tasks:
- protecting walls from moisture and dirt;
- partially eliminates the ingress of water and snow from the roof onto the foundation of the building, preventing erosion;
- harmonious and finished look of the overall roof structure of the house.


Construction requirements
Designing an attic floor involves meeting the following requirements:
- the relationship between the communications of the attic and the whole house;
- the selected material for the attic must be technically and harmoniously combined with the building material;

- compliance of the additional floor plan with the building design;
- compliance with safety rules when carrying out work with the presence of people in residential premises;
- strict adherence to fire safety regulations;
- compliance of the light-transparent fencing with the general concept of the building style.
Installation technology
The assembly of all elements of the attic room occurs in the following order:
- It is better to calculate the strength of a building with the assistance of specialists;
- preparation of the attic and roof project can also take place with the participation of qualified people or on the basis of a ready-made option;
- dismantling the old roof if the building is no longer being rebuilt;


- manufacturing a wooden rafter frame is one of the most difficult points in the construction of an attic;
- it is necessary to ensure the accuracy of the construction using a cord stretched between the arches, which ideally should be in a horizontal position;
- fixing the arches to each other with nail plates or stamping corners;
- vapor barrier material on the inside of the rafter system, secured with construction staples;
- a layer of insulation that fits tightly to the rafters;
- installation of the sheathing on the insulation material is carried out using wooden blocks;

- waterproofing is laid on the outside of the rafter system - often polyethylene film is used for this, and another layer of boards is placed on top of this layer;


- for natural ventilation of the space under the roof, special cavities are installed between the hydro- and heat-insulating layers in the eaves area, which are located in the upper part of the ridge;
- covering the frame with roofing material depending on the preferences of the home owner.
Among the finishing options you can consider the following options:
- Metal tiles are used not only because of their attractive appearance. This material is excellent value for money. Durable, light both in installation and in weight. It withstands shocks reliably, but at the same time transmits all sounds well, which is the main drawback.

If you have made such a decision on how to build an attic, it will be correct. Before building an attic in an existing house, you first need to decide on its shape, and whether the roof will be completely converted into an attic floor or not.
After all, the construction of an attic is considered not only more economical, but is also a process that will require much less labor in comparison with the construction of the next floor. It is these facts that make the construction of an attic very popular. Projects of country houses with an attic, as a rule, have a special or, as builders call it, a “broken” roof, since it makes it possible to make maximum use of the usable area.
When deciding how to build an attic, special attention must be paid to the quality of the roof. Since it should not only have an aesthetic appearance, but also have excellent thermal insulation, and also have good waterproofing. The best thermal insulation material for roofing is either slate or ceramic tiles, but in no case use metal tiles, as they tend to get very hot in the sun. In this case, how to build an attic with your own hands? At the initial stage of building construction, it is possible to make calculations of the supporting structure with maximum accuracy.

It should be taken into account that the rafters must be installed at an angle (from 30 to 60°), since an increase in the degree of inclination leads to a decrease in the usable area of the attic.
To solve the problem, you can insulate the attic from the inside using mineral wool.
A residential attic space requires a large layer of insulation. The material must meet fire safety requirements and be non-toxic. Mineral wool is one of the most suitable options.

Types of material
The main types of mineral wool are basalt wool and glass. Each has its own properties, pros and cons.
Basalt wool
Basalt wool is produced from gabbro-basalt rock. Carbonate rocks are specially added to it, which allows you to regulate the acidity module. Material with higher acidity is more resistant to moisture and more durable. Adding binders to basalt wool: bitumen, synthetic, composite, bentonite clays holds the fibers together and helps give the desired shape.
Glass wool
Glass wool is a mineral material, the production of which uses raw materials used in glass production, as well as waste and broken glass.

The properties of glass wool are different from basalt, its thickness is 3–15 microns, and its length is several times greater than basalt. Therefore, glass wool slabs are more elastic, have greater strength, and are resistant to vibrations. Glass wool is fire resistant and can withstand temperatures up to 450 °C.
Despite all the advantages of glass wool, there is one significant drawback that reduces the popularity of its use. When laying this material, many small particles are formed that are harmful to health. Therefore, installation is carried out in special clothing, shoes, and a protective mask. You won’t be able to clean them after work; you’ll have to throw them away.

Nuances of isolation
When insulating a roof, it is better to use cellulose wool; it provides better moisture conductivity and does not allow moist air to accumulate under the roof.
The main difficulties of insulation appear when working on the slopes of a roof that has a truss structure.
Here it is necessary to use dense wool, which can be securely placed between the rafters. It should be light and elastic.

The main advantages of mineral wool remain its non-flammability, soundproofing, good thermal insulation properties, vapor permeability, high environmental friendliness, and relatively affordable price. It is produced in slabs, mats, cylinders, and there are options coated with foil.
If the size of the insulation is larger than the distance between the rafters, it is cut into the necessary pieces, adding a few centimeters for a tight fit.

This method is well suited for insulating attics and living spaces located directly under the roof. The disadvantage is the reduction in internal dimensions due to a layer of wool, plasterboard and additional finishing.
Thermal insulation methods
Depending on which structural element of the building is insulated, there are 2 ways to insulate the roof from the inside.

Thermal insulation of the floor
The first option is to insulate the floor. The method is inexpensive and very easy to implement. It consists of laying wool on concrete base slabs or, in the case of a wooden floor, between structural elements. Any type of mineral wool will do, even soft and granular. Installation is simple, there is no need to go around the rafters, as when insulating roof slopes, you can easily fill all the gaps and cracks.
Thermal protection of stingrays
The second option is to insulate the roof slopes. If the room in the attic is not used, then this option is not economically viable. The consumption of materials increases significantly; more time is required due to bypassing the rafters and additional fastening of mineral wool.

Insulation of slopes can be done in two ways: on top of open rafters or between them. With the first option, wooden beams remain visible inside the room and have an additional decorative function.
Sequence of work
Regardless of which method of mineral wool insulation is used, the general algorithm of actions is as follows: surface preparation, waterproofing, installation of insulation, laying a vapor barrier, sheathing.

Preparatory activities
Before starting work on thermal insulation, the surface to be insulated must be prepared. The structure is inspected, if necessary, identified defects are eliminated, and cleaned of dirt and debris. Preparatory work also includes calculating the amount of material.
The thickness of the insulating layer should be at least 15–20 cm, so if you choose wool of a smaller thickness, it will need to be laid in two layers.

Waterproofing
To protect the roof from moisture, waterproofing is installed on the insulated surface. It is laid overlapping, secured with a stapler and gluing the joints with tape.
It is important to install the waterproofing membrane so that there is a ventilation gap between it and the insulation, and the material completely covers the entire rafter system and extends slightly onto the walls.
Then, over the insulation, a batten of battens is nailed to the rafters, which will secure the material and provide a ventilation gap. It is better to treat all wooden structural elements with a special antiseptic.

Laying insulation
After installing the waterproofing, you can begin installing the insulation. To do this, mineral wool is cut into pieces approximately 5 cm wider than the distance between the rafter beams. Then, after installation, the material will straighten out and better fill the space. Installation of mineral wool should be carried out in such a way that the material fits as tightly as possible to the beams and there are no gaps left.
Arrangement of vapor barrier
After laying the insulation, it is necessary to protect it from water vapor coming from inside the room. If this is not done, the mineral wool will gradually become wet and lose its thermal insulation properties. Therefore, a vapor barrier is installed on top of the insulation. As a vapor barrier, special foil materials, polyethylene films or roofing felt are used.
To ensure tightness, the vapor barrier is laid with overlapping layers, and the seams are taped. It is important to install foil vapor barriers with the metallized side inside the attic. The structure is fixed with wooden slats, onto which the sheathing (lining or drywall) is subsequently attached.
Insulating the roof with mineral wool is one of the most affordable ways to create a warm and cozy attic. The main thing is to strictly follow the technology. And then everything will work out.

Try to pay special attention to the insulation of the attic roof. If the roof is not insulated, do not expect heat in the attic. A roof is a roofing covering. An attic roof is a “roofing pie” consisting of several layers: a vapor barrier layer on the inside, a waterproofing layer on the outside, insulation between them and an air gap.
Various materials are used as insulation. The characteristics of the materials used depend on several factors: the functional purpose of the room, humidity level, critical temperatures, loads, and so on. Non-flammable basalt materials are the best option.
Various materials are used as insulation for the attic from the inside. The most popular and simplest is mineral wool.
Polystyrene foam is not recommended. It's flammable. Has poor vapor conductivity. Mineral wool is perfect. It is pressed into a slab. On the inside there is a vapor barrier layer. On the outside there is waterproofing (special layer).

Nowadays, the use of sprayed polyurethane foam to insulate the attic from the inside has become quite popular. This method is also quite economical and very effective.
If an attic is made from an old attic, then, as a rule, the rafters are retained. The load is minimized by using low-density insulation materials, since they are much lighter. The disadvantage is that they are blown by the wind. Additionally, windproof, vapor-permeable material is laid.
Approach the installation of insulation with due care. Do not forget about the presence of sufficient ventilation space between the roof covering and the insulating layer.
The attic is warm in winter and cool in summer only when all the work on insulating the walls and roof is done correctly. Do not ignore these rules and your budget will have a tangible effect.
The attic is a fashionable architectural element. F. Mansara (French architect) three centuries ago was the first to use attic space not only for economic purposes, but also for housing.
Nowadays it is quite widely in demand in civil and industrial construction. In individual construction, the attic is experiencing a real boom. It is equipped both during the construction of a new house and during the repair of attic spaces (roofs).
The house takes on an expressive appearance, and the attic space is used functionally and efficiently. The area occupied by the attic is decent. Additional space for a nice recreation room (billiard room) or a wonderful summer bedroom. Keeping it warm and dry will make it habitable.

A well-insulated and well-made attic can become an excellent relaxation and work room.
How to properly insulate an attic from the inside? A pre-developed project is required. It will allow you to prepare well and provide for all the nuances. A competent approach to attic insulation and the mandatory use of high-quality materials will help to avoid mistakes that can play a very bad role over time.
In a private home, as a rule, there are large heat losses. Basically, this happens through the ceiling and upper floors. The processes of wetting (drying) the insulation occurring under the roof worsen its quality. Microclimate disturbances often cause cold inside the house. This arises mainly due to poor quality construction work related to the attic.
It is recommended to insulate the attic not only from the outside, but also from the inside. Insulation is a technically quite complex process. The impressive area of the attic floor, its maximum contact with the external environment, the complexity of the design - requires certain knowledge and skills from the one who will be involved in its insulation.

Attic structures are distinguished by the fact that they can be constructed from a variety of materials, for example, wood, metal, reinforced concrete. There are no restrictions here, you just need to ensure stability and proper insulation. Ceilings in rooms can also be very different: inclined, flat with one inclined wall, formed by two slopes converging at an acute angle. All this and much more has made the attic so popular for more than four hundred years.
The main advantages of such a roof are as follows:
1. The possibility of adding an attic, that is, using the infrastructure of an existing building. In this case, there is no need to completely disassemble the entire roof, which allows significant savings during the work. This is an additional floor that can be used for its intended purpose.

2. The living space of the house is increased by reconstructing an unused attic space. This allows you to add a full second floor at relatively low cost.
3. In places with fairly dense buildings, an attic second floor is the best way out.
4. The appearance of the building improves, the structure acquires a finished, holistic appearance.
5. Attics can be built on more than just one level. If necessary and compliance with all rules and requirements, it is possible to build a two-tier attic, which will decorate any building, adding additional living space to it.
6. When constructing an attic, heat loss through the roof of the house is greatly reduced. This also results in lower heating costs during the winter months.
7. Construction of attics is possible even in a residential building without the need to move out residents. To do this, it is not necessary to use heavy construction equipment; all work is carried out directly on the roof of the building in the shortest possible time. A new floor can be erected with virtually no problems or costs.
But the construction of an attic also has its disadvantages, as with any structure. It is worth noting such disadvantages as:
1. When constructing such a room, some of the usable space is lost.
2. Sloping and sloping ceilings greatly reduce the height of the walls; ceilings in attics are usually low, not exceeding 2.4 meters.

3. In many cases, windows can only be located in the ceiling, which is not always convenient.
4. Rafter structures begin to quickly degrade due to lack of ventilation. Typically, their service life is about three times less than with a cold attic.
5. Large amounts of snow often accumulate on roof windows in winter, which reduces the level of already insufficient lighting.
Types of designs
When deciding how to make an attic, you must first decide what type of rafter system will be used. A characteristic feature of the attic structure is its broken, rather steep configurations, but we must not forget that this is not an aesthetic function, but a purely practical one. Such broken shapes provide:
· correct transfer of all loads to load-bearing walls;
· allow you to effectively protect the entire structure from precipitation;
· impart resistance to such negative phenomena as sudden temperature changes, rainfall, snowfall, and the formation of large amounts of ice.
The simplest form of a residential attic is a triangle, the most complex is with a break. It is recommended to make all horizontal logs and vertical posts from thin wooden beams.

Among the rafter systems used for the attic floor, the most commonly used are:
1. Hanging type rafters. They rest on the walls, creating a horizontal load. If you decide to build an attic second floor using this type of rafter system, then you need to take into account the design features. To connect the beams, intermediate supports are not used here, only special ties made of metal or wood.
2. The inclined type of rafter system is recommended for small cottages in which the load-bearing wall is located in the center or there are intermediate supports. The rafters rest on the outer walls, the middle part of the structure rests on the inner wall. Such a simple system can only be used for those houses in which the distance between separate load-bearing walls is no more than six and a half meters.
3. Hanging and inclined rafters can be in the form of right triangles, which have a stop behind the load-bearing wall. In this case, there is no need to erect a mauerlat; ordinary beams are used for rafters. Struts are required, all racks cut into the floor beams, rafters are secured with anchors.
Construction stages
So how to properly assemble an attic structure? The sequence of all work should be strictly observed, which will allow you to build a strong, reliable attic. It is imperative to correctly determine all loads, which only experienced designers can do.

The construction of the attic involves the following work:
1. Dismantling the old roof. In this case, it is not necessary to completely disassemble the ceiling. Unless this is provided for by the project.
2. If necessary, the floor structures are strengthened. This is done so that the second floor (attic) does not give unnecessary loads. If necessary, an additional layer of waterproofing is laid at this stage.
3. Construction of the rafter system, insulation of the attic itself.
4. Installation of windows.
5. Internal and external finishing of the building.
To build an attic, it is recommended to use wooden beams that have a cross-section of fifty by one hundred and fifty centimeters. In this case, the following sequence of work is observed: first, the frame of the future structure is made, after which the support beams and rafters are strengthened. After installing the stepped bevels, waterproofing work and installation of insulation are carried out. Now you can strengthen the sheathing and lay the roofing material. Finishing work is carried out last, after all the windows are installed.

The attic second floor must be insulated to ensure the safety of the structure and comfortable living conditions. For such a process to become effective, it is necessary to observe the construction of a multi-layer “pie”, which includes:
· internal finishing material on the ceiling of the attic room: moisture-resistant plywood, plasterboard, etc.;
· vapor barrier membrane;
· insulation (usually mineral wool in rolls or slabs);
· laying waterproofing;
· installation of roofing covering (tiles, corrugated sheets, etc.).
The insulation layer should be two hundred and fifty to three hundred millimeters; often a special frame is made for its installation, attached perpendicular to the rafter system. During installation, gaps and cavities should not be allowed between the insulation boards, as this will lead to significant heat losses and low thermal insulation efficiency.
The attic is not only beautiful, but also a very functional architectural element that is capable of fulfilling the numerous tasks assigned to it. This is a great place for living space. Here you can arrange a children's room, a playroom or a large gym.
The technology of attic construction consists of high-quality and consistent performance of the following work:
1. Development of a project for the construction of an attic floor or its conversion.
2. Dismantling of old roofing structures.
3. Strengthening the wall structures of the upper floor.
4. Installation of waterproofing and thermal insulation of ceilings.
5. Construction of the end walls of the attic room.
6. Construction of an attic roof, its insulation and finishing.
7. Installation of attic windows.
8. Arrangement of a new living space.

To work, you will need to purchase materials and tools. It is usually necessary to have wall panels (or other material) for cladding the end walls of the attic, thermal insulation materials for the walls and pitched roof, roofing materials, beams for the roof structure, finishing materials, etc.
After preparing everything that is required for construction and developing the project, you can begin the main work. First you need to make a frame for the roof. The rafters can be made from beams measuring 50x150 cm. The structure must be well secured, install slings, support blocks, erect attic walls and install rafters. The rafter structure must be installed securely and accurately. After this, stepped wall slopes and attic partitions are installed, and work on insulation and waterproofing of the attic is carried out. Next, you should build a sheathing for the attic roof, lay a heat insulator on it, strengthen it and then finish the roof with roofing material. After this, the installation of doors and windows, interior decoration and arrangement of the premises are carried out.
Attic roof
In order to understand how to make a roof in the attic correctly, knowledge about the features of such a room will not be superfluous. Leaks in the roof and other roof defects will negatively affect the entire building to a much greater extent than the same defects of a conventional attic roof. In this case, water will flow into the living room, which will most likely lead to repairs to the room.

The main feature of an attic roof is that it is exposed to moisture both from the outside and from above (snow, rain, etc.) and from below (the formation of condensation from the moisture in the air in living spaces on the lower floors). To eliminate this problem, the attic construction technology involves installing a special vapor barrier layer that prevents the penetration of moist and warm air from living rooms to the tiles.
It is also necessary to waterproof the roofing material and ensure sufficient ventilation of the roof of the attic space. As a roofing covering, you can use soft bitumen shingles or metal tiles.
Insulation and arrangement of the attic
Due to the fact that the attic is usually used as a living space, great importance is attached to its thermal insulation. High-quality insulation of the attic roof ensures the creation of a comfortable microclimate in such a room and other rooms of the house, effective heat retention and a long service life of the entire building. There are several ways to insulate an attic. Insulation from the outside implies general insulation of the entire house.
The optimal and most effective method is additional internal insulation, which involves the use of a multi-layer thermal insulation structure consisting of the following layers:
· The first layer (inner) – finishing material, for example, sheets of plasterboard, plywood and other materials that form the ceiling of the attic room
Second layer – vapor barrier film
· The third layer is a porous thermal insulation material (mineral wool, etc.)
· The fourth layer is a waterproofing material, laid to form a small gap and allow water to easily drain out
· The fifth layer is the roofing covering (metal tiles, soft roofing, etc.).

Advice from the master!
In addition to insulating the attic roof, it is also necessary to insulate its walls and floor. Arranging a room in the attic includes performing work such as installing attic windows, internal partitions, doors, as well as decorative finishing.
Installing pitched roof windows is the best solution for an attic. Glazing can occupy a significant surface area of the attic, minimally 12.5%. The glass used in such windows is special: it does not break under strong pressure or impact, but crumbles into granules that do not have sharp or cutting surfaces.
The specificity of attic rooms allows them to be equipped in a special way, decorated in an unusual and original way. Many designers recommend using translucent plastic partitions or partitions decorated with translucent fabrics to zone these rooms. When choosing a shade for wall decoration, it is recommended to give preference to light colors that will make the interior light and pleasant. It is not recommended to decorate roof windows with curtains, but it is better to choose light-colored blinds.
Having learned how to build an attic yourself, arrange it, create a comfortable, cozy and unusual room, you can try to build an upper floor at home. This is a great way to make your home unique and individual, increase its usable area and equip additional living space.
You should also take into account that the attic must be at least 3 meters wide, and the height in the center of the room is at least 2.2 m. But in this case, how to build an attic that was not originally planned? Additional questions always arise, such as, for example, the arrangement of stairs. You can place the staircase in the area of the attic hatch, which will simplify construction, and a spiral staircase will also make it possible to save space. In order to prevent the wood from rotting and being damaged by pest beetles, all wooden elements of the roof must be treated with an antiseptic.

To increase fire resistance, it is necessary to impregnate with fire retardants (special wood fire retardants). Also, when deciding how to build an attic, it is necessary to take into account that the attic and the attic differ primarily in climatic conditions. The attic is a less ventilated room, which causes condensation to form on the insulation. Therefore, it is necessary to leave a space between the insulation and the roof (at least 50 mm), and another layer of vapor barrier should be laid on the inside of the insulation. When carrying out thermal insulation work, you should also not forget about insulating the walls, which are thinner in attic structures. Their thermal insulation layer must have a thickness of at least (250-300 mm). Independent construction of an attic floor is possible, but for this it is necessary to carefully plan the implementation of all work and thoroughly follow the existing technology.
Of course, it would be much easier not to disassemble it, but to reinforce the ceiling above the premises of the house. Beams or channels can be used as load-bearing structures.
After the ceiling has been strengthened, you need to decide on the size of the attic rooms; their height at the walls should not be lower than 1.5 m, and in the middle part it should be a standard height of 2.5 m, or even more. After this, a guide profile (PN) is attached to the floor for drywall, and above it, the same profile is attached to the rafters. Markings are made using a plumb line, tape measure, or strong cord. Then the profile of the racks (PS) is installed in the guide profiles, the pitch of which should be 600 mm. On inclined ceiling surfaces, the metal profile can be mounted horizontally. After this, when the location of the rooms is clearly visible, several skylights can be installed on the roof so that the rooms are well illuminated with natural light. In addition, it will be necessary to make an opening in the ceiling to install a staircase to the attic. The least amount of space on the ground floor will be occupied by a single-flight staircase with goose-step steps.

After this, the outer side of the attic partition frame can be sheathed with waterproof plasterboard, and then electrical wiring can be laid inside the frame to connect switches and sockets. Next, mineral wool slabs with a thickness of 100, or, in extreme cases, 50 mm are placed in the frame. On the inside, they are covered with a vapor barrier, and an internal lining made of waterproof plasterboard is attached, holes are made in it for installing sockets and switches, and wires are brought out into them for connection. Then the ceiling and inclined surfaces are hemmed, which are also insulated with a mineral wool board.