How to protect a brick wall from moisture? How can external walls be treated to protect them from moisture? How to protect a wall from dampness
Read also
Waterproofing walls is a mandatory procedure when constructing a building. Unprotected surfaces will be exposed to moisture - precipitation, condensation - and deteriorate, and mold may appear on them. When carrying out work, it is necessary to strictly adhere to technology; this is the only way to ensure the protection of brick, wood or concrete surfaces from water, extending the service life of the house.
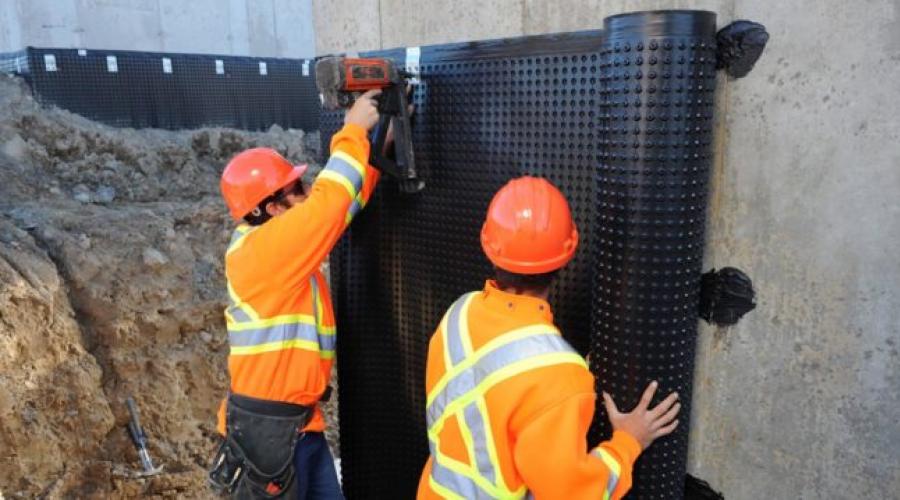
Application of liquid waterproofing
Condensation forms on the internal surfaces of the walls in the room. This is due to high humidity air. In bathrooms, kitchens, basements, non-residential buildings (garage, barn, workshop), especially if they lack heating system, air humidity is constantly increased, so protecting the walls from the inside is mandatory.
Another reason for the appearance of condensation is insufficient quality insulation of the house.
External surfaces come into contact with precipitation and groundwater.
Why is waterproofing needed?
The absence of a waterproof coating will significantly reduce the service life of the building; the material (concrete, brick, wood) will deteriorate, cracks, mold, and moss will appear on it. To prevent this from happening, you need to waterproof the walls outside and inside.
In addition, protecting internal surfaces will help:
- prevent the appearance of damp smell;
- support optimal microclimate in room;
- protect pipes and other metal structures from corrosion;
- delay the need for cosmetic and major repairs.
Types of waterproofing materials
According to their purpose, materials are divided into 4 types:
- sealing;
- anti-corrosion;
- hydro- and heat-insulating;
- antifiltration.
In appearance, waterproofing can be liquid or roll.

An example of using rolled waterproofing
Bitumen mastic
Bitumen is an elastic mass that is a product of oil refining. Creates a dense waterproof film on the surface and is not subject to cracking. Fills the smallest cracks, penetrates into the pores of the base. Used in combination with roll material or on your own. Designed to protect the wall from the outside and treat the foundation.
Bitumen mastic is easy to apply; even a person with no experience can cope with the task. The work takes a little time. The material is sold in the form of bars, which must be heated to 150 degrees to melt before use.
The disadvantages include the duration of hardening. If low-quality compounds are used, the resulting coating may crack over time.
Polymer mastic
Polymer mastics are acrylic-based plastic adhesive compositions used for waterproofing walls from the inside or outside. In addition to protection from moisture, it improves the thermal insulation properties of the treated surface.
Advantages of polymer mastic:
- forms a dense, even coating that does not require finishing;
- fireproof;
- protects against moisture, fungus, moss;
- has a safe composition that allows its use in bathrooms and other rooms;
- Available in a wide range of colors;
- resistant to sub-zero temperatures;
- dries quickly;
- elastic, when the base dries or deforms, it retains its integrity.

Colored polymer mastic
Deep penetration compositions
Dry mixtures containing quartz sand, cement and polyurethane resins, diluted with water immediately before use. After drying, they form an airtight film that reliably protects the surface.
The application technology is extremely simple; the work can be performed by a non-specialist. Penetrating compounds are used primarily inside the home.
Roofing felt and roofing felt
Both materials are used to waterproof the outside of the wall and protect the foundation from moisture.
Ruberoid is a rolled material consisting of a base (cardboard, fiberglass) and impregnation (most often bitumen). Roofing felt is a cardboard sheet impregnated with a tar composition. The first is superior to the second in its properties; only it costs less.
Membrane (film)
It is a roll material made of synthetic rubber or PVC. Used indoors and outdoors. Significant disadvantage– instability to mechanical stress. Waterproofing film for walls it is easy to damage even at the installation stage.

Covering the foundation wall with a membrane
Injection waterproofing
This type includes:
- epoxy compounds;
- acrylate gels;
- polyurethane compounds.
Holes are drilled in the wall in increments of 50 cm into which liquid is injected under high pressure. The method is quite expensive and requires special equipment, therefore its use is justified only in very difficult cases when it is impossible to use other materials.
Location of insulation cover
Waterproofing a wall can be done in 2 ways: horizontal and vertical.
Vertical
This method is used both during the construction process and during renovation work. Use roll or liquid waterproofing material or both at the same time.
Horizontal
The rolled material is laid on the base where the wall is being built. Roofing material or film will prevent the absorption of moisture from the cellar, basement or soil.

Horizontal waterproofing
Device horizontal waterproofing possible only during the construction phase.
Preparing walls for waterproofing
Before starting work, the surfaces must be thoroughly cleaned of old finishes: remove plaster, paint, wallpaper. You will need spatulas, metal brushes, chemical removers, and in difficult cases, a sandblaster.
If the surface has defects, they are eliminated - the cracks are filled with cement mortar, the protrusions are chipped off.
Features of insulation when insulating premises
Waterproofing walls from the inside is necessary when laying insulation. Most thermal insulation materials are highly absorbent, so they need to be protected from moisture. Otherwise, they will become damp, lose their properties, begin to rot or become moldy.
Internal protection
Waterproofing interior walls carried out using polymer mastics or membrane fixation.
Procedure for applying mastic:
- The prepared and cleaned surface is leveled with cement plaster.
- Apply primer.
- After drying, the surfaces are covered with a layer of waterproofing. In total, several layers will be required.
Polymer films are used for walls in an apartment or private house. Membrane installation:
- The sheathing is attached to the insulated surface.
- Insulation is placed in the cells between the racks.
- Using slats, the film is attached to the frame. Place it vertically, the stripes overlap.
- Covering is done with finishing material.
If necessary, you can attach 2 layers of film - directly to the wall, before installing the sheathing, then to the frame itself.
Features of waterproofing foundations and basement walls
The main feature of the foundation waterproofing process is that the surfaces requiring treatment are buried in the soil, and they will need to be cleared by digging a trench around the perimeter of the building.
Before starting work, you need to inspect the foundation and eliminate all defects.
Waterproofing of basement walls from the inside is carried out using bitumen mastic, roofing felt, and membrane.

Waterproofing a basement wall
Waterproofing of external walls
To protect external surfaces, you can use bitumen, roofing felt, or a combination of both.
Coating technology
Procedure:
- Cleaned surfaces are primed special composition(you can use bitumen diluted with gasoline). Apply the liquid with a brush. Wait until it dries. Apply a second layer.
- Cover with preheated liquid state bitumen mastic. If the composition is too thick and difficult to spread, add a small amount of solvent or gasoline to obtain the desired consistency. Special attention are given to the joints of the material from which the foundation is made.
- After applying the first layer, wait until it hardens. Cover with another one.
In order for the waterproofing to perform its intended function, its total thickness must be at least 3 mm.
Pasting principle
Waterproofing the external walls of a house with rolled material is carried out as follows:
- The cleared surfaces are primed in 2 layers.
- Heat a strip of roofing felt or roofing felt using construction hair dryer, burners. The impregnation needs to soften.
- Apply the material to the bottom edge of the surface horizontally (parallel to the ground).
- Press with force and carefully iron so that the roofing felt sticks tightly to the outer wall and there is no air left inside.
- The next strip is fixed vertically, with its lower end touching a horizontally fixed section of roofing material. The remaining strips are fixed in the same way, making an overlap of about 20 cm.
- The joints must be additionally sealed. Bitumen mastic is suitable for this.
Combined method

Waterproofing outer wall roofing felt
For high-quality and reliable waterproofing of house walls, you can use liquid composition and rolled material.
In this case, first the surface is coated with bitumen mastic, and roofing material is laid on it.
The simplicity of the technology and the absence of the need to use special equipment make it possible to carry out work on protecting walls from moisture with your own hands, and the tangible benefits - a significant increase in the service life of the building - justify the investment of time and money.
The construction of houses and other real estate is carried out in many cities, regardless of the number of people living in it. Despite the fact that new, unique Construction Materials, used for the construction of structures, preference is still given classic options bricks
And large ones construction companies, And ordinary people We purchase bricks only from trusted suppliers. After all, we should not forget that we're talking about, first of all, about the safety and reliability of the future structure. The strength of the structures being built has been tested by time. However, there are still points that can result in problems of various sizes with brickwork. To avoid such a situation, a series of measures should be carried out in a timely manner preventive measures to eliminate such a deficiency.
Brickwork needs to be treated by special means using hydrophobic composition for bricks, which will prevent moisture from entering directly into joints and seams. Seemingly minor exposure to moisture can lead to serious problems: cracks in the wall, decline thermal insulation properties, the appearance of mold and other fungi.

protection of masonry - example of plaster
Even if a decision is made to insulate the walls indoors, this will not solve the problem. Under the influence of natural precipitation Negative influence moisture will continue the destructive process of the structure. It is possible to protect brickwork if adequate measures are taken in a timely manner, identifying the first signs of the presence of destruction.
Moisture protection
Protecting brickwork from moisture must be carried out until the moment when destruction becomes obvious. It would be perfect option. But, if time and precipitation have already taken their toll, then repairs can be done in several ways.

At the same time, we should not forget that even after taking such measures to protect the brickwork from the destructive effects of moisture, the surface must be inspected and cleaned at certain intervals. Such inspections should be carried out at least once a year. It all depends on climatic conditions. Visual inspection will allow you to identify existing contamination, the presence of mold, greenery, fungus.
If the listed negative impacts, you need to clean the wall surface. Moreover, it is advisable to carry out this activity manually. If financial capabilities allow, you can purchase a special device that will high pressure can clean the surface from any type of contamination. Once you invest money in such a device, you can use it around the house to clean surfaces, both chemical and mechanical contaminants.
We offer you to view the features of brick processing for protection from moisture:
Sealing seams

Having identified problem areas, it is important to clean the seams between the bricks. All crumbling elements are removed. If facing brick has lost its original appearance and strength, it should also be removed from the wall. Next, the brick is treated to remove moisture and the joints are sealed with cement-sand mortar. After final drying, the wall is re-impregnated with a water-repellent agent.
Many people have a question - how to treat bricks from destruction. There is a special impregnation for brickwork, which seems to envelop the surface with a kind of film, preventing the penetration of moisture. The main thing is not to treat each individual seam, but the entire surface of the wall.
When starting to treat external walls, you should make sure that everything necessary materials were at your ready. It’s better to choose a warm sunny day. This will guarantee that a dry wall will be processed, and the applied solution will quickly absorb and create the desired effect.
I would like to emphasize that moisture impregnation for bricks consists of a number of components that help close pores and cement mortar, and, in fact, in brick. As a result, it forms on the wall transparencies, which is completely invisible. At the same time, it reliably protects the wall from moisture penetration.
Any solution can be applied in a convenient way. Many people use a sprayer, while others use a roller or brush. For application, you can purchase both domestic and foreign manufacturer. A common feature Such products are environmentally friendly and safe.
Video on waterproofing brickwork:
Salt protection

The brick product is based on components containing only natural raw materials - clay. After a certain period of time, peculiar stains - efflorescence - may appear on the surface of the brick. The solution contains a small amount of salts. Of course, white stains significantly spoil the appearance of the wall. But this fact is not yet the worst thing. The presence of salt deposits on the surface indicates that the process of destruction of both the wall and the mortar is slowly but surely taking place.
To eliminate defects such as efflorescence, special preparations are used. However, before you start applying the product, you must preparatory activities. The condition of the roof is carefully checked, if necessary, a new waterproofing material is installed, and drains are improved. These preventive measures will reduce the ingress of moisture onto the wall.

Efflorescence is quite often one of the first signs of the onset of destruction of brickwork.. With the first appearance of a specific white plaque you should be extremely careful and vigilant, since cracks, mold, and greenery may appear in the near future.
Don’t be at a loss as to how to treat the brick against destruction. By far the most effective means Water repellents protect masonry from moisture and other liquids. This is a special composition of silicon-based components. It is used at many stages of construction to achieve a water-repellent effect. They are processed and fake diamond, and brick, and ceramic tiles, even concrete, slate, cinder block, plaster, etc.
Brickwork protection water repellent increases frost resistance not only individual elements, but also the entire structure. In addition, it helps to improve the indicator of such properties as strength. Quite often this product is used in the process of wall cladding, where it is intended increased level humidity. This prevents the penetration of moisture into the material, which in turn prevents the development of microorganisms and fungi.
You can also use a water repellent when painting walls. This tandem reduces paint consumption significantly, which provides an opportunity to save a little. To work with such a substance, it does not matter at all whether you have experience or special equipment.
Main advantages of water repellent:
- creating a surface where dust, dirt, etc. do not accumulate;
- environmentally friendly;
- fireproof;
- the appearance of the treated surface does not change;
- has a low cost;
- durable.

The product is sold in concentrated form and diluted with water. So, 1 liter of product can treat at least 150 square meters any surface. It is important to properly dilute the working solution. The surface to be treated must be clean and dry. It is better to pre-treat the wall antiseptics to disinfect the surface.
In order to work with by similar means no special skills are required, since ease of use is another advantage of the water repellent. Unlike foreign analogues, domestic concentrate is consumed significantly less, since even in the presence of humidity, additional costs for surface treatment are not required.
Impregnation for brick walls applied in a thin layer. If the need arises, a short interval of 10-15 minutes should be maintained before the next layer. The validity period of the product can vary from 10 to 12 years. Throughout its entire service life, the wall will be reliably protected from harmful mold and other fungal growths. After treatment, the wall does not change its appearance at all.
We offer you to watch a video on protecting bricks from efflorescence:
Wind protection
Causes of destruction of brickwork may be different. The wind is one of those atmospheric phenomena, which have a negative impact on cement-sand mortar, destroying it. Weathering concrete mixture does not happen in one moment.
High-rise buildings especially suffer from the effects of winds, where, in addition to constant air flows, there is also overheating external walls on top floors. Changes temperature regime significantly affect the number of freeze-thaw cycles of brickwork. Since destruction begins precisely from the seams, when planning the construction of a structure it is important to select a cement-sand mortar with a high frost resistance. The result of the painstaking work of winds and rains after a certain period of time leads to partial or complete destruction of the masonry. Possible ones are listed at the link.
If the masonry is made with loose seams, then the frost resistance indicator decreases significantly. In addition, if brick is used during construction Low quality, then such construction is generally doomed to failure. However, even such a building can be given a second life by treating the walls with a water repellent.
Of course, brickwork should not be allowed to reach this state.
Protecting bricks from destruction carried out at the first detection of damage.
To carry out all stages of repair work, you should stock up the right tool and material, namely:
- container for mixing the solution;
- water hose;
- antiseptics;
- roller;
- sprayer;
- Master OK;
- hydrophobic solution;
- stairs, etc.
After reading the materials in our article, the question “how to protect a brick from destruction” should not arise. Moreover, there are many videos that show in detail each stage of repair activities.
Protecting bricks from moisture- the primary task of any builder. The better the protection of the masonry, the longer the structure will last. All types of destructive factors caused by natural precipitation are called destruction of brickwork. This is a common name among professional building contractors.
If you still have questions, we recommend watching the video instructions on how to protect a brick wall from wind and steam:
More on the topic.
How to protect concrete from moisture? In this article we are going to look at several popular solutions that are applicable both for waterproofing foundations and basements, and for protecting main walls from precipitation and seasonal humidity fluctuations.
Our goal is to give the concrete hydrophobic properties.
Classification
All waterproofing materials are divided into three main categories.
Useful: roll and coating materials are usually applied on the side of the foundation or enclosing structure on which excess static water pressure is present. Otherwise, there is always a risk of peeling off the protective layer and compromising its integrity. Penetrating waterproofing does not have this limitation.
Obviously, we are most interested in the last category of waterproofing. It is with her that we will get to know each other better.
Possible solutions
Ironing
The simplest and cheapest surface treatment (applying cement laitance to it). Cement penetrates into pores and microcracks, completely or partially clogging them. Of course, such waterproofing is not enough for a foundation; but the ironwork cement plaster facade will significantly reduce water absorption.

Liquid glass
If you add sodium to a cement-sand mortar liquid glass(aqueous solution of Na2O(SiO2)) in a ratio of approximately 1:10, you will get moisture-resistant concrete with a very short (no more than half an hour) setting period. This recipe is often used to seal sewer and water wells, block foundations, and cracks in basement floors.

The photo shows domestically produced sodium liquid glass.
Treatment with liquid glass is quite capable of reliably waterproofing the surface of the finished reinforced concrete product. Doing this work with your own hands is more than simple: the material diluted with water in a ratio of 1:1 is applied to the concrete with a brush, roller or spray.
Hint: undiluted liquid glass, applied in one layer, penetrates concrete by an average of 2 millimeters. If the treatment is carried out with an aqueous solution and in several stages, the depth of impregnation will increase to 15-20 mm.
Water repellents
How to treat aerated concrete against moisture if it is used to construct the external walls of a residential building?
In this case, silicone-based hydrophobic primers will come to the rescue. The instructions for their use are also extremely simple: the composition, ready for use or diluted with water in the concentration specified by the manufacturer, is applied to the surface of the facade in two or three layers without preliminary drying.

Protecting aerated concrete from moisture using a water-repellent solution solves several problems at once.
Let us clarify: silicone-based water repellents are intended not only for aerated concrete. They can process all porous materials: heavy concrete, limestone, plaster, etc.
The composition is applied to a dry base. A concrete moisture meter will help you assess the moisture level of a structure - it’s not difficult electrical device, measuring resistivity surface area.
Average price of water repellents Russian production is 150 rubles per kilogram. The only drawback of the solution is the limited adhesive properties of the facade after treatment: it can only be painted after six months.
Crystallizing compounds
Penetron, Crystallisol and their numerous analogues differ from the solutions listed above in their operating principle: simply put, they do not transport material to fill pores through capillaries from the surface, but create it on the spot ().
Chemical additives cause accelerated crystallization of calcium salts (the main component of Portland cement) upon contact with water. The crystals reliably fill the pores of concrete.

What is the result?
- The most obvious result is the impossibility of moisture penetration into the thickness of concrete when external treatment designs. If the basement walls are treated with the same Penetron from the inside - groundwater will no longer find their way inside the room: the impregnation penetrates 40-60 centimeters into the concrete.
- Of course, you can also forget about efflorescence and mold.. Moisture is necessary for their appearance.
- Frost resistance of concrete increases by an average of 100 cycles. WITH practical side this means an increase in the service life of capital walls by 150-200 years.
- Finally, moisture impregnation for concrete increases its compressive strength: the absence of pores prevents the material from crumbling under load.
It is curious that Penetron and its analogues provide a kind of self-healing waterproofing. Where water begins to penetrate into the concrete through new cracks and pores, the growth of calcium salt crystals immediately resumes. What is especially pleasing is that waterproofing measures can be carried out with damp walls or foundations.
Where do new cracks come from? concrete structures? The main reasons are movements and frost heaving of soils, as well as installation work. When perforating technological holes and openings, shock vibration is destructive to concrete.
What to do?
- In the first case, the problem is solved by enhanced reinforcement of structures. A foundation connected by reinforcement into a single rigid frame will not deform during any ground movements.
- In the second - using less destructive methods of work. Thus, cutting reinforced concrete with diamond wheels, and cutting reinforcement with a gas cutter or a regular abrasive wheel, is much less destructive than using a jackhammer. Diamond drilling holes in concrete is much more preferable than working with a hammer drill.

Conclusion
As part of a short review, we have listed only a small part possible solutions. As usual, the video in this article will offer the reader Additional information ().
Brick wall protection is important stage, since the material absorbs moisture from the soil. As it rises, it can reach the upper floors of the building, destroying the masonry. As a result, the rooms will become damp and mold and mildew will begin to spread.
High-quality waterproofing protects brickwork from moisture and dampness.
Protection of brick walls must first be carried out from the outside, this is the first stage of work. If this is not done, the device internal waterproofing may strengthen Negative consequences. Creating protection inside the rooms will lead to even greater saturation of the walls with moisture. Dampness on upper floors will become stronger.
Your job is to protect brick wall, base or foundation from dampness. First, make high-quality waterproofing on the outside. It is very good if this stage of work is carried out at the stage of construction of the building.
Options for protecting basement masonry
When building houses they are used the following types protection:
- coating:
- pasting;
- clay castle;
- the use of plaster with special modifiers included in it;
- screen
Clay castle is a method that is based on constructing a ditch around the foundation. Liquid clay is used to strengthen the walls and bottom. Then the ditch is filled with gravel, and a blind area is built on top. Screen waterproofing involves working with bentonite mats; they are laid overlapping.
These 2 types of waterproofing are good to use to protect the brickwork of the basement, but work must be carried out during the construction of the building. The clay castle and the laying of screens cannot be considered the only possible options. Plaster mixtures and the hydrophobic modifiers introduced into them make it possible to reliably protect the masonry from groundwater.
Coating waterproofing involves the use of mastics made on the basis of bitumen. Adding synthetic resins or other fillers increases protective functions. Before treating a brick wall with mastic, thoroughly clean the surface.
The lining is very effective; it is based on the use of fiberglass materials. It's simple and cheap way protection of the foundation and basement masonry from groundwater.
Protection of masonry walls
Seams of brickwork located above ground floor, are also vulnerable to moisture. Ceramic stone Today it is used most often; due to excess moisture, it begins to deteriorate.
Brick is a porous material, and masonry seams can be called weak point. When moisture rises along the walls, the following troubles are possible:
- the appearance of whitish salt formations;
- In winter, moisture freezes to form ice;
- destruction of masonry;
- heat leaves the building.
Processing of the brick surface is carried out in stages.
A special impregnation is best suited to protect bricks from moisture.
After processing it will be completely protected. In addition, brick walls will become very beautiful, and the durability of the structure will significantly increase. The product creates a water-repellent layer and excellent vapor barrier. This is achieved due to the penetration of impregnation into the brick by 1 cm. As a result, the stone wall is not afraid of rain, and the ingress of snow and melt water will also not have a harmful effect.
Impregnations are available for sale in specialized stores. It is worth mentioning the following products, which differ from each other in composition:
- Water-repellent impregnation for bricks. It is most in demand because the product has excellent protective characteristics.
- Silicone impregnation. Remedy for water based, it consists of 2 components.
- Impregnation varnish. By applying it to the walls, you will get a surface with a slight gloss.
- Silicone acrylic impregnation.
Impregnation for bricks has a water-repellent effect. On the surface of the brickwork, the products form a very thin hydrophobic film, which reliably seals the pores of the brick, preventing moisture from penetrating inside. The destruction of the brick stops.
Before starting work, you need to identify sources of moisture penetration. To do this, examine the seams. If they are not destroyed, then simply apply impregnation to the walls. If there is visible damage to the seams, first carry out restoration work, and only then cover the walls with a protective agent.
Inspect stone walls once a year. Remove dirt with water or a special paste. No less effective mechanical cleaning. To remove traces of salt on the walls, use special solutions. Be sure to treat mold and mildew with antiseptics.
It is best to apply the product to dry and clean brick walls. Wait for dry weather and then get to work. If the mortar in the masonry joints crumbles, remove it. Replace crumbling parts of the masonry, lay new brick. Apply impregnation to the masonry and let dry. This is the preliminary stage of work. Then seal all seams.
//www.youtube.com/watch?v=rcAhesRjvDU
If you want to receive good result, then make sure that at least a day passes between the preliminary impregnation of the masonry and the finishing part of the work. Then seal the seams by applying a 2 mm layer of cement-sand mixture. Using a sponge diagonally, rub in the solution. Remove excess and wait until the solution has completely set. To remove residue, rinse the wall thoroughly cold water. Close the seams from getting in sun rays. Wait 3 days and then apply finishing impregnation. This is an excellent hydrophobic coating for sand-lime bricks.
If there is no need to repair the seams, apply protective impregnation in 2 layers. There should be a little time between coats 1 and 2, but waiting 15 minutes is enough. There should be a visible shine on the wall; such a coating will last at least 10 years. Now you know everything about how to protect walls.
Conclusion
Protection of brickwork consists of 2 stages. First, waterproof the foundation, and then move on to protecting the walls of the building from precipitation. Use special impregnations.
//www.youtube.com/watch?v=khFbmy2hGDg
The products form a thin hydrophobic layer on the surface of brick walls, which prevents moisture from penetrating into the masonry.
A brick wall looks like an insurmountable obstacle to dampness, but this impression is deceptive. The fact is that brick has pores through which moisture can penetrate. Dampness can also get through not very hermetic connection between individual bricks and onto the inner surface of the wall. Thus, water penetration into the home is possible even in cases where dense bricks were used in the construction of the house, concrete blocks or stone. Moisture that has penetrated the walls destroys floors and other wood parts. Moreover, heat loss during damp walls 50% higher than dry losses. Thus, external waterproofing housing seems to be a very urgent task. The best protection there may be a layer of plaster prepared on a cement base, or a special protective covering. The first method is more difficult to implement, but much cheaper.
The plaster is applied in two or three layers, it outer surface can be given different kind from flat to lumpy structure. The appearance of the wall is largely determined by the tastes of the owner of the house, but the number of layers depends on the rate of moisture absorption. If the adhesion of the coating to the wall is good, then it is enough to apply two layers; in case of weak adhesion, apply another thin layer with a rough surface, which will serve as a base when laying other layers. This layer is also applied if the wall has an increased ability to absorb moisture. It is recommended to do a simple test: spray water on the wall and see how the wall absorbs moisture. If water flows down in the form of drops, it means that the wall repels moisture; otherwise, water is absorbed into the wall almost instantly. Having determined the number of layers that will be applied to the wall, prepare the surface for work. The wall should be cleaned of dust, mold and anything else that will interfere with tight adhesion to the coating; the same applies to the mortar between bricks.
If you doubt that you can do it yourself plastering work, then you can simplify the task and limit yourself to only painting the walls outside. The cheapest is the so-called cement paint, which is sold in powder form and mixed with water before use. You can also apply an emulsion to the wall, which has the advantage of being easy to apply and drying quickly. The emulsion has water-repellent properties and can subsequently serve as a base when applying subsequent layers. It should be borne in mind that the paint and emulsion are applied to a dense and thoroughly cleaned surface. If, when carrying out work on waterproofing walls, it is undesirable to change appearance structures, it is recommended to use colorless sealants. These sealants are applied by brush or spray; By clogging the pores of the brick, they prevent the penetration of moisture. If the manufacturer's instructions are strictly followed, the specified coating will last for 10 years; if the wall has too many pores large diameter, then a second layer of sealant should be applied. Be sure to seal all cracks and potholes before using such substances.
Renewing brickwork joints
1. Cleaning. Remove old mortar and crumbs; wet slightly internal surfaces seams. Prepare a solution: 1 part Portland cement, 3 parts fine sand and enough water to obtain an elastic mixture.
2. How to put the solution. Using a mortar and trowel, place the mortar into the cracks; press him down. After the solution has dried a little, press it into the seam with a tube with a diameter of 15 mm.

Application of a protective layer
Preparing for painting. Using a stiff brush, remove dust and grout particles from the surface. If there is mold or any vegetation on the wall, treat it with a fungicide, and then remove it with a brush and scraper. Apply a second coat of fungicide and let it dry. Finally, fill all cracks and gouges with fresh mortar. If the surface to be coated is smooth, then it can be painted with a regular brush or roller. For uneven surface a special coarse brush is required, shown in the picture. Once you dip your brush or roller into the paint, use even, slow strokes to get the paint into the cracks and gouges.

Choice of coverage. A typical covering is plank cladding. The boards are nailed to a slatted frame, with each board partially overlapping the underlying board. Architraves are made around windows and doors, which cover the ends of the boards. More difficult is joining the edges of the boards in a quarter. In this case, the boards do not simply overlap each other, but are connected by inserting part of one board into a groove on the other. This connection is more durable and prolongs the life of the nails used. However, the use of wood also requires appropriate care - painting or impregnation with drying oil. The picture shows a different coating that uses plastic or aluminum sections; it does not require special care. When applying the coating you choose, it may be necessary to simultaneously install thermal insulation; in this case, it is recommended to seek advice from a specialist, since this work is not so simple.

Plastering works
1. Installation of slats. Start by installing 10mm thick slats, spacing them 1.5m apart. The slats are nailed down with nails that are inserted into the spaces between the bricks. The nail heads should be above the surface of the slats so that they can be easily removed. A 15 mm thick strip should be nailed along the upper edge of the waterproofing layer; the thickness of the plaster should be the same. Finally, nail the battens around the doors and windows.

2. Preparation of the solution. Place sand on a hard, horizontal surface (such as a sheet of plywood). Add the lime and mix it all with a scoop until the mixture is evenly colored. Make a hole in the middle of the mixture and add cement; Mix the mixture components thoroughly again. After making the second hole, add water; the amount of water should be approximately half the volume of the dry mixture. While stirring the solution, add water until you get an oily mass. Make sure that there are no lumps left in the solution. Transfer the solution to a special board mounted on a trestle or stool. Holding the falcon almost perpendicular to the surface of the board, take approximately 1 liter of solution (see figure). A typical solution recipe for brickwork looks like this: 1 part Portland cement, 1 part slaked lime and 5 parts dry sand. You can also add 1 part ordinary cement mixed with lime to 4 parts sand. For very dense walls (for example, concrete blocks or solid bricks), the proportions are 1:1/2:4 and 1:2 1/2, respectively. If you do not want to calculate all these proportions, then buy a dry solution in the store, to which you only need to add water. If you decide to do the work of preparing the solution yourself, then start with a ten-liter bucket of cement, adding the appropriate amount of sand and lime. If you can estimate the amount of solution that you can put in one hour (that is, the time after which the solution begins to set), then you can easily determine how much solution should be prepared.

3. Application of the solution. Holding the falcon in one hand almost horizontally, use a trowel to separate the layer of mortar. Tilt the falcon as shown in the picture and throw some of the mortar onto the wall with a sharp upward movement of the trowel. After this, distribute the solution over the wall, moving from one slat to another. Repeating this operation, fill all the space between the slats. After each movement, turn the falcon about a quarter: this will maintain centering and make it easier for you to hold the falcon in your hand.

4. How to level the solution. Having filled the space between the slats, you should level the solution with a trowel. Make sure that there are no air bubbles left in the solution and that the coating adheres tightly to the wall.

5. Leveling the solution layer. The coating must have the same thickness. Take a mason's float (this is a flat board with a handle) and make the surface level, lying flush with the surface of the slats. If the grater pulls the solution along with it, then do the indicated work after the solution has set a little.

6. Filling grooves. After applying the solution to the entire wall, let it dry for three hours and then remove wooden slats. Fill the grooves remaining from the slats with mortar and level these places.

7. Why do they scratch the surface of the first layer? When the solution has hardened a little, cover the surface of the wall with scratches in the form of wavy lines. This is done so that the second layer clings tightly to the first. The lines are drawn using a special comb shown in the figure. You can make such a comb yourself by hammering several nails into a block of wood. After removing the slats around windows and doors, lay down 10mm thick mortar. After making scratches, install the slats so that they overlap the quarters of windows and doors by 5 mm. After completing all the above work, leave the wall to harden for about a week. In warm, dry weather, spray moisture onto the surface of the wall - this will promote the hardening process.