How to replace a tee in a sewer riser. Replacing the sewer riser tee. Description of the procedure for removing a cast iron sewer tee
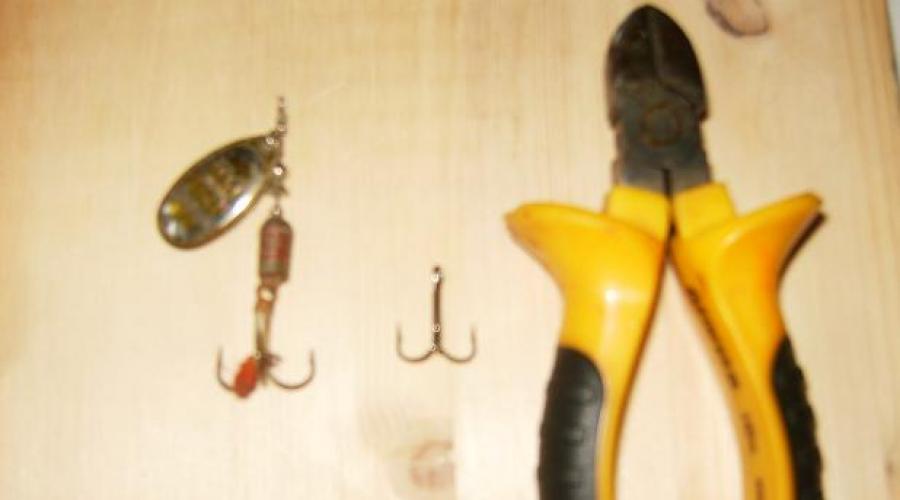
Good day everyone, I will describe a simple way to replace a tee on a “rotator”. For this we need; ordinary wire cutters, soldering acid, soldering iron, tweezers and the spinner itself and a new tee). Many people have spinners with rusty, deformed, broken hooks, and in order to replace it it is necessary to disassemble the entire structure of the spinner, which is not always convenient, and sometimes impossible without “consequences,” because putting the entire structure of the spinner back together turns into a fetish )
I don’t remember where I saw or read this method, but the point is that this method remained for me the only acceptable one both in terms of time and labor costs.
So, let's start, turn on our soldering iron and wait for it to heat up, any low-power soldering iron will do, about 40 W is the best, in our store its price is about 100 rubles)) Soldering acid is also needed, absolutely any kind and solder, sold in all sorts of “radio equipment” price 20 rubles per bottle.

On the new tee, we bite the eye closer to the fore-end and bend it slightly, so that the eye for the tee of the spinner fits into the resulting gap.

If the Tee has any nano coating)) it is necessary to clean it off with sandpaper 1...1.5 mm from the edges of the gap.
Then we put the tee into the eye of the spinner, bend the eye in initial position, we etch our cleaned edges of the tee break with acid (carefully with a toothpick!!!) and solder it with regular solder).


That's it, the tee has been replaced. This procedure has virtually no effect on the strength of the tee (IMHO).
By the way, if you went too far with acid, it’s okay, after soldering, wash the spoon with soap and karachun acid)
I hope some of the things I wrote will be useful to someone. See you at the reservoirs)
For a better understanding, a question about replacing a tee without specifications is like asking “how much does food cost?”
I think it will be clearer this way, the food is different; in the case of tees, everything is the same, even more complicated.
1) What floor do you live on? If the latter, you don’t have to shut off the water; if the floors are lower, the cost of replacement includes shutting off the water.
2) What material is the tee made of? Replacing a propylene tee is not % but many times (!) cheaper than replacement cast iron tee.
3) Where is the tee? Replacing a cast iron tee under a riser sewer pipe will not be possible without removing and replacing the toilet, especially if the toilet is installed with mortar.
It is also not possible to change only the tee. The vertical riser pipe will also have to be replaced.
4) What is the diameter of the tee? If 50,
This is a tee for internal sewerage wiring; replacing such a tee is an order of magnitude cheaper than replacing a 110 mm tee.
5) The condition of the sewer pipes (now I'm talking about cast iron)? The fact is that if the sewer pipes are in poor condition, lateral caulking of the tee from the main pipe is not possible, it will simply split.
6) How does the toilet fit into the tee? If a toilet was installed in the USSR, then usually the neck was built in permanently, replacing a tee under the toilet = replacing a toilet with a tee.
7) Has the riser sewer pipe of the neighbors below been changed? If so, then when replacing a tee, no caulking is needed; the pipe in the ceiling is replaced and connected into one unit with the riser of your neighbors from below; such work costs less.
These are just basic questions, without answers to which even +- a kilometer it is not possible to navigate the price.
What is the cost of replacing a sewer tee in Moscow
Replacement of a riser sewer pipe, Moscow (together with a tee, of course, but without installing a toilet), the cost of the work is 4,000 rubles. Riser pipe and tee, diameter 110 mm.
Replacement of internal sewer distribution(pipe 50 mm) 3,500 rubles.
One point, pipe diameter 50 mm, cost 1,000 rubles.
At the end there is not much information from personal experience: A large company will not take on small work; if they do, the price will be exorbitant.
No fixed price for many types of work, repairs, the condition of the customer’s pipes, the number of floors and so on, all this is very individual, the master knows how much he earns per hour (on average) looks at the amount of work (not standard, standard includes replacing a riser , installing a toilet, and so on) estimates how long it will take him to do this work and names the price.
There is a fixed minimum price for small and very small work (change a gasket, tighten a nut, and so on).
Just call the plumbers and describe the situation as accurately as possible (for example, replacing the tee into which the toilet goes, or replacing the tee under the sink, and so on) there are no other options at all.
29346 0 30
Sewer riser in an apartment: 5 typical problems and their solutions
I think there is no need to explain to the dear reader what a sewer riser is. But how it is structured, who is responsible for its safety and repair - these are questions that are relevant for many residents of municipal and privatized apartments. I will try to answer these questions, and at the same time tell you how to solve typical problems DIY sewer risers.
Areas of responsibility
Repair and replacement
First, let's figure out who should change the sewer riser in an apartment when it wears out (for example, if the socket of a cast-iron pipe begins to crumble or the ear under the inspection cover falls off).
Resolution No. 354 of the Government of the Russian Federation in paragraph 5 provides a list of elements sewer system related to common property residents.
The list includes:
- Sewer outlets;
- Risers and branches from them to the first butt joint;
- Exhaust (exhaust) pipes;
- Cleanings (audits).
The riser (that is, pipes, tees and crosses mounted on a vertical channel for drainage) belongs to the area of responsibility of the housing organization or service company regardless of the type of housing ownership (state, municipal or privatized).
There are, however, a couple of nuances here.
- Tenants have the right to refuse to make repairs to you if you do not pay the rent. An exception is a situation where the emergency condition of the riser can lead to flooding of neighbors. However, in this case, the management company can replace the defective section of the riser with a tee or cross smooth pipe, plugging the outlet to your apartment;

- Who should repair a riser that you previously replaced yourself? If the act drawn up by representatives of the management company indicates that the leak is a consequence of the residents’ independent intervention in the work utility networks at home, all the consequences of the accident (including compensation for flooded neighbors) will fall on your head. If the act states that the leak is a consequence of natural wear and tear of the riser, all repair costs are again borne by the housing owners.

If you change pipes yourself, be prepared for the fact that all their problems will now become yours.
Blockages
Any clogged riser is a problem management company. Both because the riser belongs to common property, and because if the same floor rag becomes clogged, it is impossible to unambiguously determine its owner.
Even if the blockage occurred between the top and second floors from above, the owners of the upper apartment can quite rightly point out that the drain on the roof is accessible to any visitor to the roof.
In my practice, there were several cases when the cause of a clogged riser was actually garbage (including large ones) thrown into the sewer from the roof.
Among the most exotic cases was a jar made of thick glass.
To remove it, I had to open the cast iron riser.

Device
Alas, it is not always possible for an apartment owner to emergency situation wait for active actions from the management company. Sometimes you have to take matters into your own hands. To understand how to change the sewer riser in an apartment and how to solve some typical sewerage problems, it is advisable to have a good understanding of the structure of the riser.
Elements
| Element | Description |
| Pipe | Socket pipes 0.3 - 3 meters long form straight sections |
| Tee | Serves to connect a comb (indoor sewage) or a toilet. The side bend can be straight (90 degrees) or oblique (45 or 60 degrees) |
| Cross | Serves to connect plumbing fixtures located on both sides of it to the riser. In some houses it provides sewerage distribution to two neighboring apartments |
| Audit | Hatch for cleaning sewer. Plastic revision - a short tee with a threaded cap on the side outlet; cast iron is equipped with ears for attaching the cover to bolts. Tightness is ensured by a rubber gasket. Sometimes, instead of revision, an oblique tee with a plug is used |
| Fan outlet | Exiting the riser beyond the level of the pitched or flat roof. Provides sewage ventilation and air suction during volley discharge of water. The absence of a drain outlet during a volley discharge can disrupt the operation of water seals of plumbing fixtures |


The photo shows the terminals of risers on the roof of an apartment building.
Description
The riser is assembled from socketed cast iron or plastic (PVC, polypropylene, less often polyethylene) pipes. The neck of each pipe must be secured to the main wall with a clamp. The fastening is designed to prevent spontaneous uncoupling of socket joints.
The connections of pipes with each other and with shaped elements (tees, bends, etc.) are made airtight. Sealing prevents leaks Wastewater in case of blockages and penetration of foul-smelling sewer fumes into apartments.
Tightness is ensured:
- In case of cast iron pipes— chasing the socket with a heel (organic fiber impregnated with oil or bitumen) followed by sealing the socket cement mortar. Filling the socket with molten sulfur is less commonly used;
It is best to mint a cast iron socket yourself using a graphite gland.
It is more durable than the heel and does not require sealing with mortar.

- When plastic pipes - rubber ring seal. It is installed in a groove on the inside of the socket and tightly covers the pipe inserted into it.
In the basement, the riser turns into a drainage pipe - a horizontal sewer branch connecting several risers with an outlet to the well. It is brought to the roof by a straight pipe of the same diameter that is used between floors; In new buildings, it is common practice to combine 2 - 4 risers with a common waste pipe.
Cleaning inspections should be located:
- In the basement or, in its absence, on the first floor of the house;
- Upstairs;
- In five-story or more tall buildings- every three floors.
Problems and solutions
Replacing the riser between floors
How to replace a sewer riser in an apartment if the tightness of the straight section between the floors, limited by socket joints, is broken?

We will need:
- A straight pipe (or several pipes) with a total length equal to or slightly less than the length of the section to be replaced;
- Compensating pipe.
Plastic pipes can be installed in the gap of a cast iron riser.
To combine a plastic socket with a smooth cast iron pipe, it is enough to thoroughly clean the surface of the latter from layers of paint and rust using sharp knife or a wire brush.
Replacing a site plastic riser with cast iron pipes is not possible.

All work with the sewer riser begins with thoughtful communication with the upper neighbors up to the top floor. They should be asked not to use the plumbing for 1 to 3 hours.
If you have access to the basement, take the time to turn off the cold and hot water along the riser, hanging signs on the valves with the inscription “work in progress in apartment No. ***.” In addition, prepare a deep basin or bucket. My experience shows that among the residents there will always be someone who has forgotten your request and used the toilet.
The procedure is as follows:

If the lower bell is located in the ceiling, it is not necessary to open it. It is enough to add a sewer coupling to the list of necessary items. After the defective area above the ceiling is cut out, it is put on the lower pipe with the outer chamfer previously removed. Further actions identical to those described above.
Replacing the riser in the ceiling
How is the replacement performed? sewer riser in an apartment if the socket inside the ceiling is broken?
The most labor-intensive part of the operation is dismantling the ceiling itself. Fortunately, reinforced concrete slab there is no need to chisel: the risers are passed through the technological hole in it and sealed cement-sand mortar. However, you will still have to tinker.

The work begins with dismantling the toilet and all fragile interior items in the lower and upper apartments. If the lower toilet is installed with cement or glue, only the tank is dismantled; the bowl is covered with boards, plywood boards and other available materials. The top toilet almost always has to be removed: the tee or crosspiece to which it is connected must be replaced.

The seal of the riser in the ceiling can be dismantled:
- Jackhammer;
- Hammer;
- Hammer and chisel.
For this purpose, I used an improvised chisel 40 - 50 cm long, made from a sharpened steel rod with a diameter of 30 mm with reinforcement welded on the side, and a sledgehammer on a steel handle.
Further instructions look like this:
- We make two cuts on the riser closer to the top of the area being replaced. Cast iron can be cut with a grinder or chipped with a sharp chisel; the plastic pipe is cut with an ordinary garden hacksaw;
- Disassembling bell after bell, we completely dismantle problem area. IN upper apartment often have to be disconnected from the sewer plumbing fixtures, preventing the comb from being removed from the sockets of the tee or cross;
- We assemble the riser from the bottom up. In this case, we immediately fix each socket to the wall with a clamp. The exception is the socket located in the ceiling: it will be securely fixed when the hole is sealed with mortar. In order for the tee or cross to coincide in height with the comb of the upper apartment, the pipe located underneath will have to be cut in place;

- When assembling the riser in the upper apartment, we use the compensating pipe that is already familiar to us.

Trimming plastic pipes locally is carried out in compliance with a couple of simple rules:
- WITH inside all burrs are removed. They can catch rags and other debris, causing a blockage;
- The chamfer is removed from the outside. It will greatly simplify the assembly of the connection.

If the plastic socket takes a lot of effort to assemble, apply a little liquid soap to the O-ring.
After assembling the riser, formwork is assembled under the ceiling (for example, a plywood panel cut to size and supported from below with several blocks); then two or three reinforcement bars are placed in the hatch, resting on the edges of the hole. Then the technological hole is filled from above with cement-sand mortar in a ratio of 1:3. The solution is bayoneted with reinforcement for greater packing density.
Bell leak
A typical problem with old cast iron risers is the destruction of the socket, crushed by the mass of the pipe resting on it. This problem can be solved in two ways:
- Replacing a section of the riser with a socket. The procedure is identical to that described above for replacing the riser between floors;
- Installation of a rubber band. It can be played by a rubber bandage purchased at a pharmacy or a bicycle inner tube cut to length. The bandage is placed like this:

Leak in the ceiling
Often the cause of a sewer leak in the ceiling is the subsidence of the lower cast iron pipe under the influence of its own weight. As a result of subsidence, the upper pipe completely or partially leaves the socket of the lower one, and when the riser is filled with drainage from the ceiling, it begins to flow.
Diagnosing drawdown is quite simple. A sure sign of it is an unpainted strip of cast iron on the sewer riser just below the ceiling. The reason for the subsidence is poor-quality sealing of the technological hole in the ceiling, coupled with unreliable fastening of the pipe to the wall.

The problem is solved like this:
- A clamp made of strong rope or thick wire is placed on the pipe;
- A strong support is built on the bathroom floor from timber, boards or other available material;
- Next, the lever principle is applied: the crowbar or pipe rests on a support and is placed under the clamp. The weight of an adult is usually sufficient to lift the pipe to its original position;
- The riser is then secured with clamps to the main wall. For temporary fixation, a pair of wooden wedges driven into the lower socket can be used;
- The socket is re-embossed with a heel or gland and sealed with cement mortar.
Blocked riser
If the water level in your bathtub and toilet rises even when the taps are closed, this is a sure sign of a clogged sewer riser or drain. What to do in this case?
To clean the riser the following can be used:
- At a small (up to 2 - 3 meters) distance from the nearest revision to the blockage - a sewer cable;

Plumbing cable. The price of the tool is from 150 rubles.
- At a greater distance - sewer wire.
Your task is to gain access to the nearest revision or tee located above the blockage.
Cleaning the riser from bottom to top is a very bad idea. When cleaning, a column of sewage several meters high will cover you and everything around with an even layer of a substance with an unforgettable aroma.
It is better to clean the riser together. One person pulls the cable or wire, preventing it from folding into loops, and rotates the handle; the second delivers the tool to the blockage. After the water has gone, continue to rotate the cable as you return: this way you will not allow the cause of the blockage caught by the hook to float freely again.

If the cable or wire does not pass the blockage, you can try to clear the riser from the roof. For this purpose in fan pipe a crowbar tied to a strong rope is lowered. The length of the rope should not allow the crowbar to rest against the connection of the riser with the ladder: in my memory, there were cases when the crowbar pierced the cast iron bend right through.
Conclusion
I hope that my recommendations will help the reader in the unequal struggle with sewage. As usual, additional useful information can be found in the video in this article. Please feel free to share your own experiences in the comments. Good luck, comrades!
July 15, 2016If you want to express gratitude, add a clarification or objection, or ask the author something - add a comment or say thank you!
Let's consider replacing a tee (in our case, a cross) of an existing plastic sewer riser. The need for replacement is due to the fact that a flat cross is not suitable for us - we will install a volumetric one.
To replace the tee you will need:
- Actually a new cross
- Compensating coupling
- Hacksaw
- Roulette
- Pencil or marker
- Gloves
- Condom
- A small piece of tube (20-40cm long, 10-30mm in diameter)
We kindly ask all neighbors above us not to use the water and especially the toilet during the work; we leave a note with a request at the doors of those apartments where we did not find anyone.
It’s good if the work is carried out on top floor at home - you don’t have to do all this.
Second phase:
We mark the pipe cut. We retreat 75 mm from the upper edge of the bell of the old cross and make a mark on the pipe - this is where we will cut.

In order not to cut askew, we will use the welding method: wrap the pipe with newspaper and align the edge evenly; Make markings with a pencil along the entire circumference of the pipe. No need to cut yet. dismantle the pipes connected to the cross. If the riser is secured to the wall with fastening cuffs, remove them.
Third stage:
We protect workplace, and most importantly, from the sewage flowing down the pipe, as well as from forgetful old women and vindictive neighbors: unscrew the lid of the inspection tee; In the part of the pipe above the hole we insert a condom, which was previously put on the tube (not all the way to the tip!!) and secured with thread. Inflate and tie.
Now for a short time we are saved from uncleanness, then we act quickly and confidently
Fourth stage:

We cut the pipe according to the prepared markings; we tilt the upper part so that it becomes possible to remove the old cross, take it out (don’t forget about gloves!); insert the new cross into place; We put the compensator on the pipe until it stops (apply soap solution to the sealing collar of the compensator - then it will fit much easier) now you see why we used the expansion coupling - the bell of the compensator is three times longer than the bell on other parts of the pipes - pushing it all the way onto the pipe and by aligning the parts of the riser coaxially, we are able to connect them by “removing” the compensator from the pipe.

Actually, the main part of the work has been done. We deflate or pierce the condom, screw on the revision lid. If required, we install plugs on the crosspiece outlets or assemble the pipes connected to the crosspiece and secure the riser to the wall.
The cast iron tee is one of the main elements of the sewer system.
It is an adapter that connects three pipes; by the way, one of them has a smaller diameter than the others.
This device is installed in places where the pipeline acquires several directions.
Many people wonder whether it is possible to replace a cast iron sewer tee? Practice shows that this can be done, but it is quite difficult with your own hands. First of all, myself technical process quite difficult, and secondly, for this type of repair sewer pipes you will need an expensive tool. Well, in general, this part It is quite possible to replace the system, because it is not cast together with the pipe.
This is what a cast iron tee looks like

Replacing a tee using an angle grinder
Dismantling cast iron sewer
Replacing an old pipeline is not an easy task, especially when we're talking about about cast iron. The method of connecting the pipes plays a decisive role in the labor intensity of the process. The set of tools that will be used also depends on this. So, in order to carry out a more or less accurate repair of the sewer system, or more precisely, its complete replacement, you will need:
- grinder with cutting and grinding discs included;
- blowtorch;
- hammer and screwdrivers of various lengths, thicknesses, crosspiece;
- pipe wrench and chisel.
To implement complete dismantling cast iron sewer you will also need a hammer drill, a knife, a steel wedge, a chisel, a pipe cutter, and a crowbar. Do not forget that the first step is to determine how to connect the elements of the sewer system.

Hammer and pipe cutter
What to do if cast iron pipes are connected with sulfur
You can determine with what substance the pipeline was built using a blowtorch. If, when it is brought to the junction, the substance begins to melt, then it is definitely sulfur. The destruction process itself is divided into several stages:
- The pipe that is located farthest from the riser is the first to break. This is done with a hammer and continues until a crosspiece is found that needs to be loosened.
- At this time, you need to connect a blowtorch or gas heating pad. Under influence high temperatures the sulfur melts, and accordingly, it is possible to loosen the pipe. Before carrying out this procedure, you need to wear gloves to avoid burning your hands.
- After the sulfur has been removed, you can try to remove the cross from the riser.

This is what a blowtorch looks like
Description of the procedure for removing a cast iron sewer tee
A shaped piece of piping called a tee is located at the very bottom of the main riser. There are several ways to extract it. And it’s better to involve a professional in this. All cast iron tees for sewerage can be dismantled in three ways:

Breaking apart a cast iron tee with a screwdriver
- using a screwdriver and milk;
- by heating;
- using a grinder.
In the first case, you need to follow a certain order. First, you gently tap the tee. A gap should form between the pipe and the crosspiece, into which a screwdriver can then be inserted and the tee removed.

Screwdriver and hammer
The second method is faster, but is accompanied by selection unpleasant odor. Most often, a gas heating pad or blowtorch is used when it is necessary to disassemble a connection with small diameter pipes. You can do this yourself, but if you don’t have experience, it’s better to hire a gas welder.

Gas welder services
The last method is to use an angle grinder. With its help, you need to cut off some parts of the tee and leave a small piece of pipe. After the remains of the product are cut, the socket is closed with a plug. The cut part of the cross is knocked out with a hammer. Finally, the treatment area is cleared of cast iron residues. It is worth noting that exactly last method disassembling the tee is the most practical and reliable, not requiring much time.
If after dismantling there is burning sulfur left on the crosspiece, then it must be lowered into a bucket with cold water, it is desirable that it be iron. After the socket has cooled, you can begin installing a new riser made of plastic.