How to screw self-tapping screws into a wooden surface with a screwdriver. An easy way to screw in long screws without drilling. The best way to screw in a long self-tapping screw
There are self-tapping screws for concrete that, without drilling or other preparatory operations, will securely fasten the sheathing materials to the walls. This is convenient: it significantly speeds up and simplifies any finishing task. Although experienced builders advise not to be lazy with preparing the hole.
What do self-tapping screws for aerated concrete look like?
Self-tapping screws mean fasteners that are made in the form of rods with heads. They have a special external thread with which they are screwed into the surface. That is, self-tapping screws are rod screws that have been threaded using a special variable method. This method helps to ensure fixation and good adhesion to concrete structures. The shape of the screws resembles a long rod with a pointed end on one side and a round cross-shaped head on the other.
Concrete structures require special hardware products. Manufacturers have taken this fact into account, and on store shelves you can always see self-tapping screws for aerated concrete and ordinary concrete. To screw in any other hardware, you first need to drill a hole of the required diameter; in concrete structures this can only be done using a hammer drill or impact drill. Then dowels, for example made of plastic, are driven in to the appropriate sizes, and only then can the screws be screwed in. This path must be taken, otherwise the fastener will not adhere firmly to the surface, but there are also other ways!

Self-tapping screws for concrete - dimensions and other parameters
Since these hardware must be firmly held in such a hard material as concrete, they must be made of durable metal. It is important that the material is also moisture resistant. Therefore, they are often made of stainless and carbon steel, or brass. For greater strength, self-tapping screws are covered with protective layers, so they can be of the following types:
- silver color, galvanized, good for all types of work;
- yellow, galvanized, suitable for interior work, quite suitable for external fastenings, serve well as decorative hardware;
- black with oxidized coating, used only for rooms with normal humidity levels.

In order to fasten self-tapping screws in different bases, they are specially made with certain thread pitches. Typically, for these hardware, medium pitch and variable pitch, with notches, are used. The main characteristics that can describe self-tapping screws for concrete: head dimensions, length, thread pitch. Let us give an approximate classification according to this list of parameters.
- Self-tapping screws with a medium thread pitch and a universal profile; with their help, you can make different types of fastenings. Their diameter will be 3-6 mm, and their length will be from 12 to 220 mm. This type of self-tapping screws is the most popular.
- Self-tapping screws also have a medium thread pitch, but with a different profile - herringbone. They need to be used with dowels; they will have a diameter of 3-8 mm and a length of 12 to 200 mm.
- The third type is self-tapping screws with a variable notch (dowel). Such hardware is used for fastening to concrete walls without dowels; they come with a diameter of 7.5 mm and a length of 70-200 mm.

For the last type of self-tapping screws, holes must be drilled with special drills for concrete, the diameter of which is about 6 mm, and the depth must be 10-15 mm greater than the selected length of the fastener.
How to screw a self-tapping screw into concrete - preparing the hole
Self-tapping screws for working with concrete must not only withstand heavy loads, but also provide reliable and durable fastening. Therefore, materials and design are chosen taking into account these properties. Before screwing a self-tapping screw into concrete or aerated concrete, you must additionally use dowels. Thanks to these auxiliary elements, a strong and reliable fastening to load-bearing bases is ensured. Auxiliary elements are made of nylon, polyethylene and polypropylene.
These elements consist of two parts: cylindrical and spacer. The purpose of the cylindrical part is to adjust the fixation in the plaster so that the layer is not destroyed. The spacer part helps to firmly secure the entire structure in the holes. The most basic task of these devices is to ensure easy screwing of fasteners, while at the same time they must be securely fastened to the wall. We will tell you right now how to provide additional strength and reliability to the fasteners, so that in the future you can screw in a self-tapping screw into concrete without any problems.

For example, in order to drill holes, you need to use concrete drills whose diameter is equal to the diameter of the dowels. All holes must be made 3 or 5 mm larger than the length of the dowel. And you need to select self-tapping screws of the same length as the length of the dowels, or a little longer. It is important that the dowels fit into the finished holes easily and without additional effort. To install them in concrete or aerated concrete, you only need to lightly level them with light taps with a hammer. The screws are tightened using either a screwdriver or a screwdriver.
If it is important for you to make fastenings without dowels, then such a method exists, but experienced craftsmen use it very rarely. In this case, the screws will need to be screwed directly into the prepared holes. If the surface itself is made of porous materials, then drilling with a hammer drill is impossible. To facilitate the work associated with screwing, you must use any machine oil. You need to drip it or lubricate the holes. Only this method allows you to screw in the screws forever. In the future it will be impossible to unscrew them.

Self-tapping screws for concrete with a herringbone profile can be driven into the surface with a hammer. This method is also considered “eternal”, and it is not possible to unscrew the hardware back. Self-tapping screws must be driven into the prepared holes together with dowels with a hammer. The main advantage of this method is speed. In this case, no additional time is needed to install and secure auxiliary elements.
Choosing self-tapping screws for concrete - what are the criteria?
The main purpose of these hardware is to be in the wall and carry some kind of load. In order for them to last long enough, they must be selected correctly, taking into account the main design features and characteristics. Not only their service life, that is, the ability to withstand a certain load for a long time, but also their appearance will depend on their length. Today you can purchase self-tapping screws for concrete from different manufacturers. When purchasing, you need to pay attention to the thickness, the material from which they are made, and the presence of protective coatings.

It is also possible to select screws that match the color of the room design. Often decorative elements are attached to these hardware, and therefore it is possible to purchase them with colored heads.

There are also special fittings for masking on the surface of the heads. Self-tapping screws for working with concrete are particularly durable. The head is often cross-shaped for ease of use. It is important to choose the right screwdriver. Also, this type of hardware is additionally treated with an anti-corrosion layer. If, using a method such as driving, the screws remain in the wall forever, it is important that the integrity of the metal is not compromised.
How to tighten screws?
If you are going to attach one structural element to another using a screw, you should make a screw thread in the first one. The second will contain the smooth part of the screw, which is located immediately under the head. The smooth part must enter the body of the attracted fragment.
Otherwise, you will not have a rigid connection between the planes due to the gap formed between them.
Countersinking is done so that the countersunk head does not protrude on the surface of the part or fragment. Sometimes craftsmen neglect countersinks, believing that they can screw a screw into soft material so that its head goes deep into the surface and does not protrude.
Of course, sometimes this is possible, and if you wish, you can tighten any screw without making a countersink in advance. However, it is worth remembering that the wood fibers will be damaged by such exposure to the caps, since they will have to find a “way out” under pressure, and, consequently, the presentation will be lost.
Screw slots can be:
- straight,
- cruciform.
Some models of screws even have special plugs.
They are put on a twisted head, visually hiding it. Models are presented in which there is no slot on the head at all. They have to be tightened using a socket or wrench.
Stages of fastening work
Screw manufacturers do not always handle their products responsibly. There are screws on sale in which the screwdriver cannot be inserted into the heads at all because the slot is shallow or there are burrs in it.
It's better to throw them away. When purchasing good screws, follow some rules to tighten them securely and efficiently:
- drill a hole in the first part;
- make sure that the diameter of the hole is equal to the diameter of the screw (including its smooth part and thread);
- insert the screw into the hole without force;
- drill a hole in the second part;
- check that its diameter matches the diameter of the screw, but without taking into account the thread, because the screw must fit in here with force;
- countersink a hole in the first piece.
If the craftsman has a special drill that helps combine the two stages (drilling and countersinking), the process is simplified and accelerated.
Keep in mind that any special drill can only fit specific models of screws.
Countersinking
The screw will only screw into the second part if you approach the process scientifically, i.e. use special drills or perform your work in stages. It will pass freely through the first part, and its cap will tightly pull one part to the second.
If a small-diameter screw is used, drilling is not required. All you have to do is apply force and make a hole with an awl.
Working with screws involves a number of subtleties. Sometimes you have to come up with a whole variety of tricks to tighten or remove a screw.
For non-standard cases, these tricks have already been invented.
Self-tapping screws for concrete without pre-drilling holes
For example, if you need to unscrew a screw that desperately “rests”, use an adjustable wrench. This tool clamps the handle if it has edges, as well as the upper part of the slot. Press down on the screwdriver with one hand and turn the adjustable wrench with the other.
A hammer can also be used successfully.
The screwdriver is inserted into the slot, then you need to lightly tap its handle with a hammer while rotating the screwdriver, just tap, and not knock hard. Screws with “character” are removed using a heated soldering iron, which is pressed against the head.
This kind of “torture” usually helps.
For no apparent reason, difficulties also occur with tightening/unscrewing. It seems that the slot is not defective, and the screw is in place, and the screwdriver is normal, but the process does not proceed. Check whether the working part of the screwdriver matches the slot of the screw. If the size does not match, the screwdriver will behave incorrectly, much like a foot in the wrong size shoe.
There are times when the length of the screw is not enough to connect two fragments.
In this case, a hole is drilled in the first of them, first equal to the diameter of the screw without thread, and then a second, blind hole is drilled in it, equal in diameter to the screw head. The screw and head will partially go deeper into the first fragment. The hole can be filled with putty so that it is not visible.
When tightening a screw with a screwdriver, it is better to choose a long model.
The further the hand with the screwdriver is from the head, the less the axis will tilt. If you need to screw a screw into hard wood, be sure to drill a hole and rub it with soap or vegetable oil before screwing it in. To strengthen the fastener, many craftsmen use glue: they dip the screw in it, and only then screw it in. It enters the tree more easily and then fastens it tightly.
Advantages of fiberboard
Marking
Preparation for installation
Base
The nuances of installing slabs
Completing installation
Fiberboard (more often you can see the abbreviated name, fiberboard) is a frequent visitor to construction and finishing stores.
The scope of its use is quite extensive, but it is often used for rough finishing of the floor or even as an independent flooring. Its main advantage in this regard is the possibility of installation on almost all surfaces, including previously made coating.
So, how to lay fiberboard on the floor?

Fiberboard boasts the ability to hide various surface defects, such as cracks, cavities or height differences. Today, professionals most often use 3 mm thick fiberboard. When the old base is not too even, then choose sheets twice as thick.
For the lower rear floors, oil-impregnated fiberboard should be used, as they are more moisture resistant.
Advantages of fiberboard
Among the main advantages of fiberboard, the following should be especially highlighted:
- environmental friendliness (the material contains only natural wood);
- simple installation;
- smooth surface, helping to get a perfectly flat floor;
- low price;
- increased resistance to mechanical stress;
- due to the peculiarities of production - dense structure;
- In terms of antiseptic properties, it outperforms even solid wood;
- durability;
- strength.
It is worth noting that the last two properties are relevant only if the coatings are used correctly.
This also means the creation of an additional layer of protection, which allows you to isolate the material from moisture. The best choice for him would be water-repellent varnishes and paints, which will also improve the appearance of the coating.

Another useful quality of fiberboard is its excellent sound and heat insulation, which allows it to be used as insulation.
This is especially true for the lower floors of buildings, where slabs are laid on the floor. Most often, the M-20 and PT-100 brands are used for this.
Almost any other covering can be installed on top of fiberboard.
Marking
Today you can find a huge range of fiberboard boards on the market.
In order not to get lost in their diversity, you should focus on the following markings:
- T - solid slabs, the front surface was not additionally refined;
- T-P – frontal surface is tinted;
- T-S – the front surface is made of finely dispersed wood pulp;
- T-SP – the front surface is made of tinted wood pulp and painted;
- M-1 – M-3 – soft slabs;
- ST – super-hard slabs, the front surface is not refined;
- ST-S – the front surface is made of finely dispersed wood pulp.
Preparation for installation
Before proceeding with the actual installation of fibreboards, some initial work should be done.
Chief among them is the adaptation of the slabs to the humidity in the room, which should protect them from possible swelling. The work itself is quite simple - you need to moisten the surface of the sheets with a roller with warm water. Then the fiberboards are arranged in pairs with their back sides facing each other. After a day, the fiberboard slab for the floor is ready for installation, and you can begin further work.
An important point: this procedure is not performed in continuously heated rooms. Instead, the sheets are simply left alone for 48 hours.

One of the areas of application of fiberboard is surface leveling.
In case of small differences, the sheets are laid directly on the base. For large ones, it will be necessary to install flooring from logs. A level is used to check evenness.
Base
Often the base of the floor is a wooden floor, as can be seen in numerous photos.
Self-tapping screws for concrete: selection options
In this case, slabs with a thickness of about 6 mm are used for laying. There is no need for a fiberboard underlay on a wooden floor.
You can also get an almost perfectly flat surface using a screed made of sand and cement, the production of which is carried out with a drawn line. The principle of operation here is quite simple: first we clean the coating very thoroughly, and then dry it. Next, pour a layer of sand up to 50 mm thick, on top of which the solution is distributed. After it hardens, bitumen or primer dissolved in gasoline is applied on top.
The hardening time of such a mixture is about 8 hours, after which the gluing of fiberboard sheets begins.

To do this, the screed is covered with a layer of mastic or glue over the entire surface.
The fiberboard slab for the floor is processed in the same way. It is worth noting that the mastic dries very quickly, so the process is carried out with one sheet at a time, and the composition should be applied immediately before installation.
Level the mastic using a rubber comb, after which the slab is attached to the floor. It is advisable to press down the laid slab with some kind of weight.
The floor will be completely ready in a few days.
Separately, it is worth highlighting the option of laying on logs. It is important to measure the size of the sheets before installation. Next, based on the data obtained, markings are made of where exactly the logs and fiberboard sheets will be laid. The logs themselves are boards or beams, dried and treated with an antiseptic, which are attached directly to the floor surface at a distance of no more than 40 cm from each other.
Very important: you cannot use undried wood, as this is fraught with rapid rotting of the base of the floor and subsequent squeaking.
With this approach, the coating will have to be changed every couple of years.
Chipboard spacers may be required to install the joists evenly. If they were previously installed, their condition should be carefully inspected and, if necessary, repaired or replaced. Before you start laying fiberboard, it’s a good idea to measure the room again. It is very important that the width of the slabs does not exceed the width of the joists, as otherwise the floor may turn out uneven.
The nuances of installing slabs
Before you begin laying fiberboard slabs, you should carefully inspect the floor surface for signs of mold. If any are found, the affected areas should be treated with an antiseptic. Fibreboard is laid directly on the old covering only if it has a completely flat surface.
Otherwise, you will need to clean it first.

A gap of 5-10 mm should be left between the outer sheets and the wall, which will become an expansion joint. In order to hide it, a plinth is then used. Fiberboard slabs should be joined to each other as much as possible to avoid any distortions.
Laying fiberboard begins from the corner opposite to the exit. They are laid out along adjacent walls. The lower side (rougher) of the slab should be at the top - this will allow for a stronger connection with the mastic.
If you plan to attach the fiberboard with glue, it is first leveled over the entire surface of the sheet, after which it is allowed to dry a little.
For additional strength of the connection, it would be useful to prime the floor. After securing to the surface of the coating, a load is placed on top. It is very important to check the position of the board (both horizontal and vertical) after each gluing and pressing.
If there is a pipeline in the room, care should be taken in advance to ensure that a certain gap remains around the circumference of the pipes, which is filled with cement mortar.

If fiberboard is laid on logs, then the sheets should be leveled and laid in such a way that the edges and joints fall exactly in the middle of the bars - such measures are necessary to create the most reliable and durable floor.
Another advantage of this approach is that in the event of a breakdown, you do not have to replace the entire floor at once - it will be enough to make do with damaged sheets. Each subsequent slab is aligned with a slight offset relative to the previous one to ensure structural stability.
Also, it is extremely contraindicated to place joints in places that bear a heavy load. Examples include the refrigerator, stove, and similar places where people frequently walk.
So, how to fasten fiberboard to a wooden floor: fastening the boards is carried out using nails, screws or self-tapping screws.
If the thickness of the slab is 19 mm or more, then exclusively 50 mm nails are used, which are driven in in increments of 10 cm at an angle of 30 degrees. Nail heads should be recessed into the surface - they should not stick out from above. Traces from fasteners are additionally sealed with putty - its color should be matched to the color of the future floor covering.

There are also special nails for fastening the boards that are designed to work with this material.
The method of laying fiberboard on logs allows you to get a warmer floor. Additional insulation is laid in the network cells. In addition, the places where the slabs are attached to the joists are completely invisible. In order for them to lie as evenly as possible, you may need to additionally trim them with a knife or jigsaw.
In case of particularly complex cutting, you can prepare a template from cardboard. Fiberboard flooring on a wooden floor is carried out without a primer.
Completing installation
The final stage of work includes finishing the floor. It consists mainly in the most careful control of the seams. If glue is found, it should be removed with a rag, and the gaps found, 2-3 mm wide, should be treated with putty. The joints are additionally glued with reinforcing tape - this will further increase the strength of the connection.
Many people prefer to prime or sand the subfloor.
This stage of work is not at all necessary, especially if you plan to lay laminate, parquet, carpet, etc. on top. If you plan to paint the VDP floor with your own hands, preference should be given to a painting composition with water-repellent properties and alkyd enamels.
Home > Articles > Choosing to use a self-tapping drill

| K | F | G | |
| Designation | Rec. Drilling capacity, mm |
Min. Profile thickness, mm | Effective thread length, mm |
| 4.8 x 29 | 2.30 | 1.30 | 18.00 |
| 4.8 x 38 | 2.30 | 1.30 | 27.00 |
| 4.8 x 50 | 2.30 | 1.30 | 40.00 |
| 4.8 x 60 | 2.30 | 1.30 | 50.00 |
| 4.8 x 70 | 2.30 | 1.30 | 60.00 |
| 4.8 x 80 | 2.30 | 1.30 | 70.00 |
| 5.5 x 19 | 5.30 | 1.30 | 6.00 |
| 5.5 x 25 | 5.30 | 1.30 | 12.00 |
| 5.5 x 32 | 5.30 | 1.30 | 18.00 |
| 5.5 x 38 | 5.30 | 1.30 | 24.00 |
| 5.5 x 51 | 5.30 | 1.30 | 37.00 |
| 5.5 x 64 | 5.30 | 1.30 | 48.00 |
| 5.5 x 76 | 5.30 | 1.30 | 60.00 |
| 6.3 x 19 | 6.50 | 1.30 | 4.00 |
| 6.3 x 25 | 6.50 | 1.30 | 10.00 |
| 6.3 x 32 | 6.50 | 1.30 | 16.00 |
| 6.3 x 38 | 6.50 | 1.30 | 22.00 |
| 6.3 x 50 | 6.50 | 1.30 | 36.00 |
| 6.3 x 60 | 6.50 | 1.30 | 44.00 |
| 6.3 x 80 | 6.50 | 1.30 | 64.00 |
| 6.3 x 100 | 6.50 | 1.30 | 84.00 |
| 6.3 x 130 | 6.50 | 1.30 | 115.00 |
| 6.3 x 150 | 6.50 | 1.30 | 135.00 |
| 6.3 x 175 | 6.50 | 1.30 | 160.00 |
Selecting the appropriate self-tapping drill to use

PULLING FORCE, kN
| Self-tapping diameter, mm | drill | 0.46 | 0.61 | 0.76 | 0.91 | 1,22 | 1,52 | 1,91 | 2,67 | 4,17 | 5,69 | 6,35 |
| 4,2 | №2 | 0.543 | 0.872 | 1.192 | 1.339 | 2.197 | 3.14 | 4.279 | 6.944 | — | — | — |
| 4,2 | №3 | 0.547 | 0.863 | 1.076 | 1.281 | 2.104 | 2.963 | 4.061 | 6.348 | 10.186 | — | — |
| 4,8 | №1 | 0.672 | 1.085 | 1.397 | 1.601 | 2.527 | 3.688 | 4.955 | 8.002 | — | — | — |
| 4,8 | №2 | 0.596 | 0.965 | 1.223 | 1.65 | 2.447 | 3.501 | 4.608 | 7.366 | — | — | — |
| 4,8 | №3 | 0.565 | 0.939 | 1.197 | 1.343 | 2.233 | 3.163 | 4.315 | 6.57 | 9.252 | 11.632 | — |
| 5,5 | №1 | 0.716 | 1.174 | 1.517 | 1.748 | 2.900 | 4.052 | 5.614 | 8.683 | — | — | — |
| 5,5 | №2 | 0.707 | 1.094 | 1.272 | 1.681 | 2.705 | 3.785 | 5.267 | 8.269 | 11.436 | 15.671 | — |
| 5,5 | №3 | 0.645 | 0.952 | 1.299 | 1.530 | 2.464 | 3.381 | 4.742 | 7.268 | 10.778 | 13.349 | — |
| 5,5 | № 4 | — | — | — | — | 2.215 | 3.114 | 4.399 | 6.828 | 10.871 | 15.515 | 17.112 |
| 5,5 | №5 | — | — | — | — | 2.180 | 3.123 | 4.075 | 6.806 | 9.831 | 16.476 | 17.802 |
| 6,3 | №1 | 0.939 | 1.477 | 1.917 | 2.513 | 3.572 | 5.133 | — | — | — | — | — |
| 6,3 | №2 | 0.752 | 1.192 | 1.410 | 1.926 | 2.882 | 4.115 | 5.138 | — | — | 20.889 | — |
| 6,3 | №3 | 0.641 | 1.041 | 1.317 | 1.5 52 | 2.727 | 3.928 | 5.107 | 8.278 | 10.716 | 20.253 | 22.401 |

SHEARING FORCE, kN
K, Thickness of steel base, kN
| Self-tapping diameter, mm | drill | 0.46 | 0.61 | 0.76 | 0.91 | 1.22 | 1.52 | 1.91 | 2.67 | 4.17 | 5.69 | 6.35 |
| 4,2 | №2 | 1,321 | 2,22 | 2,504 | 3,305 | 4,728 | 4,809 | — | — | — | — | — |
| 4,2 | №3 | — | — | — | 3.261 | 4.862 | 5.396 | 5.413 | — | — | — | — |
| 48 | №2 | 1.401 | 2.14 | 2.633 | 3.705 | 5.378 | 5.654 | — | — | — | — | — |
| 4,8 | №3 | — | — | — | 3.252 | 5.645 | 6.864 | 6.917 | — | — | — | — |
| 5,5 | №1 | 1.935 | 3.14 | 3.363 | 4.542 | 6.472 | — | — | — | — | — | — |
| 5,5 | №2 | 1.637 | 2.682 | 2.785 | 4.008 | 6.107 | 7.833 | 9.524 | — | — | — | — |
| 5,5 | №3 | — | — | — | 3.434 | 6.054 | 7.219 | 8.776 | 8.847 | — | — | — |
| 5,5 | № 4 | — | — | — | — | — | — | — | 9.123 | 9.0430 | — | — |
| 5,5 | №5 | — | — | — | — | — | — | — | — | 12.023 | 12.112 | 12.299 |
| 6,3 | №1 | 2.286 | 3.79 | 3.95 | 5.547 | 7.860 | — | — | — | — | — | — |
| 6,3 | №3 | — | — | — | 4.150 | 6.428 | 9.355 | 11.504 | 11.081 | 12.557 | — | — |
Sometimes you need to attach a dowel to the wall, but it breaks halfway. Or you don't have the plastic part of the dowel and it's hard to find it at the right time. In such cases, when you need to attach a screw without a dowel, you can use a complex but effective method which you will read below.
For screws in a brick or concrete wall without a stud, you need tools.
However, there is nothing rare or hard to find that is not needed. It is necessary to pre-install a drill bit, a drill bit (higher quality universal or for concrete) much smaller than a screw or jack screw and even a screwdriver.
First, mark the point where this screw or bolt should be installed.
Then, take the blade, cut it into the background at the point with the cutting lines. Get the resulting back flowers back. This must be done so as not to damage the wallpaper. Later, if you need to pull a screw, you can close the space again.
Next, you need to drill with a thin drill bit that is slightly thinner than the screw. Drill and smooth drill. Do not allow the hole to be larger than the specified size, otherwise the screw will not be installed correctly.
Insert a match into the hole that is best immersed in PVA glue.
Now you can screw the screwdriver on with a screwdriver. Just don't use a screwdriver. Use it nicely at low revs. The fact is that if the bolt is driven at high speeds, it enters the wall very quickly and can move several times and thereby destroy the walls of the hole. Accordingly, there will be a corresponding fixation in this case.
Now the walls can hang a picture, a piece of furniture on courses and even some courses.
By the way, this method works best if the walls are strong enough, for example, made of high-quality brick or reinforced concrete slabs. If the wall is easy to cut, it is better to use another method.
Cut the background blade, bend the flowers.
Turboshurupy - or like a screw into concrete
Drill the hole a little deeper and larger than the diameter of the screw or screw you want to screw into the wall. The cut, depending on the size of the hole formed, should not protrude outward.
Before inserting the chip into the drilled hole, immerse it in PVA. Tighten the hole. This method is ideal for fragile walls that are collapsing for some reason. This way you get a wood covering in the wall that you can breathe everything into, and then hang the screw or screw that is really needed.
CONFERENCE START-CAPE
questions about repair, maintenance, refueling, selection
Go to graphical version
all: screw hole restoration
0th Anatoliy513.03.13 20:20
Sometimes it happens that the screw in the plastic is faulty. Who solves this problem?
first ASSP23.3.13 20:27
Hmm... If you follow the laws of physics, then in this case you need to "add" material to the hole or increase the diameter (or change the thread height) of the screw...
second CAT13.03.13 20:46
...There are many options - everyone chooses the one that suits them best.
From observations;) - Sometimes you bring repair equipment with bent threads in a plastic and self-leveling state.
Versions I've seen:
<б>1 placeReproducibility, the part corresponds or toothpicks are screwed into the hole and the screw (in principle, this is logical - the part corresponds to a decrease in the diameter of the hole and the screw does not rotate, holding..), including options - instead it matches any piece of foil or thin plastic chip (usually plastic edge clamps).
<б>2nd place: Insert a bolt with a larger diameter/length into this hole (depending on whether larger screws can be used).
<б>3rd place: Various adhesives or fillers...
…it was even discovered on several occasions that they had put some sort of super glue on the screw. It is curious that the screw still makes concessions with great force (and even the frozen glue thread remains, so the screw is screwed back to normal..), but in one case the screw is squeezed out of the hole, the glue in the gap between the connected parts - the screw answered I did it, but I had to work with a chisel to break the glued surfaces.
Only miraculously plastic when split.
<б>4th place: People just hammered ... ... not in the sense of blowing up a screw with a hammer and inserting the screw into the hole and the result is that it did not have, so that if something is not always screwed into the insert hole - the results are that the screws do not ...
third contrabass13.03.13 20:55
And people came with epoxy glue and plastic that dissolves easily in acetone. But it's not good if you don't have time to get rid of...
fourth mhz8613.03.13 20:57
mainly used
<цитировать><б>CAT(2): 2nd place
FC copiers had severely broken table openings.
Large diameter drilled, machined needles, which are raised on a very dense plastic axle (mf 6550 hobs), are installed on adhesives and holes in conventional screws...
<цитировать><б>contrabass(3): when there is no time to burn. <цитировать><б>CAT(2): People just forget
Edit: 20:57 mhz86
CAT13.03.13 20:57
<цитировать><б>contrabass(3): plastic which can be soluble in acetone.- Well, yes - drop two or three drops of dichloroethane into the hole and insert the screw...
sixth contrabass13.03.13 21:05
(5) And here you are...
Sometimes they bring it. Cartridges with construction screws, not pins. There are also holes that you want to name a hole for.
sevenths ASSP23/03/13 21:51
(6) "When the opening "hole" of the hole begins to exceed the surface of the article, such article is considered invalid."
My school teacher is at “work”...)))
eighths contrabass13.03.13 22:04
(7) a good look at the master, competent, just don't forget..)) For us, these entries often appear, which, it seems, was not their school teacher at work, but in physics and much more for what..
A nail can't hit a fingernail, but a telephone socket can be screwed in..(
tenths Ingmar13.3.13 22:35
when the holes are definitely not broken, but they are removed using plastic foil, I use a mixture of soda and cyanoacrylate. The resulting mass is completely drilled, processed with a file and held tightly with plastic. The only downside is that it froze in less than one second.
11 ASSP13.03.13 22:41
(8) The moderators forgive me again - I’m very lucky to have teachers at all.
The same master I mentioned taught me how to operate lathes and milling machines and how to properly (and use) correctly (and this is much more difficult than any machine), a screwdriver, a hammer, a chisel, etc. Good teachers were in old times.)))
But I was unhappy with the chemistry teacher. Her last name was (whoever wants it, he believes, and whoever wants it, no) Kaplan... Probably everyone will guess that the first question I asked when I “find out.”
)) After that, I did not rise above the “C” in chemistry, and the “honorable diploma” was equally covered by the “copper pool”.)))
How to screw a screw onto concrete on a very strong base?
Andrew03-14-2013 00:48
In particular, for this purpose, a glass of dichloroethane with a plastic stopper is dissolved from slot 5.25 of the computer to the consistency of thick sour cream.
A droplet falls into the hole and inserts a screw. The next time the cartridge goes in, it is extremely twisted and turned.
And in general, this crowd has been restoring a lot of things, but have recently become dependent on adhesive glue (even though it's not good for carving - any more than a plastic screw)
Printers, copiers, multifunction devices, fax machines and other office equipment:
questions about repair, maintenance, refueling, selection
Go to graphical version
You often experience difficulties when screwing a self-tapping screw into wood; the deeper it cuts into the tree, the more difficult it is. Often even the cross edges are torn off. You have to unscrew it with pliers and screw in another screw in place of the previous one. You can get rid of such inconveniences forever, without preliminary drilling, if you know the simple secret of how to easily screw a self-tapping screw into a tree.
First, it is better to prick the hole in the wood for the screw with an awl or drill a small hole with a drill so that it fits exactly where it is needed and does not come off.
Then the screw itself just needs rub with soap. After this procedure he will enter into wood (chipboard, chipboard, plywood) like butter, well, not exactly like butter, but very easy.
Very useful advice. I myself “steamed” more than once until I learned this secret.
For the experiment, we took a small piece of chipboard, an awl, a screwdriver, soap and a couple of screws:

Then we made two punctures with an awl in the chipboard for subsequent screwing of screws into these holes:

We take the first screw without any rubbing with soap:

and screw it into the first hole - it is quite tight, but we did not bring the matter to the point of tearing off the cap.

We simply run the second screw along a piece of soap:

After this, a little soap remains on the screw itself, as you can see:

And we screw it into the second prick with an awl, we are convinced that it is screwed in much easier, indeed, like “into butter”:

Many people, when doing DIY repairs and dealing with wood, metal, plywood or drywall, cannot do without using self-tapping screws. In unskilled hands, self-tapping screws can bend, even break, and all due to ignorance of the techniques and techniques for working with self-tapping screws. Therefore, it is important to know how to screw in a self-tapping screw.
Self-tapping screws come in a wide variety of types and classifications. First of all, they are divided into screws for metal and wood. The fundamental difference from each other is the thread pitch. Those used for wrapping in wood have a much wider thread pitch, those used for metal have a smaller thread pitch. And this is not without reason. For example, if you try to screw a wood screw into metal, it will most likely break or bend. Self-tapping screws with fine metal threads will also not stick to wood, because the wood will not penetrate well between the narrow turns and cling to them weakly. By the way, metal screws have two types: with a drill at the end and without it.
Note! When working with self-tapping screws without a drill, a hole is pre-drilled in the metal into which they will be screwed with a drill slightly smaller than the diameter of the self-tapping screw. The self-tapping screw is then screwed into it.
If you don’t make holes in thick metal, then you won’t be able to screw in such screws, no matter how hard you try. Unlike simple self-tapping screws, self-tapping screws with a drill do not require pre-drilling, and they make their own way through the thickness of the metal. Roofing screws also have such drill tips. They are made with a hex key head and equipped with a rubber gasket to prevent water from penetrating under the roofing.

Tools
In order to screw in screws correctly, you need the appropriate tools. If you plan to screw in one or two self-tapping screws, then you can get by with a simple Phillips screwdriver. If we are talking about several dozen, and even more so hundreds, then there is nowhere without a screwdriver.
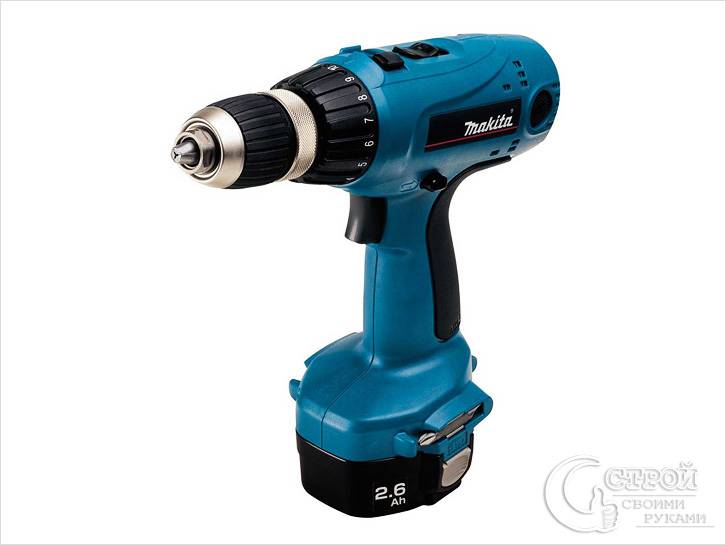
It will greatly facilitate and simplify the task. But on its own, such an electric assistant will not help much. It is necessary to have a serious arsenal of all kinds of attachments of various configurations.
Materials


Roof. When carrying out roofing work, they use either special roofing screws or self-tapping screws with a press washer. They also come in metal and wood. Self-tapping screws are screwed into the upper wave of the roofing sheet, most often corrugated sheets. Here it is very important to control the force of pressure of the cap on the sheet.

Value for money
It is recommended to purchase self-tapping screws in specialized building materials stores. There is at least some kind of guarantee of the quality of the product. But even when buying self-tapping screws in a store, there is a risk of purchasing a low-quality product. Of course, in the market this risk is much higher, but you can find good goods there too, so you shouldn’t completely ignore the construction materials markets. It is important to pay attention to the cost of self-tapping screws.

If they are almost half the price of their neighbors on the shelf, then you should refrain from such a purchase, since this is most likely a low-quality product from an unknown Chinese manufacturer. The head of such self-tapping screws very often breaks off, or they simply bend during the tightening process. A good product is worth the money.
Video
You will learn a lot of interesting things about tightening self-tapping screws from the following video material:
Self-tapping screws are a very common product, widely used for various types of fasteners. However, in order for its capabilities to be used to the maximum and for the fastening made with its help to have maximum reliability, it is necessary to be able to correctly select and screw the self-tapping screw into the load-bearing surface. We intend to pay close attention to these issues today.
The choice of self-tapping screws according to the type of cutting available on them is small: they can be universal or for wood, the pitch of which is much larger.
If you have to screw a self-tapping screw into metal, chipboard or plywood during your work, feel free to purchase universal products. If the work is to be done with wood, then only those that are designed specifically for this material are suitable. Why, you ask. The answer is simple. For the fixation to be reliable, the material must “settle” securely between the threads. The wood structure cannot do this if the thread pitch is too small.
What to use when you need to screw in a self-tapping screw
If there is only one self-tapping screw or if their number is very small, you can easily use a regular screwdriver. If you are assembling some complex structure with a large number of fasteners, then it would be better to arm yourself with a good-quality screwdriver.
In order to choose the right screwdriver, we devoted this particular issue. The effectiveness of this device increases significantly if it is used with.
Now let's move on to the most important thing - screwing in the screws.
General technology for screwing in self-tapping screws
In order for the self-tapping screw to be securely fixed in the base material, when screwing it in, the following general technology should be followed:
- Use an awl or thin drill to mark the installation location;
- Place the tip of the product in the intended hole;
- carefully screw it in so that the position of the screw becomes stable;
- then continue screwing at maximum speed (if a screwdriver is used) and maximum force;
- at the last stage, reduce the force and speed to avoid damage to the screw and the material.
How to properly screw self-tapping screws into various materials
Concrete
Perhaps the method of installation in concrete is now known to everyone: first you need to install a dowel in it, and then you need to screw the self-tapping screw into this already installed dowel. According to many craftsmen, the reliability of fixation increases significantly if the surface of the dowel is lubricated with appropriate glue.
To drill holes, it is best to use a hammer drill. By installing self-tapping screws on dowels, you can use both universal products and wood.
Ceramic tiles and bricks
If you need to screw a self-tapping screw into a brick or ceramic tile, proceed in the same way as with concrete. But to drill holes it is better to use a drill.
Soft non-ferrous metals
To ensure reliable fastening in such metals, before screwing the product into them, you should drill a hole of a very small diameter, smaller than the diameter of the self-tapping screw. Screwing it in is done without any special tricks. The only important point is that it is necessary to use only universal type products.
Hard metals
The diameter of the pre-drilled hole in such material should be equal to the diameter of the universal screw without taking into account its thread or slightly exceed it. However, some hard metals - cast iron, for example - are simply too tough for self-tapping screws.
Plastic
Self-tapping screws are not suitable for all types of plastic; some of its varieties may simply collapse when screwed in. If you are completely sure that your plastic product is not one of them, then in this case you should use the technology that was described above for soft metals, using self-tapping screws for wood.
Wood and wood panels
Naturally, in this case, you should again use self-tapping screws for wood. If they are screwed into thin boards or slabs, as well as into hard wood, a thin receiving hole must first be drilled. The easiest way to work is with thick boards made of soft wood: no special tricks are required for this.
Drywall: pay special attention!
Drywall is a material in which screwing screws into which involves the largest number of different nuances. The main ones include:
- the optimal screw-in step for this fastener is considered to be a distance of about 70 cm;
- When using a screwdriver when working, you should start immediately at maximum speed, gradually reducing it as the screw deepens;
- When working with a regular screwdriver, you need to ensure smooth and restrained movements;
- the head of the twisted screw should press the cardboard surface of the sheet without breaking through it. This condition is the key to maximum strength of the future structure;
- if the surface of the sheet is torn, the screw should be removed, the hole should be filled with putty and a new place to install the fastener should be selected at a distance of about 5-9 cm.
When working with drywall, the type of self-tapping screw is selected based on the material of the supporting sheathing. If it is wooden, then self-tapping screws with wood threads are used; if it is metal, then universal ones are used.
So, we have introduced you to the basic rules that allow you to screw a self-tapping screw into any metal in such a way as to ensure maximum reliability of the structures you create. We hope that our recommendations will allow you to eliminate any defects and make any repairs the way you originally intended.
Before working with self-tapping screws, you need to accurately determine their number. In addition, you need to choose a tool that will be used to screw in the screws.
It is not difficult to calculate the exact number of screws for the job. After this, you need to go to any hardware store and purchase the required amount of hardware. Any hardware store has a wide range of similar products, but self-tapping screws are most often sold by weight. Our calculation of self-tapping screws will help you find the correspondence between weight and quantity, as well as calculate purchase costs. In addition, do not forget that you need to purchase the correct type of screws. They are available for wood and universal. Although universal screws can also be easily screwed into wood, it is still recommended not to do this, since the small grooves of such screws, given the viscosity of the wood, will not guarantee that the fastening will hold long enough.
Now you need to select a tool for installing screws. It is worth noting that the screw heads can have not only different sizes, but also different sockets for screwdrivers. These recesses can be used not only for a flat or Phillips screwdriver, but also for a special type of screwdriver and key. If you dig even deeper, it turns out that the cross cavities can have different shapes and sizes.
So, in order not to have problems with the installation of such hardware as a self-tapping screw, you must have either a suitable screwdriver or a screwdriver with an impressive set of interchangeable attachments. It must be remembered that during the operation of the screwdriver, its attachments will wear out, so care must be taken to replace them regularly. Moreover, it is better not to wait until the nozzle breaks, but to replace it in advance, since a breakdown can take you by surprise at the most inopportune moment. The nozzles also need to be chosen correctly. Nozzles made of tool steel with various hardening additives will last the longest. Nozzles must be carefully selected and be sure to be fitted to the head of the hardware. You shouldn't take the first attachment you come across. It's better to try everything on and then make a choice.
The choice between a screwdriver and a screwdriver is obvious if you need to work with a large number of screws. If the work is simple, consisting of mounting several hardware, then you can use a screwdriver. The main thing is that it is comfortable and has a thick wooden or rubberized handle. In other cases, it is better to take a screwdriver. It is very easy and quick to tighten the self-tapping screw. When choosing a screwdriver, you need to take into account that there are two types of these devices. There are powered screwdrivers and cordless screwdrivers. It is better to refrain from purchasing a cheap cordless screwdriver, because it is completely unsuitable for long-term work. Such devices do not like long periods of downtime, and they often lack battery charging control. Therefore, if you choose a screwdriver, then you should either look towards expensive professional battery solutions, or simply buy a device powered from the mains.