How to lead the pipe from the stove to the roof. Correct installation of a chimney on the roof. Types of roof cuts, restoration of waterproofing
The passage of a pipe through the roof is the most complex structural element with several problems associated with its construction. In this article we will talk about performing work on the correct installation of the passage, as well as how to pass a pipe through the roof while maintaining all the protective properties of the roof pie.
The node for passing the pipe through the roof is the subject of controversy among various experts. Thus, professionals in the field of installation of fireplaces and boiler rooms believe that the pipe passage through the roof should be located at the ridge. This allows you to protect the main part of the pipe from the effects of cold, which reduces the likelihood of condensation inside the pipe. Roofers, in turn, say that the passage unit must be equipped directly through the ridge, as this simplifies the work associated with installing the passage element. This method, among other things, eliminates the formation of snow drifts above the chimney. But everything is further complicated by the fact that the pipe exit through the roof can also be organized on slopes at a certain distance from the ridge.
In order to protect internal surfaces chimney to prevent moisture from entering there, its outlet is covered with a special umbrella. But if the chimney is connected to boiler equipment, then it is better not to install such protective element, since due to the low temperature of combustion products, they can accumulate under, which will create additional pressure in the pipe itself and ultimately reduce draft.

The most problem area This node is the passage of the pipe through the roof, since in this place it is necessary to take special measures to protect the roof and insulate it from high temperatures. In order to protect the roof “pie” from the chimney, use a separate box. At the same time, it is very important to adhere to the requirements of SNiP regarding the location of beams and rafters, and inner space the box must be filled non-flammable material. Such material as stone wool has proven itself well for these purposes.
The passage element may have different shape depending on the cross-section of the chimney itself and the roofing material used:
- oval;
- round;
- square;
- rectangular.

Exiting the pipe through the roof
When equipping a pipe passage through the roof, care must be taken to ensure that two conditions are met:
- passages through the roofing pie must be fireproof;
- the under-roof space should be protected as much as possible from moisture penetration.

Exiting the chimney through the ridge makes all the work quite simple. Due to the fact that the formation of snow pockets on the ridge is impossible, it is possible to achieve better protection against leaks. But at the same time, this installation method implies that in the design of the rafter system the ridge beam will not have load-bearing functions. And this requires additional strengthening of the rafters themselves. If there is an attic, install additional rafter supports may be undesirable or simply impossible.
That is why developers prefer installing a chimney passage on the slope, directly at the ridge. A snow pocket also does not form in this place, and besides, the rafter system does not need additional strengthening. But besides this, the choice of location for the passage of the roof chimney is also influenced by the location heating equipment. It should be remembered that the horizontal sections of the chimney should not be more than 1 meter in length. In some cases, it is the location of the boiler that becomes the reason for choosing the method of passing the chimney pipe through the ridge.
Professionals recommend avoiding installing a passage element in the valley (the point where two slopes meet an internal corner), since it is especially difficult to install at this point. As a result of rain and snowfall, the junction may not be able to cope with moisture and, as a result, the roof will leak.

It is important to maintain a distance between the rafters and the roof in the range of 25-30 cm. If the roof is made of flammable materials ( different kinds roofing material, soft roofing), then a gap of 13-25 cm must be maintained between the material and the chimney wall. If the material is resistant to high temperatures, then this gap can be left minimal, and removed only from the sheathing.
If the roof is a “pie” consisting of hydro-, steam- and thermal insulation, then when installing the passage element, some difficulties may arise due to the violation of the integrity of this layer. As a result of an error protective properties roofs can be significantly reduced. IN in this case the chimney can be installed in a separate box, which will isolate the roofing materials from the hot walls. Distance between inner wall duct and chimney should be about 15 cm, while free space filled with non-flammable heat-insulating material. It is recommended to use mineral or basalt wool, as it is resistant to moisture.
The waterproofing and vapor barrier is applied to the box using the standard method: the “pie” is cut in the shape of an envelope. The film web is brought to the rafters and cross beams, where they are fixed with nails or staples. Then the waterproofing layer is pressed on top with bars, and the vapor barrier is pressed with the base frame under Decoration Materials attic or attic. After this, the joints of the films and the box are treated with sealant and glued with a special tape.
How to bring a pipe through the roof
To organize a hermetically sealed connection between the roof and the chimney, an internal apron is created at this point. To create it, use the lower abutment strips. The strips are applied to the walls of the chimney, where its upper part is marked. A groove is made along this line using a grinder. Then the dust is carefully removed from the formed border. This is done so that small particles of sand and cement do not fall on the surface of the waterproofing or roof. In some cases, fine grains of sand will turn into an abrasive over time, which can seriously damage the roofing material.
The lower apron begins to be installed from the bottom wall, while only one part of the apron is inserted into the groove. Similarly, this element is attached around the entire perimeter of the chimney. Individual elements must be overlapped with an overlap of 15 cm. The joints are sealed.

For chimneys with a round cross-section in construction stores you can purchase special passage elements consisting of steel sheet and an apron cap. Their use allows you to significantly speed up the work on equipping the passage of the chimney pipe through the roof. The purchased or manufactured apron should be securely fixed to the roof. At the same time, it is not firmly fixed to the chimney, since expansion of the material or shrinkage of the rafter system can cause damage to the chimney by the apron (be sure to read: " ").
The passage of a chimney pipe through the roof, detailed video instructions:
At the junction of the pipe and the apron, a skirt is installed - a steel clamp, which is secured using a heat-resistant gasket. This approach can significantly improve the waterproofing of the roof in a given location. Upon completion of the installation of the apron, it is necessary to apply sealant to all junctions between the element and the chimney. This helps to obtain a reliable connection that does not leak.
One of the most important tasks when building a bathhouse is the correct exit and sealing of the chimney pipe. Moreover, two problems need to be solved simultaneously: ensuring fire safety and insulating the pipe joint from the flow of precipitation and condensate.
First of all, before solving the problem of water passage, you need to decide where the pipe exits on the roof. The height of the pipe must comply with certain standards. The height depends on where the pipe will exit on the pitched roof.
When installing a pipe, the following rule applies: “The closer to the ridge, the higher the pipe should be raised.”
Elevation chimney above the roof plane
- If the distance from the center of the chimney to the ridge of the roof does not exceed 1500 mm, the pipe must be raised above the ridge not less than 500 mm;
- With a distance from the center of the pipe to the ridge from 1500 to 3000 mm, the top of the pipe can be at the same level as the roof ridge;
- At a distance of more than 3 meters, the top of the pipe must be no lower than a line drawn down from the ridge at an angle of 10 degrees to the horizontal.
Where is it better to route the pipe through the roof of the bathhouse?
Most convenient option to exit the pipe through the roof - pass it through the ridge. In this case, installation is easiest; there are rarely snow pockets on the ridge, and thanks to this arrangement, it is easy to carry out insulation work. But this method has a drawback: the rafter system should not have a ridge beam. An option with two beams that are attached in the area where the chimney passes through the roof is also suitable, but this is quite difficult to implement and is not always possible.
The most unfortunate option for the location of the chimney is in the valley (the valley is a roof element made of a kind of tray, forming internal corner between the joints of pitched roof elements). Large masses of snow usually accumulate here; during rain, water flows down from two slopes, so even with the most careful insulation, a leak will only appear a matter of time.
 The most convenient option for venting the pipe through the roof is near the ridge
 Based on this, the most acceptable option for pitched roofs is not far from the ridge, but below it:
- installation is quite simple,
- There is usually little snow accumulation, which means there is no need to install snow retention,
- installation is not the most difficult,
- Due to the not very high height of the pipe, it does not need to be reinforced with braces.
If it turns out that the chimney runs near the floor beams, or close to them ( minimum distance should be 13-25 cm depending on the type of pipe), comes out in the valley or close to the slope, a way out of this situation can be an additional elbow, with which you can bring the pipe to the right place.
In any case, to drain condensate in the waterproofing layer, you will need to attach a drainage groove. You can buy it (usually it is made from stainless steel), or you can make it yourself from a film of sufficient thickness. The groove is secured around the pipe and its end is pulled out to the side. Thus, the condensate flows into this groove and is discharged onto the roof slope.
Passage through the roof depending on the roofing material and type of chimney
When passing through the roof, the most important thing is to remove the water flowing down the roof and the pipe itself. To protect against precipitation, protective aprons are used, the upper edge of which is placed either under the sheet located above roofing material, or under the ridge.

When venting the chimney through the roof, it must be fixed, but so that it remains movable relative to the roof. Otherwise, due to thermal expansion/contraction, the integrity will be compromised and leaks will certainly appear. For example, a round pipe can be given a direction metal strips or corners.
When installing, check the verticality using a plumb line - this is important so that soot does not accumulate and there is good traction.

Brick pipe passage through the roof
If the chimney is brick, rectangular or square shape, you can use the materials included with the roofing material.


You can make an apron for a square or rectangular pipe on one's own. Roofers usually use sheet metal for this, but sheet aluminum works well. Four separate parts are made of metal - two side, front and back.

The metal strips are bent so that one part fits onto the pipe, and the second is attached to the sheathing. In a brick chimney, in the upper part of the apron, an edge is made, which is inserted into a special groove and coated with sealant. To prevent water flowing down the apron from getting onto the sheathing and insulation pie, a sheet of metal of large width is placed under the front part of the apron, with curved sides along the edges. It goes under the roofing material and is called a “tie.”
If metal tiles are used on the roof, then an apron is made from a smooth sheet of the same color, the upper edge of which is tucked under the row of roofing material located above so that the water flows onto the apron and does not flow under it. If the pipe comes out close to the ridge, you can either tuck it under the ridge itself, or bend it to the other side.
There is one important nuance: if width brick chimney more than 80 cm (its size perpendicular to the rafters) you need to make a slight deviation gable roof, located above. It removes sediment, reducing the likelihood of leakage. But such a width of chimneys in a bathhouse is the exception rather than the rule.
Passage of a round pipe through the roof
Modern round chimneys in bathhouses are common. Occasionally you can still see on the roofs of the bathhouses asbestos pipes, even less often - a monopipe without thermal insulation.
A simple single wall, which is discharged through the roof, carries a very high probability of a fire. Therefore, using this option is extremely undesirable.
 Modern round pipes are usually sandwich pipes
 The video below shows an option for sealing a pipe when installed on a metal tile roof.
If metal tiles are used as roofing material, then manufacturers often offer roof passages. They are made from a sheet of the same color and connected to a special cap through which the pipe passes.

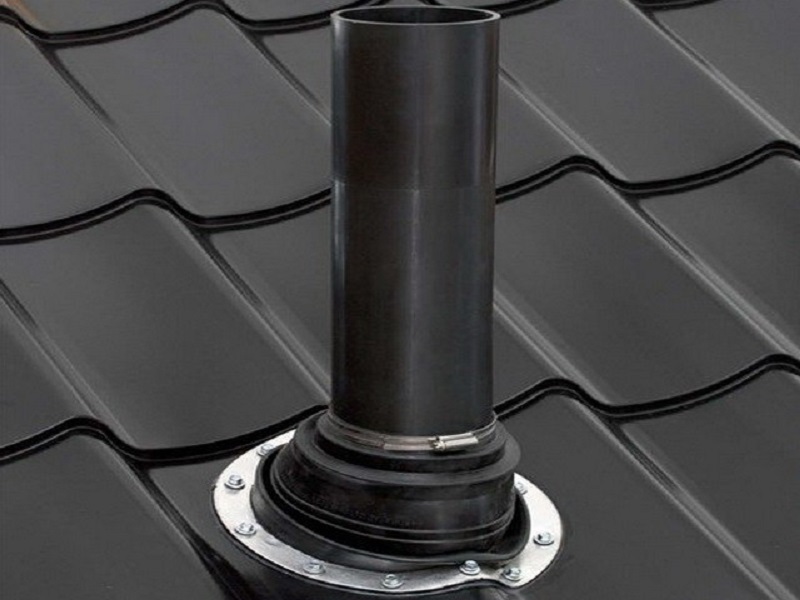
Easy and simple to seal round pipe on the roof if you use a factory penetration. It consists of an aluminum flange to which an elastic part made of rubber or silicone is attached.
 Factory-made penetrations are the most easy option sealing the junction of pipe and roof
 They are different sizes and have different angles slope You can choose it for any diameter, roof type and installation location. The penetration flange is coated with a composition similar to the composition of the corrugated part; there are grooves along the edges into which they are filled with sealant. One of the penetrations, “Master Flash,” has 11 sizes that cover diameters from 3 to 660 millimeters.
 Walkthrough "Master Flash" MASTER FLASH
 When installing such a penetration, part of the corrugation is cut off in accordance with the required diameter. Then it is put on the pipe. The rubber must move with force to ensure a tight fit. Since the hole is about 20% smaller than the diameter of the pipe, you have to pull hard. To make less effort, you can lubricate both with soapy water.

After the corrugation is stretched to the right place, the flange is given the required shape - the material is plastic and you can use a hammer, but you need to work carefully.

Then the grooves located on the inside are filled with sealant, the edges are pressed against the roofing material and secured (self-tapping screws are included in the kit). If the roofing material is not iron, self-tapping screws are not suitable. Need to use or long screws, which will reach the sheathing, or dowels for floor slabs.

There are quite a lot of options for factory-made penetrations, and there are detachable models. They are used when there are thickenings on the pipe or when they have to be mounted on an already assembled chimney of great height. In this version, the kit includes clamps that connect the parts of the passage to each other. The rest of the installation is similar.
The video shows how to seal a penetration through a regular slate roof using a MASTER FLASH corner penetration.
Roof sealants
To seal joints different parts When passing a bathhouse pipe through the roof, you need to use not just a roofing sealant, but always a heat-resistant sealant. It is advisable to use a neutral silicone heat-resistant sealant.
If Master Flash is installed on a metal roof (metal tiles or metal profiles), then it is necessary to use silicone sealant which does not contain vinegar (non-acetic sealant). This is necessary so that he does not enter into chemical reaction with metal and did not destroy it
Roofing silicone sealant retains its properties in the range from -50 ° C to +300 ° C, which is sufficient for any weather conditions and is quite suitable for sealing a chimney pipe.

But you need to remember that the surface to be treated must be clean and dry. The time for complete hardening is indicated on the packaging, usually 24 hours.
Fire safety precautions when using MASTER FLASH
MASTER FLASH made of silicone can withstand temperatures up to +300 degrees Celsius. This is quite enough to seal a sandwich pipe and, in many cases, a chimney made of asbestos-cement pipe.

As for the metal mono-pipe, in these cases it is possible to use MASTER FLASH in cases where the length of the chimney from the stove to the passage through the roof is at least 3 meters. As a rule, in this situation the temperatures will not be critical, but if not, then thermal insulation of the area that passes through the roofing pie is necessary.
Before reaching the roof, the pipe also passes through the ceiling. Do it right ceiling cutting It’s not difficult: there are factory pass-through units, but you can do without them.
Heating devices - required element every residential building. They are designed to provide a comfortable indoor temperature during cold seasons. In the regions of Russia, this period averages 6 months, in selected places- up to 10 or more. Gaining additional comfort comes with a certain risk of fire.
For this reason, increased attention must be paid to chimneys that carry smoke and combustion products from heating devices outside the room. This article will look at how to remove a chimney through the roof safely and in accordance with all modern standards and regulations.
The chimney pipe is used in devices where heat is generated by burning various fuels. This fuel is wood, coal, gas or other flammable substances. The removal of combustion products through a pipe through the roof is regulated by the requirements of SNiP 41-01-2003. Some points are considered partially outdated, but most supervisory services rely on this document. Therefore, the requirements and standards contained in it are mandatory.
What can result from poor installation?
Often, the list of works master stove maker or an installer of a gas or electric heating boiler, chimney installation work is not included. It is assumed that the passage of the chimney pipe through the roof is laid at the construction stage, or the homeowner will install the chimney on his own. The apparent simplicity of such work provokes owners to refuse to use professional roofers. They don't think about how serious negative consequences may result from poor-quality chimney outlet to the roof. Frequently encountered problems:


Not only chimneys from stoves, fireplaces and other things are raised above the roof solid fuel devices. The exhaust pipes from the gas heaters, as well as ventilation pipes. When installing them, exactly the same methods are used as for chimneys.
The height of the pipe and the location of its passage in the roof
A chimney on the roof can only be placed correctly if the outlet for the pipe through the roof is chosen correctly. This factor may affect correct functioning heating systems. To prevent installation errors, you must follow existing requirements against fire safety, and building regulations and standards. Key points of arrangement:


The main problem with installing a pipe through the roof lies in the fact that when smoke or combustion products pass through, the temperature of the structure increases, and this can lead to a fire of the materials from which the roofing elements or rafter system are made.
Flexible passage for round chimney
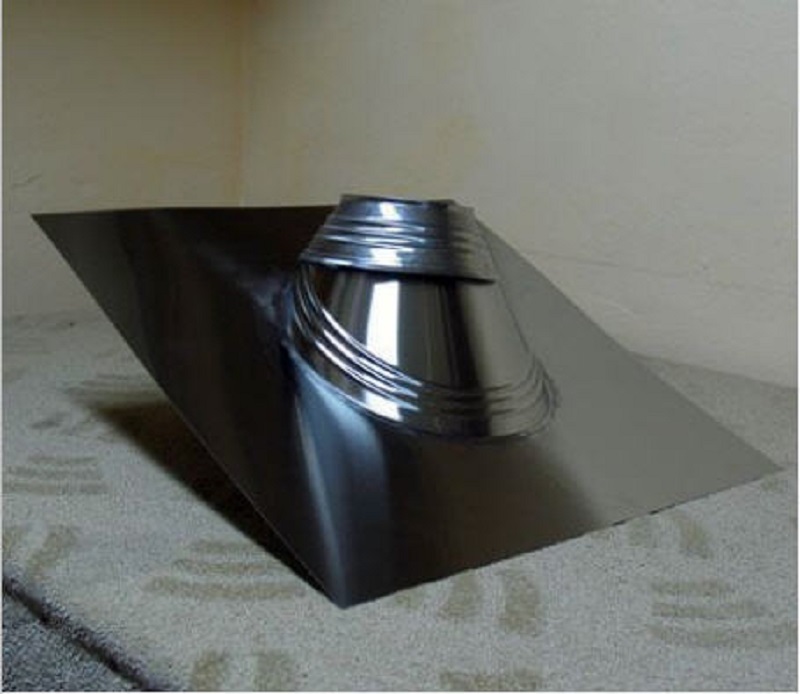
Typically, in private residential construction one has to deal with the arrangement of smoke exhaust and ventilation pipes round section. How can you install a chimney through the roof elements to also ensure sealing of the passage? For this purpose, a special design is used - an elastic roof passage element. This product is made of special durable silicone or rubber. The shape resembles a funnel with wide round or square margins. These fields are called an apron. The elastic passage element, due to the flexibility of the material, can take any configuration. This allows it to be used on roofs with any slope angle and any final coatings. The material from which it is made must withstand the lowest and high temperatures, and also have resistance to exposure external environment. Flexible penetrations are available various colors and configurations.
When choosing which penetration to purchase, you need to focus on the diameter of the chimney and color finishing coating roofs. Universal products are produced, similar to a stepped pyramid, they are suitable for any pipe diameter. The size is adjusted using scissors, which are used to trim the penetration to the required level.
Installing an elastic apron on the roof is quite simple. To do this, you need to attach it to the chimney passage, press it on top with a metal circle in which there are holes for self-tapping screws, apply fire-resistant sealant to the place of contact with the roof and screw it in with a screwdriver or screwdriver.
For roofs with extremely steep angles, it is necessary to use a special type of penetration with a fixed mounting angle of the pressure flange.

Rigid metal feedthrough
To install chimneys, you can use another type of passage products for round pipes - a passage pipe made of metal. It is used in cases where it is necessary to arrange the passage of a chimney pipe through a roof without relief. Such finished goods made of galvanized or painted steel to a fixed roof slope angle.
To purchase, you need to measure this angle at your roof. The installation of such a product is carried out in the following order:

In some cases, it is recommended to use another method. Its essence is that it is necessary to remove the chimney pipe in the passage box in advance and cover it with a special insulating material, for example basalt wool, and after that the entire structure is laid into the roof.
Arrangement of rectangular chimneys
The chimney pipe of a stove or fireplace is usually made of brick and has a square or rectangular shape. In this case, a different method must be used to arrange the roof passage. When the chimney pipe masonry approaches the roof, you need to cut a hole in it of the calculated size with a tolerance of about 6 cm. Using it, the pipe will be brought out above the roof. Despite the fact that heat-resistant brick perfectly retains heat inside the chimney, the outside of this pipe must be lined with asbestos sheets. This measure will protect the rafters from exposure to high temperatures.
To the protruding part brick pipe metal profile The waterproofing is attached to an aluminum base, and its lower edge is secured to the roof using sealant. Next, the unsightly waterproofing of the chimney on the roof is covered with a special decorative apron. It consists of four parts and is mounted on the roof, making the transition aesthetic and protected from influences.

A well-arranged pipe outlet will not spoil appearance roof, will not allow moisture penetration and is completely safe fire safety requirements. The finishing of the chimney on the roof is carried out depending on the design of the roof and the desires of the homeowner.
Installing a chimney is quite a responsible and complex job. It is necessary to think through all stages of installation in advance and get advice from a specialist.

Sergey Novozhilov - roofing materials expert with 9 years of experience practical work in area engineering solutions in construction.
Arrangement theme low-rise buildings, which are increasingly appearing in suburban areas, is gaining popularity again. People want to have their own property in which they can live year-round in comfort and safety. Independence from utilities, fresh air, the absence of city bustle and a host of other factors that were quite fed up with the townspeople and became the reason for the acquisition or construction country houses, and arranging them for the purpose comfortable stay. One of the main questions during the arrangement that worries the owners is: how to remove the chimney through the roof to ensure normal heating of buildings in the cold season and safe operation of the buildings.
When installing a heating system that will be powered by a stove or other device, you need to accurately determine the design of the exhaust of combustion products, taking into account all the necessary fire safety rules and without violating the tightness of the roof.
Features of choosing a location
Exiting a chimney through the roof is not as simple as it seems. Incorrect determination of the place where the pipe will be installed may subsequently lead to poor-quality operation of the entire heating system and not only that. We list the main problems that may arise when wrong choice places for the removal of combustion products in the furnace, taking into account that the sealing of the chimney on the roof and the roof itself will not be compromised.
- It is not recommended to install in areas near ventilation openings and skylights to avoid getting hit carbon monoxide inside the room.
- Installation is not recommended at the joints of the slope, where there is external corner, as this will lead to snow accumulation during the winter.
- Do not use hard material to secure the system. This is taken into account in cases where the roof itself “floats” for some reason. If the system is fixed rigidly, the drainage system will suffer along with the roof.
Experienced builders advise installing a chimney system directly near the ridge. Why in this place and not in any other place:
- In the joint area of the structure, moisture leakage is excluded, because in this place during snowfalls the least amount of snow accumulates.
- The location of the pipe in close proximity to the roof ridge reduces the impact external factors. By placing the structure near the ridge, favorable conditions least condensate collection in this place.
Increasing the distance from the ridge affects the height of the chimney structure itself, as it rises higher than the roof. If there is another building nearby that obscures the exit node, then this factor must also be taken into account, raising the height of the structure above the structure.

Features of the junction of the structure
Before installing a chimney through the roof, it is necessary to prepare special elements, the manufacture of which requires various material. Initially, the following points are taken into account:
- Technical characteristics of the material used for installation.
- What is the roof made of?
- Waterproofing the chimney on the roof, as well as using an apron as an installation element.
The design uses material with different characteristics operation. This can be refractory brick, metal, ceramic parts, even glass, which is pre-treated special treatment. The main factor when choosing is the peculiarity of the operation of the chimney pipe with the calculation of the temperature of the combustion products. The junction location may vary depending on the base from which the structure is made. When installing a chimney through the roof, the degree of protection of the roof from moisture using waterproofing and insulation is taken into account. A special feature of the installation is the use additional layers hydro- and vapor barriers, which should not have ruptures or connections during installation.
According to the standards ensuring the safe operation of buildings, the distance between exhaust systems and combustible elements should not be less than 15 cm. This requirement requires the presence of a special pipe box that provides a buffer layer in the area adjacent to the chimney structure. Experts recommend separating the abutment area from the roof structure with a system of transverse beams and rafter legs. The method by which it is produced protective film, taking into account the required distance, is performed with cutting using the envelope method and fixing the material with staples to the edges of the beam.
Further waterproofing film is secured with lathing, and the vapor barrier layer with finishing, which will be used as fasteners.

Ondulin roofs, output features
Before removing the pipe, it is necessary to study the technical features of the material from which the roof is made. Ondulin is included in the list of roofing materials that are used for equipping low-rise buildings. Exiting a chimney through an ondulin roof involves some special features when performing installation work.
- When choosing a location, it is best to pass the pipe through the ondulin roof near the ridge. Before installation, it is required to provide the required height of protrusion above the top of the ridge, ensuring minimal impact unfavorable factors. The same condition is optimal in preventing the accumulation of moisture and other elements in the area of the structure.
- The passage through the roof for the chimney is made at a distance from the location of the roof windows.
- The passage of the pipe through the roof is not carried out at the junction of the slopes, as this will lead to the accumulation of snow at the junction.
- The fastening of the structure should not be done rigidly, in order to avoid disruption of the smoke exhaust system in the event of destruction of the roofing material.

The material from which it will be made is also taken into account. The passage of the chimney through the roof is subject to the condition of use in the structure roofing pie. Before installing a chimney through an ondulin roof, it is necessary to prepare an additional structure in the form of a box to ensure fire safety of the entire building. It is necessary to additionally perform the following activities:
- Installation of rafter “legs” on both sides of the chimney pipe.
- Using transverse beams, the chimney pipe is secured at the lower and upper points, taking into account the thickness of the rafter “legs”.
In all other respects, the technology of the passage and the installation of the chimney is carried out according to the standards that are used when performing similar work.
Corrugated sheeting: output features
Many developers are interested in the question of how to properly remove the chimney through the roof if it is made of corrugated sheets. Roofs made of corrugated sheets are lightweight, durable and reliable in operation. Many developers use it as a roofing base. When making a passage through a roof made of corrugated sheets, there are no fundamental differences in the design; the place in the roof and the material that will be used are selected in the same way.
Before installing a chimney through a roof made of profile sheets, it is necessary to distribute all types of work step by step, taking into account each structural element.
- The diameter, thickness and material from which it will be made are determined. The quality of traction depends on the height and evenness of the installation.
- Before making a hole in the roof, it is necessary to take into account not only the dimensions of the pipe, but also the fastening elements with which the structure will be secured.
- When connecting to rafter system It is necessary to take into account the presence of a protective box.
- In the presence of complex types roofs using insulation, it is recommended to pass the chimney from sandwich pipes through the ceiling, attic and roofing material. Using a chimney sandwich during installation, the entire assembly structure is extremely simple and quick.

The output principle is in many ways reminiscent of standard installation of structures:
- Using a chimney sandwich in finished form You don’t have to waste time on insulation. Installing a chimney from sandwich pipes through the roof greatly simplifies the work.
- Using the passage as a structural element, the best sealing of the joint is ensured, which prevents moisture from getting inside attic space. As a through pipe the most rational option is the use of the material from which the pipe itself is made. There are ready-made elements on sale that completely solve the issue of sealing the joint and its elasticity; this is especially important if the roof has a corrugated surface.
- The pipe passage through the roof has several varieties; its type is selected according to the diameter and shape of the system.
Slate roof: system output
Slate has not been used as often lately as other, more modern and popular ones. But nevertheless, its relevance in construction remains high in demand. The smoke hole is brought out using a special circle to ensure evenness of the edges. The most popular materials for making a slate roof are fire bricks or prefabricated ceramic pipes. Before fixing the chimney to the slate roof, a special apron is made, most often galvanized or stainless steel is used as the base.

Returning to the question of how to seal the joint with the roofing material used as slate sheets, it would be appropriate to use a ready-made connector that provides maximum sealing quality. In all other matters relating to the organization of installation work for the construction of the device on slate roofing they are not much different from installation options with other types of roofs.
Metal tiles: design features
The passage of a chimney through a metal tile roof is in many ways similar to the principle of working with a similar material, or rather corrugated sheeting:
- The installation location, diameter and length are determined.
- Markings are made on the roof surface to cut out a hole, taking into account a small deviation (1.5 cm) in the direction of increase.
- To install a chimney system that passes to the roof through attic rooms, boxes are used that are attached to the rafter system. When cutting into the roof, the presence of waterproofing and insulation is also taken into account.
- When installing on complex roofs, it is better to use sandwich pipes; this will make it possible to assemble the structure from parts, which in turn saves time and makes the work easier.
Many novice craftsmen are interested in why insulation is required and how to do it correctly. In construction, a material that is highly fire-resistant is used as insulation. Mineral wool and fiberglass will not only provide least loss heat, but will also protect the home from fire. Work on insulation of a multi-layer type of roof should be carried out in such a way that they do not interfere with the subsequent installation of the pipe itself.

Elements used for terminals and sealing
Most often, chimneys have the shape of a circle; this complicates the making of holes in the roofing material, which can subsequently affect the tightness of the joints of the two systems: the roof and the chimney. In order to improve the quality of penetrations with further fastening to the roof structure and maintaining the required sealing quality, builders use ready-made penetrations, which differ in the form of manufacture and the method of creating elasticity at the joints. For convenience, there are several varieties of this element, which is also used when installing ventilation piping.
Most stove makers will probably agree that the device chimney on the roof is one of the most complex work. In addition to professionalism, performing this process requires: the ability to correctly calculate and determine the location for pipe installation, an understanding of how the roofing pie is constructed and knowledge of the basic requirements regulated by GOST and SNiP.
You will also need to ensure that the installation and fastening of the chimney pipe to the roof is done in such a way that it can withstand wind load. This raises several important questions:
- How to bring a chimney through the roof?
- What should you consider when using a metal chimney?
- How is the roofing pie waterproofed and thermally insulated?
- Do SNiP and GOST regulate what height of the chimney above the roof is required?
- How to make a cut, and what materials can be used to line a chimney?
How to remove a brick chimney through the roof
In order for the work to be completed efficiently, and not have to redo your own mistakes, you need to follow a few simple recommendations:- Layout - even with a “spontaneous” repair, there should still be time when you should stop and think about: where exactly the stove will be located, how the smoke removal system will be installed. Where on the roof will the chimney go? The calculation will make it possible to calculate what height of the chimney above the roof will be sufficient to provide the necessary draft.
- Pipe location- exists general rule, how better pipe blown by the wind, the stronger the draft in the furnace. Following this, they try to place the chimney as close as possible to the center of the roof - to the ridge. The height above the ridge depends on how far the pipe is from it.
- Sealing and insulating a chimney on the roof– single-layer metal chimney They may become hot during intense combustion, the brick does not heat up so intensely, but still requires the use of thermal insulation in the area where the roofing pie passes. The outlet through the roof of the chimney must be carefully insulated so that moisture does not pass through the opening.


There are certain standards regulating what the gap between the chimney and the roof should be. According to SNiP, the distance to hot materials from the chimney should be at least 13-25 cm.
Passage of a metal stove pipe through the roof
Installation and installation of an iron chimney through the roof is a process that cannot be rushed. The master needs to understand the characteristics of each roof with which he will have to work. The essence of the work comes down to two important principles:- After installing the chimney, the integrity of the roof should not be lost; in other words, it is necessary to avoid a situation in which the roof will leak after the first rain. Often water runs straight down installed chimney. At the same time, waterproofing a chimney on a slate roof is significantly different from how the same operation is performed on a metal tile or soft bitumen roof.
- A single-layer metal chimney gets very hot, so it is necessary to install a thermal insulation barrier or duct.


For chimneys made of different materials, there is a solution to this problem. Namely:
- Waterproofing a brick chimney - a special plate is used for it. For slate roof you will need to make a special pedestal around the chimney. A sealant plate is placed on top of it for sealing.
- Pipe box - used if the roof is made using a roofing pie. The fact is that violation of the integrity of the pie leads to the loss of waterproofing and thermal insulation properties. To avoid this, a special box is made. The structure surrounds the chimney around the perimeter and a special heat-insulating composition is poured into it.
- The roof pipe can be protected using a special insulating apron. The advantage of the apron is that it completely follows the curves of the roofing material and fits tightly, protecting it from moisture. The apron is a rubber seal made of durable and resistant to temperature and atmospheric phenomena material.
- Installation roofing around the round chimney is the best solution. In this case, the material is laid according to a completely finished structure. This allows you to narrow the required opening. For a roof made of metal tiles or corrugated sheets, the hole for the chimney can be made larger than the diameter of the pipe by only 0.5-1 cm.
The cutting of the roof must be carried out taking into account the material from which it is made, as well as technical characteristics chimney.
What is the height of the chimney from the ridge
The presence of draft in the stove, rapid heating of the pipe, and the slow settling of soot on the back side of the structure depend on the correctly calculated height of the chimney. These standards are strictly regulated by GOST and SNiP. In particular, the regulations specify the following requirements:- Installation of the chimney at a distance of up to 1.5 m from the ridge. The edge of the chimney should protrude at least 0.5 m above the top point of the roof.
- The distance of the pipe outlet is 1.5-3 m from the ridge - the optimal height would be above the roof so that the chimney is approximately level with the ridge.
- More than 3 meters from the ridge - the chimney should be 10 degrees below the ridge.

To increase traction, pipe heads are used. Head divides air flow, directing it in two directions (down and up the pipe), thus increasing the thrust by 15-20%. The distance from the chimney to the ridge is important requirement associated with safe operation furnace equipment.


It is not possible to fix the chimney on the roof; its stability depends on fixing it below when passing through the attic. Typically, brackets are used for these purposes, with which a metal chimney is rigidly screwed to wooden beams and rafters.
How to seal a chimney on the roof
Bypassing the chimney and waterproofing it is carried out as follows:


In most cases, cutting the roof can be done using already ready-made structures, which can be purchased at any construction supermarket.
How to cut a chimney on the roof
 The connection between the pipe and the roof and its subsequent waterproofing can be done either independently or using ready-made structures. Each type of roofing material has its own way of performing this work.
 The roof to be maintained must be handled by a professional construction crew, the rest of the work can be done independently.
Practice has shown that penetration for a chimney through metal roofing from corrugated sheeting is best done using a lead apron placed on the roof cut. The advantage of this solution is that lead is soft and pliable, which allows it to completely follow the shape of the roofing material.
Framing the junction is done using a hammer. By lightly tapping, you can give the apron the desired shape. After this, the cutting is removed and generously coated with special silicone. The upper part of the apron is laid under a sheet of roofing material.
Device soft roof around the chimney can also be carried out using a similar structure or a special rubber insert.
You can solve the connection problem using other laying methods metal pipe, namely its side exit from the room.
 The device for connecting the chimney and the metal tile roof also consists of an apron, but in this case the apron is made not of lead, but of galvanized metal, painted in the color of the roof.
Most manufacturers of metal tiles also blow out structures for the chimney. The exit assembly through the roof made of ondulin is also sold ready-made. The apron of the product completely follows the curve of the wave of the material. After installation, the apron is covered with sheets and then insulated with self-adhesive tape.
Additionally, it is recommended to use following materials for cutting: 
The easiest way to remove a metal sandwich chimney from a round-section chimney is through the roof. The surface of the sandwich pipe practically does not heat up, and in the place where the floor and roof slabs pass, you will need to install a regular sleeve.