How to level a floor using a laser level. Leveling the floor: how to correctly measure the curvature and eliminate it yourself. Specialized laser levels for floors
Read also
Laser level or a level - a modern special tool that every builder should have. With its help, you can quickly, and most importantly accurately, measure the level during the construction of buildings and carrying out finishing works. Working with a laser level is simple and straightforward. Modern devices so easy to use that people with basic theoretical knowledge in the field of construction can handle them. Simply turn on the device. The built-in laser will at the same moment project a horizontal and vertical axis onto the surface, according to which the level is struck. Laser level greatly simplifies installation ceramic tiles on the floor, if all the work is supposed to be done with your own hands.
Types and advantages of laser levels
You can find it on sale today following types levels using laser:

Regardless of the type, a laser level is an expensive piece of equipment. Buying it for one-time use is a waste of money. For example, to level the floor when laying ceramic tiles with your own hands or when you need to cut material, you can rent the device, or you can make it yourself.
Making a laser level yourself
Making a laser level yourself is easy. To do this you need to take the following devices: laser pointer, bubble level, plywood board (thick), square or round section with a diameter of 6 cm, a piece of rubber.

We make a level for leveling the floor with our own hands. Stages of work:
- First of all, you need to make a level from a laser pointer. To do this, take a regular nozzle without a pattern and cover it with cardboard. A hole is made in it with an awl. Thus, we manage to focus the light beam.
- Attach a pointer to construction level using clamps. You also need to make a shock-absorbing layer with your own hands. To do this, take a piece of rubber and place it between construction equipment and a pointer. Rubber will allow you to change the level of inclination of the pointer while leveling the floor.
- Prepare the tripod. To do this, cut off the top part of the peg strictly horizontally. We attach a board to it using self-tapping screws. Its position is also regulated by a level. The platform for the level is ready.
- Assembly of the structure. We install a homemade laser level on a do-it-yourself tripod and turn it on. A projection of a point will be obtained on the surface. We mark its position on the wall. We find the position of the second point and also mark it on the wall. By connecting both points, we get a perfectly straight line along which beacons can be easily installed when laying ceramic tiles. This level is also used for cutting tiles.
To make using a homemade laser level comfortable and correct, the equipment is calibrated.
Laying ceramic tiles level
Using a homemade level when laying ceramic tiles on the floor and for organizing beacons is no different from setting the floor level using professional equipment.
Do-it-yourself work is carried out in the following order:
- We turn on the level, made by ourselves. Its installation is carried out in a strictly horizontal plane. Correct position We determine the building level to which the laser pointer is attached. If you plan to level the floor for laying ceramic tiles, then install the equipment without a stand.
- After leveling the device, we determine the position of the first point at which the beacons will be placed. We project the device onto the wall. Leave a mark where the laser beam meets the wall. We rotate the device a certain degree, again align its position with the building level, and find the second point.
- We connect the resulting points with a line. It will be used to orient the beacons and then lay the ceramic tiles with your own hands.
A homemade level can be used not only when laying tiles and for organizing beacons. With its help you can make the correct markings of the floor and walls under rough finishing. Also, based on its readings, cutting is performed finishing materials.
Advantages of cutting tiles with a laser
Do artistic styling tiles for the floor with your own hands, you can make various shapes on the floor if laser cutting is used during finishing work. IN in this case The material is processed using a focused beam of light (laser) in an auxiliary gas environment. Cutting is used in the processing of almost all finishing materials, including tiles. In this case, the thickness of the material lies in the range of 0.1 mm...70 mm, the width of the resulting cut is 0.05 mm...1 mm. Conventional cutting is performed at a speed of 80 m/s...1 m/s.

Laser cutting has a number of advantages:
- is different high quality, not required here additional processing cut edges;
- high productivity and cutting speed;
- narrowly targeted effect - the laser has a targeted effect. As a result, the temperature of the processed material does not increase, and therefore its technical characteristics remain unchanged;
- by using laser cutting you can process materials without fear of their deformation;
- Such cutting allows you to make any cut on such fragile materials as ceramic tiles. At the same time, the integrity of the latter is preserved;
- silent process;
- Process parameters can be easily changed and adjusted.
Artistic cutting of tiles and setting beacons using a laser will allow you to create an original and durable floor finish based on ceramic tiles without spending a large amount of money on the work.
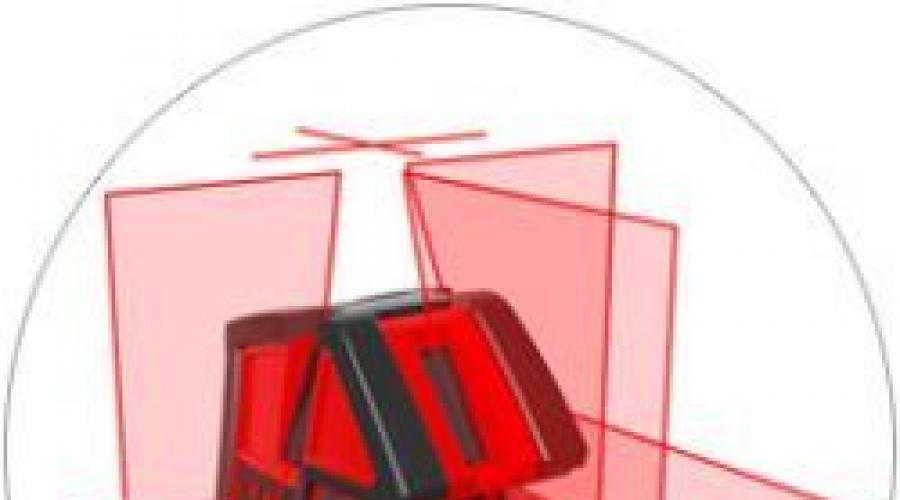
Many construction and finishing processes can be accelerated and simplified. You just need to know how to use a laser level, and buy one, of course. These devices are also called plane builders or levels. The most common option is prism laser levels. Several special LEDs and optical devices - prisms - are built into the body of this device. The rays from the LED are refracted in prisms, allowing the construction of vertical and horizontal planes. On surfaces they are displayed in the form of red lines, along which it is convenient to mark, check deviations from the vertical and horizontal, and a lot of other similar things.
Preparing for work
Before using the laser level, it must be aligned vertically. There are two types of devices - with and without automatic position adjustment. If your unit does not have auto-tuning, it has bubble levels and adjustable feet. Tighten the legs so that the air bubbles are exactly in the center of the scale. After this, the level can be turned on.
If the laser level is self-adjusting, it compensates for small deviations - about 4° - on its own. When the position is set, a sound signal sounds (in another version it stops beeping) or the green LED lights up, indicating readiness for work (before this the red light is on). If the normal position cannot be corrected by automatic correction, you will need to manually tighten the legs so that the angle of deviation is smaller.
How to work with a level
Laser levels can have different sets of functions. IN basic version It is possible to obtain vertical and horizontal planes, as well as include them together and obtain an intersection. In some models it is possible to obtain a point at the zenith and below the device (plumb, point - nadir), there is also a function of constructing two parallel vertical planes. Additional features useful, but their presence increases the cost as the system becomes more complex. Some manufacturers add tripods or platforms to the basic package that can be mounted on the wall with a screw or magnet.

The main functions of a household-grade level (plane builder)
The models also differ in the possible angle of the plane aligned in the horizontal surface (sweep angle). It can be from 110° to 360°. The easiest way to work is with the one that gives a complete plane, but it is a professional model and costs a lot. You can get a complete plane even with a small plane of luminescence. To do this, the device is rotated around its axis.
When using the device outdoors, the laser catcher may be useful. It is usually purchased separately. When purchasing, you need to check if it is compatible this model with your laser. Special glasses may be helpful. Firstly, they protect the eyes from accidental exposure to the laser, and secondly, they allow you to see the beam more clearly.
Use when working on the floor
It is convenient to use a laser level when leveling the floor. Place it approximately in the middle of the room and enable the construction of a horizontal plane. A straight line is marked on the walls, along which it is convenient to make markings.

The laser beam is also displayed on any object that you place in its path. Using this property and a ruler (tape measure), you can find the most protruding and most “recessed” part of the floor. Using this data, you will determine at what minimum level you can screed the floor. Next, use the found height to make marks on the walls and begin installing the beacons. They can also be placed along the beam. Having set the laser beam to the desired height, set the back of the lighthouse so that it is evenly illuminated by it.
Using the same horizontal surface, you can check how evenly the concrete is laid in the screed. The beam will be visible on the hillocks, and the depressions can be found using a rod.

How to use a laser level to lay floor tiles
You can also use a laser level when laying tiles on the floor. To do this, you need to get the intersection of the rays on the floor. Set the required mode, choose the direction in which you will lay the tiles and, along the line visible on the floor, align the seam.
What can it do on the walls?
Now let's look at how to use a laser level on walls even more actively:
- Check how crooked the wall is. Parallel to it, at a distance of several centimeters, beat off a horizontal plane with a laser. Using a ruler or tape measure, measure the distance from the beam to several points on the wall. This determines how littered the wall is and in what place you can find recesses and bumps. This procedure is necessary when.
- Using the same technique, you can check the verticality of the corners.
- Mark a horizontal line for fastening something: furniture, profile, etc.
- Get a crosshair for laying tiles on the wall.
- Have a vertical line in order to horizontally, in order to evenly stick the border, etc.
- Check the verticality of the doors.
- Mark the line for laying.
You often have to use a laser level during repairs, and later in everyday life, for small jobs it is often needed: to hang something straight, then to set it household appliances (washing machine, for example) etc.
Video lessons on working with a laser level (level)
How to check a laser level for accuracy
To be able to unconditionally rely on the readings of the laser level, it must be checked. IN technical specifications The model indicates the maximum permissible error for a given device. It is indicated in mm/m (millimeters per meter). Naturally, the smaller it is, the better, and this is one of key parameters, which are worth paying attention to. But even comparing different devices One model can see a significant difference in readings.
For a normal repair result, the deviation should be minimal, and it can be determined by inspection. In theory, this check should be done before purchasing, but few stores will give you this opportunity. Then you can check the laser level at home, and if it does not pass the test, return it or exchange it (don’t lose the receipt). The verification procedure itself is in the video. There are quite a lot of manipulations, but they are not complicated.
Leveling the floor is one of the most labor-intensive jobs during renovation. Moreover, the work itself with leveling mixtures or installing lags is not so much difficult as with the definition zero level sex and miscalculation required material to level it. Have you ever tried to figure it all out? It's actually simple. The curvature of the floor is determined using several points of its level, which are compared with control points in relation to the floor itself. After you have determined the curvature of the floor, you need to mark the new level on the walls. And only after that proceed to its construction. And the floors are leveled from the lowest point to the highest. And how exactly everything happens – now let’s break it down into pieces.
Which level should I choose?
The construction world has already accumulated vast experience in measuring the curvature of horizontal surfaces using strings, plumb lines and homemade water levels. And, as life shows, all data obtained in this way are far from absolute precision. This can also be seen in the way old buildings are destroyed - mainly, they have obvious problems with geometry. Therefore, in an era of obvious shortage free land in cities and ecologically clean regions, building a crooked house is extremely irrational. Which is to the advantage of modern manufacturers of construction equipment - they have developed tools that measure deviations from the strict horizontal to a hundredth of a millimeter.
The majority of products of this type are produced today by manufacturing companies Bosch, Dewalt, Ada and Skil. There are also other brands - and it is important to understand why one such device will be better than others. After all, it depends on how easily and accurately you can measure the curvature of the floor:
- Simplicity of design. If you doubt that you can set up a complex mechanism yourself, then give preference to a simple laser level in the form of a ruler.
- Price. For entire teams involved in professional repairs, a high-quality multifunctional device for measuring floor curvature is vital - and this is a truly justifiable expense. But for a person who has simply decided to start renovations in his house, and it is important for him to simply make a good, flat floor, there is no point in doubling his estimate three times because of the purchase of an expensive “toy”. It is enough to use budget analogues, or invite a specialist with the necessary equipment for this specific task.
- Self-leveling function. Such a tool creates an optical cross and finds the required horizontal and vertical positions on its own, without an additional rack level.
- Wall mounting. If you are only going to measure the curvature of the floor, then this function is unlikely to be used at all. On the contrary, if the level only works when positioned on the wall, its range of actions with the floor is extremely limited.
- Source. Some laser levels are powered by a battery or batteries, and some have to be connected to the network, which is not always convenient - after all, the house is just being built, and, for example, there is no electricity in it yet.
In principle, you can use the “old-fashioned” methods of measuring the curvature of the floor - unless the area of the room is large and you are going to level the floor under carpet or linoleum. Then errors invisible to the eye will not be noticeable either when walking or on furniture. But it's expensive to install finishing coating or when constructing a foundation that must be perfectly level, such techniques are not suitable. In addition, modern laser and optical levels are much easier and faster to use than the same stretched threads. But let's look at everything that the construction fraternity uses today.
Rack bubble levels
Easy to identify new level floor and using a regular bubble level. The bubble level is the simplest hand tool, which is most popular in construction. Usually it is 1 meter long, but three meters is also used. Modern linear levels even have a digital display that accurately determines the degree of inclination of the horizontal floor surface.
Simply place a ruler with a bubble anywhere on any wall to the height at which you plan to make a new floor. Then move it to the left and extend the line - and so on until your outline is closed. By the way, the coincidence of the last line with the initial point will be evidence that you hit the level correctly.
The principle of operation of this level is this: on a horizontal surface the bubble appears in the middle of the capsule, and on an uneven surface it goes to the part where the level is higher. Such a device is quite good for measuring the curvature of the floor in small rooms.
So, the advantages of the linear level:
- Cheapness
- Convenience
- Ease of use
- Application in any conditions
Flaws:
- Inability to measure large areas
- Low accuracy of indicators
- Bulky
- Physical labor, which also takes energy.
If the floor has a slope, then the resulting horizon line will diverge from the floor surface. Just use the bars and set the level exactly:
If you suspect that the subfloor is different places rooms higher than the walls, check: pull two threads from the corners of the room. Based on the proximity of the floor to them, you will determine the highest zones from which you should build.
Hydraulic level
But on large areas one ruler with a bubble will not be enough - here you need to use at least a hydraulic level. Essentially, this device is a communicating Pascal vessel in the form flexible tube with graduated transparent flasks. Tinted water is poured inside, which is used to determine the evenness of the floor. Just look: if the liquid at both ends is located at the same level, then this device lies on a flat horizon, but if the liquid’s marks no longer coincide, then there is curvature. By the way, you can make such a device with your own hands.
There are several marks on the glass bulb itself that allow you to accurately determine how much the horizon is shifted. And the more professional the water level, the more of these risks there are.

Laser levels
Laser linear level is a device that, thanks to the presence of a horizontal line and a staff, allows you to measure distances between the right line and the floor surface itself. That is, if the data turns out to be the same, then the floor is fairly level.
Advantages:
- Compactness
- Ease
- High measurement accuracy
The main disadvantage is the low operating range. But anyone can work with a modern laser level, and independently. All you need is to place the device level, by eye, the internal slope sensor - inclinometer - will construct the plane itself as accurately as the manufacturer indicates in the instructions. If it beeps or doesn’t work, it means you have placed it outside the alignment zone.
The operation of laser levels is based on the action of diodes, which form a powerful light radiation. Based on its display on the walls, they take measurements themselves. high precision, which is only possible to achieve. Some laser levels also have a built-in magnetic damper: if you accidentally touch the device, it will quickly dampen its own vibrations and you can continue working almost immediately.
Even the cheapest simple laser plane builders can be rotated 360 degrees without moving the tripod. ABOUT construction dust and dirt you don't have to worry about: measuring instruments for the floor are usually made of thick plastic and have rubber inserts, which protect the internal space.
If you marked the level of the new floor with dots along the entire perimeter, then simply connect them into one line that will run along all the walls parallel to the ground.
Here's how to measure the curvature of the floor and level it:


Rotational levels
A rotating laser level is a device that projects a laser point onto a wall. When rotated, it turns into a line - horizontal or vertical, and then you work with the rod.
Rotary levels have a rather complex internal mechanism, with high speed rotating small LEDs. This allows you to project several parallel beams at once - and at any height.
Such models are manual, pendulum and electronic. Pendulum ones allow you to simultaneously make up to 5 measurements in different planes, and electronic ones can detect the slightest error over long distances - such devices are equipped with several sensors at once. There are also mixed types– both pendulum and electronic.
The range of action of the rotary level is large, and the accuracy is high. The only drawback is the point measurement results, which are not enough. And the level works like this:

Optical levels
The optical level is more often used outdoors, although it is suitable for measuring the curvature of the floor. Its action and principle of operation are similar to that of a rotary laser, but the accuracy of the results over large areas is already higher. What are the advantages of this device, and the disadvantage is the fact that the hands of two workers are required for measurement.
Cost of devices for home use today ranges from 200 to 300 dollars, but professional models will cost you several times more. The Bosch plane builder is considered the most accurate today.
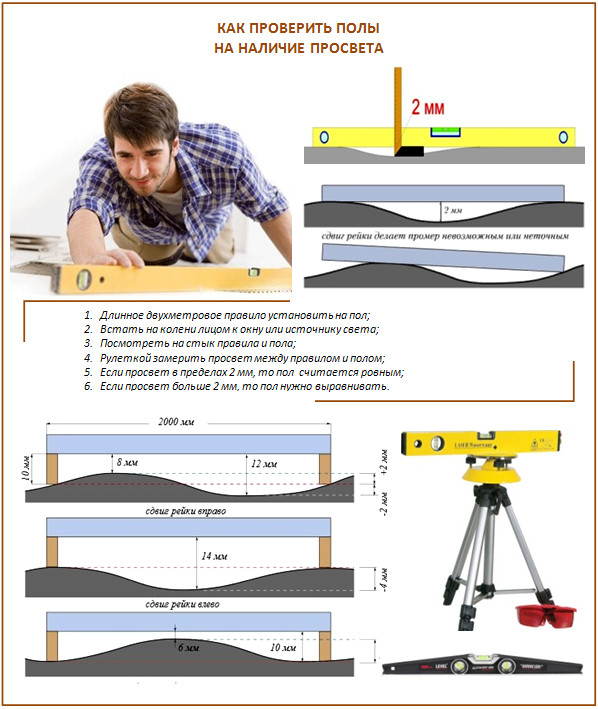
Determining the height difference: step by step
First, let's learn how to determine the curvature of the floor using a regular slatted ruler level. This skill is invaluable, because you don’t know where and under what conditions you will have to measure something.
So now step by step:
- Step 1. We put things in order in the room where we will work. No construction waste or foreign objects it shouldn’t be there - all this greatly interferes with the search for the exact height of the future screed.
- Step 2. Draw a line along the walls basic level- around the entire perimeter. It must be strictly parallel to the floor, for which we recommend that you use a modern laser level or simply create a section parallel to the floor through two points and continue it along the walls until you connect it to the beginning.
- Step 3. Now we check the floor height from the base level in different parts premises. So we will find the highest point of coverage, from which we will start.
- Step 4. Now we raise the line (or draw a new one) so that it is exactly one meter above the highest point.
- Step 5. Next, draw the third line - the line of the finished floor. It will be lower than the previous one in terms of the following formula: “100s (thickness of the future screed) =?” For example, if you plan to have a screed that is 3 cm high, then you need to lower the level by 97 cm, and if it is 5 cm, then by 95 cm.
If you have good device is available, then we measure the curvature of the floor using it. It is also important to set the level correctly - this will ensure the required accuracy in measuring curvature. So, if it is possible to choose a certain scanning angle, then it is worth choosing it, and not be content with the fact that the vertical beam for the ceiling seems to show a straight line for the finished floor. In this regard, it is most convenient to work with those devices that have a self-tuning function.
So, this is what working with a laser level looks like:
- Step 1. Remove all dirt and debris from the floor to ensure accurate measurement results.
- Step 2. Install the device on the floor - preferably at the highest point of the floor.
- Step 3. Direct the beam along the wall.
- Step 4. Once the laser level is finally installed, start marking lines on all the walls in a way that is convenient for you. How high or low the laser dot lines are is not important; it is not difficult to move them to the desired height using a tape measure.
- Step 5. When you find the highest section of the floor, attach the painting cord to it, and stretch it with the other end to the level marks on the opposite and adjacent walls. If the cord is loosely pulled in any direction, there are no bumps anywhere, and this point can be taken as a reference point. If the cord comes across something else, carefully inspect this place; perhaps the protruding area is small and it makes sense to simply chop off this protrusion with a hammer and chisel. If not, then move the mark of the highest point of the floor here.
- Step 6. Once we have decided on the most high area floor, raise the point by 5 cm - this is the mark of the future screed. Or even simpler: raise it by 100 cm, i.e. to the height of the entire rule, mark it on the walls and lower the lines exactly 95 cm.
Advice: looking at lasers from levels is not safe for your eyes - be sure to wear special glasses. Usually they come complete with a level.

And now according to the broken level, according to which we will level the floor:

Elimination of differences depending on the degree of curvature
There are several ways to level floors with obvious curvature:
- Self-leveling mixtures, which themselves fill small differences of about 2-3 cm.
- A leveling screed, which is simply indispensable for large curvature of the floor.
- , where each log can be raised to the height that is needed.
- A dry prefabricated screed that can cover everything.
- And on a smaller scale, in the form of plywood flooring, for example.
It cannot be said that any of the listed methods is worse or better - it all depends on the condition of the base and how pronounced the curvature of the floor is.
Technology No. 1. Bringing the foundation to perfection
If the floor surface is almost flat, additional horizontality can be given to it with sheets of extruded polystyrene foam, or a full-fledged dry screed. Many people appreciate this screed because the process of such work is as clean as possible: no dust, no dirt, no dampness.
But the dry layer must be leveled relative to the horizon carefully - and this will not work just by eye. To do this, special beacons are placed in the form of U-shaped profiles and filled to the top with the mixture. They level along these profiles, as if on slippery rails - this is the only way to guarantee that the entire floor is at the same level. Quite a responsible process, we note.
Technology No. 2. Aligning minor curvature
The maximum unevenness that can be on a “wet” floor screed is 2-3 mm. If the planned finishing requires a more accurate horizontal, the floor will have to be leveled additionally or with sheets like plywood.
Technology No. 3. Filling cracks, potholes and chips
Self-leveling mixtures are designed for thin-layer and thick-layer floors. So, sometimes it is necessary to level up to 8 cm of floor difference, and sometimes it is necessary to create something like a film on the concrete screed:


Technology No. 4. Coping with noticeable unevenness
To solve problems with fairly large potholes in the floor, it is better to use it - it is quite easy to install, and it will not cost much.
Technology No. 5. Very old floor - there is a solution!
But if your old floor horizontally resembles a roller coaster, to level it the most practical solution will concrete screed with expanded clay or adjustable logs.
You can also learn how to properly level floors using the listed technologies in other articles on our website.
Every builder knows that the quality of work largely depends on correctly set marks. When leveling surfaces, use a device with a directed light beam. How to use a laser level to mark planes
What is a laser level
For laser marks, a directed beam of light is used, which is emitted by diodes. Even the ancients knew that a ray of light travels linearly in transparent media. Thus, it is an ideal coordinate system for marking lines and their intersections. There are two types of laser level:
- The device is configured and installed manually. For these purposes, use a small built-in bubble level. This is the simplest type of device in this line, but quite effective and reliable.
- The second type is devices that self-align in a plane.
The first one is suitable for household use, individual species construction work: leveling the surface of walls and floors.

It's quite easy to use. It is used to install plasterboard structures and partitions, used for laying tiles.
Self-leveling levels
Laser levels of this type are used in professional construction. Most of the equipment is equipped with a tripod for fixing them. On the street, especially during the day and in sunny weather, the LED beam is difficult to see, so special glasses are included in the kit. For uninterrupted operation, the devices are equipped with spare batteries. The self-leveling type of laser levels is divided into three types.

There are also point lasers, angles, rulers, more simple devices for various uses.
Video instruction: how to use a laser level
Differences in laser devices, rules of use
The range of meters based on the principle of a directed laser beam is quite wide. Basic rules on how to properly use a laser level.
First you need to decide for what construction work the level will be used: for the floor, measuring differences, laying tiles or installing drywall.
For these types of work, a pendulum axle leveler is quite suitable. It shows vertical, horizontal, angle. For outdoor installation work, more detailed markings use electronic, rotary devices.

Basic distinctive characteristics laser levels:
- in the number of exposed planes;
- they can be used for linear markings or along the entire perimeter surface, including inclined planes;
- differ in the length of the laser marking.
The marking line for simpler axle builders takes up to 10 meters. In complex devices, when using reflector screens, the beam is reflected at 100, 200 m, in some cases up to 500 m.
When you use it manual setting, first install it in vertical position, align with the bubble level. In a tripod, leg clamps are used for these purposes.

Then you need to remove the pendulum lock and turn on desired mode. Remember that there should be no visible obstacles in the path of the beam. If builders previously used a conventional hydraulic level, they will immediately notice the difference if they start working with laser device. These devices not only simplify surface marking, but also significantly save time. At the same time, the possibility of errors is minimized.
The most popular brands of manufacturers
The widest range of laser meters is represented by German company Bosch (Bosch). If you use tools from this company, you have probably noticed that the quality of the products fully justifies the price of Bosch equipment.


The Chinese companies Matrix (Matrix) and Condtrol (Control) are popular and have proven themselves well. Their products are optimal combination low price and good quality. Range of laser measuring instruments quite wide.


Video reviews
A builder I know with extensive experience states: “I use Matrix laser levels of varying complexity for more than 12 years, they have never let us down.” Many note that there is some bias towards qualitative characteristics Chinese goods not justified in relation to this company.
The second widespread opinion was expressed by the foreman construction crew from Moscow: “If you want to have a tool at hand that will not let you down, you use Bosch, then you should not look for cheaper manufacturers. In addition, the company guarantees high-quality service and repairs.” What kind of laser level is needed for construction work, everyone decides individually, starting from specific tasks and complexity of work. But the fact that these devices optimize the work process is recognized by all professionals.
A laser floor level helps you quickly and evenly pour liquid screed or lay any floor covering: tiles, laminate, parquet boards.
Leveling the floors is carried out using beacons set in two directions.
Advantages of laser levels for floors
Do you have a bubble level and are you happy with everything? Perhaps you will change your mind.
Fast work
Place the floor leveling laser level in the corner of the room and work freely throughout the room. No more taking turns walking from beacon to beacon with a bubble level!
High accuracy
The accuracy of a floor laser level is unchanged throughout the entire beam, but when measuring with a liquid level, an error will inevitably accumulate. Taking measurements relative to a fixed plane is much more reliable.
Compactness
Small dimensions are an equally important advantage. A laser floor level is more compact than a long and bulky bubble level, it is more convenient to carry with you, and you don’t need to move it at all during work.
What levels are suitable for leveling the floor and laying the covering?
Choice laser level for the floor depends on the work that is planned to be carried out and the available budget.
Leveling the floor

For leveling using a dry or liquid screed, any level with a horizontal plane and sufficient projection accuracy is suitable.
The simplest solution is a bubble level with a laser axis, like the STABILA 80 LMX. Provides a fixed reference line for the entire length of the room.
A budget option is RGK ML-11 or, for example, Bosch PCL 10. They will provide a horizontal plane of 10-15 meters just a few centimeters above the floor.
The best choice is RGK UL-360 or Leica Lino L360. The circular plane allows you to place a level to level the floor anywhere in the room.
Flooring installation
Level installation of flooring will require vertical guides on the floor. One is the minimum, and up to four is optimal.
Budget choice - still the same basic ones Appliances, projecting a laser cross. Their vertical will set a guide along which it is convenient to align the floor elements.
For laying the coating at an angle to the walls, a floor level with a horizontal limb is best suited: Geo Fennel FL-55 or RGK LP-64. With them, you can set the angle to the nearest degree and maintain it throughout the room.
Specialized laser levels for floors

Special devices designed for laying tiles and leveling the surface amaze with their convenience and efficiency.
Laying tiles becomes easier with Geo Fennel Square Linner II and STABILA FLS 90: once fixed on the first tile, they will not allow you to stray from the intended direction. And Bosch GTL 3 builds three lines at once at an angle of 45° to each other: two at right angles and one “sighting” between them.
Bosch GSL 2 will help you detect and eliminate the slightest irregularities. The floor leveling laser level projects two lines, one on top of the other. In an uneven place, the lines will diverge to the sides, indicating the problem area.
It is advisable to buy a laser level for laying floors professional builders, as well as repair and installation specialists floor coverings: this is how you can achieve best quality with significant savings in time and effort.
Select and buy a floor laser level in Moscow you can in the store or on the RUSGEOKOM website. We also deliver to other regions.