How to lay a brick sewer pit. How to make a cesspool with your own hands for a private house from brick, concrete or tires. Surface sewerage collectors
When creating a drain hole, you can use concrete rings, slate on a metal frame, old tires or brick. Brickwork has its pros and cons.
Advantages:
- No professional skills are required for installation. Even a beginner in the construction business can do brick laying. The ease of making a brick pit stands out especially compared to the production costs of similar cesspools made of a different material. Concrete rings must be delivered to the construction site, then lowered into the pit. For this you need special equipment. To fasten slate in a hole, you first need to weld metal carcass, which adds complexity if you do not have the appropriate skill. When using old tires, the diameter of the tank will be strictly limited, and you will also need to make a pit with a reserve of space. Pit size for brickwork does not require such restrictions.
- Environmentally friendly. The waste collected in a brick drainage pit can be easily pumped out using a sewer truck.
- No pollution groundwater and soil. A small volume will allow bacteria in the soil to carry out cleaning on their own. But this does not apply to drainage pits with a volume of more than 1 cubic meter - the absence of a bottom in this case is prohibited.
- The type of soil is absolutely not important.
Flaws:
- Possibility of unpleasant odor. Timely cleaning or the use of substances to accelerate the decomposition of waste will help get rid of this.
- Not very long lasting. Without repairs, a brick drainage pit will last about 15 years, since with constant contact with moisture, slow softening of the walls is inevitable.
- Frequency of tank emptying. A call is required to prevent the well from silting drain machine about 2 times a month.
Features and design options
When creating a brick pit, you can use one of two options:
- Leaky pit. Due to the release of water into the soil, the frequency of pumping using vacuum trucks is limited. But at the same time, the daily volume of water used should not exceed 1 cubic meter. The construction of a pit begins with digging a pit. The bottom is covered with a drainage layer of broken bricks, sand and crushed stone. The base is at least 20 centimeters thick. The bricks are laid in a checkerboard pattern, leaving gaps between the bricks. This will ensure fluid drainage. Crushed stone is poured into the pit around the masonry. A trench is dug along the perimeter of the pit under concrete floor. The gap between the brickwork and the earthen wall is filled with concrete.
- Pit with waterproofing walls. Most of the construction is excavation. For a family from three people a pit will be required standard size 1.8 cubic meters. It is required to make a slight tilt of the structure towards the placement of the hatch. The base of the pit is filled with sand and compacted, then filled with concrete. The thickness of the concrete bottom is 10 cm. The bricks are also laid in a checkerboard pattern using sand-cement mortar. The wall thickness is 25 cm. After construction, the surface of the pit is plastered from the inside and covered with a waterproofing layer, and a layer is made around it - a clay castle.

Choosing a location and size
For the normal functioning of a brick cesspool, certain sanitary standards must be observed when planning the site:
- The distance to the nearest source of drinking water is at least 30 m. If the soil is sandy - 50 m.
- The minimum distance to a residential building is 5 m.
- The distance to the fence is at least 2 m.
- The depth of the pit should not exceed 3 m.
- When choosing a location, it is necessary to take into account the access space for the sewer truck and the distance to it no more than 4 meters.
- The terrain of the site is chosen in such a way that wastewater moves through the pipes by gravity.
- Groundwater should not enter the hole and fill it to avoid soil contamination.

Step-by-step construction instructions
- Digging a hole. The most labor-intensive process. Soil type has a big influence. A sand pit 3 m deep and 1.5 m in diameter can be dug by two people in a day. IN clay soil the task becomes much more complicated, and the use of technology will most likely be required. It is necessary to provide access for the excavator from both sides to allow even digging. It is also necessary to plan in advance where to put the excavated soil - level it over the territory, dump it to the side for later removal, or remove it immediately. Some of the earth should be left for a hill near the hatch.
- The shape should resemble a glass slightly expanding at the top. The bottom is made with a slight slope towards the hatch. You need to think in advance about the location of the pipe coming from the house and whether you plan to insulate it.
- The base of the pit is something you should not skimp on. It should consist of layers of sand and gravel, after backfilling concrete is poured. Its thickness is affected by the diameter of the pit - the larger it is, the thicker the bottom (approximately 15-20 cm).
- The arrangement of the walls depends on the type of pit - unsealed or waterproofed. The latter may even require coating with bitumen mastic.
- For the ceiling, you can use a ready-made concrete pancake; there must be a hole for the hatch. The diameter of the ceiling is half a meter larger than the diameter of the masonry. You can also fill the ceiling yourself, you will need wooden shield, serving as formwork. The vent pipe can be poured into the ceiling. The surface of the lid is covered with a layer of soil.
cesspool for a private home can be built with your own hands from different materials. Each has installation features, advantages and disadvantages, which it is advisable to familiarize yourself with first. For example, a brick cesspool requires construction skills.
Cesspools made from tires or concrete rings are by far the most common options. Read on for more information on how to install these objects.
Before starting installation, it is also important to carry out high-quality design work. In particular, choose a suitable location for the construction and calculate the required capacity of the drainage pit and take into account SNIP standards.
Design and types of drainage pits
Cesspool for country house considered sufficient simple method elimination of sewerage. In most cases, it is installed in dachas where there are no permanent residents, so there is no need to install complex septic tanks or connect to a centralized sewer system.
Installing a cesspool in a private house is not particularly difficult. This structure consists of the following components:
- dug pit;
- a special container that will contain waste liquids;
- pipeline;
- a system of fasteners and anchors to prevent the container from floating;
- filters for cleaning Wastewater;
- sealants and other installation compounds.
The advantage for a private home of a self-made cesspool is financial savings and the ability to select the type of device, depending on the characteristics of the site (soil, proximity to the groundwater surface, etc.).
Which manufacturing method to choose also depends on the regularity of use, required service life and financial capabilities. To make the right choice, it is recommended to carefully study the options offered on the market and compile a list of features of your own sewer system.
If the wrong variety is chosen or there are errors in the arrangement of the cesspool, the owner of the site is highly likely to encounter some unpleasant moments. These include the release of sewage into the environment (deterioration of the ecological situation in the area), damage to property, the appearance of an unpleasant odor, etc.
Types of cesspools and septic tanks
Structures are classified according to the material used for their manufacture:
- car tires various diameters;
- wood (this includes chipboard, plywood, boards, fiberboard, etc.);
- brick;
- concrete rings and slabs;
- plastic, metal-plastic, MDF, plastic.
The above materials are affordable and easy to find. It is worth noting that it is permissible to use not new products, but used high quality ones. Models are also divided by period of application:
- all seasonal;
- summer models.
 Based on the principle of operation, structures are divided into sealed and filtration. , because wastewater is not treated, but simply accumulated.
In the second case. The waste is not only cleaned, but also goes into the soil, which means there is no need for constant pumping. It will be necessary to call the sewage disposal equipment quite rarely and only to remove inorganic waste.
The main disadvantage of filtration cesspools is their low environmental friendliness. Poorly treated wastewater entering the ground can directly contribute to the pollution of nearby reservoirs, wells, etc. However, if such objects are located at a distance from the site, then the best solution will be the construction of a filtration type structure.
The advantage of sealed pits is that there are no too strict requirements for choosing the location of the system. However main drawback consists in the need for regular pumping of wastewater. If about 5 people live in a house, then waste removal from the pit will need to be done every 1-2 weeks.
Design principles
Some owners of private houses believe that it is not worth spending time and resources on design, because... It is possible to install a cesspool with your own hands without it. This is a common misconception. This stage is as important as the installation work itself.

Before starting installation, it is important to choose the right location for the structure, study its structure and calculate the capacity of the tank. If this is not done, several problems may arise at once:
- if placed incorrectly, the owner will bear administrative responsibility, and the building will have to be destroyed and rebuilt in another location;
- the system will not function correctly;
- Frequent pumping of the contents will be required (using sewage pump) or using special equipment to carry out sewage disposal. Thus, it will result in significant financial or time losses;
- improper preparation for installation work can lead to ineffective functioning of the cesspool.
Therefore, it is advisable to immediately devote Special attention design stage future system.
Location
To select a location, you must follow certain requirements and standards that are regulated by current legislation.
Note! If this is not done, the inspection may require moving the structure, and a fine will be imposed on the owner of the site.
It is advisable to pay special attention to the design and selection of location.
The structure must be located at a certain distance from the walls of houses, other buildings and objects:
- 3 m from trees and vegetable gardens;
- 4-5 m from the road;
- 10 m from various rivers, streams and foundations;
- 30 m from the reservoir;
- 50 m from the well where it is taken drinking water. If the soil is clayey, then a distance of 20 meters is allowed.
It is recommended to avoid constructing a cesspool at the lowest point of the site. Otherwise, such a location can lead to flooding due to heavy rains. It is also undesirable to place the structure on the site if the groundwater level is less than 4 meters.
 When choosing a location, you should definitely take into account the possibility of unhindered access for special equipment for sewage disposal.
It is worth noting that the above requirements apply mostly to cesspools drainage type built with your own hands. If you plan to install sealed containers for a private home, then the exact distances to objects may not be observed.
Another factor on the basis of which the location is determined is the slope of the site. It is recommended to independently install a cesspool for a private house below the drain point. This is required to ensure gravity flow. When laying the pipeline, the slope should be 3 cm for each meter of pipes so that the drain liquids independently fall into the tank.
Device
After determining the place where the cesspool for a private house will be installed with your own hands, you can plan the installation procedure. There are certain subtleties that are important to know before starting the process.
If you plan to use the pit exclusively for summer period, then the depth of the pit can be approximately 1-1.5 meters. If the structure will be operated in winter period or all year round, then when calculating the depth it is important to take into account the characteristics of the soil.
For example, in winter the volume of soil will increase due to freezing, and during the season of heavy rains the soil will become wet. The minimum permissible tank depth is 0.5 meters.
During installation, be sure to provide for the presence of a ventilation pipe, as well as drainage system. Ventilation should be located at a distance of approximately 40-70 cm from the surface.
 When building a cesspool with your own hands for a country house or a private house, it is recommended to choose not a sealed model, but one whose tank has a filtration bottom.
However, it is advisable to take into account that the total volume of waste water and waste should be less than 1 cubic meter per day. Such a sewer system is best choice for sandy soil type, if the depth of groundwater is more than 2.5 meters.
The problem of how to properly make a cesspool worries all owners of a private house who are planning this procedure. It is advisable to know about certain features of mounting and choosing a sealed model:
- The scope of application and design of tanks made of concrete and plastic containers are somewhat different;
- wells have worse tightness compared to plastic containers;
- The best ratio of quality and cost is a Eurocube as a container. It is completely sealed, can store up to 1000 liters of waste, is sold in many hardware stores and has affordable price;
- the cross-section of the ventilation pipe should be approximately 10 cm, and the distance from the surface should be more than 40 cm;
- The pipeline should be laid taking into account the possible need for future repairs or replacement. Therefore, it is recommended to design it in such a way that various bushes, roots and trees do not interfere.
 Scheme for creating a cesspool in a private house, built with your own hands:
- A pit is being dug required sizes.
- The walls are being constructed and a pipe is being laid through which waste liquids will flow into the tank. It is important not to forget about maintaining the slope to ensure immediate gravity flow of waste and the absence of blockages.
- An outgoing pipe is connected to a special hole in the tank, through which wastewater leaves the tank.
- The installation of sewerage components is carried out directly.
- Hatches are being installed.
- At self-installation cesspool made of brick, an additional 30-centimeter ditch is made on top, on which it is then placed concrete slab.
- The slab is covered with earth and the surface is leveled. The hatch, as a rule, remains open.
Dimensions
One of the most important stages design is the calculation of the required volume of a cesspool, built with your own hands, for a private house. Basically, a general rule is used: the container must contain approximate quantity drained liquid in 2 days.
That is, you will need to find out how much water is drained on average per day (kitchen, bathhouse, bathroom or shower, sinks, etc.). If a heating tank is used to supply hot water, then its volume is multiplied by 2, resulting in the required tank size.
However, it is important to note that the above calculation can only be used if you plan to operate the filtration cesspool in the warm season.
If necessary year-round use or using a sealed model in winter, you will need to calculate the required liquid capacity using the formula: Volume = N * X * V.
- N – how many days the tank must be filled before pumping is carried out;
- X – the number of people who live in the house;
- V – how much liquid does 1 family member use (measured in liters).
For example, 4 people live in a private house, each of whom drains approximately 200 liters per day. If you plan to pump out wastewater once every 30 days, then you can substitute this data into the formula.
It turns out that Capacity = 30*4*200 = 24 cubic meters.

It is advisable to analyze from your own experience how much water is consumed per day, but if this is not possible, then you can use the average value - 150-200 cubic meters. meters per person. This parameter is largely based on the habits and lifestyle of those living in the house. Statistics say that, for example, city residents use more water than people living in villages.
Installation of cesspools - preliminary planning
After making calculations and selecting the location of the cesspool for a private house, we install it ourselves. When the owner has chosen what material the sewer system will be built from, construction can begin. First of all, you need to dig a pit of a suitable size for the future cesspool.
This stage can be carried out with the help of specialized equipment and a team of workers, or completely independently. In the latter case, it will take more time, but sometimes this is the only option possible.
For example, when it is impossible to access special equipment or power lines are located too low.
To properly equip a cesspool for a private house with your own hands, you need to adhere to a certain algorithm:
- The first ring is installed, a person climbs inside it and begins to dig under it, throwing soil to the surface.
- As you dig deeper, the soil under the walls is also removed.
- It is imperative to maintain uniform removal of soil from under the ring, because smoothness is important vertical arrangement products.
- When the ring is in line with the ground, install the next ring.
- The soil continues to be removed evenly until a suitable depth is reached.
When the preparatory excavation work has been completed, the products from which the drainage pit will be constructed should be prepared. Depending on the nature of the soil, the required structure and other factors, concrete rings are used, car tires, plastic containers, brick. Formwork requires boards.
 In addition to using basic materials, you will also need the following tools:
- components for creating cement mortar;
- crushed stone and fine gravel to create a drainage area;
- reinforcing bars for mounting the concrete top cover;
- waterproofing materials;
- ready metal hatch or the components for making it yourself;
- shovels, hammer;
- level, plumb line and cord;
- several containers for different needs, for example, making a solution;
- trowel.
It is advisable to immediately plan all the work and, based on the plan, prepare necessary tools. If the project involves a lot of concrete work, then it is better to purchase, rent or borrow a concrete mixer.
Making a concrete cesspool yourself
Watch the video
The design of a concrete cesspool can be called the best option for a private home in terms of service life and reliability.
Such structures can be used throughout the year; they are resistant to the most low temperatures and high humidity, do not deform under the influence of high soil viscosity during a long rainy season.
Advantages of choosing concrete as a manufacturing material:
- you can quickly build a structure;
- long service life (up to 50 years);
- reliability, manifested in resistance to negative impacts environment;
- no regular maintenance, repair or restoration work;
- it is easy to find and purchase raw building materials.
 Disadvantages of building such a drainage pit:
- heavy weight rings, which will require the help of several people or special equipment for installation (especially if the diameter is more than one and a half meters);
- price concrete materials higher than the price of plastic analogues;
- the need to strictly follow the drawings.
The installation procedure consists of the following steps:
- A layer of crushed stone is placed at the bottom of the excavated pit to create a filtration element.
- A concrete screed is made or a ready-made reinforced concrete slab is installed, which will become the base of the structure. This step must be accompanied by a check using a level.
- Required amount reinforced concrete rings (usually 3-4) are placed on top of each other. If the height is not achieved, then sometimes low brickwork is made on top.
- A hammer drill creates holes through which communications for the sewerage system will be connected. The cross-section of the holes must be calculated based on the diameter of the pipeline and the shrinkage of the pit must be taken into account.
- Connections concrete products, as well as all pipe joints, must be covered with a special sealant. Then, when the sealant has dried, outside be sure to be coated with a water-repellent compound. The inside surface needs to be plastered.
- The ceiling is mounted (upper horizontal slab). You can make it yourself or buy it ready-made right away, but in the latter case it will cost more.
- The top is covered with soil.
Watch the video
A similar drainage hole correct installation will be characterized by tightness and stability. It does not require additional anchoring due to large mass designs. Also, the structure will be completely resistant to freezing and heaving of the soil in winter time of the year.
Making a cesspool with your own hands from bricks
Watch the video
A do-it-yourself cesspool made from brick is a popular option for arranging a sewer system in a private home. Solid red brick is used for the work. The best variety burnt brick is considered to be a brick that is not used in production.
 It is not allowed to use varieties of products that have poor resistance to environments with high humidity. This category includes, for example, silicate type.
Key Features brick cesspool for a private house:
- the constructed pit will have a long service life;
- has excellent tightness and the ability to reliably retain waste liquids;
- brick allows you to create a pit of any shape and volume, as well as build it on any type of soil (both clay and sand);
- in terms of labor intensity and time spent on construction, the work is approximately equal to the construction of a system of concrete rings;
- drain hole can be built even on an area where groundwater runs close to the surface. This material is also reliably protected from soil heaving in winter;
- It is recommended to do brickwork carefully, because if implemented incorrectly, it may subsequently collapse. However, some aesthetic flaws are still allowed, because they will be completely hidden under the surface of the earth;
- a rectangular or square pit is not able to withstand heavy loads;
- It is quite difficult to build a round structure on your own; most likely, you will need the help of professionals;
- the cost of a brick pit is higher than construction plastic structures. You can save money financial resources, if you use used products in the process.
If you plan to build a reservoir closed type, then you need to prepare in advance large quantities sand and cement. In most cases, a cylindrical or cubic pit is built with your own hands.
 It is recommended not to make the depth more than 3 meters. The permissible volume of a septic tank depends not only on the fluid consumption of people living in the house, but also on the distance of the structure from the building.
How to make a brick cesspool with your own hands:
- Dig a pit of the required dimensions.
- Level the bottom and create a cushion of crushed stone on top (about 50 cm wide) or concrete it (in this case, reinforcement is also used for additional strengthening).
- Make brickwork walls with rectangular, round or square shape. The procedure is carried out completely, and all joints are certainly filled with a mixture of sand and cement. During construction drainage structure without pumping, it is necessary to lay out the brick in a checkerboard pattern, this will increase the drainage function of the pit.
- It is recommended to make a small “pocket” between the brickwork and the pipeline, approximately 6-10 cm. This will not at all affect the tightness of the drainage pit, but will prevent the structure from deforming during shrinkage.
- Laying the walls begins 25 cm below the surface level, then the construction of the ceiling begins: a sheathing (sealed lattice flooring) with a ready-made hole for the hatch is installed, an armored belt is created and the entire slab is filled with concrete.
- The slab needs to be covered with soil and its level leveled with the surface. If installation is carried out in an area where the temperature drops to minus 20 degrees, then the top soil layer is increased to avoid freezing of the pit in winter. In this case, the distance from the surface level of the site to the slab is 50 cm.
Watch the video
Making a cesspool with your own hands from tires
Watch the video
The solution of arranging a cesspool from tires is becoming quite popular. Tires of large vehicles are used for this purpose. For example, buses or trucks. Since the diameter is not too large, it will be necessary to make it for a private house deep hole. The number of tires required is 9-10 pieces.

Before making a tire cesspool, it is recommended that you familiarize yourself with the advantages and disadvantages of this material. The benefits include:
- tires are not subject to aggressive environmental influences and are not subject to corrosion;
- low price on products;
- light weight, which makes it easy to move components;
- the material can be easily processed with improvised means; no special tools are required.
Flaws:
- small cross-section of tires compared to reinforced concrete rings or brickwork;
- Suitable only for creating small drainage pits. For country cottage where at least 5 people live, you will most likely need to choose a different material;
- Larger tires require additional assistance.

You can dig the pit yourself or you can use an excavator. As a rule, an additional 30 cm more than the dimensions of the products themselves are laid in the size of the pit. This will significantly simplify the installation process and will also increase the filtration capacity of the sewer system.
Some experts advise removing side walls tires so that the working area of the drainage pit is increased and waste cannot accumulate on the surface. However, this action may lead to a decrease in the strength of the system, as well as difficulties during installation.
If the owner of the site nevertheless decides to do this, then it will take about 45 minutes to prepare one tire. The procedure is carried out in this way: a hole is created in the side wall through which the hacksaw passes, then with its help the remaining unnecessary elements are eliminated.
Watch the video
You will also need to prepare one of the buses for connecting sewer communications. To do this, a hole of about 20 cm is created in the side. Further process almost identical to the construction procedure using concrete rings.
 A sheet of high-strength material that is not subject to corrosive deformation is then installed on the constructed pit. It is advisable to use thick galvanized a metal sheet. After installing the cover, the building is covered with a layer of earth and compacted.
After some time, turf will form on top, so the hole will not be very visible on the site. Similar design will be able to function effectively for a decade, processing a daily liquid consumption of approximately 70-100 liters. If you only need to build a drain for a bathhouse, then it is enough to use 4-6 large tires.
Watch the video
The construction of a drainage pit for a private house is carried out using various materials. Which type to choose depends on the financial capabilities of the owner, the required service life and the daily volume of waste liquids.
The most reliable and durable design is considered to be made from Eurocubes, but in this case additional help will be required. If daily water consumption is low, the best solution would be to build a tire pit.
PostsThe simplest local sewer network in a suburban area is a structure that includes a cesspool. It can be made from different materials: reinforced concrete rings, brick or concrete blocks, containers different sizes and types. This article will look specifically at a brick cesspool.
The construction of a brick pit for collecting sewage consists of several stages. But at the very beginning, you need to decide where this collection container will be located, what size it will be, and so on.
Choosing a location for a cesspool
Determining the location of the cesspool:
- No closer than 5 m from the foundation of the house;
- No closer than 2 m from the fence (site fencing);
- No closer than 30 m from the water intake well or well.
Plumber's advice: It is necessary to ensure that the cesspool is located conveniently for access by a sewage disposal truck, if in the future you plan to clean the pit with its help, and not with your own hands
Determination of volume
It is believed that a person needs 200 liters of water for domestic needs. Multiply this number by the number of people living in the house. This will be a daily filling of the pit. A certain percentage of wastewater will go into the ground, a small percentage will evaporate. In addition, it is necessary to take into account that the drains should not overflow, so it is recommended to take the volume of the cesspool with a small margin.
And one moment. Don't build the hole too deep. The optimal depth is 3m.
Stages of constructing a brick cesspool
Excavation
If the location of the well is established and its volume is calculated, you can proceed to the construction processes. The most time-consuming of them is to dig the hole itself. It’s not difficult to do this with your own hands using shovels, but you will have to spend a lot of time and effort.
The optimal shape for a cesspool is square or rectangle. To prevent the walls of the pit from collapsing, it is necessary to dig it with a narrowing towards the bottom. At the same time, it is necessary to compact them.
Please note that the bottom of the pit should be slightly sloping towards the location of the hatch. This will make it more effective to clean the well from sewage.
Preparatory stage
The bottom of the pit is covered with sand 15-20 cm thick. It must be compacted and watered. Then it gets ready concrete mortar, with which the bottom is concreted. A reinforcing frame made of metal reinforcement or mesh must be placed in the concrete layer. A concrete layer 15-20 cm thick must be kept for more than a week for the material to become durable.
I would like to note that you can purchase ready-made concrete bottoms on the market, which can be installed at the bottom of the pit using a crane.
Bricklaying
For this you can use ordinary burnt brick. And here masonry mortar should be clay-based with a small sand content (15-20%). This waterproof material, which will repel water from the brickwork itself, which will increase the service life of the cesspool.
Brick laying is done using conventional technology with a sling. Experts recommend making a kind of screed based on cement-sand mortar every fourth row, on which the next row is immediately laid. The thickness of the masonry is at least 25 cm.
As soon as the masonry process is completed, it is necessary to coat the walls of the pit both inside and outside with clay mortar. This protective screen, which, in essence, will perform the functions of waterproofing. And the thicker the layer of clay, the better. Of course, inside it will reduce the volume of the well itself, so it is better to increase the thickness of the clay layer on the outside of the brickwork.
Now you need to wait for the clay to dry thoroughly. After which it must be treated with hot bitumen or special bitumen mastic.
Final stage
The cesspool is almost ready, all that remains is to install the lid. There are two options here:
- Order a floor from the reinforced concrete products factory, which can only be installed by a crane. But this option is guaranteed to be of high quality with a hatch and a hole for ventilation;
- Make the ceiling yourself.
To do this, you will have to construct formwork, make a reinforcing frame and pour the floor with concrete right at the installation site. It will have to stand in the formwork for at least a week. Don’t forget to install a hatch and ventilation pipe in the lid.
Often the cesspool cover is poured into formwork on the ground, and after drying it is installed on the edges of the brick well. But also in in this case You can't do it without a crane. The ceiling is poured in several layers:
- First, a concrete layer 7-10 cm thick is poured;
- Then, until the concrete solution has dried too much, a reinforcing frame of reinforcement with a diameter of 8-10 mm is laid. The frame will have to be pre-made with cells of 10x10 cm;
- Then a second layer of concrete 10-12 cm thick is poured.
Plumber's advice: The size of the overlap should be larger size the pit itself is half a meter along the edges
And lastly, the space between the walls of the brickwork and the pit is filled. For this, soil that was removed from the pit is used. The ceiling is also covered with soil to hide the well and not spoil the landscape suburban area. All that remains is to install the pipe on the pipe exhaust ventilation and hatch. It is better to make the hatch double with insulation.
The simplest and perhaps the most good option organizing a sewer system at a dacha or in a small cottage - a brick cesspool built on the local area.
Such a storage tank receives all the sewage and wastewater flowing into it from the house through special pipes. You will learn how to make such a structure with your own hands from our article.
"Pros" and "cons" of brick cesspools
A cesspool made of brick on a plot near a private house, like any other autonomous system sewerage has both positive and negative sides.
About the advantages of a brick cesspool
- Environmental friendliness. All contents from such a container are removed by a special vehicle or cleaned on site.
- No dependence on level fluctuations groundwater in different seasons.
- No polluting factor. There is no contamination of the soil and groundwater directly adjacent to the pit by sewage, since a cesspool without a bottom can only be used with a wastewater volume of up to one cubic meter, and the space of a large brick storage pit is reliably separated from the ground on all sides.
- The possibility of building such a structure even by unskilled masons, which are often summer residents who need a cesspool for a toilet on their site.

About the disadvantages of a brick cesspool
- There is a risk of periodic occurrence of an unpleasant odor when the storage tank is filled.
Pro tip: If possible, use special ones that are designed to speed up the decomposition processes of biological waste. Reduce the time between scheduled tank cleanings.
- The fragility of brickwork in the specific conditions of a cesspool. Replace bricks that fail and turn into clay from prolonged use in a humid atmosphere with concrete inserts. This way you can extend the service life of the entire storage structure from 10-15 to 50 years.
Pro tip: If a country house is operated year-round, vacuum cleaners should be called once or twice a week. This is how you can prevent hard-to-remove sludge from appearing in the storage tank and save the effort and time required to clean the pit from it.
Stages of construction of a cesspool

The construction of a cesspool consists of the following stages:
- Choosing a place for a cesspool and the work itself on digging it can take up the lion's share of the entire time of the process of constructing a storage tank. Usually such a pit is made one and a half meters deep and no more than one meter wide. The length is selected depending on the expected volume of waste. Mandatory design feature the cesspool is a significant slope of the bottom in the direction where the hatch is supposed to be made.

- Approximately the same layer of concrete is laid on top of a sand cushion located at the bottom and having a thickness of 10-15 centimeters. On top of it, another screed (up to 4 centimeters) is added from a mixture of cement and sand. Great option will be used already finished slab made of reinforced concrete, placed on the bottom at an angle of up to 45 degrees.
- The masonry is made in half a brick or a quarter of a brick, in a checkerboard pattern, using sand-cement mortar. The best method would be to use the method of ligating every 4th and tying row with strong cement mortar. The total thickness of the masonry is 25 centimeters.

- At this stage of construction, you should think not only about how to properly build a cesspool, but also about minimizing the potential danger of seepage. To do this, a clay castle is built, or the walls of the pit are covered with bitumen mastic.
For plastering, a mixture of one part cement and two parts sand is used. Increasing the service life of plaster is achieved by ironing it.
Construction of a cesspool floor and hatch
The cesspool must be reliably covered from above by at least 50 centimeters on all sides. For this, either densely laid logs or reinforced concrete slabs are used.
The location of the hole (about 70 centimeters in diameter) for the hatch is immediately determined.
Polyethylene or roofing felt, laid on the ceiling for waterproofing, is covered with a fairly thick, about 30-40 centimeters, layer of slag, softened clay or soil.

To prevent the spread of low-aroma cesspools in the warm season and to prevent its contents from freezing in winter, it is imperative to install a double hatch: one cover is flush with the ground, the other is at the same level with the ceiling.
The free space is filled with expanded clay, slag, foam plastic and other similar materials.
Following the above recommendations, any zealous owner of a dacha plot will be able to not only imagine how to build a cesspool on his own, but also try to build one, applying theoretical knowledge in practice, and live in his dacha with urban comfort. The main thing is not to forget about timely cleaning of the pit, so as not to create inconvenience for yourself or others.
All the conveniences of human habitation are associated with three components: electricity, water and sewerage. Owners of “summer residences” - dachas, small country houses - are trying to equip their seasonal home with maximum comfort. Providing it with electricity is the most simple task, almost every corner of Russia is electrified. Water supply is solved by installing boreholes or wells. Most complex issue- device local sewerage- also has a standard solution: a drainage pit is built on the site with your own hands.
A drainage pit in a private house or country house is an elementary structure designed to collect and accumulate local sewage waste. Here by sewer pipes transported household waste from toilets, from kitchen sinks, washing machines and dishwashers.
Any wastewater treatment plants in anticipation of this simplest collection of sewage drains are not provided. As the pit fills, it is cleaned by pumping out the contents. Depending on the cleaning method, the accumulated sewage is removed by special machines - sewage trucks, or after treatment with biological products, it is used for watering plants and as fertilizer.
Types of drainage pits
Drain pits are classified according to ground level and materials of manufacture.
Relative to ground level
By this characteristic Sewage waste collections are divided into two groups:
- superficial;
- underground.
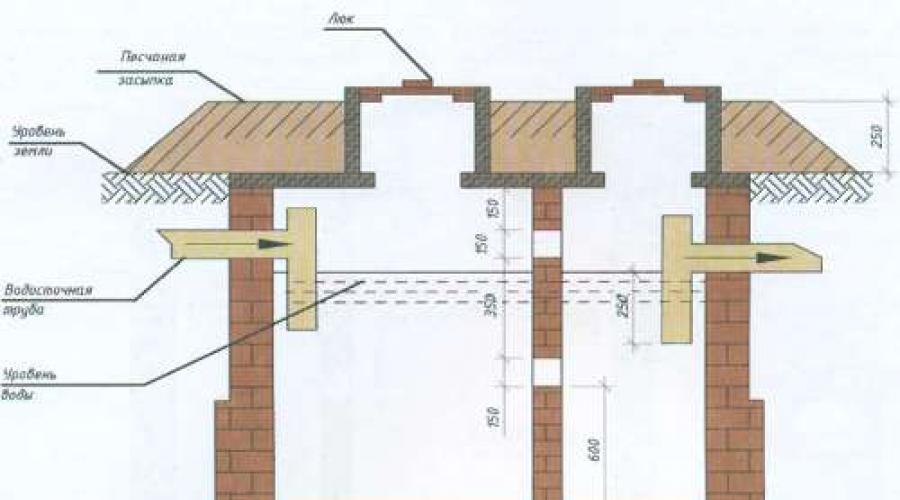
Surface sewerage collectors
This option is only suitable for use in the warm season. It is used extremely rarely, since in this case the sewer network has to be laid on top. The required slope (from the “supplier” of wastewater – sink, toilet, etc. – to the collection tank) can only be ensured if all sources of wastewater are located above the inlet of the tank. It is advisable to install surface drainage tanks in areas with high level groundwater.
Underground drainage pits
Underground sewage collection structures are the most common. Depending on the amount of drainage, the design of the drainage pit may or may not have a sealed bottom. Sanitary standards Russia It is allowed to construct pits without sealing the bottom if the daily volume of wastewater does not exceed 1 m3.
In all other cases, a sealed underground tank is installed.
According to manufacturing materials
The following materials can be used to construct the drainage pit structure:
- ceramic brick;
- concrete (in the manufacture of a monolithic structure);
- waste tractor tires;
- plastic;
- tree.

For constructing drainage pits with your own hands, concrete rings are the most unsuitable option. Their installation requires construction equipment - heavy products cannot be handled manually.
The simplest and cheap way arrangement of a drainage pit in a private house or on summer cottage– decorating its walls using tires. But this design is unreliable in terms of tightness: there is a high risk of the liquid component of sewage drains getting into the soil.

Location – sanitary restrictions
Some homeowners believe that they can do whatever they want on their property, and they are deeply mistaken. Sanitary services do not sleep - they require strict compliance with the rules and regulations in force in the state, regardless of the type of property.
The location of the drainage pit in a private house is also strictly regulated: the standards stipulate the minimum permissible distances from waste storage tank to engineering structures, residential buildings and site boundaries:
- to the water conduit (central) - 10 meters;
- to the underground gas pipeline – 5 meters;
- before drinking well: 20 meters - on clay soils, 30 m – on loams, 50 m – on sandstones and sandy loams;
- to a residential building (own and neighboring) - 10-12 meters;
- to the fence (site boundary) – 1 meter.
The maximum depth of the drainage pit is also regulated: it should not exceed 3 m, if the groundwater level allows it. These restrictions are contained in SanPiN 42-128-4690-88 and SNiP 30-02-97.
Important: Homeowners should be aware that failure to comply with sanitary requirements may not only result in a fine; if harm is caused to the health of others, a criminal case may be initiated.
In addition, when making a drainage hole at the dacha with your own hands, it must be located on the site in such a way that it is possible to organize unhindered access to it for special equipment at the time of pumping out.
Advice: Practice shows that it is better to place the drainage pit at a distance of at least 15 meters from the windows of residential premises.
Construction procedure
Installing a drainage pit in a private house with your own hands, regardless of the choice of material, is carried out according to the general algorithm:

Explosive gas is formed in sewer storage tanks. For his withdrawal ventilation is arranged. Its role is played by a pipe leading through the pit lid. Its dimensions are regulated building codes: diameter – 100 mm, height – at least 600 mm from ground level.
Choosing a method for cleaning the drain pit
Before building a drainage pit in a private house, you should decide very important question: How will you clean it? The amount of work to improve the site depends on this:
- if it’s easier for you to periodically invite specialists with a sewer truck, take care of organizing an access road;
- if you are ready to do the cleaning yourself, purchase plastic container with an airtight lid and find out in advance who will accept your waste. Don't forget about hand and respiratory protection. It would be better if it was a gas mask, but, at worst, a respirator would do. Of course, you can't do without rubber boots.
 When arranging a drainage hole, you need to worry not only about how to dig it, but also about how to clean it
 Modern technologies can significantly simplify the process of cleaning the drainage pit if it fills quickly, or even make it virtually waste-free. It's about about microscopic helpers - capable of turning waste into enough clean water and a solid fraction suitable for use as fertilizer.
Bacteria not only decompose the contents of the drainage pit, but also diligently fight the unpleasant odor.
Just keep in mind when deciding how to clean a drainage pit in a private house that you should choose biological products in accordance with the composition of the wastewater. Most bacteria cannot survive contact with household chemicals: detergents and washing powders have a detrimental effect on them. However, microorganisms that are resistant to aggressive environments are now being grown.
After the bacteria have done their work, all you have to do is use a pump to pump out the liquid component (it is completely harmless to humans, animals and plants) and remove the solid sediment from the pit.