How to install a shower tray. We build a shower tray with our own hands. Installation of shower cable
Read also
Shower stalls with a tray are a modern, compact and multifunctional plumbing structure. However, when installed in wooden house, including plank floors, objective problems arise.
They are mainly due to the fact that the surfaces of the walls and floors of the room must be reliably protected from moisture.
Problems with installing plumbing in a wooden house

The hygroscopicity of wood is both its main advantage and disadvantage in construction. The advantage is that wood, due to its structure, breathes and thereby normalizes the microclimate in the room.
Disadvantages are discussed below.
- The material strongly absorbs water; under its destructive influence, the service life of surfaces can be reduced by several years.
- Wet areas are an ideal environment for the development of harmful microorganisms.
- Wood is subject to temperature and humidity deformations. In other words, it shrinks, shrinks and swells.
Based on all this, the instructions assume that when installing a shower room in a wooden building, a number of protective measures must be taken.

- An effective exhaust ventilation, which will prevent the proliferation of fungus, mold and other microorganisms.
- The wood must be treated with an antiseptic composition.
- Before installing a shower tray on a wooden floor, all surfaces of the room must be protected with waterproofing.
- To neutralize the effects of shrinkage, the shower room should be equipped taking into account constant changes linear dimensions wood.
Note! Great option There will be installation of a sliding frame. It will not allow the height of the bathroom to change. In essence, the structure consists of metal profiles.
They are fixed on the walls so that the holes are extended vertically by an amount greater than future shrinkage.
Preparing the premises
Arrange earlier wet room it was very difficult in a wooden house. Now everything is much easier thanks to modern materials and technologies.
You can install a shower tray:
- homemade or factory metal frame with legs;
- on a support made of brick or plastic;
- directly onto a flat floor with a drain hole.
In case of wooden floors options with bricks and direct installation of a pallet are no longer available for obvious reasons.
First of all, you should qualitatively prepare the room that you plan to use as a shower room. The floors need to be leveled, then all surfaces of the room need to be waterproofed.
Shower waterproofing

Any rolled materials can be used as the main waterproofing layer - from traditional roofing felt to modern waterproofing materials, hydroglass insulating materials, special polymer films, etc.
- Waterproofing should be installed on dry and level surfaces. They must be coated with bitumen-based primer in advance.
- For waterproofing wooden buildings Experts advise using fiberglass or polyester reinforced bitumen with polymer additives. This material can be self-adhesive and weldable (a gas burner is required for operation).
- Waterproofing sheets cover both the floor and walls of the room.
Note! It is necessary to start work from the floors. The material should be placed on the walls to a height of 20 cm.
- Areas at the junction of surfaces are best reinforced additionally. This can be done using a fiberglass mesh with small cells. The price of the coating will increase slightly, but you will increase the strength of the insulation in especially critical areas.
Preparation and finishing of surfaces

To level floors, concrete or cement-sand screed. However, in the case of wooden base This option is difficult to implement and expensive.
If the plank floors are uneven, then it is best to cover them with two layers of DSP ( cement bonded particle board), wall slate (flat) or moisture-resistant plywood.
After this, you can begin waterproofing the ceiling and walls. Roll material in two layers they are either fused or fixed using a construction stapler.
As a cladding, the ceiling and walls of the shower room can be sheathed with gypsum boards ( plasterboard sheets moisture-resistant), and then painted with moisture-resistant paint. A good option– use panels made of polyvinyl chloride. A tension system is also suitable for the ceiling.
Pallet installation

Now about how the installation occurs shower tray on a wooden floor.
It is best if the device is equipped with height-adjustable legs, brackets for easy fixation and a support frame.
To adjust the legs you need wrench And bubble level. With their help, the pallet is installed in the correct horizontal plane relative to the floor.
Fixtures made from steel, fiberglass and acrylic have one drawback: there is often no support under their middle part. It can be corrected by installing the bowl on a stable podium or support made of any durable and waterproof material.
After this, you can install the shower tray with your own hands on the wooden floor.

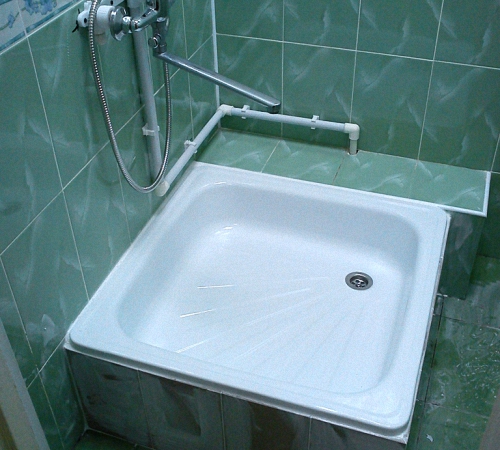
A shower cabin with a steel tray is perhaps the most practical and durable type of similar devices. Unlike plastic and ceramics, steel can withstand operating loads well, which is why it is usually chosen as a material for the manufacture of plumbing products.
In our article we will tell you what iron shower trays are, how to install them correctly, and analyze their advantages and disadvantages.
Design Features
Production technology
Products of this type are one of the most popular on the market. In addition, if we accidentally make a mistake and type in a search engine something like “steel shower tray 900x900 mm”, we will still take a fairly wide sample of tens or hundreds of models.

The steel pallet itself has a relatively simple design.
It is produced in a factory using the stamping method with subsequent processing:
- In most cases, as source material is taken steel sheet thickness from 1.5 to 3 mm. The sheet is cut into blanks, the size of which allows the manufacture of a container of the appropriate dimensions.
Note! Most models on the market have square shape and sizes from 70x70 to 90x90 cm. Huge products and rectangular pallets whose width exceeds their length (for example, 120x90 cm) are less commonly seen.
- Steel blanks are subjected to primary heat treatment, after which it is fed under a press. Along with this, the sides of the pallet are formed in a couple of steps, a hole is made for drainage, and a relief is applied to the bottom.
- Upon completion of stamping, the edges of the sides and holes are cleaned, and after that an anti-corrosion compound is applied to all surfaces. Much more often it is enamel, but from time to time passivating agents based on zinc are also used.
- In addition, in many cases, fasteners for installing legs and upper guides are welded to the pallet, used to fix the shower enclosure.

Note! Models without legs are installed on side walls, which are much more often welded to a stamped blank. But such products have a drawback: they can only be mounted on a pre-leveled surface, while pallets with legs allow position adjustment.
The result is a fairly strong, reliable and stable product that is relatively easy to install and can withstand the most intensive use.
Forms and varieties
As we noted, most pallets are in the shape of a square or rectangle. Such products are relatively inexpensive and easy to manufacture and install. But they are not overly practical, because with the classic corner mounting take up quite a lot of space.

A pair is more expensive corner models with a trapezoidal or rounded façade. They are more compact and therefore are chosen for installation in small bathrooms.
Another parameter influencing the choice is the depth of the base. If you want to protect your bathroom floor from drops and splashes as much as possible, then the deepest one (up to 150 mm from the top edge of the side to the bottom) is ideal for you. drain hole) pallet. But in an outdoor shower it is possible to use small (up to 80 mm) models.

In addition, it is worth paying attention to the material from which the structure is made. There are two options, and the most ergonomic way to compare them is in the table below:
| Product type | Highlights |
| Stainless steel |
|
| Dark metal with enamel |
|

But, whatever the anti-corrosion protection of the metal from which the pallet is made, its effectiveness depends on the thickness of the base.
This is explained simply:
- In most cases, these products have a fairly large area (80x80 cm or more), and are installed on a frame laid along the edges.
- Under the action of enormous loads, the narrow (less than 2 mm) metal in the middle part begins to bend, and the elastic anti-corrosion composition that is not enough becomes covered with microcracks.
- Over time, these cracks increase in size, leading to peeling of the enamel.
This is why experts strongly advise against saving on purchasing narrow pallets. It goes without saying that their price will be lower, but the service life will also be reduced by an order of magnitude.
Pallet installation method
Tools needed
Installing a steel shower tray with your own hands is not only completely possible, but also quite simple.
We will need the following tools and consumables:
- For a model without legs - a screed to level the floor.
- A pipe with a diameter of 50 mm for connecting the siphon to the sewer.
- A special siphon that is installed under the shower stall.
- FUM tape for sealing pipe threads.
- Sealant (it is best to use moisture-resistant, silicone-based).
- Roulette and level.

Advice! The tray, purchased separately, must be measured in advance so that all other elements that we will make for the shower stall fit in size.
Installation algorithm
Installation instructions similar products do it yourself involves the following sequence of actions:

- First, we check the floor level. The structure on legs can be fixed to virtually any surface, but models with a massive base require leveling by pouring screed.
Note! Because it takes at least 7 days for the screed to gain sufficient strength, it must be filled in advance.
- Then head to collect the pallet. In most cases, before installing it, we need to attach the legs to it by inserting them into the intentionally made grooves and securing them with fixing screws.
- We install the product in the chosen location, after which we attach a siphon to it to drain the water, sealing all connections with rubber gaskets. It is most ergonomic to do this before final fixation, while the tray can still be tilted.

- We connect the siphon outlet to the sewer pipe. In most cases, a rubber cuff is used for this purpose, which allows you to quickly disassemble the system to clear the sewer blockage.
- Smooth the tray by turning the screws on the legs. At the same time, we make sure that the drain level does not fall below the level of the siphon entrance to the sewer.

- We do a test drain, letting water into the pan under low pressure. If there are no leaks anywhere, we completely fix the legs and install side panels or cover the edges with tiles.
Advantages and disadvantages
Steel products have many advantages:
- Firstly, they are significantly stronger than acrylic and plastic models. So if in your family there are people weighing well over 100 kg, then you will not find an alternative. A shower cabin 800x800x1975 mm with a steel tray is the minimum you need!
- Secondly, most of the models are installed in almost an hour and a half. It goes without saying that from time to time difficulties arise at the stage of leveling the base, but if you purchase a structure with legs, you can adjust its position by rotating several screws.

- Thirdly, pallets can be used as an independent type plumbing fixture, and as part of a shower stall. The second option, of course, is preferable from the point of view of comfort, but if you need to equip a shower with minimal money, then just a tray with plastic curtains around the perimeter will be enough.
As for the disadvantages, they are as follows:
- Tendency to corrosion when the enamel or passivation layer of dark steel is damaged.
- Limited quantity design solutions.
- High volume of sound when a jet of water falls.
But we can compensate for the last minus by applying a layer of polyurethane foam to the underside of the pallet before installation. The remaining shortcomings can be fully tolerated by properly using the structure and avoiding damage to the anti-corrosion layer.
Conclusion
The variety of sizes of steel shower trays available in specialized stores allows you to choose a product for virtually any bathroom. Well, having found a model that is suitable in terms of dimensions and other parameters, all we have to do is install it correctly. And here the above tips from skilled craftsmen and the educational video in this article will help.
Installation of a shower stall begins with the installation of a tray. Before installing a shower tray with your own hands, you need to prepare properly: understand the nuances of installation, assign a sequence of work, following the instructions and calculation diagram.
Types and shapes of pallets
Models of trays for different shower stalls may differ in both shape and material. The most common are acrylic, ceramic and steel - it is not difficult to install such a shower tray with your own hands, while products made of cast iron and marble are quite heavy, so it is better to entrust their installation to specialists.
The shape of the pallets comes with rounded edge or without it, square, rectangular, etc. Regardless of the material and shape, the installation principle of all models is similar. Let us consider in detail the process of equipping acrylic and ceramic pallets, what are their fundamental differences and installation subtleties, in order to simplify self-execution work and avoid possible mistakes.
You will need the following set of tools and consumables:
building level, hammer, jigsaw, screwdrivers, screwdriver, pliers, adjustable wrench, marker/pencil, drill, hammer drill, electric, copper cable, sewer pipes, trowel, concrete mortar and silicone sealant
Preparing space for a shower stall
Installation of the shower tray is carried out using one of the following methods:
- on a special metal frame;
- on plastic supports;
- directly onto a flat surface.
To begin with, carefully prepare the place where the future shower stall is planned to be placed. Particular attention should be paid to leveling the floor surface if you plan to install the pallet directly on it, that is, without using a frame or support. When installing a pallet in a frame or wooden building In addition, the walls are insulated using roofing felt or polyethylene film.

In addition, you should make sure that the pallet you are installing is strong: if the structure bends under your weight, the pallet must be reinforced using boards polyurethane foam, brickwork or polystyrene foam boards. One of the most simple options reinforcement - fill the space under the base of the booth with concrete. You can do one of two things: possible options: you can make an initial concrete floor screed only in the place where you plan to place the stall, or you can completely fill and level the entire area of the bathroom.
Advice! A steel tray is characterized by increased noise, so when installing it, be sure to pour polyurethane foam under the bottom of the shower stall - this will help eliminate or at least reduce the loud noise from the stream of water pouring from above.
In addition to preparing the floor, it is necessary to properly install the pipes, as well as lay the electrical wiring for the shower stall. All pipes should have convenient outlets so that it is easy to connect hoses to them. As for the electrical wiring, it is made hidden and necessarily moisture resistant, and it is important to make as few twists as possible. The power supply cable is connected using a three-wire copper cable with double insulation, the cross-section of which is from 2.5 mm. An RCD must be installed; the cable is laid directly from the electrical panel.
Attention! If you do not have the appropriate skills and experience in working with electrical wiring, it is better to entrust the work of connecting the shower stall to the electrical panel to an experienced specialist!
How to install an acrylic shower tray
Acrylic models are usually equipped with adjustable legs, which can already be attached to the product, as well as brackets for convenient fastening and other types of fittings that facilitate the installation process.
To adjust the legs, an adjustable wrench and a level are used, which allows you to install the product as horizontally as possible in relation to the floor.
Acrylic products have one weakness- there is often no support under their central part. Therefore, acrylic pallets are often placed on stable podiums or special supports. The strength of the pallet will directly depend on the size of the existing installation clearance. At the same time, it is important to leave unimpeded access to sewer pipes.
After strengthening the bottom, proceed directly to installing the product:
- markings are being applied - the structure is aligned horizontally using a building level, a line is drawn along the walls/tiles with a marker/pencil to accurately mark the markings of not only the profile, but also the drainage hole;
- the pan is temporarily removed, all parts of the drain are separated, the drain outlet is connected to the sewer pipe;
- the siphon for the shower tray is combined with the drain into a siphon drain hole - the so-called gluing of pipes is performed, a seal is installed on the drain hole, and the tray itself is placed on top of it, then the drain funnel is screwed on;
- the central part is fixed - bricks are placed under the base, serving as a support, or steel pipes, and on top there is a layer of thick rubber, after which the structure is retracted and attached to silicone;
- the booth is connected to all necessary communications;
- The lower perimeter of the entire structure is lined with decorative panels, and the joints are carefully sealed using silicone sealant.
Installing a ceramic shower tray
Attention! The installation of any ceramic tray must be done extremely carefully. The product is very fragile and can easily be damaged or cracked even with a slight impact or falling of a heavy object!
A distinctive feature of ceramic models is that there is no free space, which means that no additional supports are required and can be installed directly on the floor covering. This is convenient in that any manipulations to strengthen the structure are excluded, but there is a drawback - difficulties arise in providing access to the drain and all other communications.
Work order:
- markings are indicated - using a marker/pencil, the future location of the drain is indicated and boundaries are drawn along the entire perimeter of the structure;
- a drain hole is equipped (it is important that it is as close as possible to the supplied drain pipe) - the part of the floor where the siphon will stand in the future is carefully cut out with a jigsaw;

- unhindered access to sewer communications is ensured - not far from the existing cutout, another small recess is made in the floor so that the floor section is outside the boundaries of the structure and it becomes possible to lay a siphon and a network of pipes under the floor;
- from a piece cut with a jigsaw flooring a small removable inspection panel is made, and PVA glue, previously diluted with a small amount of water, is applied to the location of the pallet in two layers;
- the siphon is connected to the drain;
- the pallet is fixed with a solution, while maintaining a horizontal position;
- when the solution is completely dry, the siphon is carefully connected to the pipe through the inspection panel;
- all joints are carefully sealed with silicone sealant.
For long-term use of the shower cabin, it is necessary to install the shower tray correctly. The technology for performing the work must be accompanied by competent installation of all structural parts. In this article we will describe the features of installing a shower tray in accordance with the rules and recommendations of specialists.
Types of pallets
The shower is an excellent addition to the bathroom, which saves free space in the room. The method of installation of the shower tray must be installed in compliance with safety regulations. Installation options depend on the type of pallets and the technology of fastening to a specific material. However, it is important to remember that not all pallets can be installed independently, and in some cases, you need to seek help from specialists.

Shower trays differ in the type of material from which they are made. So, they distinguish the following types designs:
- cast iron products;
- marble and ceramic trays;
- steel products;
- acrylic pallets.
Marble products are considered the most durable and reliable, however, their cost is quite high, so not everyone can afford such a purchase. Ceramic trays are also expensive and have excellent decorative properties, but too sensitive to various damages.
An affordable option is to install a shower tray made of acrylic materials. To install the structure, it is necessary to build a special frame that would support the pallet, because such products tend to sag under weight. The kit includes special mounting feet, as well as reinforcement parts that ensure the strength and reliability of future installation. For example, cast iron pallets are the cheapest among other types of products. The peculiarity of such pallets is their durability and reliability, which is indicated by the material used.

Aspects of pallet installation
The cost of a shower cabin depends on the variety of functionality of the product. For example, a shower with hydromassage, telephone, lighting and other effects will have high cost. It is important to take into account the payment to workers for installation of the entire structure. The easiest way to install acrylic or steel products with your own hands.
During the installation process with your own hands, it is important to remember to level the surface under the shower for vertical position legs The technology for assembling the structure can be seen in the instructions for the product. They indicate the features of installing a product made of plastic or metal, and also describe tips for connecting the sewer system to the shower stall. Pallets can be installed on supporting elements made of plastic, which can be replaced with bricks.
It is important to know! To insulate the shower tray, as well as to seal all voids, it is necessary to use polyurethane foam in the work. However, this method can complicate the implementation dismantling works or repair. For check correct installation shower trays, you need to stand in it with extreme caution, after which you will determine the stability and reliability of the structure.
Installation of an acrylic pallet with your own hands: features of the work
The main disadvantage acrylic products highlight the lack of support under the central part of the pallet. Thus, the surface may be damaged by careless movement. This will cause damage to the installation and damage to the human body due to splinters.
Therefore, when installing an acrylic tray, it is important to follow the sequence.
Preparatory work
During repair work In bathroom Special attention pay attention to connecting the sewer system and water supply. The shower stall must be connected to several systems, which include water supply and drainage, as well as electrical wiring. Wherein, last detail must have high resistance to dampness and water.
To install a shower tray for showers you need to purchase quality pipes and other products to avoid leakage in the future. After installing all communication systems for the bathroom, it is important to check everything carefully, especially the water supply and operation sewer drain. All pipe openings are closed with temporary plugs at the time of installation work.
Installation process
During installation, it is important to align all pallets strictly vertically. This is due to the need for proper drainage into the sewer, only if the product is installed perfectly evenly in a horizontal position. This will prevent the formation of puddles in the shower stall. To install the pallet it is important to do level base from tiles or ceramics.
To properly mount the pallet, you need to secure the central part of the product, while the horizontality of the structure should not be compromised. To simplify the work, draw a contour along the entire perimeter of the pallet to establish the exact position of the product. After this, you can start connecting sewer pipes and other elements.
Strengthening the shower tray
To ensure the installation strength of shower trays, it is necessary to measure the distance between the product and the floor. Initially, it is important to leave space for the drain so that the drain pipes can be cleaned or replaced later. Additional support parts can be bricks or steel pipes, which depends on the design parameters.
Rubber is placed on top of the pipes or bricks, after which the supports must be pushed tightly under the base of the acrylic tray. After this, you can connect the communication systems.

Detailed instructions for installing shower trays
Before you start installation work need to prepare necessary tool. For installation you will need the following materials:
- FUM tape;
- sealant or special glue;
- twin to the sewer network;
- If the kit does not include a siphon, then you need to buy it at any plumbing store.
1. The tray with legs must be leveled horizontally. To do this, the legs are separately unscrewed and fixed in special locking screws. If you purchased a booth without supports, then you need to fill the floor with cement mortar. The level of the base should correspond to the position of the floor in the bathroom. After this, installation work begins and finishing is done using ceramic tiles or other products.
2. It is important to fix the pallet from the wall using adhesives. Joints and fastening points must be additionally sealed with sealant. All work must be carried out carefully to avoid further flow of water between the wall and the structure. On sewer system attach a double, if there are other types of connection, install a tee.
3. All parts and joints of the pallet must be carefully sealed to avoid water leakage and destruction of the pallet.
4. It is important to install the pan above the level of the sewer pipes. This is necessary for further access to communication items for their repair or dismantling in case of breakdown or damage.
5. Finally, you need to check all attachment points. They also check the water supply and drainage. If there is a leak in some areas, it is important to tighten all connections more thoroughly. If necessary, additional insulation is carried out.
Features of installation of other types of pallets
Cheap cabin tray can be installed different ways, for example, on brick base, on plastic supports or metal frame. The technology for carrying out the work depends on the characteristics of the product and the materials from which it is made.
For a ceramic tray there is no need to install supports or other racks, because the structure is mounted directly on a flat floor. Mounting clearance in in this case will not happen, therefore it is important to install all communication systems efficiently and professionally. To carry out repair work or replace sewer parts, you will need to dismantle the pan. Answering the question: how to install a shower tray without legs made of ceramics, you need to attach the product with glue or cement mixture for tiles. Lastly, install the drain hole.
For installation of steel or cast iron products it is necessary to use more reliable support elements, which are bricks. Initially, the boundaries for installing the pallet are set on the floor. After this, a cement mortar is prepared and brickwork is made. The height of the masonry must correspond to the parameters of the pallet and have the same shape. The pallet must not be in contact with the floor in order to be able to install the communication system.
Three days after drying cement mortar you need to install a tray. You need to apply a layer of cement on top of the masonry, then apply the product and level it in a horizontal position. A hose must be attached to the drain system. As facing materials tiles are used, decorative panels, mosaic and other finishing options. This is necessary to complete the installed structure.
Unlike installing a low shower tray, other products require a metal or plastic frame, making the DIY installation process simple. The work process consists of aligning the legs, installing the tray and fixing the drain hole.
At the end of installation, it is necessary to check the stability of the structure. If the pallet is loose or fastened, then additional supporting elements need to be made such as brickwork or attaching steel pipes.
The process of making a pallet with your own hands
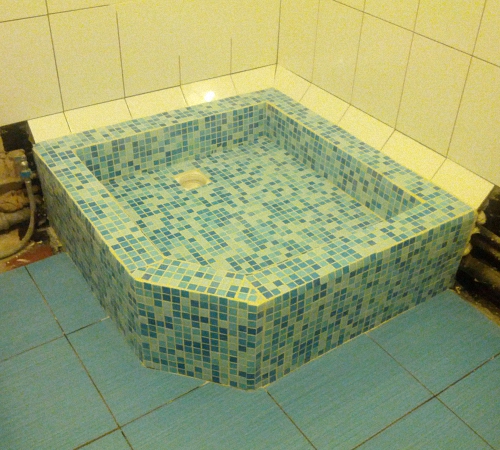
It is quite possible to install a pan with your own hands without buying similar products in plumbing stores. The main thing is to adhere to the rules and detailed instructions performance of work. The shape of the base for the shower cabin can be different, you can also use different finishing materials, creating own design designs. The work process has the following sequence:
1. First, we designate the place of drainage and installation drain system. We cover the surface of the base under the shower tray with a waterproofing layer, and the height of the wall covering should be 30 cm.
2. A brick barrier is installed along the perimeter of the structure, the height of which should be more than 5 cm above the position of the drain hole. Next, the screed is poured, which should be 6 cm below the drain point.
3. After the screed has hardened and brickwork, the barrier is covered with a layer of insulation. Filling of adhesives or cement mortar is carried out with a slight slope towards the drainage system. The technology for applying the mixture starts from the edge and moves towards the center. It is important that there are no steep angles of inclination, as this creates significant and sloppy transitions.
4. At the end of the work, the surface is finished different materials, For example, ceramic tiles, mosaics and other products at the discretion of the owners.

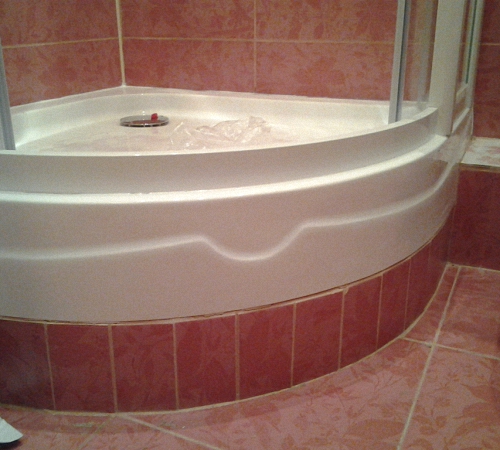
Features of installing sides for a shower tray
After determining the specifics of installing the shower tray, a video of which is presented at the end of the article, you can begin building the sides. If the tray has a large height, then it is necessary to build one or more steps for the shower stall. The masonry can be made of bricks with the installation of formwork, however, the type of material used does not matter, because the surface will be covered with tiles.
After laying the steps and removing the formwork, it is important to cover the surface of the sides with a primer and a layer of waterproofing. After this, the treated and correctly erected structure can be covered finishing materials. It is important that the shade and type of finish matches the appearance of the shower stall and the style of the bathroom. It is important to tile the walls behind the pallet if they are not treated waterproof materials. As an adhesive for tiles, you need to choose waterproof products without the addition of silicone, as it darkens over time and spoils appearance shower cabin.

To equip a shower stall in an apartment, it is better to seek help from specialists. This will allow you to correctly distribute the load on the base, as well as lay all communication systems. It is easier to install such a structure in a private house or in a country house where there is no danger of flooding lower floors Houses. During the work process, it is important to fasten all parts and elements firmly and securely in order to extend the life of the shower tray.
For the manufacture of shower trays they use various materials, on whose properties the characteristics depend finished products. Today we want to talk about steel models, consider their advantages and disadvantages, and also pay attention to how to install a steel shower tray with your own hands.
Steel shower trays
Characteristics and Features

If we look at shower bowls and divide them into groups according to the materials from which they are made, we will notice that steel products will be the most budget-friendly:
Cheapness is one of the indisputable advantages of steel models, but it can also have the opposite effect: most buyers believe that low cost- a sign of low quality.
This is not entirely true, and often the low price is caused by the peculiarities of product production, the cost of materials, as well as (and this is especially important) existing market trends and associated marketing policy manufacturers of goods.

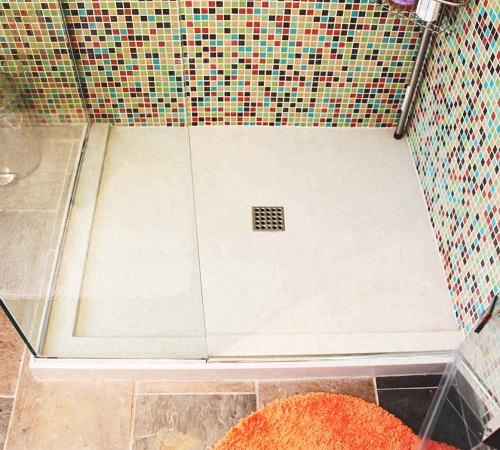
In the case of steel pallets, it cannot be said that they are definitely worse than their analogues, but in some positions metal models really lose. Their the lineup not as diverse, especially in terms of design. It is quite difficult to find a bowl of an unusual shape; square and rectangular shapes, corner models are much less common.
There is also a limitation on the depth of the vessel, and it is almost impossible to find really deep steel shower trays, since this parameter is limited to 160 mm. At the same time, models with a maximum depth of 130 mm are more common, and any pallet with a depth of more than 40 mm is called deep. However, this feature is not unique to this class.

On the other hand, steel is an excellent construction material, which is characterized by high strength and durability, which is not afraid high temperatures, blows, falls heavy objects, fungal infections and other similar influences. Low cost makes steel models especially in demand for installation in country and country showers.
The products are made from carbon steel coated with anti-corrosion wear-resistant enamel. If you remember cast iron bath, then you can imagine what we're talking about. The bowl can be equipped with a frame for installation, special legs or supplied without them.

Important!
By the way, bathtubs can last for decades and still look good, so stereotypes about the quality of steel bowls are largely far-fetched.
Advantages and disadvantages

Despite their low cost, steel pallets have a number of advantages, thanks to which the demand for this class of products remains quite stable.
We list the main ones:
- High strength characteristics of steel. The material is not afraid of high temperatures, does not crack, does not split, can withstand significant weight, and withstands impacts and falling objects;
- Low cost. With quite acceptable quality, the products are several times and orders of magnitude cheaper than analogues made of ceramics or artificial stone. Even acrylic bowls cost about two to three times more;
- Possibility to choose enamel color. Unlike ceramic and acrylic counterparts, steel bowls can be coated with enamel various colors and shades, which makes it possible to fit it much more harmoniously into the interior of the bathroom;
- Easy DIY installation. The product is quite easy to install using ordinary tools, without any special skills in construction or plumbing.

Important!
When installed on a frame, the need for wet processes and brick podium construction is eliminated, making installation much easier and faster.
Of course, there are also disadvantages.
We will list only the most significant of them; if they do not confuse you, then you can ignore the rest:
- Steel is afraid of electrochemical corrosion. The enamel coating may come off the surface or be damaged by mechanical stress, and then the bowl will begin to actively rust and deteriorate;
- The appearance and variety of forms leave much to be desired;
- Steel surfaces are very slippery, especially if they are not corrugated;
- When water flows from the shower, a noticeable noise occurs;
- If there is no frame or solid foundation under the bottom, it may sag under the weight of an adult. This is dangerous due to cracking of the enamel.

Important!
It should be noted that, unlike steel, it heats up quickly enough from water, and you can use the booth practically without preheating the bowl.
Installation

Installation of steel pallets is done in two ways: on a podium made of brick or concrete, as well as on a special steel frame with legs. It is advisable to choose a model with a frame and adjustable legs.

If there is no frame at the installation site, a brick podium is first laid out. To do this, the floor is freed from finishing until clean screed, on which the structure is laid out from ceramic bricks(silicate is not suitable due to low moisture resistance).
The design is a parapet 0.5 - 1.5 bricks high around the perimeter of the bowl:
