How to install a new plastic window. How to properly install a plastic window. Do-it-yourself installation of slopes on plastic windows
Read also
Plastic windows have become so popular not only because of their operational and technical characteristics, but also thanks to the simple installation process. Even at home, without special construction skills, installing plastic windows with your own hands is quite feasible, due to the fact that the factory package includes additional parts for fasteners, and the installation rules are simple.
In order to install plastic windows with your own hands, it is enough to follow the recommendations of specialists, be patient and invite a reliable person as an assistant.
Window measurements and calculations made before purchase
Before buying a plastic window, you should take the most careful measurements possible. window opening . In this case, it is necessary to take into account the presence or absence of a quarter in it. This feature will play an important role in calculating heat loss, and therefore in the consumption of material for window production. The fact is that quarter openings are usually used in buildings made of foam concrete; they significantly reduce thermal energy losses. If window hole without a quarter, the window should be smaller than the opening by 5 cm in length and 3 cm in width. As a result, you will get gaps along the contour that will be foamed, 1.5 cm at the top, right and left, and 3.5 cm at the bottom, where you will install the window sill. According to GOST, the gaps around the perimeter can be 2.0 cm. Thanks to this, finishing the opening before installing plastic windows is greatly simplified.
When calculating the size of a window for an opening with a quarter, the measurement at the narrowest point is taken as a basis, and 3 cm is added to the width. The length is not taken into account.
The plastic window should be positioned inside the opening 1/3 deep relative to the plane of the outer side. However, for those who want to do this work themselves, this condition It doesn’t matter: you can make a shift in any direction. The main thing is to take this circumstance into account in the calculations prior to installation, and when ordering window sills with external ebbs, add 5 cm to the width of these elements for each.
Before you install anchor plates in the opening, make small recesses for them. This will save you from having to level the surface before you begin installing the internal slopes.
Often, when installing a structure, specialists use these two methods, combining them with each other. To do this, the anchors are buried inside the wall through the base and sides of the frame, when the top is secured with plates.
Standards for installing plastic windows
During installation metal-plastic construction In the window opening with your own hands, a prerequisite is the use of polyurethane foam. This material will give the frame-opening connection the necessary rigidity, provide additional fastening and act as an insulator. To prevent the layer of polyurethane foam from losing its technical abilities over time, insulating strips are glued onto it: on the outside - with a waterproofing effect, on the inside - with a vapor barrier. Since wood has the ability to transmit steam, it is recommended to lay it around the perimeter wooden box foil insulation.
The time of year in which the installation of plastic windows will be carried out is chosen by the owner. Experts often recommend doing it yourself in winter: this allows you to immediately identify possible flaws. When choosing polyurethane foam, pay special attention to the instructions. In it you will find data on the temperature values at which the composition will harden faster, as well as a description of how to properly foam. Usually this process is carried out from the bottom up, blowing the foam out several times in small sections of 25 cm - this will help to avoid unnecessary consumption of material, which is not cheap.
Preparing the window opening before installing the structure
Installing plastic windows with your own hands implies complete cleanliness of the prepared surface. That is, the opening from the inside must be freed from residues paint coatings, dust or debris. If a plastic window is mounted in a wood frame that has already been used, outer layer should be trimmed down, or completely eliminated, if you think that it may peel off after the polyurethane foam dries.
Pay attention to the size of the gaps between the opening and the frame. If they are more than 4 cm, then filling them only with foam will not only be very expensive, but also of poor quality. In such cases, it is better to use scraps of timber, foam plastic or drywall for partial filling.
Preparing a plastic window for installation
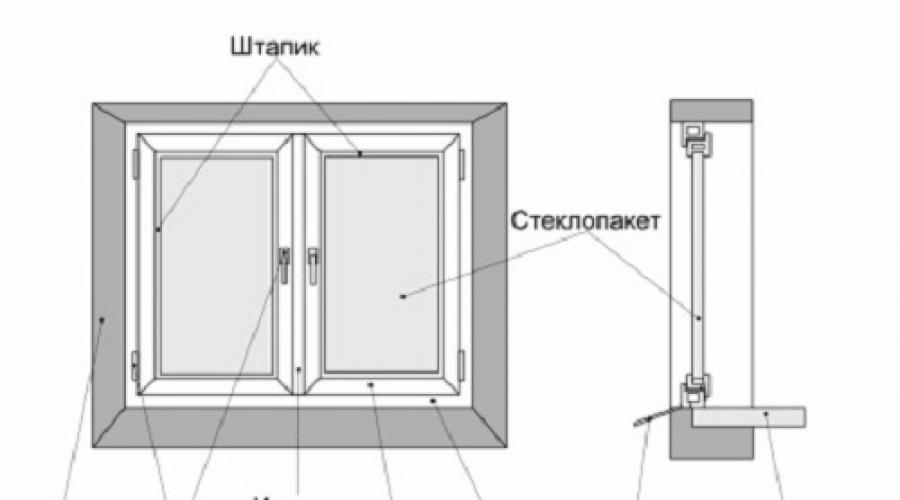
To begin with, the frame should be freed from the doors by carefully removing the pin located in the upper hinge. To do this, use a screwdriver and pliers; these are the most suitable tools for DIY work. Then remove the sash from the lower hinge, lifting it slightly. If the window is solid, the glass unit is removed from it by first removing the longitudinal and then the transverse beads. To remove the bead, take a putty knife, insert it into the gap, and move it slowly to avoid damaging the glass surface.
Plastic window small size can be installed without removing the double-glazed windows. To do this, it is enough to use mounting plates.
Place the removed structural elements on a previously covered with soft thick fabric or cardboard, leaning against the wall under small angle. Do not lay the glass unit flat. Any, even the smallest, obstacle under the base can subsequently lead to the formation of cracks in the glass unit, bending of slopes and other defects.
Now remove the layer from the frame protective film. It is recommended to do this right away, otherwise you will have to face certain difficulties later.
Mark the places for fastenings in increments of no more than 40 cm, departing from the impost and corners by 15 cm. When using mounting plates, first secure them with self-tapping screws on the surface of the frame.
Installing a plastic window in the prepared opening
Self-installation and fastening of plastic windows with your own hands requires attention and accuracy. Therefore, follow it step by step, strictly adhering to the recommendations.
Along the perimeter of the opening, lay spacers - bars or plastic corners, which will provide a technological gap. Insert the frame, strictly aligning it horizontally and vertically, making sure that the side gaps are even. In order to control the position of the frame, use a plumb line and a spirit level.
Once there is no doubt about the correct installation of the frame, proceed to fastening it.
If the walls of the house are built of wood, screw (not all the way) screws through the holes located in the frame.
Before attaching the frame to concrete or brick wall, you should mark the points for fastening through the holes on the surface of the frame, remove the frame and use a drill to make recesses into which the fasteners will be attached.
In case of installation using anchor plates, bend them so that they fit snugly against the anchor point. Follow-up after window installation PVC finishing slopes will require precision.
Complete the final fastening of the window: carefully screw in the screws, making sure that the cap does not protrude more than 1 mm above the level of the double-glazed window frame.
Insert all the dismantled elements in reverse order, check how fully the structure as a whole functions.
Fill any gaps left and cover the seams with protective tape on the outside and inside.
The space under the drainage for slopes should also be filled polyurethane foam. Attach it to the bottom profile of the frame with self-tapping screws, inclined relative to the surface of the window. This finish will prevent rattling during rain.
After the polyurethane foam has polymerized, install the window sill, placing it 2 cm under the sweet clover. Foam the space under it, this will provide a slight slope.
Immediately, or within a maximum of three days after installing the plastic windows, install the slopes.
Before you begin work such as finishing slopes with plastic, stock up on the following:
- strip plastic material about 10 mm thick;
- U-shaped profile, which will serve as a starting profile;
- F-shaped profile;
- rail wooden thick 10-15 mm and width 40-50 mm;
- soft texture insulation.
Finishing of slopes is carried out as follows.
Using self-tapping screws, attach the starting profile along the outer edge of the frame. At the junction internal walls at the point of vertical and horizontal connection starting profile, there should be no gaps. Then mount the rail around the perimeter of the opening: it should not protrude beyond the surface of the wall.
The F-shaped profile is made of a plastic strip and stapled to the edge of the rail closest to the wall. The slope panel will be inserted into the groove.
Inside plastic profile fits acrylic sealant and a pre-prepared panel is inserted. The gap is evenly filled with insulating material. The outer remainder of the workpiece is inserted into the F-shaped profile. The blanks are mounted on the sides of the frame in the same way. After installing the panels, the overlaps are carefully cut. The joints are degreased and filled with liquid plastic. Carefully remove any excess. This completes the work of finishing the slopes with plastic.
When all work on installing a plastic window is completed, it is not recommended to use the structure for 16 hours, so that the seams remaining after installation dry out and do not lose their integrity, and the cladding is not damaged.
As you can see, installing plastic windows and finishing slopes yourself is a task that is feasible even for a beginner. These recommendations will help you not only do all the work yourself, but also control the process of installing plastic windows if you decide to use the services of an installation team.
Premium German brand on the Russian market since 1995. With VEKA you get true German quality from a company with a 48-year history around the world.
- ALL profile systems top class "A"
- ALL are made frost-resistant and marked with the letter “M”
- ALL have a maximum 4-way steel reinforcement
- Uniform quality standard regardless of country of production
The more air chambers, the less air exchange and, accordingly, the higher the thermal insulation.
The wider the profile and the greater the installation depth, the higher the thermal insulation.
Profiles ONLY of the highest class “A”
According to the thickness of the internal walls, ALL our profiles are upper class“A” - the thickness of their front wall is at least 3 mm.
- class “A”: front wall not less than 3.0 mm
- class “B”: front wall not less than 2.5 mm
- class “C”: wall thickness is not standardized
Please note that 80-90% Russian market these are classes “B” and “C” and only 10-20% of class “A” profiles. At the same time in assortment VEKA profiles Class "A" ONLY.
We fundamentally DO NOT use profile systems of classes “B” and “C” (with a front wall width of less than 3.0 mm).
ONLY frost-resistant profiles
According to GOST 30673-99 “PVC profiles for window and door units” for resistance to climatic influences, ALL of our profiles are “frost-resistant” - for areas with an AVERAGE monthly air temperature in January BELOW minus 20°C.
GOST standards for different classes:
- normal version "N": average temperature in January - minus 20°С and above
- frost-resistant version “M”: the average temperature in January is lower than minus 20°C
Our assortment includes ONLY frost-resistant profile systems marked with the letter “M”.
Heat transfer resistance (thermal thermal resistance) is the main thermal insulation coefficient. Determined by the ratio of the temperature difference between outside and inside the room to heat flow passing through the window. The higher this number, the better efficiency thermal insulation.
Evolutionary double-glazed windows SmartGlass 2.0
Our multifunctional double-glazed windows work for you both in winter and summer. In winter, spraying silver particles retains up to 90% of thermal energy heating devices, and in summer the double-glazed window reflects 25% more solar heat than ordinary plastic windows.
- 42% more HEAT in winter (energy saving properties)
- 25% less HEAT in summer (sun protection properties)
All our double-glazed windows contain special energy-efficient glass. We DO NOT use regular glass even in the most basic configurations.
AirDrive I, II and III climate control systems
Optimal ventilation mechanisms are built into the windows - the sashes open slightly by 1-5 mm, depending on the selected mode. Is not external devices(combs or valves), namely BUILT-IN ventilation fittings.
Three options:
- AirDrive I: slot ventilation (1 mode)
- AirDrive II: discrete multi-stage ventilation (3 modes)
- AirDrive III: discrete multi-stage ventilation (5 modes)
We try not to put combs because of them appearance(only at your request). In principle, we do not use valves due to the fact that they violate the integrity of the window, reduce its tightness and strength (since the profile and its reinforcement are drilled through).
MAXIMUM steel profile reinforcement
Reinforcement is a steel frame inside PVC profile. This is what gives the structure rigidity. The more steel and stiffening angles, the more reliable the window geometry.
Types of reinforcement:
- Square – 100% reinforcement on 4 sides, 4 stiffeners (maximum)
- U-shaped – 75% reinforcement on 3 sides, 2 stiffeners (regular)
- L-shaped – 50% reinforcement on 2 sides, 1 stiffener (very, very bad!)
All our profiles are reinforced to the MAXIMUM - on 4 sides and always with 4 stiffeners.
VEKA technologists managed to achieve a compromise between the unpretentiousness of the matte texture and the spectacular gloss.
Pleasant shine and low sensitivity to external influences are the most noticeable feature of our window systems.
The VEKA profile complies not only with the Russian GOST, but also with the European RAL building standard.
Question self-installation plastic windows is relevant for those who would like to save on the services of specialists and benefit from quality, since there are often cases when invited installers do the work hastily, which ultimately leads to further problems various problems when using the window.
How difficult is it to install a metal-plastic window on your own? We’ll talk about this in detail in this article, which will discuss in detail the process of its self-installation. We will tell you how to take measurements correctly, how to prepare for work, what mounting method to choose and how to install window design qualitatively.
We make the necessary measurements
The first stage of work when installing plastic windows yourself is taking measurements. It is important to approach the measurement process responsibly; the overall quality of the installation depends on how correctly you take all the necessary measurements. Measurements are made in several stages:
- First, the width of the window opening is measured. To obtain the most reliable result from the opening, it is recommended to first remove plaster coating.
- The next measurement is the height at which in this case the distance between the upper slope and the window sill will be understood.
Measure distances several times and take the smallest result, not the largest.
- To calculate the total width of the window, you need to make calculations using the following formula: subtract two from the measured opening width installation gap. The total height is determined similarly, but in this case, not only two gaps are subtracted from the height of the opening, but also the height of the stand profile.
Then you can proceed to determining the width of the drainage. To do this, add 5 centimeters per bend to the width of the existing drainage structure. If in the future you plan to cladding facades, also take into account the width of the insulating and finishing materials.
The process of taking measurements is completed by determining the size of the window sill. To do this, add the overhang size to the opening width and subtract the frame width from the resulting value.
Based on the measurements taken, a drawing is made and sent to the manufacturer of window structures. When the products according to your sketches are ready and delivered to the site, you will need to make careful preparations for the installation process.
What you need to install windows
In order to carry out the work on self-installation of PVC structures without delays and with high quality, it is worth preparing in advance the tools and materials that may be useful to you at different stages of the work.
The list of what you need to prepare in advance will be quite extensive:
- Spacer wedges. These elements are used to fix frames. They will hold the structure in correct position until the polyurethane foam dries.
Do not under any circumstances refuse to use wedges when installing a plastic window yourself. The polyurethane foam expands as it dries and this can lead to a change in the correct position of the window structure. Prevent similar Negative consequences Fixation with wedges will help.
- Polyurethane foam. This material is used for high-quality filling of seams between openings and the frame base. Foam is sold in stores in a wide range of types, but experts advise using a material with the lowest possible expansion rates when installing windows.
- PSUL or sealing tape. It is used to prevent slopes from becoming damp, since polyurethane foam cannot cope with this task: it allows both air and moisture to pass through. When purchasing PSUL, pay close attention the right choice material in width - it must match the width assembly seam.
- Waterproofing tape. The material ensures the tightness of the assembly seam with inside.
- Diffusion tape. It is needed to protect external assembly seams from the effects of such negative factors, like moisture, ultraviolet.
- Fasteners When installing a plastic window yourself, you may need different types fastening elements: dowels, anchors, strips, perforated plates, screws and consoles. Each type of fastener performs a specific function. Anchors - the use of anchor fasteners during the work process is necessary to maintain the integrity of the frame. Dowels, according to experts, are a more durable alternative to anchor fasteners, since dowels allow the structure to be fixed as firmly as possible.
Dowel fasteners are not used in the process of fixing the lower part of the structure!
- Supporting consoles. Their use is especially advisable when installing large-sized window structures with heavy weight and complex configuration.
- Stand profile. Used in working with ebb tides and installing window sills.
In the work process you cannot do without using silicone sealant. It is used to fill joints and provide high-quality insulation seams.
You will also need: a spatula, a hand saw, a hammer drill, primer mixture, putty or plaster mortar, brushes, sandpaper, hammer, hammerless drill, grinder, cutting scissors different materials.
Window mounting methods
Before proceeding directly to the installation work, you need to decide on the method of fastening the structure in the opening. There are two different ways to implement this task in practice - installation with anchors and installation with plates. Let us consider the specifics of each method in detail.
Anchor method
When using the anchor method of fastening a window, special through mounting holes are made in its frame for fasteners. Similar holes are drilled in the wall. The anchors are inserted into the holes in the frames and tightened. To make the fastener invisible in the overall design of the structure, it is masked with a sash or covered with a double-glazed window.
Advantages of the technique:
- The ability to place the frame in the opening as accurately and evenly as possible;
- High fixation strength, which is especially important if you plan to install large and heavy structures. Note that fastening with anchors is the only possible variant for windows with heavy weight and when installing structures in places with increased external loads.
Disadvantages of anchoring technology:
- The window structure will have to be disassembled first - double-glazed windows, glazing beads, sashes must be removed. For a beginner this will not be an easy task as the slightest mistake can lead to damage important elements plastic window, and structures made from this material cannot be restored or repaired;
- The window profile will be pre-drilled, and this entails a violation of its integrity, which can lead to a decrease in heat and sound insulation.
Another significant drawback The considered method is quite labor-intensive and time-consuming.
Mounting plates
This method involves fixing the frame to anchor plates, which are pre-fixed to its end part. After the frame is installed in the opening in the correct position, the plates are additionally secured with dowel fasteners to the wall surface.
Pros of using mounting plates:
- Installation is quite quick and simple, especially if the fastening uses standard-type plates that fit tightly into special grooves;
- The profile remains intact, which has a beneficial effect on heat and sound insulation;
- No need to waste time unpacking the window. Although experts still advise disassembling the window in order to properly insulate all joints and seams.
When attaching a window to anchor plates at a high height or in case of installing a structure with a large weight or a complex configuration, unpacking is necessary!
- The method of mounting on plates has one drawback - it is not applicable in conditions of increased external loads on the window - high number of floors, strong and frequent gusts of wind at the installation site.
- Based on the considered pros and cons of each fastening method, you can choose for yourself best option fixing the window structure.
Installing a window with your own hands
Having decided on the fastening method, you can go directly to the work process, which begins with dismantling old structures.
Removing the old window
First, prepare the work site - free up as much space as possible for yourself; be sure to cover furniture and other objects in the room with polyethylene film to protect them from dust, which will be quite abundant when dismantling the old window.
- Since old windows are usually thrown away, their frame is broken out along with the fastening or cut out.
- Next, you need to clean the surfaces from insulation and thermal insulating materials.
- The old plaster coating is removed from the slopes. The easiest way to perform this task is with a hammer drill with a special shovel attachment.
- The window sill is removed and the cement layer is cleaned.
The dismantling of the old structure is completed here, but it is also important to properly prepare the opening for the installation of a new window structure.
Preparing the window opening
The opening part of the window requires before installation preliminary preparation. First, you need to thoroughly clean it of dust, dirt and old sealant. If there are defects on the surfaces of the opening in the form of extensive cracks, pits, or other damage, they must be repaired with a plaster or putty mixture.
If possible, wait for drying plaster mortar no, you can use a quick-drying gypsum-polymer mixture in your work. When finishing preparing the window opening for the installation of plastic structures, be sure to prime all adjacent surfaces.
If the structure will be placed in a wooden opening, it is important to carry out work to ensure high-quality waterproofing!
Installation and assembly of a plastic window
Work on fixing the frame in the opening begins by securing support pads or spacer wedges around the entire perimeter of the opening area.
During the installation process, certain tolerances must be observed - they are specified in GOST standards. In particular, the vertical tolerance should not exceed 3 mm. After inserting the frame into the opening, make sure that it is really level, using a level or plumb line for this purpose.
To control the verticality of the frame, you can use another method: simply open its sash more than halfway. If the sash opens further on its own or begins to close, errors were made during the installation of the frame, the position of the structure must be corrected, otherwise complete sealing of the structure will not be ensured, which is fraught with the appearance of ice and a decrease in the thermal insulation value of the window.
The installed frame will need to be carefully fixed in the opening, and we will consider this process step by step:
- Fastening the frame part of the structure to the wall surface can be done with anchor fasteners or plates (depending on the method chosen in advance). Before fixing the frame in the opening, it is recommended to unpack the structure by removing the glass from it and removing the sashes. Unpacking will make the process of aligning the frame in the opening and its subsequent fastening easier.
- Holes are made in the inside of the frame for fastening. Three holes vertically and two horizontally. The recommended diameter for anchor holes is up to 10 mm, but in general this figure is determined by the diameter of the fasteners used. It is most convenient to use for drilling holes. different instruments: for the frame a hammerless drill, for the walls - a hammer drill.
- The frame is fixed in a certain order - first the lower anchors on both sides of the structure are tightened (without screwing all the way!), then the upper and central ones. When screwing in anchors, be careful - overdo it and the frame may become deformed.
Having secured the frame in the opening, do not rush to remove the supporting pads from the bottom of the structure; they will reliably hold the window in the correct position until the work is completed!
- The next stage of working with the frame is making an assembly seam, which the current GOST requires to be made in three layers. The seam is formed between the wall and the frame cut and its task is to provide reliable sound insulation and protection of the structure from the action of various negative environmental factors.
- A seam is made using the following materials: PSUL tapes, polyurethane foam, para-insulating tape.
- If you make a seam using PSUL tape, then it will need to be glued around the entire perimeter of the opening before starting the frame installation process.
- Next, the seam is filled with foam. It is best to use polyurethane foam-based compounds during the work, which are sprayed with a special gun. It is worth knowing that the polymerization process of the foam will begin only when it comes into contact with moisture, and therefore, before filling the seam with foam, its surface should be moistened, and after completing the filling process, a small amount of water should be sprayed onto the seam.
- Do not try to fill the seam as tightly as possible. When drying, the foam expands and if it was used in excess, this process can cause deformation of the frame.
- It is worth considering that polyurethane foam is afraid of contact with moisture and ultraviolet radiation, and therefore a seam filled with it needs additional protection, which can be achieved by sealing the seam with PSUL tape or treating it with silicone sealant.
- The process of installing the frame in the opening is completed by processing inner surface seam in which polyacrylate sealants or vapor barrier tapes are used.
We fix the drainage system
Drainage - the outer part of the window structure, necessary for draining rainwater flowing down the glass unit from wall surfaces. Modern drip tides are made from different materials - plastic, metal, but whatever the material of the element, it is important to install it competently and efficiently.
The element is fixed to a special profile at the bottom of the PVC window structure. This method of fastening will prevent moisture from penetrating under the frame. The drainage system, installed correctly, should go under the slopes.
After installing the drainage system, you can assemble the window. The work is also carried out in several stages:
- A double-glazed window is installed and secured with putties. Attention! The spatula must snap into place properly!
- The valves are checked for quality of opening/closing, as well as tightness. If you installed the frame correctly, the doors will not open or close spontaneously.
- The side assembly seams are sealed.
After completing the assembly of the structure, you can begin installing the window sill and slopes.
Window sill installation
Window sills are also made of polyvinyl chloride and are identical in color to the PVC profile. The width of the element is always calculated based on the thickness of the wall.
Correct installation of the window sill implies that the element goes under the frame part no more than 2 centimeters. Opening under installed window sill sealed with polyurethane foam or mortar.
From the inside, the element is fixed to window frame or on the stand, on the outside - simply placed on a high-quality layer of sealant. The width of the window sill can be arbitrary, but it should not extend beyond the wall by more than six centimeters. This will prevent condensation from appearing on the glass.
The inclination of the element towards the floor can be in the range from 5 to 60. This will allow you to place various objects on the windowsill without fear of them falling from it, and will also prevent the accumulation of dirt, water and dust on the surface of the window sill when the window vent is open.
Let's give a few useful tips that will help you in the process of installing plastic windows yourself:
- You will be surprised, but best time The season for installation of PVC structures is winter. In cold weather, you can easily identify defects in sealing by condensation in places of slopes. Have you seen condensation in certain areas? This means that the seams in this area need to be foamed additionally;
- When installing a window sill, be sure to carefully foam the end holes. This will allow you to improve your overall thermal insulation performance;
- When unpacking the product, number the spatula. This will allow you to avoid mistakes and discrepancies during the subsequent installation of the PVC structure in place;
- You can determine the levelness of the frame in the opening using a regular building level, but it is best to use a plumb line for this purpose, which gives a minimum of distortion in the work.
Let's sum it up
As you can see, installing a plastic window can be done on our own, which will allow you to save time and money and achieve ideal quality work.
The main thing in the work process is to follow the stages of technology, study all the important nuances in advance and not ignore the requirements of current GOSTs.
HidePlastic windows are very popular. They protect the room well from cold and wind, and retain heat well inside the room. It is important to know how double-glazed windows are installed, because its correctness determines whether the window will function as planned. If a glass unit is damaged, it is quite possible to replace it yourself.
What do you need to prepare before installation?
Play an important role preparatory work: Without them, it will not be possible to install according to all the rules, which can lead to a violation of the window’s tightness.
If you have an old window installed and you want to replace it with a new product, you will need to start by dismantling it, then you will need to clear the opening of debris and level it if necessary. If you want to replace only a double-glazed window, it will be enough to carefully remove the damaged one from the frame: it is secured with special glazing beads. Leftovers broken glass must be carefully removed. Wear gloves when working, as the edges may be sharp.
Before installation, it is necessary to take correct measurements to determine whether there is any horizontal or vertical displacement
Which design should you choose?
Installation begins not with installation, but with measurements. They must be accurate, otherwise new design will not fit in size. If you are afraid of taking measurements incorrectly, invite a measurer. It’s good if it comes from the same company that will manufacture the double-glazed windows for you.
It is better to give preference to proven manufacturers whose product quality has proven itself well in the market.
The configuration is selected based on the number of sashes of the future window and the method of fastening. This determines how the glass unit will be attached. Usually there are two methods:
- Fastening through the frame in the same mounting plane.
- Using support reinforcement. Such fittings are already present in the frame and are placed there by the manufacturer.
Most often, the first method is used during installation, since it is easier to do it yourself, the weight of the structure is reduced, and installation takes less time. If the sashes are solid, you will need to remove the internal double-glazed windows. In the case of fittings, the scheme itself is a little more complicated, however, despite this, you do not risk damaging the double-glazed window during installation, accidentally damaging the frame or breaking the glass. You can install double-glazed windows hermetically, which is not always possible when installing them yourself using the first method.
If the window is under warranty, you should not change the glass unit yourself: this will deprive you warranty service. If the glass is damaged, contact the installation company.

How the window works
How is a double-glazed window installed?
The work takes place in several stages. First of all, you need to prepare the place: clean it, move the furniture away from it so as not to interfere with work; if the opening is uneven or there is debris, it needs to be cleaned and leveled using cement mortar.

Removing the old window

Preparation of the opening
After this, you can move on to preparing yourself. To do this you will need to remove the flaps. U Installation of a double-glazed window into the frame should not be carried out by weight; for installation, you will need to remove the glazing beads, for which you can use a chisel and a hammer. The work should be done carefully so as not to accidentally break the glass.
The beads need to be placed in the same place where they were previously, so it is better to number them right away.
You should pull out the lower and side elements, top - last. The glazing bead should fit tightly, but not tightly; if it does not fit into place, try another one: you probably have the elements mixed up. If the sequence is violated, the double-glazed window will not hold firmly, small gaps will form, violating the tightness of the window. There is no need to remove the frame to install the glass unit.

Installing the frame in the opening
After the first steps have been completed, you can proceed to the direct installation of the double-glazed window. Even with minimal experience, you will spend a little time on these actions. The installation is carried out as follows:
- In order for the installation of the frame to be smooth, special bars made of wood or plastic are placed at the bottom of the window. Most often, these elements are sold in the same place where plastic windows are sold. The top edges of the substrates must be horizontal; this can be checked using building level appropriate length or use for this purpose laser level. If the line is skewed, the window will also skew and it will not be able to function properly.
- After this, the structure is secured using anchor bolts or polyurethane foam. There is no need to rush to pull out the bars: this should be done two weeks after the window is fixed.
- To prevent the frame from bending, pegs should also be installed on the sides or in the center. They will hold the structure in an upright position.
- Check whether the glass unit is horizontal or not using a building level. If it is not level, you need to add pegs to level the structure to the desired plane. In order to find out whether the window is vertical, use a plumb line.

Installation of double-glazed windows
It is more convenient to fasten the frame from below, on both sides of the corners. After this, you can move on to other attachment points. If fastening occurs using anchor bolts, they should be tightened to the end only when the structure is perfectly level. Otherwise, there is a high risk of its deformation.
- Some structures are attached using the included metal ears: they already have holes for anchor bolts. Make sure that the hole drilled in the wall coincides with the hole on the eyelet, and metal element fit against the wall as tightly as possible: this will eliminate unnecessary cracks.
- After this, a window sash is installed, into which a double-glazed window has already been inserted, and the cracks are sealed.
Knowing how to install double-glazed windows, you can save a lot if you need to replace the glass and do the work yourself. This does not require any construction skills or the purchase of expensive tools.
The advantages of new plastic Euro-windows over old window systems are difficult to dispute: their installation guarantees reliable thermal protection and sealing. Let's discuss the process of replacing old windows with new double-glazed windows.
The desire to save on the installation of structures and do the installation yourself is quite logical. Although plastic windows are complex design, you can handle their installation yourself and without specific equipment.
Taking measurements
When taking measurements, you should take into account the features of the opening - with or without a quarter, other parameters and details, including the window sill and the presence of ebbs.
In the first case, one opening is measured in the vertical and horizontal directions.
The second option involves measuring the distance horizontally between the quarters at the narrowest point, adding 3 cm to the resulting value. The net distance from the bottom of the opening to its top is measured vertically, which determines the height of the planned glazing.

We make the required calculations
To perform installation without a quarter, you should, in addition to measuring the distance between the surfaces of the window opening, calculate it optimal dimensions. To do this, subtract 5 cm vertically to obtain optimal height, and horizontally - 3 cm to calculate the width. These intervals include a 1.5 cm layer of polyurethane foam around the perimeter of the window opening and 3.5 cm for installing the window sill. Add another 5 cm to the measurements of the window sill with ebb, so that there is a margin for installation in the wall.
Before visiting the store and purchasing materials, you should obtain six dimensional data:
- window height and width:
- window sill dimensions (width with length);
- tide parameters.

We prepare inventory and consumables
What do you need to install a plastic window yourself? From your inventory you will need the usual set of tools:
- building level;
- set of hexagons;
- tool for tightening screws;
- jigsaw;
- perforator;
- knife;
- pencil with tape measure.
Watch a video showing how to install a plastic window in accordance with GOST standards:
The package of necessary consumables includes: foam for installation, silicone composition, putty, screws.
For execution installation work you need to prepare the profile of the future window, handles, window sill, fasteners and ebb.
Removing the old window
If the frames are solid, the first step is to remove the elements that hold the glass. The opening sashes are removed from their hinges at the same time as the glass. If the double-glazed windows are worn out, the frames in them are loose and move horizontally, in order to avoid unnecessary problems and protect the glazing, it is recommended to dismantle them in advance.
After this, the frame is pulled out, sawed with a hacksaw in selected places. Sometimes the use of a grinder is required.
Having divided the frame into parts by sawing, they are removed with a crowbar, hammer and other auxiliary tools, disconnecting the windows from the opening, with which they have “fused” over the years of operation. If the frame is in good condition, you can do without dismantling works. But it is better to still perform this action so that you can install the new glazing directly to the wall.

The procedure for dismantling an old window sill is the same, and if it is made of wood, such a measure is necessary. The concrete structure is beaten with a hammer or a crowbar and sledgehammer are used. But if her condition is normal, you can do without a crash. But keep in mind that a plastic structure is warmer than a concrete one, and if there is a lack of heat, it is preferable to install it; moreover, a worn-out structure is not able to provide optimal contact with the new frame.
After dismantling the intermediate components, inspect, clean from dirt and, if necessary, repair the load-bearing parts of the opening.

Preparing a new euro window
If the doors open, lock them securely before installation to prevent them from accidentally opening during installation. The window must remain closed even when foaming, sealing cracks, or installing it in a frame - its flexible ribs can bend in a semicircle under the influence of foam that increases as it hardens.
Before opening the sashes, wait about 12 hours after completing installation work - this time is required for the fixing compounds to harden.
Important! Inexperienced installers make the mistake of removing the protective membrane before installing the window. But the film is required just to protect the window from damage and dirt during installation.Remove the film after finishing work related to finishing: puttying, painting, installing slopes.
Installation stages
Installation begins with marking the frame for fixing elements placed on all sides of the frame at a distance of 70 cm. If the double-glazed window is single and has light weight, you can increase the distance, but by a maximum of 100 cm. The extreme mount is mounted at a distance of 5-15 cm from the corner of the frame. But double-glazed windows having stand profile in the design, do not require fixation from below.
Fastening elements are installed in accordance with the marks on the frame. They are combined with it so that the screw passes through the iron that is in the frame (it is called a bent channel). For this, special screws designed for iron are used, 0.4 cm in size, with a tip similar to a drill.
On a note! It is also possible to use ordinary 0.5 cm screws, but then you will need to extra work, use a drill to drill 4 mm recesses for the screws, and then screw them in. They cost approximately the same, but differ in the thickness of the metal: the plates are 1.1-1.5 mm thick, while for pendants this parameter is 0.5-1 mm.
Holes are made at selected points for installing fasteners on the window opening. This action is not performed by eye, but rather a frame already equipped with fixing parts is placed at the installation site and, in accordance with the perimeter of the fastening, holes 2-4 cm deep are made in their “prints” on the outside of the opening - a stone or brick wall. The fixing parts are immersed in these holes.
The window is placed in the opening using a level, if necessary, placing wood chips under the frame. It is permissible to insert wedges exclusively opposite the transversely located components of the frame: under horizontally lying planks at the places where they intersect with the vertical ones.
Simple instructions for installing wedges: insert two at the bottom and one at the top to adjust the bottom edge and top horizontal. After that there are two at the top for fastening the frame. Then the remaining wedges on the right and left sides, top and bottom. If there is an impost, it is wedged in the same way - so that the plumb lines are parallel to one another. Installing wedges takes a lot of time - this is an important part of the installation work, on which the correct placement of the frame in the window opening in the vertical and horizontal directions depends.
The next step is fixing the glass unit in the opening.

Having adjusted the placement of the window, it is secured using anchor bolts. Anchor fasteners are more reliable, but also more expensive. Any fastening device can withstand a load of up to 60 kg - this is enough for a window. The cross-section of dowels for fastening in concrete, foam concrete, brick and shell surfaces is 6-8 mm, and the length is 75-80 mm.
At the end of the installation work, the gaps between the window opening and the frame mounted in it are foamed so that there are no cavities.
The foaming technique in the presence of gaps larger than 2 cm involves applying several layers of foam at 60-120 minute intervals for each layer to harden. This reduces the deformation of the foam mixture as it increases in volume and reduces unnecessary costs, since the excess will still have to be removed.
Important! If the temperature during work is less than +5, you need to use universal foam, suitable for all seasons, or intended for winter work.In most cases, window sills have standard parameters with the required margin; during the installation process they are adjusted to the dimensions of a certain opening. These actions are performed using a grinder (a hacksaw with small teeth will also work) and a jigsaw.
Then the trimmed part is adjusted in accordance with the substitution profile design: it is set exactly by level - using the same method as the window. As for the plugs for the window sill structure, it is preferable to install them so that they fit into the opening in the wall. To secure them, it is recommended to use special glue, and not rely on silicone and acrylic compounds.
Watch another video about the features of self-installation of PVC windows:
The window sill structure must be placed level so that a cup filled with water can be placed on the surface without it spilling. Make sure that the window sill does not change position even under excessive pressure.
It happens that the window sill is installed with a slight slope (less than three degrees in the direction of the street). The slope prevents the accumulation of condensation on the glass, thanks to it the water flows to the ground.
Having completed the adjustment and fastening, proceed to foaming and seal the space under the window sill, placing a weight on top so that the foam does not lift the structure. 24 hours after the foam has completely hardened, the excess is removed with a knife.
It happens that due to the unevenness of the window sill element, after its installation a cavity appears between its upper part and the frame. It is filled with a silicone mixture, but keep in mind that the silicone will darken over time due to the formation of mold, which will spoil the appearance of the white Euro window. Try to avoid the formation of such a defect at the installation stage. Before installing it, screw Z-shaped plates made of galvanized sheet metal to the plastic profile. Such elements will make the process of setting up a window sill easier.
Installation of slopes with platbands
On the inside of the window, wooden slats are installed on self-tapping screws 9.5 cm long, controlling their location using a level with a square.
The next step is installation initial profile, having a U-shaped configuration, with mini-screws screwed directly into the frame. This profile is intended for inserting slopes; when installing it, you need to be especially careful when joining its outer edges.

A profile similar to the letter F is attached with a stapler. Its groove must correspond to the groove of the previous one; they will hold the slopes.
After the double-glazed window is equipped with two types of profiles, slopes are installed in them.
The final step is the sequential installation of platbands: one at the top and two on the sides. To ensure mutual contact, their edges are cut at 45 degrees.
Adjusting fittings
To adjust the sashes, hexagons located next to the hinges are used. To do this, use a six-sided bat or adjust the flaps with a small wrench. Due to this, during their rotation, a position is created in which the doors can be easily closed and opened without damaging other components of the system. The doors should not open or slam shut arbitrarily; their position should remain stable.

Often, during manipulations with the sashes, there is strong contact with the locking fittings, which is accompanied by characteristic sounds. The problem can be solved by unscrewing the self-tapping screw that secures a certain fitting element and moving the latter by 5-10 mm.
Installation of ebb tides
In most cases, ebb tides are installed after all installation procedures are completed. It is recommended to mount them directly under the window: this will prevent moisture from getting into the cracks between the ebb and frame. But in some cases this is impossible to do, and the ebb is attached to the frame using miniature iron screws with a diameter of 0.4 cm and a length of 0.9 cm.

Let's calculate the costs - these are the labor and financial costs for the installation itself.
The technique of self-installation of windows involves two main types of work: dismantling the existing window and installing a new one. It will take from 0.5 to 1.5 hours to remove the old window. Installation of a new double-glazed window with medium dimensions will take approximately a couple of hours.
On average, it takes 2.5-3.5 hours to replace one double-glazed window. Working at this pace, you can install several windows at once in one day.

Thanks to do-it-yourself glazing, you can save on the services of specialists, because professionals require a payment of 2-4 thousand rubles. - for glazing one opening. When ordering this service from any company, you can spend even more if the prices are based on percentage from the price of double-glazed windows (from 10 to 40%). And if you do everything yourself in accordance with the step-by-step instructions, you will receive not only savings, but also confidence in the quality of the work performed.
Does it make sense to install windows yourself?
Self-installation of plastic profiles is not as difficult as it seems. Almost all double-glazed windows have a modular design that does not require assembly individual elements and are almost ready for installation. In order to insert and secure them in the opening, you do not have to be a professional, expensive instruments will not be required for this.

But keep in mind that the installation is carried out at your own responsibility - this means that you will have to take measurements and purchase materials yourself.
The manufacturer's warranty will apply exclusively to the glass unit and fittings. The quality of the installation work, the tightness of the seams, the correct location of the structures and the operability of the window system will be the responsibility of the person who installed the window.
If you use the services of an installation company, there is a guarantee for the work performed and Consumables will range from 1 year to 5 years.
But if you have the time and desire to install a plastic window yourself, do not be afraid: you will cope with this task if you follow the step-by-step instructions. You can install the glazing yourself, enlisting the help of a relative or friend to hand you the tools.
You don’t have to pay professionals, because their services are not cheap, and the work of installing a new window will not last much longer than if it were done by specialists.
Another detailed video on how to install a plastic window correctly:
Common Mistakes
Beginners installing for the first time plastic double glazed windows, often make the same mistakes. Such defects are not critical, but can affect the service life and ease of use of the window system.

- The window profile is installed with glazing beads on the street, thereby opening the way for intruders to enter the house. To get into the room, unauthorized persons only need to remove the glazing beads; removing the double-glazed window will not take them much time and will not require much effort.
- Installation is not always performed correctly, as is, without checking or adjusting the level; Because of this, malfunctions in the operation of the structure occur.
- Closing the cracks construction foam, ignore the instructions supplied with it. Many people do not even suspect that foam is destroyed under the influence of sun rays, and this is stated in the instructions. To maintain the tightness of the window system, foamed cracks must be covered with finishing material.
- The glass unit is fixed exclusively with mounting foam without additional fasteners in the opening. A similar mistake, if there is a quarter opening, can cause cracks to appear on the slopes, due to the fact that the foam cannot provide full fixation of the frame, and the frame, shifting, will begin to break the slopes. A double-glazed window installed in an opening without a quarter, over time, under the influence of vibration and other influences, may even fall out.
 Read about: the main causes of foggy windows and ways to combat them.
Read about how to properly install a thermostat on a battery.
It is undesirable to use an iron cutter when dismantling any wooden structures, including a worn frame - this tool not suitable for this job. Thin disk with a rotation speed of 7 thousand revolutions per minute. easily damaged by a twig - this is very dangerous for the performer. The use of a toothed disc should also be abandoned - for the same reason.
Until the foam has completely hardened, do not install a handle to open the doors so that household members do not unknowingly ruin your work.