How to install an enamel shower tray. Strengthening the shower tray. Shower cabin made from scrap materials

Read also
From the author: Hello, friends! Many of us, when entering the bathroom, regularly dream that it was at least a little more spacious. This desire is especially pronounced among those who live in the so-called “Khrushchev” or other small-sized apartments. Agree when free space in the bathroom there is only enough space for one person to squeeze in (but not bend over) - this is not the most comfortable state of affairs. There is little pleasure in being in a cramped space, and cleaning such a room causes many problems.
That’s why in such cases we try to somehow optimize the placement necessary elements in space. Of course, it is impossible to completely give up or shower. But modern market, fortunately, gives us quite a few options for solving such problems. For example, you can purchase a wall-hung toilet instead of a regular one, saving about 15–20 centimeters of space. Or read our article today and learn how to install a shower tray in your bathroom to replace a bulky bathtub with a relatively compact shower enclosure.
You can say that you have seen shower stalls in the store and they do not seem small at all. This is true when it comes to closed models. They have a floor, ceiling and walls, as well as many built-in elements to perform a specific set of functions - for example, hydromassage. Such cabins are essentially a separate room. Of course, their sizes are appropriate.
We are talking about a completely different type of equipment. A shower corner can also be called an open stall. The role of the side elements is performed by the adjacent walls of the bathroom; this corner is closed using special panels and a door (usually a sliding one). At the bottom there is a tray with a drain hole. And there is no ceiling at all.
Of course, in terms of versatility, this type of cabin is significantly inferior to closed ones. Simply put, you are unlikely to place a rain shower and built-in aromatherapy equipment here. But such a corner copes well with its intended purpose. In addition, the space savings are quite significant.
At the same time, the cost of such a design is much lower than closed cabins, and installation is much simpler. If you follow the instructions, you can handle it without any problems. So sit back, and we will begin to describe what you have to do.
Types of pallets

The first step, of course, is to do right choice in the shop. If you come there unprepared, your eyes may run wide from the variety of models. Therefore, it is advisable to decide in advance on the main desired parameters. For example, with the material from which the equipment is made. It could be:
- acrylic. This pallet is characterized by low weight, smoothness, excellent appearance and durability. It can fit into any design as the choice of colors and shapes is quite large. The acrylic tray is pleasant to stand on because it is not cold. Very easy to install and easy to repair. If you scratch acrylic or cause other mechanical damage to it, everything can be corrected with sandpaper and special tools for repairing acrylic. As disadvantages, two nuances can be noted. Firstly, it is advisable to choose not the cheapest option, since otherwise you may end up with low-quality acrylic that will quickly turn yellow or fade. Secondly, you will have to take a close look at cleaning products - not all of them can be used to care for acrylic. For example, abrasive ones are not suitable here, as they will completely ruin the surface. Therefore, for cleaning it is necessary to purchase polishing options;
- enameled steel. Here there will be no problems with maintenance; any cleaning agent will do, even an aggressive one. In addition, enameled steel has good strength and low cost. It is resistant to scratches, but chips appear on it quite often, so the surface requires careful handling. Other disadvantages include the always cool surface, as well as a loud ringing sound when water falls. However, you can purchase a special rubber mat that fits into the tray. Thus, you will receive protection from chips, coolness, and uncomfortable sounds;
- ceramics. Very easy to clean, strong and durable, not too susceptible mechanical damage. It has an excellent appearance, looks aesthetically pleasing and beautiful. The installation procedure is quite simple, the only difficulty is the large weight of the ceramics. For example, a square pallet with dimensions of 0.9×0.9 meters can weigh up to 46 kg. In addition, the disadvantage is the high cost. If you compare it with acrylic, the difference will be quite significant;
- conglomerate. This material is also called artificial stone, it is made up of 80% marble and 20% other ingredients such as plastics, dyes and various resins. It looks exactly like real marble, which is an undeniable advantage. In addition, the stone, although artificial, is durable and strong: it is difficult to scratch or split, and it can withstand temperature changes well. It also tolerates cleaning easily and is not afraid of chemical influences. The conglomerate is smooth and not cold, which gives special pleasure during its operation. In addition, it is resistant to fungus and various bacteria. All in all, excellent material, the disadvantage of which can only be called a very high cost;
- a natural stone. Typically, marble or granite is used as the material for shower trays. They have an excellent appearance, are aesthetically pleasing and elegant, durable and resistant to stains, can store heat, and also soften the sound of water when it falls. It would be pleasant to stand in such a tray, since it is very comfortable to the touch, but the matter is spoiled by the fact that the wet stone surface is quite slippery. Therefore, you have to use a rubber mat to ensure your own safety. Another disadvantage is the difficulty of care. Firstly, only cleaners with low alkaline ingredients are suitable for stone, otherwise the color of the material may change. Secondly, without proper treatment, stone absorbs moisture, so it must be frequently polished and special water-repellent impregnations applied. In addition to maintenance problems, a stone pallet can also be off-putting due to its high cost. However, if the budget allows and the nuances of operation are not intimidating, then purchasing such a pallet will be completely justified from the point of view of comfort and aesthetics. The material looks simply luxurious. Although in a very small bathroom, a stone structure can make it feel bulky.
We've sorted out the material. Now let's talk about other possible differences:

- form. The pallet can be in the form of a square, rectangle or semicircle with one acute corner. For small rooms The first and third options are optimal, since they are the most beneficial in terms of space saving. The rectangular shape is larger, but it is more comfortable to be in it, since it assumes relative freedom of movement. When choosing, also take into account the shape of other elements of the bathroom: sink, toilet, etc. For harmonious interior all these items must be combined. That is, it is advisable to equip a semicircular sink with a semicircular one;
- size. There are several popular standard types of pallets that are most often found in stores. These are squares with a side of 80, 90 or 100 centimeters. Before going to the store, be sure to take careful measurements of the room to know exactly what dimensions will optimally fit into the space;
- depth. Small pallets are the most popular. Firstly, they look more elegant and compact. Secondly, they are more convenient to use. In particular, it is much easier for older people to climb into such a structure than to overcome high sides. On the other hand, functionality may be important to you. Deep tray can be used as a small bath for bathing the smallest family members or, for example, a cat. They are also suitable for soaking laundry if necessary. So make your choice based on your family's needs;
- presence of a seat. This again depends on the needs. In small shower enclosures, the seat can become a very annoying element as it takes up some of the space. On the other hand, for older people, its presence can greatly facilitate the procedure of taking a shower;
- siphon. Before purchasing it, be sure to measure the diameter of the drain hole. It can be in two versions: 50 or 90 millimeters. The siphon must be taken accordingly.
Now you have all the necessary information, you can safely go to the store to do your shopping and then begin the installation work.
Preparing the premises
To ensure that the pallet fits correctly and its operation does not cause problems, you first need to prepare the room. First, decide on the exact location of the structure. In this case, you need to focus on where the drain hole is located.
You need to place the pan so that the drain holes in it and the sewer are closer to each other. Too much distance will require the use of additional adapters, and this always leads to reduced connection reliability.
Secondly, it is necessary to ensure high-quality waterproofing of both the floor surface and its joints with the walls. Otherwise, your new acquisition may cause a lot of problems for your downstairs neighbors and, ultimately, for you.
Thirdly, it is very important to make the area of the floor under the pallet as level as possible. If the structure is distorted, the drain may not work well, so this aspect should be taken very carefully. The surface can be leveled using either a screed or a self-leveling floor. During work, be sure to check the levelness using a building level.
If for some reason it is not possible to perfectly level the floor, it doesn’t matter. The problem can be solved either by adjusting the legs of the pallet, or by placing plastic blocks under them. Although the latter option, of course, worsens the stability of the structure.
Installation procedure

So, everything has been purchased, the premises have been prepared, and we are finally starting to install.
- Turn the tray upside down and install the feet included in the kit. The space between the bottom and the floor will subsequently be protected by a special panel - measure its height and adjust the legs so that they are the appropriate length. For this you will need wrench. Turning the leg clockwise will shorten it, and counterclockwise will lengthen it. During these works, do not remove from the pallet protective layer so that the surface is not scratched.
- Then attach special brackets along the edges of the structure to which the side panel will be fixed.
- Place the pallet in the intended place and use the building level again to check the evenness of the surface. If there is any deviation, adjust the legs accordingly until the levelness is perfect. Next, check that the side panel will fit between the pan and the floor, but don't secure it yet.
- Now we are connecting to the sewer. We insert the siphon into the corresponding hole in the pan. Then we fix a flexible hose or tube in it. We attach an elbow to its other end, which, in turn, inserts into the hole sewer drain so that it goes in completely. By the way, instead of a siphon, sometimes just a hose is used, but in this case it should be bent using special plastic components included with the equipment. Curved design required to prevent penetration unpleasant odors from the sewer drain into the bathroom.
- Now take a waterproof silicone-based sealant and a special gun for it. Treat all places where sewer drain elements meet. That is, you need to seal the connection of the siphon with the pan and the hose, the hose with the pipe and the pipe with the sewer. Then wait a couple of hours for the sealant to cure. Only after this proceed to further work.
- Check the functionality of the siphon. Pour enough into it a large number of water. After it leaves, carefully inspect all connection elements and the floor underneath them for leaks.
- If everything is in order, then once again check the levelness of the installed and connected pallet using a building level.
- We apply assembly adhesive or the same sealant to the sides of the pallet adjacent to the wall, thereby ensuring a strong connection. In the same way, the legs should be glued to the floor so that during operation the pallet does not move on the floor. Wait for the fixatives to dry.
- Then we fasten sidebar on pre-installed brackets, at the end of the procedure we press on special clamps.
- Finally, we need to treat with waterproof silicone sealant all joints between the pallet and the walls and floor. To avoid staining the equipment, apply masking tape along all joints, that is, on the bottom and sides of the panel, as well as along the perimeter of the surface of the pallet. Fill all existing cracks with sealant and immediately tidy up the seam using a narrow putty knife or just a wet finger. Without waiting for the silicone to dry, remove the tape.
It remains to wait a day until the sealant completely hardens. After this, the pallet is completely ready for use. But, of course, you will have to install other elements of the corner: for example, vertical panels and a door, or hang a special curtain - in general, provide the room with protection from flying water splashes.

You can read detailed instructions for installing a shower stall in other articles on our construction and repair portal. And now you can handle the pallet easily and simply. The main thing is not to forget to constantly use a building level and waterproof sealant during the work. These two simple things will make your work reliable and high quality.
To get more visual information, watch the video, the link to which is attached just below. This will help you gain an even clearer picture of the work being done. And we say goodbye to you temporarily and wish you every success in arranging your bathroom!
Dismantling the bathtub and replacing it with a shower stall is a very common solution today, allowing you to give a small bathroom a more or less decent look.
This work is not difficult and to cope with it, you do not need to be a hereditary plumber. This article will teach you how to install a shower tray.
Shower trays differ in material and shape. Here's what they're made from:
Polymers
Plastic pallets are purchased most often today, and primarily because of their affordable cost.There are other advantages: light weight (simplified delivery and installation shower tray) and low thermal conductivity, due to which the material does not burn with cold.
Disadvantages: polymers are easily scratched and do not have high strength.
Pallets are made from 3 types of plastic:
- ABS plastic with thin layer acrylic coating: This is the cheapest option, but it is characterized by complex repair technology in case of scratches.
- Acrylic: It costs a little more, but scratches can be removed by simple sanding.
- Kvaril: acrylic with the addition of quartz is characterized by high strength and scratch resistance.
Steel or cast iron with enamel coating
A tray made of this material is more expensive than a plastic one, but it is stronger and more durable, and it is much more difficult to scratch it. But there are also disadvantages: standing on cold metal with bare feet is quite unpleasant, in addition, cast iron is too heavy, and steel “rings” loudly under streams of water.
 In some cases, it is more convenient to make a pallet yourself rather than buy a ready-made one. In this case, it will be the size that you yourself want and there will be no restrictions. — tips, materials, current trends.
You will find useful tips on choosing a shower stall.
In a small bathroom it is impossible to install a shower and a bathtub at the same time, so you have to choose one. At this link you will find comparative characteristics baths and showers. This will help you make your choice.
Ceramics
Porcelain and earthenware pallets look very stylish and their advantages are not limited to this. The glaze that covers such products remains smooth and shiny for a very long time, unlike enamel, which is prone to abrasion, loss of density and absorption of dirt.
The disadvantages of ceramic trays can be considered high price and fragility, which may cause the product to crack if handled or installed carelessly.

Ceramic square shower tray LuciaSalud – Spain
Marble and other types of natural stone
Expensive luxury pallets. Such products are chosen by those who are willing to spend money on exquisite furnishings.
Design features
The shape of the pallet can be any, and its choice depends entirely on the preferences of the owner. If there is not enough space, a semicircular shape or a quarter circle (for corner installation) will be optimal.
The pallets also differ in depth. Products with a maximum side height (35 cm) can be used as a miniature bathtub, for example, for bathing children.
But if there is a person in the family with limited mobility, it is better to install an extra-flat tray with a side height of 6 to 10 cm - it is much easier to climb into it.

Correctly aligned pallet
Features of installing acrylic shower trays
Due to their low strength, acrylic pallets are installed on a metal frame supplied in the kit. In some models, the frame does not provide adequate support for the plastic bottom in its central part.
Under the weight of the user, the plastic pallet is deformed, so sealing the seam between it and the wall with sealant may not give the desired effect.To prevent the seam from coming apart, the side of the pallet should be screwed or glued to the wall.
Installation of shower trays made of ceramics, cast iron, steel
How to install a shower tray?
Ceramic The pallets do not have adjustable legs, so the floor at the installation site must be level and strictly horizontal. Due to the lack of mounting clearance under the product, access to the pipes without dismantling it will be impossible, so it is very important to assemble all connections between pipeline elements as efficiently as possible and seal them well.

Pallet installation
Metal pallets usually installed on a brick podium. Its height depends on how much space is required to accommodate the sewer pipes. You can begin installing the pallet only after the solution has completely dried. brickwork, which usually takes a couple or three days.
The product is installed on a layer of cement-sand mortar and, using a building level, is brought into a strictly horizontal position. After connecting the pan to the sewer, the seam between it and the wall is filled with sealant, and the brick podium is covered with tiles or plastic panels.
Low-end steel pallets can bend greatly due to their small wall thickness, so they, like acrylic ones, are recommended to be screwed to the wall. You can place bricks or a piece of steel pipe under the bottom.DIY technology for making a brick shower tray
Someone who loves to design and implement design ideas original character, can make the pallet yourself. In this case, the owner himself can choose both the shape and color scheme.

Construction of a brick pallet
To install a homemade pallet, you will need to purchase a drainage device - a ladder. We will make the side of the pallet from brick.
It is better to purchase a high ladder, since such devices are characterized by high throughput.
Base installation sequence
The arrangement of the pallet is carried out in the following order:
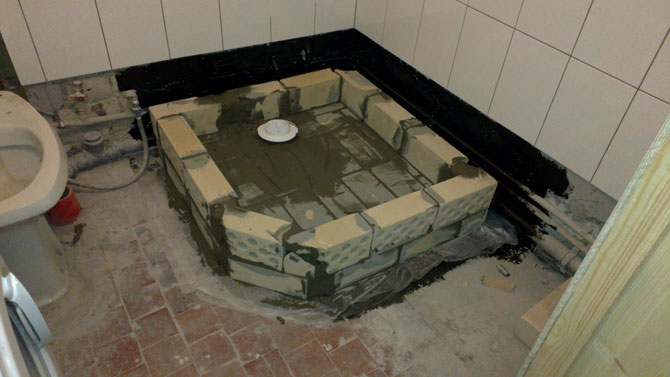
- At the work site, the floor covering along with the screed is knocked down, reaching the concrete slab.
- A brick wall is laid along the border of the future pallet so that it is at least 50 mm above the drain hole (depending on the height of the drain).
- The ladder is disassembled into lower and upper parts (they are connected by two flanges). Bottom part connected to a sewer pipe with a diameter of 50 mm, laid with a slope of 3 cm/m. Usually the ladder is located in the corner. Remember that all connections will be inaccessible, so they need to be sealed not only with rubber cuffs, but also with silicone sealant. The pipe and drain must be fixed with cement-sand mortar.
- Next, the site is covered with sheets of extruded polystyrene foam 50 mm thick, in which grooves are cut for all elements drain system.
- A layer of concrete approximately 40 mm thick should be laid on top of the expanded polystyrene - it should reach the flange of the ladder.
- Hardened concrete is covered roll waterproofing, for example, roofing felt (fused with a gas burner) or “Isoplast”, with mandatory release onto the walls and brick side at least to the height of the subsequent layer of screed. For reliability, it can be laid in two layers. Above the drain, a hole is cut in the waterproofing material with a diameter corresponding to the internal diameter of the flange.
- The upper part of the ladder is installed, and the waterproofing will be pulled together by two flanges.
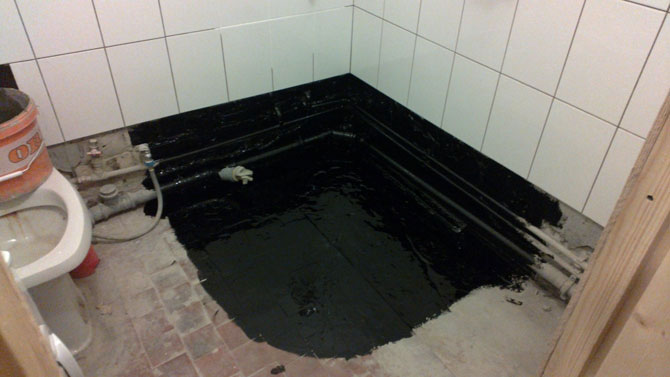
Having installed plastic beacons (to ensure a slope towards the ladder), lay a layer of waterproofing cement-polymer screed (for example, Ceresit CR65). Its surface should be lower than the drain grating by the thickness of the tile with glue. Along the corners along the entire perimeter, using adhesive mastic on a polymer-cement basis, you need to glue a waterproofing tape.
If we define without enthusiastic bias constructive principle shower hydrobox, then it is a combination of a tray and partition panels, and all other elements, including numerous functionalities, are only additional extensions integrated into it.
The configuration and dimensions of the shower tray are selected for maximum adaptation to the bathroom interior, and only then are they determined color palette walls and a variant of the door opening system. The installation of a shower tray determines the entire course of further activities for the preparation and commissioning of the shower cabin.
Variety of shower trays
Designers and manufacturers have done their best - there are several options for choosing pallets. The most common classification methods are as follows:
- By thickness:
- Super flat pallets, up to 100 mm thick;
- Flat (from 100 to 180 mm);
- Deep (over 180 mm);
- Some models of hydroboxes have a depth of up to 460 mm.
- By form:
- The outline of a circle, most often a quarter circle;
- Square and rectangular;
- Polygonal, for example, pentagonal (pentagon);
- Complex exclusive configuration.
- In terms of size, the range of pallets is represented by a minimum size from 70 cm in radius or the length of one edge to 130 cm.
- According to the material of manufacture:
- made of cast iron;
- become;
- acrylic and
- ceramics.
Since the method for installing a shower tray is somewhat different for products made from different materials, we will give brief characteristics standard pallets.
Some features of cast iron, steel, acrylic and ceramic pallets
- Cast iron pallets are available in enameled versions. Very strong and durable. Their heavy weight gives them stability during installation. The supports placed around the perimeter are quite sufficient; the central part is left in a suspended position.
- Steel pallets are made from of stainless steel or alloy steel, which is then coated with enamel. Compared to cast iron, they are cheaper and lighter. General disadvantage of steel pallets:
- Under the water jet they rattle irritatingly;
- Over time, the enamel of the coating corrodes and begins to absorb dirt, losing its external luster.
- Acrylic pallets are the most affordable in price, which is why they are the most popular. Among the advantages of acrylic water collectors are the following:
- Fast heating when hot water is supplied;
- Acrylic does not age and does not darken over time. Minor scratches are not critical on it and, if necessary, can be easily repaired;
- Due to high processing technology, a large number of models are produced various forms, size, depth and color. The disadvantages of acrylic structures include the need for additional reinforcing reinforcements when installing acrylic shower trays, since they bend under the user’s weight. Pallets reinforced only along their perimeter can burst, so for these structures an additional metal support is installed in the central part.
- Ceramic trays, like their cast iron counterparts, are massive and stable. Made from sanitary ware, they look beautiful. But they are cold and crack even if the shower head is accidentally dropped.
It is important! Pallets are available with smooth and corrugated surfaces. Corrugation can be different - meshes, rays, small patterns, “pimples”, which gives the surface anti-slip properties. Sometimes such a surface is ignored, mistakenly believing that smooth surface is of higher quality.
Installation of shower trays
Most shower trays (cast iron, steel, acrylic) have a set of adjustable legs in their design, designed to simplify adjustable leveling of the shower stall.
The exception is marble and stone monoliths. Therefore, the process itself, how to properly install a shower tray, causes more difficulties in its preparatory part, which includes the following activities:
- Preparing the site for a shower stall;
- Elimination of uneven floors and walls;
- Repair or replacement of utilities, including electrical wiring;
- Preparing the floor and sewerage for installation of the cabin drainage system.
Against the backdrop of this amount of work, installing a shower tray no longer seems like a global problem. Several are used in various ways their placement in the bathroom. Pallets are mounted not only on a metal frame or plastic supports, but also simply installed on flat surface, as you have to do for ceramic trays. For massive cast-iron shower trays, craftsmen use their installation on a “brick cushion” laid out in place, which not only distributes the large weight of the shower system over its entire area, but also, instead of flimsy legs, creates the necessary free working space under the bottom for placing drainage elements.

The method of installing a shower tray on bricks allows the use of conventional solid building bricks and blocks made of foam concrete or aerated concrete.
In a nutshell about installing a pallet on bricks
 Sequence of work when installing a pallet on a brick cushion:
- Leveling the floor in the brick laying area. Cement mortar and putty are used.
- Marking the perimeter boundary of the pallet outline for laying bricks.
- Mixing cement mortar for laying bricks.
- Apply the solution to the floor using strokes of a spatula along the outline of the pallet.
- Laying bricks along the contour of the pallet. As many layers of brick are laid as provide the height of the drainage system with a siphon and outlet pipe. When laying bricks, you do not need the qualifications of a professional mason, but bricks should be laid according to all the rules of building science so that the masonry retains its strength for a long time. The thickness of the seam should be uniform, within 5-7 mm. This is already enough to ensure the strength of the structure.
- Plumbing installation.
- After 2-3 days the pallet is installed. It is laid on an applied layer of cement mortar.
- Check the level for horizontal alignment. It is necessary to check at several points so that the measurement statistics are more plausible.
- Connect all plumbing connections.
The process of installing a shower stall requires the mandatory fixation of the tray, without which it is impossible to secure the stall, as well as equip it with doors.
The shower cabin cannot be installed without first fixing the tray
Trying to avoid this procedure, some prefer to purchase pre-assembled units, without taking into account important nuances, for example, how to then transport the bulky device, and whether it will fit through the entrance and interior doors of an apartment or house.
Those who doubt that the device will fit into the overall design concept and are considering possible options for using non-standard materials also prefer to install a shower tray on site.
For this purpose, you can turn to specialists for help, or find out on your own how to install a shower tray, and thereby save part of the family budget.
How to choose a pallet
What types of pallets are there?
Most often, shower enclosures have trays of limited area. The shower room can be equipped with many functions - hydromassage. The equipment is in demand due to the wide price range in which the cabins are presented.
You will have to pay a large sum of money for a pallet made of marble, but if you do not have the skills to work with the material, even during the installation phase of the device, it may crack. From the point of view of the design component, ceramics compare favorably with other samples, but they are considered the most fragile and unreliable. At the same time, the price of such models remains at a fairly high level.

When choosing a pallet for self-assembly, craftsmen advise paying attention to devices made of acrylic or steel. These are the products that can be found today on construction market in 85% of cases.

Although you may find that when using an acrylic pallet that it flexes somewhat under the weight, this can be easily eliminated with the help of adjustable legs, construction brackets, and other special fasteners.

If this nuance is not corrected in time, the product may crack. Therefore, when purchasing this model, immediately discuss with the seller the issue of selecting an appropriate additional stand for the equipment.
Choosing a manufacturer
Even if the pallet is marked with a well-known foreign brand, check where the structures are assembled; in most cases, foreign parts are assembled by Chinese craftsmen. Therefore, do not chase a foreign device; practice shows that last years, domestic producers, wanting to get competitive advantages, produce plumbing fixtures at the proper level.
Of course, we are still a long way from Italian and German brands, but with economy-class models the Russian manufacturer can compete with success, and the cost of the latter will pleasantly please the wallet.
Installation of an acrylic shower tray
Preparatory stage
The pallet is installed in the designated place after everything renovation work in the bathroom have already been completed. We are talking not only about decorating the walls with ceramic tiles; no problems should arise, first of all, with sewerage and electrical wiring. After all, almost all shower fixtures are connected to all existing communication systems.
Ideally, electrical wiring hidden in the wall should contain the smallest number of twists. To supply and remove water, it is better to use pipes made of plastic, which has proven itself to be the most reliable, flexible and high-quality material.
Before getting started, carefully read the step-by-step instructions for the device, and also decide on the required number of parts.
Features of the installation stage
The following tools will help you make a shower tray:
- FUM tape;
- silicone-based sealant, which can be replaced with an adhesive if it is included with the main product;
- mixer and siphon.
If you plan to place the pallet on legs, they are secured with locking bolts. Instead of legs, ordinary bricks or supports made of plastic can be used, which are poured cement mixture at a height slightly higher than the drainage height. If this nuance is not taken into account, the wastewater regime may be disrupted.
 Accurate fixation of the pallet is important
Next, glue the base base of the device to wall structure rooms. If not included special remedy, “Moment” glue is suitable, connecting together objects in contact with moisture.
Apply sealant to the seam between the pallet, this will help prevent liquid from penetrating into the formed joints.

Attach the mixer to the drain opening in accordance with the diagram stated in the instructions. To protect the device from leaks, seal the screwed parts using FUM tape, turn on a small water pressure and check the device for leaks, carefully examining each section of the unit with your finger.
Making your own base
How to prepare a sewer and lay out a barrier?
It is not necessary to buy a pallet in a store; if you wish, you can arrange it with your own hands. Having learned how to install plumbing, the rest of the repairs in the rooms and attic will seem like a mere trifle to you.
The procedure begins with waterproofing a homemade shower at a height of about 30 cm. Prepare sealant, fiber rubber or other products presented in wide range at a hardware store. It’s good if the sewer pipe is located in the center of the future pan, this simplifies the creation of a drain.
Make sure that the parts adjacent to the sewer are well glued, and make sure there are no cracks or crevices that could cause liquid leakage. The outlet pipe must rise above the base flooring by 12–15 cm. To prevent the part from becoming clogged with debris and dirt, close the pipe tightly.

To install a shower tray, place a barrier along its edge - a border corresponding to the walls of the planned shower stall. The height of the “fence” must exceed the level of the pipe by at least 5 cm.
Smooth sharp corners from brick using cement mortar. The mixture can be kneaded by adding cement and sand in a 1:1 ratio to a basin or bucket. Stir the resulting mass with a trowel, additionally pour in liquid glass, which will provide the solution with water-repellent characteristics.
Filling the bottom
It's time to move on to pouring the floor, which includes three stages of execution. First, use a cement mixture marked “self-leveling” on the packaging; the layer of the mixture should reach 5–8 cm. Wait for the material to dry and apply waterproofing, it can be “Fiberpool”, “Decoprof”, for the best effect, apply the product in 2 layers.

When this material has hardened, mix the glue intended for adhesion of the tiles to the surfaces with the cement mixture. Apply the mixture in concentric circles, maintaining the technology of increasing the height starting from the drain hole. This work is exquisite and cannot be rushed. It is necessary to ensure a uniform radius of curvature; a sharp difference cannot be hidden under the finish.
Now wipe it cement coating, your goal is to achieve a smooth plane and the same level of height.
Floor finishing
If you decide to mount the shower tray at an angle, it is better to finish the floor, which will hide all visible imperfections. Glass mosaic, which is produced specifically for bathrooms, has a number of properties that distinguish it from other types of mosaic, for example, it has anti-slip characteristics and does not lose color saturation and shades over time. Of course, working with small elements is more difficult than working with tiles, but the end result will please you.

After the repair work is completed and the shower cabin is installed, wait a few days and enjoy your own creation inside the structure.
Conclusion
When getting started, remember that incorrect installation of the shower tray can lead to gradual destruction of the base, which means everything will have to be redone.
Professionals advise when installing a structure that rises above floor surface, build a comfortable step that will protect you and your household from falls and injuries.
In this article we will talk about how to make a shower tray with your own hands from available and inexpensive materials with a simple construction tools. The topic of the article is relevant because, despite the abundance of ready-made pallets on sale, the price of such products is high.
Again, only by building and finishing the shower enclosure with your own hands can you ensure that it optimally matches the interior decoration of the room. So we found out that self-construction guarantees a number of obvious advantages, it remains to decide how and what to build from.
Selection of building material
Before you make a shower tray with your own hands, you need to decide what construction and finishing materials should be used.
The products offered for sale are made of stamped steel, cast iron, acrylic, ceramics, natural stone etc. Unfortunately, all of the materials listed are not suitable for making your own pallet. The only thing you can use to build a pallet bowl yourself is concrete, followed by lining with ceramic tiles.
The advantage of using concrete is the ability to give the bowl any shape, even the most complex shape. In addition, if, when facing the bowl, you use ceramic tiles used to finish the floor, the constructed pallet and the room will be stylistically perceived as a single whole.
So, we decided that we will use concrete and tiles; all that remains is to determine the characteristics of these materials.
Concrete proportions
![]()
Traditionally, concrete is a mixture of cement, sand and water with the addition of one or another aggregate. For example, in the manufacture of structures in contact with water, crushed stone is used as a filler since it has low porosity and practically does not absorb moisture.
Tip: To give the concrete product maximum hydrophobicity, “liquid glass” can be added to the solution along with water at the mixing stage.
But in this case, the rate of setting of the solution will significantly accelerate.
The ratio of ingredients in the solution is determined by the brand of concrete. For example, concrete grade 200 (most often used in individual housing construction) is made from 1 part cement, 2.6 parts sifted dry sand and 4.5 parts crushed stone (fraction no more than 2-2.5 cm).
For the production of concrete, Portland cement with a grade of at least M400 is used.
Type of finishing materials used

The following requirements apply to tiles:
- Safety- provided with a rough surface texture;
- Hydrophobicity- ensured by a low degree of porosity;
- High fracture strength- ensured by greater thickness of the material compared to wall tiles.
Cladding materials that meet the listed criteria can be purchased at any building materials store.
Tip: Considering that the price of tiles is high, you can save money and purchase tile battles.
Broken tiles are much cheaper and at the same time much easier to lay on surfaces with complex shapes.
Construction works
After we have decided on the choice of construction and finishing materials, we will consider how to install a shower tray with our own hands. The construction of the pallet is not particularly difficult, however, it is better to plan the arrangement of the bathroom during a major renovation.
The installation instructions include the following steps:
- Preparing the base of the floor:
- First, let's determine the configuration and dimensions of the bowl.
- Along the perimeter of the future pallet, we remove the old floor covering, taking about another 20 cm on each side.
- On the cleaned base we carry out waterproofing work, namely, we cover the surface with a layer of bitumen mastic.
Important: If the base is old and its surface is crumbling, before applying mastic we use special deep penetration dust-removing impregnations, such as concrete contact.
Impregnations of this type penetrate into the porous structure of concrete and polymerize there, resulting in a denser base thickness.
- We prepare engineering communications.

Preparation of communications consists of placing a drain at the place where the drain is expected to be in the bowl.
Polypropylene (gray) pipes with a diameter of 50 mm can be used as a drain pipe. You can select a siphon (drain) specifically for the socket of these pipes, which is installed directly into the concrete.
Important: When connecting the sewer pipe to the drain, you need to bring them to such a height that the plane of the bowl has a slight slope towards the drain, and then the water will flow away by gravity.
- Let's start construction:
- First of all, we arrange the formwork on a pre-prepared foundation.
For formwork you can use various sheet materials not subject to rapid destruction upon contact with water. For example, formwork can be made from laminated plywood or fiberboard.

Considering that the pallets are mostly oval or semicircular, for formwork you can use strips of old wide plastic lining. This material bends well, and therefore the formwork can be given any shape. Moreover, a lining width of 25 cm is enough to fill a high side.
We install one lining opposite the other, bend it at the desired angle and fix it with dowels and clamps.
- In the internal volume of the formwork we lay out a reinforcing mesh made of steel wire with a cross-sectional diameter of at least 3 mm.
- Next, prepare the solution in accordance with the specified proportions.
- We pour the solution into the formwork in portions and immediately level it so that it penetrates into all the cavities and so that there are no voids left.
- Cover the top with concrete plastic film and leave for several days for it to set.
- After 2-3 days, we dismantle the formwork.
- Prepare the solution and fill the bowl 2 cm below the level of the sides of the drain.
- Cover the concrete with film to prevent it from cracking and wait 3 days. Then we remove the film.

- We stretch cords from the sides of the constructed barrier to the edges of the drain hole, which will serve as a guide.
- Cooking cement-sand mortar without crushed stone at the rate of 1 to 2. Mix “liquid glass” into the solution.
- We draw an inclined plane along the cords with a solution.
Important: To prevent the solution from flowing, make it thick.
- After the constructed bowl has dried, cover it thin layer"liquid glass" As a result, the structure will be hydrophobic and the concrete will become more durable, since it will not release all the moisture outside before the allotted time.
- Tiling works.
- Apply to small areas pallet tile adhesive with a layer thickness of 5 mm.

The photo shows an example of tiled cladding
- We lay the tiles over the layer of glue so that the pieces of ceramic adjoin each other with a gap of 2 mm.
- We immediately level the surface so that some pieces of tile do not protrude relative to the surface of other pieces.
- After the tiles have been laid, but the glue has not yet dried, take a match, go through all the gaps and pull the glue out of them.
- We fill the resulting gaps with tile grout.
Conclusion
So, we have talked in detail about how to build a shower tray. Still have any questions? We recommend watching the video in this article.
Bathroom renovations often involve replacing plumbing fixtures. Installing a shower cabin with your own hands is possible, but if your budget is limited and there is no money to buy an expensive shower box or bathtub, you can make a shower tray with your own hands.
This solution also allows you to show your own individuality and creativity.
- metal;
- acrylic;
- cast iron, etc.

But it is not always possible to install such a tray in the bathroom.
In old buildings, bathrooms are very small, and in order to fit all the necessary plumbing there, you can make a small and unusually shaped shower tray from brick, concrete or tile.
How to make it yourself
To make a shower tray yourself, you need to carefully prepare the place where this structure will be.
Important! Before installing the shower tray, it is necessary to carry out high-quality waterproofing of all surfaces that are in close proximity to the planned structure.
Made of brick and concrete
One of the most common shower trays that are made are those made from brick and concrete.
Such pallets can be made of any shape and size. A tray made of concrete and brick is an excellent alternative to an expensive shower box.
Materials and tools
Materials and tools required to construct the pallet:
- brick;
- cement;
- plaster lighthouse;
- metal grid;
- waterproofing mixture;
- trowel;
- drill;
- mixer attachment;
- sand;
- paint brush;
- roulette;
- level;
- pan drain;
- self-leveling mixture;
- putty knife.
Pallet installation
In order to make a shower tray with your own hands, you need to properly prepare the base.
 Photo: site preparation
 It is better to make the pallet before the walls and floor are completely finished. In places where the pallet adjoins the wall, it is also necessary to treat the wall with waterproofing to avoid the appearance of mold.
 Photo: waterproofing
The waterproofing is applied with a paint brush in a thin layer, first under the screed, then on top of the screed and immediately before the cladding.
To keep the floor in the shower warm, you can lay it under a finishing screed. electrical system"Warm floor". Such a system is installed not only under the pallet itself, but also around it.
 Photo: heated floor system
After completely dry After the first layer of waterproofing, you can begin to form the contour of the brick shower tray.
 Photo: brick outline
Both ordinary brick and silicate brick are suitable for this. The brick is laid on a cement-sand mortar (or a special mixture that is sold in any hardware store). It is also necessary to lay a metal mesh on the base so that the base is very strong.
 Photo: water drainage system
Important! The water drain must be of high quality, since once the construction of the pan is completed, it will no longer be possible to replace it.
After this, you can install construction beacons and pour rough screed. For a rough screed, you can use a cement-sand mortar with the addition of crushed stone.
 Photo: screed
The pouring area is small and a trowel or spatula is used to level the surface. The solution must be compacted using a trowel, immersing it edgewise into the solution with precise movements.
After the rough screed has dried, the surface must again be treated with a waterproofing mixture. This is done to prevent moisture from getting into deep layers of concrete or onto floor slabs.
 Photo: waterproofing again
Also high-quality waterproofing will help prevent the appearance of mold and mildew not only in the bathroom, but also in adjacent rooms.
Video: waterproofing a tile shower tray
Then a self-leveling mixture must be applied to the dry surface. You need to make a smooth depression around the drain so that the water drains smoothly. It is better to purchase a high-quality metal water stack.
When the layer of self-leveling mixture has completely dried, you need to apply waterproofing again. This layer of waterproofing must be applied with particular care, especially where the floor meets the walls and around the water drain.
For special safety, it is better to make the sharp edge of the pallet smooth, semicircular.
The next step is to line the shower tray.
DIY tile tray
To cover the pallet, you can use ordinary ceramic floor tiles, but a mosaic will look more beautiful.
Materials and tools
Materials and tools required for tiling a shower tray:
- floor tiles or mosaics;
- adhesive mixture for laying tiles (it is better to use water-repellent);
- notched spatula (comb);
- level;
- roulette;
- rubber hammer;
- grinder or tile cutter;
- construction knife;
- water-repellent grout for seams;
- rubber spatula;
- crosses for seams.
 Photo: tools for laying tiles
Step-by-step installation of tiles
Before starting installation, you need to prepare an adhesive composition. It is prepared using a drill with a “mixer” attachment in the exact proportions recommended by the manufacturer.
 Photo: adhesive composition for laying tiles
Laying tiles must begin from one corner. For high-quality styling the adhesive mixture is applied to the surface with a notched trowel, the tile is laid on the adhesive and pressed down.
 Photo: laying tiles
To adjust the level use rubber mallet, tapping in the right places. The evenness and uniform size of the seams can be controlled using special plastic crosses.
After laying the tiles over the entire surface, it is necessary to fill the joints with a special mixture. It serves to prevent water from getting under the cladding.
The mixture is prepared in small portions and rubbed into the seams using a rubber spatula.
Next, you need to rinse the entire surface with a damp cloth to remove any remaining grout mixture. To make the seams the same, you can go through them reverse side spatula ( plastic handle special spatula is designed for this).
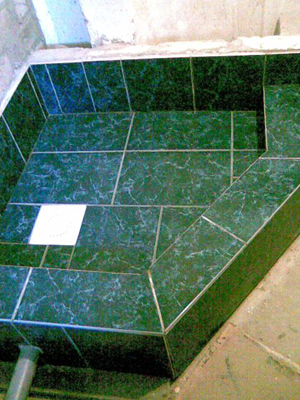 Photo: finished pallet
 After completing all the work, the surface of the tile is washed again and wiped dry.
Step-by-step installation of mosaics
Mosaic is very beautiful finishing material, which is usually used for lining shower trays, or for solving other design problems.
 Photo: plastic and glass mosaic For bathroom
Mosaics come in glass and plastic. You can use any mosaic for the pallet.
For mosaics it is better to use an adhesive composition white. Laying the mosaic begins from one corner.
The adhesive composition is applied to the surface using a notched trowel, and the tile is applied. The tile is pressed a little, and excess glue must be removed immediately.
In the article: read detailed instructions on installing polypropylene pipes.
For ways to hide pipes in a toilet, watch the video.
A do-it-yourself acrylic bathtub installed on a frame fits perfectly into the interior of a modern bathroom. How to do it? .
Trimming of tiles is carried out construction knife or with scissors, since the base of the mosaic can be paper or in the form of a mesh.
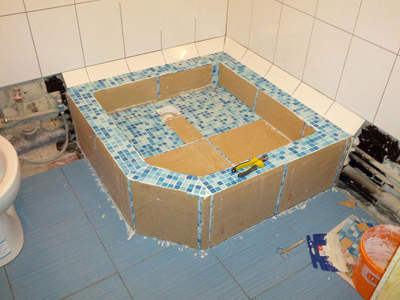 Photo: mosaic installation
After laying the mosaic, you can begin grouting the joints. The seams are rubbed with a special waterproof grout mixture using a rubber spatula.
Grouting the joints on a mosaic is a very important moment, which must be carried out very quickly and any remaining grout should be wiped off immediately.
 Photo: wash and wipe dry
After filling the joints, thoroughly wash the lined surface and wipe dry.
Video: installation of a shower channel
Installation of a shower stall begins with the installation of a tray. Before installing a shower tray with your own hands, you need to properly prepare: understand the nuances of installation, assign a sequence of work, following the instructions and calculation diagram.
Types and shapes of pallets
Models of trays for different shower stalls may differ in both shape and material. The most common are acrylic, ceramic and steel - it is not difficult to install such a shower tray with your own hands, while products made of cast iron and marble are quite heavy, so it is better to entrust their installation to specialists.
The shape of the pallets can be with or without a rounded edge, square, rectangular, etc. Regardless of the material and shape, the installation principle of all models is similar. Let us consider in detail the process of equipping acrylic and ceramic pallets, what are their fundamental differences and installation subtleties, in order to simplify self-execution work and avoid possible mistakes.
You will need the following set of tools and consumables:
builder's level, hammer, jigsaw, screwdrivers, screwdriver, pliers, adjustable wrench, marker/pencil, drill, hammer drill, electric, copper cable, sewer pipes, trowel, concrete mortar and silicone sealant
Preparing space for a shower stall
Installation of the shower tray is carried out using one of the following methods:
- on a special metal frame;
- on plastic supports;
- directly onto a flat surface.
To begin with, carefully prepare the place where the future shower stall is planned to be placed. Special attention Care should be taken to level the floor surface if you plan to install the pallet directly on it, that is, without using a frame or support. When installing a pallet in a frame or wooden structure, the walls are additionally insulated using roofing felt or polyethylene film.

In addition, you should make sure that the pallet you are installing is strong: if the structure bends under your weight, the pallet must be reinforced using boards polyurethane foam, brickwork or polystyrene foam boards. One of the simplest reinforcement options is to fill the space under the base of the booth with concrete. You can do one of two things: possible options: you can make an initial concrete floor screed only in the place where you plan to place the stall, or you can completely fill and level the entire area of the bathroom.
Advice! A steel tray is characterized by increased noise, so when installing it, be sure to pour polyurethane foam under the bottom of the shower stall - this will help eliminate or at least reduce the loud noise from the stream of water pouring from above.
In addition to preparing the floor, it is necessary to properly install the pipes, as well as lay the electrical wiring for the shower stall. All pipes should have convenient outlets so that it is easy to connect hoses to them. As for the electrical wiring, it is made hidden and necessarily moisture resistant, and it is important to make as few twists as possible. The power supply cable is connected using a three-wire copper cable with double insulation, the cross-section of which is from 2.5 mm. An RCD must be installed; the cable is laid directly from the electrical panel.
Attention! If you do not have the appropriate skills and experience in working with electrical wiring, it is better to entrust the work of connecting the shower stall to the electrical panel to an experienced specialist!
How to install an acrylic shower tray
Acrylic models are usually equipped with adjustable legs, which can already be attached to the product, as well as brackets for convenient fastening and other types of fittings that facilitate the installation process.
To adjust the legs, an adjustable wrench and a level are used, which allows you to install the product as horizontally as possible in relation to the floor.
Acrylic products have one weakness- there is often no support under their central part. Therefore, acrylic pallets are often placed on stable podiums or special supports. The strength of the pallet will directly depend on the size of the existing installation clearance. At the same time, it is important to leave unimpeded access to sewer pipes.
After strengthening the bottom, proceed directly to installing the product:
- markings are being applied - the structure is aligned horizontally using a building level, a line is drawn along the walls/tiles with a marker/pencil to accurately mark the markings of not only the profile, but also the drainage hole;
- the pan is temporarily removed, all parts of the drain are separated, the drain outlet is connected to the sewer pipe;
- the siphon for the shower tray is combined with the drain into a siphon drain hole - the so-called gluing of pipes is performed, a seal is installed on the drain hole, and the tray itself is placed on top of it, then the drain funnel is screwed on;
- the central part is fixed - bricks are placed under the base, serving as a support, or steel pipes, and on top there is a layer of thick rubber, after which the structure is retracted and attached to silicone;
- the booth is connected to all necessary communications;
- The lower perimeter of the entire structure is lined with decorative panels, and the joints are carefully sealed using silicone sealant.
Installing a ceramic shower tray
Attention! The installation of any ceramic tray must be done extremely carefully. The product is very fragile and can easily be damaged or cracked even with a slight impact or falling of a heavy object!
A distinctive feature of ceramic models is that no free space is left under this structure, which means that no additional supports are required and can be installed directly on the floor covering. This is convenient in that any manipulations to strengthen the structure are excluded, but there is a drawback - difficulties arise in providing access to the drain and all other communications.
Work order:
- markings are indicated - using a marker/pencil, the future location of the drain is indicated and boundaries are drawn along the entire perimeter of the structure;
- a drain hole is equipped (it is important that it is as close as possible to the supplied drain pipe) - the part of the floor where the siphon will stand in the future is carefully cut out with a jigsaw;

- unhindered access to sewer communications is ensured - not far from the existing cutout, another small recess is made in the floor so that the floor section is outside the boundaries of the structure and it becomes possible to lay a siphon and a network of pipes under the floor;
- a small removable inspection panel is made from a piece of flooring cut out with a jigsaw, and PVA glue, previously diluted with a small amount of water, is applied to the location of the pallet in two layers;
- the siphon is connected to the drain;
- the pallet is fixed with a solution, while maintaining a horizontal position;
- when the solution is completely dry, the siphon is carefully connected to the pipe through the inspection panel;
- all joints are carefully sealed with silicone sealant.
A modern shower cabin is a wonderful addition to the usual bath, making pleasant and healthy water treatments as varied as possible. Here you can place a hydromassage system and an exotic shower, connect light music and create light and sound effects.
However, without a high-quality shower tray - the basis of any shower - all this is simply impossible. Therefore, you should know how to install a metal shower tray with your own hands.
Why is it better to choose, for example, not a ceramic shower tray, but a metal shower tray, and why is it better to install it yourself, rather than with the help of qualified installers? A metal shower tray is a great choice and is easy to install. Plus, you can save money this way.
Materials and tools

In order to quickly and correctly install a metal pallet, you need to stock up on the following materials, tools and devices:
- ready-made shower tray;
- drainpipe;
- mixer with siphon;
- cement;
- sand;
- waterproofing mixture (silicone sealant);
- brick stock;
- sheet rubber;
- FUM tape;
- trowel for stone work;
- plaster spatula;
- paint brush;
- hammer;
- building level.
Return to contents
Installation procedure

There are many ways to quickly and efficiently install a metal tray in a shower room (chamber). Let's look at one of the simplest and most common options for installing a waste tray.
Before you begin the process of installing this structure with your own hands, you must thoroughly study technical instructions, which is usually attached to it when selling. It is worth noting that experts recommend doing this regardless of what material the shower tray is made of.
First of all, the shower stall must have dimensions that generally correspond to the dimensions of the metal base. In this case, the dimensions and finishing should be adjusted so that the facing ceramic tile, if not the entire wall of the room is lined with it, its lower edge descends slightly below the level of the pallet placed against the wall. If there is a gap between the wall and the base of the cabin, it must be sealed with a waterproofing compound (sealant).
When starting to align the pallet according to all the rules, it is recommended to immediately use a building level to monitor the clear horizontalness of its upper plane.
This situation should not interfere with the effective removal of water in the future, since modern drain products are manufactured with ready-made cone-shaped funnels.
To fix the structure in a certain position and to ensure its horizontalness, the legs supplied with the pallet are used. They are usually adjustable, so they can be used to quickly and easily position the base. Once the adjustment is complete, the legs are firmly fixed with locking mounting bolts.
In some cases, instead of legs, special ones are used plastic supports, which are supplied complete with a pallet. At the same time, very often builders install these products, resting them not on legs, but on specially constructed stands made of bricks or mounting cinder blocks.

The specified stand (or, as it is also called, a well) is built in accordance with such dimensions that the future bottom of the shower stall can be freely laid on it, resting its sides on the edge of the brick (cinder block) masonry. To fix the pallet, its sides are either glued to the masonry with a special adhesive mixture or placed on cement mortar.
When installing the base of the shower chamber on a stone well-support, one cannot ignore the fact that a siphon must be connected from below to the drain neck of the pan. To ensure that the height of the well is sufficient for it (the sewer outlet should be above the floor level at a height of 12-15 cm), care must be taken in advance when designing the bathroom. By the time the entire structure is finally secured to the brick support, the mixer must be assembled, and its components must be tightly screwed to each other according to the diagram.
For better stability of the pallet, the space between it and the floor can be filled with ordinary sand. This will create additional support for him. If you don’t have sand at hand, polyurethane foam can partially replace it.
It should be borne in mind that the shower stall is a place where, by definition, there should be a lot of water. Therefore, all the slightest seams, cracks and joints are between the sides and the brick on which they rest, between the edges of the pallet and tiles on the walls, between the tightly screwed elements of the mixer and the tray - should be thoroughly coated with silicone sealant and covered with FUM tape.
Every time you complete one or another stage of the installation procedure, it is recommended to immediately check the quality of what was done. In particular, after placing the support well (but without its final fixation), it is proposed to ensure its stability. To do this, all you have to do is stand on the pallet with the utmost care, and, most likely, balancing deficiencies will immediately manifest themselves.
It is also necessary to ensure good tightness of the junction of the pipe with the neck of the pan and the siphon with sewer pipe. For this purpose, water is supplied to the tray with low pressure. If there is no leakage of liquid, the shower can be used for its intended purpose. If water leakage is detected, additional sealing of the connected components will have to be done.
Of the entire process of installing a shower stall, installing a shower tray is perhaps the most time-consuming process. Of course, the current level of technology makes it possible to completely abandon installation work - installing a shower box (i.e., a “box” type stall) provides the opportunity to purchase an already assembled cabin, which only needs to be connected to a water supply system, an electrical network and water drainage to the sewer. However, this option is not always acceptable or optimal. Installation of a shower tray may be required where you would like the cabin to fit into the interior, for example, in the bathroom, or where it should be used non-standard materials and integrate the booth. Ultimately, a shower stall is one of many possible combinations of a tray and shower screens, and everything else is just an extension of them. In this article detailed instructions on how to properly install a shower tray.
What types of pallets are there?
According to their design, all pallets can be divided by thickness into:
- super flat (6-10 cm);
- flat (10-18 cm);
- deep (25-35 cm).
Regarding the shape of pallets, we can say that they can be very different, for example:
- round;
- polygonal;
- free form.
Most of the trays are produced universally - round and quarter-circle (when you need to install a shower enclosure). The materials from which pallets are made are limited:
- acrylic;
- cast iron;
- ceramics.
IMPORTANT! In each case, the shower trays are covered with an anti-slip coating
But according to color scheme trays typically match the shower panel they come with and can be any color. Installation of a shower tray (in this case an overview video is provided) begins with the supply of sewer pipes and securing their outlet.
Installation of a shower tray: VIDEO
Installing a shower tray
Installing a shower tray, as can be seen from the video above, is not difficult in itself. Some difficulties may be caused by the joining of plumbing parts, floors and walls: uneven floors, old plumbing, etc. This may be partially caused by the characteristics of the material from which the pallet is made, but in most cases this is due to the readiness of the site for it. Taking into account the possibility of different depths of pallets, the need to create a natural water flow, frequent unevenness of the floor and walls, it becomes clear what problems can await those who want to install a shower tray with their own hands.
If the installation height of the pallet is limited by the height of the room, then additional excavation of the floor may be required for installation of the drain.
From the point of view of the quality of pallets, we can talk for a long time about the fact that acrylic pallets are much more comfortable than ceramic or cast iron: the latter can be unpleasantly cold in the mornings; however, the hygiene and durability of all pallets three types is equally certain. Therefore, installation of a shower box with any of specified types pallets, from a technical point of view, are absolutely identical, although the cost of acrylic pallets is higher.
New materials and systems without pallets
The market, like technology, however, does not stand still, and not so long ago the consumer was offered a new material - quaril - mixture quartz sand and liquid acrylic.
IMPORTANT! With a slightly lower thermal conductivity, this material is many times stronger than acrylic and is practically impossible to scratch; but that is precisely why it is more difficult to restore it.
Also, unlike acrylic, which is rolled from sheets, quarryl is nothing more than casting. This property of quaril is widely used for decorative purposes, not only in the shower room, but also where a concealed hygienic shower or something like that is usually installed.
For special aesthetes and, as a rule, pallets can be made from marble or sandstone to order. In addition to aesthetic satisfaction, a person who prefers stalls with such trays or concealed shower systems enjoys their ability to retain heat and absorb sound.
A distinctive feature of all pallets of this type without exception is the presence of adjustable legs, which greatly simplifies their use: installation hygienic shower or does not require a shower stand additional work by alignment.
Shower drain and channel: everything could be even simpler
An alternative to a tray is to install a shower drain. In this embodiment, the presence of a tray becomes superfluous, since the drainage and drainage of water occurs in principle new technology. Moreover, modern options combining a shower channel or drain can be the most successful solutions in specific conditions - drains can be of any shape.
Thus, the presence of an ordinary shower head and drain can literally create a place out of the blue for showering, both in the existing bathroom and in places where the shower system was installed for the first time.
Separate metal or steel drain designs that are complements to an overhead shower, such as I-DRAIN, can be an indispensable solution in places where installation of trays is not possible - they take up only 54 mm of floor depth.
Since these are ready-made units, their installation instructions are quite simple and not very expensive, that is, their installation even looks much simpler than installing pallets.
$ Cost of work and price of pallets
Here it would be appropriate to remember how much pallets cost and mentally add the cost of installing them, and then return to alternatives with channels and drains. So, prices for shower trays of popular brands (RAVAK, CERSANIT, KOLO, APPOLLO, TIMO) for comparison:
- in Kyiv are from 1000 hryvnia,
- in Moscow - from 9,000 rubles.
Conclusion
A far from obvious advantage of pallets is the ability to replace them, more comfortable view and higher hygiene. And although there are a number of models of pallets with a corrugated surface, it is still more profitable to clean and care for the area of the pallet than, for example, the entire floor surface near a hygienic shower.
On top of that, pallets are created with special surfaces that prevent slips, falls and, as a result, possible injuries.