How to install a shower tray on a frame. Correct installation of the shower tray. Material for making the podium
Read also
If we define without enthusiastic bias constructive principle shower hydrobox, then it is a combination of a tray and partition panels, and all other elements, including numerous functionalities, are only additional extensions integrated into it.
The configuration and dimensions of the shower tray are selected for maximum adaptation to the bathroom interior, and only then are they determined color palette walls and a variant of the door opening system. The installation of a shower tray determines the entire course of further activities for the preparation and commissioning of the shower cabin.
Variety of shower trays
Designers and manufacturers have done their best - there are several options for choosing pallets. The most common classification methods are as follows:
- By thickness:
- Super flat pallets, up to 100 mm thick;
- Flat (from 100 to 180 mm);
- Deep (over 180 mm);
- Some models of hydroboxes have a depth of up to 460 mm.
- By form:
- The outline of a circle, most often a quarter circle;
- Square and rectangular;
- Polygonal, for example, pentagonal (pentagon);
- Complex exclusive configuration.
- In terms of size, the range of pallets is represented by a minimum size from 70 cm in radius or the length of one edge to 130 cm.
- According to the material of manufacture:
- made of cast iron;
- become;
- acrylic and
- ceramics.
Since the method for installing a shower tray is slightly different for products made from different materials, let's give brief characteristics standard pallets.
Some features of cast iron, steel, acrylic and ceramic pallets
- Cast iron pallets are available in enameled versions. Very strong and durable. Their heavy weight gives them stability during installation. The supports placed around the perimeter are quite sufficient; the central part is left in a suspended position.
- Steel pallets are made from stainless steel or alloy steel, which is then coated with enamel. Compared to cast iron, they are cheaper and lighter. General disadvantage of steel pallets:
- Under the water jet they rattle irritatingly;
- Over time, the enamel of the coating corrodes and begins to absorb dirt, losing its external luster.
- Acrylic pallets are the most affordable in price, which is why they are the most popular. Among the advantages of acrylic water collectors are the following:
- Fast heating when hot water is supplied;
- Acrylic does not age and does not darken over time. Minor scratches are not critical on it and, if necessary, can be easily repaired;
- Due to high processing technology, a large number of models are produced various forms, size, depth and color. The disadvantages of acrylic structures include the need for additional reinforcing reinforcements when installing acrylic shower trays, since they bend under the user’s weight. Pallets reinforced only along their perimeter can burst, so for these structures an additional metal support is installed in the central part.
- Ceramic trays, like their cast iron counterparts, are massive and stable. Made from sanitary ware, they look beautiful. But they are cold and crack even if the shower head is accidentally dropped.
It is important! Pallets are available with smooth and corrugated surfaces. Corrugation can be different - meshes, rays, small patterns, “pimples”, which gives the surface anti-slip properties. Sometimes such a surface is ignored, mistakenly believing that smooth surface is of higher quality.
Installation of shower trays
Most shower trays (cast iron, steel, acrylic) have a set of adjustable legs in their design, designed to simplify adjustable leveling of the shower stall.
The exception is marble and stone monoliths. Therefore, the process itself, how to properly install a shower tray, causes more difficulties in its preparatory part, which includes the following activities:
- Preparing the site for a shower stall;
- Elimination of uneven floors and walls;
- Repair or replacement of utilities, including electrical wiring;
- Preparing the floor and sewerage for installation of the cabin drainage system.
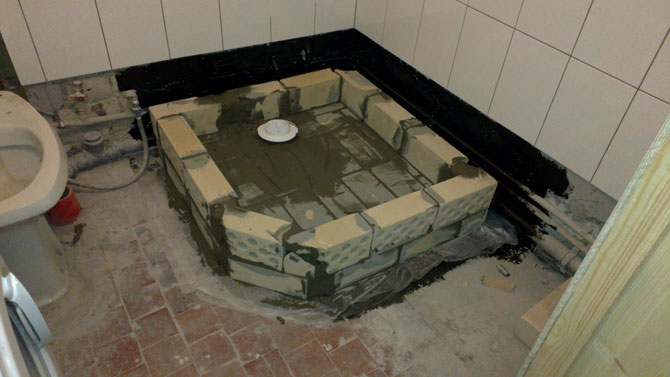
Against the backdrop of this amount of work, installing a shower tray no longer seems like a global problem. There are several different ways to place them in the bathroom. Pallets are mounted not only on a metal frame or plastic supports, but also simply installed on a flat surface, as is necessary for ceramic pallets. For massive cast-iron shower trays, craftsmen use their installation on a “brick cushion” laid out in place, which not only distributes the large weight of the shower system over its entire area, but also, instead of flimsy legs, creates the necessary free working space under the bottom for placing drainage elements.

The method of installing a shower tray on bricks allows the use of ordinary solid building bricks and blocks of foam concrete or aerated concrete.
In a nutshell about installing a pallet on bricks
 Sequence of work when installing a pallet on a brick cushion:
- Leveling the floor in the brick laying area. Cement mortar and putty are used.
- Marking the perimeter boundary of the pallet outline for laying bricks.
- Mixing cement mortar for laying bricks.
- Apply the solution to the floor using strokes of a spatula along the outline of the pallet.
- Laying bricks along the contour of the pallet. As many layers of brick are laid as provide the height of the drainage system with a siphon and outlet pipe. When laying bricks, you do not need the qualifications of a professional mason, but bricks should be laid according to all the rules of building science so that the masonry retains its strength for a long time. The thickness of the seam should be uniform, within 5-7 mm. This is already enough to ensure the strength of the structure.
- Plumbing installation.
- After 2-3 days the pallet is installed. It is laid on an applied layer of cement mortar.
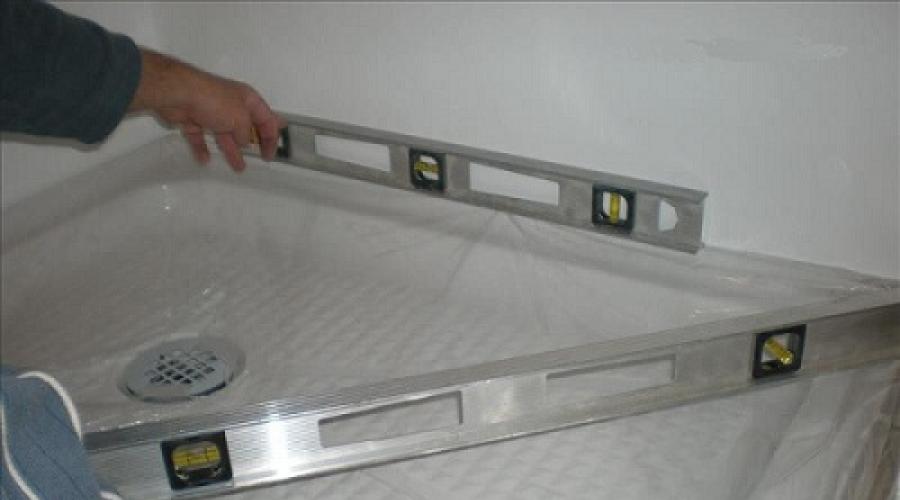
- Check the level for horizontal alignment. It is necessary to check at several points so that the measurement statistics are more plausible.
- Connect all plumbing connections.
The process of installing a shower stall requires the mandatory fixation of the tray, without which it is impossible to secure the stall, as well as equip it with doors.
The shower cabin cannot be installed without first fixing the tray
Trying to avoid this procedure, some prefer to purchase pre-assembled units, without taking into account important nuances, for example, how to then transport the bulky device, and whether it will fit into the entrance and interior doors apartments or houses.
Those who doubt that the device will fit into the overall design concept and are considering possible options for using non-standard materials also prefer to install a shower tray on site.
For this purpose, you can turn to specialists for help, or find out on your own how to install a shower tray, and thereby save part of the family budget.
How to choose a pallet
What types of pallets are there?
Most often, shower enclosures have trays of limited area. The shower room can be equipped with many functions - hydromassage. The equipment is in demand due to the wide price range in which the cabins are presented.
You will have to pay a large sum of money for a pallet made of marble, but if you do not have the skills to work with the material, even during the installation phase of the device, it may crack. From the point of view of the design component, ceramics compare favorably with other samples, but they are considered the most fragile and unreliable. At the same time, the price of such models remains at a fairly high level.

When choosing a pallet for self-assembly, craftsmen advise paying attention to devices made of acrylic or steel. These are the products that can be found today on construction market in 85% of cases.

Although you may find that when using an acrylic pallet that it flexes somewhat under the weight, this can be easily eliminated with the help of adjustable legs, construction brackets, and other special fasteners.

If this nuance is not corrected in time, the product may crack. Therefore, when purchasing this model, immediately discuss with the seller the issue of selecting an appropriate additional stand for the equipment.
Choosing a manufacturer
Even if the pallet is marked with a well-known foreign brand, check where the structures are assembled; in most cases, foreign parts are assembled by Chinese craftsmen. Therefore, do not chase a foreign device; practice shows that last years, domestic producers, wanting to gain a competitive advantage, they produce plumbing fixtures at the proper level.
Of course, we are still a long way from Italian and German brands, but with economy-class models the Russian manufacturer can compete with success, and the cost of the latter will pleasantly please the wallet.
Installation of an acrylic shower tray
Preparatory stage
The pallet is installed in the designated place after everything renovation work in the bathroom have already been completed. It's not just about wall decoration ceramic tiles, no problems should arise, first of all, with sewerage and electrical wiring. After all, almost all shower fixtures are connected to all existing communication systems.
Ideally, electrical wiring hidden in the wall should contain the smallest number of twists. To supply and remove water, it is better to use pipes made of plastic, which has proven itself to be the most reliable, flexible and high-quality material.
Before getting started, carefully read the step-by-step instructions for the device, and also decide on the required number of parts.
Features of the installation stage
The following tools will help you make a shower tray:
- FUM tape;
- silicone-based sealant, which can be replaced with an adhesive if it is included with the main product;
- mixer and siphon.
If you plan to place the pallet on legs, they are secured with locking bolts. Instead of legs, ordinary bricks or supports made of plastic can be used, which are poured cement mixture at a height slightly higher than the drainage height. If this nuance is not taken into account, the wastewater regime may be disrupted.
 Accurate fixation of the pallet is important
Next, glue the base base of the device to wall structure rooms. If the kit does not include a special product, “Moment” glue is suitable, connecting objects in contact with moisture.
Apply sealant to the seam between the pallet, this will help prevent liquid from penetrating into the formed joints.

Attach the mixer to the drain opening in accordance with the diagram stated in the instructions. To protect the device from leaks, seal the screwed parts using FUM tape, turn on a small water pressure and check the device for leaks, carefully examining each section of the unit with your finger.
Making your own base
How to prepare a sewer and lay out a barrier?
It is not necessary to buy a pallet in the store; if desired, you can arrange it with my own hands. Having learned how to install plumbing, the rest of the repairs in the rooms and attic will seem like a mere trifle to you.
The procedure begins with waterproofing a homemade shower at a height of about 30 cm. Prepare for work with sealant, fiber rubber or other products available in a wide range in hardware store. It’s good if the sewer pipe is located in the center of the future pan, this simplifies the creation of a drain.
Make sure that the parts adjacent to the sewer are well glued, and make sure there are no cracks or crevices that could cause liquid leakage. The outlet pipe should rise 12–15 cm above the base of the floor covering. To prevent the part from becoming clogged with debris and dirt, close the pipe tightly.

To install a shower tray, place a barrier along its edge - a border corresponding to the walls of the planned shower stall. The height of the “fence” must exceed the level of the pipe by at least 5 cm.
Smooth out any sharp corners from the brick using cement mortar. The mixture can be kneaded by adding cement and sand in a 1:1 ratio to a basin or bucket. Stir the resulting mass with a trowel, additionally pour in liquid glass, which will provide the solution with water-repellent characteristics.
Filling the bottom
It's time to move on to pouring the floor, which includes three stages of execution. First, use a cement mixture marked “self-leveling” on the packaging; the layer of the mixture should reach 5–8 cm. Wait for the material to dry and apply waterproofing, it can be “Fiberpool”, “Decoprof”, for the best effect, apply the product in 2 layers.

When this material has hardened, mix the glue intended for adhesion of the tiles to the surfaces with the cement mixture. Apply the mixture in concentric circles, maintaining the height-increasing technology starting from drain hole. This work is exquisite and cannot be rushed. It is necessary to ensure a uniform radius of curvature; a sharp difference cannot be hidden under the finish.
Now trowel the cement coating, your goal is to achieve a smooth surface and the same level of height.
Floor finishing
If you decide to mount the shower tray at an angle, it is better to finish the floor, which will hide all visible imperfections. Glass mosaic, which is produced specifically for bathrooms, has a number of properties that distinguish it from other types of mosaic, for example, it has anti-slip characteristics and does not lose color saturation and shades over time. Of course, working with small elements is more difficult than working with tiles, but the end result will please you.

After the repair work is completed and the shower cabin is installed, wait a few days and enjoy your own creation inside the structure.
Conclusion
When getting started, remember that incorrect installation of the shower tray can lead to gradual destruction of the base, which means everything will have to be redone.
Professionals advise when installing a structure that rises above floor surface, build a comfortable step that will protect you and your household from falls and injuries.
In this article we will talk about how to make a shower tray with your own hands from available and inexpensive materials with a simple construction tool. The topic of the article is relevant because, despite the abundance of ready-made pallets on sale, the price of such products is high.
Again, only by building and finishing the shower enclosure with your own hands can you ensure that it optimally matches the interior decoration of the room. So, we have found out that self-construction guarantees a number of obvious advantages; all that remains is to decide how and what to build from.
Selection of building material
Before you make a shower tray with your own hands, you need to decide what construction and finishing materials should be used.
The products on sale are made of stamped steel, cast iron, acrylic, ceramics, natural stone, etc. Unfortunately, all of the materials listed are not suitable for self-made pallet The only thing you can use to build a pallet bowl yourself is concrete, followed by lining with ceramic tiles.
The advantage of using concrete is the ability to give the bowl any shape, even the most complex shape. In addition, if, when facing the bowl, you use ceramic tiles used to finish the floor, the constructed pallet and the room will be stylistically perceived as a single whole.
So, we decided that we will use concrete and tiles; all that remains is to determine the characteristics of these materials.
Concrete proportions
![]()
Traditionally, concrete is a mixture of cement, sand and water with the addition of one or another aggregate. For example, in the manufacture of structures in contact with water, crushed stone is used as a filler since it has low porosity and practically does not absorb moisture.
Tip: To give the concrete product maximum hydrophobicity, “liquid glass” can be added to the solution along with water at the mixing stage.
But in this case, the rate of setting of the solution will significantly accelerate.
The ratio of ingredients in the solution is determined by the brand of concrete. For example, concrete grade 200 (most often used in individual housing construction) is made from 1 part cement, 2.6 parts sifted dry sand and 4.5 parts crushed stone (fraction no more than 2-2.5 cm).
For the production of concrete, Portland cement with a grade of at least M400 is used.
Type of finishing materials used

The following requirements apply to tiles:
- Safety- provided with a rough surface texture;
- Hydrophobicity- ensured by a low degree of porosity;
- High fracture strength- ensured by greater thickness of the material compared to wall tiles.
Cladding materials that meet the listed criteria can be purchased at any building materials store.
Tip: Considering that the price of tiles is high, you can save money and purchase tile battles.
Broken tiles much cheaper and at the same time much easier to lay on surfaces with complex shapes.
Construction works
After we have decided on the choice of construction and finishing materials, we will consider how to install a shower tray with our own hands. The construction of the pallet is not particularly difficult, however, it is better to plan the arrangement of the bathroom during a major renovation.
The installation instructions include the following steps:
- Preparing the base of the floor:
- First, let's determine the configuration and dimensions of the bowl.
- Along the perimeter of the future pallet, we remove the old floor covering, taking about another 20 cm on each side.
- On the cleaned base we carry out waterproofing work, namely, we cover the surface with a layer of bitumen mastic.
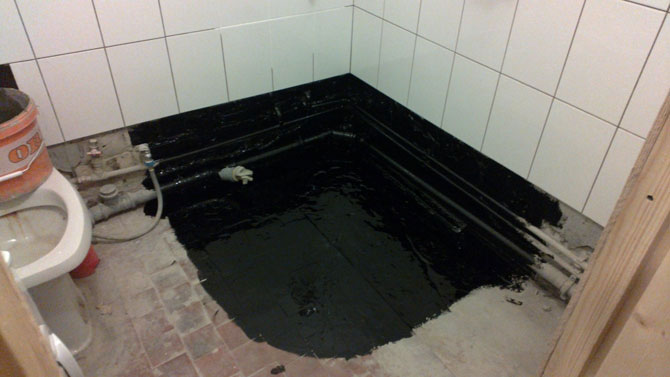
Important: If the base is old and its surface is crumbling, before applying mastic we use special deep penetration dust-removing impregnations, such as concrete contact.
Impregnations of this type penetrate into the porous structure of concrete and polymerize there, resulting in a denser base thickness.
- We prepare engineering communications.

Preparation of communications consists of placing a drain at the place where the drain is expected to be in the bowl.
Polypropylene (gray) pipes with a diameter of 50 mm can be used as a drain pipe. You can select a siphon (drain) specifically for the socket of these pipes, which is installed directly into the concrete.
Important: When connecting the sewer pipe to the drain, you need to bring them to such a height that the plane of the bowl has a slight slope towards the drain, and then the water will flow away by gravity.
- Let's start construction:
- First of all, we arrange the formwork on a pre-prepared foundation.
For formwork, you can use various sheet materials that are not subject to rapid destruction upon contact with water. For example, formwork can be made from laminated plywood or fiberboard.

Considering that the pallets are mostly oval or semicircular, for formwork you can use strips of old wide plastic lining. This material bends well, and therefore the formwork can be given any shape. Moreover, a lining width of 25 cm is enough to fill a high side.
We install one lining opposite the other, bend it at the desired angle and fix it with dowels and clamps.
- In the internal volume of the formwork we lay out a reinforcing mesh made of steel wire with a cross-sectional diameter of at least 3 mm.
- Next, prepare the solution in accordance with the specified proportions.
- We pour the solution into the formwork in portions and immediately level it so that it penetrates into all the cavities and so that there are no voids left.
- Cover the top of the concrete with plastic wrap and leave it for several days to set.
- After 2-3 days, we dismantle the formwork.
- Prepare the solution and fill the bowl 2 cm below the level of the sides of the drain.
- Cover the concrete with film to prevent it from cracking and wait 3 days. Then we remove the film.

- We stretch cords from the sides of the constructed barrier to the edges of the drain hole, which will serve as a guide.
- We prepare a cement-sand mortar without crushed stone at a ratio of 1 to 2. Mix “liquid glass” into the solution.
- We draw an inclined plane along the cords with a solution.
Important: To prevent the solution from flowing, make it thick.
- After the constructed bowl has dried, cover it with a thin layer of “ liquid glass" As a result, the structure will be hydrophobic and the concrete will become more durable, since it will not release all the moisture outside before the allotted time.
- Tiling works.
- Apply tile adhesive to small areas of the pallet with a layer thickness of 5 mm.

The photo shows an example of tiled cladding
- We lay the tiles over the layer of glue so that the pieces of ceramic adjoin each other with a gap of 2 mm.
- We immediately level the surface so that some pieces of tile do not protrude relative to the surface of other pieces.
- After the tiles have been laid, but the glue has not yet dried, take a match, go through all the gaps and pull the glue out of them.
- We fill the resulting gaps with tile grout.
Conclusion
So, we have talked in detail about how to build a shower tray. Still have any questions? We recommend watching the video in this article.
Bathroom renovations often involve replacing plumbing fixtures. Installing a shower cabin with your own hands is possible, but if your budget is limited and there is no money to buy an expensive shower box or bathtub, you can make a shower tray with your own hands.
This solution also allows you to show your own individuality and creativity.
- metal;
- acrylic;
- cast iron, etc.

But it is not always possible to install such a tray in the bathroom.
In old buildings, bathrooms are very small, and in order to fit all the necessary plumbing there, you can make a small and unusually shaped shower tray from brick, concrete or tile.
How to make it yourself
To make a shower tray yourself, you need to carefully prepare the place where this structure will be.
Important! Before installing the shower tray, it is necessary to carry out high-quality waterproofing of all surfaces that are in close proximity to the planned structure.
Made of brick and concrete
One of the most common shower trays that are made are those made from brick and concrete.
Such pallets can be made of any shape and size. A tray made of concrete and brick is an excellent alternative to an expensive shower box.
Materials and tools
Materials and tools required to construct the pallet:
- brick;
- cement;
- plaster lighthouse;
- metal grid;
- waterproofing mixture;
- trowel;
- drill;
- mixer attachment;
- sand;
- paint brush;
- roulette;
- level;
- pan drain;
- self-leveling mixture;
- putty knife.
Pallet installation
In order to make a shower tray with your own hands, you need to properly prepare the base.
 Photo: site preparation
 It is better to make the pallet before the walls and floor are completely finished. In places where the pallet adjoins the wall, it is also necessary to treat the wall with waterproofing to avoid the appearance of mold.
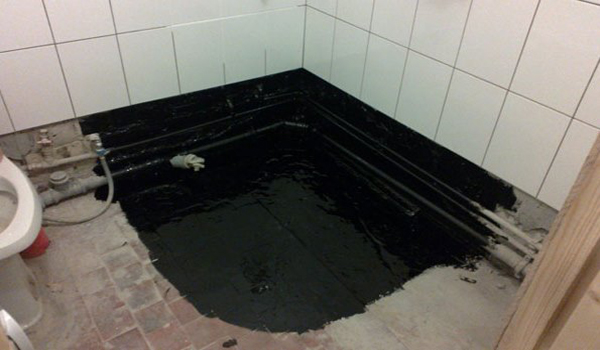 Photo: waterproofing
The waterproofing is applied with a paint brush in a thin layer, first under the screed, then on top of the screed and immediately before the cladding.
To keep the floor in the shower warm, you can lay it under a finishing screed. electrical system"Warm floor". Such a system is installed not only under the pallet itself, but also around it.
 Photo: heated floor system
After the first layer of waterproofing has completely dried, you can begin to form the outline of the brick shower tray.
 Photo: brick outline
Both ordinary brick and silicate brick are suitable for this. The brick is laid on a cement-sand mortar (or a special mixture that is sold in any hardware store). It is also necessary to lay a metal mesh on the base so that the base is very strong.
 Photo: water drainage system
Important! The water drain must be High Quality, since after the construction of the pallet is completed, it will no longer be possible to replace it.
After this, you can install construction beacons and fill in the rough screed. For a rough screed, you can use a cement-sand mortar with the addition of crushed stone.
 Photo: screed
The pouring area is small and a trowel or spatula is used to level the surface. The solution must be compacted using a trowel, immersing it edgewise into the solution with precise movements.
After the rough screed has dried, the surface must again be treated with a waterproofing mixture. This is done to prevent moisture from getting into deep layers of concrete or onto floor slabs.
 Photo: waterproofing again
Also high-quality waterproofing will help prevent the appearance of mold and mildew not only in the bathroom, but also in adjacent rooms.
Video: waterproofing a tile shower tray
Then a self-leveling mixture must be applied to the dry surface. You need to make a smooth depression around the drain so that the water drains smoothly. It is better to purchase a high-quality metal water stack.
When the layer of self-leveling mixture has completely dried, you need to apply waterproofing again. This layer of waterproofing must be applied with particular care, especially where the floor meets the walls and around the water drain.
For special safety, it is better to make the sharp edge of the pallet smooth, semicircular.
The next step is to line the shower tray.
DIY tile tray
To cover the pallet, you can use ordinary ceramic floor tiles, but a mosaic will look more beautiful.
Materials and tools
Materials and tools required for tiling a shower tray:
- floor tiles or mosaics;
- adhesive mixture for laying tiles (it is better to use water-repellent);
- notched spatula (comb);
- level;
- roulette;
- rubber hammer;
- grinder or tile cutter;
- construction knife;
- water-repellent grout for seams;
- rubber spatula;
- crosses for seams.
 Photo: tools for laying tiles
Step-by-step installation of tiles
Before starting installation, you need to prepare an adhesive composition. It is prepared using a drill with a “mixer” attachment in the exact proportions recommended by the manufacturer.
 Photo: adhesive composition for laying tiles
Laying tiles must begin from one corner. For high-quality styling the adhesive mixture is applied to the surface with a notched trowel, the tile is laid on the adhesive and pressed down.
 Photo: laying tiles
To adjust the level, use a rubber hammer, tapping in the right places. The evenness and uniform size of the seams can be controlled using special plastic crosses.
After laying the tiles over the entire surface, it is necessary to fill the joints with a special mixture. It serves to prevent water from getting under the cladding.
The mixture is prepared in small portions and rubbed into the seams using a rubber spatula.
Next, you need to rinse the entire surface with a damp cloth to remove any remaining grout mixture. To make the seams the same, you can go through them with the back of the spatula ( plastic handle special spatula is designed for this).
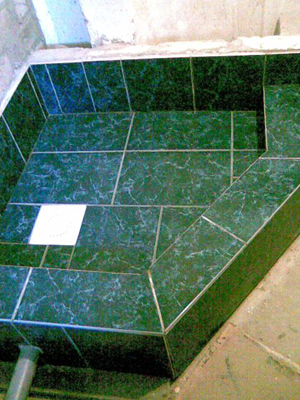 Photo: finished pallet
 After completing all the work, the surface of the tile is washed again and wiped dry.
Step-by-step installation of mosaics
Mosaic is very beautiful finishing material, which is usually used for lining shower trays, or for solving other design problems.
 Photo: plastic and glass mosaic For bathroom
Mosaics come in glass and plastic. You can use any mosaic for the pallet.
For mosaics it is better to use an adhesive composition white. Laying the mosaic begins from one corner.
The adhesive composition is applied to the surface using a notched trowel, and the tile is applied. The tile is pressed a little, and excess glue must be removed immediately.
In the article: read detailed instructions on installing polypropylene pipes.
For ways to hide pipes in a toilet, watch the video.
Installed acrylic bathtub on a frame with your own hands, fits perfectly into the interior of a modern bathroom. How to do it? .
Trimming of tiles is carried out construction knife or with scissors, since the base of the mosaic can be paper or in the form of a mesh.
 Photo: mosaic installation
After laying the mosaic, you can begin grouting the joints. The seams are rubbed with a special waterproof grout mixture using a rubber spatula.
Grouting the joints on a mosaic is a very important moment, which must be carried out very quickly and any remaining grout should be wiped off immediately.
 Photo: wash and wipe dry
After filling the joints, thoroughly wash the lined surface and wipe dry.
Video: installation of a shower channel
Installation of a shower stall begins with the installation of a tray. Before installing a shower tray with your own hands, you need to properly prepare: understand the nuances of installation, assign a sequence of work, following the instructions and calculation diagram.
Types and shapes of pallets
Models of trays for different shower stalls may differ in both shape and material. The most common are acrylic, ceramic and steel - it is not difficult to install such a shower tray with your own hands, while products made of cast iron and marble are quite heavy, so it is better to entrust their installation to specialists.
The shape of the pallets comes with rounded edge or without it, square, rectangular, etc. Regardless of the material and shape, the installation principle of all models is similar. Let us consider in detail the process of equipping acrylic and ceramic pallets, what are their fundamental differences and installation subtleties, in order to simplify self-execution work and avoid possible mistakes.
You will need the following set of tools and consumables:
builder's level, hammer, jigsaw, screwdrivers, screwdriver, pliers, adjustable wrench, marker/pencil, drill, hammer drill, electric, copper cable, sewer pipes, trowel, concrete mortar and silicone sealant
Preparing space for a shower stall
Installation of the shower tray is carried out using one of the following methods:
- on a special metal frame;
- on plastic supports;
- directly onto a flat surface.
To begin with, carefully prepare the place where the future shower stall is planned to be placed. Particular attention should be paid to leveling the floor surface if you plan to install the pallet directly on it, that is, without using a frame or support. When installing a pallet in a frame or wooden structure, the walls are additionally insulated using roofing felt or polyethylene film.

In addition, you should make sure that the pallet you are installing is strong: if the structure bends under your weight, the pallet must be reinforced using boards, polyurethane foam, brickwork or polystyrene foam boards. One of the most simple options reinforcement - fill the space under the base of the booth with concrete. You can do one of two things: possible options: you can make an initial concrete floor screed only in the place where you plan to place the stall, or you can completely fill and level the entire area of the bathroom.
Advice! Steel pallet It is characterized by increased noise, so when installing it, be sure to pour polyurethane foam under the bottom of the shower stall - this will help eliminate or at least reduce the loud noise from the stream of water pouring from above.
In addition to preparing the floor, it is necessary to properly install the pipes, as well as lay the electrical wiring for the shower stall. All pipes should have convenient outlets so that it is easy to connect hoses to them. As for the electrical wiring, it is made hidden and necessarily moisture resistant, and it is important to make as few twists as possible. The power supply cable is connected using a three-core double-insulated copper cable with a cross-section of 2.5 mm. An RCD must be installed; the cable is laid directly from the electrical panel.
Attention! If you do not have the appropriate skills and experience in working with electrical wiring, it is better to entrust the work of connecting the shower stall to the electrical panel to an experienced specialist!
How to install an acrylic shower tray
Acrylic models are usually equipped with adjustable legs, which can already be attached to the product, as well as brackets for convenient fastening and other types of fittings that facilitate the installation process.
To adjust the legs, an adjustable wrench and a level are used, which allows you to install the product as horizontally as possible in relation to the floor.
Acrylic products have one weak point - there is often no support under their central part. Therefore, acrylic pallets are often placed on stable podiums or special supports. The strength of the pallet will directly depend on the size of the existing installation clearance. At the same time, it is important to leave unimpeded access to sewer pipes.
After strengthening the bottom, proceed directly to installing the product:
- markings are being applied - the structure is aligned horizontally using a building level, a line is drawn along the walls/tiles with a marker/pencil to accurately mark the markings of not only the profile, but also the drainage hole;
- the pan is temporarily removed, all parts of the drain are separated, the drain outlet is connected to the sewer pipe;
- the siphon for the shower tray is combined with the drain into a siphon drain hole - the so-called gluing of pipes is performed, a seal is installed on the drain hole, and the tray itself is placed on top of it, then the drain funnel is screwed on;
- the central part is fixed - bricks serving as a support or steel pipes are placed under the base, and a layer of thick rubber is placed on top, after which the structure is pushed in and secured with silicone;
- the booth is connected to all necessary communications;
- The lower perimeter of the entire structure is lined with decorative panels, and the joints are carefully sealed using silicone sealant.
Installing a ceramic shower tray
Attention! The installation of any ceramic tray must be done extremely carefully. The product is very fragile and can easily be damaged or cracked even with a slight impact or falling of a heavy object!
A distinctive feature of ceramic models is that there is no free space, which means that no additional supports are required and can be installed directly on the floor covering. This is convenient in that any manipulations to strengthen the structure are excluded, but there is a drawback - difficulties arise in providing access to the drain and all other communications.
Work order:
- markings are indicated - using a marker/pencil, the future location of the drain is indicated and boundaries are drawn along the entire perimeter of the structure;
- a drain hole is equipped (it is important that it is as close as possible to the connected drain pipe) - the part of the floor where the siphon will stand in the future is carefully cut out with a jigsaw;

- unhindered access to sewer communications is ensured - not far from the existing cutout, another small recess is made in the floor so that the floor section is outside the boundaries of the structure and it becomes possible to lay a siphon and a network of pipes under the floor;
- a small removable inspection panel is made from a piece of flooring cut out with a jigsaw, and PVA glue, previously diluted with a small amount of water, is applied to the location of the pallet in two layers;
- the siphon is connected to the drain;
- the pallet is fixed with a solution, while maintaining a horizontal position;
- when the solution is completely dry, the siphon is carefully connected to the pipe through the inspection panel;
- all joints are carefully sealed with silicone sealant.
Small bathroom? Or do you simply prefer a shower to a bath? If you nodded your head in agreement to at least one of these questions, then this article will be interesting to you. Here we will talk about how to install a shower tray in your bathroom.
However, not all at once. It is important to know the installation technique, but first we will understand the types of pallets and other important nuances.
Types of pallets. Making the right choice
Pallets are quite varied. Color, material, depth, shapes and sizes - all these parameters vary between models. If you have already purchased the pallet, great. But if you are just at the selection stage, we will try to help you not make a mistake.
Differences in shape and size
In total, you can distinguish 4 main forms of shower trays:
- Square (with edge sizes up to 130 cm);
- Rectangular pallets have minimum size 70x80 cm;
- Semicircular – 80x80, 90x90;
- Pentagonal – 100x100 cm.
In addition to shape, pallets also differ in depth. This way you can purchase plumbing fixtures with a depth of only 4.5 cm. Maximum indicator is 18 cm.
Not all sizes are listed. More details can be found upon purchase. However, it is worth considering the size of the bathroom. But you shouldn’t forget about comfort either. If small sizes you are confused, and the minimum depth causes discomfort, it is better not to save money and choose a larger pallet.
Differences in materials of manufacture
There are enough materials for making shower trays. The main ones are: acrylic, ceramics, cast iron, steel and even marble. Which one should you choose? The answer to the question lies in another question. Quality or appearance. The fact is that some materials are more durable, others are more useful in design solutions. Therefore, you should decide what is more important to you. Or you can combine both qualities. But here comes a financial problem.
The best option would be a marble tray. In terms of external parameters and strength, none of the above options can be compared with it. However, this is where this financial plan comes into play. The cost of the pallet is high compared to other models, so not everyone can afford it.
If you rely on durability, then do not ignore cast iron and steel models. The first ones also have an attractive appearance, which, alas, cannot be said about the second option.
Acrylic and ceramic trays have a beautiful appearance. However, compared to plumbing fixtures made from other materials, they are more fragile. Despite this, acrylic pallets are purchased most often. Many are not embarrassed by the fact that even under the weight of a person they already bend and can crack. To be fair, we note that this can be avoided. This is done by first installing a special stand for the pallet. Curious to know how to make it? Read on.
Acrylic shower tray installation basics
Since we have already touched on the topic of installing acrylic pallets, we will not deviate from the course and will immediately analyze the installation technique.

First of all, you should decide on a stand for the pallet. It can be installed on the floor, and then the legs can be adjusted. However, it is better to mount a brick stand that will provide support from below. This way the pallet will stand more confidently, and you won’t have to worry about waiting for the day when the coating bursts.
Basic installation steps
You already understand about the brick substrate. But let's look at everything from the very beginning. It is worth noting that further instructions apply to all pallets, not just acrylic ones. So, let's go.
We have already discussed the parameters of pallets and how to choose them. However, there is another nuance that lies in the drain holes. Usually they are located at the bottom, but there are options when the holes are shifted to the side. This should also not be forgotten when choosing a pallet.
Once the shower base has been delivered, you can move on to the main work. The most necessary thing is to make markings. To do this, place the pallet in the selected location and outline it with a marker. Also, do not forget to indicate the drainage location. Try not to make any mistakes in the markings so that further problems do not arise.
After this, remove the pan, disconnect the drainage hole into parts, the outlet of which is connected to the main sewer pipe. Do not forget that the location of the hole must coincide with the previously applied markings.
Now take the pallet again and try it on in accordance with the markings. If the hole fits perfectly, you can go ahead and install the pipes. Remember that their joints must be well sealed. Finally, the pallet itself is installed.
Adviсe
The debate about how the pallet should be installed—flatly or with a slight slope—will probably never end. In fact, there is not much difference. And if the essence of a perfectionist comes out in you, and you want the pallet to stand perfectly level, stock up on a water level. But if you consider it necessary to install the shower bottom with a slight slope, be sure to take care of additional strength.
Remember when we talked about how important it is to install bricks under an acrylic pallet? If not, move the page up a little higher. So, in addition to support, they serve as a soundproofing covering for your neighbors. The water that beats against the pan will be incredibly audible to the residents of the lower apartment. If you don’t want them to know the schedule of your showers, or just want to protect other people’s nerve cells, soundproofing is a must. However, it can be not only bricks. Now you can purchase modern materials that do their job better.
Do you want to visually expand the pallet? Cover it with bricks, on top of which stick ceramic tiles. Why ceramic? It tolerates high levels of moisture best. In addition, it is better to install the tiles with a slight slope towards the pallet. This way the water won't stay on it.
We make a pallet with our own hands
People often say that you have golden hands? Then maybe you can try making a shower tray with your own hands? What are the advantages of this method?

- You can choose any shape and size;
- At the same time, you will save something;
- And once again make sure that your hands are truly golden.
However, think again before you jump into action. After all, the work is really not easy. Have you changed your mind? Great, let's begin.
To begin with, we determine and install the location of the drain, the height of which should be at least 20 cm from the floor. However, we are in no hurry to consolidate it. You will definitely do this, but a little later, when you have carried out all the calculations and are convinced of their correctness. After this you can secure the drain. This is obvious, but let us remind you anyway. The drain must go into the main sewer.
There is still a lot of dusty and difficult work ahead, which can damage the drain. To prevent this, it should be covered metal pipe, which fits in diameter and attach it to the floor with clamps. Next you need to create a platform for the future pallet. To do this, lay bricks around the entire perimeter, which should be filled with concrete screed. By the way, it should be about 7 cm below the drain level, since there will be several more layers on top. You will find out very soon what they will be made of.
So, while your screed is drying, don't waste your time. Consider what the side of the tray should be and whether a step under the seat is needed. All this can also be made from bricks, and ultimately finished with ceramic tiles.
Finishing work
When the screed and brick compound are dry, you can prime the surface with a special waterproofing compound. Now the design is almost ready. All that remains is to cover it with ceramic tiles. It should be chosen according to general style rooms.
The shower tray is ready. When everything is dry, you can try it out.
As you can see, you can install a shower tray with your own hands different ways. And you don’t necessarily need to start by purchasing this plumbing fixture. However, whether it is a purchased pallet or a home-made pallet depends only on you. The main thing is to correctly follow all installation procedures, and then you for a long time You will enjoy your time in the shower.
Video: how to install a shower tray
The shower cabin is an excellent alternative to the traditional cast iron bath. It is perfect for a small combined bathroom, allowing you to save a lot of space, as well as for taking water procedures in the country. The main element of the cabin is the pallet. The service life and comfort depend on it. It is important to install the base correctly, in compliance special requirements. You can cope with this task yourself by doing a few simple steps. The installation procedure depends on the material and coating of the bathroom.
Types of shower trays
Before purchasing a shower tray, it is important to choose a specific sample that will meet all the necessary requirements. Similar products differ in the material of manufacture, installation method and cost.
The most popular today are pallets made from the following materials:
- sheet metal;
- cast iron;
- acrylic;
- ceramics.
Metal products are distinguished by their availability and excellent strength. The inner surface is coated with abrasion-resistant enamel, which increases service life. The main disadvantage is the significant noise that water drops will make when falling. This problem is especially relevant for large families, since getting up early to take a shower will prevent neighbors from resting.
Acrylic bases are the most popular among consumers due to their low cost and wide variety of products. Modern technologies make it possible to give plastic any shape. It’s difficult to call a pallet absolutely silent, but compared to sheet metal, the discomfort levels are significantly lower. Among the disadvantages, low strength is noted, since under heavy load the product can lose shape or crack.

The most expensive model is made of cast iron. It has good durability, noiselessness and reliability. The heavy weight requires a solid base and supports during installation. The main disadvantage of cast iron is its low thermal conductivity. Without additional heating, it takes a long time to heat up. This is why your feet will experience slight discomfort in the first few minutes of taking a shower.

A less popular material is ceramics. In all respects, such pallets occupy an average position. Sufficient strength, lack of noise and affordable cost make them a good option when choosing a product in terms of price and quality.

Add to list distinctive characteristics include wall size, geometric shape and location of the drain hole. Large sides, more than 20 centimeters high, minimize the likelihood of pan overfilling and leakage. However, they can be a problem for older people or children. For installation, the shape and location for the drain are of great importance. Therefore, you will have to devote some time to the correct placement of the tray in the bathroom, so as not to spend extra pipes and don't hit the walls.
Step-by-step instructions for installing a pallet
Professional builders most often use three main methods for installing a shower tray. They differ in the type of base on which the product is installed. The choice will depend on the floor in the bathroom and the materials from which the product is made. A concrete or tile floor is ideal. The wooden structure will require additional reinforcement.
Installation on a foundation made of foam concrete blocks
Foamed concrete blocks are used as the basis for the future pallet, which are placed at all corners of the frame. If necessary, they can be replaced with bricks. Add to list the right tools will include a building level, tile adhesive, a bottle of sealant with a gun, a trowel, a hacksaw, a tape measure, a pencil, a corrugated hose and a siphon for organizing the sewer system.

The pan must be placed so that the sewer hole is covered by the plane of the product, and the drain is located as close as possible. Having chosen the correct place for placement, you should trace the contours of the product with a pencil or marker. 4 rectangles no more than 10 centimeters high are cut out of foam concrete. The floor in the room must be clean and level. Pre-prepared tile adhesive is applied to one of the edges of the stand, after which it is attached along the perimeter of the contour.
It is important to secure all the blocks perfectly level using a building level and a trowel.
Pieces of foam concrete placed in the corners will serve as beacons for the foundation. Using a hacksaw, cut out rectangular strips, apply glue and fill all the gaps, forming an even square along the contour of the pallet. Remember to use a level and constantly check the perfect horizon.
The foundation will take several hours to completely harden. It's worth doing at this time sewer system and installation of a siphon. The hole for the drain is located next to the sewer, adjusting it using a corrugated hose. The siphon is assembled in accordance with the instructions, special attention is paid to the tightness of all connections and the correct installation of the o-rings. The resulting base is coated with a thin layer of tile adhesive, no more than 1 centimeter thick.
Before fixing the pallet to the foundation, the assembled drainage system is installed. After the glue has completely hardened, removing the product without damage will be very problematic. Therefore, it is especially important to immediately set the ideal level.
Processing the joints between the pallet and the wall requires close attention. Poor sealing will result in nasty black streaks around the perimeter of the shower stall and harmful mold. Experts recommend a special sanitary mortar that is elastic and quick-hardening.

The final stage will be the process of laying the foundation. To do this, use tiles and decorative aluminum corners that hide the cut points.
Product with factory metal legs
Most modern products are equipped with metal legs made at the factory. This installation method is much faster and requires less money. If you act in accordance with detailed instructions, which lies in each box, the shower cabin will be absolutely stable and will last for many years.

The places where the legs are fixed have special markings and are highlighted more material to give strength. The bases are fastened to the pallet on the floor, with the obligatory use of a building level. After installation, the installation of the drainage system begins. A siphon must be supplied with the shower cabin. If you don’t have one, the plumbing store has a wide variety of similar devices. Right choice A sales consultant will help you do this.

Assembling the siphon will require precision and painstakingness. All connections must be tight and prevent water leaks. It will be impossible to correct deficiencies after installation is completed. You will need to completely disassemble the structure and do all the operations again. The delivery package may include side clamps that will provide maximum stability. They are secured with self-tapping screws, so you will have to use a drill. Professionals advise not to drill holes at the joints of the tiles, as this will cause cracks to form.
Do not use the drill in hammer drill mode, as the shock load will lead to the destruction of ceramic products.
After the pan is installed and connected to the drain system, the attachment points to the wall are treated with plumbing sealant. To make the layer perfectly smooth and uniform over the entire surface, use construction gun. It will take from 12 to 30 hours for the composition to dry completely.
Expanded polystyrene base
Some manufacturers include stand blanks made of durable polystyrene foam in the delivery package. Such structures are very low, easy to install and will serve as an excellent basis for a future shower stall.

Thanks to the presence of cross-sections, the polystyrene strips are easily broken, allowing you to form a foundation to the desired size. Having turned the structure over, it is necessary to mark places for attaching the stiffeners and a hole for drainage. Plastic legs are screwed into pre-prepared sockets, which will ensure maximum stability of the entire system. By adjusting the height, a minimum clearance is achieved between the stand and the floor. A building level will help you cope with this task.
The structure is installed on the floor so that the siphon is located directly under the hole. The outline is drawn with a pencil or marker both from the outside and from the inside. Fastening will be carried out using polyurethane foam, which is applied over the entire marking surface.

The stand is carefully placed on the circuit, and the siphon and drain hole are checked for compliance. Having degreased the surface and cleaned the tray from dust and moisture, it is secured to a plastic base with foam and pressed tightly. For greater reliability, use heavy objects. It will take up to 24 hours for the tiles to completely harden.

At the final stage of work, all joints are coated with plumbing sealant, guided by general rules. Like the foam concrete base, the plastic contour is covered tiles or decorative mosaic. If you determine the height of the pedestal for the shower stall in advance, you can choose the lining the right size and avoid unpleasant pruning marks.
The choice of installation method for a shower tray depends on the size of the bathroom, the material of the product itself and the strength of the base. By following all the instructions step by step, it is easy to create a strong and reliable foundation for the cabin with your own hands.
- Materials and tools
- Installation procedure
- Useful tips
A modern shower cabin is a wonderful addition to the usual bath, making pleasant and healthy water treatments as varied as possible. Here you can place a hydromassage system and an exotic shower, connect light music and create light and sound effects.
Diagram of a floor with a pallet.
However, without a high-quality shower tray - the basis of any shower - all this is simply impossible. Therefore, you should know how to install a metal shower tray with your own hands.
Why is it better to choose, for example, not a ceramic shower tray, but a metal shower tray, and why is it better to install it yourself, rather than with the help of qualified installers? A metal shower tray is a great choice and is easy to install. Plus, you can save money this way.
Materials and tools
Shower tray diagram.
In order to quickly and correctly install a metal pallet, you need to stock up on the following materials, tools and devices:
- ready-made shower tray;
- drainpipe;
- mixer with siphon;
- cement;
- sand;
- waterproofing mixture (silicone sealant);
- brick stock;
- sheet rubber;
- FUM tape;
- trowel for stone work;
- plaster spatula;
- paint brush;
- hammer;
- building level.
Return to contents
Stages of installing a metal pallet.
There are many ways to quickly and efficiently install a metal tray in a shower room (chamber). Let's look at one of the simplest and most common options for installing a waste tray.
Before you begin the process of installing this structure with your own hands, you must thoroughly study the technical instructions that are usually included with it upon sale. It is worth noting that experts recommend doing this regardless of what material the shower tray is made of.
First of all, the shower stall must have dimensions that generally correspond to the dimensions of the metal base. In this case, the dimensions and finish should be adjusted in such a way that the facing ceramic tiles, if not the entire wall of the room is lined with them, have their lower edge descending slightly below the level of the tray placed against the wall. If there is a gap between the wall and the base of the cabin, it must be sealed with a waterproofing compound (sealant).
When starting to align the pallet according to all the rules, it is recommended to immediately use a building level to monitor the clear horizontalness of its upper plane.
This situation should not interfere with the effective removal of water in the future, since modern drain products are manufactured with ready-made cone-shaped funnels.
To fix the structure in a certain position and to ensure its horizontalness, the legs supplied with the pallet are used. They are usually adjustable, so they can be used to quickly and easily position the base. Once the adjustment is complete, the legs are firmly fixed with locking mounting bolts.
In some cases, instead of legs, special ones are used plastic supports, which are supplied complete with a pallet. At the same time, very often builders install these products, resting them not on legs, but on specially constructed stands made of bricks or mounting cinder blocks.
Installation diagram of a shower tray with a wall-mounted mixer.
The specified stand (or, as it is also called, a well) is built in accordance with such dimensions that the future bottom of the shower stall can be freely laid on it, resting its sides on the edge of the brick (cinder block) masonry. To fix the pallet, its sides are either glued to the masonry with a special adhesive mixture or placed on cement mortar.
When installing the base of the shower chamber on a stone well-support, one cannot ignore the fact that a siphon must be connected from below to the drain neck of the pan. To ensure that the height of the well is sufficient for it (the sewer outlet should be above the floor level at a height of 12-15 cm), care must be taken in advance when designing the bathroom. By the time the entire structure is finally secured to the brick support, the mixer must be assembled, and its components must be tightly screwed to each other according to the diagram.
For better stability of the pallet, the space between it and the floor can be filled with ordinary sand. This will create additional support for him. If you don’t have sand at hand, polyurethane foam can partially replace it.
It should be borne in mind that the shower stall is a place where, by definition, there should be a lot of water. Therefore, all the slightest seams, cracks and joints - between the sides and the brick on which they rest, between the edges of the tray and the tiles on the walls, between the tightly screwed elements of the mixer and the tray - should be carefully coated with silicone sealant and laid with FUM tape.
Every time you complete one or another stage of the installation procedure, it is recommended to immediately check the quality of what was done. In particular, after installing the bathtub on the support well (but without its final fixation), it is proposed to ensure its stability. To do this, all you have to do is stand on the pallet with the utmost care, and, most likely, balancing deficiencies will immediately manifest themselves.
It is also necessary to make sure that the junction of the pipe with the neck of the pan and the siphon with the sewer pipe is well sealed. For this purpose, water is supplied to the tray with low pressure. If there is no leakage of liquid, the shower can be used for its intended purpose. If water leakage is detected, additional sealing of the connected components will have to be done.
Return to contents
Trays of various configurations for shower cabins: a – square, b – radial, c – rectangular, d – pentagonal.
Even before purchasing a shower system kit, the main renovation of the bathroom must be completed. We are primarily talking about the installation of water and waste pipes and the safe installation electrical wiring.
Before you start installing an iron shower tray, you must not only study the assembly and installation instructions in detail, but also check the completeness of the delivery.
The presence of sharp corners in the brickwork of the support well is unacceptable. The indicated defect is carefully smoothed out cement mortar.
If a product with high sides is used, the resulting shower installation may result in a rather high base. In this case, it would be useful to build an additional step.
When marking the position of the future foundation, it is necessary to ensure that when installing the pan, its drain hole clearly coincides with the drain sewer pipe. Otherwise, all the work will have to be done again.
But if you think through all your steps and actions in advance, calculate all possible deviations and surprises, such work will not seem impossible.
vseovannoi.ru
Steel shower tray: advantages and disadvantages, varieties and do-it-yourself installation
Are you planning to purchase an expensive shower cabin for your dacha? Take your time - there may always be a cheaper option! The low cost of a product does not mean its poor quality; more can be said - almost always it is just a simplified and minimized design. In this article, together with the site vannaja.net, we will study a steel shower tray that will help you build a primitive, but quite nice shower stall.

Rectangular shower tray
Steel shower tray: advantages and disadvantages
It is generally accepted that steel enameled shower trays have no advantages and that the most attractive thing about them is the price. But this is not true, except for the low cost, of this type There are other positive qualities of plumbing fixtures, which for some reason everyone is trying to forget. Yes, they have less attractive appearance than similar products made of acrylic, the enamel on them can peel off due to careless handling, they are a little colder than all their other brothers, but, you see, it would not be very correct to focus on the shortcomings alone. Especially considering that they are fixable.
In addition to low cost, metal shower trays have the following positive sides.
- Durability that no acrylic can match. If you are a massive person, then a steel pallet can carry your weight without additional supports.
- A very simple installation that anyone can do if desired - there are no subtleties or nuances that could affect the service life of this product.
- Versatility. Such a tray can be used as a separate plumbing fixture or in conjunction with shower curtains. And what’s most interesting is that choosing a factory sliding shower screen for such a tray will not be difficult.
And the shortcomings mentioned above, by and large, are not shortcomings at all - only the appearance cannot be corrected. But even here, if you think carefully, you can come up with something - products of this type, as a rule, are built either into the floor or into a pedestal made specifically for it. In general, the appearance of such a shower tray depends entirely on the quality of the cladding surrounding it.
Metal pallet: types and their differences
Another point that turns most people away from an enamel shower tray is the small variety of shapes and design solutions. The product is simple, has no frills and is designed to fulfill its only purpose - to collect water and drain it into the sewer system. In general, the conversation about the types of metal pallets will be short - metal pallets can be classified according to two criteria.

A visual aid for installing a shower tray can be found in next video.
Rectangular steel shower tray: installation technology
As mentioned above, one of the advantages of steel shower trays is its simple installation, which will be discussed further. To make the information easier to understand, we will present it in detail and point by point.

Basically, that's all. After the mounting foam or sealant has hardened, all that remains is to tidy up the parapet itself (if there is one, of course). Typically, the supporting brick is covered with tiles that match the finish of the floor or walls of the room. When the finishing is complete, all that remains is to take care of the curtain, and a simple shower stall will be ready.
As you can see, a steel shower tray is not a difficult device to install - everything is simply simple and clear. And the lack of appearance that is usually attributed to it rather depends on the inept hands of the craftsman who lays out the pedestal and tiles it.
vannaja.net
How to install a shower tray with your own hands
To carry out water procedures, it is necessary to create all the conditions, a necessary prerequisite for which is the installation of a bathtub or shower. Compared to a bathtub, a shower cabin is a more convenient, multifunctional device that allows you to significantly save space and at the same time decorate the bathroom. Choosing a cabin is a simple matter, but installation will require certain knowledge and skills. In this article we will figure out how to install a shower tray without involving specialists, but rather do the work yourself.
Specifics of the work
Installing a pallet in some cases requires certain specific knowledge possessed by specialists. There is no doubt that such a familiar procedure will take them little time, especially since you will receive a guarantee for the installation. But it’s much nicer when everything is done with your own hands.
Before installation, you should read the product instructions, determine the dimensions of the structure, and its convenient location. The instructions will definitely indicate the number and set of components that are needed to install the pallets yourself.
 Types of shower trays
 During the installation process, you need to correctly adjust the horizontal surface of the pallet. This is explained by the fact that insufficient quality level markings can affect the operation of the waste drain into the sewer. Therefore, it is necessary to control this process so as not to disrupt the wastewater regime.
Depending on which shower cabin you purchased: with a deep or shallow frame, the complexity of installation will depend. To install a flat pallet you will not have any difficulties, but installation will require additional dexterity.
You can use bricks or foam blocks. And additional rigidity can be given to the pallet using a metal frame. This greatly simplifies DIY installation.
If the model you choose has a fairly high base, then you should think about installing a step. To ensure that the tray will be installed correctly, you should carefully stand on it.
 Acrylic tray on prefabricated frame
  Steel pallet on a metal frame
  The cast iron pan requires almost no installation
 Preparatory work
Before starting work, check the presence of all components and elements. Pay attention to the condition of the floor. To install the pallet correctly, you need to prepare the floor - its surface must be perfectly flat. The sewer pipe must be led to the very center of the surface where the pan will be installed. For waste drainage should be used quality pipes. Water supply pipes must be installed and electrical wiring must be securely hidden under the tiles. The pipe outlets must be accessible for connecting the shower stall.
Before you start installing a shower tray, you need to have the following materials and tools with you:
- metal carcass;
- drainpipe, flexible hoses and siphon;
- level, mounting knife;
- screwdrivers and keys;
- silicone sealant, FUM tape;
- spatula, trowel;
- brush and gloves.
 Tools for installing a shower tray
 Let's get started
Do-it-yourself installation of a structure with sides requires the use of a metal frame. This requires beginners to know some technology for conducting the process, since their absence can cause difficulties for home craftsmen.
To place the pallet correctly in the level, you must start by assembling the metal frame. To do this you should:
- turn the pallet upside down in order to attach load-bearing beams to its bottom with self-tapping screws, the dimensions of the square section of which are 0.1x0.1 cm. If the design provides space for bolts in the required places, then we assemble the frame using fasteners;
 Metal carcass
 - depending on the shape of the plumbing product and to achieve its maximum strength, we fasten the pipes with our own hands crosswise or in parallel;
- at the end of the supporting tubes there are special holes where pins are mounted, which serve as legs to support the entire structure. Each stud has bearings that rest against the base. On the other side, the studs are fixed with washers or nuts;
 Fastening the frame
 - The frame is assembled, now you need to turn it over and install it in the right place. Before fixing the pallet, using its dimensions and holes, we apply markings to the walls and floor. If preference is given to the corner option, then with the help of special brackets the structure is attached to the walls, the joints between which are ultimately treated with sealant;
- When all fasteners are screwed to the base, it is necessary to adjust the pallet relative to the horizon using a level. High-quality installation will ensure unhindered drainage of water into the sewer pipe. The final touches are made by adjusting the thrust bearings or tightening the studs, which need to be tightened with locknuts;
 Adjusting the shower tray legs
 - Now you should install the siphon. It is desirable that it have a flexible tube that allows you to adjust the dimensions along the length and height of the structure. First, a mesh coated with sealant is installed in the drain, then a gasket is applied and the tee is secured with a screw. We insert a branch into the sewer, which is pre-sealed with additional gaskets, and as a result is secured with a coupling. We connect the other side of the siphon tube to the connecting unit, which must be lubricated with sealant and sealed with a gasket;
 Connection to sewerage
 After installing the siphon with your own hands and checking all its connections, you need to connect the cold and hot water supply. To prevent leaks, all joints are treated with sealants or FUM tape.
Other ways to install pallets
Installing a shallow pan is a simpler procedure. A special feature of this installation is the correct installation of the siphon, which should be located below the floor level.
In this case, you should carefully select the drain hole, which must have sufficient throughput. So, for a pan with a layer of water of 12 cm, siphons are used, the dimensions of the opening of which are 0.52-0.62 cm. If the maximum layer of water exceeds 15 cm, then the diameter of the hole should be at least 0.9 cm.
 Drainer
 Installation of flat and shallow pallets after the drain hole is carried out by gluing to the base, the joints are treated with polyurethane foam and the structure is loaded for a day. After which all joints are treated with sealant.
In addition to the above method of installing a shower tray using a metal frame, there are other methods. So, as a rigid base for enameled pallets they can use brickwork or foam blocks. This makes it possible to eliminate the presence of space between the floor and the pallet and ensures maximum structural strength.
 Installing a shower tray on bricks
 Homemade pallet
If you have the opportunity and time allows, you can make a tray for your bathroom with your own hands. In this case, there is no need to buy an acrylic pallet, since moisture-resistant brick will be used as the base.
The first step is to install the sewerage and water supply and carry out waterproofing and preparation of the floor. It is best if you install the tray in the place of the old bathroom. However, the floor should be treated with mastic and covered with film.
 Cement strainer
  Floor waterproofing
 Now you can move on to the stage of building brick sides, which are laid on a moisture-resistant mortar. Their height should be greater than the protrusion of the drain ladder, from which the height of the homemade pallet begins to be counted.
Now the base is ready and you need to give it time to dry. Then fill the inside of the pan with a self-leveling concrete mixture 6-8 cm thick. At this stage you need to create small angle tilt towards the sewer hole so that the water drains quickly.
After the pallet has dried again, it is treated on all sides first with a primer, and then with mastic or any other waterproofing compound in several layers. Ultimately, the entire surface of the pallet is treated with a mixture of cement and tile adhesive. When this mixture has dried, the tray is rubbed with sandpaper.
Now you can start decorating your product. You can choose from mosaics, tiles from ceramic material or decorative rock. Preference should be given to moisture-resistant brands.
Stages of installing a homemade shower tray
To lay materials you must use special glue, does not contain chemicals and does not deteriorate when exposed to water. Using a notched trowel, glue is applied to the surface of the pallet. It is best to start work from a corner. When laying out the mosaic, you need to lightly press it; if you are using tiles, then a rubber hammer will help you.
One can also consider combined options, when the inside of the pallet is treated with mosaics, and the outside is tiled. But, and this is at the request of each master.
vannayasovety.ru
Installing a Shower Tray: 3 Best Methods + Step-by-Step Installation Instructions
High performance indicators have made shower cabins in demand not only for small bathrooms; today they are also installed in prestigious houses or apartments as an alternative to bathtubs. Shower trays are considered one of the main elements of the cabin; the correct installation of them affects the convenience and duration of use. The pallet installation algorithm depends on its design features and material of manufacture.

Installation of a shower tray

Bathroom design with installed pallet for shower cabin
Before purchasing a specific pallet, it is advisable to familiarize yourself with the advantages and disadvantages various options. What types of pallets are there?
Pallet classification
Depending on the material of manufacture, linear dimensions and geometric shapes, the cost of pallets varies within a fairly wide range. These characteristics also influence the installation methods of pallets. Professionals conditionally classify products into the following categories.
 Material of manufacture | They can be made from ductile iron, sheet steel, ceramics and plastic. Metal ones are distinguished by increased strength indicators, inner surface covered with durable enamel. Cast iron is much more expensive than steel. Disadvantage: cast iron pan long time remains cold, which negatively affects the comfort of water procedures. Ceramic ones are not widely used; in terms of performance and price they occupy an average position. Plastic ones are currently the most commonly used. In all respects they meet modern requirements and have a large number of different modifications. The price is affordable for the vast majority of users. |
 Installation location | Can be mounted in wall corners or frontally. Depending on the installation location, they differ in size and methods of water drainage. |
 Drain hole location | The hole can be located in the center or in one of the corners of the pallet. There is no particular difference from an installation point of view, but when choosing, you should take into account the layout of the existing utility networks in the bathroom. |
 Side height | The height of the sides ranges from 6–10 cm for superflat, 10–18 cm for flat and 25–35 cm for deep trays. |
 Geometric shape | Square, rectangle or sector. Sectoral ones are installed only in the corner of the room, the rest are universally used and can be mounted anywhere. |

Shower trays
It is better to purchase pallets complete with shower stalls. If for some reason this option is not suitable for you, then separate installation of the pallet is also possible, and you will have to make the protective fences yourself. When choosing a specific model, it is recommended to pay attention to the following features.

Video - Which tray to choose for your shower
After the decision has been made to specific form, you can begin installation. Installation depends on the design features of the pallet; this should be taken into account when purchasing and soberly assess your capabilities and skills. Choose pallets that you can easily install. We will look at three examples of installation of pallets; the rest have no fundamental difference.
Step-by-step instructions for installing a pallet on foam concrete
Construction and installation work is among the simplest in terms of complexity, but increased care is required when connecting drains. For example, let's take a universal square plastic pallet.
Step 1. Decide on a specific installation location. We have already mentioned that you should also pay attention to the existing utility network diagram. The outlet of the drain pipeline must be located under the plane of the pan. Making the sewer visible is allowed only in extreme cases. And then in the future it is recommended to take a set of measures to hide the pipelines.
Step 2. Purchase materials and prepare tools. In addition to the pan itself, you will need a siphon, a corrugated drain hose, a tape measure, a level, silicone sealant, foam concrete, tile adhesive, a caulk gun, a saw, a trowel, a tray and a pencil or marker.

Required materials and tools
Step 3. Prepare for installation. The floor must be clean and level, the outlet of the pipe for draining water is under the plane of the pan. Place the pallet in the intended location and trace the outer contours with a pencil.

You need to trace the contours of the pallet with a pencil
Step 4. If your pallet model does not have factory legs, then you need to place it on four stands cut out of foam concrete at all angles. The height of the stands is within 10 cm.

Pallet installation block
Step 5. Prepare the tile lei according to the instructions. Make sure that there are no dry lumps in the mixture.

Step 6. Apply glue to reverse side four stands, place them in place and place the tray on top.

Applying glue

Laying blocks

The blocks are pressed into the glue

Laying a pallet on 4 blocks
Using a level, level its position, check all four directions, they must be strictly horizontal. To do this, tilt the blocks in the desired direction with gentle blows of a construction hammer or the handle of a trowel.
Step 7. Wait a bit for the glue to harden. These four corner blocks will be the height guides for the foundation for the pallet. From the same foam blocks, use a hacksaw to cut out pieces for arranging the entire structure. As a result, you should end up with a square that fits the entire perimeter of the pallet.
Practical recommendation. Do the laying in the usual way, applying glue from the bottom and sides of the blocks. Constantly check the position of each element with a level and correct them if any deviations are detected. Further work can be continued only after 24 hours.
While the foundation is maturing, begin installing the shower and faucet. Place them at a comfortable height, making sure that in places threaded connections there were no leaks.
Step 8. Place the tray on the foam blocks and mark the location of the drain hole on the floor.

Marking the location of the siphon
Take care of the drain. If necessary, tighten the drain inlet sewer pipe to the drain hole. In our case, no special precision is needed; the final connection is made with a flexible corrugated hose.

Siphon connection
Step 9. Assemble and reinstall the siphon. Very important work. Keep in mind that dismantling a plastic pallet on the foundation without damaging it is impossible. Such manipulations can be done with pallets on legs, but we will talk about their features below.
Make every effort to completely eliminate the risk of drain leakage. What should be done for this?
- Read the siphon assembly instructions and check the technical condition of all its elements. Pay special attention to the condition of rubber gaskets and seals.
- During assembly, do not use excessive force; install the rubber seals in the correct position. To facilitate the entry of plastic pipes into the seals, lubricate them with special lubricants, soap or ordinary water. Never try to connect dryly or with too much force. The fact is that the thin edges of rubber seals are very easily damaged, and as a result, a leak will definitely appear. It is impossible to notice it under the pallet in a timely manner; eliminating the problems that have arisen due to prolonged exposure to water on building structures will require not only a lot of time and effort, but also financial resources.
Step 10. Spread the upper perimeter of the block stand with glue, the thickness of the solution is about a centimeter.

Base for installing a pallet. Applying glue
Place the tray in place, screw on the siphon, connect flexible hose with a drain pipe inlet.
Step 11: Using a level, level the tray horizontally.

Pallet installation, leveling
Take your time, lower the edges very carefully. If you make a mistake and one edge of the pan is tilted too much, then to eliminate the problem you will have to disconnect the siphon, remove the pan and start all installation operations over again.
Step 12. Seal the joints where the pallet meets the walls. Be sure to degrease the surfaces and clean them of dirt and dust. There is a wide variety of sealants, but we recommend that you use special plumbing silicone ones. They have a slight elasticity, which compensates for the vibration of the edges of the tray while taking a shower. In addition, it contains antiseptics that prevent the proliferation of microflora and pathogenic bacteria.
Notice how unsightly shower stalls look with black mold stripes around the perimeter of the tray. This is a consequence of violating the rules for installing pallets. The disadvantage of silicone sealants is that after a few months it is necessary to inspect the tightness of the seam. The fact is that the material begins to peel off in some places. 
Mold in the shower stall
The application of sealant is done using a special gun. Cut the tip of the tube at a 45° angle and gently push the material into the slot. Do not leave gaps; irregularities can be removed with your finger or any available object of appropriate width and length can be adjusted. To prevent silicone from sticking to it, wet the item in soapy water.

Trim the tip of the nozzle to required diameter

Applying sealant
Step 13. Proceed to cover the visible surfaces of the block foundation of the pallet with ceramic tiles. If the tile had to be cut, then it is better to place the cut at the bottom, and to improve the design characteristics, use special plastic or aluminum corners. They are sold in the store along with tiles.

Pallet after lining
At this point, the work of installing the pallet on the foundation is completed; final installation can be done only after the glue has completely hardened. This will take at least two days.
Installing a shower tray with legs
This pallet is installed much faster; it often comes with a special plastic screen, which allows installation without masonry work. If the screen is not included in the kit, then at the final stage the perimeter of the pallet must be trimmed with blocks or bricks of appropriate parameters and covered with ceramic tiles. Before starting work, check that all pallet installation elements are present and carefully read the manufacturer’s instructions.

Each pallet comes with instructions
Step 1: Lean the tray against a wall or place it on your workbench. Find the places where the legs are fixed; they have factory markings or are thicker due to molded fastening inserts.
Step 2: Screw on the legs. Pre-adjust their height using a tape measure. Exact height adjustment must be done on the floor.

Screwing the leg

Assembly decorative screen

Leveling the legs
Important. Please note that each leg has a lock nut to secure the element in the selected position. Make sure that all the locknuts are in place, otherwise you will have to remove the legs again to install the nuts.
Step 3. Place the pan in the desired location and decide on the method of connecting the water drainage. Depending on the location of the inlet pipe of the sewer pipe, additional connections will have to be made to connect the siphon. The siphon should be sold together with the tray; if not, buy it separately. At the same time, make sure that the dimensions of the equipment allow it to be installed under a pallet. If you don’t have enough personal experience, consult a store sales consultant.
Step 4. Assemble the siphon, pay great attention to the quality of all connections, do not allow leaks. Remember that eliminating them will always take much longer than a high-quality assembly. Not to mention the financial side of the issue and possible negative consequences.

Step 5. Put the tray back in place and use a level to set it to a horizontal position. Control all sides and do not allow them to slope in any direction. After adjustment, be sure to tighten the locknuts.

Pallet leveling
Step 6. If included metal profiles to rest the side surfaces against the wall, install them. Mark a specific location and use a level to check the horizontal position. The metal profiles are fixed to the wall with dowels; drill holes for them in the right places.

Marking for drilling a hole for mounting the stop

Drilling a hole

Screwing the fastener

Fastening the pallet with clamps
Important. If the walls are already finished with ceramic tiles, then all measures should be taken to prevent them from cracking during drilling.
How to avoid unpleasant situations?
- Never drill a hole where tiles meet. When installing metal profiles, it is always possible to move them slightly to one side or another and thus select safe place for drilling holes. However, such manipulations will in no way affect the fixation strength of the pallet.
- Always work only with serviceable tools and sharp drills. Do not apply much force while drilling.
- It is strictly forbidden to use a drill in hammer drill mode; ceramic tiles do not tolerate shock loads. The hammer is turned on only after the thickness of the tile has been passed.
Step 7. Connect the drain.

Assembling the siphon, installing the grille
Never assemble rubber seals with great force; lubricate them with mastics or at least moisten them with ordinary water. It is very easy to damage the seals, but they cannot be repaired; they need to be completely replaced. A problem may arise when searching for an identical replacement. Such troubles especially often arise during the search for spare parts for imported pallets. It is not recommended to use silicone as a sealant when assembling the water drain; it will definitely peel off after a certain amount of time and leak.

Installing the pallet on factory plastic stands
Some manufacturers complete pallets with stand blanks made of durable extruded polystyrene foam. Such structures are very low in height and require a different installation algorithm.
Step 1. Unpack the pallet, take out the stand blanks.

Shower tray kit
Step 2. Try on their length around the perimeter of the pallet, measure the required parameters. To make breaking off easier, polystyrene foam boards have vertical slots; it is enough to bend the material a little in this place and the extra piece will break off.

Assembling a frame from plates
Step 3: Turn over the assembled plastic stand, place it on a pallet and mark the locations of the stiffeners. Here you need to cut recesses according to the height and width of the ribs. At the same time, make a hole for the drain pipe.

Marking for drainage
Step 4. Screw in landing nests legs, adjust their height so that the tray is in a horizontal position.

Screwing in the legs
Step 5. Assemble and attach the siphon to the drain. It should be located exactly in the center of the pallet. Try to make adjustments in such a way that the gap between the floor and the stand is minimal. If the floor is tilted towards the wall, you will have to remove the stand several times, unscrew/twist the legs and re-check the horizontal position.

Adjusting the legs
Step 6. Place the tray on the floor so that the siphon is located in in the right place. Check the position. Trace the perimeter of the stand on both sides with a pencil or marker.

The master traces the frame with a marker
Step 7. Clean the surfaces from dust, degrease, and moisten with water.

Apply a little foam in the center of the drawn outline. Also apply foam to the top surface of the stand.

Foam application
Step 8. Carefully place the stand in place, the tray on it, and check the location of the siphon again. It must be located exactly under the drain hole, otherwise problems will arise when fixing it to the pan. Screw onto the drain mesh. At the same time, she presses the siphon against the pan.

Frame installation

Installing a pallet on a frame
Step 9. Press the tray with great force and leave in this position until the foam hardens. In order to eliminate the possibility of the tray being lifted by foam, it is recommended to press it inside with heavy objects.

Pallet installed
Step 10. Once the foam has firmly adhered the tray to the floor, begin finishing the perimeter of the base with ceramic tiles. On the second day, you can begin sealing the joints. The algorithm for sealing work is no different from the options described above.
Practical advice. Before installing the pallet, estimate its approximate height. Today there is a large selection of tiles in stores various sizes, there is a chance that you will be able to find the right one. For a precise fit, use the feet. Due to such manipulations, it will be possible to avoid cutting the tiles, and this not only speeds up the process of laying them, but also greatly improves the appearance of the bathroom.
If you do not plan to buy an assembled shower cabin, then draw a diagram of the mounting locations for the brackets on which the protective polyethylene film will be hung. This is a very economical solution, but this option for arranging a shower room has more disadvantages than advantages.

Shower tray in the bathroom interior
Video - Rules for installing a pallet
Despite the presence of various models on sale, you can make a shower tray with your own hands. This will not only save money, but also create a design that exactly matches the layout of the room and your idea of its design. The main requirements for the design are high-quality waterproofing and reliability. The rest of the work is not difficult.
Ready-made models available for sale are made from different materials:
- become,
- cast iron,
- acrylic
In shape, they usually correspond to the configurations of the most common models of shower cabins, which means they are:
- square,
- corner,
- rounded.
Pallets may also differ in depth.
Advantages of homemade pallets
Like many other designs in a house or apartment, making a shower tray with your own hands will cost you less than purchasing and installing a factory model. Self-construction takes time, but allows you to significantly save money.
An undoubted advantage of doing the work yourself is also complete freedom to implement design ideas. In this case you are not limited standard forms and color range of available models. The relevance of this advantage is especially noticeable if a shower cabin with a tray is installed in a large room and may have a non-standard fancy shape.
Covering the surface with waterproof ceramic tiles or mosaics will allow you to choose not only the color, but also the texture of the surface, provide it with an ornament or combine shades.
Materials and tools needed for work
When deciding how to make a shower tray with your own hands from tiles, it is important to know that the set of necessary tools will not require additional costs. Almost any home craftsman has everything you need.
You need to prepare:
- a manual or electric tool for cutting tiles (especially if you have chosen a large-format tile type),
- trowel, spatula and chisel,
- roller or paint brush,
- ruler, square and pencil for marking,
- drill with attachments,
- rule and level for leveling the surface.
The set of materials includes:
- cement,
- brick or additional cement to fill the sides of the pallet,
- purchased waterproofing mixture or bitumen,
- facing tiles (it is important to choose a material intended for constant contact with water and having a non-slip safe surface),
- waterproof tile adhesive,
- self-tapping screws
Note: To level the tiles, use a rubber hammer or a spatula with a rubberized handle. Do not forget about the “crosses”, with the help of which it is easy to maintain the same width of the seams between the tiles or blocks of the mosaic canvas.
Preparatory work
The amount of preparatory work largely depends on the condition of the floor. If there was no screed in the room before installation, it will be necessary to install one. Before screeding, the floor is waterproofed with a polymer film or bitumen mastic, extending onto the walls.

Ready screed primed and waterproofed with the mixture again. Multi-layer waterproofing and primer not only avoid flooding of the rooms located below, but also protect against the occurrence of pathogenic microflora, the appearance of high humidity and unpleasant odors.
- If you are thinking about how to make a shower tray with your own hands as comfortable as possible, you can supplement it with a “warm floor” system. Its installation is carried out under a rough foundation. Also, for insulation, it is possible to lay sheets of expanded polystyrene under the screed, but you need to keep in mind that this will raise the level of the structure.
- All work is carried out with the geometry checked by level.
- You can strengthen the base using metal mesh, placed in the screed.
The height of the base is selected for ease of use, but it should also be taken into account the need to maintain an inclination of at least 3° for the drainage pipe. A foundation that is too low will not allow this condition to be met, which will negatively affect the operation of the drain. A high foundation or a pallet with high sides can be equipped with an additional step on the outside for ease of use.

After the screed has hardened and a waterproofing layer has been applied to it, another layer is made - from self-leveling construction mixture. Together with the sides, it is also covered with a primer and waterproofing after drying, and this layer of protection against moisture should be the most reliable. Experts recommend paying special attention corners and seam around the drain hole. It is important that the layer does not have “gaps” or omissions and is a solid coating.
- The sides of the pallet are traditionally made one brick high, however, depending on your desire, they can be made to a different size, not forgetting that the height of the fence should protect the room from water and at the same time allow you to easily get under the shower.
- The sides can be made of brick or, after completing the formwork, you can make a poured concrete fence.

Gutter installation
In the answer to the question “how to make a shower tray with your own hands,” the installation of a drain (or drain) occupies a special place. It will be extremely difficult to correct problems once the pallet and cladding are completed, so it is very important to ensure high quality.

To do this, you must use the following rules and recommendations:
- The connection between the drainage point and the sewer system is made with a slope of about 3°. This ensures optimal flow rate and prevents blockages and water stagnation in the shower pan.
- The joints of all elements must be sealed.
- For installation, it is recommended to choose plastic pipes and fittings of the highest quality. They can serve for a very long time because they are not subject to corrosion and destruction from other types of external influences.
- The drain ladder must be firmly fixed. The foundation is poured only after making sure that the structure will not move either at the time of pouring or during the process of strengthening the mortar.
 Installation diagram
Read about how to select and install in another article.
Surface finishing
The cladding of the inner and outer surfaces of the pallet is carried out after the masonry mortar or concrete poured into the formwork has completely hardened. The tiles will look great and hold securely, regardless of how the sides are made: you can make a shower tray with your own hands from brick or poured concrete.
The technology of laying tiles is no different from tiling any other surface, however, it has its own nuances.
Select an adhesive intended for use in rooms with high humidity and a similar material for processing seams.
To build a shower tray with your own hands, providing a beautiful, flat surface and reliable protection from water penetration, you should not neglect the recommendations of specialists.
- Applying the adhesive with a notched trowel will help create a smooth surface.
- The adhesive is applied to the surface to be tiled, and not to the back side of the tile.
- To fix the tile, it should be pressed to the surface.
- It is easy to level the surface by tapping the tiles with a rubber hammer.
- Special crosses will help ensure equal thickness of all seams.
- The surface should be covered from the corner.
 Do-it-yourself shower tray made of tiles - photo with the sequence of tiling work
 There are some nuances mosaic surface finishing. Many consider this cladding more preferable than classic tiles. Both glass and plastic tiles are suitable for the tray, as well as for the walls of the shower stall. Except large selection ready-made mosaic canvases with a mesh or paper base; their advantages are ease of installation and the non-slip surface of the finished coating. No special tools are required for cutting - just use regular scissors.
All of the above rules for tiling are also valid for making mosaic coverings, however, in the latter case there are also some nuances:
- It is preferable to use white tile adhesive.
- Grouting joints and cleaning the surface must be done as quickly as possible, without allowing the composition to dry out.
The general requirement for tiling or mosaic cladding is correct preparation of glue. It is important to strictly observe the proportions recommended by the manufacturer and the uniformity of the composition. To ensure the latter condition, it is better to stir the mixture not by hand, but to use a drill with a mixer attachment. In order to avoid partial “setting” of the adhesive composition and, accordingly, a decrease in its quality, it is better to prepare the mixture in small portions.
It is difficult to make a do-it-yourself tile shower tray with rounded edges, so the safety of the structure can be increased by installing special corners.
You can see how to decorate a shower tray with mosaics yourself in the video.