How to lay flexible tiles with your own hands. How to fasten flexible tiles. What should the roof of a private house be like for laying flexible tiles?
Read also
Laying technology soft tiles it is quite simple and does not cause any particular difficulties and, if you follow the instructions and also have some construction skills, it is quite possible to carry out installation bitumen shingles with your own hands. Proper installation of such a coating is not only excellent protection housing from unfavorable weather conditions, but also excellent appearance the roof itself.
Weather
According to the instructions, it is recommended to lay flexible tiles in a warm dry time years, at a temperature of at least +5ºС, but still better than +10ºС. This is necessary so that, under the influence of heat, the sheets of bitumen shingles better stick together with each other and with the base, forming an almost monolithic coating layer. At low temperatures, the sheets become fragile and bend poorly, so winter is not the best time to work with this type of coating, but if you plan to lay bitumen shingles in winter and the air temperature is less than +5ºС, then it is necessary to keep the material at room temperature day and use construction hair dryer for heating the tiles and bitumen mastic for better sealing of the layers. It is better to produce in winter partial renovation roofs, not full installation over the entire surface of the roof, especially if the installation flexible tiles made with our own hands for the first time.Roof slope
It is advisable to install flexible tiles on roofs with minimum slope 12º-18º. If the slope is less or the roof is flat, then it is better to choose a different type of covering, since the inevitable stagnation of water will lead to rapid deterioration of the roof.The main stages of laying soft tiles
Base, ventilation
Any type of roof installation begins with preparing the base. A solid solid base is used as a base for laying bitumen. It must be smooth and solid, since the slightest irregularities will inevitably affect the appearance of the roof. Ideal option The coating is considered to be OSB-3 board. Required condition long service soft roof is proper ventilation according to the “bottom-up” principle. At the bottom of the ramp are made ventilation holes, through which air enters, and it is drawn out through the so-called ridge vents or aerators.
 Features of laying the lining layer
Installation of soft tiles is carried out on a special underlay carpet, preferably from the same manufacturer as the tiles. If the angle of inclination of the roof is minimal, i.e. 12º-18º, then the underlayment carpet must be laid over the entire surface of the roof. The underlayment layer begins to be attached from the lowest point of the roof, parallel to the eaves line. Layers overlap each other: upper layer should be 20 cm on the bottom, the edges are coated with glue and nailed with nails with wide heads. Pay attention to good carpet tension! If the roof slope is more than 20º, you can lay the lining only on the eaves overhangs, ridges, at the junction of the slopes (valley), around the pipes, i.e. on the “ problem areas", where there is a high probability of leakage. In this case, the carpet can also be mounted vertically. Also, vertical carpet fastening can be used for roofs with steep slopes. In any case, before installing the lining layer, it is better to coat the base bitumen mastic. Then, when the carpet is heated with a hairdryer, the lining adheres perfectly to the base and a continuous covering is obtained. The correct foundation and a well-laid underlayment affect both the appearance of the roof and its protective functions. Use as lining material hydrobarrier, roofing felt is not recommended.
Protecting the "edges" of the roof
For water drainage and protection wooden elements metal eaves strips are installed along the roof overhang on top of the lining. They should be fastened with nails in a checkerboard pattern and overlapped by 5 cm. The end strips are attached in the same way. These elements strengthen the overhangs and protect wood covering from precipitation, increase wind resistance and give a finished appearance.
Marking for flexible tiles
If laying soft tiles for the first time, it is better to make preliminary markings to avoid curvature of the rows. Tapping is done with a cord on horizontal and vertical lines in increments of 0.8 and 1 m, respectively. This marking will help to align the rows horizontally and vertically, as well as correct distortions if some object is built into the roof: a pipe, a window. You cannot fasten the tiles strictly along these lines! Just follow the direction! It is necessary to mix several packages of tiles so that the roof covering looks uniform, since different batches may have different shades that cannot be immediately noticed. Initially, 1.5-2 cm from the edge cornice strip, self-adhesive attached cornice tiles joint to joint, additionally it is nailed with nails with wide heads. You can take ordinary ordinary tiles and cut off the protruding parts, the so-called petals. The first row begins to be fastened from the center of the slope towards the ends of the roof in both directions. If you are installing flexible tiles yourself for the first time, then you should follow the sequence of actions:- Remove the film from the bottom of the sheet (after this you cannot stack the tiles on top of each other).
- Place the shingles on the surface and secure with four nails along the “notches” at least 2 cm from the edge. If the roof slope is large, then you need to fasten it with six nails - drive two along the edges of the sheet for additional fixation.
- We place the next row on the previous one so that the “petals” of the top sheet are located on the notches of the previous row and form a continuous straight line with them.

Registration of “problem” areas
- Having reached the end strip, the soft tiles need to be cut flush with the strip and sealed with bitumen sealant or glue to a width of about 10 cm.
- When laying in valleys, the tiles are laid overlapping on the adjacent slope and cut to one line, additionally heated with a hairdryer and glued with bitumen glue.
- A metal apron should be used around pipes, antenna outlets and in places where soft tiles adhere to vertical surfaces, and be sure to additionally coat the seams with bitumen sealant.
Horse
Eaves tiles, divided into three parts, are attached to the roof ridge. Each part is bent at the desired angle. You can start laying from any side of the ridge. The sheet is glued to the ridge with the self-adhesive side and nailed with four nails. The next (top) tile must be overlapped with the bottom tile by 5 cm to overlap the nails. The outer sheets are glued. That's it, the roof is ready!
  But most questions arise during the work process, so it’s worth familiarizing yourself with the video materials on installing flexible tiles.
A reliable, inexpensive and easy-to-install roof is one of the most cherished wishes of the developer. Simplicity, the possibility of arrangement with your own hands without the help of third parties - all the parameters distinguish the laying of soft tiles. Available technology, affordable cost of material, no need to use special skills and tools make laying out easier. And we will tell you how to install soft tiles with your own hands.
Preliminary calculation of the material, additional elements, fasteners is the key quality arrangement roofing carpet. Approximate costs such:
- The number of shingles in a box can vary: from 1.5 to 3 m2. It all depends on the size of the elements (including overlap). All parameters are indicated on the box; the material should be purchased with a margin of 5-7%.
- Mastic in quantity: 200 g/m2 for the valley carpet, 100 g/m2 for the ends, 750 g/m2 for junctions, nodes.
- Nails 30 mm long, galvanized with a 3 mm shaft and a 9 mm head in an amount of 80 g/m2.
All calculations are averaged standard. Tools you will also need:
- Knife for edging bitumen shingles, substrate;
- Tin scissors (or others) for cutting planks;
- Hammer for fasteners;
- Brush for bitumen mastic.
Advice! If laying flexible tiles with your own hands is done in the cold season, a burner will be useful for heating the bitumen layer. Despite the possibility of carrying out work down to -5..-7 degrees, it is better to install the roofing carpet in warm, dry, not very hot and windless weather. In cold weather, the flexibility of shingles decreases, the risk of cracking increases, and in extreme heat, bituminous materials heat up excessively and melt.
Roofing pie for flexible tiles

From the arrangement roofing pie For soft tiles, a large stage of work begins. Depending on its purpose, the attic can be warm or cold. The purpose of the roof space affects the arrangement of the roofing pie, however, the part above the rafters is always the same:
- layer of waterproofing material;
- bars with a thickness of 30 mm;
- sheathing in the form of a continuous flooring.
Important! Additional elements: junction strips, eaves overhangs, pediment strips are made of special steel.
Laying out waterproofing

Membrane materials can be one-, two-, three-layer.
- Single layer waterproofing– accessible and cheap option, which performs the task of preventing moisture from entering the room and not preventing evaporation from escaping outside.
- Two- and three-layer materials– more durable and practical. They have an absorbent layer that absorbs condensation, as well as a layer that strengthens the material, which gives greater tensile strength.
Advice! Three-layer waterproofing membranes are indicated in the case of mineral wool insulation. The material is afraid of getting wet and with an increase in humidity even by 10% it loses 56-60% of its quality characteristics. In the case of arranging a cold attic, it is better to use a two-layer membrane fabric: the price is slightly more expensive than a single-layer one, but the strength is much higher.
Advice! If the slope angle is more than 18 °, waterproofing membranes should be placed parallel to the end and eaves planes. Connection points have an increased risk of leaks, so the laying is carried out with an overlap. The same is true in the ridge area. If necessary, the ridge area is covered with another lining carpet. The work is carried out from the bottom up, fastening is carried out with nails with an increased head size. The fastening pitch is 20 cm.
Ventilation
Ventilation of a roof made of soft tiles is usually arranged using a ridge. It is laid out on a ribbed profile. In case of insufficiency this method, ventilation elements are laid on the roof surface. This is the name given to profiles with ribs located at a distance of 20 mm from each other. The structures are attached to the base with nails.
Lathing and flooring

Immediately after laying the waterproofing, sheathing strips are placed on top. Thick timber elements create the necessary ventilation gap. Lathing is made from timber timber coniferous species. The thickness of the elements is at least 30 mm; before installation, the wood is treated with impregnations against rotting and fire.
Important! The length of the boards for sheathing is a distance equal to two spans of rafters. Fastening is carried out above the rafter legs.
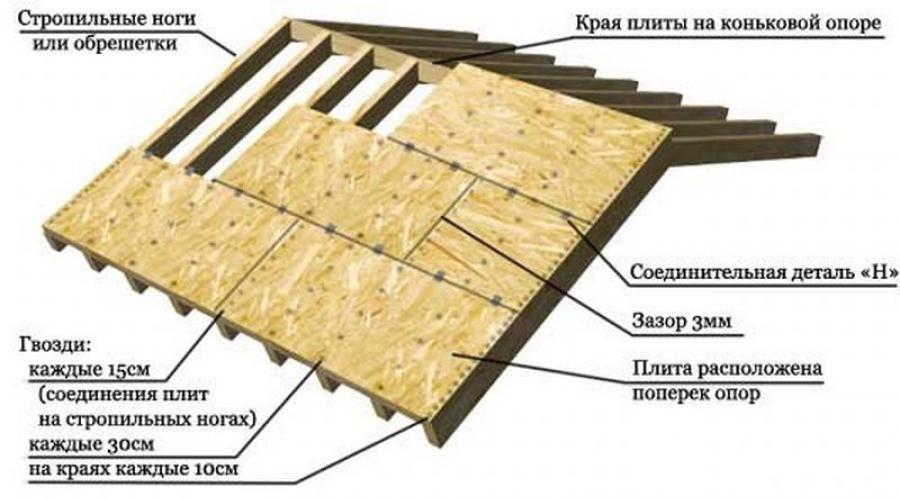
Do-it-yourself installation of flexible tiles is carried out on a continuous flooring. It is made from OSB3, sheets of moisture-resistant plywood, tongue-and-groove or edged boards 25 mm thick, humidity not higher than 20%.
Important! The laying out of solid elements is carried out with gaps - compensators for thermal expansion of the material. For plywood or OSB the gap width is 3 mm, for boards 1-5 mm. Sheet dies are attached using the method of spacing the seams so that the joints are not continuous. Fastening with self-tapping screws or rough nails.
Arranging a deck next to chimneys more than 0.5 m wide often requires the construction of a mini-roof. After installing the flooring, it is necessary to check the evenness of the surface of the covering, the dimensional parameters - the slope must be perfectly adjusted.
Laying flexible tiles

When purchasing a product, you should carefully review the instructions from the manufacturer. It must indicate how to lay flexible tiles. Often it is enough to follow step by step instructions to execute roofing correct, but familiarizing yourself with the procedure in advance helps to allocate time.
Advice! Installation of bitumen shingles requires caution: no bending or creasing. You should not walk on the surface unless necessary.
Now the installation technology:
- Strengthen the overhang. A drip strip is installed to protect the structure of the rafters and sheathing from moisture. Place one edge of the drip line on the flooring, and cover the overhang with the other. Fastening with galvanized nails. Step 200-250 mm, checkerboard order, laying with an overlap of 30 mm. The gaps are coated with bitumen mastic and sealant.
- Attach hooks for drainage pipes.
- Lay a waterproofing carpet. The adhesive bottom side facilitates the installation process. Start from the valley section. An overlap of at least 0.5 m is left from the point of inflection in both directions. It is better to do without joints, but if necessary, leave an overlap of 150 mm. Laying from bottom to top, the joint is pre-treated with bitumen-based mastic. There is free residue along the eaves overhang waterproofing material 0.6 m.
Advice! Before laying, the waterproofing carpet is rolled out, trimmed, then the protective film is removed and only then glued to the backing. Additional fixation along the edges with stainless steel nails will help secure the sheet of material more firmly. The points of joints and overlaps are additionally sealed with bitumen mastic and crimped.
- Carpet lining. The product also comes in the form of a roll with an adhesive backing protected by a paper layer. The layout option depends on the profile of the selected shingles, the shape of the roof, and the angle of the slope. If you choose a covering type Jazz, Trio, an underlay carpet is required. If the roof slope is 12-18 °, the lining is installed along the entire perimeter of the roof. Installation should be done from below, overlaps are at least 150-200 mm, joints must be sealed. The upper edge is additionally secured with galvanized nails. If the slope angle is from 18°, a lining is needed in places of kinks, at the points where the pediment line adjoins the wall panels.
- Pediment strip needed for arranging side cuts. The additional element already has the required form, mounted on the lining or waterproofing deck and secured with nails at 150 mm intervals.

Advice! When starting to lay out shingles, it is better to first mark the slope. Mesh markings will help place the roofing material, taking into account alignment and joints. It’s easier and more even to make markings with regular paint cord.
- The first strip of shingles, as a rule, ridge-cornice or ordinary row with trimmed petals. The sheet is laid out on the edge of the slope so that one edge of the shingle goes over gable plank. The lower edge of the shingle should lie on the drip edge with a distance of 150 mm from the fold of the additional element. Fastening in the corners with a gap from the edge of 20-30 mm.
Advice! Often sheets in bundles have some differences in background color. To ensure that the laid shingles are not very different, you should open several packs in advance and lay out the elements alternately.
- How to lay ordinary soft tiles? The first shingle does not reach the edge of the starting strip 10 mm, the sheet is fixed with nails (except adhesive base). The number of fasteners for a slope of 12-45 ° steepness per sheet is 4 pieces, and at the junction points of two sheets, nails are driven so that the head “covers” the edges of both shingles. If the slope angle is greater than 45°, fasteners are driven into each sheet.
After the installation of the tiles along the slopes with your own hands is completed, all that remains is to design the valley and gables. Flexible roof has a lot of advantages, one of them is the quick arrangement of the most difficult areas. The roof in the valley area is arranged as follows:
- Mark the area where nails cannot be driven in (300 mm from the midpoint of the valley), mark the boundaries of the additional gutter - this is approximately 5-15 cm in both directions.
- Now drive the fasteners of ordinary tiles as close as possible to the line beyond which fasteners are no longer allowed.
- Trim the shingles along the gutter installation line.
- To prevent water from leaking under the edge of the material, the corners of the material are trimmed (4-5 cm each), the loose edge is attached to bitumen mastic.
Laying roofing material along the gables is not difficult: the side shingles are cut with a distance of 10 mm to the ribs. Trim the upper corner, just like the valley elements: diagonally 4-5 cm. Place the edges of the tiles on bitumen mastic and fix them with nails.
Installation of bitumen shingles on a ridge has its own characteristics: along ridge element a gap is cut that does not reach the ribs by 300 mm. The installation of shingles is carried out before the start of the slot, after which the additional element (ridge profile) is mounted. A long skate may require several profiles, this is normal. Fastening with nails, laying is carried out end-to-end, the interface points are coated with bitumen.
Important! On the ridge, a downwind installation is carried out; the flexible tiles are laid out towards the wind, with an overlap of at least 30-50 mm.
Installing a soft roof is not difficult, especially if you follow technological subtleties process, perform an accurate preliminary calculation. The work is carried out on a dry, sunny day without wind or intense heat. If you need clarification, watch a video from professionals: do-it-yourself flexible tile installation.
1.
2.
3.
4.
Of course, no owner will refuse to have a reliable and at the same time quite affordable roof on his home. A well-planned manual installation will not only protect all structures from bad weather and possible damage, but also save significant volume financial resources. So, all of these qualities are possessed by an innovative soft roof made of flexible tiles, the basis of which is bitumen. Therefore, it is important to understand how to properly install a roof made of flexible tiles.
It is necessary to study in detail how flexible tiles are laid, the installation technology of which has some of its own characteristics. Only strict adherence to each stage of its installation will allow you to create a reliable and durable roof. Exactly about technical specifications soft tiles, as well as the method of their installation will be discussed further.
What are flexible tiles made of?
Roofing made from this material also has some other names, such as shingles, shingles or roofing tiles. The main advantages of such a roof are its light weight(the weight of one sheet is on average 8 kilograms) and not too high price compared to metal tiles. Thanks to the first indicator, the structure of the house is not so massive, which allows you to save on construction materials and labor costs, and the second characteristic allows the roof to seriously compete with other, heavier roofing types.

The basis of such tiles is usually fiberglass or fiberglass (less commonly, organic cellulose) impregnated with bitumen. These materials perform the functions of so-called reinforcement, which holds two layers of SBS modifier together, which directly affects the flexibility and elasticity of the coating. Outside, the material is sprinkled with slate, mineral chips and basalt granulate. They are able not only to protect the material from damage, but also to give it a variety of shades of color.
Preparatory work for laying soft tiles
The basis for soft tiles is particle board, moisture-resistant plywood or boards. When choosing boards, you need to carefully select quality material. The best option will be the use of planed tongue and groove boards. If its thickness is 2 centimeters, then rafter step should be 6 meters. With a thickness of 2.5 - 3 centimeters, the step can be 1.2 meters. Minimum thickness plywood is a distance of 1.2 centimeters (rafter pitch is 6 meters), with a thickness of 2 centimeters, the rafter pitch is 1.2 meters. One way or another, the joints of the material must correspond rafter legs. When working with a material such as flexible tiles, it is recommended to treat the installation of the base with an antiseptic. It is important that the boards used during installation are dry. The base coating should be hard and even.

In addition to the coating itself and the base material, during installation you cannot do without the following elements:
- lining carpet, which can be represented by any bituminous roll material provided that the shingle roof is new. For old roof You can also use roofing felt that has already been used;
- valley carpet, the role of which is performed by bituminous material using polymers, necessary to protect junctions to walls and ventilation pipes from moisture.
When laying carpet, you must use following materials:
- roofing sealant or mastic;
- construction hot air gun;
- knife for cutting material;
- three types of nails: regular, roofing and galvanized;
- construction strips required for processing junctions, cornice and front.

When all the parts have already been assembled and the installation of flexible tiles is carried out, the instructions require compliance with the following set of rules when working:
- Initially with inside roofs need to be secured vapor barrier film. The material is attached to the rafter legs using nails, and to the ends - wooden planks. The film strips are connected using tape.
- After this, already from outside you need to lay insulation, for fixing which it is customary to use wooden blocks.
- A film is placed on the insulation to protect the roof from the wind. To fasten it, a counter beam is used, to which the sheathing will need to be nailed.
- After this, boards, strand board or plywood are laid. The material is secured with nails equipped with a wide head or self-tapping screws.
Laying flexible tiles
When arranging a roof with soft tiles, you should first of all take into account temperature conditions, since the structure of the material requires a special approach. The greatest strength of connection between shingle elements will be ensured only by heat, sun and absence of any precipitation, and installation of flexible tiles in winter is not recommended, since this may lead to the falling off of the slightly previously glued tiles (read: ""). Sometimes in cold weather it is permissible to use a hot air gun to heat the coating sheets. You can also heat the adjacent attic (attic) space.

- Initially, the installation of the lining carpet is carried out. It must be spread and nailed over the following areas of the roof:- cornice;
- ;
- valleys;
- skate;
- places where the roof slope is broken.
Provided that the roof slope is more than 20 degrees, the lining carpet must cover the entire roof area. You need to start work from the bottom, and relative to the sheathing, the carpet should have perpendicular arrangement. It is nailed with an overlap (width - 15 centimeters) with a fixing step of 20 centimeters. It is important that each of the connections is carefully processed using bitumen mastic or special roofing sealant. A cornice strip is nailed onto the spread carpet, designed to protect the sheathing from moisture. If it is not possible to do this, then the cornice strip is simply wrapped under the sheathing base. They nail it down using galvanized nails in 5-centimeter increments.
- Then work on the construction of the pediment is carried out. It is also necessary to nail end strips to it, which are designed to ensure wooden sheathing protection and remove moisture down from the ridge. After installing them, you can begin installing the ridge-eaves covering strips, which can simply be represented by soft tiles with cut off edges. Nail them end to end, retreating 2.5 centimeters from the edge. It is recommended to treat these areas with bitumen-based mastic; it is also used to secure the free edges. On at this stage It is also worthwhile to work on fastening the drainage elements - brackets that are used under the gutter.
- Flexible roofing, the installation of which has certain features, requires the laying of a valley carpet. It needs to be laid on top of the main one, that is, as a second layer. This carpet should be located in areas of junctions, recesses and other places that are optimal for the accumulation of excess moisture. It is fastened using galvanized nails in increments of 10 centimeters, and the edges are treated with bitumen mastic. If possible, it is better to use special glue - waterproof.
- It is after completing all these procedures that you should proceed directly to. The material must be from different packages, since the sheets in them have different shade. After completing the installation work, under the influence of the sun, the material will gradually acquire a uniform color. You need to start laying from the bottom of the central section of the slope. The adhesive part of the material must be stripped of the protective film, and the coating must be pressed tightly to the base. It must be nailed on top using 4 nails, departing 4 - 5 centimeters from the ridge-eaves strip. The petals of the material should completely cover the perforation of the strip located below. From the edges of the gable line, the coating should be cut to the required length and treated with mastic.

- Extremely important point is also the intersection with the chimney and ventilation systems. The underlayment carpet should be installed initially in this area. The ventilation base should be treated with bitumen mastic. Next, you need to select one of the fragments of flexible tiles and make a hole in it corresponding to the ventilation device (read: ""). After finishing laying the coating, the base must be treated with mastic again.
Working with a chimney is more difficult. At the point where it contacts the roof, three triangular slats should be nailed, located at right angles to the pipe. Then a lining carpet is laid around the chimney, which is overlapped and treated with the same mastic (read also: "
A soft roof is not the easiest to make with your own hands, but it is not the most difficult either. If you understand the installation technology, then doing it yourself and with high quality is realistic. Two types of materials are used as roofing materials - rolled and flexible bitumen shingles. They have a lot in common, but the technology and installation features are different. In this article we will talk about the design and installation of soft tiles. It is also called bitumen or flexible tiles, roofing tiles. There are many names, but the same material is implied.
Small flat sheets flexible roofing material that has one figured edge and is called soft tiles. It is most often based on fiberglass or fiberglass, but sometimes organic cellulose - felt is also used. The base is impregnated on both sides with a composition, most of which is bitumen (bitumen-polymer mixture).
This is what soft bitumen shingles look like on the roof of a bathhouse
The front part is then sprinkled with colored basalt granulate or mineral chips. It is dyed using special technologies, thanks to which the color does not fade for decades. Powder not only improves appearance. It gives the surface increased wear resistance, protects against atmospheric phenomena and neutralizes the effects of ultraviolet radiation.
Sometimes the sprinkles fly off in some places. This happens rarely, and almost always with elements from the economy segment. The defect can be easily eliminated using glue and powder of the appropriate color.
The back side over the bitumen layer is covered with:

Soft bitumen shingles have many different colors and shades are also available different shapes figured edge: hexagonal, rectangular, rounded, diamond-shaped. There are a lot of types. Some of them are shown in the photo.
Advantages and disadvantages
Flexible tiles are suitable for laying on single and multi- pitched roofs. Due to its plasticity, small sizes, it is indispensable on roofs complex shapes: round, domed, multi-sloped. This coating looks good on buildings of any purpose, the most different styles architecture.
The advantages of flexible bitumen shingles include:

Its disadvantages are the following:
- Quite a high cost.
- Increased consumption of materials when installing sheathing (again, increasing the cost of the roof).
Flexible roofing device
Soft roofs are suitable for roofs with a slope greater than 12°. At smaller angles, leaks may appear at the joints, so a lining carpet is laid under the tiles with a continuous carpet - special material, protecting roofing materials from moisture.
The main difference between any type of soft roof is the use of a solid base or sheathing with very small gaps - about 0.5 cm. Otherwise, the system is similar to any other: rafter system, with hydro- and wind protection, insulation located between the joists. An approximate roof pie made of flexible tiles is shown in the photo.
 This is what a shingle roof pie might look like
 There are several options for installing a base for roofing material:

Flexible tiles are not affected by fungi and mold, they do not rot or deteriorate. But it is laid on wood, which when high humidity is damaged. Therefore, wood is treated with antiseptic impregnations. But to ensure its durability, a ventilation system is also necessary.
For natural ventilation and drying, leave a gap of at least 5 mm between the waterproofing layer and the base for the flexible tiles. Sometimes this requires a counter-batten, to which the base is already attached. Also, ventilation holes are made in the eaves along the entire perimeter of the roof. To prevent birds and insects from flying in, the openings are covered with nets.
Installation
Laying of bitumen shingles occurs on a flat, clean and dry base in several stages. Installation work should begin in the warm season, when the temperature is above +5°C. Then it will be convenient to work and the coating will become airtight. The thing is that bitumen is under the influence sun rays heats up and fuses with the sheets underneath into a single whole. The covering, previously consisting of separate sheets, becomes a monolith.

If temperatures are low, the bitumen does not warm up. When moisture gets between the elements (precipitation or evaporation), leaks remain, moisture seeps into them all the time, gradually rendering the roof unusable.
There is another difficulty in working with low temperatures: Flexible bitumen shingles lose their elasticity and are much more difficult to work with and easy to break. Therefore, we wait for warm and dry weather - the humidity of the base is no more than 20% - and only then we begin to lay bitumen tiles on the roof.
Stage one: additional waterproofing
If the roof slope is 12° or more, along the roof overhangs, in valleys, places adjacent to the walls of the building, on attic windows and skates, a special lining carpet is laid. Although the coating is sealed, in places where leaks are most likely and where water accumulates the most, this serves as additional insurance.
 Installation of a roof made of bitumen tiles
 Almost all companies provide an additional guarantee for the roofing material if this layer of waterproofing is installed over the entire surface of the roof. This option is required if the slope has a slope less than the recommended 12°. In other cases it is desirable. It’s a good idea to use it if the base is made of boards rather than slab material: plus, the waterproofing will smooth out and hide the cracks. It will also improve the heat and sound insulation of the roof.
Begin to roll out the waterproofing carpet from the lower edge of the roof along the entire overhang. At least 5-10 cm of material is left on the sides, it is bent and nailed to the end of the base. The upper edge is fastened with roofing nails (galvanized with a wide head) every 40 cm. Along the lower edge, fasteners are hammered more often - every 10 cm.
Roll out the second layer on top. Its lower edge overlaps the first one by at least 10 cm. To be sure, marks are made in several places with chalk or a marker, which are used to guide when laying.
 This is what a partially laid waterproofing carpet looks like
 At the junction of two rolls or strips, they are laid with an overlap of at least 15 cm. The overlap areas are glued with bitumen mastic and pressed, then nailed in increments of 10 cm.
In places where pipes pass through the roof or where they adjoin walls, the material is cut so that it extends 5-10 cm onto the wall or pipe.
When passing through the valley, the horizontally rolled carpet is cut along the border and nailed along the edge. When the waterproofing is laid and secured on both sides, another piece of waterproofing material is rolled out from above along the axis of the joint. It is nailed lengthwise at intervals of 20 cm.
Stage two: installation of end and cornice strips
To protect the eaves and ends and to prevent water from flowing under the materials, eaves strips are installed along the entire overhang of the roof. They are fastened with nails every 10 cm, with one at the bottom of the plank, the other at the top, the next one at the bottom again, and so on, moving in a zigzag. Two adjacent planks are laid with an overlap of at least 5 cm.
 The edges of the roof are protected with special strips
 The end strips have a slightly different shape. They are attached at the same intervals, according to the same pattern. Installation begins from the bottom, moving towards the ridge.
Stage three: laying the valley carpet
For valleys (places where roof slopes meet) there is a special protective carpet - it is thicker than the protective one, as well as a coating made from the same coating as on the tiles. These places definitely require careful treatment: this is where a large amount of water flows. It is rolled out from top to bottom and nailed in increments of 10 cm.

It is advisable to use a valley carpet in places adjacent to the walls of the building (if there are any) and around chimneys. These are also the areas where leaks are most likely.
Stage four: securing the cornice strip
This material differs from ordinary flexible tiles in its geometry: it is a flat strip, without a figured lower part. It is the starting one: it rolls out along the roof overhang and forms a smooth bottom edge.
Remove from the wrong side protective film. The strip is placed at a distance of 1-2 cm from the bend point of the cornice strip, laid and pressed. Nail along the edges and in perforation areas. The attachment points are then overlapped the following stripes— they overlap one another by 5 centimeters.

Stage five: installation of flexible tiles
Packages of tiles are stored indoors or under sheds. Several packs are transported to the installation site. Colors in different packs may vary slightly. Therefore, it is advisable to open four to six pieces at a time. When laying bitumen shingles, you need to take one sheet from each alternately (or stack it, laying it alternately). This way, a roof made of bitumen shingles will be more voluminous, and there will be no clearly visible stripes of different shades.
The laying of ordinary flexible tiles begins from the center and moves towards the ends. The first row is positioned so that its bottom edge is flush with cornice strip. The top edge should overlap it by a few centimeters.
Before installation, the protective film is removed and the sheet is laid on the base. Fasten along the edges and above the cutouts (3 cm above the edge). In case of increased wind loads in the region, or if the roof slope angle is more than 45°, they are secured with six nails: two additional ones are driven into upper corners. Two adjacent sheets in a row are laid close to one another.
The second and subsequent rows of tiles are positioned so that the ends of the petals (protrusions) are at the level of the cutouts of the previous row.
At the ends, soft tiles are cut along the bend line of the end strip. The place is glued with bitumen mastic. After gluing, each seam is additionally treated with sealant.

Special attention Endova demands. To prevent the tiles from sticking beyond the fold line, part of the film is left glued. The excess is cut off so that it remains open lane the valley carpet is approximately 15-20 cm. When cutting, hard material (a piece of plywood sheet) is placed under the tiles. This is necessary so as not to damage the waterproofing layer located under the tiles.
WITH reverse side tiles remove the remaining film. The joints with the valley carpet are glued with bitumen mastic, and the seams are filled with sealant.
Stage six: sealing pipe passages
Using round pipes, install special passage elements. They are different diameters under different angles roof slope.
Under the passage node is marked required hole. According to the markings, a part of the base and the lining carpet are cut out. The part of the carpet to which the passage unit will be attached is coated with mastic. It is installed and secured around the perimeter with nails every 10-15 cm (the distance from the edge is about 1-1.5 cm).
The laid sheets of tiles are trimmed, the edges that overlap the passage unit are glued with mastic. After installation, the seams are sealed with sealant.

In places where brick pipes pass, patterns are made from the valley carpet. Similar patterns are also made from galvanized metal. How to properly make the passage of a pipe through the roof, read the article “How to route a pipe through the roof of a bathhouse.”
Along the perimeter brick pipe gets nailed wooden corner, measuring 5*5 cm. When laying, an underlay carpet is placed on it, and then ordinary tiles are placed on top. The lower surface of the chimney is treated with bitumen mastic to a height of 30 cm. The lifting strip on this side should be of this height. It should also extend onto the bottom row of bitumen shingles by at least 15 cm (also coated with mastic).
The side lifting strips are placed under the tiles. The rear lifting strip is installed last on the bitumen mastic. The height of the rear and side parts depends on the roof slope angle. The upper edges of the strips are attached using clamping strips, and the seams are sealed with sealant.
 Sealing a pipe is a rather complex process.
 The tiles, which during installation overlap the installed lifting strips, are additionally coated with bitumen mastic. The seams are also sealed with sealant.
Stage seven: skate
This stage is the final one. The ridge is closed after both slopes are covered roofing material to the top.
There are two options: some companies have special ridge tiles, others offer to cut ordinary tiles into separate fragments. Then, with a bend along the length, they are attached to the ridge using mastic and nails. The second option is cheaper: special packaging ridge tiles costs almost twice as much as usual.

Installation is carried out as follows:
- The last row of shingles should be positioned at the top at such a level that the nails are covered by the ridge shingles.
- The ridge tiles are bent in half and laid on top, extending to the other side.
- They are nailed along the edges with roofing nails: two on one side, two on the other.
- The next fragment is placed with an overlap of 5-10 cm, overlapping the nails securing the previous piece.
- The latter is glued to bitumen mastic.
That's it, the installation of a soft roof made of bitumen shingles with your own hands is completed. But he stayed finishing touch: it is necessary to seal all seams along the roof overhang, in the valley, in the passages and junctions with sealant (check again, and where necessary, glue). Then nothing will leak anywhere.
There are few operating requirements and they do not take much time. Necessary:
- Inspect the roof in spring and autumn. If holes and cracks are found, they are sealed with either bitumen mastic or sealants.
- When cleaning and removing snow and debris, do not use hard tools. For soft roofs, brushes are suitable, not shovels.
- Do good system drainage of water from the roof.
These are all the requirements.
conclusions
We tried to give as detailed a technology as possible for laying soft tiles. Now installing it yourself will not be a problem for you. There are no difficulties here, you just need to follow safety precautions when working at height.
Thanks to the good operational characteristics flexible tiles, or as they are also called, are becoming increasingly popular soft roof, all the work can be done with your own hands, which will significantly save your budget. The cost of the material itself is several times cheaper than other coverings for the roof of a house.
Soft roof structure
IN construction reference books it is called bitumen sheets, sprinkled with multi-colored crumbs. Flexible tiles are produced in the format of a rectangular sheet with one-sided figured cutouts of complex and simple shapes, where the relief is based on a rectangle, oval or polyhedron.
Material structure multilayer, the order of layers is as follows:


The thickness of the soft roof varies between 3-4 mm - depending on the manufacturer and is characterized by a rich color scheme. Installation of flexible tiles is carried out on a prepared plywood or tiled surface.

Advantages and disadvantages of coating
Before installation, you should weigh the strengths and weaknesses of the material in order to be prepared for various surprises.


Availability characteristic differences material in terms of advantages or disadvantages does not categorically indicate that a soft roof should or should not be used.
Installation instructions and requirements for it

The instructional steps will help you learn how to install shingles. They must be followed in order to simplify the work process and guarantee high-quality results upon its completion.
Installation of flexible tiles requires strict adherence to instructions due to the complexity of the process and the need for experience, as well as special knowledge in the construction industry. At the time of installation, you need to make intervals between components lathing, observe optimal linear parameters underlying surface.
Minimum permissible value slope when laying flexible tiles with your own hands - 12 degrees, but the underlying surface must be smooth and solid. Humidity indicator building material it is desirable that it does not exceed 20% of its total weight.
Installation of a soft roof includes several sequential operations.
Fastening the base layer and underlayment.

Flooring made of boards or plywood is used as an underlying carpet for a soft roof, protecting the roof from leaking. If the roof slope does not exceed 30%, the lining layer is made continuous. When the degree values of the angles are large, the flooring is attached only in special dangerous places– where the cornice, the end of the structure, is located.
Installation of the underlying surface start from the bottom of the slope, gradually moving towards the top. The flooring is overlapped with a width of 0.1 m. This allows you to protect the surface from leakage. The fasteners are nails at intervals of 0.2 m and glue. The glue seals the surface, and the nails secure it. After fastening the underlying surface under the tiles, the process of installing a drainage system begins.
Installation of curtain rods.

Installation eaves overhangs is done to it is better to secure the gutter for the drainage. Then sheets of steel are laid on them and on the end on top of the underlying layer. The main thing is to overlap with a width of 20 mm. Fixed steel sheets using special nails, nailing them in a zigzag in increments of 0.1 m. In the area for racks, the interval between the fasteners is 3 cm - necessarily thicker than 2 sheets.
Marking.

It is recommended that you first make markings that will guide during installation flexible tiles - the instructions imply this stage primarily for beginners in this matter, but also experienced craftsmen It also doesn’t hurt to have some insurance just in case. It is performed directly on the roof using ordinary chalk.
In view of small size rows, they tend to move to the side during execution construction work. On a large surface this is very noticeable, and then the structure will not be entirely strong if all parameters are not followed exactly.
From bottom to top, preferably closer to the edge, you need to draw a pair of parallel straight lines so that the segment between them is 0.5 m long. In the perpendicular direction from them, straight lines are drawn for rows at intervals of 0.25 m.
Laying soft roofing and fixing it.
Installation of flexible tiles begins from the outermost section of the slope - from the bottom:

By following the instructions, as well as acquiring skills in self-installation tiles, you can not only save cash when installing the roof, but also learn how to do it correctly so that the roof is resistant to deformation and the influence of climatic factors. All in your hands!