How to make a fence on your property with your own hands. Simple options for fences to build with your own hands How to build a fence and types with your own hands
Read also
Construction of a country fence is a rather labor-intensive process. However, thanks to our instructions, you will learn how to make a fence in your country house and significantly save energy and time. In the previous article we looked at standard options country fences, using the example of which you can build a fence from any material. But we will describe the features of constructing a structure from each of them below. Reliability plays a huge role in the durability and strength of the entire structure. supporting structures and foundation.
The foundation is the basis of the fence structure
To country fence has stood on your site for decades, you need to approach its construction thoroughly. A properly laid foundation and properly installed supports are a guarantee of the reliability of the fence. The foundation of the fence is the same as residential buildings, can be strip or pillar.
Strip foundation
It is customary to pour a strip foundation under heavy building structures, on heaving soil, if it is necessary to create a completely fenced area that is not visible from the outside, if it is necessary to prevent the entry of wild animals and other living creatures into the dacha.
The strip foundation for the fence is made using the following technology:
- Dig a trench 30 - 80 centimeters deep; for greater reliability, go deeper to a depth of 1.5 meters.
- Make a sand cushion and water it generously.
- Tie the reinforcement, vary the cell size depending on your desire.
- Erect the formwork for the foundation of the fence in such a way that the fence is located at a height of 30-50 centimeters above the ground.
- The formwork is filled concrete mortar. If you are using posts to support the deck, they must be installed and leveled before the foundation is poured.

Pillar foundation
Pillar foundations are more economical and are primarily suitable for lightweight enclosing structures. When erecting a wooden fence on a pillar foundation, it is important to treat all wooden parts with a special compound that prevents rotting, because such structures are more exposed to moisture from the grass. A well-thought-out and correctly manufactured fence on such a foundation is no less durable than a fence on a strip foundation.
Technology for pouring a pillar foundation for a country fence:
- Using a garden drill, dig holes for the posts that are 100-150 centimeters deep. Make the diameter 15-30 centimeters larger than the diameter of the pillars. The distance between the pillars should be 2-3 meters, depending on the required span width.
- Fill the holes with 20 centimeters of sand with crushed stone or sand itself, and water generously.
- After you have leveled the pillars, fill the holes with sand concrete solution and add crushed stone if desired.

The result was cemented posts for a country fence. Next, it is customary to attach spans to the pillars if you use ready-made designs, for example, from a chain-link mesh, or logs - horizontal guides into which pickets are stuffed or the fence sheet is attached.
Corrugated fence
One of the popular materials for building a country fence is corrugated board, which has many advantages. Installing a fence of this type at your dacha provides significant time savings because the work goes quite quickly. You just need to define a fence line around the perimeter of the site, install drains and poles, which should be sheathed with corrugated sheeting.
Advantages of corrugated sheets
Such a fence does not provide outsiders with the opportunity to observe what is happening on a piece of land, unlike a fence made of lattice or chain-link. Corrugated sheets reflect sound well and are durable material, and also does not require the involvement of professionals, you only need to buy some tools.
For the fence, it is recommended to choose corrugated sheeting with a corrugation height of no more than 21 millimeters. It is not profitable to buy material with a higher height, since it is intended for roofing and has greater rigidity to withstand the seasonal weight of snow and rain.
Installation of a fence made of corrugated sheets
Before building a fence from corrugated sheets, it is worth calculating the perimeter of the building. You need to outline the position of the country fence and determine the location of the gate and gate, as well as determine the location of the pillars for support with an installation step of approximately 3 meters. Then you need to determine what the height of the perimeter fence will be, as well as the height of the wicket and gate. The length and number of corrugated sheets depends on these parameters.
Now install support pillars, which can serve as metal pipes that have a diameter of at least 80 millimeters. The side of the post that is directed upwards must be welded so that moisture does not get inside the pipe.
To place the pillars, you should dig holes about 1-1.5 meters deep and 1.5 meters wide. Make the foundation using the technology described above. When it hardens, you can begin installing the transverse steel profile, onto which the corrugated sheet should be attached.

As a profile, take a profiled pipe that has a cross-section of 40 by 25 millimeters. Determine the number of pipes based on the height of the fence. If the height of the fence is up to 1.7 meters, then two rows of pipes are enough, which are fixed in parallel and installed at a distance of 30-40 centimeters. If the height of the fence is 1.7 - 2 meters, then you need to install pipes in three rows.
Secure the profile and support posts using electric welding. Then coat them with a primer to protect them from corrosion. At the final stage, corrugated sheets should be secured to the frame. This material is usually fastened with self-tapping screws at a distance of 50 centimeters. Adjacent sheets are usually overlapped together.
When you install a fence made of corrugated sheets at your dacha yourself, do not forget to wear gloves, because you can get hurt on the sharp edges of the material. If scratches occur on the corrugated sheeting during installation, you should use spray paint to remove them. To achieve a better aesthetic appearance, you can cover the support pillars with brick or stone cladding, at which point the installation of corrugated fences can be considered complete.
Chain-link fence
As fencing cladding dacha area Chain-link mesh remains unrivaled in its popularity because it meets all the requirements for reliability, light transmission and service life.
Types of mesh
Today the following types are offered on the market: metal mesh: non-galvanized, galvanized and plastic-coated chain-link mesh. The first solution immediately disappears, because its useful life is minimal due to the lack protective coating from corrosion.

Chain-link mesh, lined with PVC, is primarily intended for building fences in warm climates. climatic zones and on the coast of the seas, since plastic provides good protection from atmospheric moisture, but does not withstand seasonal changes in low and high temperature. The optimal solution is still galvanized mesh.
Installation of chain-link mesh
The arrangement of a chain-link fence begins with marking the position of the posts - intermediate and tension. The first columns are usually installed in increments of 3 meters, the second - every 9 meters. Use metal profiled posts as pillars; pipes with a diameter of 60 millimeters or more and corners of 50 millimeters are suitable.
Using a drill, drill holes up to 40 centimeters deep under intermediate posts in the soil; under tension posts, you need a hole 60 centimeters deep. On clay and loam, concreting pillars is pointless, because heaving soil can push out the concrete base along with the pillar in cold weather. If the soil is light loam or sandstone, then the bases of the pillars can be concreted.

After installing the tension posts in place in the corners of the future fence, connect them to adjacent posts with supports from a metal corner with bolts or welding. To attach the chain-link mesh, poles that are placed at a 3-meter distance are sufficient. In this case, the canvas will not sag.
However, such a fence is not reliable, because it is easy to lift bottom part sheathing and enter the fenced dacha area. Therefore, a wire rod with a diameter of 3 millimeters is needed, which should be passed through the mesh cells at three horizontal levels. To stretch the wire rod between the posts, drill three through holes in each of them.
Start attaching the mesh to the posts - place its roll vertically near the support post and make sure that the folded ends of the stitches are located on the upper side of the roll. Hook the top line of the mesh to the top of the post and move to the next post, gradually unwinding the roll. Having passed the wire rod through the chain-link mesh between adjacent posts, insert its ends into the prepared holes, pulling the wire and securing it to the posts using tension bolts.
Slab fence
Croaker is essentially waste at any sawmill, similar to shavings and wood chips. As a consequence, we can note low cost cubic meter of slab. If you are interested in what kind of fence to put in your dacha so that it best emphasizes your frame house, select slab fencing. On the one hand, this material is outwardly unprepossessing, but, nevertheless, it retains all the attractiveness of wood, which allows you to create a cheap and attractive country fence at the same time.
Preparatory work
It is customary to begin work on creating a fence with debarking the croaker - if you leave the bark, the structure will be affected by the bark beetle and will soon collapse. Removing bark is not an easy task and requires the use of special tools - a flat shovel with a sharp blade, a small carpenter's hatchet and a staple. Having removed the bark from the slab, you need to sand its surface and cover it with several layers of antiseptic.

Support posts for slab fencing can be wooden or metal. A pipe with a diameter of 76 millimeters and a wall thickness of 3.5 millimeters, with welded plates that are used to fasten horizontal wooden purlins, is suitable for metal racks.
Wooden fence posts are made of oak, pine or larch - trunk diameter is 20 centimeters, length is 2.3 meters. The side of the pillars that will be placed in the ground is coated in several layers with Kuzbass varnish or hot resin. If you plan to make runs from a slab, then make a distance of 2-2.5 meters between the fence supports.
Covering a fence with a slab
On loamy soil, metal and wooden poles They are simply driven into the ground without additional strengthening measures; in the places where they are installed, you only need to drill holes with a drill and hammer the posts with a sledgehammer.
Chernozem and sandy soils require significant effort - under each pillar you need to dig a hole 60 centimeters deep, 2 times wider than the pillar. Then pour 10 centimeters of gravel onto the bottom of the pit, tamp it down, place a post in its center, pour gravel around the perimeter, check building level and plumb vertical position post and compact the gravel firmly after setting the post.

Covering the fence with a slab can be done vertically or horizontally. In the first case, you need to attach a 50 by 30 millimeter beam on both sides to the support pillars and an overlapping slab with screws or nails - it will not be possible to fit the slabs end-to-end.
For vertical cladding of a country fence, the slab must be sawn lengthwise, the sawn slab must be secured to the purlins with the convex side inward, leaving gaps of 40-50 millimeters between it, then closed with a slab that is placed outward with the convex side. For longer useful life, the finished slab fence should be painted or varnished, the ends of the posts should be covered with metal or plastic cones - it will serve as a country fence for about 10 years.
Wattle as a country fence
Compared to other fences, the material for wattle fence requires almost no cost - it’s just cheaper to do without a fence altogether. However, such a fence will last no more than 3-4 years and the owners will only be provided with a decorative fence, which is unlikely to be able to resist burglary.
Procurement of material
The design of a fence is no different from the construction of other types of fences - you need to make a foundation, you will need metal and wooden supports, and flexible rods for cladding. Wooden racks are made of pine, and hazel and willow branches are best suited for cladding; in the absence of which, aspen, alder or birch branches should be used.
It is customary to prepare rods for wattle sheathing in early spring or late autumn. First, watch a video about garden fences. Choose smooth and straight rods that have a thickness at the cut from the trunk of at least 30 millimeters and a length of 1.5 meters. Before harvesting, you need to check the branches of a bush or tree for breaks by cutting off one twig and inspecting its cut.

If the core of the branch is large and has a reddish-brown tint, such rods are not suitable for sheathing, because they will break during installation. Therefore we need to go to next tree and evaluate the core of branches cut from it. The core should be barely noticeable. Having found material that is suitable for creating a fence, cut off the branches required diameter and lengths that are free from damage, knots and growths.
Dry the cut rods for a couple of hours, then remove the bark from them, after soaking them in water. To soak, tie the rods into a bundle with a rope and immerse them in water, placing the weight on top. The soaking period is 7-14 days. Using a special tool, debark the rods. After removing the bark, sort the rods by length and thickness, then you can begin arranging the fence.
Building a fence at the dacha
Typically the distance between supports is 350 millimeters or more. If you plan to use metal posts for this, then feel free to hammer them in the previously marked places. If the supports are wooden, then you should prepare the stakes themselves: sharpen the lower part of the stakes that are intended for the fence supports, coat them with heated resin on a segment that is slightly greater than the depth to which the supports will be driven into the ground.
A rubber or wooden mallet is required to drive the wooden posts and place the sheathing rods between them, because a metal hammer can break up the wood. The supports that are placed along the edges of the fence must be placed at a not too great distance from the posts that are located nearby.

Before weaving, soak the rods for several days, they will become more flexible. To attach the branches, prepare annealed wire and copper. Weaving is usually done from the bottom up - press right hand the butt of the first rod to the outer support post, circle the rod along the second post with your left hand and bring it behind the third.
Place the next branch behind the first support with its tip, hold it with your right hand, use your left hand to circle the second support and bring it to the third. Alternating the tops and butts will reduce the presence of gaps between the branches and avoid the slope of the twigs, which are already intertwined, towards one side of the fence.
To ensure that the rods fit more tightly together when weaving, they are knocked down with a mallet. Secure the ends of the rods to the posts using annealed wire. To protect the ends of the support from getting wet during rain, equip them with galvanized caps or put clay caps on them.
Decorating a blind fence
Owners of private houses and summer residents often face the question of how to decorate a garden fence. Indeed, look at a flat plane large area near his country house not too interesting. Sometimes our fences are very long, and such blank walls do not decorate the space.
The first thing that comes to mind is closing a blind fence with climbing plants or bushes, the use of techniques vertical gardening. Choose actinidia for this purpose, girl's grapes or fragrant hops. You can also plant annuals that climb along wires or ropes that are pre-stretched vertically.
Painting and painting is another option for decorating a fence. You can also hang pots with hanging plants - petunias and pelargoniums - on a blank fence. These unpretentious plants They can bloom almost all summer! Blind fences will also serve well in the construction of a gazebo, because you already have one wall, you need two more supports, then you can start building a roof.
Along the fence of the dacha area, you can make several flower beds raised above the ground. This technique can visually break a long fence into several parts, which will no longer look so monotonous. Plant tall flowers and shrubs with colorful foliage in raised beds. If you prefer conifers, remember that they are sensitive to the bright spring sun.
The construction of a fence allows the owner and his family to hide from prying eyes, as well as protect their country cottage area. Near residential building, which looks beautiful, any fence will look good, and if you make the structure yourself, it’s even better. Modern technologies help in the aesthetic possibility of erecting a fence, which can be made from almost any durable material- bricks, corrugated sheets, mesh, plants. The fence can be low, high, medium, exactly as you see it on your summer cottage.
The fencing of the dacha plot is erected first. It defines the boundaries of the site and hides it from prying eyes. You can make it yourself or order it on a turnkey basis. The first option is often chosen, since building a fence at the dacha with your own hands is not at all difficult. About how to make a simple and beautiful hedge will be discussed in this material.
Fencing options for garden plots
Types of fences for dachas can be divided into three categories: light, heavy and combined. Lightweight fences are made of wood, mesh, or corrugated sheets. Heavy ones are stone and brick. Combined ones use both light and heavy materials.
If the question arises of how to make a fence at your dacha inexpensively and quickly, then preference should be given to lightweight fencing. Such structures do not require preliminary fabrication of the foundation, and they are very easy to install with your own hands.

Fig.1.
Heavy fences are also not difficult to make yourself, but construction time and costs will increase significantly. For the reason that you will have to make strip foundation under brick or stone masonry.

Fig.2.
Quite often, heavy fencing structures are installed on the facade of the site, and light ones are used to delimit neighboring plots. Combined types can be used in both cases.
How to make a simple site fence
Having understood the types of fences, you can proceed to the question of how to make a fence at the dacha with your own hands. Structurally, any fence consists of supporting pillars and spans. The entire construction process is divided into installing pillars and assembling spans. The construction procedure and design depend on what materials will be used. The only thing that is common is the distance between adjacent pillars and is 2 - 2.5 m.
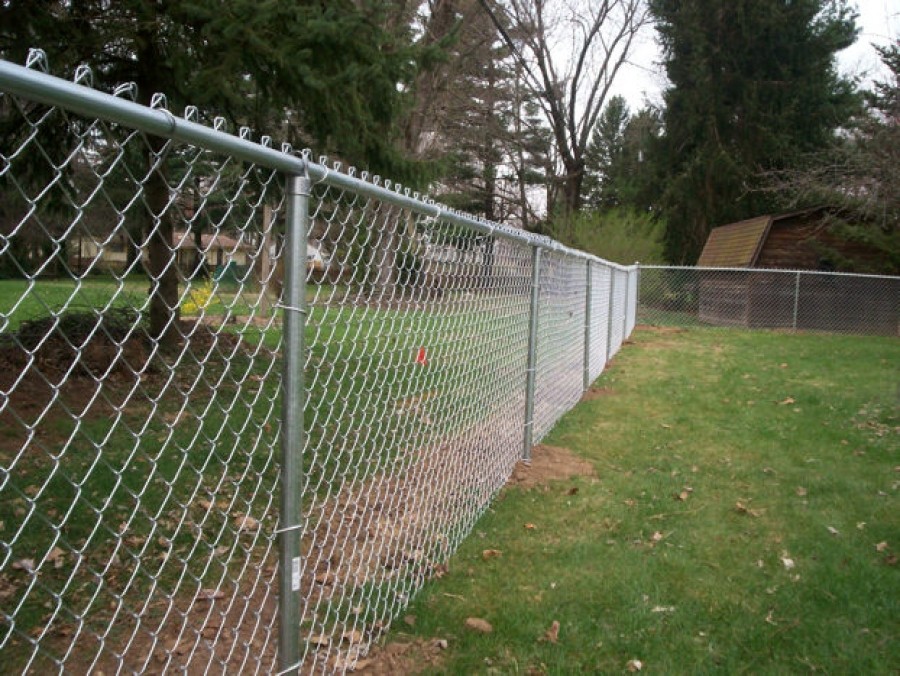
The simplest fence at the dacha can be made from chain-link mesh. To do this, you will need metal poles with a length of 2.5 - 3 m and a diameter of 50 mm. You can use regular water pipe or purchase ready-made fence posts, last option preferred. Under the pillars, holes with a depth of 1 m and a diameter of 150 - 200 mm are drilled with a garden drill in increments of 2 m. Pillars are installed in them and covered with earth, compacting it thoroughly; this option is well suited for heaving soils (clay, loam). If the soil is not heaving, then the pillars can be sealed with concrete, which can be easily prepared on site from cement, sand and crushed stone in a ratio of 1: 3: 5-7.

Fig.3.
The mesh can be attached to the supports using special hooks (possibly if special poles are installed), or with clamps if a water pipe is used.
Another option is to purchase ready set mesh fencing. It includes posts, mesh and fasteners. Putting up a fence at your dacha with your own hands using a ready-made kit will not be difficult.
The main disadvantage of such a fence is that it will not hide the area from prying eyes. To eliminate this drawback, a camouflage mesh is used for the fence at the dacha. It is pulled over the supports steel mesh. The camouflage mesh perfectly hides the area and does not stand out against the general background of vegetation.

Fig.4.
The disadvantage of camouflage netting is its low durability; cats and other living creatures can easily enter the area through it. They can even get stuck in it and die. Therefore, facade mesh for fences in the countryside is very popular, which has the same ease of installation, but does not have the disadvantages of camouflage. Given the variety of colors, it can become a wonderful decoration not only for the fence, but also for the entire site.
How to make a fence from corrugated sheets
Another equally popular option is fencing a summer cottage from corrugated sheets. It is somewhat more difficult to make a fence at the dacha from corrugated sheets with your own hands than from a mesh. This is due to the fact that for this fencing option, only support pillars are not enough, but horizontal crossbars are also needed, to which the corrugated sheet will be attached.
To attach a profiled sheet, you need at least 2 transverses. So that the profiled sheet holds well wind load It is advisable to install them at a distance of 1 m from each other. Therefore, for a 2-meter fence it is advisable to install 3 transverses. The first is installed at a distance of 20 - 30 cm from the ground level, the second in the middle of the support pillar, the third at the top of the pillars.

Fig.5.
A square pipe measuring from 20x20 to 40x40 mm or a metal corner measuring from 30x30 mm will work well as a cross-section.
The crossbars are traditionally attached to the support pillars by welding. If there is no welding, then you can secure them with bolts. Of course, such a connection will have less rigidity, and you will have to tinker a lot.
The corrugated sheet is fixed to assembled structure using self-tapping screws. It is good to use roofing fasteners for this purpose. It is galvanized and equipped with rubber gaskets, which extends its service life and eliminates unpleasant sounds. Which a corrugated sheet can make in the wind. Before fastening the sheet, you need to drill a hole and then secure it with a self-tapping screw.
When installing a corrugated sheet fence at your dacha, it is important to take into account one more point. It is not good if the corrugated sheet touches the ground. From constant moisture it will quickly rust and lose appearance, but leaving a gap is also not good. Therefore, the corrugated sheet is installed with a gap of 5–10 cm from the ground, and a strip of rubber 15–20 cm wide is attached to the lower edge of the corrugated sheet. The strip of rubber is buried in the ground. Thus, the corrugated sheet does not rot, and there is no gap left.
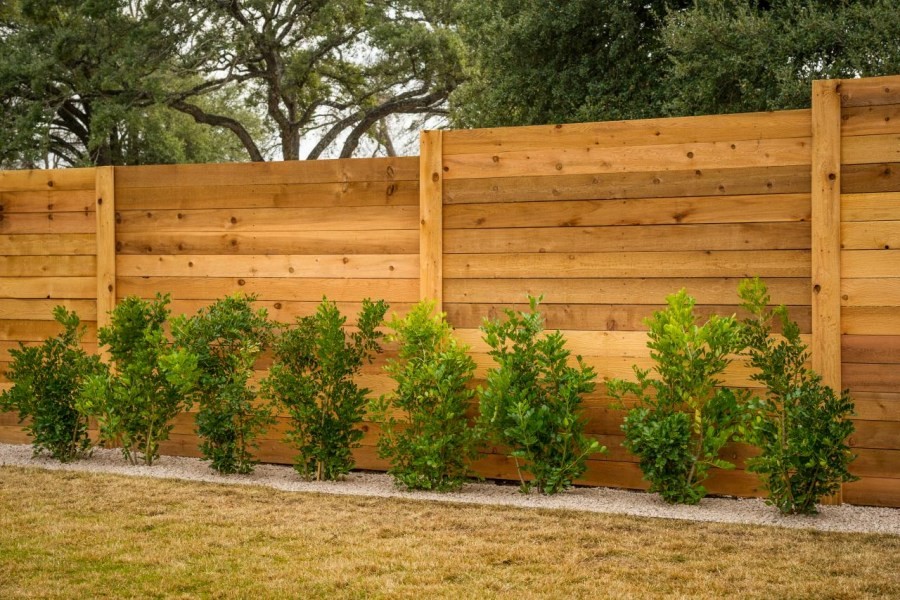
How to build a wooden fence
A beautiful fence at the dacha can be made from boards. There are many options wooden fencing plot they can be divided into two types with vertical and horizontal fastening of boards.
Wooden fencing, like the previously discussed types, is installed on support posts. However, in in this case Not metal poles, but wooden ones can be used.
Timber with a cross section of 80x80 mm is usually used as wooden supports. Before fixing the timber in the ground, it must be treated to prevent rotting, otherwise the fence will not last long.
Only the part that will be below ground level can be processed. The first stage is treatment with an antiseptic, then the timber is covered with mastic and wrapped in roofing felt. Only after this can it be installed in the ground.
Under wooden poles, it is necessary to drill holes with a depth lower than the freezing depth of the soil, approximately 1.2 -1.5 m. At the bottom of the hole, drainage is arranged from a layer of sand and crushed stone. After that, a wooden fence support is installed and filled with concrete.
Once all the pillars are installed, you can proceed to lining the spans. At this stage, it’s time to think about how to decorate the fence at the dacha. The main decoration is the special order of fastening facing board. There are many options, here are some of them.

Fig.6.

Fig.7.

Fig.8.

Fig.9.

Fig. 10.

Fig. 11.
We looked at what you can use to make a cheap fence at your dacha. If you want to have a stronger, more durable and impregnable fence, then your only option is to use brick or stone.
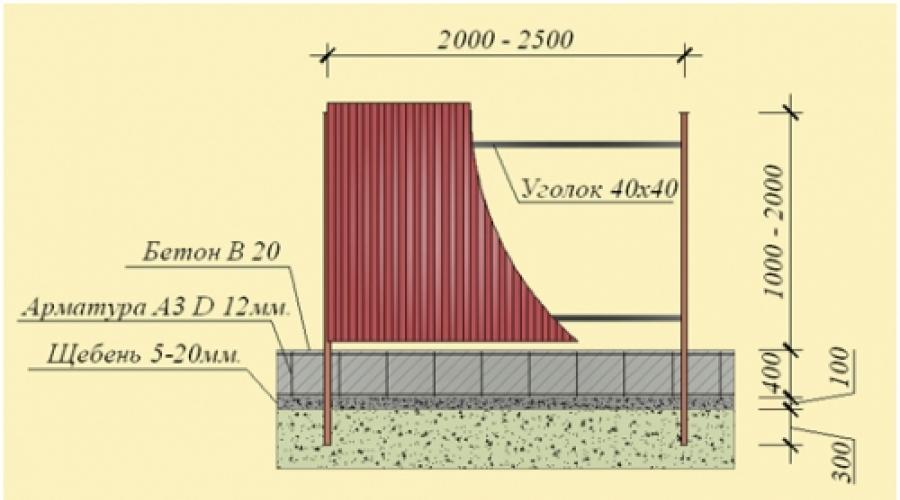
Brick fencing on a strip foundation
Brick fencing differs from the previously discussed options in the presence of a strip reinforced concrete foundation, on which a brick or masonry. All the complexity and high cost of construction lies precisely in it.

Fig. 12.
The strip foundation for a country fence is made in the same way as for a house. A shallow strip foundation is used. Its depth is approximately 50 cm.
The order of its construction is as follows:
- A trench 70 - 80 cm deep and 20 cm wide is dug along the perimeter of the site.
- A 20 cm layer of sand is poured onto the bottom of the trench, then a 10 - 20 cm layer of crushed stone.
- Formwork 10–20 cm high is erected above the trench.
- The trench and formwork are laid with roofing felt. It is necessary so that the concrete does not sink into the ground.
- They make the strapping. Concrete reinforcement is performed with a 12 mm thick rod. The rod is installed 10 cm from the bottom of the trench and 10 cm from the top. It is fastened with wire or welding.
- Concrete is poured. On days 2-3, the formwork is removed and the foundation is left to dry and gain strength for another 30 days.
- After the strip foundation has dried, you can lay stone or brick.

Fig. 13.
An analogue of a strip foundation, but a simpler option is columnar foundation with a grillage. This foundation consists of piles buried below the freezing depth of the soil (1.2 - 1.5 m). Piles can serve steel pipes or special screw piles. The grillage is made of concrete. The advantage of a foundation with a grillage is that it is cheaper and less labor-intensive to manufacture.
As you can see, installing a fence at your dacha is quite simple. It is important to decide on the design and purpose. If you do not want to spend a lot of effort on installing a fence, then preference should be given to lightweight materials such as corrugated sheets, mesh or wood. If you want to have a fundamental building, then you should consider building a fence made of brick or stone, or make a combined option.
It is very important that at the dacha the eye enjoys not only the plantings, but also the surrounding environment. About, and we have already talked about, it’s time to talk about how to make fences for your dacha with your own hands. The arrangement of a dacha area cannot be done without them, and therefore it is better to take care of creating a strong and good fence. And it’s even better that it fits into the overall picture of what you create on your site.
DIY garden fences cheap
Don’t let the length of the fence or its height bother you. Let's start with the fact that it is easy to make a fence with your own hands and quite inexpensively, because if you have the desire and basic knowledge“fence theory”, then you can safely move on to the next stage - the choice of materials.
Country fencing can be made from:
- wood;
- picket fence;
- metal profiles;
- grids;
- yes everything, anything!
You just have to choose what you like best and fits into the overall design.

Wooden garden fence
Wood is one of the the best materials. It looks noble, can withstand bad weather, can be purchased without problems, and at the same time it is environmentally friendly.

It is not necessary to purchase a pre-prepared board. Just take out the supplies and scraps that have accumulated in the backyard and are still suitable for use - for example, ranch fences allow the use of uncut and uneven boards. All you need to do is dig in the wooden posts along the intended path and nail the boards to them in a horizontal position.

This is a fairly simple and cheap fence for a dacha, and if you take into account its environmental friendliness, then you should give preference to just such fencing.
In addition, depending on the length of the board, you choose its direction yourself, so you can build either a ranch fence or a simple vertical or horizontal fence, which has long proven itself.

To install a wooden fence with your own hands you will need:
- beam;
- boards;
- nails;
- hammer;
- shovel;
- sand.
If desired, you can add cement and bitumen to this list if you want the timber to be installed as stably as possible.
The principle of installing a wooden fence is very simple. You dig holes to install the support beam and fill them with cement or cover them tightly with sand, compacting it. This way the supports will not deform under the load of the boards and will become more stable.

Next, all you have to do is nail the boards to the posts. If you want to attach the boards vertically, then you will have to stretch and nail two planks between the supports, onto which the boards will then be attached. If you still want to see a ranch fence on your property, then it is enough to immediately attach the boards from post to post. More details in the video Ivan Galkin:
Just don’t forget that wood has its own shelf life and doesn’t like moisture. Therefore, be sure to paint the fence after construction and periodically inspect it for damage in order to repair or replace the board in time.


Picket fence
And picket fences are the most popular variety wooden fences. And no wonder, because the picket fence is so easy to install, economical to purchase and beautiful when finished.


Before starting construction, it is necessary to mark the area where the building will be located, determine its height and the frequency of installing the picket fence. Although we install a fence for protection, if we tightly close the area, we can deprive the plants of light, which will lead to crop failure.

The set of materials for building a picket fence is similar to what we presented above:
- timber for supports;
- board for horizontal screed;
- cement;
- sand;
- nails or screws.
Tools can be different - from a shovel with a hammer to a screwdriver and an electric drill. Only the speed of construction will depend on this, but not the quality of the fence.

First you need to install the pillars, which will become the basis of the fence. Therefore, dig holes for the timber at an equal distance from each other, but no further than the length of the board that will serve as a screed. After this, install the supports and fill them cement mortar.
While the solution hardens (and this will take at least 3 days), you can proceed to the installation of sections. To do this, we cut the board to a length sufficient to attach its ends to the support. We place the sections on supports using nails or self-tapping screws and then attach a picket fence to them at an equal distance.
As you can see, the process of building a fence is quite simple and does not require any special construction skills - just patience to wait for the solution to harden. Then you can create a fence to your liking.


Well, to understand the intricacies of working with a picket fence and its installation, we recommend watching a video master class Andrey Krylov:
Metal profile fence
And yet, despite the beauty and cheapness of the picket fence and wood in general, it has one drawback - such a fence is short-lived and maximum term its service is only 15 years. Therefore, many, wanting to save money, are looking for a more durable, affordable and strong material - metal profiles.

Due to its durability and availability, corrugated sheeting has long been widely used among summer residents. It is used for garden beds, roofing and, of course, fencing.
Metal profiles do not have the most aesthetic appearance, so most designers categorically bypass corrugated sheets when creating beautiful and original fences. But its accessibility and ease of use plays into the hands of summer residents, allowing them to good fence for a do-it-yourself dacha.
The construction of such a fence is not much different from others. You will need the same support posts and boards for the horizontal screed, on which the profile itself will be attached.

And since metal profiles are still not the most popular material for creating a fence, it’s worth dwelling a little on basic requirements for its installation:
- The distance between supports should not exceed 2.5 meters. It’s better to stick to a more frequent, half-meter installation. This is due to the fact that the profiled sheet is quite flexible and will be deformed under the pressure of the wind, losing its beauty and, most importantly, strength. Therefore, the shorter the sections, the better the quality of the fence.
- The supports must be buried at least 1.5 meters into the ground. Despite the flexibility of the metal profile, the sheet itself is quite heavy and requires stable support. That is why it is recommended to cement all supports at the base.
- It is best to use not a beam as a post, but a pipe with a diameter of 6-8 cm and a wall thickness of at least 2 mm; such supports will definitely become a good basis for a stable and strong fence.
- It is recommended to use 3 horizontal logs when installing the profile - top, bottom and middle. This way the fence will be more resistant to deformation and will better hold its shape under any pressure.

And so that you can be convinced of the simplicity of building such a fence, we invite you to watch the channel’s video master class We do it ourselves 36, where they share with us all the tricks of working with metal profiles:
Mesh fence for a summer residence
And yet one of the most budget options considered a chain-link fence. Like any metal product, the mesh tolerates most natural phenomena. And even rust can be prevented by timely treatment. Therefore, fences made from it are quite durable.

Fence mesh comes in several types:
- Chainlink, which is sold in rolls, treated with polymers to prevent corrosion and can be easily installed between posts without unnecessary partitions,
- Grooved, formed from wire with a cross section of 6-7 mm and bent by a wave. It has a strong weave. And thanks to it, it keeps its shape well.
- Welded, has a smaller wire cross-section than in the case of corrugated wire, but due to welding it is stronger. True, using it for a fence will be more expensive than in the case of chain-link.
A fence from any mesh can be made in two different ways:
- Stretch the fabric around the perimeter and attach it to the support posts.
- Stretch the mesh over the frame, and then assemble the fence from the resulting sections.


Allows you to keep track of your pets
Both methods have their own characteristics, so it is impossible to single out one of them as more profitable or simpler.
So, for example, by simply stretching the mesh from pillar to post, you will reduce the time for preparing materials. After all, you will only need to drive in the support, determine the height of the future fence and stretch the mesh, attaching it to the posts with wire.
This method is easy to implement and practical if you are short on time and want to make a temporary fence.
And yet it is worth considering that for a chain-link mesh, the posts will have to be placed at intervals of 1.5-2 meters, and this will increase the budget for the material. While for a corrugated mesh a distance of 3-4 meters is sufficient.

But if there are differences in height on your site, then this is the only solution if you have chosen mesh as the material. The sections are already prepared frames made of metal profiles, which brings us to a limitation - if they are installed in a descending manner, there will be open space under the fence, which does not add either safety or aesthetic beauty to the site.
Installation of sections is simpler than stretching the mesh fabric. Ready-made frames are simply attached to the installed poles, equipped with the necessary anchors, or even welded to them.

As you can see, the choice of grid and method depends entirely on your desire to improve the area, the time you have and, of course, the budget allocated for this.
To figure out which material is right for you, you can take a look at a detailed master class on selecting materials and installing them in a fence.
If you want more clarity and understanding of how to do everything correctly, with explanations seasoned master, then it’s worth watching the video tutorial from the channel RemontHelp.com:
The grid itself consists of cells, i.e. your area will be clearly visible from the street. Therefore, it is usually recommended to use this material only between areas so as not to block the plantings from light.

Original ideas for a fence at the dacha from scrap materials
Every practical summer resident will consider it his duty to save as much as possible and use everything that remains from other projects. Therefore, before you start building a fence with your own hands, we suggest you think about whether it’s worth rushing to the store to buy a mesh or picket fence? Maybe we can make do with improvised materials?
Then let's see what we have accumulated over the entire time we owned the dacha? And is it possible to make decent fences out of this trash?
There is only one answer - yes, you can.
AND car tires, and , and the covers from them can become a fence or its decoration. Moreover, it will be no worse or more boring than one assembled from high-quality materials.
Tire fence
Let's start with tires, for example. A lot of this stuff always accumulates, so over time the question arises of where to put it. Recycling costs money, but the fence will also bring benefits. The choice is obvious.

Somewhat eclectic

All that remains is to fill the area well and begin to install the tires on top of each other in a checkerboard pattern, as if laying out bricks, or secure them to a previously installed chain-link fence.
By the way, if you build a fence from tires according to the pyramid principle, then the soil in the protruding parts can be used for flower beds, thus creating an entire green wall.

Fence made of plastic bottles
Plastic can be considered an ideal material for a fence. After all, it decomposes in at least 60 years, which means that a fence made from it will not suffer from rain or sun. Although bottle plastic is still soft, and its shape at first glance is not suitable for building a fence, many began to give it a chance and use it for other purposes.
To enclose the entire summer cottage with such a “ plastic fence", you will need to accumulate a lot of bottles to create a complete fence.
The low weight of the material makes it easily deformed from physical damage. In addition, if you have accumulated mostly transparent bottles, then such a fence will not provide protection from prying eyes. But the cost of the finished fence will be small.
If you combine bottles of different colors, you can assemble entire mosaics. That's why creative personalities agree to endure shortcomings for the sake of an original fence that attracts the attention of passers-by.
To create a complete fence from plastic bottles It is recommended to take the same size of material. And it can already be assembled into a wall, stringing it on a wire like a curtain, or placing it on top of each other, filling the voids with cement mortar. The result will depend entirely on your desire to strengthen the fence or make it more airy.

By the way, bottle caps will also be used. After all, you can make a movable fence from them, and even with any pattern.
This will require a lot of caps with four drilled holes and meters of wire. Based on the colors you have, choose a pattern, and better diagram for embroidery with beads, and then simply string the lids in order, as in embroidery, in rows. Then pass the wire through the vertical holes, thus connecting the rows.

If you are simply bored with the old fence, but still want to put the covers to use, then simply screw them on with self-tapping screws, creating a bright pattern-panel on the fence. And now you already have interesting wall on the site, attracting the attention of kids and pleasing your eyes.
A master class from Soloremont.
However, an ordinary picket fence or an old picket fence can simply be painted in an original way.


Fun pencils


You create your own mood and desire to visit the dacha more often!
Do-it-yourself wattle fence in the country: a master class for lovers of rural romance
And if you have ever seen a Ukrainian farm or met huts in the south of Russia, then your heart could not remain indifferent to this peaceful romance. And it’s not even these cute, like toy houses, with thatched roof and whitewashed walls, and a wicker fence with clay hanging on it upside down.

And yet, in addition to the decorative component, the wattle fence is perfect solution even for modern dacha. Such a fence is not inferior in strength to either wood or metal. And in terms of beauty and attractiveness it will rank first among them.
And from the point of view of economy, it fits well into our criteria. After all, weaving such a fence will allow you to realize your creative side, and will also save your budget.

Flowers are clearly visible
But first, it’s worth preparing the material:
- timber or logs as a support and basis for weaving;
- material for weaving (preference is given to willow twigs, although twigs of other trees are also suitable, the main condition is their plasticity);
- gloves;
- shovel;
- sand.
If you are going to weave along already driven posts, then first dig them in and cover them with sand and tamp them down. After that you can start working on the rods themselves. It is necessary to steam the rods so that they become more flexible and do not break when deformed.

You can weave in different ways:
- horizontally, passing the rods in a figure eight between the pillars. This method was borrowed from weavers;
- vertically, between horizontally located logs. This weaving turns out to be more decorative than practical. That is why it is used for fences between adjacent areas, but not external ones;
- diagonally, forming an original wooden mesh. This type weaving is the most labor-intensive, because the rods must be long for the fence to be at least of medium height. In addition, it is recommended to dig each rod into the ground for greater stability.

To understand the intricacies of simple weaving and try to make your first wattle fence, we recommend taking a look at the video tutorial Oleg Bryukhanov, where he shares the secrets of creating a simple but beautiful fence.
If you prefer sectional fencing, then the master class will be useful for you Yury Kulakevich, where he shows how to create a wicker wicker base.
As you can see, a fence is not just a protective structure that hides a summer cottage from prying eyes, lovers of other people’s harvests and stray dogs. A fence created with your own hands is also a decoration of the territory, allowing you to enjoy every day spent in nature, among the plants we planted with great love.
Our portal has already repeatedly told you how to build a dacha from a wide variety of materials. In articles about the fence from unedged boards and the construction of a version of a fence made of corrugated sheets, we revealed and explained
Of whatmake a cheap fence for your dacha with your own hands

Then, placing them along the line, he hammered them 1 meter into the ground with a sledgehammer, at a distance of no more than 2 meters from each other.

After that, I painted the above-ground part and connected all the posts with twine in 4 lines.

WAAD
At the upper ends of the posts I made twists from thick copper wire for 2 turns. This is necessary so that the twine does not fly off. I pulled the twine, wrapping it once around the post, going sequentially - from bottom to top. This provides good tension. If you start pulling the twine from top to bottom, then when you tighten the lower lines, the upper ones will weaken.
Having pulled the twine, Nikolai “threw” the cable, and the cable did not wrap around the posts, but ran it tangentially (this should compensate for the lengthening/shortening of the cable in cold weather), fastening it with a twisted wire clamp. Moreover, the cable does not go under tension, but with a slight sag, 1 cm on each span, and then it is tensioned by twisting it with twine.

Having received the basis, WAAD I simply draped the netting over the top of the structure, as if hanging a sheet on a line to dry, and then tied the bottom section with twine.

But the easiest way to make potholders is from plastic ties, without tightening them completely, ensuring a free play of 1-1.5 cm.

Important: we grab the mesh only at the bottom, and do not screw it to the posts. Otherwise, in places where there are “tacks,” the wind will tear it, until holes form.

Not all cheap types of fences can boast of strength and durability. But here the result is a light, rather opaque over budget fence, which has low windage, because The mesh allows air to pass through. In terms of reliability, it even surpasses other cheap fences without a foundation. Testing with strong winds showed that the fence does not fall (it only bends by 2-3 cm, and due to the elasticity of the posts, it immediately returns to initial position). The mesh practically does not fade in the sun, does not tear, does not flapping, only sways a little.

There is virtually no snow load. The fence performs and security function. It is impossible to climb over it - the posts are springy. Do not tear the mesh, only cut it with a knife. It is also impossible to crawl under the fence. The lower cable can only be raised by 20-30 cm. Setting it on fire by throwing a cigarette butt will also not work.

How to make an inexpensive fence around your house.
WAAD
I didn’t expect that the fence would be so strong, and that the installation would be so easy and quick, even for one person. The fence is green, it merges with nature and does not look like an alien element on the site, and by lifting the lower edge, you can slide a mower under the blade and calmly mow the grass.
If repairs are necessary (a hole has appeared in the fence fabric, or over time it has faded a little, etc.), there is no need to change the entire fencing material. We buy the cheapest roll of “facing” with a density of 35 g/sq. m, we throw it over the old one, tie it up, and the fence is like new. The fence-reinforcement column itself does not stick out of the ground due to frost heaving, and if necessary, it can be corrected with a “light movement of the hand.”
The fence fabric follows the topography of the site, flowing around all the irregularities, and allows air to pass through the cells without the formation of stagnant zones, which is important for plant growth.

Also, such a fence is optimally suited as a temporary - intermediate fence, before the construction of a permanent fence during the construction of a house; it is also an excellent budget fence from neighbors.
Despite the ease of installation, before making such a budget fence for your dacha, you should pay attention to a number of nuances and recommendations developed during its operation. In order for the outermost column to provide support when tensioning, and not bend (since it has to maximum load), Nikolay hammered in an additional spacer post at an angle of approximately 45 degrees.

And after watching our video, you can see the fence made of facade mesh “live” and get acquainted with other secrets country life from WAAD.
Protection personal plot from prying eyes, winds and precipitation by a fence is a primary task. It can be built from materials of various quality: brick, mesh, wood, artificial decorative rock etc. But, if cost issues are relevant, you should choose a profiled sheet. The material has many advantages. But, the main thing is that even a novice builder can make a fence from corrugated sheets with his own hands. Sheet slabs have a small mass, so there is no need to hire assistants and special equipment. Their installation is carried out using standard fasteners according to a simple scheme. Let's find out how else you can save on a fence made of corrugated sheets, and how to build it with your own hands.
What can you save on?
The lion's share of the budget will go to the purchase of profiled sheets. There is no need to seriously skimp on its quality, especially if the country fence is installed with the aim of blocking access to the site for intruders.
You can reduce costs by:
- Competent calculation of the required volume of building materials. Especially the profiled sheet. If you reduce the amount of waste to a minimum, the final savings will be at least 12%;
- Installing a fence with your own hands without involving craftsmen. Relatives can help at the stage of driving support pillars;
- Drawing up a competent design of the enclosing structure. You will need to take measurements, draw a diagram and mark the territory. Strict adherence to the plan will eliminate installation errors, which means additional expenses;
- Stages of work that you can do yourself;
- Ordering corrugated sheets in the amount required for the construction of the fence. To do this, you will need to accurately perform measurements and calculations. There is no need to buy material in large quantities. The remainder will then have to be thrown away or stored for the entire service life.
And if you purchase materials for building a fence in winter period- from December to February, - then you will have to make smaller compromises on quality. During the “non-construction” period, the cost of all building materials without exception is reduced by approximately 12-45%. During the off-season, many manufacturers of profiled sheets also offer free shipping. Therefore, before ordering building materials, it is worth studying as many offers as possible.
Foundation for a fence made of corrugated sheets
The enclosing structure made of corrugated sheets itself does not require a foundation. The base material is quite light - from 5.9 to 11.2 kg/m.p. Such a load can easily be withstood by support pillars, which will definitely have to be installed. The foundation is poured if high aesthetic requirements are imposed on a fence made of corrugated sheets at the dacha and, if sheet material will be hung in close proximity to the edge of the ground. In the first case, the entire structure will look more neat and elegant, and in the second, it will last longer.
If there is no foundation, and the lower edge of the corrugated sheet rests on the ground, then in winter the material will probably be deformed. At low temperatures, water in the soil freezes and provokes soil heaving. Simply put, the ice pushes fragments out, which in 9 out of 10 cases deforms the profiled sheet.
If the country fence is only supposed to protect the site, then you can save on the foundation by using one trick. A trench up to 10-15 cm thick and about 30-50 cm deep is dug under the lower edge of the corrugated sheeting. Ordinary sand is compacted into it. The better it is compacted, the better the profiled sheet on the fence is protected from deformation. No foundation costs - minus another 45% of expenses.
You can buy corrugated sheeting in Perm from the manufacturer at a low price from the Novy Dom company.
We save on poles and joists
Support posts and logs - the stability and reliability of the fence. Therefore, it is better not to save much on their purchase. The standard version of supports is profile pipes 60×60×2.5 mm. But if the fence is no-frills, then supports of 40×40×1.5 mm will be sufficient to hold the corrugated sheets. By strictly adhering to installation recommendations, it is not difficult to obtain a strong and reliable enclosing structure.
To stay within your budget, you can make a corrugated sheet fence with your own hands from used pipes. They will cost half as much as new products, but you need to know which ones to choose. Most suitable option- pump and compressor pipes. They are dismantled after their service life has expired. excellent condition. The thickness of the pipe is sufficient to withstand a light metal fence. When purchasing, you need to check the products for pockets of corrosion and rust. After installation, paint with protective paints.
But it is better not to use wooden pillars as support. Cheap fence made from corrugated sheets with such elements will not last more than 5 years. Of course, you can choose thick oak or deciduous timber (wood that perfectly resists weather and climatic stress). With such a support, the service life of the fence will be much longer, but it will not be possible to reduce the cost of construction. Wooden beam needs additional processing special compounds, otherwise it will quickly rot and warp. Annual maintenance will also cost a pretty penny. And the cost of the timber is significantly higher than the profile pipe.
It’s worth stopping at using wooden logs with metal pillars. In this case, you will have to order additional metal brackets for attaching the planks. This means extra expenses and longer installation of the fence.
You can also save on the number of support pillars. The recommended distance between supports is 2-2.5 meters. If a profiled sheet with a profile height of 21 mm or more is selected for the construction of a fence, then this parameter can easily be increased to 3 m. But if the profile is low, then compensate long distance There will be additional logs between the pillars.
How to save money on the corrugated sheet itself?

You shouldn’t skimp on the quality of corrugated sheets for a fence, but you can choose it wisely. Competently means, taking into account the purpose of the design and the basic requirements for it. For example, you can purchase a regular galvanized sheet without colored polymer coating. Costs will be reduced by approximately 14-29%. The external design data will not be so expressive, but over time this drawback can be eliminated yourself by painting the corrugated fence with a protective paint and varnish material. It is better not to buy non-galvanized sheets, since galvanizing them at home will not work.
A cheaper fence would be made from profiled sheets of grade C10, C12 or C14 (wall with corrugation heights of 10, 12 and 14 millimeters). The savings will be somewhere between 19-31%. When constructing structures enclosing the territory, it is recommended to buy corrugated wall grades with a corrugation height of 20 mm - C20, NS35, C21 or C44. Metal thickness 0.5-0.8 mm. The brand is selected according to the height of the fence. The higher it is (from 2.1 m), the more corrugation on the sheet, otherwise the fence will not be able to withstand even average wind loads (high windage of the sheet).
You can reduce the cost of construction by ordering a profiled sheet with a thickness of 0.45 mm. Saving about 13-17 rubles. at every linear meter. Optimal thickness material 0.6 mm. But 0.45 mm is also perfect if you calculate the dimensions correctly. It is believed that the enclosing structure should have a height of 2 m. Usually 2.1-2.3 m. But, if you make a fence from corrugated board with a height of 1.8-2 m, then there will be no significant losses in its reliability and practicality. With such dimensions of the structure, it will be possible to reduce costs by 7-10%.
We minimize the costs of installing corrugated sheets
It will be much cheaper to build a fence from corrugated sheets with your own hands. Savings of approximately 15-20%. But this takes into account that the builder has at least minimal skills, otherwise correcting errors will cost 3 times more than paying for the services of professionals. Therefore, those summer residents who know how to work with their hands and have the necessary tools will be able to build a fence cheaper:
- Drills and concrete mixer;
- Welding machine in case you have to weld brackets for joists;
- Reinforcement and everything for tying it - when pouring the foundation;
- Self-tapping screws, etc.
You should decide on the missing equipment in advance, otherwise the process will end before it even begins. When installing a fence made of corrugated sheets, you must also take into account its future external characteristics. Therefore, work is carried out following the instructions and carefully.
Installation of a fence made of corrugated sheets

The installation of the building envelope begins with the purchase of the necessary building materials. Required:
- Support pillars;
- Crossbars, or logs. Profile pipe 40×20×2 mm ( best option). The length of the logs should be equal to the distance between the support pillars;
- Profiled sheets;
- Caps for support pillars;
- Holders. Elements that will save on welding;
- Roofing screws and bolts.
To give the fence a finished look, you can install an end U-shaped strip along the upper edge of the profiled sheet. But this is not necessary on a modest budget. Essential functional features the bar does not have. It is also worth taking care of the purchase of sand, crushed stone and cement in advance. These building materials will also be useful if the foundation is not organized.
Foundation for a fence
If it is difficult to decide whether to fill the foundation for the fence, carefully read the photo in the article. Fencing structures with and without a foundation look different.

It’s easier, faster and cheaper to pour a strip foundation. It is universal and suitable for all types of soil. At the initial stage, they mark the territory - mark the boundary of the site, mark the location of support pillars and functional elements fence, for example, a wicket or gate. It will not be possible to make a high-quality fence from corrugated sheets with your own hands without excavation work. Therefore, after marking the territory, they begin to dig a trench along the line of installation of the fence. The depth of the ditch is 45-50 cm. In the places where support pillars are to be installed, they are buried to a depth of 90 cm. The following are the instructions:
- Installation of formwork inside the trench. It can be made from scrap materials. The formwork is installed so that the foundation protrudes 40 cm above the ground level;
- Laying of reinforcement;
- Setting up pillars;
- Pouring concrete.

Having completed the pouring, the foundation is left for 17-21 days. The formwork is not removed until the concrete reaches 55% strength. But it is better to withstand the entire 24-day period.
Installation of poles and joists
Pillar pouring will allow you to complete the work faster. Required:
- Dig holes up to 1.5 m deep at a distance of 1.5-3 m from each other. The diameter of the ditch is 3 times the diameter of the pipe;
- At the bottom of the pits, make pillows from crushed stone and sand;
- Plug the pipes;
- Fill the holes with the pipes placed in them with cement mortar and gravel;
- Wait until the concrete hardens.
When marking the territory, do not forget about the sand cushion. If additional excavation If you don’t want to spend it or don’t have time, you need to raise the profiled sheets of the fence above ground level by 10-15 cm. If the terrain is uneven, this parameter needs to be increased so that the flooring installation line is level.
The logs are attached after the concrete has completely hardened. Their number depends on the height of the fence. For fencing up to 1.5 m, one crossbar is sufficient. For heights up to 1.7 m, two crossbars are needed. And the reliability of a fence 1.8-2.1 m high will be ensured by three logs. They are installed along the upper and lower edges of the corrugated sheet, 4-7 cm away from the edges, as well as in the center.
We fasten the fence from corrugated sheets
To properly make a fence from corrugated sheets with your own hands, you need to take the choice of fasteners seriously. The easiest way to fix the flooring is with self-tapping screws. You will need 35 mm metal fasteners with flat heads. Wall material will hold securely if you place the screws at a distance of 50 cm from each other on each crossbar. Installation of sheets at joints is carried out overlapping.
The final stage of work is attaching the U-shaped strip. When installing profiled sheets, there is a high probability of damage to the galvanized surface. If this happens, the defect must be corrected immediately by painting the fence. Self-installation the building envelope will take about 1.5-4 weeks. The timing depends on the dimensions of the fence and the skill of the builder.