How to make a flat floor with a screed. How to make a floor screed: characteristics of types of screeds, making a screed with your own hands step by step How to make a floor level without a screed
Read also
Almost all floor coverings require a perfectly horizontal base underneath. Only in this case can a flat floor be made in the room. Even a wooden floor that does not seem to touch the base is easier to install on joists that rest on a plane without bumps. The main leveling element of the floor is still the screed. The recommendations that will be given below will help you make a surface suitable for finishing with any flooring material - from tiles to laminate.
Only on a perfectly flat horizontal base can a flat floor be made.
Preparatory stage
A strong and durable floor screed will only work if you properly prepare the surface for laying it. No matter how much you would like to skip this step and simply stretch the solution over the old coating, you still have to remove it to the base. After this, all screed residues, debris and dust are removed. Possible cracks in the ceiling are sealed with a solution, and the surface itself is thoroughly dried. After this, waterproofing is placed on the slab.
So, to remove the old coating and prepare the base for the new one, you will need:

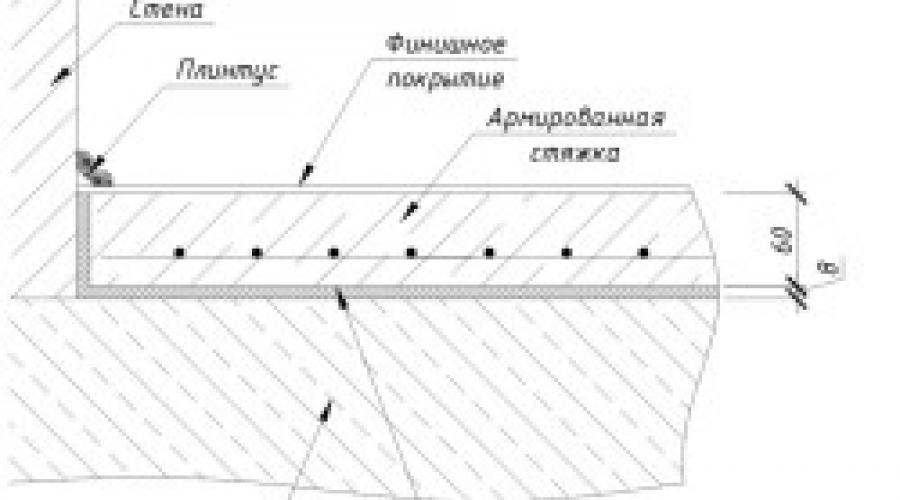
Scheme for leveling the floor with a concrete screed.
- perforator;
- shovel;
- trowel or spatula;
- broom;
- cement-sand mortar.
Before laying the waterproofing material, the surface must be treated with antifungal compounds. They are applied to the ceiling with a brush or roller. After the impregnation has dried, the floor is primed.
The floor screed is installed after it is waterproofed. As a moisture-repellent membrane, you can use dense polyethylene film and rolled materials based on bitumen. Today there are also liquid mastics that can be applied to the floor in one or several layers. Polyethylene is placed on the base with an overlap on the walls. The height of the overlaps should slightly exceed the thickness of the future coating. Roofing felt is laid in the same way. The edges of adjacent sheets and film and bituminous material must overlap each other. Polyethylene joints are covered with tape, and roofing felt joints are covered with bitumen. The waterproofing material is fixed to the wall so as not to interfere with further work. Now the floor screed will be protected from moisture, which without a membrane could destroy it from below.
Construction of a plane
Before making a floor screed, you need to create a horizon that will make it easier to fill. For this stage of surface leveling the following will be useful:

Guide for leveling the floor.
- hydraulic level;
- long ruler with level;
- painting cord;
- dowel-nails;
- alabaster or plaster;
- hammer drill;
- screwdriver;
- trowel;
- metal beacons;
- synthetic threads.
Now take the chalk and hydraulic level in your hand. Make a mark on the wall of the room near some corner. The point can be located at any height from the floor, as long as it is convenient for you to make the marking, but it is best to do it at a height of 1.5 m. Using a level, make another mark on the other side of the wall. In the same way, make markings on the remaining surfaces of the room. On walls over 3 m long it is better to apply more than 2 points. Adjacent marks on the walls are connected by lines marked with chalk-rubbed paint cord. You have got the so-called zero horizontal, starting from which you will create a floor plane.

Scheme of a poured leveling floor.
To do this, you need to take measurements of the distance from the line to the floor at regular intervals. In most cases, the height of the slab will vary in different areas. As a basis, take the smallest gap between the horizontal and the floor and subtract the value of the screed thickness from it. At this distance from the horizontal, make marks on the walls and draw lines with a cord. Drill holes along them, drive dowel nails into the walls and stretch the threads between the opposite surfaces. The result is a plane of the future floor.
Beacons are installed under the threads. The first and last profiles are placed 10-15 cm from the walls. The distance between the beacons should be 15-20 cm less than the length of the rule. The beacons are directed from the far wall to the door to the room. The profile is laid on slides of gypsum or alabaster diluted with water. The distance between the gypsum supports is 25-30 cm. If the lighthouse protrudes from the plane, then it is pressed into the hill with a construction ruler and level. Additional portions of mortar are applied to supports of insufficient height. Using a ruler with a level, applied along and between the beacons, the horizontal is checked again.
Filling and leveling the screed
The work must be carried out at a temperature of 15 to 25 ° C. It is advisable to complete the pouring of the ceiling at one time, otherwise cracks may appear in it later. In addition, the quality of the screed is affected by the uniformity of the solution composition. It is necessary to ensure that each batch is performed in exactly the same proportions as the first. To work you will need the following tools:

Floor leveling tools.
- shovel;
- rule;
- Master OK;
- grater;
- putty knife;
- pliers.
Pour the solution into the space between the wall and the first 2 profiles. Run the rule through the beacons. Pull the device towards you. The rule removes excess solution and forms flat surface. After leveling (after 20-30 minutes), the area can be rubbed with a trowel. Fill the next square to the right or left of the first. Continue moving towards the entrance, not forgetting to wipe down the leveled areas.
The screed is not ready yet.
After 2-3 days, the beacons should be removed from it, as there is a possibility of rust forming on them, which will come out over time.
To make the profile easier to remove, marks should be made on the walls when laying it. The beacons are pulled out using a scraper, which exposes the edge of the profile. Next, pliers or pliers come into play. The remaining cracks are sealed with a primer, after which it dries, they are filled with a solution. The mixture is leveled with the rest of the surface with a spatula. You should not remove the profile immediately after pouring the screed; this will have a more detrimental effect on its integrity.
After a month, the coating will be ready for laying tiles or wooden floors. The floor screed should be moistened with water for 3-5 days. In the first ten days, the solution should harden under a plastic film.
How to level a screed using self-leveling materials

Scheme for using a self-leveling mixture.
The mortar screed has already created a flat surface, ready for finishing many materials, but an ideal floor plane is achieved by laying a self-leveling floor. In addition, it will create a durable and strong moisture-proof film on the screed. In addition, it can serve both as floor covering and as a base for further finishing.
Still, the screed is subject to some shrinkage, so a self-leveling floor can correct this shortcoming. Before pouring it, the screed is primed to seal microcracks in the surface. Along the walls you need to lay an expansion compensator - a damper tape (it is removed after finishing the work, and the remaining groove is covered with sealant).
You need to work with self-leveling floors in the absence of drafts. Each layer of coating should not be thicker than 0.5 cm. Pouring a medium-thick mixture also begins from the area farthest from the door. The self-leveling floor is leveled with a squeegee. During pouring, air bubbles form in the solution. To get rid of them, roll over the surface with a needle roller before the mixture hardens. You can only step on self-leveling floors in shoes specially designed for this work.
A few hours after application, the self-leveling floor will harden. Complete hardening will be completed in 3-4 days.
Smooth floors in the house are not just an indicator of a beautifully and efficiently done renovation. A perfectly flat floor means 100% functional use of both furniture, doors, and the floor coverings themselves. After all, if you have even, level floors throughout the apartment, you don’t have to think about how to join various kinds floor coverings on one level, without steps or differences. With properly organized, level floors, you can easily and effortlessly open and close interior doors, do not correct or repair floor surfaces that sag due to improper slopes and unevenness, or that constantly open cabinet doors and drawers.
Why do you need a flat floor?
Floor repair is the first and one of the most basic stages of any renovation.

Flat floor, subsequently - This:
quickly, efficiently and beautifully laid and properly functioning flooring:
- if the floor is uneven, then the laminate comes apart at the seams and rises like a “house” and completely loses its aesthetic appearance;
- linoleum lays down in waves and only emphasizes the unevenness of the floor, and subsequently bubbles and quickly rubs and tears;
- the wooden floor boards creak and sag;
- laying ceramic tiles on the floor is faster and, although not with less financial costs, because a screed device is required, the cost of tile adhesive is required, although it will be required several times less than when laying in layers, but the quality will increase significantly. Ceramic tiles laid on a flat floor will not “float”, as when laid in layers, with an uneven rough floor covering; during subsequent use, they will not come off due to the presence of voids and reduced adhesion due to more viscous tile adhesive.
- no steps or differences when joining different types of floor coverings within one apartment: everything lies in one beautiful, functional and safe carpet, which is much easier to clean and wash and there is no fear of tripping, forgetting about the presence of an inappropriate and unplanned step.
Beautifully, quickly and correctly installed and functioning interior doors:
- In the case of uneven floors, interior doors installed at a level visually do not appear as such, because the gaps between the door and the floor can be of different levels or even waves;
- installed by not entirely competent and experienced craftsman interior doors in an apartment with uneven floors may not close or, conversely, may not open fully - they will need to be filed, violating the integrity and beauty of the entire door.
Furniture on flat floors not only costs better, but also lasts longer:
- cabinets, chests of drawers, kitchens and other furniture installed on uneven floors, even despite the presence of adjustable legs, stand unevenly, and sometimes even very dangerously due to the instability of the entire structure;
- doors, drawers (closers), if the furniture is on an uneven surface, can open spontaneously. And this, again, is a possibility of injury, a violation of the overall aesthetic appearance of the furniture, as well as rapid wear of the door closers.
Therefore, people who have installed a flat floor in their apartment or house leave only positive reviews about its operation, as well as the quality of all repairs.
How to make a flat floor: types of screed
A flat floor, the price of which constitutes a significant percentage of their estimate for the entire renovation of the premises, is a prerequisite for any high-quality renovation.
Floor leveling can be done using the following methods and types of screed:
- dry screed: type of screed for beacons, the main material of which is dry bulk materials - expanded clay, expanded clay sand, slag. A rough base of gypsum fiber boards and plywood is laid on top of the screed material, which prevent the screed from deforming during operation, i.e. the floor remains level.

Pros of dry screed: it is carried out quickly, with fairly minimal financial costs, does not weigh down the floor structure, so it can reach a layer thickness of up to 20 cm. In addition, dry screed is a good insulation and sound insulator for the floor.
- semi-dry screed: type of screed according to beacons, the main material of the screed itself is a cement-sand mixture with minimal addition of water. To make such a screed even, compaction requires skill, patience, time and, preferably, a special tool. The layer of the screed itself must be at least 5 cm or more. That is why it is more often used on an industrial scale when organizing subfloors.

Advantages of semi-dry screed: Due to the small amount of liquid in the mixture, it is practically impossible to flood the neighbors below if you use it to level the floors in the apartment.
- cement floor screed: type of screed for beacons, the main material of which is ready-made cement mixtures or homemade cement-sand mixtures. The minimum layer of cement screed is from 1.5 cm. Although, with such a thickness of the screed, self-leveling mixtures are more often used to level the floor, and it is advisable to use a cement screed with a thickness of the required layer of 3-10 cm. A cement screed is a monolith that weighs down the floor structure quite heavily , therefore, use it on loggias, balconies, in houses with wooden floors- highly undesirable. The cement screed dries, reaching full readiness - 28 days, which is quite long, because... During this time, you cannot begin laying the final floor covering.

Advantages of cement screed: levels out uneven floors with significant differences in height, durable, suitable for organizing heated floors.
- self-leveling floor screed: type of floor screed using beacons, the material used is purchased self-leveling mixtures gypsum base. It evens out unevenness from a few millimeters to 5 cm. But, due to its decent cost, it is used to level out minimal differences in heights remaining after leveling the floor with a semi-dry or cement screed, making the floor smooth rather than even. When pouring the floor, it dries quite quickly, so it requires skill and experience. Due to its fragility, walking on the finished floor covering is not advisable due to its possible chipping; it requires quick organization of the finished floor. For this reason, a self-leveling screed is installed immediately before laying the finished floor.

Advantages of self-leveling screed: dries quickly, makes floors not only perfectly flat, but also perfectly smooth.
- floor on adjustable joists: a special type of flooring used to create a smooth wooden floor. The logs are set according to level, to some extent, they themselves are beacons and load-bearing structure floor, at the same time.

Advantages of flooring with adjustable joists: ideal for leveling wooden floors, is performed quite quickly and cleanly, does not weigh down the floor structure, allowing you to even out differences and raise the floor level by 5 - 25 cm.
In the process of organizing any kind of screed or floor leveling method, you need to know how to check whether the floor is level. The best way to do this is to use quality tool- laser level, because bubble levels require constant calibration, because The error of such levels increases during active operation.

How to make a flat floor: types of floor coverings
Based on the results of the repair, we see only a clean, finishing coat floor. And it, just like the rough screed, should be even. To do this, you need to consider the following:
- laminate best placed on something hard level base: dry, cement, self-leveling screed.
- for laying ceramic tiles You also need a solid base, so a cement screed is best for laying it. You can also lay tiles on a dry screed, but only with the help of special tile adhesives
- linoleum will lie flat, for a long time and with high quality on a flat floor made with a cement screed and additionally leveled and smoothed with self-leveling mixtures. But laying it on floors with adjustable joists, as well as on a dry screed, is not advisable: the floor on a wooden or gypsum-fiber base under the linoleum begins to condense, and then mold and rot.
- plank (wooden) floor It is impossible to lay it evenly and correctly without organizing adjustable joists, with the help of which wooden floors become smooth, ventilated, and therefore will last a long time. In the case of laying floor boards on a cement, albeit even, screed, it will be almost impossible to fasten the boards, with a 99% guarantee, they will lose moisture from the screed itself, the lack of ventilation gap between the screed and wooden flooring floor.
Do-it-yourself level floor
There are general principles for constructing a floor leveling screed:
We clean the floor surface and prime it.
We organize waterproofing with special liquid mastics or film (in the case of a dry screed).
We display and install beacons.
Pour in the screed mixture, tighten it using the rule along the beacons (cement screed, semi-dry and dry screed), level the mixture with a special spatula and roller (self-leveling screed).
Waiting for it to dry.
Before laying the finished floor, we clean the screed and prime it again. After the soil has dried, the screed and rough level floor are ready.
The video will tell you more clearly how to make a flat floor:
This is how the floor is leveled using self-leveling mixtures:
Level the floor with dry screed
And pouring a cement screed looks like this
You can see how to make a wooden floor smooth here:
To make your floor serve you a large number of years old, and looked perfectly straight before starting styling floor tiles, you should first make preparatory work, and level the floor surface. Now let’s try to consider how to competently approach solving this problem. Let's learn how to screed a floor together with the portal.
What kind of screed is there?
If you don’t know how to make a floor screed with your own hands, then you should watch the video below. Before we start talking about this process, we need to talk about what a floor screed is.
So, floor screed can be done using all kinds of materials and using various techniques. Exist the following types screed:
Concrete screed. This type of screed is one of the most common. This screed is used mainly for the initial leveling of the surface of the floor. If the surface has a large number of differences, then this method can be called the most suitable. The mixture fillers for this leveling method are usually sand and cement. But to complete this work you will need to spend a lot of time and effort.
Self-leveling screed It is performed mainly from already prepared mixtures. The leveling layer is approximately 3 cm thick. It is used at the end of the work to level out various differences in the floor surface. This method Suitable for almost all types of existing floor coverings.
Dry screed It is mainly produced if you need to level a floor that has very large uneven surfaces ranging from 4 to 11 cm in height. There are two options for making this type of screed.
A) Alignment by lags. Materials used are plywood, chipboard or various other types of sheet materials.
B) Leveling using gypsum fiber sheets. For this type of screeds are often used German materials KNAUF company. For the right choice material needed to level the floor, you need to know what general state floor surface and what type of flooring you will use upon completion of all work.

Purpose of the screed
In order to carry out complex repairs to your floor, in any case, you should screed its surface. Now let’s try to find out what functions this screed has.
- The main purpose of the screed is to form a flat floor surface. For example, a material such as laminite, parquet or linoleum requires a perfectly flat base on the floor surface.
- Another main function This basis is to increase the rigidity of structures.
- The base has excellent heat and sound insulation properties.
- Thanks to the use of a screed, you can raise the floor to any level without any problems.

Requirements for floor screed
To perform its functions to the maximum, the screed must meet all necessary requirements and standards. Namely:
- The screed must be strong in order to withstand the compressive loads established by the standards.
- The density of the constituent substance of the screed over the entire surface of the room should have the same thickness.
- If the screed is poured over a soundproofing layer, then its thickness should be at least 4 cm and no more than 2.5 cm for floor slabs.
- The screed should have a thickness 2 cm greater than the diameter of the pipes that need to be hidden in it.
- When pouring onto a soundproofing layer, you need to retreat 3-6 cm from the edge of the wall. This indentation will also be filled with soundproofing in the future.
- A monolithic layer is poured onto the waterproofing. To do this, as a rule, they use a film made of very thick polyethylene or use roofing felt. In this case, the waterproofing layer is placed 6-11 cm on the walls of the room.
- The surface layers of the screed should not have chips or cracks.

Necessary preparatory work
The amount of work that, as a rule, must be done before laying the screed depends mainly on its type and on the condition of the floor surface. However, you will still need to do the following:
- First, you should inspect the floor and, if necessary, dismantle the old covering.
- After dismantling, it is necessary to completely remove construction waste.
- Now it’s time to wet or dry clean the floor surface using a brush or vacuum cleaner.
- Determine the required floor level for its subsequent raising by using a laser tape measure.
- Now it’s time to install the beacons.
Work technology and features
In this article we are talking about what a do-it-yourself floor screed should look like in an apartment. In addition to our tips, there is a video in this article that will also help you see this.
Correct execution of floor screed depends on compliance with all standards provided for this work. You should know what composition of the mixture should be used, as well as how to properly knead it and install it. The order of your further actions will depend on what type of screed you have chosen.

Carrying out work on laying concrete screed.
Leveling the floor using this method is very popular and quite common, despite the fact that this work is quite complex and time-consuming. First of all, it is necessary to completely clear the entire surface of the floor from objects: remove furniture, various interior items, etc. from the room. Then they begin to remove the old covering from the floor, while painstakingly examining its base. The composition of a concrete screed usually includes the following components: sand, cement and other fillers. To complete this work you will need:
- Building level.
- Roulette.
- Beacons.
- Spatula and trowel.
- Dishes for the mixture.
- Construction knife.
- A drill with an attachment for kneading the mixture.
Most hardware stores sell already prepared mixtures of sand and cement for making concrete mortar. As a rule, all these elements are already present in them. But if you do not want to spend money, then it is quite possible to make this solution yourself, if you have all the necessary ingredients in the required proportions.
Basically, in order to make a screed, you should take three parts of sand to one part of cement. And plasticizers will help the mixture become more elastic, and it will not harden quickly enough, which will prevent chips and cracks from appearing on it. If you need to level the floor with large differences (more than 6 cm), then you should add fiber, which has reinforcing properties, to this mixture, or use a metal mesh for laying.
Pay attention to the article on the site: How to glaze a balcony with your own hands
Screeding the floor surface in a room using concrete mortar should be done in the following sequence:
- The floor surface is measured using a building level, then all existing differences and unevenness are determined.
- All chips and cracks on the floor surface are carefully cleared and smoothed out.
- The surface of the floor covering is cleaned of debris and dirt.
- The waterproofing layer is laid (if necessary).
- Using a building level, the beacons are installed and fixed to the floor surface.
- Now the floor is being primed.
- After which they make concrete mortar from dry ready mixture and additional components. As a rule, immediately after preparing the mixture, it is laid on the floor surface.
- When leveling the solution, you should pay attention to the installed beacons. In one room, you should try to install the solution within one day. In order for the adhesion of individual areas filled with mortar to occur better, it is necessary to use metal mesh or fittings.
- After all work on filling the floor is completed, you need to start laying polyethylene film over its entire surface and leave it until it completely hardens. This procedure will help you avoid cracks.
 You should also ensure that the room is completely protected from drafts and sun. Depending on what mixture was used to fill the floor, the first steps on it can only be taken after 4 days. Using a building level, you need to once again carefully check the floor surface to see if it is level, or if there are small irregularities somewhere that, immediately after detection, will need to be smoothed out with a special device. You must always remember that the time for complete hardening of a concrete screed is 25-30 days. Only after the end of the specified period can you begin laying the flooring or laying thermal insulation. An exceptional option in this case is laying ceramic tiles. This work can be carried out within 6 days after screeding.
Laying a self-leveling screed
This screed is used mainly to obtain a perfectly flat floor surface. In this case, we mean the finishing installation of linoleum, laminite, or any polymer coatings. The majority of construction stores sell a variety of self-leveling mixtures, the preparation of which is carried out at home according to the instructions attached to them. These works must be carried out in the following order. All debris and dirt should be removed from the entire floor surface. This work must be performed with special care, since the small debris that may remain after cleaning may float to the surface of the poured layer.
According to the instructions, you need to start preparing the solution. When making it, in order to avoid the appearance of lumps, the mixture should be added to the liquid, but not vice versa. Construction mixer will help you stir the mixture thoroughly. The resulting solution should look like a creamy mass. It is saturated with oxygen and left for 10 minutes.
Filling is usually done starting from the farthest corner of the room to the corner of the door along its entire wall.
Thanks to the use of a metal brush and a needle-shaped roller, the solution is leveled and its thickness is leveled. Based on this, the floor surface dries quickly enough, unlike concrete. You can take your first steps on the floor after 9-10 hours. These terms may depend on the internal climate in the room and the thickness of the resulting layer. After pouring the floor, it must be protected from sunlight and drafts, as well as water getting on its surface.
If you try to follow all of the above recommendations, you will end up with a very hard surface that will not absorb any moisture in the future.

Arranging a floor screed is a process that, when good repair Moreover, no one will be able to avoid construction. And in this process, a lot of dusty, dirty and wet work. After them, the screed should be left to “mature”, “helpfully” moistened for several days, and not walk on the floor for quite a long time. Not to mention the money spent.
To ensure that the result is pleasing to the eye, and the process occurs in an organized and fast manner, we suggest that you read this article, which will tell readers how to make a floor screed yourself. Moreover, there is nothing supernatural or prohibitively difficult in this, which we intend to convince our readers of.
A floor screed is an intermediate layer that is placed between a base and the final floor covering. Why do you need a screed?
- To give floors the required rigidity and strength in accordance with expected loads.
- To level the floor horizontally or, conversely, to give the required slope in some areas, for example, in shower stalls.

- No matter how funny it sounds, screed is sometimes made for thermal insulation, since some of its types are capable of this.
- The screed in heated floors plays the role of a large radiator, therefore, we can say that it is needed for the necessary heat absorption and distribution.
- To cover elements engineering systems: electrical wiring, heating pipes and underfloor heating coils, sewer pipes.

- To cover and protect the thermal insulation layer from mechanical loads.
In some cases, the screed itself is also the final floor covering. For example, in garages, any technical or production premises, where no other covering will be laid in the future. Then, we can say that such a screed - single-layer .
In many other cases, ties are made two-layer .
- The first layer levels the surface horizontally, or gives the desired slopes. It is usually made from a cement-sand mixture or concrete. It is commonly said that the first layer is rough screed . In the future, you can lay tiles or porcelain stoneware on it.
- The second layer is called finishing screed . It already makes the surface perfectly flat for the final floor covering, for example, laminate, parquet, carpet. Very often the finishing screed is performed giving an ideal surface when used correctly.

The screed can be laid on on different grounds: compacted soil, concrete or even wood. Depending on the connection with the screed bases, you can divided into the following kinds:
- Tied tie , which is characterized by the fact that it is firmly bonded to the previous layer. More often it is concrete screed on a concrete floor slab. The necessary adhesion and uniformity of this design also provide excellent mechanical strength. Such screeds can only be made in rooms where the humidity of the base will not be high. They are used on the second and subsequent floors of various buildings.

- Screed on the separating layer . This design should exist when two different materials come into contact. For example, when a concrete screed is made on the ground. Or in the case when gypsum or dry screed is laid on concrete. And also the use of a separating layer is mandatory if the humidity of the underlying layer is higher than normal. Various bitumen-based roll materials (roofing felt), polymer films or coating compositions can be used as a separator. Obviously, the screed will already be a separate structure, so it is advisable to reinforce it and make it at least 3-5 cm thick.
- Floating floor screed is a further continuation of the previous one. It must be arranged if any insulation is required. The floating screed is separated from the base by a layer of insulation along with waterproofing. It must also be separated from the walls. This may be insulation, but of less thickness, or a special damper tape. Warm water floors are necessarily accompanied by a floating screed, since in addition to mechanical loads, such a screed will also change in size due to temperature effects. Working in such conditions forces the use of reinforcement and a thickness of at least 5 cm.
- Prefabricated or dry floor screed. In our country this is a relatively new phenomenon, but in Europe it has been used for a long time. On the prepared and insulated base of such a screed, filler is poured in the form of dry bulk material. Most often granular is used, which is a good heat and sound insulator. Sheets are laid on top of it gypsum fiber plates fastened together. This type of screed can be installed very quickly and this is its main advantage. However, dry screed can only be done in rooms with guaranteed low humidity and with low or medium load on the floor.
Screeds can also vary in installation methods. Let's list them:
- Continuous floor screed performed using the “wet” method . This is the most common, one might even say classic way. The solution, mixed with water, is applied to the prepared base and leveled according to the beacons using the rule. Since the main binder for the wet method is 95% cement, such screeds gain full strength only after 28 days, which is a big drawback.
- Continuous floor screed performed using the “semi-dry” method . This direction began to develop relatively recently. The point of this approach is that exactly the amount of water that is necessary to hydrate the cement is added to the working solution. Such screeds dry faster - the next day you can already walk, and lay the tiles within a week. A plasticizer is introduced into the solution, which improves mobility and ductility during installation. In addition, micro-reinforcement with fiber (polypropylene or basalt) is often used in semi-dry screeds. Screed with fiber has better strength, wear resistance, tensile and bending properties than with classic wire mesh reinforcement. The technology for laying semi-dry screeds is more complicated; preparing the solution requires strict adherence to the recipes.
 Laying, leveling and sanding of semi-dry screed - all in one day
 - Continuous floor screed using self-leveling mixtures . This method also applies to “wet”. As we noted, this method is very convenient for making a finishing screed. Such screeds are made in a thin layer of 0.5-20 mm, primarily for economic reasons, since dry mixtures for preparing solutions are very expensive. But the installation technology and the result observed later are above all praise. The working solution is simply poured over the surface in strips, rolled with a needle roller to remove bubbles, and that’s all.
- Dry or prefabricated floor screeds. We have already mentioned them earlier. You can read more about them on our portal.

All floor screeds, with the exception of prefabricated (dry) screeds, are made using based on two main binders component - cement or gypsum. There are also others - magnesium, bitumen, anhydride - but they are not used for residential construction, and therefore will not be considered. Let us note the strengths and weaknesses of these two main materials.
Prices for cement screed
cement strainer
- Cement based screeds They have high strength, durability and, most importantly, resistance to water. Weaknesses Such screeds are prone to shrinkage when drying and take a long time to mature.
- Gypsum-based screeds strong enough and durable. The solutions are very plastic and do not shrink when dried. They have good thermal insulation properties. Can be applied to any substrate, including wood. The maturation period is several times shorter than that of cement screeds. But there is one main disadvantage - this is the “fear” of water.
Naturally, in addition to the astringent component, which is the main one, the composition of any modern solution or dry mixture also includes other components: fillers and modifiers, both of natural origin and those obtained in chemical production. Therefore, modern mixtures cannot be called only cement or gypsum. It's more correct to say cement-polymer or gypsum-polymer .
In cement screeds, polystyrene foam chips are often used as one of the fillers, which gives the coating thermal insulation properties. The load-bearing capacity and rigidity of such screeds is less, this must be taken into account. In this case, a second leveling and strengthening layer with more durable fillers is also required.

If you need to create a screed with thermal insulation properties of great thickness, then another material comes to the rescue - expanded clay, obtained by firing clay. This is an excellent filler that has good thermal insulation properties, it is inert, does not decompose with water and is quite durable. Another advantage of using expanded clay as a filler is a significant saving of cement and a reduction in the labor intensity of laying the screed.

Using fillers and modifiers, modern cement screeds they dry faster and shrink less, and gypsum ones partially overcome the “fear of water”. But, it must be said that “hereditary diseases” still remain in one form or another. Therefore, cement-based screeds are still the most versatile. Gypsum-polymer also has a place, but only in dry rooms, where exposure to water in any form is excluded.
Let's move on to the practical part of implementing the floor screed. To do this, we will divide this process into stages, each of which will be considered separately. What are these stages?
- Preparation of the base;
- Display of beacons;
- Preparation of the solution;
- Floor screed device.
At each stage, we will try to explain the entire process in detail, accompanied by photos and video materials. So let's begin.
Preparing the base for a floor screed
We will consider only three types of foundations: soil, old floor screed and concrete surface. Wooden base We will not deliberately consider it, since we believe that it is easier to install floors on it without a screed, using other levelers: plywood or OSB sheets.
The basis of the screed is soil
The best time to arrange rough screeds floors on the ground - this is the stage of foundation construction. Then all excavation and other work is much easier to carry out. And in modern construction they do exactly that. If you do this in an existing house, then, of course, the task becomes much more complicated, but it is not fundamentally different. Let us note the main stages of preparation.
- The first thing to do is to select soil to a depth of at least 50 cm. In each specific case, the depth may be different. The bottom of the pit is cleaned and compacted.
- If the soil is clay or loamy soil, then it is necessary to take care of drainage so that moisture does not “prop up” the floors from below.
- Next, the creation of the so-called filtration or drainage layer begins. To do this, sand is poured in a layer of at least 100 mm. More is possible, but note that 100 mm is the lower limit. After this, the sand is compacted using a manual tamper or using an electric or gasoline tamping machine.

- It should be noted that the maximum permissible layer of sand that needs to be compacted - this is 200 mm. If a larger layer is planned, then the tamping work is divided into stages, but no more than 200 mm at a time. During the compaction process, it is necessary to periodically water the sand with water from a hose.
- A layer of crushed stone or coarse gravel is poured onto the sand. The minimum thickness is also 100 mm. This layer is compacted manually or mechanized way. Crushed stone or gravel helps to better compact the sand layer and give the filter layer a rigid base.

The next step depends on how much space is left to the level from which the future floor screed will be formed on the ground.
Prices for vibrating plates
vibrating plates
- If you still have 150-200 mm at your disposal, then you can lay a layer of concrete with the addition of expanded clay on a gravel-sand cushion. This will be the first stage of thermal insulation, but which will still not be enough for most regions of Russia. Per layer expanded clay concrete then a layer of 40-100 cm of “lean” concrete is laid and compacted. It is called “skinny” because it contains a low content of binder – cement. Lean concrete usually has grades M 100 (B7.5) or M 150 (B10). The task of such a layer is not to bear the main load, but to fill the unevenness of the underlying layer, level the surface and prepare it for waterproofing.
- Another case in the preparation of ground floors for screed is the lack of 150-200 mm for the expanded clay concrete layer. Then skinny concrete comes to the rescue again. It is laid directly on crushed stone, and the concrete layer should also not exceed 100 mm, 40-60 mm is more than enough. When laying it, be sure to compact it so that the solution penetrates into the space between the crushed stones. Using a trowel, a rule and a grater, you need to form an even outer surface, which will be the basis for the future floor screed.
The subsequent steps are the same for both cases. After the “laying” of lean concrete has dried, it is necessary to carry out waterproofing measures. For this purpose, bitumen mastics are used, with which the entire surface is coated in at least two layers. Do not forget that the walls must also be coated with mastic to a height no less than the height of the floor screed. In regions with high level groundwater after mastic, a roll based on bitumen or dense polyethylene film laid overlapping would also be useful.

The base of the screed is an old screed
Those who got this option should not be envious, since in most cases the old screed will have to be dismantled. Even if it gives the impression of reliability and impeccability. Even if it does not “bounce” when tapped and has a smooth surface without cracks. Let us present the arguments.
new screed, the “impeccability” of the old one can easily be damaged. Under new conditions, detachment from the base and cracks may occur, which will also affect the top layer.
Screeds are never made in such a way that they cannot be dismantled. It seems logical to sometimes connect two layers with reinforcing bars or wire, but no. Even connected concrete screeds adhere to each other only due to adhesion and will delaminate quite easily under mechanical stress.
To dismantle the screed, it is best to call a team of workers who specialize in this particular area. From experience, it will be much cheaper. You shouldn’t even try to do this alone, since both the owners and the neighbors will be exhausted if removing the screed is difficult. apartment building. A professional team arrives immediately with all the necessary chiselling and stone-cutting equipment, shovels, garbage bags, and a vacuum cleaner. They immediately take away all the garbage collected during slotting work and the owner does not have to worry about calling a separate car. The work of the professionals goes on continuously: one or two people dig, another one or two immediately collect the garbage in bags, and the rest take it out and load it into the car.

The main task of the owners is to come to an agreement with everyone to whom the noise may cause discomfort. IN panel houses- this is the whole house. And, of course, make sure that after the team leaves, there are no traces left on the site and in the entrance from the presence of “noisy guys” and dust from old screed.
In private houses everything is simpler; you don’t have to negotiate with your neighbors. You can try it yourself, but you still can’t do it without helpers. To dismantle the old screed, you will definitely need a powerful hammer drill with a non-SDS+ cartridge, and not an SDS-Max. You will also need chisels for the hammer drill. Sometimes jackhammers are used, but this step can only be taken if this tool is in the hands of a professional. Improper use of a heavy-duty jackhammer can easily lead to the breaking of a reinforced concrete slab.
In addition to the hammer drill, a 230 mm grinder with a stone-cutting disc, a construction vacuum cleaner, shovels, brooms, and a large number of durable bags can be very useful. Work must be carried out in work clothes made of thick fabric and in a headdress, wearing gloves, wearing a mask or glasses. Since there will be a lot of dust, a respirator is required. It is better to protect your hearing organs with headphones, as there will be a lot of noise. Not every craftsman has such a set of tools in his arsenal, but all this is rented in any region. In order not to overpay for rent, it is better to fit all the work into one day, so assistants are definitely needed. Let us describe the main stages of dismantling the old screed.
- If electrical wiring, heating or water supply pipes run in the room under the screed, then it is desirable to have a diagram that should remain after installation. If it is not there, then you will have to use a special device - a detector of hidden wiring and metal, with which you need to examine the entire area of the room and mark these places on the surface with a bright marker.
- It is better to start dismantling the screed from the entrance to the room and then move deeper into it. This will make it easier to immediately remove the loose pieces of the old screed. But before starting dismantling, it is necessary to carry out “ exploratory drilling" To do this, cuts are made in a small area using a grinder with a stone-cutting disk, and then small pieces of the screed are broken off with a hammer drill with a shovel or a jackhammer to get to the next “cultural layer.” If that layer is the right one load-bearing slab, then you need to measure the thickness of the screed to be removed with a tape measure in order to know the reference point.
- You should start breaking off the old screed with low engine speeds of the hammer drill and first break off small pieces. Further, when the degree of adhesion of the screed to the base is already clear, you can increase the speed and break off in large pieces. Everything will be intuitively clear. When working, you should always take a stable body position and hold the tool with only two hands. There is no need to put too much pressure on the hammer drill or jackhammer; this does not affect the force of the blow, but your hands will get tired faster.
- It is better to remove pieces of broken screed immediately with shovels, load them into strong bags and take them to a certain place for subsequent removal. This is another argument in favor of the need for assistants.

- When working, breaks are required. This is necessary both for resting your hands and for cooling the instrument. After 15 minutes of work, rest for 5 minutes. It is also desirable that the operators behind the rotary hammer or jackhammer also change. But this can only be done if others have good tool skills.
- If the old screed is reinforced with wire mesh, then before dismantling it with a grinder with a stone-cutting disk, you need to make cuts to a depth that would ensure cutting of the reinforcing mesh. The work of the grinder must be combined with the work of the vacuum cleaner, since there was a lot of work from cutting concrete. The surface is “chopped” into rectangles, such that they can be conveniently carried away in bags, and only then chiselling is done.
- Those places where pipes or hidden wiring a large hammer drill or jackhammer should be bypassed. In these areas, then after the “heavy artillery” it is better to let a small hammer drill or even a hand chisel and hammer work. You also need to be careful in corners and near partitions, especially if they are made of plasterboard or cellular concrete.
- After dismantling and removing all debris, the surface of the base is cleaned with a hammer drill with a wide blade from the remnants of the old screed. Then the room is swept, the floor and air are sprayed with water from a sprayer and 15-20 minutes are given for all the dust to settle. Use a vacuum cleaner to remove remaining dirt.
Prices for polystyrene concrete
polystyrene concrete
It happens that after dismantling the screed, the “cultural layer” laid on the floor is exposed. ceramic tiles. Moreover It happens that this tile was laid back in the 50-60s of the last century. On construction and renovation forums, the question very often arises of what to do with these tiles? Should I fight her off or not? Opinions on this issue vary. Our opinion is clear – beat back!
Tiles laid during the times of developed socialism in the USSR, when dismantled, have two extremes. Either she literally “jumps” from the base herself, or she “stands to the last.” Moreover It happens that tiles behave differently in one area. And all because previously craftsmen did not have tile adhesives with predictable properties in their arsenal. That's why they stuck to whatever they wanted. They used just cement, and cement with PVA, and Bustilat glue, and even epoxy resin and some other “brutal” compositions with ammonia. And they glued it without any mineral base in the form of sand, chalk or lime. Therefore, dismantling old tiles can be a problem.
Some home craftsmen mistakenly believe that than hit harder perforator, the more readily the tiles will lag behind the base. However, practice shows that a small hammer drill with a sharp blade can cope with old tiles better than the “monster”, but with a more blunt blade. That is, when dismantling an old tile covering, it is not the force that is more important, but the place of its application.

After dismantling the old screed and thorough cleaning, preparing the surface for a new screed will be practically no different from what will be described in the next chapter.
The screed base is a concrete slab
It is most pleasant to make a screed on such a surface when you do not have to deal with excavation work or dismantling old coatings. But nevertheless, the surface must be prepared. What steps should surface preparation include?
- First of all, it is necessary to provide the workplace with good lighting, in which the slightest surface flaws will be visible.
- All joints of reinforced concrete slabs (if any) are cleaned, processed, and then sealed with a cement-sand mortar of the same recipe that will be used for the future screed. This solution can also be used to seal the junction of walls and floors where there may be gaps.
- All dried splashes of mortar, lime and others on the surface, as well as everything that can be touched with a spatula and hammer, are knocked off and cleaned.
- If there are large recesses on the upper surface of the slabs, then they can also be covered with the same solution as the joints between the slabs.
- If there are cracks, they are cut to a width of at least 5 mm and then filled with special repair compounds for concrete.

- After all the solutions have dried, the room is thoroughly cleaned, and then a primer is applied with a roller. deep penetration. After the first layer has dried, the second is applied. Primer treatment is required in any case, even if the screed is to be made on the separating layer.
- If the screed is bound, then it is recommended to use a special composition - “Betonkontakt”, which contains a complex of polymers, cement and quartz sand. After treatment with this primer, the surface becomes rough, to which all building materials “stick with pleasure.” However, we recommend using “Betonkontakt” after placing the beacons in order to prevent damage to the surface created by this soil.

- If the screed has a separating layer, then a dense polyethylene film. The joint of the strips should overlap at least 100 mm, and the overlap on the walls should be the thickness of the future screed plus 20 mm.
- A damper tape is glued to the walls around the perimeter of the room, which serves to compensate for temperature expansion.

At this stage preliminary preparation surfaces can be considered complete.
Prices for "Betonkontakt"
concretecontact
Placing beacons for floor screed
The floor surface intended for screeding is rarely completely flat. In addition to uneven terrain and the profile of the floor slabs themselves, in most cases the rough surface has a slope in one direction. If in a separate room a slope of 3 mm per 1 meter is imperceptible, then on the scale of a house it can already turn into several centimeters, which is unacceptable. You should always ensure that the floor in the entire apartment or floor of a private house is on the same level. The exception is bathrooms, which should be 15-20 mm lower. Therefore, with proper repairs, it cannot be that in each individual room the screed is done only in its interests. In no case! You can make a screed in some room, but taking into account the entire apartment or the entire house.
In order to prevent the floor level in an apartment or house from “dancing” as it pleases, it is necessary to set the zero level in all rooms. This is very easy to do if you have a laser plane builder at your disposal, which has long ceased to be a luxury. Let's describe the methodology.
- In a certain place, a laser level is installed on a tripod so that it can capture with its beam maximum amount premises. It is better to install it at a comfortable height for work - approximately 140-150 cm. Mark the position of the beam on the walls of the premises with a marker.

- The level is transferred to some room where there is already a mark and is set By her . Next, the position of this mark is transferred to all walls. Use a painter's cord to mark a horizontal baseline.
- Similar actions are carried out in all rooms. As a result, it should turn out that a horizontal base line is drawn on all walls, against which the floor level and screed thickness will be calculated.
- Measurement points are marked on the baseline at a certain frequency (1.5-2 meters). Then the distance from the measurement points to the floor level is measured vertically and written down with a marker or pencil directly on the wall.

- The minimum and maximum distance from the base line to the floor surface. In the example given, the minimum distance is 1420 mm and the maximum is 1445 mm. The height difference is 25 mm.
- Let's say the recommended minimum thickness of a screed for sand concrete of any brand is 30 mm. This means that you need to set aside 30 mm from the highest point and get that the zero level will be 1420 - 30 = 1390 mm from the base line. The thickness of the screed in this case will vary from 30 mm to 55 mm. This is completely acceptable.
These calculations are very appropriate to apply to the house plan. Such a document will be very useful in the future, since screeding is usually not done immediately in the entire apartment or floor of the house, but gradually, moving from one room to another.
It's time to learn how to place beacons correctly. These actions cannot be called hard physical labor, but a lot depends on the correct placement of the beacons. They are the ones who set the floor surface and the slightest mistake will further work may lead, at worst, to further elimination of deficiencies, and at best, to banal excess consumption of dry mixture, from which the screed solution will be prepared.
Let's give an example. Let's say there is an apartment with an area of 100 m² in which you need... For this purpose, sand concrete M 300 will be used, which has a minimum layer size of 30 mm. When beating the zero level, it turned out that the thickness of the screed can be from 30 mm to 55 mm (we gave this example earlier). This means the average thickness of the screed will be approximately (30+55)/2=42.5 mm or 4.25 cm. Average consumption sand concrete M 300 is 20 kg per 1 cm of thickness and an area of 1 m². It turns out that the consumption for the entire apartment will be: 4.25 * 100 * 20 = 8500 kg of dry mixture, which will be 212.5 40 kg bags.
Now let’s imagine that when installing beacons, the master instead of the minimum 3 cm at the highest point set 4 cm with the “iron” argument “the reserve is not enough for the pocket.” Let's recalculate: an extra 1 cm added to the screed over the entire area of 100 m² will result in 20 * 100 = 2000 kg, which will be an additional 50 bags in 40 kg bags. It turns out that the reserve “pulled the pocket.” And the point here is not so much about money, but about the extra load on the floor. The extra 2 tons will lie on the base of the floor. The extra 2 tons will need to be dragged, prepared and laid.
All readers probably know that the most inconvenient load when transporting and especially lifting to floors is a piano. Loaders avoid it “like hell” and charge a special rate. The average weight of one piano is 250 kg. It turns out that plus 1 cm of tie in the considered example is equal in weight to approximately 8 conventional pianos or one conventional Lexus RX 400 SUV.
There are too many ways to display beacons to describe them all in one article. Each master has his own favorite method, which does not necessarily have to be similar to others. In principle, what difference does it make if, using different methods of placing beacons, two masters get equally good results. We propose to consider a method that will be understandable to everyone and even a beginner can reproduce it.
Completely different objects and devices are used as beacons for floor screeding. Some people prefer to make beacons from mortar, others use pipe sections. The ceiling guide profile is very widely used, " borrowed"in plasterboard systems, which we know as PN 28*27 or UD 28*27. Its shape and sufficient rigidity allow it to be used for lighthouses. For example, as shown in the figure.

In the method of placing beacons we describe, we will use the PM-10 beacon profile, originally conceived for plaster, but also successfully used in screeds. It is made of galvanized sheet steel and has a shape that also provides it with good rigidity. The side shelves of PM-10 are perforated to facilitate its attachment to the leveling surface in different ways.

Very often, beacon profiles are fixed using mortars. To do this, on the pre-marked line on which the beacon should be located, at the beginning and at the end, self-tapping screws are screwed into the previously installed dowels. Then using laser level or other measuring tool The screw heads are positioned so that their top plane is in the plane of the future screed. Along the line where the beacon is placed, slides are made from cement-sand or other mortar at certain intervals, and then the beacon profile is placed on them and pressed with a rule, which is pressed against the heads of the screws.
When the beacon profile is pressed into the mortar cushion, be sure to ensure that it is pressed against the rule along its entire length. The excess protruding above the lighthouse is cleaned. When the solution has dried, you can begin the main work on the screed. For a cement-sand mortar, at least 1-2 days must pass for the beacon to be fixed, so to speed up the process, some craftsmen use adhesive gypsum mortars or even alabaster. In this case, the lighthouse is fixed almost instantly and work on laying the screed can begin immediately. Everything seems to be fine, but it turns out that there will be foreign inclusions from other materials in the body of the screed. During the operation of the screed, in those places where there are “strangers”, cracks will most likely form, since the coefficients of linear thermal expansion differ for different materials. Therefore, beacons should be installed only on the mortar that will be used to make the screed.
The method of installing beacons on a solution has a main drawback - it is the impossibility of correcting the position in case of an error. Only dismantling the beacon and reinstalling it can correct the situation. Therefore, it is better to use a method that will allow you to easily install and dismantle the beacon and adjust its position. This can be easily achieved using self-tapping screws with dowels and a special fastening – a plastic clip for attaching beacons.

This clip consists of two parts - the clip itself and the lock that secures the beacon. This type of fastening the beacon is good because the clip itself can be attached to the head of the screw after it has been screwed in and adjusted in height. There is a special groove for this. After, already after The beacon is inserted into the clip and is being finally secured with a lock. The result is a very reliable mount, which can also be adjusted in height. The price for such clips is cheap - 100 pieces cost 250-300 rubles.
Let's consider the process placing beacons using plastic clips. For ease of perception, we present it in the form of a table.
| Image | Process description |
|---|---|
 | On the prepared floor surface, the position of the beacons is marked, which should be installed in the direction of pouring the screed from the far wall of the room to front door parallel to the side walls (if the room is rectangular). From the side walls to the guides closest to them, an interval of 200-300 mm should be maintained. The distance between neighboring beacons is 1-1.5 meters. The rule applied to adjacent beacons must still have a margin of at least 200 mm on both sides. |
 | On the beacon position lines, holes are drilled with a hammer drill at intervals of 500 mm, into which dowels are immediately hammered. |
 | In the room where the beacons are displayed, there is the highest point, according to previously made calculations. At the corresponding point, the dowel is screwed in with a self-tapping screw, but not all the way. A laser level is installed and aligned along the baseline previously drawn on the walls. |
 | On a straight wooden block, a mark is made of the position of the screw head relative to the base line, but taking into account the height of the beacon (10 mm) and the clip (2 mm). That is, 12 mm is added to the previously calculated screed level relative to the baseline. The block is installed vertically on the screw head and the position of the mark is controlled. |
 | By screwing or unscrewing the self-tapping screw with a screwdriver, ensure that the mark on the block coincides with the beam of the laser level. The self-tapping screw at this point can be considered set, and all the others must be aligned with it. |
 | The laser level is installed on the floor and its beam should be higher than the head of the exposed screw. A long bit is clamped into a screwdriver. Then the bit is inserted into the slots of the aligned self-tapping screw vertically and controlled to ensure that the laser beam is on it. |
 | A strip of white masking tape is glued to the bat in a circle, then it is again placed vertically in the slots of the screw and the position of the laser beam is marked with a marker. |
 | Self-tapping screws are inserted into all previously installed dowels. |
 | Using a screwdriver, all screws are sequentially tightened to the level determined by the mark on the bit and the laser beam. |
 | Clips are put on the heads of the screws, and the adjacent ones should be oriented opposite to each other. |
 | The position of the clips is checked using a rule, a level and a laser beam. The rule should be that all clips lie strictly horizontally. |
 | Beacon profiles are inserted into the grooves of the clips. All profile joints must be made using clips only. |
 | The profiles are secured in clips with snap locks. |
 | The room is cleaned with a vacuum cleaner. |
 | The floor surface is primed with a deep penetration compound. |
 | After the primer has dried, a semi-dry solution of sand concrete is mixed and all beacons are strengthened with it. The same solution can be used to fix the position of the damper tape. |
The proposed method is also good because the level can be set without the beacons themselves, and they can be put on immediately before laying the solution. This is very useful when the screed is reinforced.
Floor screed reinforcement
The question often arises about the advisability of reinforcing the screed, because by its intended purpose it is often not a power element bearing the main load. And this is partly true. But the lack of reinforcement can only be justified in connected ties laid on a reliable concrete base, and in all other cases it will not be superfluous. Let's consider cases where reinforcement is required.
- Screeds in a heated floor system must be reinforced, as they are subject to thermal expansion and contraction.
- Floating screeds laid on insulation boards are also necessarily reinforced, since it has a much lower load-bearing capacity.
- Ground screeds must be reinforced with reinforcement, since they are usually laid on a loose base. Another reason for reinforcement may be external factors, for example, seasonal swelling.
- If heavy objects are installed in the room or the screed is subject to any dynamic loads, then reinforcement is required.
- Screeds with a height of more than 5 cm are reinforced to prevent cracking during the drying process.
Various materials can be used for reinforcement. Let's consider which ones.
Reinforcement of screeds with metal mesh
The oldest proven method of reinforcing screeds is steel mesh made of reinforcement or wire. the former are used for heavily loaded floors on the ground, for example, in garages, and the latter in all other cases. Meshes for reinforcing screeds are made from VR-1 wire with a diameter of 2.5 mm to 6 mm. If previously a frame was formed using thin wire, which was used to twist the laid rods, now meshes are offered, connected by spot welding. Cells can be square or rectangular in shape, ranging in size from 50 to 200 mm. Obviously, what smaller size cells and the thicker the wire, the more reliable the tie will be. Meshes made from thin wire (up to 3 mm in diameter) can be sold in rolls, and from thicker ones in the form of cards measuring 0.5 * 2, 1 * 2 and 2 * 3 meters.

Very important element in any wire mesh is the presence on the rods of notches located in increments of 2-3 mm along the entire length. They significantly increase the adhesion area of the frame with the concrete mortar, which strengthens ready-made screed. When purchasing wire mesh, you must strictly ensure that all wire intersections are welded, since not all manufacturers do this. And it is also worth checking the mesh for the absence of strong foci of corrosion, which will expand in a highly alkaline concrete solution when it hardens.
There are a lot of sources on the Internet that tell you how to “correctly” reinforce a floating screed with underfloor heating pipes. A wire mesh is placed on the layer of heat and waterproofing, and only then the heated floor pipes are attached to it with plastic clamps. The actions of such “craftsmen” can be seen in the photographs.

Such “reinforcement” is possible in its essence - it is hiding expensive wire mesh under a layer of concrete. They do not perform any reinforcing function, since they will simply “roll” under the screed. In order for the reinforcement not to be useless, the meshes must be located inside the concrete, and they must be separated from the base by a protective layer no less than 15-20 mm thick. In thin screeds, the mesh will be located approximately in the middle, and in thick screeds it is better to place it in the lower third, so it will work better under various loads that arise.
When forming screed frame made of steel mesh be sure to overlap by 1 cell, but not less than 10 cm. For example, if a mesh with a cell of 10*10 cm is used, then adjacent canvases should overlap by exactly 1 cell, and if 20*20 cm, then half of it is enough . To ensure that the mesh is spaced at the same distance from the base, several methods are used:
- The mesh is installed on hills of cement mortar - exactly the same as the screed will be poured. Sometimes this is combined with the installation of beacons. This is a completely acceptable method, but its main disadvantage is that the slides and the screed itself do not dry out at the same time. This can lead to heterogeneity of its structure and delamination. It is unacceptable to use gypsum solutions!
- The reinforcing mesh is installed on supports made of pieces broken bricks, fragments of concrete or other available materials. This method is also allowed, but setting the grid at the same distance from the base is quite difficult. And then, when they lay the screed and move along the grid, some homemade supports may fly out. The use of wooden blocks is unacceptable, as they will increase in volume due to water and “tear” the screed.
- The most modern and best way to install reinforcing mesh is to use special reinforcement clamps. They are made of plastic, have calibrated dimensions and are selected for any type of reinforcing mesh, any thickness of the protective layer and any base. Such “implanted” racks do not in any way affect the concrete or cement-sand structure of the screed for the worse. These products can be easily found in any normal building materials store or market. The price for them is cheap: about 0.8-1.6 rubles per 1 piece, if you take it in bags of 1000 pieces. It is recommended to use at least 8-12 fasteners per 1 m². This depends on the diameter of the reinforcement or wire, the mesh pitch and the base material.
 Reinforcement clamps are a modern and best solution for installing reinforcing mesh
 The most common reason why screed reinforcement is necessary in residential premises is a warm water floor. But placing a metal mesh on the base and then attaching pipes to it is a rather dubious task. The effectiveness of such “reinforcement” is close to zero. The most correct thing is to fasten the pipes to the thermal insulation, and place steel mesh on top of them on the reinforcement clamps.
Let us note the advantages of using steel reinforcing mesh for screed:
- Such ties have the highest tensile strength, bending, stretching and compression.
- Excellent resistance to temperature changes over a very wide range.
- Steel mesh laid on top of underfloor heating pipes allows temperature gradients to be distributed more evenly, since metal has thermal conductivity many times greater than concrete.
- Correctly installed screeds with steel reinforcing elements have long term services.
Disadvantages steel reinforcement a little means a high price and the ability to corrode if stored and installed improperly.
Reinforcement of screeds with polymer and composite elements
Progress does not stand still, so change traditional reinforcing steel elements others come from various polymers or composite materials. For a long time there was no alternative to traditional steel reinforcement, but now a worthy “rival” has appeared - reinforcement and mesh made of polymer and composite materials. Let's take a brief look at them and immediately note the advantages and disadvantages.
Composite reinforcement is rods various diameters, which may have ribs similar to those on steel reinforcement or, for better adhesion, a sand coating is applied to them. The rods are formed from fibers and a polymer binder, which is why such reinforcement is called composite. The fibers used are glass, basalt or carbon, and therefore the reinforcement is called fiberglass, basalt-plastic or carbon fiber.

Composite reinforcement has a number of advantages, we list them:
Let us note the disadvantages of composite reinforcement:
- Lower stiffness of composite reinforcement than steel.
- Lack of ductility – high fragility.
- The heat resistance of composite reinforcement is worse. Fiberglass loses its properties at 150 °C, carbon fiber at 300 °C, and steel only at 500 °C.
- When cutting composite reinforcement, a large amount of dust harmful to health is generated. Especially it concerns fiberglass reinforcement.
They work with composite reinforcement in the same way as with metal reinforcement. When knitting frames, wire or plastic clamps, and for installation - clamps or mortar pads. The correspondence between the diameters of steel and fiberglass reinforcement can be seen in the following table. The price of composite reinforcement is not lower than that of traditional steel, however, if there are large logistics costs for delivery to the site, then in the end its use may be cheaper. True, when installing the frame and pouring the screed, you must be careful, because composite reinforcement is much easier to break than steel, since it bends much worse.
Prices for fiberglass reinforcement
fiberglass reinforcement

To reinforce screeds located on reliable foundations, plastic meshes are now widely used. They are made of polypropylene or fiberglass with a special impregnation that prevents the effects of the alkaline environment inside the concrete. The nets are produced in very wide range, With different sizes cells. For screeds, polypropylene mesh with a cell size of 35 to 50 mm is most often used. The width of the canvas is from 50 cm to 4 meters, and the length of the mesh roll is from 10 to 50 meters. Of course it is very convenient. Let's note the advantages plastic mesh for reinforcing floor screeds.
The only drawback of plastic meshes is the impossibility of using them in rough screeds on the ground.
Fiber reinforcement of screed
Reinforcing the screed with microfibers (fiber) differs from all others in that the frame itself is not visible. But the fittings in concrete mixture still exists in the form of thin fibers, evenly distributed in the solution, and after drying, in the thickness of the screed. They are the ones who reinforce the concrete in all planes, as they are located randomly. Their addition, even in small quantities, significantly increases the grade of concrete, impact resistance and strength. In fiber concrete (this is what concrete with added fiber is called) There is also an almost complete absence of shrinkage cracks. Fiber can be made from different materials:
- Steel fiber – represents pieces of high-quality steel wire with a diameter of 0.2-1.2 mm and a length of 25-60 mm. For better adhesion to concrete, the ends of the wires are curved. Steel fiber is the strongest, but is not used in ties. Its purpose is concrete for massive monolithic structures, mainly prefabricated.

- Fiberglass fiber significantly improves the quality of concrete, which allows reducing the amount of cement by up to 15% and water by up to 20%. It is not used in monolithic structures and screeds, since the fibers are made from a special alkali-resistant zirconium glass is very expensive. Therefore, glass fiber found yours application in decorative and structural plasters.
- Basalt fiber is pieces of basalt fiber with a diameter of 20 to 500 microns and a length of 1 to 150 mm. Reinforcing concrete with basalt fiber increases its strength by 4-5 times, abrasion resistance by 2-3 times, tensile strength by 2-3 times, compressive strength by 1.5-2 times, water resistance by 2 times. This type of fiber can partially dissolve in cement mortar, but from this it only gains strength. It turns out that reinforcement occurs both chemical and mechanical. Consumption – approximately 0.8-1.2 kg per 1 m³ of finished concrete solution.

- Polypropylene fiber is the most common a type of micro-reinforcement of floor screeds, since along with the excellent characteristics of concrete (almost like basalt fiber), its prices are lower. Polypropylene fiber does not enter into chemical reaction with concrete mortar and does not change its properties during the entire service life of the concrete. Consumption of polypropylene fiber is approximately 0.6-1 kg per 1 m³ of finished solution.

Adding fiber to a concrete solution is very simple; there are two ways to do this - dry and wet. All types of fiber, except basalt, can be kneaded dry. This means that the basalt fiber is first soaked in water, and then the dry ingredients of the mixture are added. Steel fiber is added only in a dry manner. That is, it is added to the sand, mixed, then cement is added, and then water.
It should be noted that mixing solutions with fiberglass will be of high quality only when this is done mechanically- with help concrete mixer or mixer. The mixing time with fiber should be increased by at least 30% so that it is distributed as evenly as possible throughout the volume.
Conclusions regarding the reinforcement of floor screeds
The opinion of the authors of the article regarding reinforcement is clear - it is necessary in any case in one form or another. This is based primarily on personal experience, but also on an analysis of the opinions of professionals on numerous thematic construction forums. Here are the arguments:
- Any properly executed reinforcement makes the screed better.
- Highly loaded screeds, as well as those made on the ground, must be reinforced with a reinforcement cage.
- Composite reinforcement does not provide any advantages over steel at current prices.
- Any reinforcing frame must be inside the screed, and the thickness of the protective layer must be from 15 mm.
- on a reliable basis, it is sufficient to use polypropylene reinforcing mesh.
- It is always better to reinforce with polypropylene or basalt fiber, since the costs for this are disproportionately less than for all other components of the solution, and the result, if used correctly, is obvious.

Preparation of mortar for floor screed
The issue of proper preparation of the solution in the installation of floor screed is extremely important, since both the quality of installation and the period of further operation depend on it. If you “rewind” 20-30 years ago, then this issue did not arise at the construction sites of private houses in the territory of the former USSR. Either simply on the floor surface, or in homemade troughs, a solution consisting of cement, sand and water was mixed with shovels, and then it was laid on the floor surface using wooden graters, slats, pieces of edged boards and other available means. And many of the ties made then still serve today. But this does not mean that we should continue to use these “old-fashioned” methods.
Modern screeds are often made on a layer of insulation, and heated floors are also no longer a luxury item. Accordingly, the requirements for what kind of solution should be prepared also increase. Let us immediately tell readers that mixing with shovels on the floor or in a trough, as some current sources may even talk about, is an outdated approach. A good screed should have a homogeneous structure, so preparing a solution for it is better to compare with the craft of a pharmacist, which from various containersusing beakers measures accurately required quantity ingredients and then mixes them until smooth. It is clear that the volumes of a pharmacist and a builder are different, but the attitude should be similar. And, of course, the preparation of the solution should be done only using mechanisms - mixers or concrete mixers (concrete mixers).
 A drill mixer is a very useful device that will be useful in the household more than once
 Floor screed solutions can be prepared in two ways, each of which has its own advantages and disadvantages.
- The first method is to prepare the solution yourself. At the same time, they are purchased in the required volume necessary ingredients, which are mixed in certain proportions. It should be taken into account that with this method experience or clear instructions are desirable, not to mention the quality of the individual components of the solution.
- The second way is to use ready-made dry building mixtures, which are specifically designed for floor screed. This makes the job easier, but costs more.
Let's consider these methods separately and in more detail.
Making your own mortar for floor screed
Modern SNiPs do not at all interfere with self-cooking solution, but its grade must be no less than M-150, which means that each square centimeter of the screed must withstand a load of 150 kg. This is sufficient for simple screeds, but may not be enough for heated floors. In addition to the traditional screed components - cement and sand, it is also recommended to use a special additive - plasticizer . What does this give?
- In order for cement to turn into stone, it needs a certain amount of water approximately equal to a quarter of its mass. For 100 kg of cement you need approximately 25 liters of water. But such a ratio will not allow obtaining a plastic and flowable cement mortar with fillers, so an additional amount of water is introduced into the mixture, which makes it possible to conveniently lay the mortar. Plasticizers make it possible to reduce the water-cement ratio to a minimum, which has a beneficial effect on both the rate of hardening and the final strength of the structure or coating.
 Plasticizers are not a luxury, but a necessity
 - The use of a plasticizer avoids the appearance of air bubbles in the body of the screed. This is especially true when pouring heated floor screeds. When laying the screed, due to the plasticity of the solution, the air freely escapes on its own, and the cement-sand mortar better “encircles” the heated floor pipeline.
- The brand strength of the finished solution when using a plasticizer increases by 20-40%.
- Solutions with a plasticizer have a frost resistance 50% higher than without it.
- The “lifetime” of the solution, during which it can be worked with when laying the screed, increases significantly. This allows you to make batches in large volumes and increase productivity.
- The water resistance of screeds with plasticizer is significantly higher than without it.
We hope that we have convinced our readers of the need to use a plasticizer for screed. It can be found easily on sale in liquid or powder form. It can be called differently, but in terms of its chemical composition and in fact in 99% of cases it is a C-3 plasticizer. The liquid form is more convenient, since the plasticizer can be added directly to water to prepare a solution, and the powder requires preliminary dissolution of a certain amount in measured volume of water. All instructions for using the plasticizer are always indicated on the packaging.
Now let's look at how to prepare a time-tested solution for screeds.
- Portland cement itself must be used as a binder. common brand M 400. You can also use M 500, then the screed will be even stronger. It is usually sold packaged in 50 kg bags, but for ease of transportation there are also 25 kg bags. Of course, it is necessary to check that the shelf life of the cement has not been exceeded.

- It is recommended to use quarry sand as a filler, in which the grains of sand have an irregular shape with sharp edges. In a screed, such sand will adhere well on its own with you, with cement and foundation. river sand with prolonged exposure to water, it takes on a smoother shape, which means it will be more willing to peel off from the screed.
- Only clean water should be used to prepare the solution, free of impurities of petroleum products, fats and other contaminants. Naturally, water containers should also be clean and intended only for it. It should be noted that the required amount of water does not need to be added immediately, since a solution with a very high content can be obtained. This will have a bad effect on the ease of installation and strength of the screed. Sand may already contain some amount of water and the use of a plasticizer also greatly affects the water-cement ratio.
Now about the proportions of the ingredients of the screed solution. The proven “classic” for years is one part cement to three parts sand. We suggest calculating the exact amount using a calculator.
Calculator for calculating the amount of ingredients of a mortar for floor screed
The proposed calculator is very easy to use, requires a minimum amount of input data, and produces results with good accuracy. The only explanation for its use is the point about the difference in height of the screed. This is nothing more than the difference between the highest point of the base and the lowest, expressed in millimeters. We talked about this in our article when we looked at the installation of beacons.
Nowadays, the answer to the question of why it is necessary to level the floor will be obvious: a level floor is the main component of a successful renovation of the entire room, the best basis for covering the floor with laminate, parquet or ceramic tiles.
The main component of a successful home renovation is a level floor.
To level the floor, you must first make a level screed. To do this you will need a concrete solution; you can do this type of work yourself.
Behind last years self-leveling concrete floors, despite the labor-intensive and time-consuming process, have gained great popularity. Their main task is to withstand a certain load.
Kinds
The material is classified according to the type of binder. The most common types are concrete and cement-sand. They are used to repair floors in any premises and buildings. For concrete materials They use a concrete solution, which is laid on a layer of gravel or crushed stone, and for cement-sand - a mixture of cement, sand and water.
Anhydrite bonds are made from gypsum ( binder material), sand, water and gravel. They are characterized by great strength, lack of deformation, but at the same time, the reaction of water-soluble gypsum with moisture, which can create minor problems.

Depending on the type of construction, floor screeds can be rigid, dividing, or floating.
- The basis of magnesite materials includes caustic magnesite, bischofite solution, as well as organic or mineral fillers.
- Self-leveling floors are a new product in the construction industry. They are made from mixtures of cement, sand, aggregates and plasticizers. In addition, screeds are mosaic, asphalt and epoxy.
By type of construction it can be divided into:
- rigid, laid directly on the ceiling;
- separating ones, which are laid on a special layer that prevents the screed from adhering to the ceiling;
- “floating”, which cover heat and sound insulating materials.
Preparatory work

Before you start making a screed, you need to prepare all the tools: a building level, usually a trowel, a container for mortar, an electric drill with a mixer attachment, boards or metal profiles.
How to do everything right? First, the surface must be thoroughly swept, cleaned of debris and dust, and primed. Ideally, it is better to remove dust with a special vacuum cleaner. Any surface peeling must be cleaned, and cracks must be covered with a thick solution. We will need a list of the following tools and materials:
- Building level.
- Rule.
- Master OK.
- Mortar (concrete).
- Container for solution.
- Electric drill with mixer attachment.
- Boards or metal profiles.
It is necessary to waterproof all walls and partitions that the screed will touch, that is, protect them from moisture absorption. To do this, a strip of roofing material is glued to the walls so that the upper edge of the strip protrudes 15 cm above the level. Next, using a level, we make markings that determine the level. If you only have a water level, then mark the desired equal height on the wall in several places and use straight lines to connect the marks.

When installing “beacons”, the distance between them should be no more than 1.5 cm.
To make it level, you need to install beacons, which can be used as ordinary boards or metal profiles, attached to the surface with screws or thick mortar. The distance between the “beacons” should be no more than 1.5 cm.
After installing the beacons, they proceed directly to preparing the solution to make a self-leveling mixture.
- Using a bucket or basin, we prepare a solution for the material, mixing, for example, sand and cement with an electric drill with a special mixer attachment. The thickness of the solution should resemble stiff dough. It is necessary to prepare the solution immediately before use, because after 1.5 hours it becomes unusable.
- It is recommended to start laying from the highest point, that is, from the very long distance between the base and the mark. The solution is laid in such a way that the surface of the “beacons” is covered, but not more than 1 cm. Then it is leveled, rolled with a needle roller in order to avoid the appearance of unevenness and air gaps. Excess solution is cut off with a rule, applying it to the “beacons”.
- In order for the screed to have sufficient strength, its thickness should be at least 4-5 cm. An important condition successful work on the screed is a temperature that should not exceed 20°C and the absence of drafts. It is recommended to start and finish screeding one level or one room on the same day.
Having completed the main screed in the room big size, don't forget to fill out expansion joints(small gaps between the parts of the screed), and also moisten the finished screed with water so that it does not crack. After a couple of days, you can remove the “beacons” and fill the resulting voids with a solution.