How to Create Vector Sunbursts in Adobe Illustrator. How to Create a Sunburst Effect in Photoshop How to Make Rays from the Center in Photoshop

Today I want to tell you how in Photoshop you can make an original background pattern in the form of diverging sun rays in a few steps. In the first method, we will use dashed text, which we will rasterize and stretch across the entire document. Then apply the filter Polar coordinates and get nice sun rays. In the second way, we'll use a hard brush, change its blend mode, and then apply the Radial Linear Blur filter. The result is more like an explosion of a star, but, in any case, it looks pretty.
Step 1.1
Create a new square document in Photoshop, 500x500 pixels in size, fill it with #0488e4 color. 
Step 1.2
Select the Type Tool, set the text color to #46a9ee and use a regular dash to write a dotted line from edge to edge in the middle of the document. The text settings are as shown below. 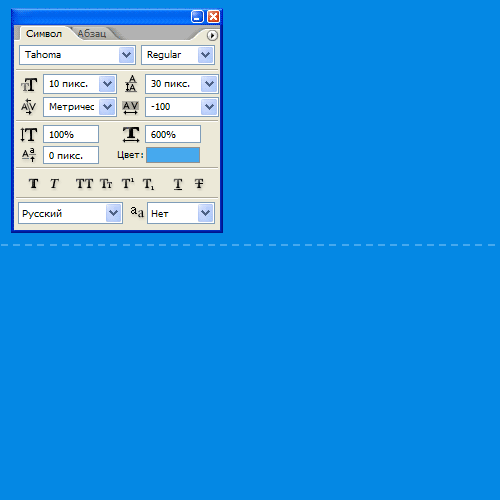
Step 1.3
After that, right-click on the layer and select Rasterize Type. Then press Ctrl+T and stretch the dotted strip up and down to the edges of the document. 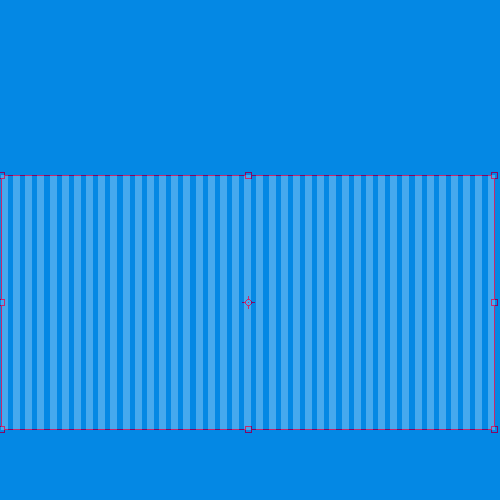
Step 1.4 
Step 1.5
After that, in the menu, select “Filter” (Filter)> “Distortion” (Distort)> “Polar coordinates” (Polar Coordinates). Set the settings as in the figure below and click the "Yes" button. 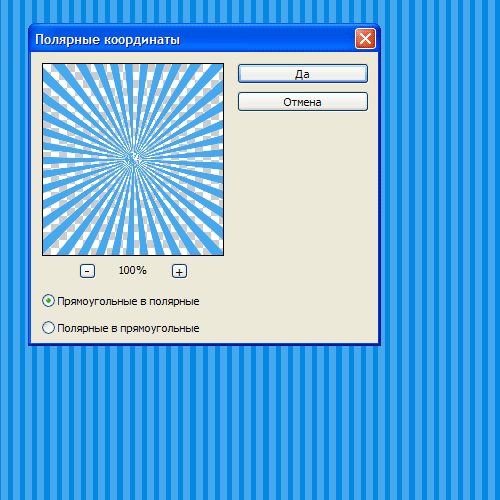
Step 1.6
This should be the result. 
Step 2.1
This is the second way to obtain divergent rays. To do this, with a hard brush of 300 pixels on a new layer, click in the center of the document. 
Step 2.2
Set this layer to “Dissolve” (Fade) (Dissolve) and reduce the transparency of the layer to 10%. Now you need to right-click on the layer and select "Group to a new smart object" (Convert to Smart Object). Then right-click on the layer again and select Rasterize Layer. 
In this tutorial, you'll learn how to create beautiful sunbeams through tree branches in Photoshop. This is not only a great way to make a photo more interesting, but it is also very simple. Much easier than you can imagine!
In the end, to make the picture more realistic, we will create streaks of sunlight falling on the ground.
So here's the image I'll be working with:
original image
And here is the same shot, but after applying the effect:

Result
Let's start.
Step 1: Highest Contrast Color Channel
After you open the original photo in the program, the first step is to determine which of the three color channels (Red, Green or Blue) has the highest contrast. To do this, in the Layers panel, go to the Channels tab. You will see three channels, Red, Green and Blue, which when combined create all the colors in your photo. You'll also see a fourth channel called RGB at the top of the panel, which is actually a mix of the three main channels:

Channels Panel
We are interested in which of these three channels gives the greatest contrast. To find out, keep only one of the channels visible in turn and watch how the image changes.
Let's start with the Red Channel, turning on which we will see our photo in black and white. Then we will move to the Green channel, while turning off the visibility of the Red and Blue channels. Remember how the image changes; You will be presented with three versions of your photo in black and white, your task is to choose the most contrasting one. For my shot, the highest contrast option is the Blue channel (which I've shown below). The sky in the background is displayed quite brightly and clearly, while the tree itself and the ground, on the contrary, are very dark. Exactly what I needed.

The black and white version of the Blue channel gives the greatest contrast between the sky and the tree.
Step 2: Duplicate the channel
Now that I know that the Blue Channel contains the highest contrast, I need to make a copy of it. To do this, simply select the desired channel and drag it to the New Channel icon at the bottom of the Channels panel:

When you release the mouse button, you will see a copy of the channel just created, located below all other channels, it will be called Blue copy.

Step 3: Darken The Shadow Areas With The Levels Command
We need to further increase the contrast in the copied channel by making the dark areas completely black. This can be done using the Levels command. To do this, go to the Image menu at the top of the screen, choose Adjustments and then Levels. To do this faster, use the hotkeys Ctrl+L (Win) / Command+L (Mac). In the dialog that appears, you will see a graph and three sliders located below this graph: a black slider on the left, a gray one in the middle, and a white one on the right. Drag the black slider to the right, as you move the slider, the dark areas of the image will become even darker. Let me remind you that we need to make the dark areas completely black.

Move the slider to the right until the dark areas are completely black.
When finished, click the Ok button to close the dialog box. In the photo below, the image is after manipulations in Levels. The dark areas are now filled with black, while the sky in the background stays the same.

Copy of the Blue channel after shading the shadow areas
Step 4: Load the channel as a selection
Hold down the Ctrl (Win) / Command (Mac) key and click on a channel in the Channels panel:

This will load the channel as a selection.

Step 5: Create A New Blank Layer
Go to the Layers panel and click on the New Layer icon to create a new empty layer.

You will see that after creating a new empty layer, the image will turn from black and white to color again.

A new empty layer Layer 1 is added above the Background layer.
Step 6: Fill The Selection With White
Press the D key on your keyboard to set the default colors for the foreground and background: black for the front and white for the back. Then use the keyboard shortcut Ctrl+Backspace (Win) / Command+Delete (Mac) to fill the selection with white on a new layer. You won't notice any change if the sky in the background of your photo was already white, but we'll use this fill to create the sunbeams later on.
Step 7: Duplicate The New Layer
To make a copy of Layer 1, use the keyboard shortcut Ctrl + J (Win) / Command + J (Mac), while the layer should be selected in the layers panel. A copy of the layer will appear called Layer 2.

Step 8: Apply The Radial Blur Filter To Layer 2
Now it's time for the sunbeams themselves. Select the newly created Layer 2 in the Layers panel. Go to the Filter menu, choose Blur - Radial Blur. The Radial Blur filter dialog box will appear on the screen. Raise the Amount value to around 80, however, this value depends on the size of your image and how you want the beams to be. The higher you set the value, the longer the rays will be, so you can experiment at this stage.
In the Blur Mode column, select Zoom, and set the Quality to Best. If you are working on a low-powered computer or just experimenting, then the blur quality can be made lower by selecting “Good” or “Draft” in the Quality item.
In the lower right corner of the dialog box there is a function Blur Center, where you can select the point from which the blur begins, and in our case, the sun's rays. The square box represents our image. Click on the point you would like to cast rays from. I wanted the rays in my photo to start from about the top quarter and from the center, so I positioned the point like this:

Click on the Ok button once you are done with these manipulations. That's what I did:

The rays don't seem realistic yet, but we'll fix that.
Step 9: Change The Layer Style To Outer Glow
To make the rays stand out a little more, you need to add a glow. To do this, click on the Layer Style icon located at the bottom of the layers panel:

Then from the list of styles select Outer Glow (external glow):

Before us appeared dialog box style Outer Glow (external glow). There is absolutely no need to change any settings here. The default settings are great for creating sunbursts. Just click on the Ok button to leave the dialog box and apply the effect:

Now the rays look much better:

Step 10: Change The Layer Blend Mode To Soft Light
Now the sun rays look better, but still not realistic enough, we need to soften their intensity a bit. We can do this by simply changing the blend mode of the layer we are working with. Staying on the Layer 2 layer, go to the menu Blend Mode (Overlay mode), which is located in the upper left corner of the layers panel, and change the mode from Normal to Soft light (Soft light):

So, here is the image that I got after applying the layer blend mode Soft light (Soft light):

Step 11: Duplicate Layer 2
Copy the Layer 2 layer, for this we use the hotkeys Ctrl + J (Win) / Command + J (Mac). The program copied the layer and named it "Layer 2 copy".

Step 12: Extending the Sun Rays
Now we have two copies with rays, one on Layer 2 and the other on Layer 2 copy. Let's make the rays on Layer 2 copy longer to give them a more natural look using the command Free Transform (Free Transform). If you are working with an image open inside the document window, then press the F key to switch to Full Screen Mode. You will have a better view of everything that is being manipulated, which in turn will make your work easier. Then press the keyboard shortcut Ctrl+T (Win) / Ctrl+T (Mac) to bring up the Free Transform dialog box.
If you look closer to the center of the photo, you will notice a small icon. Hover over it and drag it to the point where the rays come from:

Now hold down Shift+Alt (Win) / Shift+Option (Mac) and move any of the corner handles to the side to extend the rays. By holding down the Shift key while moving the handle, you tell the program to maintain the aspect ratio of the image, and by holding down the Alt key, you keep the center point fixed, which you set yourself.
To apply the transformation, press the Enter key.

Step 13: Resize And Reposition Layer 1 To Reflect The Rays On The Ground
At this point, we have finished creating the rays themselves, but to make the image look more natural, let's create glowing areas on the ground as well. As you remember, at the very beginning of the lesson, we made a selection of the copied channel, then created a new layer (Layer 1) and filled it with white. We haven't used it until now, but now it will come in handy to create a glow from the sun's rays on the ground.
To do this, first click on Layer 1 in the Layers panel to select the layer you want to work with. Then use the Ctrl+T (Win) / Command+T (Mac) hotkeys again to bring up the transform window. Click on any area in the transform window, and then move its top frame border down, thereby creating a mirror image of the sunburst effect. Experiment with the position and size of the reflection to achieve the most realistic result.

Press the Enter key when you are done.
Step 14: Change The Blend Mode Of Layer 1
So, to make the areas filled with white look like reflections of the sun's rays, and not white spots, change the blending mode of the layer to Overlay (Overlap). Again, go to the descending menu located in the upper left corner of the layers panel and select the mode Overlay (Overlap).

That's all. Let's look at the original image and compare it with what we got:

And here's the result we got after we changed the blend mode of Layer 1 to Overly:

In this simple way, you can create the effect of sunlight.
The low quality of American literary production during the colonial period helped maintain an open market for imported products and emphasized forms of importation. Never before, of course, has a civilization so numerous and occupying vast expanses been so educated and such an educated people would not have created less fiction. Perhaps there was some connection between these two features of American culture - between the education of the whole society and the lack of education of the ruling circles? In modern Western European culture, the most respectable use of the printed word, with the exception of sacred religious texts, takes place in the refined literature of the privileged classes. Such cultures are judged by dramas, poems, novels and essays, which, like palaces and castles, are monuments of aristocratic cultures. But should we judge our culture by its ability to create such monuments? Should we hope to initiate the greater part of the American people into the mysteries of aristocratic fiction?
The printed word had a different destiny in America, a role less understood by the traditional set of criteria for literary historians. An exclusively American emphasis on relevance, usefulness, "reader interest", different tastes made a different institution out of printed matter.
Not a writer, but a journalist, not an essayist, but an author of practical guides, not an artist, but a publicist - this is a typical representative of the American writing fraternity. You will find his reader not in the salon, but on the market square, not in the monastery or in the university courtyard, but in the hairdresser's or by the fireplace of a simple person. His print production is "objective": it draws attention to the subject, and not to itself. By placing less emphasis on form, such a printed word does not tend to create a class of professional "connoisseurs," a circle of initiates who value form for form's sake. Here, too, American life focuses more on the process than on the end result: printed matter is seen less as "literature" than as information. These tendencies go deep into our past and have flourished in part because a literary culture did not yet grow on our soil during the colonial period.
In Western Europe the literature of the ruling classes was first written in a dead and alien "classical" language; its inaccessibility increased its prestige, as well as the power and conceit of those who possessed the keys to the ancient temples of knowledge. In aristocratic cultures, it is still generally assumed that the works of ancient Greece and Rome can never be compared with the work of ordinary modern authors. Classical training for the English ruling class has long consisted in the study of the ancient classics - at Oxford they are pointedly called simply "the great ones"; it was assumed that the future representative of the ruling classes should learn the literature for the elite in Greek and Latin before turning to national literature. In America, much in this area had to be changed. Some of the most cultured people might have opposed the perpetuation of "classical" norms in education. Despite such romantic exceptions as George Sandys translating Ovid in Virginia in the 1620s, knowledge of ancient languages has never conferred such high prestige in our culture as in England. /1s downloaded from the national literature, which has gained a lot of popularity due to its practicality.
Because books in both colloquial and colloquial languages needed to be transported, the peculiarity of book culture in colonial America (or in various parts of it) was associated with the development of means of transportation. Since books are physical objects manufactured in a particular place, they tend to end up near the place of production, or at least not far from centers of distribution. Therefore, writing about the books of colonial America as if they were the same everywhere is completely wrong.
During the colonial period, centers for importing and selling books, and perhaps even reading, were located along the Atlantic coast. It was easier to travel a thousand miles by water than a hundred by land, and it was far less troublesome to carry a dozen books aboard a ship for six weeks than ten days on land. Book culture consisted largely of imports. Many of the characteristics of American life were due to this simple circumstance and to the peculiar ways of importing.
Books were a product of urbanization, and before the Revolution there was not a single city inland of any significant importance. Even in 1790, each of the eight cities with more than six thousand inhabitants was on the coast. The consequence of the advance to the West and the construction of cities remote from the sea was the emergence of urban centers that were less influenced by European literary culture. However, only many decades after the first books were published in America, they began to replace books imported from England.
The consciousness of the American city was directed across the sea to London. “Because his eyes were turned more to the east than to the west,” notes Carl Bridenbo, “he was more like a European society in an American setting.” Moreover, almost without exception, the most important routes of settlement in America originated from some eastern coastal city. The main cities on the coast were like numerous funnels through which British book culture flowed inland and spread further into the countryside. The literary culture of colonial America thus remained filtered through the urban filter for a long time. The only major exception was Virginia, where many rivers and tobacco production brought books to the borders of private plantations, but the cultural stream that flowed through all of Virginia had already been filtered in London.
None of the five major cities established undeniable cultural dominance over colonial life in general. Despite the similarities in government, taverns, and social entertainment, there were significant local differences that were important for the future of American culture. We used to think of Boston as the cultural center of 17th-century America, but before 1680, the city life of both New York (then still called New Amsterdam) and Newport could compete with Boston. Although Boston was the most populous of the early colonial cities, by 1760 it was already outpaced by New York and Philadelphia. Throughout the eighteenth century, therefore, there was competition for leadership among the colonial cities: even in the early decades, Philadelphia was on equal footing with Boston, and New York was not far behind; Newport and Charleston were already big cities by the English provincial scale. Numerous smaller towns gradually emerged: Portsmouth, Salem, Hartford, NewHaven, New London and Albany, to name but a few. Any priority, if any, often moved in one direction or another. When Philadelphia became the most populous city, people could not forget that it had been Boston not long before, and by the end of the 18th century, New Yorkers began to harbor the hope that they might, in turn, supplant Philadelphia. However, there has never been an American London or Paris, an undeniable historical center, a leader in the political, cultural and commercial spheres.
As a result, American literary culture, despite its main connection with London, began to react differently to local problems and the diverse life of the continent. In the following centuries, this will also determine the book culture of the nation. The colonial period created its cultural heritage from a variety of religious beliefs, from numerous local ways of making a living, from a hundred other regional differences, each of which would make the hegemony of any one area difficult. The flourishing of book imports in several colonial cities thus increased the choice of the best products.
In today's tutorial, we'll learn how to create original retro sunbursts using a transform effect and stroked paths. The techniques described here will allow you to quickly rework the vector rays we created, getting an infinite number of variations.
Step 1
Launch Adobe Illustrator and open a new document (Cmd/Ctrl + N). The workspace can be of any size. When creating sun rays, you can work in both RGB and CMYK mode.
Step 2
Take the Pen Tool (P) or Line Tool (\) and draw a horizontal path while holding Shift. This path has a random color stroke and no fill. Set the width to 4px in the Stroke panel (Window > Stroke).

Select the Arrowhead and scale down the arrow in the Stroke panel.

Step 3
Group the created path (Cmd/Ctrl + G). Select the entire created group, then go to Effect > Distort & Transform > Transform…. In the Transform Effect dialog box, set the angle to 360/20, where 20 is the number of rays that our sun will consist of. Set the number of copies - 19. The number of copies is equal to the number of rays minus one ray. Select the left center square in the control point handle, then press the OK button.


Step 4
Draw a small circle with the Ellipse Tool (L). The center of this circle is on the horizontal path that was created in step 2.

Drag the circle into the group to which the Transform effect has been applied. This action must be performed in the Layers panel.

As you can see, the Transform effect was instantly applied to the new object. Applying an effect to a group allows us to quickly introduce new objects into the rays of our vector sun without having to adjust the transformation parameters for these objects each time.

Step 5
Change the width of the path locally using the Width Tool (Shift + W), as shown in the figure below.

As expected, this will change the appearance of our radiant star.
Step 6
Let's create another bunch of rays. Draw a horizontal path from the center of the created sun. For clarity, I used a red color for the stroke. Apply the Width Profile 1 variable in the Stroke panel to the path.

Step 7
Select the entire red path, then go to Effect > Distort & Transform > Transform… and set the parameters shown in the image below.

Now the red path can be repainted in the color of existing rays, that is, black.

The radiant sun in retro style is ready.
Step 8
The techniques that have been used in this tutorial allow us to quickly create new varieties of rays from existing ones. For example, we can replace the style of Arrowhead and Width Profile in the Stroke panel.

Or change the parameters of the Transform effect, which will change the number of rays. You can access the transformation options in the Appearance panel (Window > Appearance).


The image below shows a set of rays that I got in a few minutes.

Step 9
Let's start the final design of our vector radiant sun in retro style. Create a rectangle with the Rectangle Tool (M) filled with brown, which will act as the background. For the stroke color of the beam and the fill of the circle, choose a light brown color.

Select all elements of the sun, then go to Effect > Stylize > Outer Glow… and set the parameters shown in the image below.

Step 10
Create two rectangles of the same height but different widths and place them as shown in the image below. The bottom rectangle is filled with a darker shade of blue.

Using the Pen Tool (P) create a triangle corresponding to the curved part of the ribbon. The fill of this object has the darkest shade of blue.

Add a dot on the left side of the lower rectangle with the Pen Tool (P), then move it to the right.

Step 11
Select the lower rectangle and triangle, take the Reflect Tool (O) and click in the center of the larger rectangle while holding down Opt/Alt. In the dialog box that opens, select the Vertical axis, and press the Copy button.
Set the blending mode of the rectangle to Overlay and lower the opacity to 20% in the Transparency panel.

Here's how it should look. I hope you enjoyed this Adobe Illustrator tutorial and can easily apply these techniques to your future vector projects.
The second study was led by A. Boyarsky from Leiden University. He used x-ray data at the XMM-Newton observatory collected as part of the analysis of the Perseus clusters and the Andromeda galaxy. The unrelated groups nevertheless came up with the same results. Their conclusions were almost identical: an inexplicable emission line with an energy of 3.52 keV.
The energy and location of the signal is consistent with the decay of a form of dark matter - a 7.1 keV sterile neutrino, which turns into a photon and an ordinary neutrino. The photon receives almost exactly half the energy of the original particle due to the tiny mass of the ordinary neutrino.
Sterile neutrinos are neutrinos that are not included in the Standard Model of physical particles and are not subject to weak interactions - they do not interact with W- and Z-bosons, which are carriers of the weak interaction. There are many reasons why sterile neutrinos can be considered as possible members of the "zoo" of particles. In particular, the simplest, well-working models that say that ordinary neutrinos with their mass require the existence of at least two sterile neutrinos.
The lack of interaction between sterile neutrinos makes it extremely difficult to create them. In order to originate in the early universe, sterile neutrinos had to mix slightly with ordinary neutrinos via neutrino oscillations, so active neutrinos created during the cooling of the universe after the Big Bang can partially convert into a sterile variety. The same process, only in reverse, occurs during the decay of sterile neutrinos under the action of neutrino oscillations.
Wimp at 35 GeV
The latest study of gamma-ray emissions from the central regions of the Milky Way, by astrophysicists from Harvard, the University of Chicago, MIT, Fermi Laboratories and Princeton, has provided a deeper look into the data from the Fermi space observatory. As a result, convincing evidence of manifestations of dark matter in the form of WIMPs was found. 
Scientists have found that after taking into account the known sources of gamma radiation, there are additional sources of GeV-gamma rays to be analyzed. The presence of such an excess is said to have a statistical probability of 40 sigma (5 sigma is generally considered experimental evidence in particle physics).
The signal was first registered in 2009 and has been interpreted in different ways: as synchrotron radiation, millisecond pulsars and annihilation, or the decay of dark matter.
The latest study showed that the excess gamma rays are roughly spherically symmetrical and located at the center of the supermassive black hole Sagittarius A*. The study concluded that the current best interpretation would be evidence of annihilation of the 35 GeV WIMPs of the bottom quark-antiquark pair, which themselves eventually decay into components, including several GeV gamma rays.
Even though the study described above suggests the annihilation of a 35 GeV dark matter WIMP, this alone is not strong enough evidence. The best evidence would be the detection of such a signal in dwarf galaxies, which are full of dark matter.
But even without this, the search, which was carried out by the Fermi-Large Area Telescope collaboration, covered all 25 known dwarf spheroid galaxies that surround the Milky Way. Although the results of this study are formally negative, with a statistical probability of around 2.5 sigma, this excess may hint that dwarf galaxies emit the same excess of gamma rays as the Milky Way galaxy. Enhanced sensitivity observations may shed light on this issue in the coming years.
Signs of the existence of dark matter particles are becoming more significant. To date, "", that is, there is no concrete evidence yet, but it is likely that dark matter may consist of several types of new particles, in accordance with the assumption of Harvard physicist Lisa Randall. That doesn't make dark matter any less fascinating and complex.