How to connect two valleys. Endovy roofs made of corrugated sheets. Features of the valley roof truss system
Read also
At first glance, installing a valley roof seems to be a rather complex and problematic process. Therefore, many consumers prefer to pay builders rather than do this work themselves. In the article we will further describe in more detail what a valley is, and also provide detailed instructions according to its construction.
Purpose of the groove
On roofs with complex configurations that include several slopes at once, internal joints inevitably occur. Snow precipitation most often accumulates in such places, rainwater, as well as all kinds of garbage. In addition, they are quite difficult to maintain.
The valley, or valley, is an element that is laid along internal corner roofs under slopes. It is designed to protect the structure from water flowing under the roofing and ensures free evacuation of precipitation from the roof surface.

The number of valleys will depend on the following factors:
- The roof configuration is cruciform, in the shape of the letter T or G.
- Availability additional elements, in particular, attic and dormer windows.
Structure of the internal valley
As a rule, the construction of a valley made of corrugated sheets involves the presence of two planks, which are bent at an angle coinciding with the angle formed by the adjacent slopes. In this case, the lower element serves as a drain, and the upper one is rather decorative.
In some cases, the top piece of the valley is not installed. This depends on the type of roof covering, as well as the features of the roof. As it were, competent execution Valley connections ensure reliability and waterproofing of the roof structure.

There are some standards for arranging a valley:
- The lower element of the valley is laid before fastening the roofing material, and the upper element - after its completion.
- Nails are not used to install the valley.
- The gutter is assembled from the bottom up, sealing the seams with Tegola brand bitumen-polymer mastic, sealants based on bitumen (Xtra Seal) or rubber (Tytan), or Icopal glue.
- The internal valley for corrugated sheeting is made of galvanized steel or copper, and the external valley is made of roofing material. It is preferable to use a galvanized sheet with polymer coating, which can withstand temperature changes from -60 ℃ to 120 ℃.
- To provide additional insulation roof and prevent water from flowing under the roofing material, a foam rubber sealing gasket is glued along the valley ribs.
- The groove can be secured either with clamps on the sides or with self-tapping screws along the edges.
- The sides are made at least 2 cm in height so that water does not overflow over them during heavy rain.
- The valley flange is in contact with the end parts of the sheathing slats.
- In cases where the valley for corrugated sheeting is assembled from several sections, they are laid with an overlap of 10 cm.
- On roofs with flat slopes, enhanced waterproofing is required.
Types of grooves and their connections
There are several types of roof valleys made from corrugated sheets based on the configuration of the joints between the slopes:
- Open valley - found on low-slope roofs. IN in this case additional waterproofing is required.
- The closed type of valley is characteristic of roofs that have steep slopes practically touching, overlapping the gutter.
- An intertwined valley is shaped like a closed valley, however, at the joints the fragments of the roofing intersect, forming a single surface.

Let's consider the features of each type of valley.
An open valley has the following advantages:
- No debris accumulates on it.
- Sediment is quickly evacuated from the surface.
- Installation work is quick and easy.
If we talk about the shortcomings, then such a valley does not look very beautiful.

Among the advantages of closed or interlaced grooves are:
But this design has significantly more disadvantages:
- The intertwined valley is quite difficult to install.
- The process takes much longer.
- This roof needs regular cleaning of debris.
- During thaws, ice plugs may appear between the gutter slats.
Schemes and types of lathing for the rafter system
Depending on the intended roofing material and design rafter system The valley device will be performed differently. In this case, we mean the type of sheathing. Recommendations in this regard are usually indicated by manufacturers in the instructions for roofing coverings.

The lathing for laying the valley can be of the following types:
- Continuous sheathing is performed for subsequent laying of soft roofing. In this case, the valley roofing carpet is made of waterproofing material. This installation method is the simplest.
- A gable roof with a valley, in which slate, corrugated sheeting or tiles are used as the roofing; the sheathing for the gutter is made of 2-3 boards, 10 cm wide, laid along the joints. The wider the valley is supposed to be, the larger the pitch of the sheathing will be.
- To lay metal tiles between the main slats, auxiliary battens are installed.
- Ondulin is laid on two 10 cm wide boards in 15 cm increments, so the groove will not sag.
Installation features for corrugated sheeting and other roofing materials
As already mentioned, a house with a valley roof is subject to loads from rain and snow, which must be removed from its surface in a timely manner. In this regard, arrangement high-quality waterproofing is a top priority. Therefore, when installing a valley, you should pay attention to such subtleties as: correct pruning roofing material, compliance with the pitch between supporting elements and fastenings, tightness of seams, dimensions of overlaps. Only the technology for installing a valley made of soft roofing, which is placed on a continuous base, will be somewhat different.

Installation under a soft roof is carried out as follows:
- Placed on a continuous sheathing over the entire surface of the roof slopes underlay carpet. At the joints of individual sheets it is laid with an overlap.
- A valley carpet is laid along the inner corner of the roof. Its edges are fixed with bitumen mastic and then nailed every 10-20 cm. About 20 cm of carpet should peek out from under the roofing material.
- If the length of the valley exceeds 10 m, it is made of several parts, secured in an overlap of 15 cm. The edges of the planks are secured with mastic.
The technology for installing a valley under corrugated sheets, ceramic or metal tiles is as follows:
- A layer of waterproofing is laid on top of the base, which is nailed every 20 cm.
- Next, lay the lower element of the valley with a slight overlap of the cornice board, fixing it with self-tapping screws every 30 cm.
- Sealing strips are placed along the edges of the bottom gutter strips.
- The roofing material is cut along the groove and secured so that it does not reach the bend by 10 cm.
- The upper element of the valley is mounted with an overlap of 10-12 cm.

To mark the cutting line, you can use paint cord from KARPO, Irwin, INTERPOOL MT-2507 or STAYER brands.
Installation of a groove for ondulin:
- Separate pieces of material for the valley are attached with an overlap of 15 cm using screws in upper corners each fragment.
- The edges of the groove are sealed with sealing tape.
- Roof covering along corner element trimmed and then nailed into each wave as far as possible from the middle of the gutter.
Features of the valley design near the roof windows
Roof structures such as attic doors or dormer windows also need to be waterproofed. The construction of a valley in such places involves placing its lower element on the correct covering.
The work flow looks like this:
- Near dormer window stuff the crate.
- Calculate the length of the groove, taking into account possible overlaps if it consists of several fragments.
- Mark the bend at the bottom of the gutter.
- Bend the incised areas in the direction opposite to the sides.
- The valley is slightly raised above the roof level by placing bars under it.
- The edges are sealed with tape.
- The lower section of the roofing covering is trimmed and slipped under the valley strips.
Thus, the valley is an extremely important and required element roofs, which you can arrange with your own hands. It is only important to arm yourself with some knowledge and tools.
Construction of the valley: diagram of the rafter system, inner valley for corrugated sheeting, house roof connection
Construction of the valley: diagram of the rafter system, internal valley for corrugated sheets, connection of the roof of the house
How to make a roof valley
Increasingly, the roof has not only functional purpose. Often this element is the highlight of the building. Such roofs have many planes that are connected under different angles. Some connections - with positive angles - are designed in the form of a ridge, some - with negative angles - in the form of valleys. To ensure that the attic is always dry, the roof valley must be done correctly.
Valley roofs
On roofs of complex shapes, when protruding dormer windows are installed, sharp corners are formed. They are obtained at the junction of two slopes. The junction is called the valley, and the roofs are called valleys.

What is a valley
Roofs of complex shapes look very decorative and are a decoration of the building, but their design and installation is not an easy task - connecting planes is not easy. Because of design features These areas of the roof bear a heavy load: there is always a lot of snow and water. Therefore, the sheathing is made reinforced, and waterproofing measures are much more serious than on the rest of the surface.
Features of rafter systems
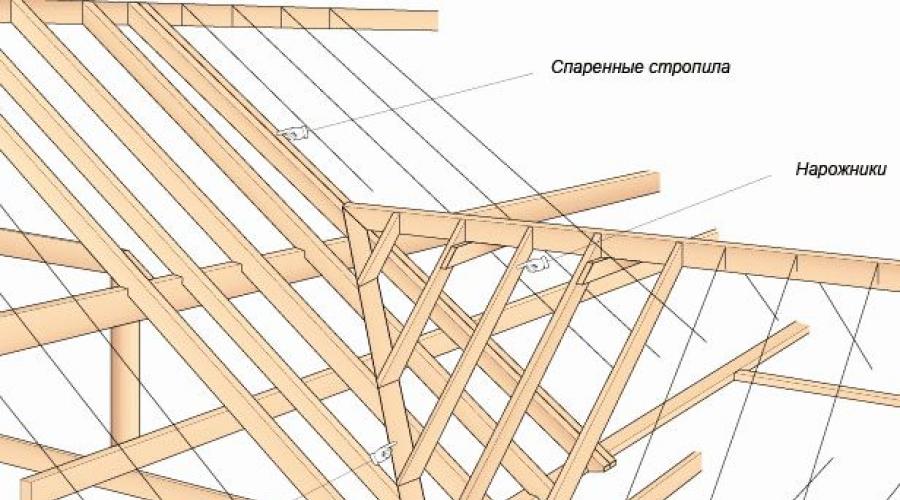
Rafters from different slopes in the valley can be connected at different angles (depending on the shape of the roof). At the junction, a rafter leg is installed, to which the rafters from the slopes are attached. For a short length (up to 2 m), it is enough to fasten them on nails (2 on each side); for a significant length, the joints are reinforced with metal plates.

In places of greatest load (in the widest place), the valley rafter leg is supported from below by a jib.

A support is placed at the bottom at the widest point
At the junction of two roof slopes, reinforced sheathing is required, and its design depends on the type of roofing material:
- Under the metal tiles in the valley, intermediate strips are installed - in the middle between the main ones. That is, in this place the step is twice as small. The length of the additional strips must be greater than the width of the bottom valley strip.

Lathing is done twice as often

For corrugated sheets, slate and ceramic tiles, two or three boards are needed on each side

Under the ondulin there should be a gap of 15 cm between the two boards
We have provided typical requirements and sizes, but some manufacturers may have specific requirements. When purchasing roofing material, you will be given instructions that will describe the entire installation process and requirements for the sheathing, etc. technical points. It is clear that you must adhere to their recommendations.
Valley device
There is no particular point in talking about the device in general, since each roofing material has its own characteristics. Therefore, we will consider the most popular ones separately.
On a metal roof
As already mentioned, lathing is done twice as often under the metal tiles at the junction of the slopes. The bottom plank of the valley is laid on this sheathing - this is a galvanized sheet with a fold line in the center and sides along the edges. This element belongs to the accessories and is painted to match the base material. It comes in two-meter pieces.

Metal roof valley
Installation of the valley strip begins from the bottom. The edge of the element extends slightly beyond the roof overhang, is cut 20-30 mm below the overhang, and a flange (side) is formed from this “remainder”. Please note that the valley strip should end behind the overhang; if there is a drain gutter, then above it. If it is made shorter than the overhang, then water will flow into the roof.
The next sheet is laid on top, with an overlap of 20-30 cm, the joint is coated with sealant (you can coat the entire overlap with bitumen mastic). Lay as many sheets as necessary, cut them off near the ridge and secure them.
There are two ways to attach the valley sheet
- special screws closer to the edge;
- with clamps over the side.

Fastening to the side with clamps
When constructing a valley, the main task is to ensure tightness. From this point of view, the second fastening option is more correct - after it there are no holes left, even if they are covered with a rubber gasket.
One more thing. The bottom bar should have sides on both sides, preferably more than 2 cm in height. They are needed so that water flowing from the slope cannot get under the metal tiles.
A sealing tape is glued to the fixed strip, at a distance of about 20 cm from the bend. It comes with self-adhesive tape. Removed before installation protective covering and the tape is pasted. Next, metal tiles are laid, which are cut so that the center of the valley is 60-100 mm. Manufacturers do not recommend placing the cuts closer to the center.
The sheets are attached to the sheathing in the regular places - in the lower part of the oxen 20-30 mm below the step. The distance from the fastener to the bend is at least 250 mm.
After fixing the metal tiles, the roof valley is ready and can remain in this form. But not everyone is happy with the appearance of the cut sheets. In order to close them there is a decorative overlay, which is called the upper valley. It performs a decorative function - it covers the cuts; quite often it is simply not used.
See the following video for details of the valley exit above the dormer window.
Made from corrugated sheets and slate
Under these materials, several boards are laid lengthwise in the valley. A strip of waterproofing is fixed to them, which is then connected to a waterproofing membrane fixed to the slopes. The overlap should be at least 10-15 cm, the joints are connected using double-sided tape.

Installation of a valley on a roof made of corrugated sheets
In this case, the sealing tape can be supplemented with sealant. A strip of sealant is applied on both sides of the inflection point of the roof. After installation of the roofing material, a large amount of water remains in the wave protrusions. free space. Water, snow, and debris can get there. To prevent this from happening, fill the gap with sealant, applying it in layers.
In the case of a profiled sheet, there are several options for designing the valley:
- Open. This is when corrugated sheets are cut at a distance of 60-100 mm from the bend line. In this case, the bar and cuts are visible. To close this “economy”, a decorative gutter is laid on top of the roofing material, covering the cutting lines. It is attached to the sheathing with nails.

Open valley made of corrugated sheets
Open or closed type You choose the connections of the slopes, the structure of the entire pie remains the same. Only the method of cutting corrugated sheets changes.
The structure of a valley roof made of tiles is exactly the same as in the case of a profiled sheet. The difference is that the continuous sheathing must be larger - at least 35 cm wide on both sides of the joint. The fastening of the tiles in the valley has its own peculiarities - some fragments are cut so much that it is impossible to fasten them with a standard lock. Then a hole is drilled in the top of the tile and a soft, acid-resistant wire is threaded through it. Drive a nail into the sheathing, twist a wire onto it and fix the tiles in the required position.
In the case of ondulin, the sheathing under the valley is not solid, but two boards located at a distance of 15 cm from one another, symmetrically relative to the center of the valley. A special gutter is placed between them.

A special gutter is placed between the padded boards
Installation starts from the bottom and moves up. The first sheet of the valley gutter is laid flush with the edge of the roofing material, and the shape is corrected. They are nailed to the sheathing from the top side. The next sheet is laid with an overlap of at least 15 cm.

The upper fragment of the gutter overlaps the lower one by at least 15 cm
After the entire gutter is laid, the installation of roofing sheets begins. First, they trim with a margin - the mark is placed 5-6 cm further than necessary. Cut along the intended line (with a jigsaw or grinder). Place it in place, mark the exact cutting line - along the protrusion on the gutter. Cut it off a second time and put it back in place. Since the ondulin sheet weighs little, all operations are easy to perform.

Ondulin is trimmed twice: first roughly, then precisely
The laid sheet is secured with special roofing nails with a head painted to match the coating. It is necessary to fasten it into each wave, retreating as far as possible from the midline of the valley.

Fastened with special nails
Roof valley: installation, do-it-yourself installation, photo, video
How to properly make a roof valley from metal tiles, corrugated sheets, ondulin and ceramic tiles. Rules for constructing valleys, work order.
Roof valley made of corrugated sheets
The design of the roof plays a very important role in creating the appearance of the house. The imagination of architects sometimes simply amazes the imagination with the intricate shapes of the roofs of individual residential buildings. Many planes made of colored corrugated sheets intersecting at different angles look unusual and original.
But the complexity of the roof also has a downside. When choosing a roof structure, you must always remember that its main task is to protect the building from rain and snow. At the same time, any junction of the roof slopes with each other carries the potential danger of violating the tightness of the roof covering and causing a leak.

One of the most critical places in complex-shaped roofs is the inner corner at the intersection of two slopes. This roofing element is called a valley. It is the valley for corrugated sheeting that receives precipitation from the planes of intersecting slopes. When it rains, a stream of water flows down the valley, collected from a large area, and in winter snow always accumulates in it, increasing the load on the rafter system.
Therefore, you need to know how to make a valley correctly and pay attention to the design of this roofing assembly Special attention.
Construction of a valley roof made of corrugated sheets
As mentioned above, the valley is the junction of two roof slopes, forming a gutter. The valley for corrugated sheeting can be of three main types:

In an open valley, the lower parts of the roof covering of the slopes end with a special gutter, the role of which is played by the lower valley strip on the corrugated sheet. It is this that serves to drain water into the gutter.
After installing the corrugated sheeting on the roof slopes, the top valley strip is installed at the place where they meet. This element performs more of a decorative function, covering the edges of the roofing. The figure shows the structure of a valley made of corrugated sheets.
A closed valley for corrugated sheets differs from open topics, that in it the sheets of roofing at the junction are adjusted closely to each other. In this case, the upper valley strip is not installed.

The interlocking design of the valley roof is even more complex. In this design, the sheets of roofing at the junction are placed on top of each other in a checkerboard pattern.
Most often used for corrugated roofs open device valley roofs.
Construction of a rafter system with a valley
Considering the increased load on the roof at the location of the valley, the reliability of the rafter system at the internal junction of the slopes needs to be given special attention. The roof truss system with a valley is quite complex. It is better to entrust the development of drawings of the frame of such a roof to specialists, but there are several basic rules, if followed, a roof with a valley can be built with your own hands.

Before construction begins there is a lot pitched roof with several valleys, you must first draw up a plan for the rafter system. To understand how to properly lay a valley, you need to conditionally divide the house into several rectangles. The largest of them is considered the main one, and the roof frame of smaller rectangles will be attached to its rafter system.
At the junction of the main room with the extensions the valley lines will begin. At the support points of the valley rafters, additional crossbars are mounted, which, in turn, rest on racks or spacers. The diagonal rafters of a hip roof are installed in approximately the same way. The most difficult is the installation of rafters for the valley of the attic roof.
The rafters under the valley are mounted in the same way as any other rafters of a pitched roof. The main thing is, before making the valley, correctly connect the slopes and securely fasten them together.

If for corrugated sheeting with a small profile height on the roof slopes it is quite enough to perform the sheathing in increments of 300 mm, then the sheathing under the valley must necessarily be continuous.
How to install a valley on a corrugated roof?
When the assembly of the rafter system is completed and the reliability of fastening all its elements together is checked, the valley can be installed with your own hands without much difficulty.
First, additional bars are installed at the site where the valley is installed in order to make the sheathing continuous. Before laying the valley, additional waterproofing must be done in this place.
A waterproofing tape is laid on top of the roofing membrane in the valley, which should be 5-10 cm wider than the bottom strip of the valley. Sometimes special self-adhesive waterproofing tapes are used, but most often they are simply nailed to the continuous roof sheathing.

4. Valley plank; 5. Sheet of corrugated sheets.
After installing additional waterproofing, a lower valley strip is installed at the junction of the roof slopes. When the angle of the corrugated roof slope is small, it is better to use an enlarged plank. If a regular valley strip has a width of about 300 mm on each side, then the increased one is 2 times larger.
Before installing the valley, measure the length of the internal joint of the slopes. The bottom planks of the valley must be cut so that they overlap each other by no less than 150-200 mm. If the roof slope is small, the amount of overlap can be made even larger.
Installation begins from the bottom section, and each subsequent plank overlaps the previous one. The lower valley strip is installed before the roofing is installed. In this case, sheets of corrugated sheets are launched into the valley, not reaching its axis by approximately 50 mm.

After installing the covering sheets, the valley is installed on the corrugated sheet. The top strip of the valley performs mainly a decorative function. It covers the edges of the corrugated sheets at the point where they are trimmed along the axis of the valley.
Particular attention should be paid to how to attach the valley over the corrugated sheet. Considering that the top strip of the valley is much narrower than the bottom one, fastening it through to the sheathing can break the tightness of the bottom strip. To avoid this, the top valley strip can be secured to the covering sheets using rivets.
How to make a roof valley from corrugated sheets?
You complex roof? Then you definitely need to know how to make a valley correctly. Visit the website and find out how to make a roof valley from corrugated sheets, what its structure is and how to seal it.
The roof is important element any construction. The durability and security of the entire house largely depends on how correctly its arrangement is carried out.
Any roof consists of separate functional elements, one of which is the valley. What is it and how is the valley arranged? Read more about this.
Endowa represents one of the roof elements, formed at the junction of two slopes. A valley roof is almost impossible to confuse with other types of roofing, since it has pronounced external corners.
The design of the roof valley will depend on the type of structural element (there are open, interlaced or closed valleys). It should be noted that the valley consists of two parts– lower and upper.
After installation roofing sheathing carry out work on constructing the lower part of the valley, and then the upper part.
To create a lower valley you need a special plate that will need to be bent at a certain angle (its value must correspond to the joining angle of the roof slopes).
If it is necessary to connect several parts of one valley, the master need to use special system fastenings. Typically, the lower valley is attached to the eaves board from the bottom using self-tapping screws.
If joints are formed during installation– they must be sealed with sealant, which subsequently helps to avoid water leaks into the under-roof space.
As for the top of the valley, then it is made from the same roofing material that is used for roofing.
Him, of course , can be replaced sheet metal , but then it is necessary to choose the right color of the material so that the finished roof acquires aesthetic appeal.

Installation of the valley has its own characteristics. In order for this work to be done correctly, it is necessary to first create a foundation for a roof of such a plan.
For this purpose experienced builders advise to use technology, which involves the installation of a continuous roofing sheathing, the bars of which are located on both sides of the slopes at an equal distance from each other (30 cm).
In places where valleys are formed, the waterproofing layer should be thickest. Now in construction stores We offer special waterproofing materials for valley roofs.
They are based on a variety of impregnations and coatings that improve the characteristics of the material and its quality. Attached waterproofing material usually with the help construction nails and adhesive composition (mastic).
After installing the waterproofing layer, the installation of the lower valley begins. It is made from special metal plate , bending it at an angle of about 90 ºC in relation to the corner joints of the slopes.
When installing the valley it is necessary adhere to these rules:
- Installation of the structure performed only on the sheathing;
- When laying waterproofing you need to monitor its integrity. There should be no tears, cracks or other damage on the surface of the material;
- The best option snow retainer for any type of roof will be a lattice or tubular model;
- If the valley begins on the cornice - its mounted on droppers;
- The upper part of the valley overlap 10 cm;
- To secure individual elementsself-tapping screws are used, and they must be screwed in at a distance of at least 25 cm from the axial center of the valley;
- The valley strips on the roof are fixed with an overlap, in the direction from bottom to top. The outermost strip at the bottom is cut slightly below the cornice line.

Installation of a roof valley can carried out in several ways:
- Intertwined;
- Closed;
- Open.
Method of installation of this structural element of the roof does not affect the installation location. The valley is always mounted in the butt corners of the slopes. On both sides of the joints, first a continuous sheathing is laid, and then a waterproofing layer.
Only after this is the lower part of the valley installed using self-tapping screws. When laying the lower valley it is necessary follow these recommendations:
- At horizontal joints of individual parts of the valley it is necessary to maintain the amount of overlap more than 100 mm;
- If you are installing a metal tile roof, needs to be laid additional layer seal(it is better to take self-expanding material);
- Flat roof slopes require the installation of an additional waterproofing layer.
If roofing slopes have equal slope, then it is better to use in this case the method of interlocking valley laying. To create a good seal in the place where the interlaced valley is laid, use a valley carpet 90 cm wide.
A waterproofing membrane is laid on top of it, secured with nails. Roofing material is laid on top of the interlaced valley.
The closed type of valley is used when it is necessary to arrange a steep roof with adjacent slopes, connected end to end.
In this case It is necessary to draw with chalk to facilitate installation line of the adjacent slope, departing from the joint by about 5 cm. In the future, this line will serve as a boundary when fixing parts of the valley with nails.
And also watch a video on how to install and mount the valley:
As part of the roof space, the valley, made in the form of an internal corner, plays a very important role. Located at the junction connecting roof slopes of different directions, it ensures rapid evacuation of collected rainwater.
However, it is the valleys that are often the place that cause roof leaks. To prevent this from happening, when installing these elements, certain rules must be observed, the content of which depends on the type of element itself and its location:
- along the entire slope from the eaves to the ridge;
- on part of the slope, without reaching its end points.
When installing such a valley, you must adhere to the following rules:
- the valley must be reinforced with additional sheathing laid at intervals of the main roof sheathing;
- installation of valley strips should be done on already installed drip edges;

- The valley planks should begin to be laid from the bottom up, placing them overlapping up to 30 cm. The bottom strip should be cut slightly below the edge of the cornice, making a flange along it that coincides with the cornice edge;

- A universal seal should be installed along the length of the flanges of the valley strips and at the ridge;

- metal tile sheets adjacent to the valley must be cut so that they do not reach the axis of the gutter by 10 cm;
- endovu and roofing sheets fastened with identical self-tapping screws. Self-tapping screws must be screwed into the designated places and pass through the metal tile sheet and through the valley strip, not reaching its axis by 25 cm. If you allow a deviation from the intended places for screwing in the screws, then a gap may remain between the metal tile sheet and the valley body with the strip, which will result in inevitable leaks.
- Care should be taken to ensure that the screws are not twisted closer than 25 cm from the axis of the gutter;
- all cuts should be carefully aligned using a rubber mallet;
- The decorative overlay (cashing) of the valley is mounted as follows:
- its installation should be done from the bottom up, creating minimum overlap at 10cm;
- The valley casing should be secured at the top points of the metal tile sheets adjacent to the valley.
When performing installation, you should be aware that installing a seal between the valley and the casing is unacceptable.
Arrangement of valleys located entirely within the slope

When arranging such valleys, you must adhere to the following rules:
- Before starting installation, you should make sure that the waterproofing is installed correctly along the length of the valley and that it is free of mechanical damage;
- The valley must be reinforced with additional sheathing laid at intervals of the main roof sheathing. Attaching the roofing sheet to the wall dormer window do it like this:
- the metal tile sheet adjacent to the side of the dormer window must be cut in length so that the cut line is 20 cm above the exit of the valley body to the plane of the slope. The cut sheet can be used to continue the installation by adding a single-module sheet, which will allow you to achieve a single joining line;

- in order to bring the sheet to the front wall and to the side of the dormer window, it is necessary to make cutouts according to the dimensions of the latter, and then install the metal tile sheet.
- at the border with the dormer window, a universal seal should be installed along the sheet;

- on eaves overhang the dormer window needs to install a cornice strip;
- install valley strips. Their lower edge should be cut at the eaves so as to extend onto the plane of the slope. The valley edge is molded rubber mallet so that the strip fits tightly onto the metal tile sheet;
- if it is necessary to lengthen the valley, the overlap should be about 30 cm;
- The joining of valley sheets converging at the top should be done using tinsmith techniques or self-tapping screws in combination with sealant.
- the universal seal is laid along the valley flanges;
- prepare everything necessary for laying metal tile sheets along a large slope using oblique cuts;

- prepare the first sheet from the main slope for installation above the valley. Its lower edge should be below the point where the valley exits into the slope. The finished sheet should be applied to the previously installed metal tiles located below the valley with an overlap of 20 cm. This will allow the valley to be sandwiched between these two sheets;
- the gaps between the axis of the valley gutter and the cut sheets should be about 10 cm;

- fixation of all elements using self-tapping screws must be carried out taking into account the rules described above;
- Installation of cash is carried out from the bottom up, observing an overlap of about 10 cm;
- it is impossible to install a seal between the roofing sheets and the casing;
- cashing should be fixed at the upper edges of adjacent metal tile sheets;

- You must make sure that the valley strips are not damaged by the fastening screws
Caring for metal tile valleys
Valley metal tiles must be kept in order and clean at all times.

If trees grow near the house, then the valley covers should be periodically removed and their water channel thoroughly cleaned. Stale debris can clog the drain and rot, causing corrosion of the metal.
0
Last revision: 10/19/2015
The complex roof structure makes the house more attractive and adds respectability appearance building. When installing a tent or hip roof a structural element appears called the valley. It is located at the junction of two slopes and is a place for snow accumulation and water drainage. That is why the design of the valley requires tightness and high strength.
Definition and types

The valley is a functional part of the roof; it is a gutter formed at the junction of the slopes. Like any connection point, it experiences increased load, so the strength and proper design roofing element The reliability of the entire roof depends.

There are two types of valley: the lower one, which protects the joint from precipitation, and the upper one, which, in addition to being protective, also performs a decorative function. The installation method determines the type of element:
- Open valley - located on gentle slopes, it is simple option. The joints of the slopes have a gap into which the gutter and waterproofing are laid.
- Closed valley - used for roofs that have steep slopes that fit tightly to each other.
- Intertwined valley - with this method, roofing sheets are intertwined with each other, and waterproofing is required.
Preparation
Roofing schemes are developed at the design stage, and then the type of valley is selected, which depends on the angle of the slopes and the material used for the covering. The lower valley is installed on the rafters, so it must be marked in the roof plan. Depending on the selected roofing material, the structural element at the junction is made of metal or soft tiles.
Note! Cink Steel - practical choice, it ensures reliable operation of the valley for a long time.

Installation of the valley
The first step of the valley device is installation continuous sheathing, it can be made from strips packed side by side or from edged boards, which are treated with an antiseptic to protect against moisture. The width of the sheathing should be about 20 cm in each direction. A solid surface will strengthen the strength of the unit, which bears a high snow load.
A layer of waterproofing is laid; this component should not be excluded, because the roof valley must ensure complete waterproofness. For a sealed base it is better to use roll material based on bitumen, with basalt topping for strength. If the waterproofing consists of several parts, the sheets are laid overlapping.
The open type of valley is used more often than others; to install it, you need to make a special valley. The material for it is a strip of galvanized steel, bent at an angle greater than the valley.
The lower valley has a curved edge that prevents water from overflowing; it starts bottom to the cornice. An overhang of 8 cm is left in this place for secure fastening. A sealant is placed at the junction with the ridge. Fastening is done with self-tapping screws to the sheathing, the drilling step is 30 cm. Laying occurs from the bottom up; if the valley consists of separate parts, then they are superimposed on one another with an overlap of up to 15 cm. The joints are protected with silicone sealant.
Device Features

When they are cut off, leaving up to 10 cm to the center of the valley. Fastening occurs with self-tapping screws, which are tightened without approaching the center of the corner closer than 25 cm. The screws pass through the metal and the valley strip, fastening the structure.
The upper valley is made of roofing material; it is fixed after laying the main covering and covers the sections of the laid sheets. It is attached to the upper junction points of the metal tiles.

To install a valley on a roof with corrugated sheeting, you will need to install continuous sheathing and waterproofing, which is 10 cm wider than the valley strip. With a small angle between the slopes, the size of the lower valley should be maintained at 50 cm in both directions. The overlap of the parts on each other is at least 20 cm. The lower valley extends 25 cm under the ridge. After attaching the corrugated board, a decorative strip is laid.

For soft roof the valley is being settled open method. The valley carpet is laid on bitumen mastic and nailed down. The overlap of the canvases is up to 30 cm and must be glued. Ordinary shingles are attached 30 cm from the axis of the corner, their edges are fixed with bitumen.

- A closed valley is more complex and expensive, but looks more attractive.
- For effective protection use several layers of waterproofing.
- In buildings with large area The roof valley can be up to three meters in size.
- The frame for a structural element subject to high loads must be durable.
- Do not perform work in wet weather.
- Roofing work requires compliance with safety regulations.

The endow is a complex and important element of the roof; its installation should be approached armed with installation knowledge. Numerous photos and video tutorials will help you with your work.
Video
This is how the bottom valley strip is installed:
Where to start installing the valley, what needs to be provided for - about this and much more below.
Multi-gable roofs look impressive and stylish, giving the building an original look, but at the same time they are more vulnerable compared to simple gable or hipped structures due to the presence of valleys. The valley is an internal (negative) angle that is formed at the junction of the conjugate roof slopes. This could be a connection gable roofs parts of the building located perpendicular to each other, or the connection of the roof of a dormer window or porch with the roof of the house.
What is a valley, its functions
The valley is called both the angle itself formed by the slopes and the structural elements from which the connection is assembled. The function of the valley is to remove moisture (precipitation, melt water). It provides protection from snow and moisture getting under the roofing at the junction of adjacent planes.
This roof assembly is experiencing increased loads– snow accumulates in the valley, and water flows here from the adjacent slopes. Errors made during the design of the valley and the installation of the elements that make up the assembly lead to the fact that the roof begins to leak and moisture causes damage to the rafter system.
The width of the gutter through which moisture leaves the junction of the roof slopes of the building depends on its length and angle of inclination. The longer the length and the smaller the slope, the wider the element that drains water should be.
 Education snow bag on the valley
 Complex shape roof needs improvement large quantity endov. This significantly increases the cost of its construction and further maintenance. It is important to consider that such roofs more often need repairs, since each such unit is potentially weak point prone to leakage.
Proper design and installation of the valley roof is required so that snow does not accumulate at the junction of the slopes and water does not accumulate. It is recommended to leave this to professionals to avoid the risk of leaks and roof collapse.
Types of structures
The valley can be installed in three ways. They differ in the principle of connecting the edges of the slope roofing. What is common to all types is the presence of a lower gutter through which water flows - it is mounted on the rafter leg.
By design, valleys are distinguished:
- Open. The simplest option is in which the edges of the hard roof covering of the slopes do not touch each other above the bottom gutter. To give the roof attractive appearance, over the open joint, as a rule, an external gutter made of a material corresponding to the roofing is attached.
- Closed. It is used if the planes of the slopes above the gutter form sharp corner. In this case, the edges of the roofing material are tightly joined together along the entire length.
- Intertwined. Essentially a type closed version. It differs in that the roofing elements of the mating slopes are intertwined.

The choice of option depends on the roofing material, roof configuration and slope angle, requirements for the decorative appearance of the roof, complexity installation work. All three types of valleys have their advantages and disadvantages:
- The open valley is quickly installed and provides effective moisture removal. But on appearance, despite the top gutter matched to the tone roofing, inferior to closed options.
- Closed and interlaced valleys look attractive, but are more difficult to install and require enhanced waterproofing. Without professional skills to work with roofing materials they are difficult to perform well.

Construction of a valley in a rafter system: diagram
At the design stage of the rafter system complex roof special attention should be paid to the joints of the converging slopes that form the valleys. Rafter frame must withstand increased loads, since snow can accumulate in these places and ice can form.
For this purpose, the joints of the slopes are structurally reinforced - instead of the usual rafter legs installation of slanted rafters mounted from boards spliced together is required. Boards with a cross section of 50×150 mm are connected along the entire length with studs installed in a checkerboard pattern.
 Reinforced joints between slopes in the rafter system
 Roofs with valleys are primarily used in the construction of buildings in the shape of the letters G, P, T, H, where each straight part of the structure has gable roof. To design a roof, you should contact professionals, as it is necessary to correctly calculate the loads and determine the thickness structural elements, step of installation of rafters and sheathing.
Installation and protection technology
After choosing the material for roofing A diagram of the valley structure is being prepared. Let's look at how to mount the node open type, if the roof is supposed to be made of sheet material– corrugated sheets, metal tiles, slate. For soft roof ( bitumen shingles) usually choose an interlocking type of valley.
The arrangement of the valley begins at the stage of construction of the rafter system. Everything is important wooden elements, from which the structure will be assembled, be treated with a fire-bioprotective composition to reduce the risk of fire and fungal damage.
groove
After installing the rafter legs, including those slanted for the construction of valleys, the valley is laid - wood flooring on the rafter system, serving as a support for the lower valley gutter. It is important to adhere to the following rules:
- A drip line is mounted on the eaves of the slope.
- The timber or boards that need to be laid along the inner corner should be positioned at a distance of 8–10 cm from the slanted rafter leg.
- The bars or boards should lie with their lower ends on top of the drip edge; they are cut from below along the eaves line.
- Top end supporting elements for the gutter adjacent to the ridge.

It is recommended to lay waterproofing in three layers. At the first stage wide strip The waterproofing membrane is laid in such a way that it envelops the relief of the valley. Fastening membrane material is done with staples to the top of the bars that form the groove, so as not to break the tightness of the structure.
Then the waterproofing of one of the slopes is installed, covering the valley and overlapping the adjacent slope. Next, the membrane is laid on the remaining slope with the same overlap across the valley. In all cases, the material must follow the contour of the groove along its entire length, forming a gutter. This space is necessary for ventilation of the valley and removal of excess heat. Otherwise, the snow accumulated in the depression will melt in winter, forming ice patches.
It is advisable to lay a strip of foam sealant on a self-adhesive base along the top of the bars - it will cover the places where the waterproofing is attached. Next, a counter-lattice should be attached along the rafters, which secures the waterproofing and creates a ventilation layer. A lathing is mounted across it under a corrugated sheet or other material, sheet or piece. Near the valley between the standard elements of the sheathing it is necessary to lay additional ones in order to obtain an almost continuous flooring on both slopes.

A metal gutter of the lower valley is laid on the formed corner. This is a standard element made of flat steel sheet. It is necessary to bend the sides on it inward so that water does not fall outside the gutter from the sides, bend along central axis in accordance with the angle of conjugation of the slopes.
The valley planks begin to be installed from the cornice, from bottom to top. Each subsequent element must be installed with an overlap of at least 10 cm on the bottom one. Fastening is carried out using clamps made of metal strips, which are nailed to the sheathing outside the gutter. It is impossible to secure the gutter with self-tapping screws, punching through it, since the tightness of the structure is broken and even the use of elastic washers will not protect against leaks.

If the roof is adjacent to the slope of the main roof below the ridge, their connection in the adjacent ridge is performed as follows:
- The first strip in the upper part is cut so that its edge extends 2–2.5 cm beyond the plane of the ridge. The edge is bent along the edge.
- At the upper cut of the second plank, the side is also bent, and at the junction installed strips A single seam lock is performed.
- The upper part of the resulting castle is heaped to a length of about 10 cm.
- The top of the triangle formed by the valley slats (it lies on the slope of the main roof) is cut along an arc with mounting scissors and the side is bent, and secured to the sheathing with clamps.
 Joint installation
 In the case where the valleys start from the ridge of the main roof, the upper edge of the first plank is bent over the ridge, then the edge of the second plank is also bent to prevent moisture from getting under the installed gutters. On final stage When installing the roof, the joint is covered with a ridge strip.