How to remove an air conditioner from a wall yourself. Several rules on how to dismantle a household air conditioner. How to dismantle the air conditioner
People often turn to us to go elsewhere. We can either the air conditioner unit as well as the entire . Here are typical situations when such a service is needed:
- Redevelopment
- We decided to move the air conditioner to another room
- We are planning to glaze the balcony, but the air conditioner is in the way
- The air conditioner needs to be moved so it doesn't blow
- The air conditioner makes it difficult to install a cabinet, make a suspended ceiling, etc.
We will test the air conditioner before removing and we guarantee that we will not damage it during reinstallation. The master will distill all the freon into the outdoor unit, and upon completion of the work, he will pump out the air with a vacuum pump and refill the system with freon.
If it is necessary to extend the tubes, installers solder pieces of the required length using a special torch. Sometimes it is necessary to re-arrange the interblock route, drill additional holes, install extended brackets... All this work can also be ordered from climates.ru.
How much does it cost to replace an air conditioner?
Partial or complete dismantling of the air conditioner is carried out for various reasons - renovation of the apartment, moving, installation in another room, and so on. The standard approach is to call employees of a specialized company to properly remove the split system and pay for this service. A more economical option is to dismantle the air conditioner yourself, having understood the intricacies of the procedure. This is not to say that it is simple, but with the right approach it is quite feasible.
About the methods and difficulties of dismantling with your own hands
As a rule, owners of private houses and apartments install 2 types of air conditioners - monoblock (mobile) and split systems. There are no particular problems with the former, since in such models all the main elements are enclosed in a single housing, and to move the unit it is enough to simply disconnect the air duct.
In addition to monoblocks and “splits,” there are other types of climate control systems - cassette, duct and column. But usually such equipment is installed in offices, shopping centers and other large premises; in private homes it is used quite rarely.
The split system consists of two sections located inside and outside the home. They are connected to each other by two lines through which the refrigerant, freon, circulates in various states of aggregation. Through a copper tube of small diameter it flows in the form of a liquid from the external unit to the internal one. Along a large diameter line, the refrigerant gas moves in the opposite direction. This gives rise to a number of difficulties that await the ignorant user when attempting to dismantle them independently:
- Complete or partial loss of freon as a result of unqualified disconnection of main pipelines.
- Air containing moisture entering the tubes and heat exchangers. If the split system is installed incorrectly in another location, incompressible moisture will enter the compressor and may harm it.
- Clogging of copper tubes when pulling them out of the wall and during transportation. Moisture or sand in the freon circuit is the quick “death” of the compressor.
- When disconnecting the lines from the pipes of the internal section, you can accidentally twist the threaded fittings soldered to them.
- Disconnecting power wires without marking the terminals where they were connected leads to confusion during the re-installation process.
- The drainage pipe that leads condensate to the street is cut too short.
- Loss during transportation of screws and other small parts that are not secured after dismantling.
Most of the listed cases lead to expensive repairs of your air conditioner in a specialized workshop, so before removing the split system, you must carefully study the instructions below.
There are three ways to dismantle the indoor and outdoor units:
- simple disassembly with release of refrigerant into the atmosphere;
- with preservation of freon in the system using the “by eye” method;
- using special equipment that allows you to completely save the refrigerant in the circuit.
The last method gives the best results, although all three are used in certain circumstances. To ensure that you do not have problems with installing a removed air conditioner and its further operation, it is recommended to proceed with the third option, having previously familiarized yourself with the method of preserving freon.
Preparatory activities
First of all, you need to prepare the following set of tools and accessories:
- Phillips and flat head screwdrivers;
- set of open-end wrenches;
- stationery knife;
- hex keys measuring 5...10 mm;
- pressure manifold or pressure gauge with a tube and threaded connection, designed for a maximum pressure of 10-15 Bar;
- masking tape and marker;
- insulating tape or regular tape.
You will definitely need a pressure manifold if you plan to install a split system in another room, so it is better to rent it, but buying it will be too expensive.
Also, for convenient and safe work, a stepladder is needed to easily reach the internal module installed under the ceiling. It is better to pull the outer section, located on the wall of an apartment building, through the window, having previously tied it with a rope. The services of an assistant will be useful here.
An important stage of preparation is to ensure that the refrigerant is preserved with minimal losses. For this, the operating principle of the air conditioner is used, thanks to which all the freon can be collected in one place - the circuit of the outdoor unit. Having prepared the tools, proceed according to the instructions:
- Covering the infrared element on the remote control with your hand, switch the split system to “Turbo” mode and set the minimum temperature. Remove your hand from the element and point the remote control at the air conditioner. In this way, you start the compressor immediately at full power.
- Connect the hose from the pressure gauge to the service fitting located on the side of the outdoor unit, after which it will immediately indicate the pressure in the system. In some models, these pipes are hidden under a cover; it must be removed.
- Unscrew the 2 nuts - plugs located at the ends of the fittings. Under them you will find valves that can be adjusted with a hex key. Select the appropriate hexagon size.
- Turn off the tap of the liquid refrigerant line (this is a thinner tube) and monitor the pressure gauge. At this time, the compressor draws in freon gas through the second tube.
- When the device needle drops to zero and begins to go into the vacuum zone, close the second valve and quickly turn off the air conditioner using the remote control. That's all, the refrigerant is in full volume in the circuit of the external module.
In split systems filled with different brands of freon (sometimes R22 and R410), the diameter of the thread of the service fitting where the pressure gauge is connected is different. For R410 you need a special adapter, which should be prepared in advance.
The refrigerant is stored using the “by eye” method without a pressure gauge manifold. After closing the liquid valve, you need to wait about 40-50 seconds, then close the gas tap and turn off the household appliance. The disadvantage is clear: you will not know how much freon managed to get into the outdoor unit, and keeping the compressor running for a long time with the line blocked is unacceptable. The result will appear the next time you install “split” and launch it.
Instructions for removing the external module of a split system
The outdoor unit of the air conditioner must be dismantled when moving or moving it to a new place. To repair an apartment, it is not necessary to remove the outer section, but you will still have to disconnect the freon lines, cable and drainage. The work is performed in the following order:
- Unscrew the pressure gauge hose used when pumping refrigerant and replace the end cap nuts.
- Using an open-end wrench, unscrew the union nuts holding the copper tubes to the fittings and bend them to the side. Using adhesive tape or tape, protect all open holes in the lines and pipes of the external module so that debris and dust do not get inside during operation.
- To disconnect the electrical cable, unplug the device and remove the cover covering the terminals (located above the freon valves). Before unscrewing the wires, place a strip of masking tape over the terminals and label them with a color marker to document the wiring order. Disconnect the wires and remove the cable.
- Tie the disconnected lines to the bracket of the outdoor unit so that the copper tubes do not dangle or bend, otherwise they will have to be replaced.
- Unscrew the 4 nuts securing the external module to the bracket, tie it with a rope and, together with an assistant, remove the unit.
Professional refrigeration technicians often practice a slightly different approach: they do not unscrew the union nuts and do not remove the freon tubes from the fittings of the outdoor unit, but bite them off. Then there is no need to wrap the ends of the pipelines with tape to protect them from moisture and debris, because they are flattened with wire cutters. During subsequent installation, the flattened ends are cut off and flared for connection with a union nut.
After disconnecting the cable cores from the terminals, tighten the contact screws and tighten them, as they may fall out and get lost during transportation.
It is better to remove the bracket itself later, when you untie the freon circuit pipelines from it. If the lines extend out of the wall no more than a meter, then there is no need to tie them down. The tubes should be carefully aligned to make it easier to pull them in from the inside. The bracket is most often attached to 4 anchor bolts, unscrewed with a regular open-end wrench.
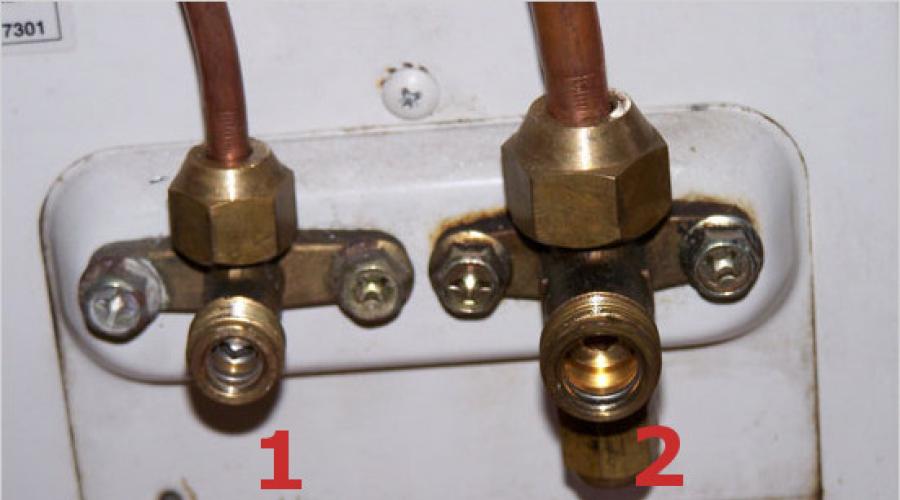
Correct disconnection of highways from the external section - photo gallery
The lines are disconnected after unscrewing the union nuts. Screw the plugs that close the port valves into place. Unscrew the cap to disconnect the wires. Having marked the location of the wires, disconnect the cable. After disconnecting the cable, the screws on the block must be tightened. According to the rules, copper pipelines must be bitten off. The bitten off tubes must be plugged.
How to remove the outdoor module while saving freon - video
How to dismantle the indoor unit of an air conditioner yourself
To remove the internal module from the wall, you need to disconnect all communications from it - cable, tubes for freon and condensate. The place where the pipelines are twisted is usually located in a housing niche located in the lower part. Depending on the split system model, there are 2 ways to get to this niche:
- Unlock the 3-4 plastic latches securing the bottom of the unit to the mounting plate. Move the bottom of the housing away from the wall and insert any rod between them, remove the communications harness from the niche.
- If your “split” model does not have latches, then you need to remove the front plastic panel, after first dismantling the blinds and additional covers (when available).
When you get to the harness, make a longitudinal cut on it with a stationery knife, which will allow you to move the insulation and grab the nuts with the keys. Do not make the cut too long, otherwise you will have to change the insulating material later. Perform further operations in this order:
- Use two open-end wrenches to unscrew the joints of the lines. An important point: the drive soldered to the short tube of the block itself cannot be rotated; it must be held in place with a wrench while unscrewing the union nut.
- Wrap the ends of the pipelines with electrical tape or tape to protect them from dirt.
- Find the joint between the drain pipe and the outlet pipe and disconnect it. You should not cut the corrugation anywhere, so that later it will be more convenient to join it back together.
- Remove the cover of the electrical compartment (located on the right side of the case or under the front panel), make notes using a marker and tape, then unscrew the screws and disconnect the cable cores. Tighten the screws back and screw on the cover.
- When all communications are disconnected, grab the housing from both sides and remove it from the mounting plate, lifting it up slightly. Give the block to your assistant.
- Remove the mounting plate by unscrewing all the dowels.
Considering that condensation may remain in the tray of the indoor module, it is advisable to protect the wall with plastic film before dismantling. If you are removing an air conditioner for apartment renovation, then such a precaution is unnecessary.
After removing the inner section from the wall, place all the unscrewed parts on it, tighten the screws and put on the mounting plate. Place the protruding pipes in a niche, securing them with masking tape. Use the same material to secure the opening front panel so that it does not dangle during transportation.
The last step is the dismantling of communications laid along the wall or inside it. There are no difficulties here, the main thing is not to bend the copper tubes under a small radius. Such treatment at the bend reduces the flow area, and it is quite difficult to align the tube with an oval profile. Pull the harness out of the outer wall carefully so as not to damage the insulation. If the hole was sealed with polyurethane foam, then it must be cut out in parts. When finished, roll the tourniquet into a ring and secure with tape.
Procedure for dismantling the indoor module - photo gallery
To disconnect the electrical wiring, you need to remove the cover of the electrical compartment. Before disconnecting the wires, write down the order of their connection. Cut the harness running in the niche with a knife and get to the junction of the tubes. Unscrew the connecting nuts. The junction of the drainage tubes. Disconnect the cable running in the same harness. The indoor unit can be easily removed with both hands. The last one stage - removing the mounting plate Having tilted the body, it must be fixed in this position
How to remove internal blocks of different designs - video
Disassembly in winter
If the outside temperature has dropped to -5°C or more, it is recommended to refrain from dismantling for the following reasons:
- it will not be possible to pump the refrigerant into the external module;
- in cold weather, you cannot disassemble connections, unscrew plugs or close service ports;
- As a result of disassembly, service valve seals often fail.
In a situation where you cannot do without removing the split system at subzero temperatures, be sure to warm up the fittings of the outdoor unit with a hair dryer. Then unscrew the plugs and close both valves, thus retaining some of the freon remaining in the outdoor unit circuit. Then slowly unscrew the lines from the fittings and disconnect them, releasing the second part of the refrigerant into the atmosphere. Then proceed according to the algorithm described above.
Personnel from specialized companies use pressure gauge stations to pump out freon in winter. But if you rent such equipment, then dismantling will cost more than paying specialists, and the result will be dubious.
At temperatures above -5°C, you can perform work according to standard instructions, but it is advisable to use a pressure gauge to control the pumping of refrigerant. If you act “by eye”, you may not guess the holding time and will still lose some of the freon. It is equally dangerous to keep the compressor running without cooling (and it is cooled by circulating freon); it can fail due to overheating.
You will successfully dismantle your home air conditioner if you get to work during the warm season and follow the instructions provided. You must not miss a single detail, act very carefully and without haste. Do not neglect the pressure gauge, since the loss of refrigerant will negate all savings from this procedure.
Dismantling the air conditioner yourself is an operation on which you can save money. But is this really so? The fact is that most people do not know how to do it and end up with non-working climate control equipment. Air entering the split system oxidizes the copper pipes, resulting in the “killing” of these devices.
To properly remove the air conditioning equipment, you need to perform some preparatory work, namely, prepare the necessary tools, shipping containers for the internal and external units of the split system. Now is the time to prepare the air conditioner itself.
Preparing climate control equipment for shutdown and removal

The preparation is complete, now all that remains is to dismantle the internal and external units of the air conditioner.
Removing the internal and external modules
It would seem that now that all the freon has been pumped into the condensation chamber and the main tubes are disconnected from the device, it would not be difficult to remove it from the wall. But many people ask: “How to remove the air conditioner from the wall.” There are few difficulties with the outdoor unit of a split system, and only if it is installed on a balcony or within reach.
 With the internal unit of the climate control device, everything is much more complicated. The whole catch is that it is almost impossible for an untrained person to cope with the latches of fastening the block to the mounting strip, especially if he does not have a specialized tool.
Important!
When disconnecting and removing the internal unit of the split system, a particular danger arises due to the possibility of deformation of the evaporator pipes, which are located in close proximity to the air conditioner mount.
The dismantling process occurs in several stages
- Opening the fastening latches.
- Removal from the mount along the guides of the indoor unit.
- Remove the mount itself from the wall.
- Packing it for subsequent transportation.
Advice:
If you are unsure of your abilities or do not have the necessary tools, then it is better to leave the work of dismantling the split system to professionals.
You can remove the external unit of a prepared split system yourself only if it is located on your balcony. In all other cases, you will need professional industrial climbers, because it is mounted on the wall of the house.
Removing the climate system is not particularly difficult, but before doing so, you should think carefully about whether the money saved is worth the lost time and health risks of dismantling it yourself?
Dismantling household climate control equipment is just as responsible as installing it. Especially if you plan to use it further, for example, when moving to another place of residence. Let's look at the basic rules on how to dismantle an air conditioner yourself without losing its effective performance.
Set of tools
It is strongly recommended that disassembly and installation of the air conditioner be left to professional installers. This largely guarantees a high-quality installation procedure, without unpleasant consequences in both cases. But if there is no money for an expensive service, with certain skills, it is possible to disassemble it yourself.
The main point when dismantling a split system is careful, consistent adherence to the basic rules that will preserve the functioning of the equipment. In many ways, special tools will be useful here to help you disassemble with the least effort and with better quality. These include:
- pipe cutter
- side cutter
- construction knife
- Phillips screwdriver
- integral screwdriver
- hex socket wrenches
- open-end wrenches
- adjustable wrenches
- drill, screwdriver
A set of these tools is a must because not many standard mounting tools are useful. Using the latter, it is likely to cause irreparable damage to the system, after which it will have to be replaced.
How to properly dismantle an air conditioner? Safety regulations
There are certain rules and conditions that must be observed in order to protect health and equipment from breakdowns and malfunctions. Let's list them:
- depressurization of the cooling circuit must not be allowed. It operates under a pressure of 15 A. If there is a sudden leak, there is a high probability of falling under a stream of very low temperature gas;
- you can get frostbite from a stream of cold freon if it leaks;
- When disassembling, it is necessary to avoid the entry of dust and moisture into the circuit, which have a destructive effect on the system;
- when transporting an external unit containing freon, an explosion may occur;
- during transportation, it is necessary to carefully handle the remaining sections of pipes, since their damage will lead to the replacement of the entire unit;
- It is forbidden to unscrew the union nuts from the fittings;
- Care must be taken to handle the latches of the indoor unit so as not to break them.
Transportation of freon
When dismantling the outdoor module, the primary task is to “pack” the freon. It is necessary to carry out this procedure efficiently so as not to subsequently waste time and money on refilling the air conditioner. You should pay attention to the accuracy and precision of pumping the refrigerant.

It is possible to reproduce using a pressure manifold or without it. This device will be able to indicate when a vacuum has been reached in the cooling circuit. It is in this case that the second valve should be closed to “pack” the freon inside the condenser.
- connect the pressure gauge manifold to the nipple on the fitting instead of the pipe with the liquid of the cooling circuit (it is thinner compared to the second one, through which gas freon passes);
- if the device is missing, you need to start from the next point;
- put the split system in cooling mode, determining the lowest temperature that the equipment is capable of according to its technical characteristics (you need to find out in the operating instructions). This way the block works for at least 10 minutes;
- close the valve of the liquid pipe (thinner. Closed with a hex key under a protective cap);
- On the manifold, follow the arrow until it reaches the vacuum level. If there is no pressure gauge, you need to mark 1 minute on the clock;
- after the time has elapsed/the desired indicator has been reached on the device, close the valve of the gas pipe with a hex key;
- turn off the air conditioner;
- Put the protective caps back.
The difficult task of transferring refrigerant can become more difficult during the cold season, when the air conditioner cannot be turned on. The compressor oil thickens and its smooth operation is impossible. If the equipment is equipped with a “winter kit” that allows the equipment to operate for cooling even at sub-zero temperatures, the problem is easily solved by starting heating devices located in the compressor crankcase and drainage. After 10 minutes of warming up, you can start the climate system for cooling and pump freon, following the recommendations described above.

If there is no winter heating system, you can use a pressure gauge station to collect the refrigerant. It is connected according to the same principle as the collector. Freon is transported there for transportation.
Dismantling the external unit. Can I do it myself?
After “packing” the coolant, you can begin to remove the outdoor module from its mountings. How to dismantle the air conditioner with your own hands:
- disconnect the outdoor unit from the power supply;
- if further use of the pipes is planned, they are unscrewed. Open fittings must be reliably protected from dust and moisture. In cases where reuse is not expected, the copper pipes are cut off, leaving 15-20 cm of each branch from the fasteners. The ends are sealed with a vice to remove moisture and debris;
- when it is known that the air conditioner will not be used for a long time, it is recommended to fill the remaining pipes with nitrogen, thereby displacing the air and plugging it. This will prevent the oxidative reaction of the metal with atmospheric oxygen;
- remove thermal insulation from the freon circuit;
- disconnect the outdoor unit from the electrical cable by removing the pre-marked terminals;
- remove the nuts holding the module to the brackets and remove the module. It is recommended to do it together with an assistant, because the block is heavy and there is a high probability of dropping it;
- place in a special box with polystyrene foam or other filler to avoid mechanical damage to the housing and pipe bends;
- transport and store only in an upright position.

How to dismantle the indoor unit of a split system?
The indoor unit of the air conditioner is removed from its mountings only after dismantling the outdoor unit. Here you also need to be careful, especially with the clamps of the evaporator and the equipment itself. If these elements are damaged, the subsequently newly installed unit will vibrate during operation, which will lead to its failure.
How to dismantle the air conditioner yourself:
- remove the front panel so that you can get to the latches;
- disconnect the cooling circuit pipe;
- turn off the power supply;
- remove the evaporator (carefully unclip the latches closed with the lid)
- release the latches of the indoor unit and remove it from the guides;
- dismantle the plate on which the indoor unit was attached;
- remove the cooling circuit pipeline from the wall grooves;
- remove the drainage pipe;
- dismantle the decorative box.

Consequences of improper dismantling
Here are some unpleasant consequences of careless dismantling of the split system:
- depressurization of the cooling circuit, resulting in freon leakage. When installing equipment again, you will have to pay to refill the system with coolant;
- mechanical damage to the external unit housing, outdoor module, any parts, freon pipes, especially if they lead to depressurization of the circuit;
- clogging of the cooling circuit with dust, debris, moisture ingress. Dust will invariably affect the operation of the compressor; it will soon have to be replaced due to a malfunction. Moisture is dangerous because it will oxidize the inner surface of the copper freon route, the metal will begin to corrode, which will render the system completely inoperable;
- falling of the outdoor module from a height. It does not matter how high it was fixed - a fall in any case will lead to its complete replacement.
The video will tell you how to properly dismantle the split system
When changing residence, they often carry an air conditioner with them; after all, the equipment is expensive. To do this without loss, it is strongly recommended to contact professional installers who will do everything correctly and with high quality. If you plan to disassemble the air conditioner on your own, you must strictly follow the dismantling rules, and do everything as carefully, clearly, and harmoniously as possible.
Friends! More interesting materials:
 Air conditioning
Show content articles
There are situations when it is necessary to dismantle the air conditioning system. For example, you have planned a major renovation, relocation of an air conditioner, or a move.
To dismantle the split system, you need to know the features of this operation. Let's consider the sequence of actions when dismantling the air conditioner, as well as the consequences of incorrect dismantling of the air conditioning system.
When is it not necessary to remove the air conditioner?
Based on the scale of the planned repair and the tight fit of the indoor unit to the wall, instead of immediately starting to dismantle the air conditioning system, you can resort to another way to resolve the issue.
Case No. 1
If you plan to re-glue the wallpaper and the gap between the wall and the indoor unit is large enough, then it is not necessary to dismantle the entire air conditioner, just disconnect the unit from the plate.
Case No. 2
If during the renovation you plan to plaster and level the walls, then you can also dismantle only the indoor unit. Upon completion of the repair, the length of communication should be sufficient for reinstallation of the module.
Case No. 3
There are cases when the block needs to be dismantled along with the route. This may be caused by a number of circumstances:
- it is planned to “lower” the ceiling;
- the nuts for connecting the route to the module are located in the wall;
- in order to prevent the connection of nuts inside the wall after repair;
- to move the indoor unit.
Case No. 1  Case No. 2
How to remove an air conditioner from the wall yourself: instructions
 Before you begin removing the split system, you need to prepare not only ordinary household tools, but also professional ones.
The necessary tools for dismantling the split system include:
- pipe cutter;
- side cutter;
- construction knife;
- Phillips and integral screwdrivers;
- hexagon socket wrenches;
- manifold;
- open-end and adjustable wrenches;
- drill;
- screwdriver
In some cases, safety equipment may be needed.
Preparatory stage
 After preparing the tool, study the recommendations of specialists on the correct dismantling of the air conditioning system. Most people ignore the recommendations of professionals, after which the air conditioner is dismantled with many errors.
Interesting:
Dismantling without pumping freon into the device leads to its leakage. Restoring freon is then quite difficult and expensive. The minimum amount of financial costs is four thousand rubles.
Freon release
 There are three main methods for dismantling the air conditioner yourself:
- disassembly with freon release;
- preservation of freon in the device;
- saving refrigerant in full thanks to the use of special techniques and specialized equipment.
The last method allows you to get the maximum effect without loss, but other methods are also widely used.
Before carrying out work, carefully consider the design features of the air conditioning system. It is a closed circuit with refrigerant and includes a compressor, an evaporator with a condenser and a system of copper tubes to connect all the components and ensure the supply and removal of refrigerant.
To turn off the air conditioning system without losing refrigerant, you need to pump it into the condenser. This is possible when operating in cooling mode by closing the valve from the product to the tube. It will take no more than one minute to pump the full amount of freon. After pumping, it is necessary to close the valve on the tube. With this operation you can stop the gas supply completely.
Dismantling
Work begins with removing the external unit. To do this, you first need to disconnect the copper tubes. The tubes are cut at a distance of about twenty centimeters from the fitting, and then the sections are caulked for complete sealing.
When the device is stored for a long time in a disassembled state, the copper tubes are filled with nitrogen and provide a tight seal to prevent oxidation.
 Work begins with removing the external unit
Outdoor unit
 After disconnecting the copper tubes, remove the thermal insulation. It is advisable that the operation be carried out by two people: one will work outside the building, and the other inside the room. This will greatly simplify and speed up the process.
So, one person will turn off the electrical energy, and the other will disconnect the wires.
The tubes should be straightened so that they can pass through the holes in the wall. Next, the end of the cable that is dragged into the room is screwed to them. After this, the nuts that support the external unit on the brackets are unscrewed.
At the end of the operation, the block is removed and dragged into the building. It can only be stored vertically.
Disconnecting the compressor
 It is very important to dismantle the compressor in the correct way. To do this, you need to perform the following operations:
- Remove the cover from the external module.
- Disconnect the suction and discharge pipes.
- Disconnect electrical wiring.
- Unscrew the condenser and fan fasteners.
- Pull out the capacitor.
- Remove the fastenings and dismantle the compressor.
With this sequence of measures, the possibility of pipe defects is eliminated and it becomes possible to repair other components.
Indoor unit
 There are cases when owners limit themselves to dismantling only the external unit. For example, when repairing a compressor. When it is necessary to remove the entire split system, it is important to take into account the existing nuances of dismantling the indoor unit.
To dismantle the indoor air conditioner module, you must perform the following steps:
- Remove the housing cover, following the indicators located at the bottom of the product.
- Disconnect the electrical cable by unscrewing it from the terminals, and then carefully remove it from the split system.
- Unhook the pipe, installing the reservoir in advance; liquid may leak out from there.
- Remove the heat insulator and disconnect the refrigerant pipe.
- Carefully unscrew the tubes as when removing the external unit, and wrap them with insulating tape or screw on the caps.
- Carefully dismantle the indoor module and remove the mounting plate.
Features of work in winter
 In cold weather, it is almost impossible to pump refrigerant into the condenser: the oil thickens greatly, and if you try to connect the air conditioner in this situation, a blower malfunction can easily occur. This situation is not terrible for air conditioner models that are equipped with a special winter kit. The equipment includes heating of the compressor crankcase and drainage, as well as a fan speed retarder.
If you have a model installed without this configuration, then freon can be pumped through a pressure gauge station to collect gas.
This station is connected to the shredder valve, similar to a pressure manifold.
Consequences of improper dismantling
Here are a number of possible consequences if the air conditioning system is dismantled incorrectly manually:
- Loss of tightness of the cooling circuit and leakage of freon. Eliminating this unpleasant situation will require significant financial investments.
- Clogging of the internal circuit of the system with dust, penetration of moisture. These circumstances especially affect the functioning of the compressor, and the operation of the air conditioner in general. Therefore, the product should not be removed in rainy or snowy weather.
- A heavy outdoor unit falling from a height. Even if the product falls from a small height, in most cases this will lead to its breakdown and replacement.
- Mechanical damage to the surface of the external module and other elements, which can cause depressurization of the circuit. Even the slightest crack can cause gas leakage and dust and moisture getting inside.
Watch the video on how to remove the air conditioner