How to make a flowerpot from tires with your own hands. DIY flowerpots made from tires, concrete and other materials. How to make a flowerbed of a more complex design
Reading time ≈ 3 minutes
To transform anyone personal plot, it is not necessary to buy expensive small architectural forms. Can be done DIY flowerpots made from tires, which will transform and give an attractive look to any area where every owner will feel comfortable and cozy.
Such a masterpiece has become popular among many gardeners who love to create beautiful flower arrangements and practice these elements in almost every area. Flowerpots and flower beds made from tires are easy to create, durable, practical and easy to use. Create with my own hands A beautiful and exclusive flowerpot is a source of pride for every owner of the property. Ready-made flowerpots can be purchased in a special store, but it’s more pleasant to watch your own invention every day.
You can see flowerpots made from tires with your own hands in the photo:

If you have the opportunity to choose tires for a flowerpot, then it is better to choose non-studded winter tires from production, because they have very soft and thin rubber, which is easiest to work with. The tires must be cleared of soil so as not to damage the instrument.
Step-by-step instructions for creating a flowerpot from tires
You can make many options for finished products: a bowl with smooth edges, a flower bed in the shape of a flower, with petals or fringe.

First of all, you need to draw a cut line and draw a contour with chalk on the side of the product, which can be in the form of petals or fringe.

Then cut along the contour figure cutting shoemaker's knife or jigsaw.

You can look at the detailed stages of this work on how to make flowerpots from tires with your own hands at video at the end of the article.

After cutting out the tire, you need to make longitudinal cuts at a distance of 5 to 10 centimeters and turn the tire inside out.

This is a labor-intensive process that requires skill and is not immediately easy for beginners. But it's enough to turn it out small area how the process will proceed quickly and smoothly.


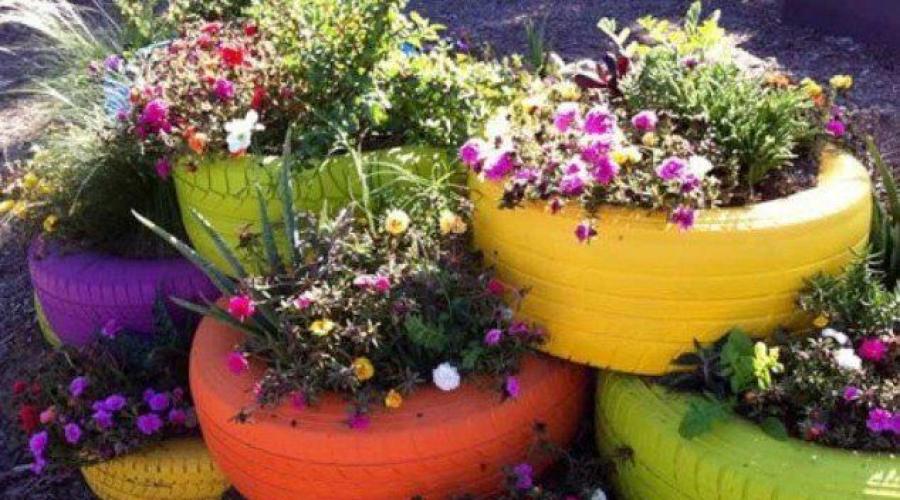
The next stage is various types decorations for flowerpots made from tires, which can be painted in different ways, decorated with pebbles, or applied with ornaments, such as in these photos:


A little free time, just a couple of hours, and without special costs, an exclusive decoration for the site is ready, made with the help of imagination and your work, the result of which will be pleasant praise from others. All that remains is to fill the mold with soil and plant beautiful annual or perennial flowers, such as in the photo.
Car tires are extremely useful and functional items. The most popular option for their use is the design of children's playgrounds. But the flow of folk creativity is rapidly moving on, coming up with more and more new options for using tires that have already served their intended purpose. So, they are successfully used as:
- swing, suspended by a rope or chain;
- containers for storing firewood, newspapers, magazines;
- in the manufacture of furniture (the procedure is very labor-intensive, but the result is really impressive. Due to the specifics of the material, such items can be used, for example, in the garden or on the terrace);
- flowerpots and flower beds.
Let's consider last option in more detail, because vases and flower pots made from car tires - great option for beautification garden plot, introducing diversity into landscape design. A little effort and patience and a lot of ideas will help you make original flowerpots from tires with your own hands, which will highlight the beauty and splendor of flowers and other ornamental plants.
How to make flowerpots from tires?
Making street flower pot- the matter is not difficult, but it requires some effort, so if you are a woman, you will have to seek help from a representative of the stronger sex who has sufficient physical strength and has experience working with tools.
We will need:
- old car tire;
- sharp knife;
- screwdriver;
- pliers;
- screws and washers for them;
- White paint.
 |
 |
Progress:
- We make markings on the tire in the form of a zigzag.
- Using a knife, cut out the middle according to the markings.
- We take out the middle, and we get this kind of improvised flower.
- We turn the base inside out, bending the “petals” outward.
- We turn the tire over, getting the base for the flowerpot.
- We place the cut out center on top and fix it to the base by screwing in the screws. The holes should first be made with a hand or electric drill.
- We paint the finished structure in White color. If you wish, you can give free rein to your imagination to apply a drawing on top. Geometric patterns that repeat the colors of the plants that you plan to place in the flowerpot will look especially interesting.
- You can put a piece of plywood on the bottom and cover it with film on top.
- We fill the container with soil, plant or replant flowers. Your DIY tire vase is ready.

 |
 |

 |
 |

 |
 |
 |
 |
 |
 |


You can also cut an unusual shape from a tire.
Sometimes you want to show your creativity in some unusual role. For example, decorate a flower garden near your house. To do this, you need to know how to make flowerpots (tires and other available materials are plentiful everywhere). You shouldn’t visit expensive supermarkets in search of elite material, because you can pay attention to ordinary tires that magically turn into fairy-tale characters.
Old tires - free stuff. Its advantages are in form. With the help of light movements and imagination, a rubber tire turns into a wide and spacious flower pot. This activity is very quick in terms of time. It will take the master about an hour to cut electric jigsaw or use a good knife to shape a certain figure, paint it and transplant flowers there.
Materials for work:
- 1 Tires size R12-17.
- 2 Knife or jigsaw.
- 3 Sand and cement.
- 4 Pebbles or crushed stone.
- 5 Grinding machine.
- 6 Primer and paint.
- 7 Soap solution.
- 8 Wire.
- 9 Trowel and paint brushes, a hard-bristled brush.
- 10 Container for concrete solution.
It is best to take winter tires that are not studded; they are soft and easily deformable. Before work, the rubber material must be thoroughly cleaned of dirt and soil so as not to spoil the appearance of the decoration.
Step-by-step algorithm
First, you should consider the algorithm for creating the simplest and most common design option for a rubber pot for a flowerpot. This will be a tire bowl with jagged edges in the shape of flower petals.
It is convenient to place the cleaned tire in a lighted place and apply a chalk drawing to the side. For example, draw petals in the shape of triangles. Using a knife or jigsaw, cut out the design along the contour. After this action, the master makes several longitudinal cuts every 8 cm, and then turns the tire inside out. The last manipulation is difficult, so it must be done by a man. To ensure that the appearance of the cut edge does not injure a person, the edges must be carefully sanded.
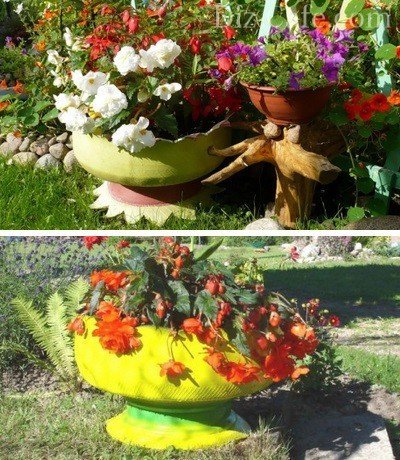
To ensure the stability of the product, you will need to take care of the leg. It could be a wheel disc. Then put foam rubber in the middle and fill it with earth to the very top. All that remains is to decorate the flowerpot with any elements and paint it beautifully. You can use several tires of different diameters to create an unusual pattern.
Tires are primed and painted. It is best to use paints light shades, because the flowerpot will be constantly exposed to the open sun, gradually losing its color.

Popular options
The most easy option decorating a flower bed using rubber tires is a combination of tires of different colors. They can be arranged in a row or in a circle, laid in the form of a multi-level ladder. The tires look interesting different diameters, if they are laid one on top of the other in the form of a pyramid.

For the most creative craftsmen, the option of a hanging flowerpot is suitable. To do this, attach a strong metal chain to the tire and hang it, for example, from a tree. Be sure to cover the bottom with dense material.
The most difficult options are creating different shapes or household items from several tires. Thus, many craftsmen, using several tires, a pipe and a bent metal strip, decorate the yard with spectacular flowerpots in the form of a teapot and cups.
An ordinary flowerpot made of tires can be decorated with stars around the edges. This is easier to do if you divide the circle into 6 or 9 triangles, into which you enter the same ornament.
After drawing, all that remains is to cut along the contour. If you cut 3-5 waves close to the disk, you can get a flowerpot with smooth shapes. By alternating several deep cuts with short ones, you can slightly complicate the contour pattern. Here you need to get used to it and dream up.

Product stability
If you want to create tall products for flowerpots, then you need to take care of its legs. A leg made of concrete and pebbles or others looks creative decorative stones. The process is easy: the master wraps the lower part of the flowerpot (disc) with decorative mesh or wire and mixes the solution. Cement, water and sand are poured in a ratio of 1:0.5:3, but so that the resulting material has a liquid consistency.
Using a trowel, you need to throw the solution onto the disk. To give the leg more spectacular look, it is necessary to decorate the solution with small pebbles or multi-colored fragments broken glass. After some time, the glass and pebbles are washed with water to wash away the dirt that has stuck to them. And in order to concrete base didn't crack under sun rays, over the next 3 days it needs to be moistened with water from time to time.

Funny fairy tale characters
There will be no limit to a child's happiness if a turtle, swan or other appears near the house fairy creature. To create a turtle you will need tires and tread. The body will be 1 whole tire. The protector must be cut into 4 parts and attached to the sides. This is what the paws will look like. You can fasten them to the main body with wire staples.

A tail is cut out of a small piece of rubber, and from a piece plastic pipe make a turtle's neck. Several old newspapers should be crumpled into a ball and attached to the neck with tape. For complete resemblance, a straw hat is put on the head. The finishing touch There will be coloring and drawing of the eyes, mouth, paws.
Swan is a product for those who have already tried to make something out of tires. The craftsman will need to cut out the neck, wings, head and tail. This can be done according to this scheme (photo 1). It needs to be drawn on the tire and carefully cut out. The black outline denotes the border of the neck and head, blue - the 2 wings, and red - the tail. After this manipulation, the product should be turned inside out.
Separately, make a beak from any material and paint it red. Now you can start assembling the swan. Put the 2 parts of the head together and insert the beak between them, strengthen the structure with self-tapping screws. It is best to insert them into the openings for the eyes, hiding them with circles of black electrical tape. Then the assembled neck and head need to be slightly raised and pressed into the tire, and the resulting fold should be secured with self-tapping screws. Now you just need to paint the beautiful swan white and plant it with flowers.
So, you can cut dolphins, parrots and other birds and animals from tires. The main thing is to think through the diagram, transfer it to paper, and then to the bus itself. Then it’s a matter of small things: cut, fold and secure, and then paint bright colors and attach the decor. Using simple plastic bottles and lids from them, pipes, rubber pieces, you can come up with incredible decor for fabulous flowerpots. Therefore, fins, tails, eyes and crests are always formed separately, attached to the main structure with simple paper clips or self-tapping screws.
If very complex circuits are still difficult to understand, the future master can start from the very simple option- creating a fence in the form of a chain. Such a large chain of colored different colors tire flowerpots will be no less attractive than an unusual fairy tale hero. The links of such a chain can be connected to each other using wire. A border in silver or golden color looks original.
Creative people never sit idle, constantly inventing something to do. Making flowerpots from this available material will bring not only benefits, but also spiritual pleasure to a creative person.
The desire to ennoble country cottage area, transforming it into an attractive cozy corner for a comfortable stay, quite naturally. A favorite among many gardeners, floral arrangements are an ever-popular element. landscape design suburban areas. Decent frame Such compositions are often flower beds made of tires, which are one of the easiest products to create and practical to use. Of course, you can purchase ready-made flowerpots in specialized stores. But flower beds made from tires with your own hands are not only beautiful and functional element design, which gives the design of the site exclusivity and uniqueness, is, first of all, the pride of every summer resident.
It's great when it's possible to have a choice. Choosing between old tires domestic manufacturer and imported products, preference should be given to the latter. Imported waste tires have softer and thinner rubber, which is much easier to work with. If you choose between “summer” and “winter” tires, then the winter version is more suitable for work.
Deciding to create original flower beds from tires with your own hands, turning old used tires into street vases of fancy shapes, you need to prepare in advance raw material and think about its design
In order to make a flower bed from old tire, it is advisable to choose wheels with maximum tread wear. The worn-out tread layer makes the product softer and makes it much easier to turn it inside out.
Tires contaminated with soil and sand must be cleaned. And the point is not even that it is more pleasant to work with a clean product. It’s just that when working with dirty tires, the blade of the knife and file becomes dull much faster.
Step-by-step manufacturing example
Before you start making a flower bed from a tire, you need to think about what it will look like. ready product: a bowl with smooth edges, a flowerpot with a wavy cut line or a flowerbed in the form big flower, bordered with petals or fringe.

The drawing, along the contour of which the cut line will be drawn, is applied to the side of the product
When thinking about the shape of the cut, you must be guided by the fact that the result should be a design based on the “pan-lid” principle: deep Bottom part and cut off top. The contour can be easily drawn along the entire circumference with a felt-tip pen or chalk.

The edges of the cut, made with wavy lines or shaped like teeth and fringe, look interesting.
Stage #2 – cutting along the contour
When thinking about how to make a flowerbed from an old wheel, designed in the shape of a large flower, you need to cut out petals along the edge of the product. The size of each petal should not exceed 10-12 cm. Otherwise, when turning the tire out in these places, the rubber simply will not bend, and the flowerbed will not take an even round shape.

You can use a shoe knife to cut the wheel. A well-honed tool will significantly speed up your work
You can make the cutting process easier by using liquid soap for lubricating the knife blade.
Great if you have it on hand jigsaw. Using a jigsaw, it is convenient and quick to perform figured cutting.
Labor mechanization is described in detail in the video:
After cutting the tire along the contour, along the tread grooves it is necessary to make longitudinal cuts at a distance of 5-10 cm.
Stage #3 - turning the tire out
When creating a flowerbed on a leg out of wheels with your own hands, the first thing you need to do is turn the rubber tire inside out. For many craftsmen, this stage of work becomes a real stumbling block. The process of turning out the rubber itself is quite a labor-intensive process.

In order to cut the metal cord, you need to use a grinder to make several cuts along the outside. Cut through the rubber smoothly. The contact of the disk with the cord can be judged by the plaque formed on the surface of the product and the white smoke emitted. Make the cuts at an equidistant distance of 15-20 cm.
After spending preparatory work, you can start turning the tire out. Before you start turning the tire for your flower bed inside out, we would like to tell you one secret: it is enough to turn at least a small piece of the tire inside out, and the work will go like clockwork.
The turning process is clearly shown in the video:
The flowerbed made from old wheels is ready, you can start decorating it.
Finished product design
Creating and growing flower beds in black forms is not entirely aesthetically pleasing. Therefore, once the flowerbed has been given the desired shape, you can begin to decorate it. Until the outer surface of the inverted flowerpot is covered with a layer of dust, it is advisable to paint it.

Painting is the easiest and affordable way design of a black rubber flower bed
Oil, enamel and nitro paints are excellent for painting rubber products. The paint lays on a clean rubber surface in an even layer and adheres fairly well. long term. You can also use leftover car paint to paint your flower bed. By using aerosol can the job can be completed in just a few minutes.
Use in flowerbed design light colors paints will prevent overheating of the earth inside the container.

The combination of colors looks interesting when the base of the flowerbed is decorated in one color, and the cloves or petals are in another.
Most craftsmen paint the rubber flowerbed only from the outside. But still, to give the capacity more attractive looking, it is advisable to slightly grab the upper part of the inner surface of the product.
When designing a flowerbed, you can give complete freedom to your imagination. Glass aquarium pebbles glued to the petals of a flower bed will create the illusion of dew drops.
If you want to further decorate the flowerbed, you can apply an ornament of a different color over a plain layer of paint. But you shouldn’t be too zealous: if the flowers grow wildly, the flowerbed pattern may be completely covered by hanging or creeping plants.
Minimum costs, a little free time - and a chic decoration for the arrangement suburban area ready
Such a flower bed will be a worthy addition to the interior and an element of the landscape design of the dacha. All that remains is to fill the container with a layer of soil and plant your favorite flowers.
It’s always nice to make something useful out of a junk item, and if the craft turns out to be beautiful, it’s double the pleasure. One example is crafts made from tires. They are used to make decorations for a summer cottage or garden plot, various flowerpots and flower boxes, build children's attractions and even make country furniture - tables and chairs.
Flower beds and flower beds made from tires
Let's start with the most, perhaps, simple flower bed and flower beds. Do you think it’s difficult to make a multi-tiered one? Maybe, but not from tires. Take a few pieces different sizes, paint in bright colors and stack them in a heap - one on top of the other. To prevent your slide from falling apart, fasten the tires from the inside using a screwdriver and self-tapping screws. Two per connection will be enough. You fill the soil inside and plant the plants. To prevent the soil from spilling out, you can cover the inside of the tire with a piece of . It will remove excess water, but will not allow the soil to spill out. A beautiful tiered flower garden is ready.
If you like flower beds correct form, you can do something like this. For example, making a flower bed in the shape of a chamomile out of tires. First, the tires in the lower tier are laid out and fastened together. Fill the middle of the tires with soil, and also free space inside the circle. There for better drainage can be laid broken brick or other construction waste, sprinkle a little earth on top and compact it. On the prepared surface, stepping back from the edge by more than half the diameter of the tire, lay out the second tier. They are also fastened together, the middle is covered with soil, and the core is placed on top. You can plant tall flowers at the very top, and border or low-growing flowers on the lower tiers.

Another option for a flower bed made of tires in the shape of a chamomile - in one tier. To do this you will have to cut the tires.

How to cut tires
In general, when making crafts from tires, they often need to be cut. This is far from easy. Can be cut off more or less easily lateral surface from the tread. People with strong hands And good knives do this manually. By the way, a good workout for the hands and the entire shoulder girdle. If you are going to cut with a knife, lubricate the blade with grease: the rubber constantly “jams” the metal, and the blade covered with grease slides out well.
You can also cut the sidewall with a jigsaw or grinder. Cutting with a grinder is relatively quick, but the stench is wild. Therefore, with a grinder, even if there is one, only the first cut is made so that the jigsaw file can be inserted. Then they work with this tool. To cut rubber, take a blade with a reverse tooth made of good steel.

If you have to cut the tread, doing it with a jigsaw or even more so with a knife is useless. Anyway with a regular knife. Blades made of special steel can even cut iron cord, but it is unlikely that anyone would want to disfigure such a tool. old tire. That’s why they most often work with an angle grinder. To avoid any troubles, the protector is secured: always think about safety. If the sidewalls have already been cut off, the tread tape is quite elastic and can be compressed with a clamp. Once cut, it will not spring back.
Flowerpot from a wheel: turning the tires out
If you have a tire with an old rim, you can use it to make a flowerpot with a leg.

To do this, cut one sidewall along the tread. And they turn it inside out. This is not an easy task: considerable physical strength and perseverance are required. The rubber is elastic and it is impossible to turn it out the first time. If absolutely not possible, notches are made on the outside side across the tread. They should be quite deep, but not through. It will also help if you make cuts along the edge with a depth of at least 5-7 centimeters. They will look like fringe on an inverted tire.
Why do they turn it inside out? Inner surface smoother, and the shape may turn out to be more interesting, especially if the edge is made not linear, but jagged. The result is a gracefully bent decoration.

For details on how to turn out a tire, watch the video.
In a similar way, you can turn out a tire without rim. The sequence of actions is the same. First, cut off one of the sidewalls - straight or zigzag. To ensure that the “petals” are even, it is advisable to mark them. It is convenient to do this with chalk. The mark is then cut with a jigsaw or knife (if the cord is synthetic).

They turn it like this: they step on inner part tires, grab the edge with your hands and pull up and towards you. It is important to achieve the first result: when at least some part is bent. If the tire looks like the photo below, it's already a success. It is developed by successively turning the edge inside out and standing on the already turned part so that it does not turn back.

Watch the process again in the video. This time they turn out the tire without the wheel (they cut it, by the way, with a knife).
Even by itself, such a tire turned inside out looks good. If you paint it, it becomes even better. If desired, they can be combined - different colors, sizes, installed differently: on a tire or on legs.

Always looks beautiful high flower bed. Especially with hanging plants. It can also be made from tires, and there are several possibilities. The photo below shows two ways to secure cut tires at different levels. The first is to use stumps for this, to which flowerpots are attached with nails or screws. The second is to use reinforcement - three or four rods on which to put rubber. Having set the tier at the desired level, it needs to be secured; on metal this can only be done with the help of clamps.

It is not always possible to place a flowerpot on the ground: some areas are so developed that even one square meter it is problematic to single out. For this occasion, people came up with various hanging flowerpots, also made from old tires. Only a small part of the whole tire remains, so you have to cut a lot... be patient. For example, you can do hanging planters in the form of a dolphin, parrot, rooster and other strange birds. For some ideas, see the photos.

Tire planter - parrot, rooster and dolphin
All these crafts made from tires. Only a small part of them - the heads - are often made of dense foam. Cutting and sanding the part the desired shape, it is attached using self-tapping screws coated with glue (this is a secret, remember), and then painted. Watch the video to see how to make a parrot from a tire.
Below are posted step by step photos, which depict the main stages of creating a table or ottoman from a tire. You will need two more circles of plywood or fiberboard of a suitable diameter; hemp rope is used for finishing. From available materials you will need glue and a glue gun, as well as varnish and a brush for applying it. To connect the circles to the tire you will also need self-tapping screws - 8-10 pieces on each side.

Next we take glue gun and after heating the glue, apply it to the sidewall. If you don’t have such a luxury on your household, take the glue that’s in the tube bigger size, like " liquid nails" It's easier for them to work with mounting gun. Apply a stripe to the side and glue the hemp rope. So - all the way to the top.

Using the same technology, we decorate the lid of the table (ottoman). You need to start laying from the middle: apply glue, lay the rope.

Finishing the work - applying varnish. We do it slowly, soaking it well. This is what should happen as a result. If you made a table, you can put glass on top - a rope, even coated with varnish, is not the best best coverage for the table, although beautiful...

Variety can be achieved through the cover. It can be sewn from the dense material you like.

Cute ottoman...
You can knit it - large knitting looks interesting.

Large knitted cover - looks interesting
If you don’t want to sew or knit, you can use old knitted items cut into strips. They are cut into long strips 3-5 cm thick, rolled into balls and then wrapped around the ottoman. It turns out interesting, especially if several colors are combined.


If you need a taller ottoman, screw the two tires together with self-tapping screws and continue working with them in this form.


Another option, see the video