How to make outdoor flowerpots for the garden with your own hands: simple and interesting ideas. Beautiful flower pots with your own hands - ideas, photos, step-by-step master class Beautiful DIY country pots
Potted and hanging plants are now at the peak of popularity in landscape design. Vases, pots, hanging flowerpots with armfuls of bright flowers decorate terraces, balconies, patios, and paved paths. Do you want to decorate your plot in the same way, but all the flowers are already planted in primitive plastic pots? There is no need to buy new, expensive flowerpots. There is an alternative: you can make original flowerpots with your own hands for the garden, and then install old pots with plants there. And the garden composition will be transformed!
Let's look at a few simple ideas for making your own flowerpots.
A simple flowerpot can be made from small mirror tiles, which are sold in hardware stores. For one product you will need 5 tiles and a glue gun.
Mirror tiles are used for wall cladding, but can also be used to make flowerpots
The first tile is laid on a flat surface (table) with the mirror side down - it will be the base of the flowerpot. The remaining 4 tiles are applied perpendicular to its sides and the joints are fastened with glue. After the glue has dried, place a pot with a plant in the flowerpot.
The mirror planter does not need additional decorations. It looks stylish in itself, and, thanks to its ability to reflect surrounding objects, it is not at all boring.

Mirrored flowerpots look stylish and expensive in any interior
Option #2 - wooden planter made of timber
This idea will certainly appeal to home woodworkers who know how to handle timber.
For an original hanging planter, you will need 24 bars 15-20 cm long. Laying them in a checkerboard pattern, they form a square box with through holes. The bars are connected with nails or self-tapping screws. Ropes are tied to the bars at the corners of the upper edge of the flowerpot and the homemade flowerpot is hung on any tree in the garden.

A wooden flowerpot, similar to a hanging swing, will “hold” a whole flowerbed with pansies (violas)
Option #3 - coconut pots
Exotic flower pots can be made from coconut shells. Blooming orchids will look especially harmonious in them.
To begin, cut the coconut. At one end of the nut, in the area of three dark “eyes,” holes are made with a knife. The juice is drained. Use a grinder to cut the nut crosswise. You can do this in the middle of the nut - then the output will be two flower pots. Or closer to the end, so that a deep flower pot is formed, looking like a pot-bellied vase.
After the coconut dries, cut off all the inner flesh with a knife. Closer to the upper edge of the pots, use a drill to make 3 holes for hanging. Rope, wire, chains or special metal hangers are threaded through the holes.

Coconut flowerpots can be left in their original form or varnished for durability
Option #4 - pots made of burlap (tarpaulin, felt)
Thick fabric, such as burlap, is perfect for making pots in a rustic country style. All you need to do is cut two pieces of fabric in the form of a semicircle or square, sew them together like a pocket and hang them on the fence. For hanging, you can use a strip of fabric sewn to the top edge of the flowerpot or wire threaded into the fabric.

Unpretentious garden annuals are planted in felt pots: petunias, calibrachoas, lobelias, etc.
Option #5 - vinyl planter made from a record
Vinyl planters were very popular during the era of Soviet shortages. Then they forgot about them - and in vain! It is impossible to find such unusual flowerpots with curved edges on sale. Therefore, after spending literally half an hour of time, you will find a truly original thing.

Planter made of gramophone record, decorated with acrylic paintings
Necessary materials:
- gramophone record;
- jar, pan - for molding;
- acrylic paints;
- Thick household gloves - to prevent burns.
Stages of making a vinyl planter:
- The plate is placed on a plate.
- A jar or pan of the same shape and diameter as the future pot is placed on top of the plate.
- Place the entire structure with the plate in a preheated oven for 1-2 minutes.
- The plate will very soon begin to soften and melt. As soon as this process becomes noticeable, the plate is taken out and by hand (remembering to wear gloves!) they begin to form the edges of the flowerpot around the jar installed in the center. If the workpiece begins to harden quickly, then it is placed in the oven again, softened and molding continues.
- While the plate is still soft, use a screwdriver to make 3 holes in the walls of the flower pot to install the suspension. Special pendants made of thin metal chains look the most beautiful in this quality.
- The finished cooled pot is painted with acrylic paints on the outside and, if desired, on the inside. When painting, you can do it yourself or use special templates for painting.
Option #6 - plant pots made of sticks or branches
This planter with the most natural appearance will fit harmoniously into the garden interior.

Flowerpots made of branches - an impressive design for any plastic pot
Materials used:
- branches or sticks;
- tight rope;
- sackcloth;
- glue;
- ready-made plastic pot.
Technology for making pots:
1. Even sticks, twigs, and stems of bamboo are cut into pieces of the same length - about 20 cm. The number of branches used depends on the diameter of the planned flowerpot.
2. The branches are tied together at the top and bottom to form a single web. They do it like this: tie a knot on the first branch, lay the next branch - again a knot. This continues until all the branches are connected together.
When creating a wooden canvas, two knots are tied on each branch
3. Wrap a strip of burlap onto the plastic pot you are using and secure it with a glue gun.
4. A wooden sheet of branches is wrapped around a pot with a plant, the ends of the ropes are tied along the edges of the sheet.
You can tie two bow knots made of thick twine on a wooden plant pot as decoration.
Option #7 - tin planter from a jar
Spectacular hanging planters for the garden can be made from completely waste material - old tin cans, for example, from canned food or drinks.

Metal tin can planter can be used as a garden vase for cut flowers
To make one such pot you will need:
- can;
- tight rope - 10 m;
- white primer-paint;
- acrylic colored paints.
Operating procedure:
1. Remove the label from the jar and clean off the glue.
2. Apply white primer paint to the surface of the can. It will cover the metallic color of the tin and will serve as protection against corrosion.

The jar is painted with a white primer
3. Cover the jar with several layers of colored paint, achieving a rich color. Each subsequent layer is applied after the previous one has completely dried.

Apply a layer of bright yellow paint
4. Make a decorative drawing - first draw its outlines with a marker. You can draw by hand or use paper stencils.

The stencil simplifies the execution of the planned drawing
5. The drawing is painted over with a bright color, preferably contrasting with the background. The contours can be additionally marked with a marker.

6. After the flowerpot is completely dry (1-2 days), a transparent varnish is applied to its surface.
7. The final touch is making a rope hanger. To do this, the rope is cut into 10 pieces of 1 m each. The entire pile of ropes at a distance of 15 cm from the edge is tied with one knot. This node will be located under the center of the bottom of the planter.
After this, adjacent ropes are tied in pairs so that the knots fall on the border of the bottom. In other words, if the diameter of the bottom of the jar is 16 cm, then the knots are tied at a distance of 8 cm from its center. At the height of the middle of the pot, adjacent ropes are again tied in pairs, and then again along the upper edge of the pot.
From above, all the ropes are tied into one large knot - the mesh suspension is ready. A tin pot is placed in it and the beauty is hung in the “had made” style on a tree branch, a nail nailed to the wall, etc.
Option #8 - swan pot made from a bottle and putty
A floor-mounted decorative flowerpot for the garden, not inferior in beauty to expensive ceramic products, can be made in a couple of days from available materials.

Swans made from putty - spectacular garden planter figures
To work you need to prepare:
- plastic bottle – 5 l;
- small pieces of reinforcing mesh;
- metal rod;
- starting putty (gypsum);
- water;
- bandage;
- oil paint;
- sand.
Step-by-step manufacturing instructions:
1. Cut off one side of the plastic bottle, screw the neck on with a lid.
2. Place the bottle on a flat surface and fill it with wet sand. They try to compact more sand to expand the internal capacity of the bottle.

Sand is poured into the bottle to fix the convex shape of the flowerpot.
3. Bend the rod in the shape of a two (swan neck) and secure it in the cork.

The swan's neck is made of a thick metal rod
4. Mix the putty in water, lay out a layer of thick solution on the work surface (previously covered with film). A bottle of sand is placed on the solution, and excess putty is pulled up with a spatula.
5. Form the beginning of the neck. To do this, a layer of putty is applied to the neck of the bottle and the beginning of the rod.

The beginning of the neck is formed with putty, smoothing the lines with a wet brush
6. A layer of solution is also placed on the walls of the bottle with a spatula, and the surface is leveled with a wet brush.

Putty is applied over the entire outer surface of the bottle, applying a layer of up to 2 cm
7. For the wings, use two meshes measuring 15x30 cm. They are slightly bent and fixed on the sides of the pots with putty.

To secure the mesh, it is better to use plaster instead of putty - it will harden much faster, literally in 5-10 minutes
8. After the mesh is glued, apply a “feather” of putty with wet hands.

The plumage is formed with short strokes on the putty surface
9. With wet hands, spread the solution around the rod, forming a neck.

10. As work progresses, wrap the rod with a wet bandage.

The bandage serves to additionally secure and fix the putty on the rod.
11. Make a tail from a small mesh, also covering it with putty.

It is also better to use a small amount of plaster to secure the ponytail.
12. Eliminate all defects: add putty where necessary, level the surfaces with a wet brush.

13. After the putty has dried (2-3 days), the surface is cleaned with sandpaper.
14. Apply a layer of primer to the pots for painting.
15. The swan is covered with white enamel, the beak and eyes are decorated with bright colors.

The final decorative appearance of the pots is obtained after covering the putty surfaces with enamel.
Option #9 - using the decoupage technique
Any clay, plastic or metal flowerpot can be changed beyond recognition by using the decoupage technique on it. This technique involves decorating household items with applications made from thin paper, most often from napkins. After varnishing, the texture of the appliqué visually merges with the surface of the product, becoming similar not to paper shreds, but to a beautiful hand-painted painting.

Decoupage technique allows an old pot to find new life
To make flowerpots using the decoupage technique you must have:
- flower pots - plastic, ceramic, metal;
- napkins with a pattern;
- PVA glue;
- clear nail polish;
- acrylic paints;
- brushes or foam sponges.
The process of decorating work:
1. Find a fragment you like on a napkin and carefully open it. It is necessary that the edges are as uneven as possible - then they will be invisible on the finished product.

Fragments from napkins must be torn off carefully so as not to damage the pattern.
2. Separate the top, thinnest layer from the cut fragment.
3. Dilute PVA glue in water in a ratio of 1:2.
4. Place the fragment on the surface of the flowerpot and apply the adhesive solution on top with a brush. Carefully straighten the fragment with your hands or a sponge and press it to the surface.

Instead of PVA glue, you can use special glue for decoupage to glue fragments
5. All other fragments are glued in a similar way to create an overall composition.

Floral motifs are the most popular when decorating flower pots using the decoupage technique.
6. After the glue has dried, you can add drawn elements to the composition. For example, add paint to an ornate pattern, sign the “work” with your name, or add a bright edging to a flowerpot.
7. At the end of the work, when the paint and glue are completely dry, the surface of the pots is coated with varnish in 2-3 layers.
If you are the owner of a private plot, you have probably at least once asked yourself the question: how to make original flower pots for the garden with your own hands, guided by ready-made projects and photos? You can make unusual decorative vases for flower pots yourself from scrap materials. In our master class we will look at several simple options for products, the production of which will take only a few hours of time.
Original street wicker flower pots.
Wooden flowerpots
Wooden flowerpots fit very harmoniously into the interior of the garden and harmonize with the greenery. Wooden flowerpots can be hanging or floor-mounted, for one small pot or for a whole group of plants. We'll look at some simple wood planter ideas that you'll need some special carpentry skills to create, just a hacksaw, hammer and nails.
From beams and boards
Many summer residents have ordinary boxes lying around idle that can be used to create flowerpots. For example, in the photo below, the boxes were sanded, painted in the desired shade and nailed together into a single structure.

A composition of several boxes fastened together.
If there are no ready-made boxes, making them will not be difficult. To do this you will need the following materials and tools:
- wooden beam with a section of 3*3 cm;
- nylon ropes;
- nails;
- hammer;
- hacksaw.
If you have a more advanced tool (a jigsaw, a screwdriver) and the skills to work with it, a hacksaw and hammer can be safely replaced. Step-by-step instruction:
- Create a drawing of the future box and decide on its dimensions. For one small pot, square boxes with a side size of 25 cm will be made.
- Cut the timber into 24 equal lengths of 25 cm.
- Build a base of 6 bars and connect them with cross bars. The distance between the bars should be the same, and the sides of the base should be equal.
- Next, attach the bars to the base one by one in a checkerboard pattern. Ultimately, there will be 4 bars on two opposite faces, and 5 bars on the other two faces.
- You need to fasten a rope at the top, place a pot with a plant inside and hang the flowerpot in the desired place.

Miniature wooden flowerpots for one pot with a plant.
Instead of a through box, you can build a solid one from wooden boards, as in the photo below:

Flowerpots in the form of a palisade.
To make it, you will need a board 1 cm thick and about 5 cm wide. For greater decorativeness, the tops of the boards are cut off in the form of a house roof, making the side of the box resemble a picket fence.
Sometimes whole boxes are used for planting seedlings or planting flowers, pouring soil directly into them. In this case, they cannot rightfully be called flowerpots, but this makes them look no less decorative.
If you plant plants directly in a box, be sure to lay insulating material on the bottom and sides, and make drainage holes at the bottom.
From twigs, twigs, bamboo
Outdoor flowerpots made from wooden branches look no less original and impressive. In just a couple of hours you can make such a beautiful decorative flowerpot:

Flower pots made of wooden twigs and twine.
For manufacturing, prepare materials and tools:
- wooden sticks or twigs (you can use bamboo);
- garden shears or pruning shears;
- twine;
- a piece of burlap;
- glue for fabric and plastic;
- flower pot.
Step-by-step instructions:


Step-by-step process for making flower pots from twigs.
It will take a little more time to create another flowerpot from twigs:

Wicker hanging pot made of twigs.
Materials and tools for manufacturing:
- an armful of thin willow or birch twigs;
- knitting wire;
- metal chain;
- decorative metal hooks;
- white paint and brush;
- wire cutters and pliers.
Step-by-step production of flower pots:

To hang the flowerpot from a support, you need to equip it with a metal chain that will be attached to the hooks.
Made from cement and burlap
A DIY flower pot made from cement and waste fabric is an excellent option for the street and garden. Such decorative vases are durable, can be easily decorated with acrylic paints, can withstand any adverse environmental conditions, and can be given any desired shape.

A bouquet of lilacs in a “cement” pot.
Required materials and tools:
- for concrete: sand, cement and crushed stone;
- water;
- cloth;
- plastic containers of any shape (for the frame).
Manufacturing process step by step:

If desired, a homemade flowerpot can be coated with paints of any shade for greater decorativeness.
To obtain a smoother and more uniform texture, instead of water, the solution can be crushed with 15% silicate glue (can be purchased at any hardware store). The finished product can be sanded with a large mesh for sanding the putty.

Pots of various shapes made of mortar and cloth.
Knitted flower pots
You can decorate your garden and plot using flower pots, created with your own hands using the macrame technique according to ready-made patterns. To make flowerpots, you don’t need to have any weaving experience or even buy threads. You can create an original decoration for a flower pot from unwanted T-shirts.

Planters made from old T-shirts.
Materials for production:
- a piece of knitted fabric (unnecessary old things);
- hook screw;
- scissors;
- measuring tape or ruler;
- ceramic or plastic flower pot.

Necessary materials for work.
Manufacturing process:

A more complex and sophisticated version of the product can be woven according to the pattern.

Flower pots made using the macrame technique.
For production you will need a minimum of materials: white nylon thread (a universal option for flowerpots of any type), scissors, narrow tape.
Step by step process:


Type of finished product.
To make it more decorative, the “tail” can be made longer, and when weaving, the threads can be decorated with ceramic and wooden beads, buttons, and stones. The plant pot will look more stylish with fringe and tassels.
Unusual uses for everyday things
You can give old household items a second life by using them as flowerpots for a flowerpot. What can be used to make flowerpots:
- Old dishes (teapots, mugs, pots and other deep containers).
- Unnecessary baskets, suitcases, wallets.
- Plastic bottles, sprinklers.
- Containers for storing food (tin cans and containers, buckets).
- Old shoes.
Let's consider the listed options in more detail.
Knocked, scratched, or warped kitchen utensils can make excellent decorative and functional elements in the garden. For example, in the photo below you can see how harmoniously a similar set of cups and a teapot looks in the garden.

Flower pots made from old teapots and cups.
Old shoes can also serve as a decorative flower pot. You can use any shoes: boots, shoes, sneakers and sneakers, rubber and leather boots. The composition will look more original if the shoes are tightly covered with paint in a contrasting shade (for example, gold or silver). Among flowers, preference should be given to bright, low-growing perennials.

Original use of old boots.
Old baskets can be used either as a hanging method, attaching them to a support using nylon threads or a chain and a hook, or simply placed along the paths or nearby on the site.

Low-growing wildflowers look harmonious in an old basket.
Old buckets can be safely used to create an original composition. Bucket pots are most harmonious with wildflowers, elegant flowers, but for more sophisticated flowers (roses, lilies, etc.) such pots are unlikely to be suitable.

Using old buckets as stands for flowerpots.
You can make very interesting compositions from tin cans (tin cans, beer cans, etc.). The advantage is that the products can be decorated in any way: painted, painted with patterns and ornaments, processed using the decoupage technique, decorated with ribbons and ropes.

Wall composition made of painted tin cans.
We looked at how to make hanging and floor flower pots for the garden with our own hands, guided by photos and manufacturing diagrams. To decorate your space, you don’t have to spend money on expensive decorative items, because homemade items often look more advantageous than store-bought ones, and save a lot on your budget!
You can get more ideas for creating garden planters from the following video:
One of the effective ways to decorate a summer cottage or garden plot is to use garden pots. They can not only harmoniously fit into the surrounding exterior, but also complement it, giving it completeness. Moreover, it is not at all necessary to buy these decorative elements, since you can make garden flower pots with your own hands; in fact, this article is devoted to this topic.
Making garden pots
There are many options for making flower garden pots. Next, we will consider the most interesting of them. This will allow you to create products suitable for different landscape styles.

Pots and flowerpots from boxes
The easiest way to make flower pots for the garden with your own hands is from wooden boxes. Moreover, you can plant fairly large plants in them.
If there is no box of a suitable size on the farm, you can put it together yourself. To do this you will need the following materials:
The instructions for making such a box are extremely simple:
- First of all, you need to make two side panels of the same size.. Each sidewall is based on two rack beams, which are connected to each other by transverse boards.
- After this you need to connect the sides with boards.
- Then you need to complete the bottom. For these purposes, you can take thicker boards.
- As legs, two bars can be attached to the bottom of the box from the outside, which should be located across the boards.
- After this, all that remains is to open the box with varnish or paint and decorate. For example, forged handles will look great, especially if the boards are tinted to look like oak.
Advice!
Before you start making the box, you need to treat all wooden parts with an antiseptic, which will protect the wood from rotting.

Flowerpot from a bucket
There will definitely be a couple of old leaky buckets at your dacha. They can also become material for a future flowerpot. Moreover, if you approach the process creatively, it can look very nice.
So, a similar flowerpot is made as follows:
- First of all, you need to clean the bucket of dirt and rust, if any.
- Next you need to decorate the container. The easiest way is to paint the product in cheerful colors, however, you can use more complex options that your imagination suggests.
- After this, the bucket must be placed in a permanent place, for example, on. The lower part can even be buried.
- Next, the container needs to be filled with substrate, after which flowers or other plants should be planted in it.
The price of such a flowerpot will be minimal, and it can look very interesting.

Pipe pots
Flower pots made of plastic or metal pipes look very original and unusual. To do this, the pipes are positioned horizontally and holes are cut into them, into which soil is poured and flowers are planted.
Such a pipe can be suspended above the ground or, for example, laid along paths, thus creating a flower garden-hedge. You can also lay several pipes of different sizes in a row, which will allow you to get a cute flower bed.
To give the pipes a more decorative look, they should be painted in the colors you like.

Pots made from plastic bottles in the shape of piglets
If you approach the design of your garden or dacha plot with some humor, you can decorate it with cute flower pots in the shape of piglets.
Moreover, it is not at all difficult to do this:
- First of all, you need to prepare plastic bottles with a volume of 5 - 10 liters and cut out the side of them for planting.
- Next, the workpiece needs to be painted pink. In the part with the neck you need to draw eyes, and paint the lid in the form of a “piglet”.
- By cutting off ordinary plastic bottles, you can make ears.
- After this, you need to pour soil into the pots and plant plants in them.
Using these products you can decorate a flower bed.

Pots and flowerpots made from car tires
There are many options for making flowerpots and pots from car tires. Moreover, they can look very interesting and original.
The use of large tires, for example, from trucks, allows you to create even quite large flowerpots that can be used not only for flowers, but also for ornamental shrubs.

The simplest option for making such flowerpots is to lay several tires on top of each other and paint them in suitable colors. If you spend a little effort and time, you can get more interesting product options.
As an example, consider making a flowerpot:
- In one side of the tire you need to cut out triangles or semicircles that will serve as petals.
- Then the tire needs to be put on the car rim and turned inside out. The disk will serve as a stand for the flowerpot.
- After this, you should fix the tire on the rim. It is best to weld several metal stops that will prevent the tire from falling down.
- Then the product should be painted in suitable colors.
- To complete the work, you need to pour soil into the resulting product and plant flowers there.
In addition, there are many other options for using tires for these purposes. For example, with their help you can make a flowerpot in the form of a cup or other figures.
Advice!
Garden crafts made from flower pots look very interesting.
With their help, you can make a variety of garden figures, in which you can also plant plants.

Pots made from wicker baskets
It’s a pity to use new wicker baskets for flower pots; besides, they are very expensive. However, you can often find dilapidated baskets on the farm, which can become an excellent decorative container for a flower.
You can decorate the gazebo with baskets of flowers or even make separate pedestals for them. The only thing is that it is better to plant plants in such pots that do not require frequent watering, which will extend the life of the product. In addition, the basket itself should first be treated with an antiseptic to prevent it from rotting.

In the photo - a pot from an old kettle
Pots from old dishes
Surely everyone on their property has old bowls, teapots and other utensils that are no longer used for their intended purpose. If you approach its design creatively, it can turn into original pots.
Moreover, old dishes can be combined with old furniture to achieve an interesting effect. For example, an old bowl of flowers can be placed on a wooden chair. True, it should be decorated in an appropriate style, for example, rustic.
You can also experiment with other unwanted items and give them a second life as flower garden pots.
Conclusion
We looked at several of the most common and interesting options for making flower pots for the garden. You can choose the most suitable ones from them, for example, if you need large garden pots, then products made from tires would be an excellent solution. In addition, on our construction portal you can find some other options for making garden pots and flowerpots.
You can get more information on this topic from the video in this article.


It is known that little things made by hand give a home a special charm; many can tell about the tastes, habits and hobbies of the owner. And one of these individual features of your home can be flower pots made by you yourself.
In addition, each of your green pets has its own character, requirements for planting and care conditions, and a pot made according to an “individual project” can fully satisfy both your aesthetic tastes and the urgent needs of the plant.
Making your own flower pots
Clay pots
Clay is considered a traditional material for making flower pots. And, of course, you can buy a clay pot in a store without any problems.
But it's possible make it yourself, even without a pottery wheel at hand.
To make it you will need:
- clay;
- oven for firing the finished product.
Before starting work, knead the clay thoroughly until smooth.
Separating a small part from the total mass, form a ball and, flattening it, give the shape of a round disk. You have the base of the pot ready.
Form a rope with a diameter of about 0.5 cm and a length equal to the diameter of the bottom. Strengthen the rope on the bottom and start making the next one. This way you will form a clay pot of the size you need.
Leave the finished work to dry for a couple of days, after which the product must be fired.
 Don't know how to do it correctly? We'll tell you!
The basic conditions for proper propagation of hyacinths are described; do not neglect them if you want to grow a healthy and beautiful plant.
Cement pot
This product will not only be original, but also durable.
To work you will need:
- several bricks;
- cement;
- sand;
- two plastic containers, different in volume;
- In addition, you will need a hammer drill and an old basin or pan in which you will mix the solution.
 Prepared Grease clean containers with oil(can be plant-based): smaller in volume - on the outside, larger - on the inside. This way you will protect them from excessive sticking of the solution.
Prepare a mixture of sand, cement and water. Place the finished solution in a larger container, and place a smaller piece inside. The greater the difference between the volumes of these vessels, the thicker the walls of your pot will be.
Place bricks or other weights inside a small container. The cement mortar must dry within 2 days. After this, cut the plastic containers and free your product from them.
In this way you can make quite large flowerpots. Small pots made in this way will look rather bulky, but, nevertheless, also original.
If desired, such a pot, after drying, can be painted with acrylic paints or decorated in another way.
Plaster pot

The procedure for making a pot from gypsum is similar to cement technology. Only other ingredients will be needed:
- gypsum;
- water;
- two plastic containers of different sizes.
We take a larger container, lubricate the inside with oil, place a smaller container inside, lubricated with oil on the outside, set the desired level and fill in the plaster, having previously made a solution in a 2:1 ratio.
To have a more complete idea, I recommend watching the video of this process below; in addition, at the end of the video they will show how to decorate such a pot using the decoupage technique.
Wicker pot
 If you are a fan of eco-style, you can try to weave a flower pot from twigs. The process is quite labor-intensive, but the result will undoubtedly please you.
You'll need:
- twigs, preferably even;
- a piece of burlap;
- strong twine;
- glue;
- base container in the form of a cylinder.
Trim the twigs so that their length is slightly longer than the height of the base container.
Use twine to tie the twigs together to create a solid “canvas” that you could use to wrap the cylindrical base. Cover the base with a piece of burlap, and place the resulting structure of twigs on top. Secure with twine. If instead of twine you take a bright jute cord, your product will turn out more elegant.
Mosaic pot
 Pots made using the mosaic technique are beautiful and original..
As a “mosaic” you can use small pebbles, shells, fragments of porcelain or dishes, or colored glass.
In this way, you can decorate both small pots and large vases.
To work, in addition to the “mosaic”, you will need:
- tin base (this can be either an empty tin can or a tin bucket);
- plaster;
- mounting mesh;
- grout for tiles.
Cover the tin with plaster, and then wrap it with mounting mesh, “drowning” it into the plaster mixture. Next, lay out the entire surface of the future pot (excluding the bottom) with the prepared “mosaic”. After this, leave your product to dry completely.
Finally, treat the surface with tile grout. to make the pot smooth and eliminate cracks and the gaps between the pieces of the “mosaic”.
Remove any remaining grout from the surface with a soft cloth.
Pot made from a piece of wood
 Original floor flowerpot can come from a small old stump, and from a piece of a fairly thick branch you can make a smaller pot.
To make such a “house for flowers,” remove the core from the tree, clean the inside and sand it.
If desired, you can free the stump from the bark or leave it in its “natural” form. In any case, coat the top of the product with several layers of wood varnish.
After complete drying, the new pot can be used for its intended purpose.
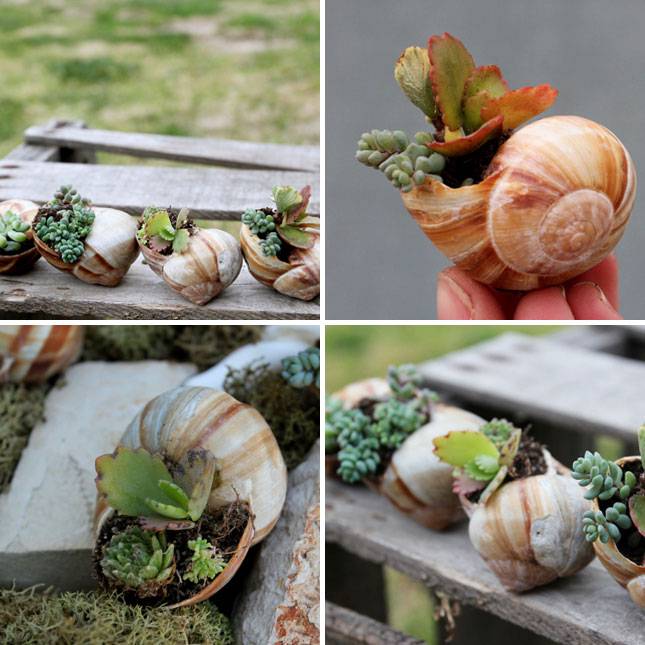
Coconut shell planter
 Coconut shells serve as an excellent container for plants that do not need frequent watering.
Hanging plants will look good in it.
Making such a design is quite simple: cut a coconut in half, extract the flesh, then drill holes in the bottom for drainage, and holes at the edges in order to thread a cord or chain through them.
Place expanded clay on the bottom, and place the substrate on top - the pot is ready!
Felt pot
 Felt products are now at the height of fashion. Why not give your favorite flowers a felt “nest”?
Take pieces of felt, ready-made or felted yourself, cut out the details of the future pot and sew them together! In such an unusual pot, plants will feel very comfortable.
Mini cactus garden
 Unusual containers for planting cacti and other slow-growing types of indoor plants can be made from wine corks.
To do this, the core of natural cork is removed with a knife. The mini-pot is filled with soil.
On one side, using a heat gun, a magnet is attached to it, powerful enough to hold the weight of the “pot” with the plant.
Such mini-containers can be attached to any metal surface, for example, to a refrigerator door, forming entire flower arrangements.
Other ideas for unusual homemade pots
- If you are a fan of high-tech style and you still have unnecessary computer floppy disks, you can build original flower pots from them. By the way, they are perfect for growing violets and other small plants.
- By gluing together 5 square mirrors of the same size or 5 ceramic tiles, you will get an easy-to-make, but stylish and original flower pot.
- Pots can be made from old vinyl records. If a vinyl disc is heated, it becomes soft and pliable, easily taking on the most unimaginable shapes.
Using old things
Sometimes The most unexpected objects can serve as flower pots. Thus, porcelain, earthenware and earthenware can turn into excellent containers for planting indoor plants. Cups, deep salad bowls, teapots with flowers planted in them will enliven a country or Provence style interior.
Enameled dishes are also suitable for planting flowers. But this is more of an option for a country house.
By the way, if you couldn’t find a suitable pot for bonsai, an elegant salad bowl is perfect for this. You just need to carefully make drainage holes in the bottom using a drill.
Sometimes the most unexpected things can turn into flower pots. For example, an old cosmetic bag can also serve as a container for planting flowers.
Decorating finished flower pots. How to decorate a pot with your own hands?
To create a flower pot with an unusual design, you don’t have to make it from scratch. You can take ordinary standard pots as a basis and decorate it yourself and according to your own taste.
By painting a clay pot with acrylic paints and varnishing it, you will get a real designer item. By the way, you can entrust such work to a child - and the image on the finished product will delight you with its sweet spontaneity.
You can decorate ordinary plastic pots by simply covering them with bright scraps of fabric. Or you can crochet “clothes” for a standard pot - such containers will add special coziness to your home.
 By covering the whole or part of the pot with braid, twine, lace or simply bright threads, winding them around the container, you will get an original and stylish decoration for your home.
You can decorate an ordinary pot with buttons, shells, coffee beans, cereals or beads.
Even eggshells are used to decorate pots. It must first be treated with a soda solution and dried. The prepared shell is glued to the surface of the pot using PVA glue, gently pressing down in the process so that it cracks. Next, the surface of the pot is covered with ink, which fills the voids between the pieces of shells. After this, the surface of the pot is wiped with a cloth and varnished.
Regular plastic pot can be decorated using decoupage technique using PVA glue and a paper napkin with a design you like. The design is cut out and glued to the surface of the pot, carefully leveling it so that wrinkles do not form. After drying, the finished picture is coated with varnish.
Other photo ideas for flower pot design


Using the tips above, you can create a truly unique pot at home, as well as decorate and decorate it with your own hands.
Flower pots can be made from the most unexpected materials: old newspapers, unnecessary cages, bottles, twigs, pencils, rags and other improvised means.
What should I plant flowers in?
Before we tell you how to make flowerpots, it’s worth telling why they are needed at all. Home flowers grow best in clay pots. But, unfortunately, they cannot retain their original appearance for long. A plaque appears on the outer walls that cannot be washed off. Place these pots with your own hands in a beautiful flowerpot and see how the flower is transformed.
When choosing a pot, buy one that is 1–4 cm wider and 5 cm higher than the pot. Garden frames for flower containers should be designed for open ground.
Some plants can be planted directly in a pot, but then you need to add drainage to the bottom. In this case, you will save on the pot.
Here are the materials from which pots and flower pots can be made, either with your own hands or purchased, from:
- clay;
- ceramics;
- metal;
- wood;
- glass;
- plastics.
- threads;
- vines;
- fiberglass.
- Clay pots have an untreated rough or smooth surface. Sometimes it is decorated with sculpting or painting. But such products are only suitable for indoor use; they allow water to pass through, so they are not suitable for the garden.
- Ceramic pots and flowerpots are treated with glaze. It decorates such products and allows them to keep water out. These containers are suitable for home and garden design.
- Metal flower containers have a modern look and will look great in a room decorated in a high-tech style.
- Wooden containers are made of environmentally friendly material and serve as excellent protection for flower roots from hypothermia and drying out.
- Glass ones have a modern look and look beautiful in the interior. Since they are transparent, it is convenient to monitor the water level (for example, when watering orchids).
- Plastic - lightweight, frost-resistant, not afraid of corrosion, easy to clean. Orchids, whose roots cannot tolerate many materials, grow well in such containers.
Planter made from old bird cages

An old birdcage will make a wonderful flower pot. If you feel sorry to throw away this item, but the bird no longer lives there, turn the cage into a home art object. First, wash it, dry it, then arm yourself with this:
- acrylic paint of the desired color;
- brush;
- gloves.
To get less dirty with paint, start covering the rods from the inside first, then from the outside. Choose a shade that blends in with your surroundings.
Paint inside through the bird door. If the cage is collapsible, lay it out and cover its individual elements with tone. After the paint has dried, place 1-3 flower pots inside, preferably with young vines. When they grow up, they will beautifully wrap themselves around the cage, clinging to the bars.
See what interesting and unusual materials you can use to make a flowerpot and a large plant pot to place in your winter garden or dacha.
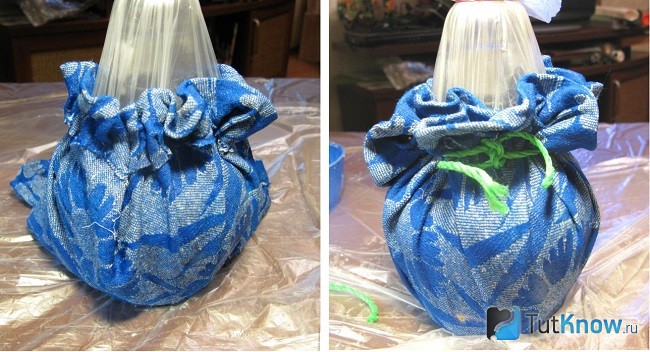
Flower pots made from old things

It’s not so easy to guess that these flower pots are made from old rags. Here's what you'll need for this unusual craft:
- unnecessary rags or burlap;
- cement;
- water;
- latex gloves;
- capacity.
When the rag soaked in the solution is dry, turn it over.

Pour some expanded clay inside, then soil and plant the plant.

If you want to make a pot for home flowers, then take a small container. For a garden planter, this could be, for example, a 10-liter bucket.

Look how beautiful products made from burlap look (photo below left). The top of these pots was decorated with fabric flowers. If you have unnecessary openwork fabric, you can use it to make small and large pots and place them in the garden. Leave them as is or paint them.
Give a second life to old things, show your imagination by taking:
- canvas;
- PVA glue;
- water;
- plastic bag;
- acrylic paints;
- rope;
- acrylic lacquer;
- basin;
- brushes;
- a shaped plastic bottle or other container.
Place the fabric in the solution, remember it and wring it out several times.

Place the bottle in a plastic bag on a cloth soaked in adhesive solution (in its center). Fold over the edges, tie with string, and let dry. If the bottle is narrow, wrap it in newspaper, tie it, and put a bag on top.

If you want to make a flower pot for an existing pot, also wrap some newspaper around it, but not much, and put a bag on top and tie it.
To make flower pots further, fold the edges of the fabric up with your own hands, covering the side seam with a fold. They need to be made around the entire container, tying the fabric with a string.
Place the workpiece in a warm place until completely dry. It is better to place it near the radiator or periodically dry the future decor item with a hairdryer.
Without removing the bottle, paint the pot in any color, adding PVA to the paint for greater strength.

When this layer has dried well, remove the bottle from the container you made by untying the rope. Paint the outside of the planter with 2-4 coats of paint. When it dries, then apply varnish 2-3 times. You can put a pot with a plant in a flowerpot or make an inlay of artificial flowers.

And if you want to place a tree of happiness there, then pour plaster inside the container, place its trunk, and leave it like that until the solution dries.

Here are 2 more ideas on how to extend the life of old things. You can renew the pot by simply wrapping a cloth soaked in cement mortar around it. Drape it as you wish and leave it on the pot after drying.

You can cut old things into strips and weave them into braids like this.

Apply PVA generously to the pot. Starting at the top, wrap the outside of the container in a spiral. In this case, the turns should fit tightly to each other.
Flowerpots for the garden made of wood
You can plant flowers in these at the dacha, and they will feel great. The excess water will go away, and the soil will warm up enough for the roots to feel comfortable. But it is better to place them where there are no cross winds or drafts.
Plant an ordinary indoor geranium in such a large pot, and soon you will not recognize it, since it will be completely covered with inflorescences.
Make such a flowerpot from leftover building materials, taking:
- bars;
- boards;
- antiseptic impregnation;
- wood varnish;
- hammer or screwdriver;
- screws or nails.

Craftsmen can make a large wooden pot like this or something similar and create a fairy-tale corner for children in their dacha.

Other flowerpots also look beautiful; use bamboo sticks and branches for them. To make flower pots from the first material, take
- bamboo sticks;
- jigsaw;
- thick twine;
- scissors;
- measuring tape.
Fold it in half, place the first stick in the resulting loop, twist this part of the twine in a figure eight, place the second piece of bamboo in the second loop.

Decorate the entire pot in this way, also connect the lower ends of the sticks, secure the twine to the first and last bamboo. This is how beautiful flowerpots for outdoor or indoor flowers are made.

You can make your own flower pots from branches. If they have leaves, tear them off. Trim the bottom of the branches so that it is even on this side. Attach the blanks to the pot, wrap them with an elastic band or a beautiful rope.

We decorate plastic and clay pots with our own hands
There are many ways to do this kind of crafting. If you have an old plastic pot of sufficient size or a bucket of the same material, use a heated knife to make several round holes in it, pour soil inside, and plant flower seedlings.
To prevent the soil from spilling out, first fill the container with soil to the first holes, plant the seedlings, then fill it to the second holes, plant flowers. So design the container higher and higher.
Look how beautiful the flowers look, including ampelous petunia, in such a pot. To hang it, use special fasteners or weave using the art of macrame plant pots and hang the pot. You can tie several metal chains with wire and hang a flower container from them.

Photos of flower pots will help you see the idea in action. You can decorate plastic containers not only with the plants themselves, but also in other ways. Try crackle. This method allows you to artificially age a thing. Craquelure varnishes are used for it. We will achieve this effect by decorating old plastic pots with our own hands, using eggshells.
Here's what you'll need to transform your flower container:
- boiled egg shells;
- acrylic paint;
- baking soda;
- mascara;
- sheets of paper.

If you use white or beige shells, then cover the pot with dark acrylic paint; this tone will highlight the mosaic elements.
- Remove the inner film from the shells of boiled eggs and rinse.
- Prepare a soda solution. Degrease the shells in this liquid and dry them. If you want to color it, do this procedure at this stage.
- Spread PVA on the surface of the pot, attach several shells to one area with the convex side up, cover with paper, press lightly. Then the shells will separate into smaller fragments and stick together.
- After holding this for a few seconds, move on to the next section. If you want the crackle cracks to be wider, then move the shells apart a little.
- Cover the work with ink, wait until it penetrates the design, then wipe off the excess with a slightly damp cloth. The mascara will remain only in the cracks, the shell will not change color.
- Finish the planter with varnish to seal the mosaic and make it durable.
For work we take:
- pot;
- alcohol-containing liquid;
- sandpaper - grit 70 and 100;
- moisture-resistant putty;
- marsh color acrylic paint;
- brush.
- Degrease the outside of the pot with an alcohol-containing liquid, then go over this surface with sandpaper.
- Cover the pot with putty and let it dry.
- Apply marsh-colored paint on top of this layer. When it's dry, sand it with 100-grit sandpaper.

And here is what happens as a result.

There are other visual aids for you as well. See how natural materials transform plastic flower pots.

After a forest walk, bring bark (from a dry tree), moss, and pine cones. Cut a piece of birch bark of a suitable size, wrap it around the containers, and secure it by tying it with twine.
And you need to dry the moss, glue it and the cones to the surface of a pot well greased with PVA.
If you want to transform white flower pots, take just:
- containers for flowers;
- PVA glue;
- twine;
- brush.

If you want to update the container for flowers, this can be done even with ordinary pencils. Cover the pot with them around the area, placing them vertically and placing the rubber bands facing up. All that remains is to decorate with a bow and place the new piece of furniture in place.

If you want to decorate a pot in an oriental style, you will definitely like the following idea. The already familiar craquelure technique was used for it.

Here's what you need to get creative:
- flower pot;
- eggshells;
- acetone;
- silver, white and black acrylic paint;
- toothpick;
- PVA glue;
Here's what the most suitable ones mean:

Draw hieroglyphs in the central part of the pot in a circle. Decorate the distance between them, as well as the top of the pot, with shells pre-painted with black paint.
To increase the distance between the mosaic pieces, push them apart with a toothpick. She will give them the desired location.
Decorate the bottom of the container with light shells. After painting with 2-3 layers of varnish, decorating the polka dots is complete.

The scope for this creativity is immense. In the second article we will continue this interesting and necessary topic. In the meantime, here is a selection of wonderful ideas for you that will help you decorate flowerpots or make them yourself: