How to make a wooden terrace with your own hands. How to attach a veranda to a country house: step-by-step, first-hand instructions Do-it-yourself timber terrace frame
Read also
A veranda is an extension option, a logical continuation of a country house. A veranda built using frame technology can become a comfortable place to relax, be used as a vestibule or additional storage space. A decorated or glazed veranda is a decoration for a low-rise building, giving it a unique style.
Advantages of a frame veranda
A frame veranda can be erected in the shortest possible time and has the following advantages:
- creation of additional multifunctional space;
- strengthening walls;
- improving sound insulation of main rooms;
- maintaining heat in the house;
- ergonomic appearance.
The veranda can be used as an entrance hall, living room, summer kitchen, or greenhouse. It can be divided into several zones, for example for relaxation and storage of garden tools, etc.
What types of frame verandas are there?
The appearance and purpose of a frame veranda make it possible to implement the most innovative design solutions. In shape they can be either classic rectangular, square, or radial, L- and U-shaped, polygonal, etc. Like verandas made of other materials, frame structures can be:
- open, in which the roof is supported by support beams, and one or more walls are missing;
- closed, which is a space completely enclosed by walls or glazing.
Verandas are also distinguished by the material from which they are built. The best option is a frame veranda made of timber. This structure is perfect not only for a log house, but also for a cottage made of brick, foam blocks, and silicate. In terms of environmental friendliness and ease of construction, a wooden frame veranda has no equal. The only condition is that the wood used for construction must be treated with effective fire and bioprotection.
Designing a frame veranda
Ideally, a frame veranda should be included in the project at the development stage. This will allow you to immediately make the foundation of the required area, preserve the landscaping of the area and reduce the cost of the extension. But it’s okay if you decide to build a veranda a few years after using the house.
When developing a project for a future frame veranda, you first need to decide on its location. In most cases, the structure is located on the front side of the house, replacing the porch. You can also make a veranda at the end or build an L-shaped extension along two walls of the house.
When designing, the following are determined:
- Dimensions of the veranda. The standard width is 2.5-3 m, but you can make a mini-veranda or vice versa - a large room that can accommodate a summer kitchen and a relaxation area.
- Foundation type. To build an extension, non-buried or shallow-buried strip foundations, as well as columnar foundations, are used. The choice of foundation type depends on the hydrogeological characteristics of the site and the type of existing foundation under the cottage.
- Filling the walls. If we are not talking about an open veranda, then lightweight, environmentally friendly material is chosen to fill the walls, such as lining or OSB boards. Glass or mirror walls, which can be combined with other materials, look impressive.
- Roofing covering. The best option is to make the roof from the same material as the roof of the house. In this case, the veranda will fit ergonomically into the architecture of the building. However, any other material can be used to cover the extension: inexpensive slate or ondulin, soft tiles, etc.

The veranda must withstand all the loads planned on it. When developing the project it is envisaged:
- joint work of frame racks and ceilings;
- arrangement of stiffening walls;
- installation of special spacers;
- reliable fastening of all components.
Particular attention is paid to creating a reliable connection between the veranda and the house.
Foundation for a frame veranda
Frame structures are installed vertically on the lower frame and are united by the top frame. Additionally, at a height of 1-1.5 m from the bottom point, a number of horizontal beams are installed that connect the frame, giving it strength and stability. The height of the veranda depends on the height of the ceilings in the house. When installing the frame, it is important to position it so that the roof is sloped. The correct installation of frame supports should be checked at the building level.
The cutting of supports is usually carried out using the “direct lock in 1/2 wood” method. Making high-quality connections of horizontal and vertical elements to create a strong and safe structure is a responsible task that only a qualified specialist can do. The joints are reinforced with bolts, angles, screws and other fasteners provided for in the project. To prevent deformation and shifting of the frame, it is attached to the foundation elements using anchors or clamps.

To connect the frame veranda to the house, exhaust floor beams or parts of the rafter system are used. After assembling the frame, the walls are filled, hydro- and thermal insulation is carried out, and the finishing is applied.
Frame veranda roof
The role of the Mauerlat in a frame veranda is performed by the top frame, on which layered or hanging rafters are installed. The roof of the veranda can be single- or double-sloped. When installing a pitched roof, it is necessary to make such a slope that will allow precipitation not to accumulate on the roof surface.
The same material is used as roofing as for the roof of the house. Also, the veranda roof can be covered with lightweight and durable polycarbonate. The roof is attached to a pre-installed sheathing. Elements of a drainage system should be installed on the roof of the veranda. They must be connected to the house's drain for effective water drainage.
Decorative finishing of the veranda
The optimal option for making the walls of a frame veranda: the bottom is covered with OSB boards or other wood materials, and the top is glazed.
When installing high panoramic windows, a lot of sunlight will fall on the veranda. This option will allow you to equip a greenhouse or winter garden.

The frame veranda should be in harmony with the appearance of the house. Decorating the veranda depends only on the owner’s imagination! Wooden carved posts and railings coated with varnish or paint will be an excellent exclusive decoration. You can order carved balusters or make them yourself. There are a lot of options for decorating a veranda, so it is recommended to consider different styles and trends and choose what you like best.
You can also use different materials to finish the floor of a frame veranda. The most ergonomic solution is a terrace board. High-end laminate can be used from inexpensive materials.
Heated frame veranda
You can turn your veranda into a full-fledged room that can be used all year round with proper heating arrangements. As a rule, the heating system of the house does not allow placing additional radiators on the veranda. In this case, you can install a small wood or solid fuel stove, if the space allows.

Also, a heated veranda requires high-quality insulation of the walls, roof and floor. Mineral wool is used as insulation, meeting all environmental and fire safety requirements. It is better to use triple-glazed windows for such a veranda to prevent heat loss.
The cost of arranging a heated veranda is much higher than a regular one, but you will get a full-fledged room that can be used as a hall, dining room or recreation room.
A veranda in a private house is a covered terrace, which is often added to the house with your own hands. It is located along the main wall and is a room without heating, for a pleasant pastime in the summer season. You can often find modern terraces with glazing; you can stay in them in any weather. When making it with your own hands, it is necessary to respect the overall ensemble of a country house or country house, maintain a uniform style and use the same materials in construction.
In a country house from logs it is better to make a summer log-shaped terrace located next to the main building. The construction of a veranda in wooden log houses is often carried out together with the construction of the main house and its roof smoothly transitions into the roof of the extension, which has a wall adjacent to the house; a single roofing material is used. In this article we will go through step by step the main points of building two types of terraces: open or closed, with our own hands.
General provisions for constructing a veranda
Modern construction of country houses and country cottages at the design stage involves the construction of a veranda for the house. In order to save money, customers remove the process of constructing extensions in order to further complete it with their own hands. Let's consider the main points that you need to pay attention to from the generalized experience of building terraces yourself.
Parameters by which verandas differ:
- How is it located in relation to the house: corner construction, at the end or along the facade of the house.
- Degree of protection: open or closed (glazed) extension. Using modern materials, you can turn a closed veranda into an open one; this is achieved with sliding doors.
- What type of construction is it made of: built-in - a common foundation with the house or attached - its own foundation.
- Construction shape: rectangle, semicircle, polygon.
Veranda project
We must not forget, when designing an extension to a house, that its purpose is to improve the performance of the main structure: make it spacious, add beauty, comfort. A closed terrace also has the function of improving the thermal performance of the house. For the correct construction of the summer extension structure, you must follow the rules that are indicated in the developed project.
What does the project consist of:
- We determine where in the main house we will add a veranda. The main aspect is maintaining the aesthetic perception of the entire architecture of your own home together with the veranda. Important! Experts recommend setting up a veranda in regions with high summer temperatures on the western or eastern side of the main house. It will be less exposed to direct sunlight.
- It is necessary to indicate the location of the entrance to the terrace (veranda). The entrance from the outside and the entrance from the house are indicated. You can make a through passage through the veranda when the door to the house is opposite the entrance to the veranda; this method is not recommended, as there is a risk of drafts.
- We select the type of doors and their installation location.
- We determine the total size of the summer room located along the house. The length is often taken equal to the length of the wall along which the veranda is built. The width is usually taken in the range from 3 meters to 7 meters, the main thing is to maintain the proportion. When choosing the dimensions of the veranda, we relate them to the overall dimensions of the house in order to maintain a single ensemble of the exterior of the building.
A good example of building a veranda with your own hands, when the design is done at the design stage of the entire house.
Let's go through step-by-step construction of a veranda in a wooden house with our own hands. It should be noted that an extension to the house can only begin after it has completely settled. Log houses, or those made of timber, are actively shrinking over the course of three years; during this period it is better not to build an extension, otherwise the walls may warp. For those who don't want to wait, experienced builders recommend building a transitional porch structure with the house that allows the frame to play.
How to start construction?
Home reconstruction must be reflected in permitting documents. To obtain these permits, you must contact the regional architecture department and submit the following documents:
- The right to own a plot of land (the land on which the house stands).
- Design documentation of the main structure.
- Written consent of all registered residents in the house for reconstruction and addition of a veranda.
- Application from the developer for registration of an extension.
It is advisable to start drawing up documents for a construction permit 3-4 months before the start of work. From the general experience of private developers, this is a lengthy procedure.
You can build an extension without permits, but in this case problems may arise when the house becomes an inheritance or you want to sell it. The reason is the change in the total area of the house, since the veranda is part of it, and the total area of the residential building is taken into account with it. The BTI department may view this as an unauthorized decision to increase the area for housing. This is especially true when the terrace is closed and heated.
There is no need to get carried away and make deviations in the dimensions of the terrace, which are indicated in the project. A simple check will easily reveal this, and a fine will follow with adjustments to the documentation. For what unauthorized developers can expect to add verandas to the house specified in the law of the Russian Federation.
Preparing for construction, choosing material
After determining the construction site of the veranda, it must be prepared. The construction site begins along the selected wall, so before starting all work you need to:

What tools and materials will we need?
When making a wooden extension with your own hands, Tool you will need:
- Having construction skills you need: a hacksaw, an ax.
- Power tools: sledgehammer, hammer.
- Marking: tape measure, plumb line, level, marking cord, corner.
- For the foundation: shovel
If a metal frame is being made, a welding unit and a grinder with a disk for cutting metal are additionally prepared. This type of frame is considered the most economical for building an extension.
It will look better brick veranda or wooden. Important! Make sure that the materials of the extension and the main house match.
A wooden summer extension requires the following material:
- Lumber: beams, logs, boards, slats.
- Elements of wooden fasteners.
- Mixtures that perform protective functions for wood.
- Construction material: crushed stone, concrete.
- You will need drying oil and roofing felt.
- Choosing the material for the roof of the veranda.
- Window and door systems.
In the design of an additional room for summer recreation, using metal corners instead of wooden materials metal profile is used, compositions for metal processing.
For a better view, you can make an extension (walls and roof) from polycarbonate, the panorama will be complete and clear. The positive properties of this material include the ability to retain heat well; it can be used for walls and roofs.
Advice! Materials that will be used in construction and that require pre-treatment must undergo this process first before construction.
 The first thing you need to do is determine the type of foundation for your veranda. A popular type is columnar foundation, since it is not tied to the foundation of capital construction (house). If the veranda is being built for a long time and thoroughly, it needs a strip foundation.
Before making a foundation, you need to refer to the house construction documents, which indicate what soil it stands on; you can choose from this type of foundation for an extension. Parameters to pay attention to:
- What is the soil's ability to absorb moisture?
- What is the composition of the soil at the site where the veranda is being built?
- To what depth does the soil freeze in the region where you live?
- How close to the surface is groundwater?
- General provisions for soil stability.
When choosing the type of foundation for the veranda, we pay attention to the foundation of the main building, its design, and the condition of the load-bearing walls. After choosing the foundation, it is done marking on the soil for further work.
Advice! A small wooden veranda will sit quite well on a columnar foundation at the corners of the extension. For wide and long verandas, the installation of pillars is used at intervals of 600 millimeters along the length and width of the extension.
Columnar foundation, how to make it?
The foundation (foundation) for an extension is just as important as for the main house; it must be made of high-quality material. Work order:
- We dig holes for the pillars to a depth of at least 100 centimeters; its depth cannot be less than the depth of the foundation under the main building. The level of soil freezing is taken into account; the hole should be deeper than this level.
- At the bottom of the dug holes we make a cushion, this is a mixture of sand and crushed stone. The pillow can be made in layers, sand, crushed stone.
- Fill the pillow with concrete.
- We lay out support columns from brick when the main house is brick. If the main house is wooden, wooden beams are used as columns. Metal supports or asbestos pipes are used in columnar foundations for a frame veranda.
The veranda looks beautiful when it is on the 2nd floor level of the house. In this case, the ground part of the extension support is laid out at the level of the main foundation under the house. When a house with a high base is recommended, the veranda should be built according to its level.
Making a strip foundation
It is used if a heavy veranda with glazing is planned. To equip it, a trench is dug along the perimeter of the future veranda and formwork is installed. It is placed a little higher than it is planned to fill the foundation with concrete.
After pouring the foundation with concrete, it is periodically moistened with water until it is completely formed; this is necessary for uniform hardening of the foundation.
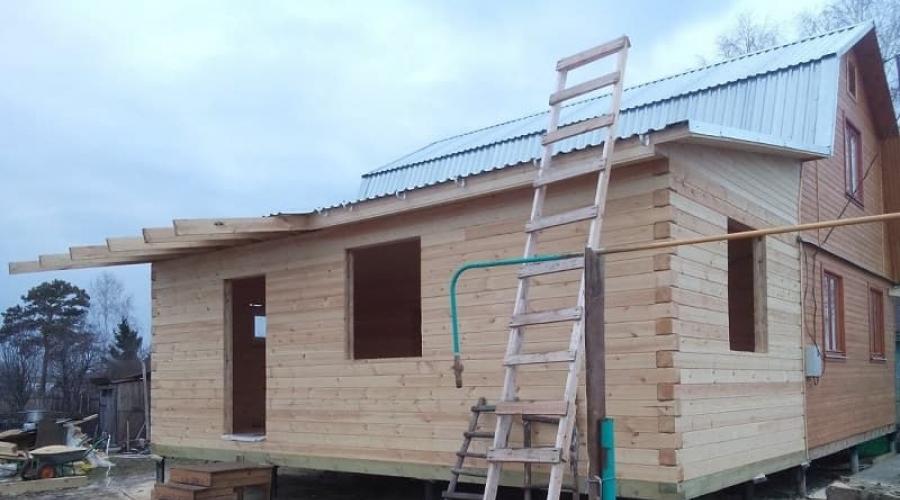
Making a veranda frame
 For a wooden house, the frame of the veranda begins with laying the timber on supports in the lower frame. In the corners we use a “dovetail” for cuts, it’s better this way join timber at corners. For reliability, nails are used; dowel fastening is possible.
Timber for a wooden veranda is used with a cross-section: 100x100 or 180x80 millimeters. When logs are used in the harness, their cross-section should not be larger than 120 millimeters. The supports near the wall are made higher than the rest to form a pitched roof. When the frame is mounted, horizontally installed beams are the basis for the window sill, if glazing is provided. The top trim completes the installation of the veranda frame; it is the basis for the rafters and creates rigidity for the entire system.
Temporary spacers must be used to avoid distortion in the frame structure.
Veranda roof
Once they have decided on the material for covering the roof, they begin to install the sheathing on the rafters, which are attached to the top trim.
Structurally for verandas we offer the following types of roofing:
- Single pitch roof. This is a simple design and easy to implement. Requires a slope from the main wall of the house towards the street.
- Gable roof. It is used if the veranda is attached to the end of the house with a narrow side.
- Polygonal roof. Its design is varied, the main thing is to maintain a slope for water drainage.
The rafter system is installed based on the selected material:
- Lathing for metal tiles, slate and ondulin
- Solid decking is made for flexible roofing materials.
 Making the floor with your own hands is simple:
- We install the logs on the lower frame of the veranda structure. The distance between the lags is no more than 100 centimeters. We install them perpendicular to the floorboard.
- We cover the logs, checked by level with a floorboard.
If you plan to build open veranda, many agree on installing a floor with a slight slope to allow water to drain. The board is fastened with self-tapping screws, the length of which is twice the width of the board. It is necessary to impregnate the floorboards with a solution that resists the creation of fungal deposits.
Conclusion
Some finishing elements can be carved in a wooden veranda. The placement of furniture on the terrace is of great importance; it will create the interior and add coziness. Flowers and plants will enliven the room and give the feeling of an extension of the residential building.
Today we will figure out how to build an open veranda from timber with our own hands. There is nothing complicated in the process; the work is much simpler than when constructing permanent structures, because you are, in fact, making an extension that will rest on the load-bearing wall of the house.
The option we described is reliable and durable; if everything is done correctly, the veranda will last for decades.
Of course, it’s easier to do everything at the construction stage; you can easily find it. But if you missed this moment or purchased a ready-made house, then it’s okay. The structure can be added later if you know all the nuances of the technology and follow them.

Note! It is difficult to implement the option with a common roof slope - you need to redo the rafter system; it is much easier to make a lean-to structure over the veranda.
Description of the construction process
We will analyze a version of a timber structure located on a solid strip foundation and adjacent to the building from the end. made of corrugated board, and the structure will be decorated with various elements. You can do without them, then the cost of the project will be significantly reduced.
Houses made of timber with a veranda look good if the extension is made in the same style as the main building.
This must be remembered when you carry out preliminary work:
- Determine the location and size of the veranda. Everything here is purely individual, some need space, while others need a cozy corner in the fresh air to enjoy the views of nature. The configuration can be different, it all depends on your ideas and on your site;
- Draw up a project for the future building. There is no need for perfect accuracy; it is much more important to determine all the main dimensions and apply them to the sketch. The most important parameters are length, width and height. You can also decide on the distance between the supports, the position of the entrance and other aspects;

- Decide what materials will be used for the job. In addition to the main beam, you will need a floor board, roofing material, fencing elements, and so on. It all depends on the design of your veranda.
Materials and tools used in the work
First, let's look at what materials were used in our project:
| Illustration | Description |
 |
Components for preparing concrete, which is used when pouring the foundation:
You can do it easier and purchase a ready-made concrete mixture, as in the photo; it should simply be diluted with water. |
 |
timber with a cross section of 100 by 100 or more is used. In our case, elements of 150x150 mm will be used - strong and durable. When choosing a material, pay attention to its humidity; it should not exceed 20%. |
 |
A special decking board is used to construct the flooring. We chose a natural option made from larch - a very durable species that is resistant to moisture and pests. You can also use composite options; they are also very reliable and durable. |
 |
Board for the construction of roof sheathing. In our case, a continuous sheathing will be made so that the slope looks good from the inside. A board 30 mm thick and 200 mm wide will be used; inexpensive pine will do. For rafters, a board with a thickness of 40 mm is suitable. |
 |
Waterproofing material will be laid between the bottom trim and the concrete foundation. Most often, inexpensive roofing felt is used, which can be laid in two layers for reliability. One roll is enough for the veranda. |
 |
Bioprotective composition for wood. It processes all elements in order to protect the material from rotting, fungus and pest damage. When choosing, pay attention to the following nuances:
|
 |
Veranda fencing elements. This includes balusters and handrails. If the handrail can be made from a block, then it is easier to buy balusters ready-made, they look better, and it will be much easier for you. If desired, you can build a rough fence from bars; it fits well with the rural design style. |
 |
. There can be many options here:
We use corrugated sheets, since the same material is used on the main roof of the house. |
 |
Fasteners Mostly wood screws of different lengths will be used. But many other things can apply: Perforated plates and corners;
For the roof, special roofing screws with a hex head and a rubber gasket at the bottom will be used. |
A certain set of tools is also required:
- Concrete mixer for preparing the solution. Making a lot of concrete by hand is a labor-intensive and time-consuming task. It’s much easier to rent equipment, then you can do it literally in a day;
Advice! You can even order ready-made concrete, then all you have to do is build the formwork and carry out the preparatory work, and special transport will pour the foundation in just half an hour.

- Chainsaw or circular saw. During the work you will have to cut a lot of wood, so you need to have a power tool on hand. It is much more convenient to use a chainsaw to make cuts in massive timber; an electric saw or jigsaw is suitable for boards;
- A screwdriver is required, since you are unlikely to have the strength to screw hundreds of screws into wood with a screwdriver. Don’t forget to grab a set of attachments to select the best option for different types of fasteners;
- The construction level will allow you to control the plane of structures. A construction pencil or felt-tip pen is used for marking. You can also use a cord, which is pulled to the desired level and serves as a guide, thereby simplifying the work process;

- Brush for applying a protective and decorative coating to wood. It is most convenient to work with a tool about 100 mm wide;
- Scaffolding or ladders for working on roof structures. You can build homemade platforms from boards, you can rent special structures;
- A router is an optional tool, but if you want to make your veranda look attractive, you can use it to quickly process the edges of the boards, giving them a rounded shape.

First, we will figure out how to pour the foundation and assemble the veranda frame from timber, and then we will look at how to make a rafter system, lay the roof and attach the fence.
Construction of the foundation and frame
Before attaching a timber veranda to the house, you need to pour a solid foundation. Do not skimp on the reliability of the foundation, because it is it that will support the weight of the entire structure, and any subsidence will lead to deformations of our extension.
The first part of the work consists of the following stages:
| Illustration | Description |
|
|
Excavation work is being carried out:
|
 |
Next you need to secure the formwork. It is made from boards at least 30 mm thick and reinforced with jumpers for reliability. Concrete is very heavy, so if the work is not done well, the boards will break or swell when filled with mortar.
|
 |
To make the concrete strong and resistant to cracking, a frame made of reinforcement is placed inside. The configuration can be different, the main thing is that metal with a thickness of at least 10 mm is used. The bottom of the trench can be filled with crushed stone to strengthen it and reduce concrete consumption. |
 |
Concrete is poured into the finished structure. It should fill all the voids; to do this, you can pierce the surface with reinforcement. The top part is carefully leveled using a smoothing board or a piece of board. If it is hot outside, it is better to cover the surface with plastic film so that the moisture does not evaporate quickly and the concrete gains maximum strength. |
 |
The formwork can be removed after 5-7 days. But for the base to gain strength, you need to wait at least a couple of weeks, and ideally 28 days. Concrete takes time, so there is no need to rush at this stage. For now, you can prepare for the next stages and collect all the necessary materials and tools. |
 |
A strip of roofing felt is laid on the top of the foundation to create a waterproofing barrier. The process is not complicated: you need to cut the roll into strips of the required width (they can be slightly wider than the base) and spread it over the entire surface. For reliability, you can lubricate the foundation with bitumen mastic; it will serve both as an additional water barrier and as glue for roofing felt. |
 |
We will use a 150x150 mm beam, which will need to be connected at the bottom trim. For joining, the dovetail method was chosen, for which the groove shown in the photo is cut. It tapers towards the edge, so the joint holds well even without additional fasteners. You can make a simple cut for half a beam and tighten the elements with self-tapping screws or screws, this is also a normal solution. |
 |
On the other side, a spike is made that will be placed in our recess. The most important thing in this process is correct marking. It's okay if you need to remove a couple of millimeters, the wood is easy to process. Clearly draw all the lines and cut strictly along them. This type of work is performed using a chainsaw. |
 |
Before installation, the timber must be coated with an antiseptic composition. It is carefully applied to all surfaces, the elements are turned over so that you treat them from all sides. Pay special attention to the ends, this is the most vulnerable spot of the timber. It is better to carry out the treatment in two layers, so the composition will penetrate into the structure of the material much deeper. |
 |
The beam is laid on the foundation, the position of the elements is checked using a level. If there are unevennesses, then linings made of wood or metal are made under the elements. The error should not be more than 2 millimeters per meter. |
 |
This is how the joint turned out in our case. The elements are securely joined even without the use of any fasteners. |
 |
The photo shows how the beams are connected at the corners. Cuts are made on them to half the thickness (into the paw), after which the elements are joined and additionally fixed with self-tapping screws. The same connection can be made at longitudinal joints if dovetail seems too complicated to you. |
 |
The same timber is used as a lag. It is simply laid on the surface and fixed using perforated corners. The elements don’t have to be joined in the middle, but placed side by side, as in the picture, and simply secured. Reliability will not suffer from this, and the workflow will become significantly simpler. |
 |
The flooring is made from decking boards. Installation is very simple, as it is done using special fasteners that fix the board and leave gaps between the elements to remove moisture and effectively ventilate the structure. The board does not need to be leveled; after covering the entire surface, all excess is cut off along the edge with an electric or chainsaw. But you can cut them right away - as you prefer. |
 |
A 40x200 board is attached to the edge of the resulting platform. It will serve as a support for the vertical posts and give the veranda a more attractive look. In the photo, the board is processed with a router - the corner is rounded, which will greatly improve the appearance of the elements. |
 |
This is the chamfer that is obtained along the edge of the board after processing with a router. The shape of the cutout can be different, you just need to choose a cutter of the desired configuration. |
 |
We will use ready-made columns for the veranda. They are made of 200x200 mm timber and treated with dark stain. This option is more attractive than regular timber, but it is also more expensive. If you need to save money, then use regular lumber. |
 |
The columns are installed very simply: the elements are located in the right places, due to their size, they stand even without fastening. The supports can be secured with perforated corners, this is quick and reliable. An additional element of rigidity is the upper lintel made of 100x200 mm timber. It is screwed directly through the top using self-tapping screws 200 mm long. For reliability, the supports can be strengthened with braces until they are completely fixed, so you will at the same time fix their correct position. |
 |
The side beam of the upper trim is placed close to the wall of the house and can be secured to it with an angle. The work is not difficult, the main thing is to align the elements before attaching them. |
Roofing and fencing
Now that a strong frame has been erected, the work will go much faster. And so that you understand what to do and in what order, below are visual instructions:
| Illustration | Description |
 |
A support board is placed on the wall of the house, on which the upper edge of the rafters will rest. Next, all the necessary measurements are taken:
|
 |
Since we use 40 mm thick boards for the rafters, it is easy to cut. Therefore, it was decided to make the protruding part of the elements curly. All bends were drawn on the board, after which all excess was quickly cut off with a jigsaw. Naturally, you don’t have to decorate your veranda in this way. |
 |
We ended up with this option, a small corner serves to support the rafters on the frame, the rest serves as decoration. To give the elements an even more attractive look, you can process the edges with a router. |
 |
The rafters are fixed to the roof structure. They are fixed using screws and corners. The spacing of the elements should not exceed 1 meter, but it is better to place them at a distance of 70-80 cm. It is best to place marks on both the wall and the frame so that all the rafters are parallel to each other. |
 |
When all the elements of the rafter system are secured, you can install scaffolding to make it easier to work in the future. |
 |
A continuous flooring is made from boards. This will provide a strong base for the roofing material and make the surface rigid so it can support the heavy weight of snow in winter. It is best to fasten the board with self-tapping screws; they hold the joints much better than nails. |
 |
This is another reason why we made a solid flooring - the structure looks very neat from the inside and does not need additional sheathing or decoration. It is enough to apply a protective composition or paint the surface. |
 |
The ends under the roof slopes are also covered with boards. This both improves the appearance of our veranda and protects the space inside from rain. The board is simply cut to size and screwed on with self-tapping screws. |
 |
A corrugated sheet is laid on top of the sheathing. It is aligned along the lower overhang (the protrusion of the metal should not exceed 50 mm), joined and screwed with roofing screws. The side ends are covered with a special strip, and the junction of the slope to the wall can be covered with a metal cast. |
 |
Lastly, the fence is installed. Everything is very simple here: the balusters are placed close to each other, and wide railings are placed on top of them. |
 |
This is what a house made of timber with a veranda looks like in the end. All that remains is to fill the porch or install a forged structure. |
Conclusion
A house with an attic made of timber and an open veranda is not difficult to construct, but it looks very good and creates additional space for relaxation. The video in this article will help you understand the topic even better, so we also recommend watching it.
A win-win option that has become a classic not only in Russia, but also in Europe and Scandinavia. A log cottage with a veranda or open terrace looks aesthetically pleasing and stylish. A covered or open veranda to a timber house is perceived as a logical extension of the house, although traditionally it is not considered a living space. The construction of a veranda is carried out both during the construction of the cottage and several years after its operation.
House with a veranda: advantages and disadvantages
The veranda can be very different. If desired, the extension can be turned into a full-fledged living space, which will serve as a living room, hall or additional room. But still, in most houses the veranda is open or glazed, representing a recreation area or summer kitchen. The closed veranda is reliably protected from precipitation and wind, which allows you to set up a greenhouse or winter garden on it.
Advantages of a house made of timber with a veranda or terrace:
- attractive appearance of the building;
- wide possibilities for using space;
- increasing the usable area of the cottage;
- profitability - the cost of 1m2 of veranda is affordable for everyone.
Another advantage of a veranda made of timber is the ability to attach it to any building. The veranda can be built as an extension to a brick or foam-, gas-block house, provided that the extension is correctly linked to the main building.
The disadvantages, as a rule, are open, unglazed structures, which are covered with snow in winter. This problem can be solved by installing removable glazing: the glass is installed for the cold period, and dismantled for the summer.
Projects of houses made of timber with a veranda
Developers offer many house designs with a veranda, which are attached on one or more sides. Depending on the configuration and location of the veranda, there are:
- facade - classic, located along the entire or part of the facade of the cottage;
- corner - attached to the corner of the house;
- end - located at the end of the building;
- round, triangular, etc.
When choosing a ready-made project or developing an individual one, you need to pay attention to the entrance group. When the veranda is located along the facade, it often acts as a vestibule and has an entrance, which is the main one for the entire house. Corner and end verandas can have a separate entrance from the street, as well as from the living quarters.


The dimensions of the veranda depend on the area of the building. Typically, the area of the extension is 10-20% of the area of the first floor of the house. The width of the veranda should be quite comfortable, it depends on the purpose: for a summer kitchen - at least 5 m, for a workshop, greenhouse or recreation area - from 3 m.
Materials for the veranda
The construction of a timber veranda for a house can be carried out during the construction of a cottage or at any time when the building is already in use. The first option is more preferable in terms of financial costs. The second allows you to wait for the building to completely shrink, which is especially important for timber houses.
Modern verandas for houses are built in one of two ways:
- From the same timber that is used to build a cottage.
- From a timber frame, followed by finishing with imitation timber.
As a rule, the first method is used when the veranda is built during the construction of a house made of timber. The second method allows you to make an extension for any house. When choosing wood for a veranda, experts advise giving preference to coniferous varieties.
DIY veranda: step-by-step instructions for each stage
Before you start building a house made of timber with a veranda or making an extension to an existing building, it is recommended that you familiarize yourself with the regulatory documentation. Separate standards for the veranda have not been developed, but the technology for its arrangement, as well as the requirements for materials, are mentioned in the following documentation:
- SNiP 2.07.01-89, 02/31/2001 - on the construction of residential private houses.
- SP 53.13330.2011 - features of planning and development of private buildings.
- SanPiN 2605-82 - on sanitary standards in private housing construction.
If the construction of a veranda is carried out with the involvement of professional builders, then the specialists must be guided by the standards described above and are responsible for their compliance.
Step-by-step instructions: building a veranda with your own hands
Foundation installation
The construction of the veranda begins with the installation of the base. If a veranda is erected during the construction of a house, then the foundation is made taking into account the veranda. To attach a structure to an existing house, a separate foundation is required. The choice of foundation type for an extension depends on the following factors:
- area and weight of the attached structure;
- type of foundation under the main building;
- soil properties on the site;
- economic expediency.
If the cottage is built on a pile foundation, then the extension must be built on stilts. In this case, the best option would be. If the house rests on a strip foundation, it is better to use a monolithic strip foundation of a shallow or shallow type for the veranda. A column foundation is the cheapest and is perfect for the lightest, smallest verandas.

The foundation installation technology depends on its type. For a pile-screw foundation, the algorithm will be as follows:
- Screw piles are screwed into the ground in increments of 0.5-1 m.
- The pile heads are connected to each other with a grillage using coating waterproofing.
- The lower floor beams of the future terrace are installed on the grillage, which are the frame for the pile supports.
For a monolithic strip foundation, the instructions are more complex:
- A trench 20-35 cm deep is dug and backfilling is carried out.
- The bottom of the trench is lined with waterproofing and formwork is installed.
- A pre-prepared reinforced frame is placed into the formwork.
- The formwork is concreted and dismantled after the concrete has hardened.
When using ready-made reinforced concrete foundation structures, there is no need to wait for the concrete to harden and you can immediately begin building the walls and fencing of the future veranda.
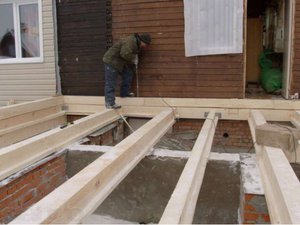
Veranda floor installation
Logs are laid on the lower crown, cut into the grillage beam. For the logs, choose a strong, good quality timber with a cross-section of at least 40x150 mm. The logs are installed in increments of 0.5-0.7 m. For an unheated veranda, in order to save money, the finished floor is laid directly on the logs, between which it is recommended to put inexpensive but effective foam insulation and a vapor barrier.
Rough or finishing floor - atmospheric drying boards 20x100 mm, laid after the construction of the end walls and installation of the railings. It is advisable to choose boards from larch or other moisture-resistant types of wood. A deck board or other finishing coating is installed on the subfloor.
Construction of walls and railings
To build an open veranda, as a rule, 2 end walls are erected.
The walls of a veranda or terrace are made using one of two technologies: frame or frameless. Frame technology means that after laying the first row of beams, which can also serve as a grillage (frame), logs are cut into them and racks are installed. To construct the frame, timber 100x100, 145x145 or 195x145 mm is used. Metal corners are used to attach vertical load-bearing frame beams to the bottom frame. The walls between the beams are filled with thick plywood or OSB sheets. To protect the veranda from freezing, insulation is attached to the frame filling and installed between the battens.

When constructing veranda walls from profiled timber, the same material is used as in the construction of timber houses. Assembly is carried out using standard “warm corner” technology. Inter-crown insulation, for example flax-jute fiber, is laid between the beams.
Railings for an open veranda can be made independently or purchased ready-made. Manufacturers offer various options for railings for timber terraces: wooden, metal, plastic, glass. For houses made of timber, owners most often choose wooden railings that fit into the ergonomics of the building. For a timber terrace of a brick or block cottage, you can use wrought iron railings that do not violate the overall style of the building.
The railing technology is simple and clear:
- Balusters of the desired shape and size are prepared or purchased.
- The supports are mounted on the floor joists using anchors and fasteners.
- Belisin racks are installed at the selected interval.
- The timber railings are installed and the end elements are fixed.
The height of the veranda railings should ensure safety. Products must be high enough and withstand a load of at least 120-150 kg per 1 m2. The railings should not be too sparse, the optimal distance is up to 10-12 cm.

The fencing of the veranda is its decoration, therefore the structure must be painted or varnished. When choosing a paint coating, preference should be given to moisture-resistant compounds for outdoor use.
Veranda roof installation
When constructing a veranda at the same time as the house, the roof can be shared. If you decide to attach a veranda to the cottage, it is cheaper and easier to make a separate roof for the extension. The same materials are used to construct the roof as to cover the house. In terms of design, the most popular option is a single- or gable roof, but in some cases owners choose more complex options: hip, multi-slope.
When installing a common roof for a house and a veranda, the rafter legs are attached to the upper rim of the frame vertical beams. When installing a separate roof, the rafters are connected to the supports on which the extension frame rests.
The roof installation algorithm for a house with a veranda is no different from traditional technology:
- The Mauerlat is installed along the top frame of the frame supports.
- The rafters are installed with a selected pitch, which depends on the area of the veranda.
- The sheathing is carried out and waterproofing is laid.
- The insulation is attached.
- The roof covering is being installed.
For the rafters, edged boards of 150x150 mm are taken, which are laid in increments of 0.5-0.6 m. The lathing is made from boards with a cross-section of 20-22 mm. The gables are sheathed with clapboard or small false beams. Lastly, the cornices are hemmed and the drainage elements are installed.
Installation of windows and doors
Numerous projects of houses made of timber with a veranda offer options with a glazed or unglazed extension. Windows increase the cost of construction by an average of 20-30%, but at the same time protect the building from precipitation, dust and wind. A glassed-in veranda is more functional, but many owners of country houses like to be in the fresh air, so they prefer the option of an open terrace.
Windows for a timber veranda can have the following design:
- Hinged windows are an inexpensive and versatile option. Window structures can consist of 2.3...5 segments, depending on the length of the window. Such windows provide excellent heat retention.
- Sliding windows are an ideal option for narrow small verandas. The cost of sliding windows depends on the material: aluminum frames are the most affordable. PVC windows are a little more expensive. If finances allow, it is better to order environmentally friendly wooden windows or ergonomic frameless glazing.

Doors for the veranda are selected taking into account the overall style and functionality. For large glass areas, it is advisable to install glass portal doors. For an open veranda with a wooden fence, ordinary wooden doors are best suited; for metal railings, doors with forged elements are best suited.
Finishing a veranda or terrace
Finishing can be done using any materials. For walls, imitation timber, narrow and wide lining, siding, etc. are most often used. If the walls of the structure are made of profiled timber, then it is enough to simply apply varnish or other paint and varnish coating for wood on them. It is important to consider the following nuances:
- the finishing in color and texture should be in harmony with the entire house;
- the materials used must be intended for outdoor use;
- paint coatings must be environmentally friendly and safe for humans.
Separately, it is worth mentioning various decorative and functional elements, which include: pergola, swings, barbecues, stoves, steps, flower beds, etc. All these elements can give a home coziness and increase the comfort of a summer holiday or permanent residence.
Two-story house with a veranda and balcony
A log house with an attic or a two-story cottage, as a rule, has at least one balcony. If desired, the owner can make a two-level extension with his own hands or order a developer company: the first floor of such an extension is a closed or open veranda, and the second is a balcony. A rooftop balcony is an easy and inexpensive way to expand your space and create additional entertaining space.
Features of the construction of a two-story extension:
- A veranda made of timber with a balcony on the roof can be attached to a house made of any building material.
- When calculating the foundation for the structure, it is necessary to take into account the weight of the balcony.
- Frame support columns are made to the height of the balcony.
- The overlap between the first and second levels is done in the same way as the floor of the veranda.
- The roof of the balcony can be shared with the house or separate.
- Balcony railings must meet safety requirements.


Project selection
When you decide to build a log house with a veranda, pay attention to standard projects. Their variety will allow you to choose the best option for your cottage. If desired, you can order an exclusive project that will take into account all the nuances of the extension and the wishes of the owner. If the construction of a veranda is carried out for a finished house, then the extension project must be approved by government agencies. That is why it is better to entrust the design and construction to a reliable organization that has experience working with timber structures. In this case, you will receive high quality work, a guarantee and all the necessary documentation.


Covered terrace where you can spend time in any weather Source kayrosblog.ru
Drinking tea with your family on a beautiful summer morning or evening gatherings with friends in the fresh air without leaving home - what could be the best way to take a break from everyday worries? Make your dream of a complete country holiday come true veranda or terrace built on the site to the house. In addition to functional properties, such buildings also carry a design idea, giving the appearance of a cottage or dacha a single, complete image of a truly comfortable home. Today, there are many designs, styles, and designs for both the exterior and interior design of a veranda or terrace. For those who are choosing which veranda to add to their house, projects, photos and layouts will be excellent inspiration.
Veranda or terrace - what are the differences?
Often people do not know the difference between a veranda attached to a house and a terrace, so they confuse the concepts with each other, or even consider the meaning of these words to be synonyms. That is why, before thinking about construction, you need to understand the differences between buildings and decide what will suit you best.

One-story house with a closed veranda and an adjacent terrace Source houzz.com
Veranda
The veranda can be closed or open. For construction, a foundation is erected and various materials are used: polycarbonate, glass, brick or wood. It can play the role of a summer kitchen, dining room, or winter garden. Such a building is usually located on the side of the main entrance or the second exit to the courtyard.
If you plan to use the extension all year round, then it is necessary to insulate the walls, make waterproofing, and install a heating system.
An attached veranda to a house can perform more functions than a terrace:
- summer living room;
- dining room;
- kitchen;
- gym;
- winter Garden;
- hallway or vestibule;
- pantry.
If you want to add a veranda to your house with your own hands, projects, photos and other visual materials will help you decide on the design. Although it would be better to take the help of professionals.
Types of verandas
The veranda can be made of a variety of materials. Some designers advise giving preference to the material from which the house is built. But this is not important; the choice depends only on the personal preferences and ideas of the owner of the main building.
The difference between the materials of the main building with the raw materials for the construction of the structure, as well as their combination, can highlight the veranda, emphasize the emphasis on one of the buildings, or focus attention on any particular aspect of the structure.
Veranda with panoramic glazing Source inar.de
Basic building materials for the veranda
- Tree. Most suitable for constructing a veranda for a wooden house. A wooden veranda is erected from timber and boards.
- Brick. Such an extension requires a more solid foundation than a wooden one. To prevent the brick structure from looking bulky, it is worth using more window openings.
- Metal. This material is suitable for a summer veranda, most of which is glazed.
- A cheaper and more reliable alternative to glass and metal may be polycarbonate– a modern material on a plastic basis, which allows the sun’s rays to pass through well, retains heat and protects from the wind. Its peculiarity is that it bends easily and makes it possible to give the building any shape.
There are many building materials from which a veranda can be built; the choice depends only on the owner’s own desires and available resources. You can use several materials at once, combining them, and giving a unique aesthetic look to the extension and the house as a whole.
The only thing worth considering is that the more weight and pressure the structure exerts, the more powerful the foundation it will require.

Spacious veranda in a two-story house Source prefer.ru.net
Verandas open and closed
By type, the veranda can be open or closed. Let's consider both options.
Enclosed veranda
A closed veranda is a room that continues the space of the house. This type gives the maximum number of options for using the room. The structures can be solid or hinged (turning into open ones). Glazing helps maintain visual contact with the landscape, create comfortable conditions for the occupants of the room, and protect the porch. Insulation and heating in winter will allow you to create an additional room on the veranda, and it is possible to stay there in the cold.
It is advisable to position the extension so as to allow as much light as possible into it. The atmosphere should not be heavy and oppressive; it is better to leave as much free space as possible, hang curtains on the windows, and create a warm, cozy atmosphere.
An open veranda is only suitable for summer holidays Source pinterest.pt
Open veranda
The design of an open veranda is simpler compared to a closed one. It can be designed in the form of a closed canopy with railings, which is a continuation of the porch. The design of this structure does not require compliance with any architectural conditions, and can be prepared after the construction of the house or cottage.
An open veranda attached to the house makes it possible to organize comfortable relaxation in the fresh air. You should pay attention to the situation, selecting furniture taking into account certain quality characteristics - it should be resistant to environmental influences, tolerate UV rays, and not require serious maintenance.
Building an open veranda requires much less material costs, time and effort. Most of all, it is suitable for owners who have no desire to use it in winter, but just want to comfortably organize their country leisure in the summer.
The disadvantages of an open veranda are:
- limitation of the functionality of the building;
- use only in summer;
- the need to use materials that are resistant to adverse weather conditions.
The main function of an open veranda is to enjoy being in the fresh air and the opportunity to admire the view.
You can combine open and closed types of extensions. For example, hang curtains made of thick fabric, install high opening window openings, or make a fence from lattice.

Open stepped terrace Source sadovodu.com
Terrace
Terrace, attached to the house, is a platform that does not require pouring a foundation, installed on a base slightly raised above the ground. It can be located on one side of the house, merge with the porch, or be a separate object. The terrace design does not include windows and doors, but has a roof or canopy and fences. When choosing a terrace, you should pay special attention to the floor covering; it must be resistant to the direct effects of natural factors: rain, snow, sunlight.
Most often, the terrace performs the following functions:
- summer living room;
- dining room;
- playroom for children;
- sunbathing place.
An open terrace attached to the house will be a good place to receive aesthetic pleasure from the surrounding landscape

Small terrace with canopy Source toldospozuelo.net
Terrace design features
There are many options for constructing a terrace, both for active and passive recreation in the summer season. But before starting to design a structure, it is necessary to determine the conditions on which its size and functionality will depend.
These include:
- determining the type of foundation for construction - compacted soil or a built foundation;
- selection of flooring material;
- determination of necessary pieces of furniture, their location;
- deciding whether the room will be a completely open space or a partially closed object.
Video description
In this video we will tell you how to build a veranda with your own hands:
The base can be racks and beams, smoothly transitioning into or adjacent to part of the structure. On such beams you can install a roofing covering that combines the terrace with the porch.
Such an open building can be installed directly on the ground, but it must be prepared first. In fact, this is very different from the addition of a veranda and terrace to the house (photos demonstrate the difference). If the floor is made of wood, then the material must be pre-treated with special compounds that protect against moisture.
The floor itself is made so that water can quickly drain from it. Under the extension itself, it is necessary to place a water collector with a tray or pipe that discharges water beyond the boundaries of the terrace.
The terrace has the following features:
- In most cases, it is simply a wooden flooring without walls, only surrounded by railings.
- You can place the terrace near one wall of the house, or you can cover the corner of the building or part of the perimeter of the building.
- The area usually depends on the size of the plot. A large terrace will allow you to organize several zones on it and accommodate a large number of people.
Equipping the terrace with additional elements, such as a roof, walls, railings, glass openings, swings, a hammock and even a dance floor, depends on personal preferences. A properly attached terrace to the house will easily fit into the surrounding landscape, allowing you to enjoy it to the fullest. Those who do not like spontaneous decisions should use projects, photos of which are presented in large quantities, when building a terrace to the house.
Open veranda under a canopy with a transition to the terrace Source opravovat-um.blogspot.com
Types of terraces
There are a large number of open areas for recreation on a country plot with a cottage or dacha.
Depending on the design features, it happens:
- Terrace attached to the house. It requires a foundation, is attached to the building, and can be made of different materials: metal posts, wood or brick. The type is open and semi-closed. Most of all it is similar to the veranda of a country house.
- A detached building. It can be located in any accessible place on the site. It is built on a concrete foundation, no more than 10 cm above ground level, and can be equipped with a fireplace. Requires moisture-resistant materials, as it is open on all sides.
- Building along the perimeter of the house. It needs a stable foundation that can support the structure and attachment to the walls of the building. It can be completely open or have partial fences or glazing. If required, a porch is installed to access the site.

Veranda with brick oven-barbecue Source doma-klyuch.ru
Depending on the material, the structure can be:
- Brick. This material is the most durable and easy to maintain. True, building from it requires time and considerable financial costs.
- Wooden terrace. It does not require a mandatory foundation, since wood is a very light material. But it needs to be treated with a special compound that extends the life of the tree.
The choice of type of construction depends on the area of the site, the location of the house and garden on it, the presence of a reservoir or swimming pool on the site, and it is also worth paying attention to the material from which the house is built.
It turns out that terrace is an open building intended for summer recreation, veranda In addition to this function, it is the protection of the external walls and the entrance door of the building from weather conditions. In some cases, the veranda is used in winter as an additional room, increasing the usable area of the house.
Verandas are more popular in areas with cold climates, changeable weather conditions and temperature changes. Terraces are more often used in places with warmer climates, where the winter period makes up a smaller part of the year. Verandas and terraces to the house, photos of which are presented in the article, demonstrate this difference.
The correct location of the veranda and terrace - what to pay attention to?
Before starting construction, you need to decide where the terrace or veranda to the house will be located; projects and photos of finished objects will help you roughly imagine what the structure should look like as a whole. It is also worth considering the following factors:
- duration of sun illumination of the selected side of the building or site;
- view from the site;
- soil properties and characteristics;
- design solution for home and landscape.

Scheme of the correct veranda Source lixovew.kapigyzes.ru.net
The shape of the terrace can be rectangular, round, multifaceted, and also have several tiers. Multi-level buildings look very advantageous and give a special look to the cottage, and with this design there is no need for steps.
Also, even before creating a veranda or terrace project, you must:
- Determine the area of the building, calculate how many people will be in the room, determine its main purpose.
- Consider the location of the roof, it should protect from the sweltering sun on a hot day, and also become a barrier to rain.
- Select material, the price of constructing an extension also depends on it. You need to realistically assess your capabilities and use this as a starting point when determining the scale of construction.
After analyzing all construction factors, you can begin designing the structure, then look for a construction company, taking into account your calculations. You should approach this with responsibility and care, otherwise the quality and external characteristics of the finished building will not be what you originally wanted. If you do not take into account all the factors, the veranda and terrace extension to the house will not correspond to the photo and project that were chosen as a sample, at least in terms of quality. To prevent this from happening, it is better to weigh the pros and cons and turn to specialists who will do everything turnkey.
Features of design and construction
Before starting construction work, it is necessary to develop a plan for the veranda and terrace of the house and draw up a cost estimate. This will significantly improve the quality of the structure and eliminate errors. When preparing the project, you need to take into account the operating conditions and the functions that the auxiliary room being built will perform.

Veranda frame assembly diagram Source ok-berta.ru
Features of terrace construction
Features of terrace construction depend on the chosen material: blocks, metal, wood, brick. The advantage of a wooden terrace is the optional installation of a foundation or the use of lightweight structures in the form of columns or piles for the foundation. Heavy stone and brick require a foundation; it is better if the base of the brick terrace is combined with the foundation of the house.
The floor area should be installed at a level from half a meter to a meter above the ground, slightly tilted towards the drainage of water. Next comes the installation of supporting structures, taking into account the engineering characteristics of the material used for construction. The roof frame connected to the house is mounted on the supports, and the roof is laid.
Then you can start finishing. The interior design can be anything, depending on the wishes of the owner of the house and the purpose of the built extension.

The veranda can be attached to an already finished house Source samozvetik.ru
Construction of a veranda
The first thing that is needed is a foundation, it must match what is being used under the house. The next step is laying the floor joists and attaching the structure to the wall of the building. A treated board is suitable as a floor, which can subsequently be varnished or painted.
The installed frame is sheathed with boards, polycarbonate or glazed, then the roof, doors and windows are installed. Electrical wiring and heating (if applicable) are being carried out. In the event that the veranda will be a living space in winter, it is necessary to insulate it with any material that suits you best and meets the climatic conditions.
The roof usually has a pitched shape; the angle of inclination should be such that snow and rain do not linger on the roof. For the roof, it is better to choose the same material that was used for the roof of the main building.
Video description
For 100 options for beautiful terraces, watch the following video:
A veranda, as an extension to a one-story house, can become a favorite place for all household members if the rules and construction technology are followed. Proper organization of space in the room allows you to achieve the most comfortable conditions. As can be seen from all that has been said, building a terrace and veranda is not such a difficult issue. With the work of qualified builders, such an extension will become an extension of the house, complement its appearance, increase the space and become a place for relaxation, parties, and children's games. Verandas and terraces attached to the house, photos of which are presented in the text, will help to outline a more successful option for a particular site, but it is better to turn to professionals for the project.