How to make a glowing cloud from cotton wool. Do-it-yourself cotton wool clouds are an unusual decor that is accessible to everyone. Party decorations
Read also
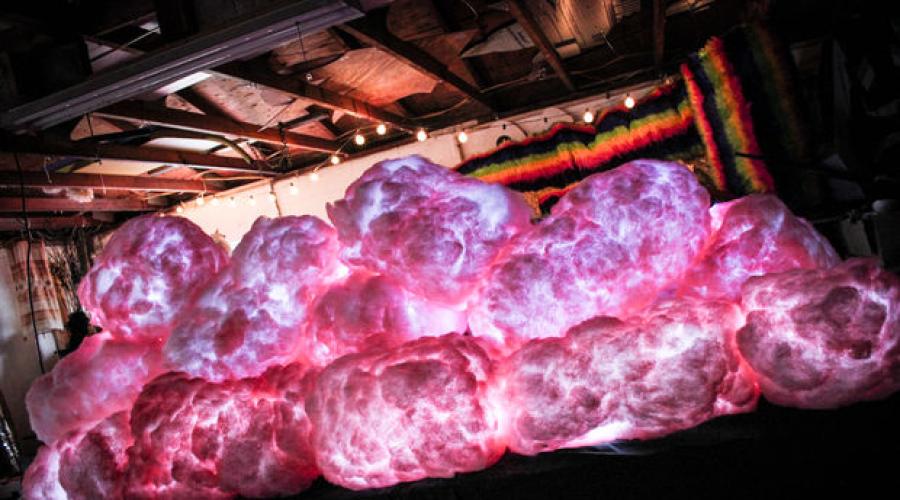
Such interior decoration elements are perfect for themed parties for Valentine's Day, but not only. In addition to any design theme that includes clouds as such (and there are a lot of them), absolutely the same version of the product, depending on the paint and lighting used (and the given shape), can easily be used as “lava”, “smoke” ( say, for Halloween), a huge cotton wool on a stick and everything else your imagination can do.


This is a very simple project in concept and relatively easy to implement, especially if you are comfortable working with wire mesh. And the result is truly magical. With our illuminated clouds you can decorate a nursery or teenage room, with their help, create a romantic, eerie or futuristic atmosphere in the room.
Materials and tools:
- Wire mesh - not too rigid, with cell sizes no more than 2.5 cm;

Polyfill (Polyfill cotton bulk; a large box or 11.5 kilos goes into 20 medium-sized clouds) or any other natural or synthetic filler that guarantees excellent internal ventilation(the volume will be approximately the same in any case, the weight depends on the specific material);

Spray paint (in the original Spray Paint Rustoleum 2X, because it fits very well on the filler, but another quick-drying spray paint that gives a fairly dense coating with one spray will do);


Glowing garland or ribbon with L.E.D. light bulbs (preferably one-color ones and only matching the color of the clouds themselves, or just white garlands);

.jpg)

IMPORTANT . Because the starting materials described in the English-language article, you are unlikely to be able to get it in Russia (unless you order it on eBay or its analogues with payment via PayPal), and I don’t know their full characteristics; in brackets following the names in the box above are the main characteristics found on the sites sellers. Remember that the main principles are the following (to avoid fires): absolutely all materials used in the project must be able to withstand exposure to extreme heat, including paint, glue, filler and insulating material lighting element (garland); the filler from which the clouds themselves will consist must also transmit heat well from the inside to the outside, and not accumulate it inside; lighting element should not be a Chinese/Taiwanese craft without a quality control mark, as this greatly increases the fire hazard of clouds. Although the author does not separately indicate the heat resistance of materials anywhere in the article, follow basic safety rules. The spray composition for protecting fabric from fire (Fabric Fire Guard) is strongly recommended to be used without fail in the English-language article. We sell similar compositions in the form of liquid impregnation, which you can always pour into your bottle with a spray nozzle, completely cleaned from the inside.
1. Roll out wire mesh from the roll and let it lie quietly for a while - then it will be easier to work with the mesh.

2. The shape of the clouds depends on your desire and the nature of the installation. These can be oval shapeless clouds, cylindrical shapes or even rectangular. It is best to start twisting the mesh into a regular one cylindrical shape, which you will then bend or pull apart into in the right places to get more free form clouds with curves. In any case, remember that the wire base should not be perfect, since the filler will then cover any defects, and the mesh will only give the clouds the desired volume. And do not forget that after gluing the filler to the mesh, small bends simply will not be noticeable - make them VERY large.

Thus, using special scissors, first simply cut a section from the mesh, the size of which depends on the desired size of the future cloud. When cutting, leave long enough ends of the wire free, because you will eventually fasten them together (for example, screwing them with pliers). If you have problems with screwing, use any convenient fastener that you can get to fix the edges of the mesh to each other - from plastic to metal or ordinary more pliable but strong wire.


3. Separate from the filler in the roll a piece equal in size to one side of the wire cloud base. In principle, the larger the pieces you use at once, the better, because there is less chance that they will fall off later. Place the piece on the floor, covered, for example, with newspapers, and spray it on all sides with a fire-fighting compound. Let the material dry completely. Then we lay it out again and spray it with glue on one side. Immediately place the mesh base form on top and press on the latter (or place a weight on top) until the glue sets. Remember that you may need help or a few small weights as the shape of the cloud base is uneven.

As the work progresses and the glue dries, spray each glued part of the cloud from the inside (!) again special composition for protection against fire.
4. In this way, cover the entire mesh base of the cloud with filler, and then add, where necessary, small pieces of filler (also soaked in the anti-fire composition and dried) to close the gaps and make the curves of the clouds more noticeable. Let the glue dry completely.
5. When the glue has completely set, place a light coat of spray paint on top of the almost finished clouds. Keep the layer thin, but use paint until the clouds look good and daylight: You will probably be attaching them once and for a long time.

When the paint has dried, spray the entire cloud from above with the same composition to protect it from fire. Allow the cloud to dry completely before continuing.
6. Bend a piece of filler from the hole in the mesh base of the cloud from the top or side, push the LED garland inside. Top or side - depends on where you intend to attach the clouds, and where the power cord will ultimately be invisible. For example, if clouds are used in a club, it is better for the wire to come out from the top, and then it should be run along the ceiling metal frame for light and music. Or you can make your life easier and buy battery-powered garlands! Choose the length of the garland depending on the size, power and frequency of the light bulbs, as well as depending on the size of the cloud. Pushed through - shake the cloud a little so that the garland is more or less evenly distributed inside. Finally, it is best to buy a garland with a control panel for programs (flashing, slow burning, changing colors, etc.).


.jpg)

This post follows on from the article about and it contains 10 options for making lamps with your own hands. Many people decide on the issue of light while making repairs, but at this time there are a lot of distractions and it is not possible to pay due attention to lighting. I am sure that if you think about it, you will find those places where you clearly do not have enough light, and if there is such a place, then read on and choose a way to make a lamp with your own hands for your home.
1. Photo flashlight
To make a paper lantern with your photos you need this list:
Photos for printing
A printer,
paper
12" paper lantern
Glue
Sponge Brush
Ribbon
knife
Template Sphere (optional) 
The most time-consuming thing is to guess the size and cut the right sphere, and then the glue and your hands will do everything intuitively.
You can make a whole family row of similar lanterns, I think the idea is clear and visual.
Found on photojojo.com
2. Bamboo chandeliers
For this project, ordinary bamboo curtains were purchased, thin bamboo strips were taken from them and using regular glue and clothespin glued balls. Next, the light source itself is added, ready. Quickly and inexpensively, you can, of course, make it a little juicier by adding more ribbons.

3. Light cloud lamp
Add clouds to your home, even if only temporarily, and be sure that these clouds bring only light and not any rain.
These cloud chandeliers or lamps (depending on your imagination) are perfect as decoration for a party or wedding day, child's birthday, etc.
For the project you need cotton wool, ready-made paper lanterns, glue and straight hands.


4. Lamp with cork lampshade.
Everything is more than simple, we break one thing and make another out of it.

5. Chandelier made from cans.
Remember earlier we already had a post about a chandelier made from cans, here is another version of such beauty.

6. Waste paper and a chandelier made from it.
Mode magazines of our ladies and give them light.


7. Plastic bubbles
Amazingly beautiful and budget project. To create such a wonderful light composition you will only need plastic bubbles (look for it yourself, it can be anything, even a box of chocolates), wire and lamps.

8. Fabric lamp.
We look at the lamp that we are tired of, we look at the remains of the fabric! Now we combine it, and the result is a new beautiful lamp.

9. Paper lamp.
Where to get beautiful material for a paper lamp, yes in any hardware store collect papers with paint color samples. I think in Leroy you can get not only paper but also wire, lamps and a frame.

Thanks to the site homedit.com for the photo and the tip.
You can make lush and airy clouds from cotton wool using: ready-made forms, and from scrap materials. To work, you will need as much cotton wool as you need to make clouds with your own hands. Instead of cotton wool, you can also take padding polyester, which is usually used to stuff plush toys.
To enhance the effect, you can add light bulbs to them: standard or colored. Clouds can be hung from the ceiling using threads or ropes. Additionally, clouds can be decorated with raindrops, flying birds and other decor.
Except suspended structures, can be done unusual crafts with your child. To do this, you can glue pieces of cotton wool onto colored cardboard, giving them the shape of a certain type of cloud (cumulus, cirrus, stratus). Such useful craft will help your child study the atmosphere of our planet.

Cloud based
To make hanging clouds, you can use a rice paper lampshade. This can be a factory-made version, or made by yourself. Spray adhesive is used to attach the cotton wool to the surface of the lampshade. Cotton wool is applied evenly over the surface in small pieces.
The glue must dry well before use. To make the resulting cloud glow, a light bulb is inserted into the lampshade. Fastening can be done in the usual way for a chandelier. Instead of ordinary light bulbs, you can use multi-colored LED backlighting.
Clouds on balloons
You can make clouds without a lampshade. To give the clouds the shape you need, ordinary ones are perfect Balloons. They need to be inflated, tied in the shape of a cloud and coated with PVA glue. Next, you need to attach pieces of white paper to the glue using the papier-mâché technique - then the structure will turn out to be solid.
Cotton wool is also attached to the dried paper with glue. If the balloons are inflated with helium, then the cloud can simply be left floating under the ceiling. Otherwise, it must be hung by any in a convenient way, the master class does not limit here.

Clouds without a base
To create a structure without a base other than cotton wool, you will need:
- starch paste (made from a mixture of potato starch and water, which must be brought to a boil and cooled to room temperature),
- a basin for dipping future clouds,
- tray.
Since the cotton wool itself will serve as the basis for the clouds, you need to take more of it. You need to pour the prepared paste into the basin. Clouds of the required size are formed from cotton wool, which are dipped in a basin with paste.
The glue needs to be distributed evenly over the surface of the cloud, and if there is too much of it, you can simply squeeze out the cotton mass so that the excess pours out. After dipping, the workpiece should be placed on a tray to dry. They will dry for about a day, during which they need to be turned over every 2-3 hours.

How to make an awesome cloud lamp. The fluffy clouds exude an extraordinary feeling of relaxation and relaxation. Their unique shapes and movements are truly fascinating. It is no coincidence that many people find the calming atmosphere created by clouds.
Bring nature into your home by making an adorable cloud light.
This small project, inspired by the recreation of a thunderstorm with blue-green flashing lights. The lamp is equipped with several motion sensors and is sensitive to environment. It also comes with high-quality speakers that play music and sounds. The price of this interactive lamp is quite high (around $3000) and not many people can afford it.
The truth is, however, you can make an alternative quickly, easily and without significant expense.
Necessary materials:
paper lanterns – size and quantity depends on how big you want your cloud to be
incandescent lamp
switch
wooden slats
transparent cord
glue gun
LED bulbs (you can also use standard Christmas lights, but you have to plan where to plug them in and how to hide the cables)
C-Hooks with Screw


Since most paper lanterns are sold folded, your first task is to remove them from the bags and unfold them to their original size. full size. They should be different sizes. This will make your cloud more realistic.

Place the light bulbs in the lanterns. As a color, blues is especially suitable. As for the type, LED bulbs – the best option. It is important to choose a model that does not generate heat to prevent a fire!

Using a gun, start applying hot glue to the surface of the lanterns and attach the pieces of cotton wool. Continue with your desired shape.

Attach C-shaped screws to the ceiling.


Tie the cord in two (or three) places to wooden lattice and hang the lamp.


Using a string, hang each lantern from a wooden pole. Assess the height of each person's personal taste and vision. It's your choice whether to leave space between individual lights and get multiple clouds, or pack them tightly and create a large cloud.


Lower LED lights also hang on wooden plank. Arrange them so that they are of different lengths. Their little flashing lights will have a fairytale effect.

Now you have to wait to go crazy and enjoy the stunning fairy lights.
Making crafts with your own hands is a very enjoyable process, it’s hard to argue with that. For many craftsmen, this is a kind of meditation; it calms, develops and inspires. The thought has probably often occurred to you: “how to make a lamp yourself?” How to make a new chandelier or pendant that will delight and highlight your creative nature, surprise guests and complete the interior? Where can I get ideas? We have prepared 5 simple examples for implementation that will be useful to you.
Lights in the clouds
Looks amazing and inspiring. Take ordinary cotton wool, form a “cloud”, use strong white threads to fix it. For lighting, use only cool, energy-saving LED lamps, can be used LED strip. For a truly “flying in the clouds” effect, create compositions from several cloud lights.
The glass is half filled with light
Glass processing requires maximum care, but it's worth it! Glass pendant lamps always look stylish. At the bottom of a vase or large glass, make a hole with a special drill for glass and tiles. Experiment with different types glass, the more the light is refracted, the more interesting effect, created by the lamp. To complete the composition, apply bright adhesive tape to a third or quarter of the wire.

All that glitters is not gold
An ordinary Ilyich light bulb can also add style to your interior. However, the rough base is the only thing that bothers me. To help you - a bushing from toilet paper. Wrap it in gold foil. The result will please you.

Light and wine
If you are into crafts, then you have definitely heard about bottle lamps. For several years now, such suspensions have been very popular. To create, you need to cut off the bottom of the bottle, sand off the sharp edges and insert the wire and cartridge inside the bottle.

Night clouds for children's
A brilliant idea for creating atmosphere in a children's room. Not the easiest option to implement, but the end result is worth the effort. All the clouds are cut out of plywood using a jigsaw and hung by loops to screws with a large head screwed into the wall. Behind the largest cloud is a compact sconce, the shade of which is directed upward.


Supernova
Our list ends with an amazing hanging chandelier. To make such a pendant you will need chinese lantern, thin paper, scissors. Be patient and go ahead! This chandelier goes well with almost any interior. Interesting design solutions And exclusive chandeliers you can find it in the store http://lampabar.ru/.

