How to make a roof for a winter garden. How to arrange a winter garden on the roof of the house. Greenhouse on the roof or attic, planned before the construction of the building
Read also
You can organize a winter garden on the roof of both a private and an apartment building. This non-standard option has its advantages. In the summer, it will be possible to do without the use of a complex ventilation system - you just have to open the windows; natural lighting will spread throughout the ecozone, you will only need to adjust the curtains; and you can also look at the stars every night, enjoying the intoxicating natural aromas.
What is important to know before organizing a winter garden on the roof of the house:
- is it possible to conduct communications there,
- whether the foundation will withstand the additional load (its characteristics are prescribed in the project documentation).
Stages of work
1. The area where the winter garden will be located must first be prepared - cleaned of all unnecessary.
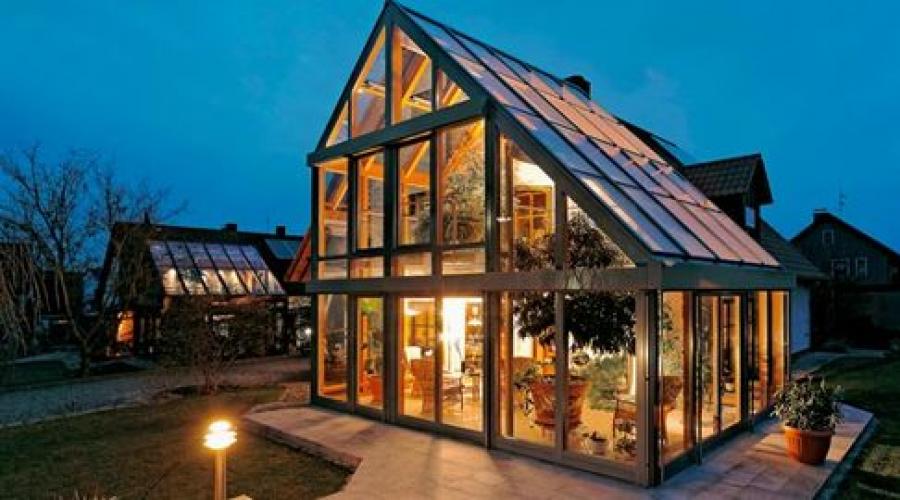
2. Check that the slope of the roof is at least 30°. Only under this condition, melt water, rain and snow will not linger on it, and the room will better “receive” the rays of the sun. Ideally, care should also be taken to counteract the icing of the roof - to prevent its deformation due to excessive weight load. For this, an anti-ice system is used: a cable is laid along the rafters and along the perimeter of the roof, through which heat will pass.
3. Before proceeding with the installation work indoors, equip the entrance group. The number of doors depends on the specifics of the project. If the entrance is from the inside, you will need to organize a staircase and railings. If outside, we recommend using a sliding door. As practice has shown, this option is the most practical.
4. As soon as the territory of the object, including the adjacent one, is ready, you can start assembling the frame. Ideally, this should be an aluminum profile or pipe. Both materials are lightweight and require no maintenance. In addition, it can be given any color, so that the presence of metal in the greenhouse will not be so noticeable.
- The sequence of work on the creation of a metal structure is as follows: a profile or pipe is cut into several sections of a given length and fastened. To do this, you can use hardware or a weld. If you decide to stop at the second option, the seam must be cleaned without fail;
- each blank for future construction must be carefully primed, and then painted.
5. Let's move on to glazing. According to the rules, at least ¼ of the glazed surface should be vents. In order not to spend money on their repair later, immediately choose reliable hinges. And, of course, don't forget to order mosquito nets.
note
It is more profitable to fix the glazing on the ground. Otherwise, you will have to build scaffolding, which will be an extra cost item.
What material to choose?
Glazing of the roof of the winter garden is made using glass or polycarbonate. Here is a summary table of the benefits of each material.
| Glass | Polycarbonate |
| The same, perfect transparency (it does not become cloudy over time) | Ease |
| Scratch resistance | Ease of self-replacement of a damaged sheet |
| More aesthetic look | lower cost |
| With an energy-saving coating, the cost of heating the garden in cold weather can be significantly reduced | The best heat and sound insulation characteristics (the difference is insignificant, but still there) |
note
If you decide to use a glass sheet, make sure that it has a reflective protective film. Thanks to her, a long stay in winter garden on the roof of the house in the summer will become much more comfortable, and the plants will be spared from an excess of sunlight. However, you can fight it with the help of blinds, roller blinds, roller shutters, etc.
Whatever glazing of the roof of the winter garden you choose, remember that the main requirement for this design is tightness. Otherwise, the ecozone will not last long, as the flora will not withstand either drafts or low temperature conditions that are typical for our country during the cold season.
6. After the glazing is ready, engineering communications are laid: exhaust, irrigation, heating, air conditioning and lighting systems - natural sunlight is not enough for the life of some plant species. Fitolamps will be required, as they will create conditions as close as possible to the natural habitat of exotic flowers, trees and herbs.
But ventilation is not required - the desired effect is achieved by using vents and transoms. Due to the limited number of plants, the irrigation system will also be superfluous. If you have free funds, you can organize it, of course. This will save you the hassle. But you can get by with a watering can - the work will take no more than 5 minutes a day.
Ecozone heating features
The winter garden on the roof requires additional heat only during the cold season. As a rule, it lasts from November to March. And the question immediately arises: which is better, a central or portable air heating system?
The answer to it depends on the area of \u200b\u200bthe winter garden, glazing materials, plant characteristics, etc. The most common option is the organization of the "Warm floor" system. It can be installed under any floor covering, even parquet. And if necessary, as an addition, you can turn on the heater.

How to humidify a rooftop conservatory?
If the area allocated for the ecozone is large, it is recommended to create a reservoir on it. It can be an ornamental lake or a full-fledged pool. Since the room will be warm all year round - evaporating, moisture will create the most comfortable environment for plantings.
With a small area of the winter garden on the roof, additional moistening of the space will still be required. However, here you can get by with the installation of a fountain. There is also a cheaper option, but only with a glass roof. A metal cylinder is painted in a dark color, water is poured into it, placed in the most illuminated place and a flexible tube is attached to it. It, in turn, must be connected to a hydraulic mechanism for opening the hatch, mounted on a folding transom. When heated, the water in the cylinder will “open” the window sash, and when it cools down, it will “close”. Such is the trick.

Having prepared the room, you can set up a winter garden on the roof - zone it and plant plants. The florist will tell you how to do it correctly.
It can be located arbitrarily relative to the cardinal points. However, depending on the purpose of the garden, it is better to have it differently. A south-facing garden will save on heating costs, you can grow heat-loving plants in it all year round, but you will need to provide ventilation and shading systems in it, otherwise the plants may simply burn out on a hot summer day. You cannot equip a living room in such a room.
The winter garden, oriented to the north, is perfect for arranging an office. In addition, this option will help to insulate the house, because the coldest side will be closed by a winter garden.
It will be pleasant to have breakfast in the oriental garden, looking at the dawn. With this orientation, there is usually no strong overheating, however, it is better to provide ventilation and shading.
In the garden, oriented to the west, it will be nice to get together in the evening with the whole family, because. heat builds up during the day.
1.2. Types of structures
The winter garden can be of different shapes. The most common is the so-called three-beam arbor. It can be easily attached to a room of any shape and size. There is another type of gazebo - five-beam. Due to the larger number of faces, it is more rounded, which is more pleasantly perceived by a person. The traditions of Russian architecture are reflected in the gable extension. A more complex option - a four-pitched gazebo - is connected by one of the slopes of its roof to the wall of the building using a special gutter. If you are going to arrange a winter garden of a large area, a p-shaped gazebo will suit you. It is universal, easily combined with buildings of almost any architecture. For lovers of symmetry, a T-shaped garden is suitable. In this type of design, the light from the central part is evenly distributed over the side rooms. Low buildings will be pleasantly decorated with a Mediterranean gazebo (solarium) with a shed roof.
The bearing part must ensure the strength of the entire frame of the winter garden. The best material for creating a frame is aluminum and its combination with wood. Aluminum is harmless, strong, durable, easy to use and can be painted in almost any color due to the wide range of colors of modern polymer coatings.
1.3. Winter garden design
The winter garden is a technically complex structure. In order for it to please you for many years and not create additional problems, it is necessary to develop a high-quality project. Any winter garden must have a safe design, create an optimal microclimate inside the premises without overheating or hypothermia, and prevent weather influences (including extreme ones). To take into account all these tasks without special training and certain experience is difficult, if not impossible at all. The architect-designer will develop a project that not only meets all of the above requirements, but also brings your wishes and ideas to life as fully as possible.
Unfortunately, winter gardens are rarely built at the same time as the house itself, most of them are being completed to ready-made buildings. But in vain! The most beautiful are recognized as being developed along with the main building. This option allows you to take into account many technical and aesthetic issues in advance. In addition, in this way the living space expands much more efficiently.
It is recommended that the area of the winter garden be at least 12, and preferably 15 square meters. m. The height of the room in the middle part should be at least 3 m, but this is not the limit - the winter garden can reach a height of two floors, if possible.
The optimal slope of the roof is considered to be an angle of 30-40 degrees. With this arrangement, more energy enters the room and less snow and dirt lingers.
When planning your indoor space, break up the space into zones for planting, recreation, and places to socialize. If possible, arrange a place to relax in a room next to the garden.
2. Ventilation and heating
An important indicator for a comfortable life for both people and plants is the level of relative humidity. For most living organisms, it is 40-60% (for tropical plants - 80-90%). Humidity is directly dependent on temperature, even a slight change can affect the well-being of plants.
A fairly common problem in winter gardens and other similar structures is condensation. It falls out when warm air touches a cold surface. To prevent this from happening, thermal breaks made of polymeric materials are inserted into aluminum profiles. Thanks to these inserts, the profile is divided into two parts, which are separated from each other. However, even the use of these racks is unlikely to permanently solve the problem of condensate if the ventilation system is not thought through. Ventilation helps reduce air humidity and provides fresh air that plants need just as much as water.
Ventilation can be forced and natural.
Natural ventilation uses physical laws. For example, hatches are arranged in the lower part of the walls for the entry of cold air, and holes are provided in the roof for the exit of warm masses. The circulation of air masses occurs due to the difference in height. It is also possible to install hatches and vents at floor level, there must be vents on the walls - the location of the ventilation holes evenly throughout the room ensures air circulation throughout the winter garden. Otherwise, the movement of air masses will occur only in some areas.
The number, location of ventilation openings, their dimensions and other factors depend on the shape, volume, orientation of the winter garden and other parameters. Typically, hatches, sashes and vents account for 5-10% of the total glazing area. However, a larger number of opening elements leads to an increase in the cost of the entire structure.
In addition to natural ventilation, forced ventilation is widespread: various supply and exhaust systems, air conditioners, hair dryers, etc. Some of them contribute to the flow of fresh outdoor air, others use the air that is in the room. Such systems allow you to regulate the intensity of air exchange, maintain a certain temperature in the room, but they depend on electricity, which is quite expensive and inconvenient. Many experts recommend combining natural and forced ventilation so that power outages or low temperatures outside the window do not affect your plants.
Heating in the winter garden can be varied. Among the most popular methods are central heating radiators, autonomous electric heaters, maintaining the required temperature with the help of air conditioners and underfloor heating. Quite often, several types of heating are combined in one garden.
To calculate the required number of heating elements, the area of the room, the area of glazing, the characteristics of profiles and translucent structures, the location of the winter garden, the thermal radiation of the entire building, etc. are taken into account. it is recommended to install radiators around the perimeter of the garden - this will help to heat the room evenly and reduce the formation of condensate (with sufficient air movement). However, remember that the radiator must not be blocked, for example, by furniture or a window sill - this will reduce its effectiveness.
3. Static structural strength
In order for the winter garden to be safe and comfortable for many years, it must be made taking into account all the standards of stability and safety. Some designers prefer to calculate the strength of each structure separately, others use already proven ready-made systems in their work, but in any case they use the same principles.
Snow, wind loads and own weight act on the supports of the winter garden. Structural profiles are made from combinations of materials such as aluminum, plastic, hardwood and steel. Aluminum profiles remain the most preferred, because. they are stronger, thinner and more reliable than, say, plastic or wood.
With a large winter garden, you will definitely need a frame that supports the roof. It is on the roof elements that the greatest snow load falls. For example, with a roof tilted 20 degrees (or less), the maximum snow load weight for snow load calculations is 100 kg/sq.m. And in various pockets and wall zones where snow can accumulate, correction factors are also taken into account. If the slope of the roof is 60 degrees, then the snow easily rolls off them and the additional load is not taken into account.
The wind load depends on the shape of the building. For example, in large buildings, the strongest elements should be the corner zones. On a tent-shaped roof, the impact is less.
After taking into account all possible loads for each specific post or crossbar, they are summed up, and it is calculated how much the element will bend under the influence of loads. The maximum deflection value is 1/300 of the element length or 8 mm (with a larger deviation, the visual perception of the element deteriorates). If the selected frame element does not fit into these restrictions, then a supporting frame is made or the profile section is increased.
In addition to the above indicators, the deformation of the structure under the influence of temperatures, loads during the "shrinkage" of the building are taken into account. Particular attention is paid to the places where the winter garden joins the main building and the foundation.
Increased requirements are placed on double-glazed windows, especially those that form a roof. The outer glass must be very durable, as a rule, the top layer in double-glazed windows is made of tempered glass. The lower glass must be laminated or made of triplex (several glasses connected by a film). This option allows you to ensure the safety of people in the winter garden - even if the glass breaks, the fragments will not scatter around the room, but will remain glued to the film.
4. Glazing
As a rule, double-glazed windows are used for glazing winter gardens. The amount of glass in a double-glazed window determines how warm it will be in the room - more glass helps to retain heat better. In winter gardens, energy-saving glass is usually used, on one of the surfaces of which a low-emission coating is applied. This coating in winter helps the rays to penetrate into the room and does not allow them to "go out" to the outside, reflecting them back into the building. In summer, energy-saving glass reflects excess solar radiation, contributing to better sun protection of plants.
Another option for glazing is the use of bulk-tinted or film-coated glass. They absorb but hardly reflect solar energy. Such glasses get very hot, so they must be tempered. Tinted glasses can not be compared with low-emissivity, but they easily protect from prying eyes.
5. Roof
Most of the heat enters the winter garden through the glazed roof. Double-glazed windows with improved characteristics do an excellent job with a large dose of solar radiation, but it is not always technically possible to use them. In cases where the use of heavy glass is not possible, multi-chamber polycarbonate comes to the rescue. It is cheaper and lighter than glass, but is not capable of reflecting solar radiation. Polycarbonate, painted in bronze or matte white, reduces the brightness of the light and protects the eyes, however, infrared rays freely pass through it both inside and outside the room. Specially for this material, films were developed that prevent the rays from escaping, but polycarbonate facades and roofs are far from always able to achieve the desired goals.
6. Blinds
Blinds are very useful in winter gardens. They absorb the sun's rays and prevent the heating of objects inside the room. They also protect from bright light, which means they prevent plant burns and fading of interior items.
Blinds are divided into internal and external.
External blinds are plates installed on the outer part of a window or facade. They scatter the light before the rays reach the glass or polycarbonate. This type of blinds is typical for winter gardens in Europe, but somehow it did not take root in our country. At us it is much more often possible to see internal blinds. They are easy to use, not afraid of bad weather, but in sunny weather they heat up and transfer heat into the room, although they should reflect it. To reflect the rays, blinds with metallized coatings were developed. However, if it is possible to use blinds on the side glazing, then their use for the roof is not very convenient. Blinds must be fastened in such a way that they do not sag, and the fastenings are not visible. The complex shape and the impossibility of fastening makes the use of blinds on the ceiling impossible. Consider a system for closing the ceiling in advance.
7. Heating
Decide in advance how you will use the conservatory and how it will be heated. According to the type of heating, unheated, periodically heated and constantly heated gardens are distinguished. The choice of type of heating affects the choice of building materials, design, indoor climate and, as a result, the selection of plants.
If you intend to use the winter garden permanently as a living space, it must be heated. It is also better to provide heat-shielding glazing to improve thermal insulation.
If the winter garden for you is a kind of transition between the house and the street, then there is no need for additional heating. There are no special requirements for glazing. Such a winter garden will help reduce heat loss in the house and reduce heating costs, but you can’t use it as a living space.
8. Winter garden interior
Translucent structures are usually used as walls, and the floor is made of tile or wood, covered with a non-rotting material (for example, a polypropylene carpet). Wicker furniture looks very good in the winter garden, but plastic furniture will do.
Small winter gardens with an area of 20-30 sq. m is usually divided into 3 zones: for plants, for relaxation and paths. In medium-sized winter gardens (30-50 sq. m.), design elements are already being used, these can be small sculptures, decorative fountains, aquariums, compositions of flowers and plants, etc. In winter gardens of a large area (over 50 sq. m.), swimming pools, large compositions of plants, sculptures, podiums, terraces can be arranged. But remember that with all the variety of decorative elements and solutions, the garden must be designed in a strictly defined style.
When selecting plants for the winter garden, consider the individual characteristics of each variety. For light-loving plants, it is better to find a place closer to the walls; species that are sensitive to sunlight are best placed in the shade.
The winter garden is an expensive pleasure. This is a structure that is complex in architectural, artistic and engineering terms. However, the winter garden will give you many moments of good mood, will pleasantly decorate your home and have a positive effect on the atmosphere of the room.
9. Automation system
An important assistant in maintaining a comfortable microclimate in the winter garden will be the automation system. A special controller regulates everything: temperature, humidity, lighting, etc. By turning the heaters on and off, it will protect plants from temperature extremes. Lamps and controlled blinds will solve problems with the level of illumination of plants. The controller can even water the plants with water at the right temperature. The hygroscopic disk of the sensor expands when water enters and opens the contact. The contact threshold can be adjusted. When moisture evaporates, the contacts close, and the controller, depending on the parameters of illumination, temperature and humidity, "decides" whether to water the plants now or later. Special motion sensors react to the presence of people in the room. If there is a person in the winter garden, then watering is postponed. If your winter garden has fountains, they can also be controlled by automation - the picture of changing water has a calming effect on a person.
10. Microclimate
Both plants and people feel good only at certain values of temperature, humidity, light and oxygen. Maintaining optimal microclimate parameters is the most important and difficult task. In the conditions of the Russian climate, one constantly has to deal with either overheating or cooling, this is especially true for translucent structures. The winter garden is a complex ecosystem, each plant feels comfortable with different microclimatic indicators. Select plants in your collection that live in the conditions that you can provide them. The advantage of a winter garden, like any other closed ground (greenhouses, greenhouses) is that you can create almost any climatic environment in it, it's just a matter of time and money. However, you should not choose whimsical tropical flowers if you do not have the necessary knowledge and opportunities for their full life.
11. Lighting
Lighting in a winter garden plays several roles. Firstly, different plants have different daylight hours, so one may have enough sunlight, while others will have to artificially increase it due to lighting devices. Secondly, lighting devices can create a pleasant environment in the evening and at night. Spot and colored lamps will emphasize the beauty of plants and help transform the winter garden beyond recognition. Light sources should not be fixed for easy movement throughout the room.
What a pleasant and calming effect on our nervous system, if not plants. These green friends in the interior of a house, office or cottage have become so welcome companions of our everyday life that without them we can’t imagine who else could brighten up working days.
The most vivid and full of dreams about life among green friends are embodied if you imagine a winter garden in a house or apartment. Here you can spend your free time taking care of your favorite flowers, enjoying the peace and tranquility that are embodied in the original design and bold design solutions.

Well-known data on the beneficial effects of flowers and plants on our nerves. In addition, our silent, but such beautiful friends in the interior of the house are:
- full, oxygenated air;
- an obstacle to the penetration of dust into the home;
- a great opportunity to show your friends your original hobby.
Built with your own hands according to your favorite project, such a green recreation area will make your abode a welcome escape from the daily routine.

Understanding the subject, a good plan and the right choice of materials
With a proper understanding of the subject, your dreams can easily take on real shape, and a winter garden in a private house, on the roof of an apartment building or in a single apartment, will delight your eyes. It used to be that plants in a home were considered a luxury all year round.
Now summer greenery and a piece of the tropics in the attic floor of a residential building or a country house is a completely feasible project. It is necessary to choose the right materials, draw up a project, choose the appropriate design that is in harmony with the overall interior of the house - and you can begin to fulfill your dream. Moreover, the possibilities for decoration today are truly endless, and problems with heat usually simply do not exist.

To begin with, we should decide that we are going to build a complex engineering structure with our own hands. First of all, it should be equipped for the comfortable maintenance of your green friends. It is necessary to make a garden that reliably protects from Russian frosts and has a strong glass dome. Therefore, the project will require that:
- maintaining optimal temperature conditions;
- breathability;
- lighting for the full development of plants;
- required air humidity;
- tightness.

If a winter garden is planned in a private house, then this will most likely be an extension to the main building. At the same time, the room should be made transparent, and a glazed terrace can become another possible interior option. This is necessary for the natural access of light, which will ensure healthy plant growth.

Planning a dream with pencil and paper
Planning a dream is most effective with a pencil and paper handy. Your project should contain a house plan with the side to which you are going to add a garden extension with your own hands. You will also need a plan for the second floor - directly the greenhouse or attic, in case you decide to equip your offspring on the second floor. In any case, your annex should initially be divided into three territories:
- communicative - these are paths that perform a connecting function in the layout;
- recreational - a place of rest, in the interior of which not only a sofa or an armchair can be provided, but also the possibility of eating or negotiating;
- decorative - there are, in fact, plants, in addition, the design can be complemented by modern finishes or trendy decor.
The original extension is the most popular form of arranging your brainchild. In addition to it, you can draw up a layout that will allow you to diversify the project, both as an addition to the main building, and as a separate building.

Do-it-yourself premises can be called as equivalent options:
- corner ("encircling" the outer corner of a one-story house);
- two-facade (in this option, the other two sides can be the inner corner of the cottage);
- three-facade (here the fourth side is the wall of the main building).

In addition, the project may take into account that the dream to be realized will look like:
- buffer zone (has the format of a vestibule or balcony);
- greenhouses (this do-it-yourself garden option assumes the format of a non-residential premises, which is partially heated, and the air is characterized by high humidity);
- a standard garden (a room heated in winter);
- verandas or terraces (this format does not involve heating, and the project itself is an extension to a heated room).
With so many options available, it is possible to make the final choice in the proposed planning and it is necessary to move on to other, no less relevant issues.

Sunlight is the strategic nuance of the whole idea
The placement of the greenhouse is even more important than the layout of the room itself. From its location it will become clear whether the plants will receive the rays of the sun or they will have to be compensated for by an expensive and not always effective alternative. Let's count the cardinal points, which include:
- southern - it seems optimal only at first glance, any most modern design will not save green friends from overheating, and the air from drying out;
- eastern - optimal for any room interior, the morning sun will not be a source of heat, and your plants will receive the required solar energy without overheating;
- western - is in second place in terms of optimality, it must be taken into account that such a placement project will still provide excess heat, especially in summer, and additional watering is inevitable;
- northern - in the design of this option, you can safely include both decorative and conventional means of heating, and the more, the better. This decision is made only if there is no other alternative.

Do not be upset if even your project turns out to be the most expensive, because the dream is good because it becomes a reality, despite the obstacles. For example, your plants will feel almost as comfortable if instead of sunlight, special fitolamps are provided in your interior. They have a service life of up to two years and perfectly perform the functions of photosynthesis assistants. If conditions allow, it is preferable to make several vents with your own hands, in which case you do not have to install mechanical ventilation.


Plexiglas, double-glazed windows or ordinary glass?
If you place your winter garden on the roof of the house, then in the process of its design it is necessary, first of all, to resolve the issue with the surface of the walls and ceiling. Here you should proceed from what the characteristics will be on:
- bearing capacity;
- light transmission.

The best option for the second position is ordinary glass, it allows 95 percent of natural light to pass through, and your green friends will receive the optimal amount of ultraviolet. If we are talking about the second floor of a two-story house, where the roof is transparent, then glass is unacceptable due to its heavy weight and excessive fragility. The negative factors should also include fast heat transfer (very expensive in winter) and high price.
Plexiglass retains heat much better, it transmits 85 percent of the rays. The only drawback is the soiledness, which directly affects transparency. Therefore, this material can be used where natural light is not so relevant.

The most optimal for the overall design of the room are double-glazed windows. These are expensive products, and their installation will require an invitation from specialists. But in the end, such a costly option will pay off by reducing the cost of heating services. For example, aesthetically impeccable beautiful PVC windows provide one hundred percent tightness, which is optimal if your green friends are tropical or plants that require special attention. Modern aluminum in this case will be a good alternative to traditional wooden frames. Your interior in this case may include options for double-glazed windows:
- hardened in mass;
- laminated;
- energy saving;
- sun protection;
- reinforced.

The most secure triplex in this respect. It is good if the roof design is made of laminated glass, it is practically shatterproof and consists of several layers.
Your winter garden in the house can have a retractable roof. For him, it is optimal to make an option from plexiglass, cellular and monolithic polycarbonate or transparent PVC slate. And if you equip the roof with a heating system with your own hands, then in winter you will not have to get rid of the ice or snow crust. In addition, the design of the room should include the possibility of convenient washing and other maintenance of the roof.
You should also think about how the various details of the situation are organically combined with each other in a single style, this will benefit the plants and your abode as a whole.
Floor covering and other details
Your plants should feel comfortable in the interior of the room. Therefore, you must take into account other materials that you place with your own hands inside your green abode. Fits well with the overall design of ceramic tiles. If the garden is planned to be located on the ground floor, it makes sense to think about sand or gravel. Perfectly diversify the interior:
- brickwork;
- wooden structures (in the form of a miniature bridge);
- hand-made platforms from typesetting mosaic will favorably distinguish your design from other design options.

The more fantasy you put in, the more comfortable and free your plants will feel. Your green friends willingly respond to care and attention to themselves. And if you make an attic for them, more like a Garden of Eden, your flowers and other inhabitants of this secluded place will bloom in every sense of the word.

Regardless of which floor you are going to place your brainchild on, do not forget about the optimal neighborhood of your green friends. It is desirable that the plants come from the same climatic zone.
There is a good idea to combine a garden with a gym or a place for yoga or fitness. The gym can be supplemented with a swimming pool (if space permits). This is how your dreams come true, and you make real miracles with your own hands, turning your hitherto gray life into a heavenly pleasure!


Everyone has an inherent desire to develop, plants reach for the sun, a person improves his knowledge and skills, and even buildings and structures do not stand aside. One of such directions for the development of a private house can be called the construction of a winter garden in a room attached to the main building.
However, if you are a thrifty owner and are not inclined to allocate a usable area for a winter garden, but would like to equip it, you can offer a non-standard solution - in the form of a superstructure above the house and further turning it into a full-fledged garden for winter use. The idea can be implemented not only on the roof or attic of the house, but also on the roof of the garage or summer kitchen.
Tempting idea? Let's evaluate its advantages.
Benefits of a rooftop winter garden
- the difference in weight between the house and the garden is leveled, in connection with which, there are different loads on the foundation;
- provides an opportunity to admire the stars without the light of electric lamps;
- eliminates the need to consider the cardinal direction. The desired lighting/shading is created by adjusting curtains, film, etc.;
- the issue of ventilation is eliminated - the garden, open on all sides, is easily ventilated even in calm weather;
- the house has a distinctive feature that distinguishes it from other buildings and gives its appearance individuality.
Convinced? Then we study the features of creating a winter garden on the roof of the house, in the attic or on the roof of the garage with our own hands.
Things to consider before building a winter garden:
- the possibility of arranging the necessary communications;
- foundation strength. As follows from GOSTs, the foundation must withstand a constant (weight of walls, ceilings, roofs) and a variable load (furniture, residents). The type and characteristics of the foundation can be viewed in the project documentation. If it is flooded with a margin and the house does not sag, this indicates that it is durable;
- the weight of the future structure and units of service systems (constant load), the approximate weight of the soil, plants and people (variable load);
If your foundation can withstand such a calculated load, you can safely get to work.
Construction of a winter garden on the roof of a house or over a garage
Stage 1 - foundation device
In this case, this step is omitted. On the other hand, a new one appears, cleaning up the future construction site, i.e. roofs from roofing material and everything that interferes with the construction process.
Stage 2 - assembling the frame of the winter garden
The frame can be made from a metal corner or a wooden beam. But it is better to use an aluminum profile or pipe. The main advantage of an aluminum profile and pipe is its low weight, no need for maintenance, the ability to paint it in any color.
All frame assembly work is best done on the ground. The process of manufacturing a frame structure includes several stages:
 Cutting a profile (pipe) from metal into pieces of the desired length.
 Assembly of blanks. As fasteners, you can use hardware or make a welding seam. The latter, more reliable, but requires the use of a special apparatus. The seam must be cleaned and treated with a primer.
  Connecting sections of the frame of the winter garden to each other. At this stage, everything that is necessary for the further installation of the frame on the roof of the house should be included in the lower elements of the sections - holes for fasteners, welded corners for fastening, etc.
  Each section of the structure must be primed and painted.
 Technical aspects of the winter garden above the house
Roof
The roof must necessarily have an angle of inclination to the outside of at least 30 °. Such a slope will provide a quick runoff of water, snow sliding, and also allows you to better "catch" the sun's rays. It is advisable to equip the roof with an anti-icing system so that the weight of the snow does not cause it to deform.
doors
Doors, or rather their availability and quantity, depends on your project. Most often, the entrance to the winter garden on the roof of the house is from the inside of the room. Therefore, it is more important to think over the stairs, railings. If the entrance will be carried out from the street, it is preferable to use sliding door systems.
Air vents
Their number should be sufficient to ensure constant air circulation. In general, the area recommended for vents and / or doors should be at least a quarter of the entire glazed surface. Take care of reliable hinges for window leaves and mosquito nets.
Stage 3 - glazing of the winter garden
 Another difference between a winter garden on the roof and one attached to a house or a stand-alone one is that the coating (glazing) material must also be fixed on the ground. You can use scaffolding - but this is an additional cost item.
For glazing, glass or polycarbonate is most often used.
Glass Benefits
- constant degree of transparency (glass is not cloudier during its use), resistance to mechanical damage (in particular, to scratching).
Benefits of polycarbonate
- lightness, the ability to replace a separate sheet with your own hands, relatively low cost, good heat and sound insulation properties.
 It is important that the selected material is covered with a film that reflects ultraviolet rays. Of course, they will not affect the growth of plants in any way, but they will make a long stay in the garden uncomfortable.
 At the same time, the use of double-glazed windows with tempered glass is sufficient for the roof and walls. The presence of an energy-saving coating will reduce the cost of heating the garden (greenhouse).
 Important. The entire structure of the garden must be airtight in order to prevent heat loss and drafts. The first will negatively affect your budget, the second - on the growth of plants.
Stage 4 - installation of the structure of the winter garden on the roof

The material was prepared for the site www.site
Engineering communications of the winter garden (greenhouse) on the roof
Like any other winter garden, a roof garden needs various systems to make it more comfortable for plants and users.
Winter garden lighting
For the growth of plants, the light that they receive through the transparent material of the roof and walls is sufficient. However, for some species it is necessary to create additional lighting. The ideal option would be to use fitolamps, which allow plants to develop in conditions close to natural.
Winter garden ventilation
In our case, the task of ventilation is simplified, since natural ventilation is sufficient, which is provided by the required number of opening structural elements (windows, transoms).
Winter garden cooling
Air conditioning, installed on the ceiling, will provide a comfortable temperature for the stay of residents. Here it is important to pay attention to the fact that cold air flows do not fall on the plants.
Winter garden shading
Excess sunlight is just as harmful to plantings as its lack. As protection, internal shading can be offered - film on windows, blinds, roller blinds, roller blinds, etc. Note external shading, so practical in extensions, loses its advantages here.
Winter garden heating
The uniqueness of heating a rooftop conservatory is that it receives a significant amount of heat from the sun. This means that it only needs to be heated between November and March. When choosing a heating system - central or portable, you need to take into account the climate, the size and shape of the winter garden frame, as well as the type of material used for glazing. It is also necessary to install heating devices taking into account the specifics of the roof garden. That is, there is no need to install heating radiators, it is better to equip water heating in the floor, connected to the central water supply or install a warm floor. The installation process is shown in the photo. These are general principles, detailed instructions are attached to each underfloor heating system.
- Underfloor heating under tiles, laminate flooring or linoleum.

- The floor is warm under natural floorboards.

If you plan to use portable heaters, it is advisable to place them in the middle of the room, since the walls are able to accumulate heat.
Another feature of roof heating is the anti-icing system. It is a cable laid along the rafters and along the perimeter of the roof.
Drainage from the roof of the winter garden
In the attached winter gardens, the outflow of water is carried out through the drainage system. Here it is also necessary to equip a drainage system that will receive rain or melt water and divert it from the structure.
Watering the winter garden
For watering plants in the winter garden on the roof of the building, drip irrigation is used, but most often there are not very many plants there, so an ordinary watering can is held in high esteem.
Humidification of the winter garden
If the garden area is large, you can make a small lake (reservoir, pool). Due to the fact that the room will heat up, the water will evaporate and create a humid environment. If the area is small, you can limit yourself to installing a fountain or use a mechanism that works like a solar collector. To make it, you need to take a metal cylinder, paint it black, fill it with water and install it in the most illuminated place. Using a flexible tube, a hydraulic mechanism must be attached to the cylinder to open the hatch. This mechanism, in turn, will be fixed to the flap (transom) in the glass roof. Heating up together with the room, the water in the cylinder will expand and the hydraulics will open the sash. Cooling down, the water will close the sash.
Arrangement of a winter garden on the roof

Of course, in this aspect it is difficult to follow any advice, since everyone has their own vision of an ideal and beautiful winter garden. However, keep the following tips in mind:
- zoning. Conventionally, in each garden there are four zones - a recreation area, an area intended for plants, a passage area and a location for communications, etc.;
- plant species. Different types of plants need different conditions for normal growth. This must be taken into account when choosing and combining them. In addition, there are heat-loving plantations, and there are frost-resistant ones. If you do not plan to maintain a constant temperature in the winter garden, give preference to the latter. It can be noted that one more requirement for plants, they must be quite hardy and unpretentious in care. So you can admire the garden with minimal maintenance;
- planting. Start gardening with tall plants. They are planted first, and medium-sized plants are already behind them. In addition, those that "draw" moisture from the air should be placed closer to the source of moisture - an installation or a fountain, while heat-loving ones - closer to heating. Also, heat-loving plants should be placed on the south side of the garden. Those who need a lot of sun - from the east. Fans of coolness and shade are best landed in the northern and western parts, respectively;
- flowering period. In order for flowering plants to always be present in the garden, you need to try to combine them in such a way that they bloom in turn;
- arrangement of a recreation area. If the winter garden is planned to be used as a rest room or an office, then the location of the table, chairs or armchairs should be determined.
Conclusion
We hope that, using our advice, you will be able to create a winter garden on the roof of a residential building or above a garage with your own hands and realize your dream of an ideal garden.

Often, owners of summer cottages are concerned about the issue of saving territory. A good solution to this summer problem will be the placement of a greenhouse on the roof of an outbuilding. And even better - arrange it right in the attic of the house.
Hothouse on the roof of the bath.  Greenhouse on a brick garage.
  Greenhouse-winter garden on the roof.
Economic advantages of a rooftop greenhouse
Such a decision will help the owner of the cottage to solve many issues:
- This is an additional protection against precipitation of the roof of the building.
- The organization of the greenhouse in the attic will increase the thermal insulation of the house.
- Heat losses, which are almost impossible to completely get rid of, will be used expediently.
- Saving land on the site will allow you to grow more crops. And if the seedlings were previously grown in a room on the windowsill, then moving the boxes to the greenhouse will make life more comfortable and the house cleaner.
- Carbon dioxide rising from living quarters is essential for gas exchange and plant photosynthesis.
- There is no need to spend money on lighting, because plants are provided with light throughout the day - trees and buildings do not interfere with the development of plants, since the structure rises above everything that gives shade on a sunny day.
- By placing a greenhouse on the roof, the owner saves on the foundation, conducting communications for plumbing, heating and ventilation.
An important factor is the fact that the greenhouse, located on the ground, is in direct contact with the soil in early spring, when it is still completely frozen. On the roof, there is no such problem. Therefore, the roots of plants receive more heat, and the seeds germinate faster.

 The carbon dioxide that humans emit is needed by plants for photosynthesis.
 Ways to equip a greenhouse on the roof
There are several options for organizing this know-how.
Type "Second roof"
A greenhouse is equipped directly on the building itself, using the roof as its foundation, if it is not sloping. To do this, you will need to build the walls up. It is best to make them with a transparent material, such as glass. You should also take care of the second roof, which, like walls, allows light to pass through.
You can use the second option: make the second roof gable or single-pitched. Of course, working in such a greenhouse will not be as comfortable as where the walls have been built up, but in economic terms, this option wins.
Drawing equipment for a greenhouse on a flat roof.Attic type of greenhouse
This option consists in the fact that the owner simply remakes the roof itself, replacing it with a transparent one. Boxes with earth and plants are installed in the attic.
It is important to remember that each building has its own purpose. And if the attic in the house was equipped with the expectation to play the role of only a mezzanine for storing rarely used items with low weight, then it is quite possible that it will not be able to withstand the load that is intended for the greenhouse.
Therefore, it is necessary to strengthen the supporting beams, the floor itself. There is another option: lay a new floor in the attic, bringing it outside a little further than the walls. Its edges must be installed on new pillars-supports. Then the greenhouse will not create additional load on the walls and ceiling of the building.
 Drawing for strengthening the greenhouse structure.
 If the house was originally planned as a building with an attic, which it was decided to use as a greenhouse, then there should be practically no problems with refurbishment.
Greenhouse on the roof or attic, planned before the construction of the building
It is optimal to foresee the equipment of the greenhouse in advance even before the construction of the house or outbuilding begins. Indeed, in this case, during the preparation of the project, it is possible to calculate the bearing capacity of the floor so that subsequently there is no sagging of the beams and the occurrence of other undesirable moments.

Rooftop greenhouse equipment
The owner who decides on this know-how should take care of factors such as:
- greenhouse water supply;
- floor waterproofing;
- ventilation;
- light flow control.

Water supply
The greenhouse needs water, because plants require constant. You can, of course, carry it in buckets upstairs, although this is difficult. But in any case, you need to make sure that the stairs to the greenhouse are comfortable and durable.

It is best, of course, to carry the water upstairs. This is not so difficult to do if the house itself already has running water.
If there is water only in the column, which cannot be manipulated while in the greenhouse, then you can put some container there, which you fill with a watering hose, and then water the plants from it.
Waterproofing
And here the question arises: what can happen if the hose suddenly breaks or is pushed out of the tank, the water container itself overturns or simply begins to slowly leak imperceptibly? The answer is not optimistic. Therefore, it is important to take care of the waterproofing of the greenhouse floor.

You can coat it with hot bituminous mastic. There is another option: put a roll of waterproofing on it.
Ventilation
It is worth considering that warm air always rises. Therefore, the temperature in the greenhouse will be much higher than if it were on the ground. Therefore, the problem of its ventilation is far from the last.
