How to make a New Year's glass ball with your own hands. We make a snow globe with our own hands - the most New Year's souvenir! Choosing figures for the composition
Read also
What should dads and children do while moms are carefully chopping salads for the New Year? Have fun making a magical glass ball with them! After all, Santa Claus is already on his way with gifts, and you still have time to prepare a wonderful surprise for him. Moreover, making a snow globe at home is not at all difficult.
To create a snow ball you will need:
The base can be a small glass jar with a tightly screwed lid;
A small piece of foam;
Decorations, figurines, figurines with a New Year theme or the symbol of the coming year (Yellow Dog). It is advisable to treat metal jewelry with a corrosion protection agent, and if you want to place a photograph inside, it must first be laminated;
Glycerin solution;
Distilled water;
Artificial snow, sparkles, stars. You can make “snow” with your own hands. To do this, you need to peel the eggshell from the film and grind it. You can also use finely chopped rain;
White enamel oil paint (optional);
Epoxy glue (waterproof, transparent), silicone sealant.
When you find all the necessary components, you can start creating a glass ball with snow inside.
Snow globe making process:

1. We make a platform for the figure from polystyrene foam and glue it to the lid. We paint it white. Leave until completely dry.
2. Lubricate the platform with a thin layer of glue and generously sprinkle with glitter. Carefully shake off those that do not stick.
3. We make a composition of figures so that it fits on the platform. Then glue them and let them dry.
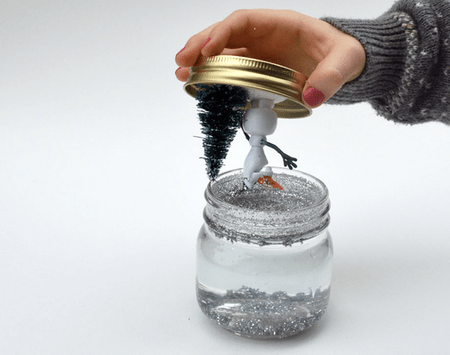
4. After the epoxy glue has completely dried, pour distilled water and glycerin into the jar (glycerin should be slightly less than half of the total liquid in the jar). If you add a little more glycerin, the snowflakes will fall more slowly.
5. Add sparkles, stars and artificial snow.
6. Coat the threads of the lid with glue and close the jar tightly. Let the glue dry.
7. Apply sealant to the joint area to prevent water from leaking out.
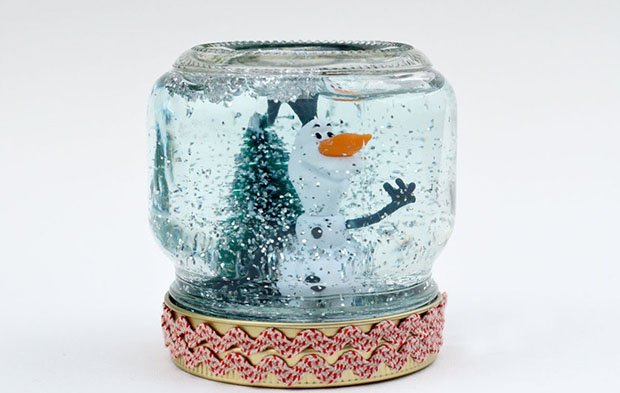
Your snow globe is ready, shake it and enjoy the magical spectacle.
Such a toy can become a decoration for your interior or an unusual gift for guests and loved ones.

To complete the composition, decorate the resulting snow globe along the edge of the lid with decorative braid or ribbon. A little New Year's souvenir is ready!
Based on Internet materials.
The imagination is limitless for realizing creative ideas and creating a unique New Year's interior. The list of original crafts also includes an unusual jar of snow – it’s not at all difficult to make with your own hands. A ball of snow, in which snowflakes swirl and whimsical New Year's figures float when shaken, is a distant childhood memory for almost everyone.
A master class for creating a winter-themed phantasmagoria with your own hands in an ordinary glass jar is incredibly simple. Shall we try?
Decoration materials
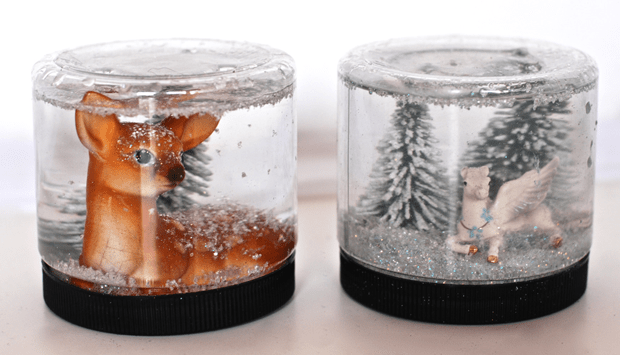
To create a New Year's jar with snow, we will need a tall and straight glass container with a screw-on iron lid with a volume of about 1 liter, loose foam or artificial snow, and minifigures that will live in the jar with snow. Our decor includes a green Christmas tree and a funny snowman with a sleigh.

To create a unique New Year's decor, the choice of miniature toys is quite wide. The main thing is that it fits in the jar. Santa Claus and deer, a Christmas tree, the Snow Maiden, gnomes, forest animals in the snow, in a word, everything that is somehow connected with the New Year and Christmas holidays.

It’s worth thinking about a platform stand for figurines in a jar of snow. This can be a do-it-yourself pedestal made from a piece of wood, polystyrene foam or cardboard. Small white cotton or wool balls will come in handy. You can make them yourself or buy them at a craft store. You will also need a needle, fishing line, glue/tape.

Step-by-step algorithm of work
A stylized New Year's jar in a festive interior will be an excellent decoration for any room: living room, kitchen, children's room. Considering that you will make this miracle with your own hands, a festive atmosphere will appear in the house during the creative process.

- We thread the fishing line through a needle and string cotton or wool balls onto the fishing line. To secure them, use a drop of glue or a drop of nail polish (colorless) on one side of the middle of the ball.
- We attach a platform for a mini-toy to the bottom of the jar. Glue and double-sided tape will help with this.
- We place miniature figures on the bottom of the jar, while there is still no snow, and attach them so that they do not dangle when the jar moves.
- Sprinkle the glass bottom of the jar with artificial snow or loose foam so as to completely cover the “podium”. By the way, artificial snow for a jar is quite easy to make with your own hands. There are many original recipes for making it on the Internet.
- The crucial moment is “snow” in the bank. We attach the improvised garland using hot glue or tape to the screw-on lid. Eight to ten “cotton-snow” threads of different lengths are the best option for the New Year’s decor of our magic jar.
- The final touch is to close the container with a lid with the garlands attached and screw it on. The jar of snow is ready!

Fantasy will suggest decor for winter, Easter, and autumn jars, in which you can use natural materials and a creative set of figurines, toys, and accessories made by yourself.

The shape of the can itself may also be interesting. The more unusual the glass container, the more intricate the painting inside can be. And a reason to create and use “can” decor with your own hands can arise at any moment.
The New Year is getting closer, and more and more I want magic, snowflakes swirling in the golden light of lanterns, a festive atmosphere... In the meantime, there is still a long time before the holiday, we ourselves can make a small miracle - a snow globe with our own hands. This magical gift will definitely appeal to adults, and the baby will be enchanted by the magic hidden behind the glass.
How to make a snow globe? When you look at the magical whirling snowflakes above a small, like a gingerbread house or a toy snowman, it seems that you cannot repeat such a miracle yourself. But we assure you - if you follow the simple instructions, you will succeed!
What do we need to create a ball?
- a small glass jar with a fairly tight-fitting lid (volume - no more than 1 liter);
- a small figurine that will need to be placed inside the ball - a house with glowing windows, Santa Claus or a snow-covered tree - anything that will help create a New Year's mood;
- waterproof glue (it will be more convenient to use a glue gun);
- distilled water;
- glitter (you can use artificial snow);
- glycerin (sold at any pharmacy);
- if you want to create an imitation of snowdrifts in a ball, you can use self-hardening plastic for this purpose.

Snow globe making process:
The easiest way to start creating a snow globe with your own hands is by gluing the toy to the lid of the jar. If you use metal figures, it is better to first treat them with an anti-corrosion agent. Beautifully combine them into a single composition (for this it will be more convenient to use a gun with super glue), you can make snowdrifts from plastic with your own hands - in general, show your imagination and create a truly magical New Year's composition! In this case, you will need to let the plastic dry completely before placing the lid in the jar.

Then wash the jar clean, pour water into it and add glycerin. There should be a little less of it than water; the more of it, the slower the sparkles or snow will fall on our figures. If you're unsure about the dosage, throw a few sparkles into the water and see how fast they go down. Too fast - add to solution glycerin, slowly -water .

Add half a teaspoon of glitter or fake snow. By the way, making it yourself is very simple: just peel the eggshells from the film and grind them in a mortar.
When the glue on which the toys are placed has dried, close the lid of the jar tightly (very tightly!). Tip: over time, water may begin to leak from the ball, and to prevent this from happening, the lid and threads of the jar along the edge can be well coated with glue.

To complete the composition, decorate the resulting snow globe along the edge of the lid with decorative braid or ribbon. A little New Year's miracle is ready!

...and also a gift for a loved one!
If you want to make not just a New Year's decoration, but a gift that will be intended only for one person and can show your love for him, we offer a great idea - a ball with a photo! It is done in exactly the same way as we just described, only inside you will need to place a pre-laminated photograph of the person to whom the gift is intended. Well, or yours together, looking at which on long winter evenings, he will remember you with warmth and joy :)
Last year we bought my daughter shower gel, with a cute girl posing on the bottle. I don’t want to repeat myself, and besides, the very idea of a man-made winter is attractive, so I collected information from the Internet and today I am sharing it with readers. I planned to call the article “New Year’s ball with snow,” but came to the conclusion that it was difficult to make one at home due to the lack of transparent balls. But cylindrical glass jars are found in every kitchen, and it is they that craftswomen use to create homemade winter-themed decorations.
The figures are glued to the lid, dried, then “snow” is poured into a clean jar and filled to the top with “winter air”. All that remains is to connect the two parts of the product and conduct a test: whether snow falls, whether the contents leak out.
Which plot to choose for the craft?
Slender spruce trees look impressive in high jars, next to which children and animals walk; in low jars you can also place one item each: a snowman, Santa Claus, the animal symbol of the year, a resident of the North; tree, winter house, etc. Beautiful and touching Christmas compositions with angels and Christ's nurseries. Sometimes it is appropriate to use a background cut from a postcard. In order for the craft to acquire a complete design, it is worth decorating the lid-base: with paint, fabric, self-adhesive film, bright tape, a bow, or varnish.
What materials are needed for snow in a jar?
- Actually a jar with a tight screw-on lid.
- Small toys that are not afraid of moisture. Ideal - penguins, bears and princesses made from chocolate kinder eggs.
- Supermoment glue for attaching toys to the lid.
- Artificial snow or glitter, crushed rain, foam balls, grated white paraffin candle.
- Transparent liquid filler. Filtered water, a mixture of water and glycerin, or pure glycerin from a pharmacy will do. The higher the density, the slower the snowflakes fall down - it’s more interesting.

What I wouldn't do
Photos with children's heads in jars give off a dismembered look, so I don't like this experiment. I don’t include pictures so as not to offend the authors of the crafts, but they are easy to find on the Internet. But the full-length figurine of a child against the background of a Christmas tree and under the snow looks very cute. They write that the photograph must first be laminated or generously covered with tape, but I’m not sure of absolute tightness, so I won’t risk it.

A transparent ball with snow can be a good competition craft for kindergarten or for the New Year. Little children should explore this toy with their parents, because the can is not only fragile and dangerous, but also quite heavy.
You will learn how to make a beautiful New Year's ball on a stand from a very good video.
WikiHow works like a wiki, which means that many of our articles are written by multiple authors. During the creation of this article, 10 people, including anonymously, worked to edit and improve it.
Are you looking to have a fun next weekend with your kids (or parents) by doing something together? Then you can make a snow globe! A snow globe looks cute and interesting and can be made using common items found in every home. You can also purchase a pre-made kit online or at a craft store to create a truly professional-looking snow globe that you can enjoy year after year. Whatever you choose, read Step 1 to get started.
Steps
Making a snow globe from household items
-
Find a glass jar with a tight-fitting lid. Any size will do, as long as you have the right shapes to fit inside the jar.
- Jars of olives, mushrooms or baby food work well - the main thing is that there is a tight-fitting lid; just look in the refrigerator.
- Wash the jar inside and out. To clean the label if it does not come off easily, try scrubbing it under hot soapy water using a plastic card or a knife. Dry the jar thoroughly.
-
Think about what you want to put inside. You can put anything into a snow globe. Cake toppers or small winter-themed children's toys (such as a snowman, Santa Claus, and Christmas tree), which can be purchased at craft or gift shops, work well.
- Make sure the figurines are made of plastic or ceramic, as other materials (such as metal) may begin to rust or turn funny when submerged in water.
- If you want to get creative, you can make your own clay figurines. You can buy clay at a craft store, shape the piece into whatever shape you want (a snowman is easy to make) and bake them in the oven. Paint them with water-repellent paint and they'll be ready.
- Another suggestion is to take photos of yourself, your family or pets and laminate them. Then you can cut out each person along the outline and place their photo in a snow globe, it will turn out very realistic!
- Even if it is called snowy balloon, you don’t have to limit yourself to creating only winter landscapes. You can create a beach scene using sea shells and sand, or something playful and fun like a dinosaur or ballerina.
-
Create decoration on the inside of the lid. Apply hot glue, super glue, or epoxy to the inside of the jar lid. You can first rub the lid with sandpaper - this will make the surface rougher and the glue will stick better.
- While the glue is still wet, place your decorations on the inside of the lid. Glue your figurines, laminated photographs, clay sculptures, or anything else you want to place there.
- If the base of your piece is narrow (for example, laminated photos, a piece of garland or a plastic Christmas tree), it will be better to glue a few colored stones to the inside of the lid. Then you can simply press the object between the stones.
- Keep in mind that the decoration you make will need to fit into the mouth of the jar, so don't make it too wide. Place the figures in the center of the lid.
- Once you have created your plot, set the lid aside for a while to dry. The glue must be completely dry before it can be immersed in water.
-
Fill a jar with water, glycerin and glitter. Fill the jar almost to the brim with water and add 2-3 teaspoons of glycerin (found in the baking section of the supermarket). The glycerin will “compact” the water, which will allow the glitter to fall off more slowly. The same effect can be achieved with baby oil.
- Then add glitter. The quantity depends on the size of the jar and your tastes. You want to add just enough glitter to compensate for the fact that some of it will get stuck at the bottom of the jar, but not too much or it will completely cover your decoration.
- Silver and gold glitter are great for a winter or Christmas theme, but you can choose any color you like. You can also buy special "snow" for your snow globe online and at craft stores.
- If you don't have glitter on hand, you can make pretty realistic snow from crushed eggshells. Use a rolling pin to crush the shells thoroughly.
-
Carefully place the lid on. Take the lid and secure it firmly to the jar. Close it as tightly as you can and use a paper towel to wipe away any displaced water.
- If you're not sure the lid will close tightly, you can make a ring of glue around the rim of the jar before closing it. You can also wrap some colored ribbon around the lid.
- In any case, sometimes you will need to open the jar to touch up parts that have come loose or to add fresh water or glitter, so think about this before sealing the jar.
-
Decorate the lid (optional). If you wish, you can finish your snow globe by decorating the lid.
- You can paint it in bright colors, wrap it with decorative ribbon, cover it with felt, or stick on holiday berries, holly, or bluebells.
- Once everything is ready, all that's left to do is give the snow globe a good shake and watch the glitter gently fall around the beautiful decoration you've created!
Making a Snow Globe from a Store-Bought Kit
- Add glitter, beads or other small particles to the water. Anything will do, the main thing is that they do not obscure the main decoration.
- To create a unique effect, try adding a few drops of food coloring to the water before adding glitter, beads, etc.
- The item inside the snow globe can look more fun if you add glitter or fake snow to it. This can be achieved by first painting the object with clear varnish or glue, and then sprinkling glitter or fake snow on top of the wet glue. Note: This must be done before the item is placed in water and the glue must be completely dry. Otherwise, this effect will not work!
- The main item could be small plastic dolls, plastic animals and/or elements of board games such as Monopoly, as well as a model train set.