How to make a small fence on the site. DIY fence made from scrap materials. Why do you need a fence?
Read also
Today, a person who decides to build a house on his own must be prepared for significant costs. Most of the money is often spent on the foundation and laying the walls, but in most cases you have to spend a lot on things that at first glance do not seem obvious. We're talking about a fence.
A smart owner of a future home sets the goal of saving on such details. Moreover, this is a completely justified and feasible solution.
A key way to reduce the cost of a fence is to do it yourself. Do not underestimate the importance of this process, since the fence is not only a decorative structure that hides the territory from prying eyes, but also a protective fence designed to prevent suspicious persons from entering the site.

In other words, the design must be reliable, durable and aesthetically pleasing. Only under such conditions will it satisfy all the requirements placed on it. In our case, ease of installation should also be added to the list of conditions.
Materials for building a fence

There are several basic materials that allow you to build an inexpensive and functional structure:
- tree;
- Rabitz;
- corrugated sheeting;
- plastic.
The main limiter in construction technology and combination of materials is financial costs. First, you should select the material that will become the basis for the fence, then find a suitable economical construction technology, and then make basic calculations.
Wooden fence: pros and cons


Modern hardware stores offer a large number of wood options suitable for constructing a reliable structure. This material has some advantages over others, which makes it almost the most popular product.
Advantages of wooden structures:

Flaws:

Materials for installing a wooden fence
To build a standard wooden fence, you will need the following materials: picket fence, cross boards, support posts, pegs, ropes, cement, sand, shovel, saw, fasteners, and a special anti-rotting agent for wood.

It is best if the entire set of tools is collected in one place within reach to facilitate access to components.

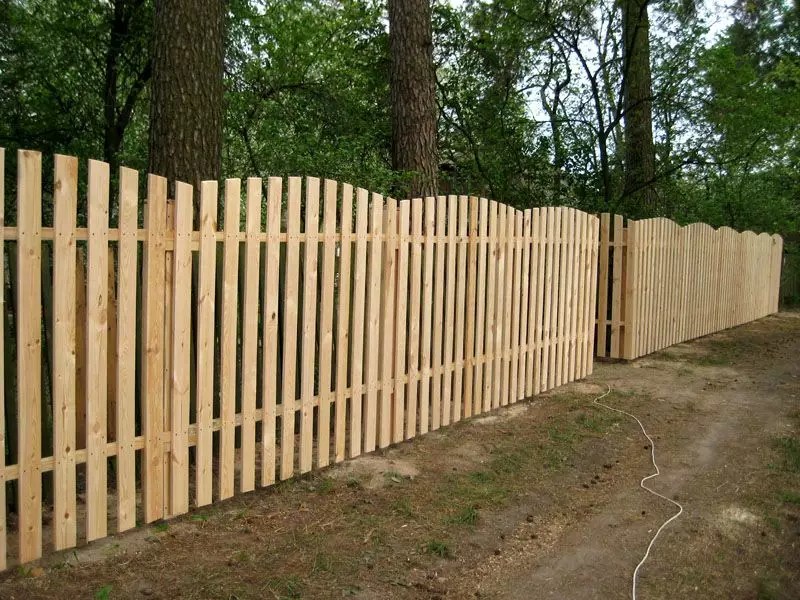
Construction of a wooden fence
Stage 1. We mark the site for the structure and determine the location of the gate. We use pegs and rope. The distance between the pillars is 2 meters. This is how the structure’s resistance to external influences is ensured.
Stage 2. Take a shovel and dig holes for the support pillars.
Stage 3. We immerse the pillars in the ground by about one-fourth of their length.
Stage 4. We install spacers to secure the pillars and fill the hole with cement mixed with sand.
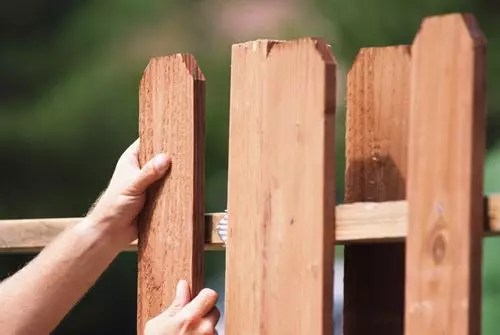
Stage 5. We drive in the cross boards.
Stage 6. We fix the picket fence vertically on the transverse boards.

Stage 7. Paint the finished fence in the chosen color.

At this point, the construction of the wooden fence is considered completed. This is a relatively simple fence option that is usually installed as a temporary option.

Fencing made from mesh is considered to be the most cost-effective option available today. Among the advantages of such fences it should be noted:

Clarifying the last point, it should be noted that installation will require tools that are easy to find in every home. In addition, modern stores offer a wide range of mesh in a variety of colors and sizes, which allows you to move away from the banal appearance of the fence.
Materials for building a fence:

For those who adhere to more original solutions, there are vinyl coverings, but they tend to lose color over time.
Construction of a chain-link fence

Step 1. Carry out the markings.
Step 2. We dig holes for the support pillars.
Step 3. Place the pipes in the holes.

Mesh fence
Step 4. Fill the holes with pre-prepared concrete mortar. In some cases, builders simply drive pipes into the ground using a sledgehammer. This is possible provided the soil is sufficiently soft.
Step 5. We begin to secure the mesh. We fasten the beginning of the roll at the first pipe, which acts as the beginning of the future fence.
Step 6. We stretch the mesh around the remaining supports, gradually securing it. It is important to ensure that the mesh does not sag, otherwise all work will be useless.


Stages of work during sectional construction of a fence
Step 1. Lay the foundation.
Step 2. We build a tension frame from metal corners.
Step 3. Fasten the corners between the supports.
Step 4. Attach the mesh inside the corners using welding.
Chain-link fences are very easy to erect without the help of specialists, which allows you to save a lot and try your hand at it.
Corrugated fencing

This type of fence can rightfully be called the most common. Most often it is used for fencing summer cottages and private houses. To erect such a fence you will need a welding machine and a little patience. In general, the installation technology is very simple, which can be attributed to the advantages of the design.
Modern construction markets offer corrugated sheeting in various colors and sizes, so buyers should not limit themselves to their imagination.
As additional components, you should purchase anti-corrosion paint, support structures, logs, shovels, screws, and also make a cement mortar.
Installation of a corrugated fence

Step 1. We mark for the future fence. It is important that the distance between adjacent supports does not exceed two and a half meters. Pegs and twine are used as auxiliary elements.
Step 2. We make indentations in the established places. In the future, supporting elements will be inserted into these holes. This task can be accomplished using a special drill or simply digging a hole with a shovel. The standard depth of the pit is one hundred and thirty centimeters.
Step 3. We install support pillars at the corners of the territory, and then along the entire perimeter.
Step 4. Strengthen the bases of the pillars with cement.
Step 5. Install the logs that are necessary for further attaching the corrugated sheeting.
Step 6. Attach the sheets to the joists using self-tapping screws.
Step 7. Paint the metal elements with enamel. In some cases, a primer is used.
Ultimately, the fence turns out to be quite pleasant in terms of aesthetic characteristics, as well as durable and reliable. It looks much more solid than a fence made of wood or chain-link mesh, and therefore can be regarded as a full-fledged fence.
Plastic fence

Plastic deservedly bears the title of one of the most affordable materials for building a fence. This is a real salvation for summer residents who do not want to build expensive structures on their plots.
The positive aspects of such fences are as follows:
- strength;
- durability;
- ease of installation;
- low cost;
- nice appearance.
Installation of a plastic fence


Stage 1. We mark the area where we plan to install the fence.
Stage 2. Mark the places where the wicket and gate will be.
Stage 3. In established places, we drive support pillars into the ground.
Stage 4. We fix piles made of durable metal in the corners.
Stage 5. We stretch the piles along the perimeter of the site.
Stage 6. Secure the pillars with spacers.
Stage 7. Attach the sections between the supports.

Thus, as a result of simple machinations, a beautiful and functional fence is obtained, which in its external qualities, although it cannot compete with structures made of decorative stone or forged elements, completely satisfies the owners of the territory.
This article discussed the simplest ways to build fences, the choice of which is determined only by your preferences. Now you can build a cheap fence with your own hands.
Video – Construction of a wooden fence
Video - Construction of a mesh fence
Video - Installation of a fence made of corrugated sheets
Video - Installing a plastic fence
Wooden fences have undeservedly faded into the background. And completely in vain! Of course, in terms of stability and reliability, fencing made of boards is significantly inferior to its brick and concrete counterparts, but a minimum of time, effort and money is spent on erecting a wooden fence.
At the same time, you can handle all the necessary activities yourself. By showing a little imagination and doing everything according to the instructions, you will create a truly original and interesting design.

What to build a fence from?
Before starting construction, we pay due attention to the choice of source material. For the construction of the fence we use only high-quality dense wood. The wood of oak, aspen, ash, Siberian larch, alder, and mulberry is perfect.

Among all the listed options, the most interesting is Siberian larch. A fence built from it will last as long as possible. If one of the main enemies of most wood species is moisture, then larch only becomes stronger from contact with water.


We limit the use of pine only to the construction of a fence panel; in the event of breakage or wear of the fence, such material can be replaced without special financial costs and effort.
 Picket fence - pine
 Important! And under no circumstances do we use birch to build a fence - it is extremely unstable and short-lived.
It is also important to choose high-quality material for making supports. Wooden pillars will be best combined with wooden spans. You can either dig them into the ground or attach them to special metal stands (consoles) concreted in pre-created recesses.
Important! To extend the service life of wood, it must be pre-impregnated. It will reduce the intensity of the harmful effects of moisture, air, fungus and other harmful microorganisms on the building material.

To consolidate the effect, it is recommended to treat the wood with a special dye, for example, Swedish paint. It will give the material a very beautiful shade. If desired, a different color dye can be applied over the dried Swedish paint.

To prepare Swedish paint we will need:
- copper sulfate – 250 g;
- salt – 250 g;
- red lead - 250 g;
- drying oil – 230 ml;
- flour – 570 g;
- water - about 4.5 liters.
Following the given proportions, you can prepare any required amount of dye.

The paint is quite economical. About 200-250 ml of dye is spent to cover 1 m2 of surface. The given recipe allows you to prepare golden-colored paint. If you want to get a different shade, replace red lead with manganese peroxide, ocher, or another component of your choice.
Swedish paint is prepared in the following order:
- the paste is cooked. To prepare it, stir the flour in 3 liters of water;
- the finished paste is passed through a sieve - this allows you to remove lumps from the mixture;
- the strained paste is put back on the fire. Salt and copper sulfate are added to the mixture. Constantly stir the mixture until the vitriol is completely dissolved;
- While continuing to stir the paste, add drying oil to it, and then pour in a certain amount of water (usually about 1.5 liters) until a homogeneous liquid composition is obtained.
Apply the finished paint to the wood in a double layer.

Table. How to paint a wooden fence
| Paints | Binder | Life time |
|---|---|---|
| Acrylic | Polyacrylate | 6-20 years |
| Water-dispersed | Organic solvents | >20 years |
| Oily | Drying oil | 2-3 years |
| Silicate | Liquid incandescent glass | 20 years |
| Silicone | Silicone resins | 20 years |
| Enamel | Alkyd resin | 10 years |
For example, you can assemble a fence using the wattle fence principle. The boards are attached in a curved state. Trying to straighten out, they will fit quite tightly to the support pillars.
Another great option is to fill the space between the supports with wood siding. We fasten the sheathing boards starting from the bottom, maintaining a 25 mm overlap.
Fences made in the form of blinds look no less original. By laying the boards with a downward slope towards the street, you will create an invisible fence that is resistant to wind loads.
The boards can also be nailed at the ends. To perform the highest quality cladding, we first make markings on each rack.
If metal posts are installed, they can be hidden by sheathing the posts on both sides. We close the metal supports on top with wooden plugs.
If desired, you can make the fence more original using wooden support posts. We make inclined cuts-grooves in the supports, and then insert the ends of the lamellas into them. Additionally, we fasten each strip with self-tapping screws. To hide the fastening points, we cover the screws with wooden covers. We crown the upper part of the supports with plugs.
To make the fence look more original and modern, we can fill the boards with a small gap (up to 15 mm). At the same time, the narrower the boards are (of course, within reasonable limits), the more interesting the fence design will be.
You can also use boards of different widths. When choosing this cladding method, be sure to ensure that the pattern on adjacent sections matches.
There are a lot of wooden design options. Choose the one you like and start building the fence. You already have all the knowledge necessary for this.
Prices for various types of construction boards
Construction boards
Good luck!
Video – DIY wooden fence
DIY decorative fence. Photo


A beautiful and reliable fence will decorate and secure any plot of land. When you are just planning to build it, the question arises - what is the best material to make a fence from so that it fully performs its functions? To do this, you should take into account the location and purpose of the structure. If the fence will protect the area from the street, then it is made of more durable materials. For example, from stone, corrugated board, concrete, brick, wood. To fence from neighbors or to zone your site, you can build a fence from chain-link, plastic, or picket fence. Sometimes such a structure is made from two different materials, successfully combining them.
Combined fence options are practical and often economical without losing “presentability”
Let's take a closer look at what to make a fence from. We list the most popular building materials for fences, from which durable and presentable structures are made.
Concrete blocks
 Concrete block fencing
 If you make a fence from two elements, concrete pillars and blocks, then it will last longer than the cottage can stand. This is a symbol of inaccessibility and reliability. The main advantages of concrete include:
- Simple and quick assembly.
- High strength to all types of impacts.
- It can be built on any soil.
- There are many block design options available. Their sizes may also vary.
- Durability.
And now a few disadvantages:
- High construction cost.
- The area will not be sufficiently ventilated.
- To do it, you need to use construction equipment.
- If the manufacturing technology is not followed, the fence may warp after the winter season.
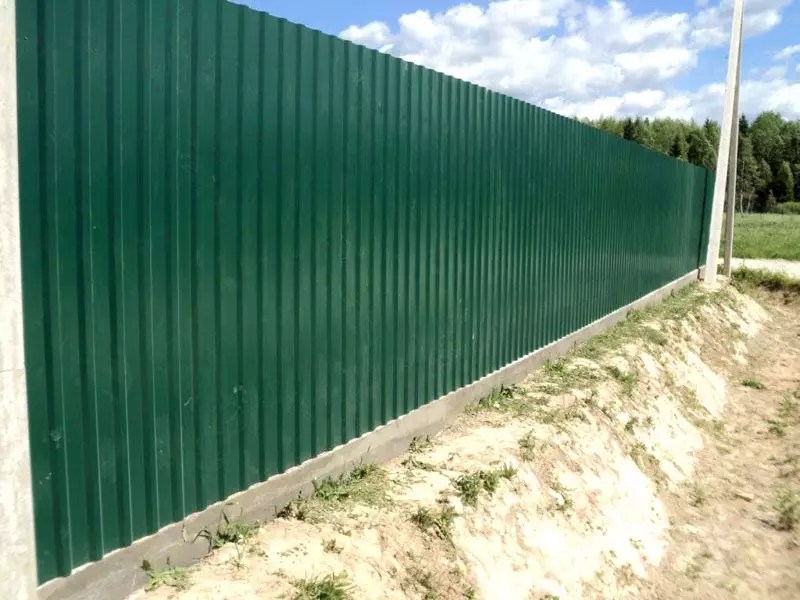
Profiled sheet
 Fencing made of corrugated sheets with posts made of profile pipes
 Often the choice of material for a fence often depends on the availability of those on the local market. Profiled sheeting is one of the most common materials for arranging fencing, especially for dacha fences. It combines ease of installation, affordable cost and durability of the structure. Completely blocks visibility of the area. There is a variety of material available for sale, and the sheet sizes allow you to make fences of various heights. It is recommended to use sheets that are not just galvanized, but also coated with a polymer layer, as a result of which the service life of the corrugated sheet increases significantly.
Advantages of a fence made of corrugated sheets:
- It is being built quickly. You can build a fence yourself.
- The light weight of the sheets eliminates the need to build a strong foundation.
- They combine well with stone and brick pillars, but the sheets can also be installed on a frame made of metal pipes.
- Resistant to moisture, frost and heat.
- Does not fade in sunlight.
- To make the new fence beautiful, it is better to make it from shaped corrugated sheeting, the upper part of which resembles domes or peaks.
- Relatively inexpensive
 Curly profile
 Disadvantages of the material:
- An impenetrable wall is formed in the area, which the plants do not really like.
- The fence looks monotonous, in the form of a solid monochromatic wall.
Forged metal fence
This fence looks very stylish. It can be made in combination with or stone pillars. Usually it consists of two elements: an elevated foundation and directly forged gratings.

Advantages:
- Presentable appearance.
- The fence can be made according to an individual drawing, taking into account the desired section sizes.
- Variety of manufacturing options.
- The area is well ventilated.
- Proper processing of the metal provides high-quality protection against corrosion.
Flaws:
- The site will be completely visible from the inside. In some cases, some kind of facing materials are installed on the sections, due to which the visibility of the area is partially blocked.
- Periodically, metal elements must be tinted.
Wooden fencing
 Horizontal checkerboard fence made of wood - a completely modern version
 It is advantageous to make a structure made of wood if there is an excess of wood or there is an option where to get it, substandard wood, maybe of decent quality, . In all other cases, the cost of its production will be quite high (with the exception of the picket fence). There are the following types of wooden fences:
- Fence. Can be thinned out or solid.
- Boards. Can be mounted horizontally, at an angle or vertically.
- Wooden grate. The slats are usually located at an angle.
- fence made of boards.
Which fence is best to make is up to each site owner to decide for himself. The location of the fence and the need to ventilate the area are taken into account.
Pros of wood:
- Eco-friendly material.
- Nice appearance.
- Easy to install.
- It can be successfully integrated into the design of the site.
- Compatible with any other materials.
- It is light in weight, which is why it does not require a powerful foundation.
Disadvantages of fencing:
- High price.
- The need for periodic treatments against pests and dampness (pillars in the ground are especially affected).
- The service life of wood is not very long.
Brick
Brick fencing is considered traditional. It has been used successfully for many years. Brick is a symbol of constancy and reliability, emphasizing the taste of the owners.
Advantages:
- Reliable fencing.
- It harmonizes with almost all building materials: stone, metal, wood, glass.
- Durability.
- Does not require repair or maintenance.
Flaws:
- When a brick fence is made, a powerful foundation is poured due to the significant weight of the structure.
- The cost of such a structure is considered one of the highest.
- Laying requires the involvement of qualified craftsmen.
Stone
 Exterior view of a fence made of wild natural stone
 To make a fence, stone can be used either artificial or artificial. The latter option will cost much less. The advantage of a stone fence:
- Excellent appearance.
- Durability.
- Reliability.
- Lack of care.
Flaws:
- High price, especially if you make a fence from natural stone. You also need to take into account the cost of delivery of materials.
- The lead time for its production can take a long time.
 Gabion - a fence made of stones in a grid
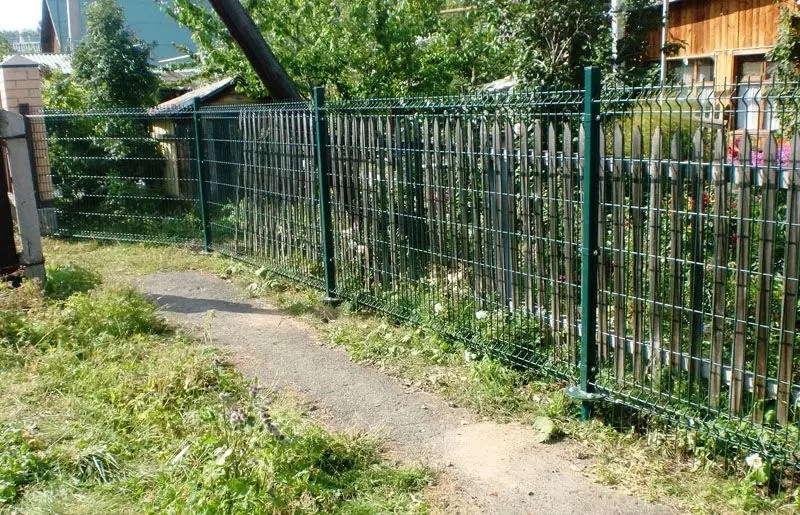
 Rabitz
 Green mesh fence
 For fencing, galvanized or polymer-coated mesh is used. It is better to use a material with a polymer layer, if possible. The mesh dimensions are selected depending on the height of the fence.
Advantages of the chain link:
- The entire area is well ventilated.
- Inexpensive price - the lowest among all materials used for the construction of fences.
- Simplicity and speed of installation are important in a summer cottage.
- You can choose the cell size you need.
- Lightness of design.
Flaws:
- The site is completely visible.
- Using a special tool, the mesh can be cut and penetrated into the area.
- The net can be stolen from the site in your absence.
Plastic
 Chess board made of dark plastic picket fence
 Plastic fencing is not suitable for fencing a site from the street, but it is successfully used for zoning an area, as well as for establishing boundaries between neighboring sites.
Pros of plastic:
- make the area more aesthetically pleasing.
- Functional zones are successfully demarcated. For example, flower beds, playgrounds, recreation areas.
- Plastic is resistant to temperature changes, is not afraid of moisture, and does not rot.
- Over time, plastic fencing will not change color.
- There are many design options from which you can choose the most suitable type of fence.
- The sizes of the plastic sections provide even more choice for creativity.
Disadvantages of plastic:
- Insufficient resistance to mechanical damage.
- It is advisable to use only inside the site.
- The service life usually does not exceed 12-15 years.
We have analyzed the most popular materials for constructing fences. Which one is better to choose and what the fence can be made from is decided on an individual basis, taking into account many related factors. Consider the purpose of the fence, the location of the site (house or cottage), your financial capabilities, and possible labor costs.
The fence is an important part of arranging a summer cottage. The main purpose of this structure is to delimit plots of land and ensure protection of the yard from intrusion by outsiders and even from their views (if the fence is solid).
A well-designed fence performs not only these functions: it completes the landscape decor and demonstrates the respectability of the owners of the summer cottage. Corrugated fencing
Which fence is most suitable for a suburban area? First of all, the costs of which are offset by quality. A self-made budget fencing on a country plot is easiest to design and make with your own hands from corrugated sheets.
A fence for a dacha made of corrugated sheets is the optimal solution - both in terms of cost and quality.
This fence has a number of advantages:
- acceptable budget cost;
- long service life;
- large selection of color options for profiled sheets;
- ease of installation;
- low maintenance (the fence doesn’t even need to be washed; rainwater is enough).

Corrugated fence: photo at the dacha
The corrugated sheet fence is erected in several steps:
- Holes for supports are prepared at a distance of 2 to 2.5 m, their depth is in the range of 0.8-1.2 m.
- The bottom of the holes is covered with a layer of crushed stone (layer thickness is about 20 cm).
- A supporting structure made of metal is installed (even placement of the supports is achieved using a level).
- The recesses are filled with a mixture of concrete and sand (the solution is prepared in proportions of 1:8).
- After the concrete-sand mixture has hardened, two cross-sections from a profile pipe are attached to the supports by welding.
- The profile sheets are connected to the joists using self-tapping screws.
It is not difficult to design a budget fence made of corrugated sheets for a summer cottage, made by yourself, it will not take much time and will not require large expenses.
Metal fence
A metal structure is also suitable as a fence for a summer cottage. How to make a metal fence at the dacha? It's simple - we draw a fencing diagram, purchase materials and erect the fence using welding.
The technique of designing a metal fence is similar to the construction of a fence made of corrugated sheets, the only difference is in the cladding. To create spans, mesh and metal rods are used. During the manufacturing process of the frame, structural elements are connected by welding.
The specificity of a metal fence is that it can do without a foundation.
Forged structures, mesh fencing, sectional fences or fences made of corrugated sheets help to achieve harmony with the landscape decor and country house building.

Fences and enclosures for summer cottages, photos
Wrought iron fencing is not a budget option, and besides, to erect it on a summer cottage, you need to work hard.
On a note! Fences constructed from iron rods belong to the economy category fences, but such structures are not blind: the courtyard will be open to the views of passers-by.Plastic enclosing structure
Plastic fencing is considered an innovation in the improvement of suburban private areas. Plastic fences are easy to install, which is especially valuable for those who have the skills to assemble PVC fences and plastic profiles.
For the construction of such a fence, high-strength plastic is used, which has increased resistance to damage.
There are plenty of advantages to a plastic fence:
- affordable price;
- ease of care;
- easy installation;
- presentable appearance of the assembled structure;
- resistance to moisture, fire and deformation;
- resistance to fading under the influence of sunlight.

Fence for a summer cottage, photo
Plastic is a material that allows you to create various variations of fencing - solid, picket-type or imitating wattle fence.
Important! The plastic fence does not dry out and is resistant to cracks.Brick fence
Construction of a brick fence is a responsible task, for the implementation of which a number of rules must be followed. Having worked on the construction, the owner will receive a durable fence, characterized by increased strength and aesthetic appearance.
Brick makes it possible to design beautiful, solid fences that fit seamlessly into any landscape design.
A properly constructed brick fence can withstand even heavy wind gusts.
How to install a brick fence at your dacha with your own hands? The construction of a brick fence is carried out according to the following scheme:
- We take measurements of the length of the future fence and create an estimate.
- We mark the site and dig holes for the construction of a strip foundation.
- After installing the supports, the base is immediately poured.
- To avoid joints and increase the strength of the fence, the foundation should be built in one approach.
- After the foundation hardens, brickwork is done. The bricks can be arranged in one row or made in a combined version. If the fence is high, the masonry is done in two rows.

Do-it-yourself country fence, photo
If you don’t have the skills to work with bricks, use the help of professionals. The brickwork must be level. If there is not enough experience, the structure may turn out to be unstable and unpresentable.
Chain-link fencing
The first fences to be built using chain-link fence showed how well this material was suitable for designing light-transmitting fencing to define property boundaries. By installing a mesh fence on your property, you don’t have to worry about the indignation of your neighbors who are summer residents because the fence is shading their plantings.
There are several types of construction mesh:
- with galvanized coating;
- regular;
- coated with plastic.
Plastic coated mesh is a more suitable option for warm climates and coastal areas.
Plastic provides mesh fencing with reliable protection from moisture, but does not withstand temperature changes. The most acceptable solution would be a galvanized mesh: it is considered the most durable.

Do-it-yourself fence inexpensively, photo
- The location of the supports is marked. We place intermediate supports in a three-meter range, tension elements - at a distance of 9 m. As load-bearing sections we use a metal profile with a diameter of 60 mm, the size of the corners is approximately 50 mm or a little larger.
- For intermediate supports, we drill the soil to create approximately 40-centimeter recesses. For tension supports, holes 60 cm deep are needed. If the soil on the site is clay or there are its impurities, there is no need to concrete the holes. Such soil has the property of heaving, which can lead to the appearance of cracks in concrete in the winter season. Sandy or loamy soil should be concreted when installing pillars.
- After installing the tension supports, connect them to other posts using bolts and metal angles using a welding machine.
- When installing only intermediate supports used as load-bearing structures, the mesh will be taut. But the fence will not be very reliable - for the reason that the sheathed lower part can be easily lifted, which makes it possible for illegal entry into the territory, both by nimble children and thieves. To make the fence more reliable, pass 3 mm wire through the mesh cells in three horizontal directions. To tighten, make three holes in each support with a drill - they should be through.
- We fix the mesh on the supports. We place the roll of mesh in a vertical position against the support and check that the folded ends are at the top. We attach the top section of the mesh to the top of the support and move to the next one, slowly unwinding the mesh. The wire should be passed through the mesh between the supports and its ends inserted into the existing holes. The wire rod is tensioned and secured with bolts.
Wooden fence
What can you make an inexpensive fence from? The classic and simplest option for a summer residence is considered a wooden fence. Among wooden structures there are such popular variations:
- wattle fence;
- fence;
- slab fence.
There is also a modern type of wooden fencing - “American ranch”.
Wattle
To erect a fence on a site, you should prepare branches, supports and pipes. Provided that the supporting structure will have approximately 8 cm in diameter, it is preferable to use willow, birch, poplar branches, willow or flexible vine as spans.
To build a simple wicker fence, branches of trees growing in the garden are suitable. But it is important that they are cut at an angle of 60 degrees.

Cheap fence for a dacha with your own hands, photo
Stages of fence construction:
- Use logs from deciduous trees as bases. The number of bases depends on the size of the proposed fence. The approximate installation distance of the pillars is 50 cm. If the rods are thick enough, the interval can be increased. Place the last three supports at a distance of 20 cm from each other.
- Treat wooden elements with protective impregnations, flame and resin. Particular care must be taken to treat the bottom of the supports, which will be located in the soil: this will prevent the destruction of the wood.
- Weave branches between the supports. Insert the first rod into the soil 15 cm and install it vertically. The remaining ones, regardless of how they are located, braid the wire rod around the frame and secure the end that is thicker first, and place the thin branch along the support through the attached vine. Tap the fabric with a hammer every fourth row. Arrange thin twigs in several pieces and move the edges inside the fence so that they are not visible.
- Cover the finished fence with varnish and plant plants along the fence that can climb along it, for example, ivy. A simple fence is ready.
 Are you landscaping the area around your house? We suggest using this for this purpose, you can create useful and beautiful things that will originally decorate the local area.
Read reviews from owners of container houses: evaluate for yourself the advantages and disadvantages of building housing from shipping containers.
Picket fence
A picket fence is a ventilated fence consisting of wooden planks. The construction of a picket fence begins with the installation of metal supports (pipes with a diameter of 60 mm are needed).
Having concreted the holes, design the logs. Weld the cross-sections to the core elements, placing them overlapping, and remove excess welding.
The next step is installing the gate and fittings. Cover the end part of the pipes with plastic plugs to protect the supporting elements from moisture getting into them and to prevent rust. Using self-tapping screws, secure the wooden planks to the cross-sections at a distance of 3 cm.
Cover the fence with ridge strip to make it more presentable. Air flows pass through the picket fence unhindered, which has a positive effect on the growth of garden crops.

Original wooden fences, photo
Fencing lined with slab
A slab is lumber with one sawn side, and the other can remain intact or have a partial sawn. When working at a sawmill, logs usually remain, which can be used when filling the spans, thereby saving on materials.
Croaker perfectly imitates wood; This material makes it possible to obtain an inexpensive but aesthetically pleasing fence.
Covering a fence with a slab is quite simple:
- Remove the bark with an ax or sharp shovel to prevent insects from damaging the fence. Polish the sanded material and treat it with an antiseptic.
- The supports can be installed from either metal or wood. If you choose the second option, larch, pine or oak wood with a diameter of 200 mm and a length of 2 m is suitable. Treat the bottom of the supports with heated resin. If the fence will have purlins, leave a distance of 2.5 m between the posts.
- If the soil is loamy, there is no need to strengthen the supports. Make holes in the places where the pillars are placed with a drill and hammer the pillars in with a sledgehammer. If the soil is sandy or black soil, first make holes with a depth twice the diameter of the supports. Cover the bottom with crushed stone (a layer of about 10 cm) and compact it. Place each support in the center of the recess and fill it with crushed stone, checking the evenness of the installation with a level.
- Sheathing is done in any direction. First you need to leave small cracks, and then seal them with a slab, with the bulge outward.
- Cover the fence with varnish or paint it.
- To protect the end part of the supports, install metal or plastic cones.
If the material is located horizontally, secure the beam to the supports using nails or self-tapping screws, overlapping it on one side and the other. To sheathe a fence vertically, cut the material transversely and fix it on the purlins with the convex part.

Fence at the dacha, photo
American wooden fence
To assemble an inexpensive fence in the style of an American ranch, treat the wood with antiseptic compounds, especially the bottom of the supports - the part that will be in the ground. After this, mark the territory and place supporting elements in the corners of the marked area of the territory, concrete them and cover them with earth.
To ensure an even installation of the pillars, stretch a rope between them - this way you can optimally fill the space between the sections - and place intermediate supports at a distance of 2 m.

Do-it-yourself fence at the dacha, photo
The transverse elements are attached to the posts with nails; Self-tapping screws are also used for this purpose.
The fence is varnished or painted.
Foundation
The choice of foundation depends on what material the fence will be made of.
Important! Brick and wood fencing needs a solid foundation. If you fill it correctly and correctly install the supporting elements, the fence will last for many years.To design fences, two main types of foundation are used:
- tape;
- columnar.
Tape-type bases are designed in the following situations:
- when constructing bulky fences;
- if the work is carried out on heaving soils;
- when you need to design a massive solid fence that serves as an obstacle even for animals.
In order to build a strip foundation, you first need to dig a trench: its depth is 30-80 cm and even more if the soil is unreliable. After this, a sand and gravel cushion is prepared, the foundation is filled with water and tied with reinforcement.
The next step is erecting the formwork and pouring it with concrete.

The post base is great for lightweight fencing. A properly designed pillar foundation can last no less than a strip foundation.
Stages of pouring a pillar base:
- Using a drill, we drill holes 1-1.5 m deep and 15-30 cm larger in diameter than the supports.
- We make a sand cushion (you can add crushed stone), a layer of 20 cm and fill it with water.
- We install the supports evenly and fill the recesses with cement.
- We install spans.
Ways to decorate a fence
The fence at the dacha should not only be reliable, but also presentable in appearance, even if the economy class option is chosen. After all, owners of summer cottages spend a lot of time in their gardens, and any owner would like the fence to be pleasing to the eye.
After looking through many photographs, you will probably select a photo or picture with an option for a cheap decorative fence that suits you, or use our ideas for decorating a homemade fence.
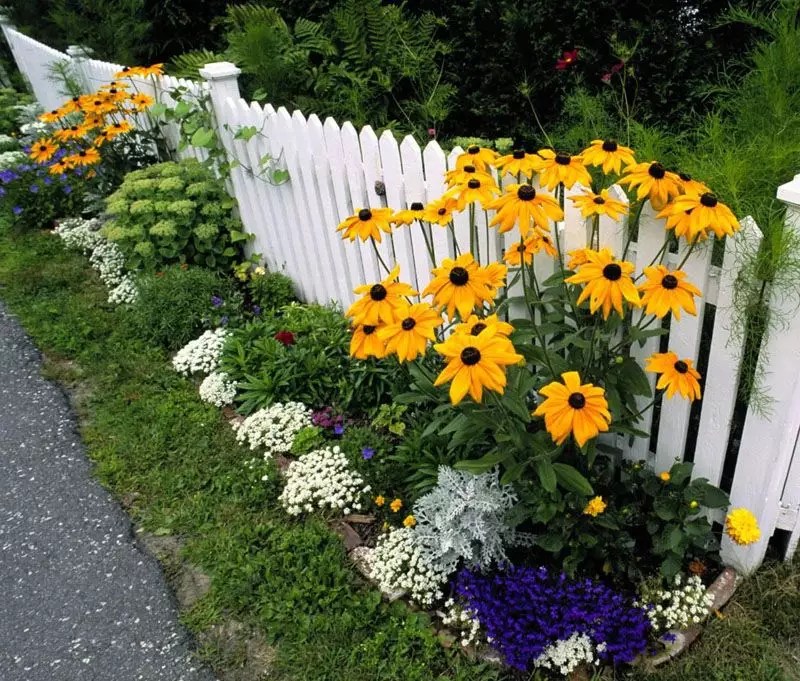
The best way to decorate a fence is to plant climbing plants next to it - for example, grapes or pleasant-smelling hops. You can also plant climbing annual plants.

Nothing pleases the eye more than flower beds along fences. Moreover, not only flowers, but also shrubs are planted next to the hedges for decoration.
Another original way to decorate a fence at your summer cottage is to paint it and make a gazebo or fountain next to it.
Pots with bright flowers, which will delight not only with their attractive appearance, but also with a pleasant aroma, are also great for decorating a fence.
There are plenty of options for creating a fence at your dacha with your own hands. This work is not so difficult to cope with: if you wish, it is quite possible to make both a beautiful and reliable fence.
Video
Other original ideas for building a fence for your country house with your own hands - look at the beautiful and unusual options and choose which fence to make for your country house:
When you get tired of the city noise and bustle, small summer houses are bought and built. Some are building solid ones, where you can go to relax even in winter, while others are using the site for a garden. In any situation, the question arises, which fences to choose for your dacha. Photos, materials, creative ideas, etc. - all this will be presented in full below. The fencing of the territory is often due to the rules of the cooperative or the need to create a barrier from the roadway. Based on the purpose of constructing the fence, the type, material and height of the structure are selected. Let's talk about all this in more detail.
When choosing a fence for a dacha based on a photograph, it is difficult to evaluate its practical side. Therefore, first you should decide on the types of fencing, and then look through all sorts of catalogs with photo examples of finished work.

There are many types of fences, here are the main subgroups:
- Plastic structures. Modern models that allow you to make a fence at your dacha inexpensively will last a long time: the plastic does not corrode and is resistant to temperature changes. There are options, completely or made with gaps from figured elements.

- Wooden fences. The most common options. But such structures have one drawback - the wood must be treated with agents against mold and rot so that it lasts longer without losing its appearance.
- Concrete options. The reliability and strength of concrete fences can be seen from afar, but in many dacha cooperatives it is prohibited to use fences that tightly block the area. The construction of the structure will require more money, but it will last a very long time, recouping the costs.

- Fences from (Euro-variants). They are attractive due to their beauty and durability, but the cost is high, so not every summer resident can afford such a fence.

- Polycarbonate- cheap and cheerful. This artificial material can be used not only in greenhouses and greenhouses. It is not exposed to moisture or corrosion, and it is not afraid of severe frosts. The price is affordable, and the sheets can be secured to a metal frame.

- Metal constructions They are characterized by increased strength and are very diverse in design. You can make both a high and low fence with or without gaps. Elite options include custom-made forged structures.

- Profiled sheet- the most popular option due to its affordable cost and ease of installation. Galvanized metal sheets coated with paint of different colors are used. Such structures will reliably hide the area from prying eyes. Disadvantage - if there are chips and scratches on the sheet, the corrosion process may begin.

- Rabitz- a simple option for cooperatives when you cannot block your plot from prying eyes. It is used in protected summer cottages, is affordable and easy to install.

- Hedge- a universal, beautiful and durable option. Can be used as decoration on the site itself.

When choosing a fence for a summer cottage, you should first of all rely on the requirements of the cooperative, otherwise a reliable structure with impenetrable walls will have to be dismantled.
Related article:
You can create a similar decor from trees, climbing crops and shrubs. If you don’t yet know what plants you want to plant, then our review will help you make the right decision.
How to choose fences for your dacha: photos of interesting options
Based on the variety of options, the question arises of which fence to choose for your dacha. At summer cottages, cooperatives have their own rules:
- the height of the fence should not exceed 1.5 m; in some cooperatives it is mandatory to leave transparency;

- a dense fence should be at a distance of 1 m from the border with the neighboring plot;
- if it is necessary to build a fence with a height of 2 m, this decision must be agreed upon with the chairman of the cooperative;
- If the holiday village has an approved general fencing plan, the construction of your own fence will also require approval.

To decide on a specific model of a country fence or think about how to build it, you should consider several nuances:
- Climatic conditions and landscape. For sloped areas, there are special methods for installing and leveling fences. In climates with severe frosts, you need to choose a material that is resistant to cold.
- Material of manufacture. For large areas, preference is given to wood, metal, concrete or brick. To fence a small area, corrugated sheets, plastic or polycarbonate are well suited. A hedge can be planted around the perimeter of any area.

- Dimensions and transparency. The indicators are based on the requirements for fencing in a holiday village.
- Lifetime. Choose the optimal price-quality ratio, then the design will last a long time and retain its presentation.
- Price. If you want to save money on fencing your territory, you can make a fence with your own hands from available materials.

Any option must first of all be practical, because the purpose of the fence is to protect against unauthorized entry into your territory.
We build fences from scrap materials with our own hands: photos of finished creations
A variety of manufacturing materials and models allows you to find a suitable fence for every consumer. If you want materials and work to be cheap, DIY fences for your dacha are the option just for you.
By design, any fence consists of sheathing and frame (supporting structures). The materials for the cladding are chosen at your discretion, and the supporting vertical pillars, fixed into the ground using a concrete mixture, are usually made of durable metal or stone; there are concrete options.
To properly build a fence with your own hands, you should pay attention to several aspects:
- Soil type. The maximum weight of the structure, as well as the required foundation, depends on this indicator.
- How strong is the wind. If the area is open and there are frequent storm warnings, then it is better to choose a loose option or make a good and strong foundation.

- External component. In most cases, owners of country houses try to maintain the commonality of compositional design and fence.
If you decide to build a fence with your own hands, photos of fences made from scrap materials will help you decide on the choice of design:
How to make a wooden fence at your dacha with your own hands with photos
Wooden fences are environmentally friendly and safe for the environment; the material is easy to work with and give it the desired shape by sawing out the elements. The designs look great in combination with natural decorations in the form of flower beds or trees. But, despite all the advantages, wooden fences require more attention and care.

Among the varieties are:
- classical;
- lattice;
- ladder;
- chess;
- vertical picket fences.

Do-it-yourself fences can be made cheaply with the correct distribution of the material; for example, you can spend significantly less boards on the picket fence option than on the classic look.
Here are some photos of DIY decorative fences:
Let's take a closer look at how to make fences at the dacha with your own hands from boards:
| Illustration | Work stage |
 | Make a mark around the perimeter of the area. To do this, install the outer supports and stretch the ropes between them. The distance between the pegs should be the same. In place of the pegs, holes are dug and frame posts are installed. |
 | Install the pillars, securing them with a sand-cement mixture. Nail longitudinal joists or beams to frame the fence. |
 | Nail a picket fence or other chosen option. |
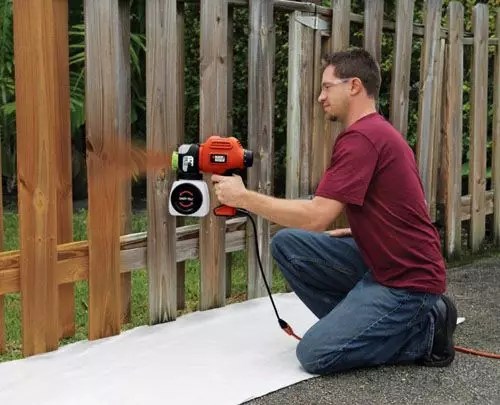 | Be sure to paint the finished product or apply a protective layer against rot and fungi. The work will go faster using special equipment for applying paint through a spray gun. |
Important! Wooden products must be coated with paint or varnish to increase their service life.
Watch a video about building a wooden fence on a summer cottage:
Here are a few more photos of do-it-yourself plank fences at the dacha:
Features of metal fences for dachas
Metal structures are durable and resistant to mechanical damage. They can tightly cover the area from prying eyes or have through gaps. Often they choose options for metal picket fences for dachas, which are mounted like wooden ones, but are stronger and more durable.
In total, there are several subgroups of country fences made of metal:
- forged options– classified as elite fencing, as they are mainly made to order;

- welded– can combine several different elements and are much cheaper than the first;

- from solid sheets– completely cover the area from prying eyes;
- sectional– a simple option, optimally suited for summer cottages, often found using chain-link mesh;

- decorative– combine several types of metal fencing.

When choosing a metal option, do not forget that it is susceptible to corrosion, so watch the paint and treat it with anti-corrosion solutions.
When purchasing a finished product, pay attention to the absence of scratches and chips.
To make it easier to understand what the finished work from solid sheets looks like, here are some examples in the photo of fences for a dacha made of corrugated sheets:
Photos of plastic fences for summer cottages and their features

Buying a plastic fence for your dacha is the best solution in terms of price and quality ratio. Externally, the variety of plastic structures is so great that every summer resident will be able to choose a fence for his site.
- Among the advantages of the material are:
- lightness of plastic, which is important for self-installation;
- you don’t have to spend money on paint;
- will not fade or darken over time;
- a large assortment;
- easy to clean: can be washed with any cleaning products;
- visually attractive and suitable for any site;
- the material is not affected by temperature changes;
- does not rot and rust does not form;

long service life.
The disadvantages include the impressive cost and the need to frequently wash the fence, as stains appear from the rain.
- Fences vary in cost, appearance, size and color. There are also several subgroups:
- fence;
- solid;
- network;

in the form of a lattice.
Here are several different photo examples of plastic fences:
Inexpensive fences for dachas: prices, photos and reviews
The choice of purchased fencing directly depends on the price of the finished product. If you want to find an inexpensive fence for your dacha, the price of which does not exceed 4 thousand rubles. per linear meter, pay attention to the wooden picket fence, chain-link mesh and sheets of corrugated board.
| Here are some examples of designs with prices and dimensions, as well as consumer reviews: | Name | Photo | Short description |
| Cost in rub. per linear meter |  | Wooden picket fence | 1050 |
| Height 1.5 m with a gap of 2 cm |  | Chain-link fence without frame | 390 |
| Height 1.5 m |  | Plastic white 1.8 classic | 3180 per piece |
| Corrugated sheeting on 2 metal joists |  | Chain-link fence without frame | 1000 |
Dmitry, Tula:“Out of habit, I put up a wooden fence at the dacha and painted it. It was inexpensive, I installed it myself.”
Maria, Bryansk:“I ordered the installation of a simple mesh fence, since the cooperative cannot block the site. Together with installation it cost 800 rubles. per linear meter."
Olga, Kaluga:“I wanted to change the appearance of the summer cottage and protect it from prying eyes. The plastic caught my attention. I'm satisfied with the result."
Mikhail, Samara:“I ordered solid sheets of metal and checked for chips before receiving them. I installed it with a friend and they got it done quickly. The fence has been in good condition for 2 years now.”
The cost of a fence made of corrugated sheets (price per linear meter) is low, but it has great strength and durability, which is why many consumers prefer it.
If you want to save extra money, make a cheap fence for your dacha with your own hands; photos of several examples are presented below:
Article