How to make a small pond. A pond in the garden: typical mistakes of amateurs. For fish farming
Read also
Many owners of country, private, and summer cottages dream of having their own pond. As practice shows, it is quite possible to create a decorative pond with your own hands. In this article we will talk about the main features of making a pond with our own hands, pay attention to the recommendations of experts on this topic, and determine the main criteria for choosing a place to dig a pit for an artificial reservoir on the site.
The main types of reservoirs on your site
Having your own water oasis on a private property has become a fashionable trend in recent years. As a rule, each owner tries to diversify this type of landscape structures with various original ideas. But, before we talk about specific types of artificial reservoirs, let’s consider what they generally are. The table shows the main types of reservoirs in summer cottages:
| Main types of reservoirs | |
| Waterfall | This is an artificially created reservoir, the peculiarity of which is considered to be falling, noisy water from top to bottom. Such structures operate due to a specially equipped pumping system. The correct location for constructing a waterfall is an area with sloping terrain. |
| Fountain | Artificial reservoirs of this type are usually divided into two groups: submersible and stationary. Stationary structures are independent elements of the territory, submersible ones are most often an additional element of the pond. |
| Creek | Requires a water supply system (for example, a small pond, etc.). Due to the overflows, bends, and stone obstacles, the stream of our own production looks not only original and beautiful, but also as natural as possible. |
| Pond | This is a body of water, the principle of creation of which is considered to be the blocking of the watercourse. Usually formed on small rivers or during the process of creating a dam. The sizes of such reservoirs can vary from very small to significant dimensions. |
| Swamp | The original creation on the site is considered to be a decorative swamp. It is customary to breed attractive, rare waterfowl plants in such artificial reservoirs. For this to be possible, the depth of such a water system must be insignificant. |
Another criterion, based on which reservoirs are divided into types, is the purpose of this structure. So, the following are distinguished:
- small;
- decorative;
- for swimming;
- reservoirs for fish breeding.
Creating an artificial water structure on a site does not require special financial investments. In this matter, attention to detail is important, not specialists; beginners should familiarize themselves with the advice and recommendations of real professionals.
Correct location of the reservoir on the site
When choosing a suitable area for constructing a reservoir with your own hands, you should be extremely careful so that when digging a pit you do not damage the gas system, etc. Taking into account all generally accepted rules, an artificial pond (or other type) should not occupy more than 3% of the site. In order for the design to become not only a decoration, but also practical at any time of the year, the following recommendations should be taken into account:
- there should be no trees in the area around the reservoir: leaves will fall, this will require frequent cleaning, and strong roots can destroy structures from underground;
- from an aesthetic point of view, the pond should be clearly visible from the house;
- the right location requires a convenient approach to the water feature and the ability to equip any path;
- The exposure of the pond to sunlight is also important; ideally, it should be illuminated for about 7 hours a day;
- It must be possible to cover and protect the reservoir from strong, cold winds.
Basic materials and tools for making a pond with your own hands
To make a pond on a site with your own hands, as practice shows, a wide variety of materials are chosen. Rigid plastic, PVC film, concrete and other construction materials initially lay the foundation for the time required for work and the budget for the process. Often, owners use scrap materials available on the farm to build a small pond in the yard. This range includes various fiberglass bowls, old sinks and bathtubs, barrels, etc.
To create an artificial reservoir, liquid rubber, butyl rubber film, EPDM membrane, etc. are also used.
To work with different types of materials, as a rule, different tools are required, but still for some work there are a number of indispensable tools:
- digging shovel;
- roulette;
- gloves;
- bucket;
- pegs and rope;
- Master OK;
- hammer;
- rakes and pitchforks;
- scissors of different types;
- copper pipes, grinder, etc.
DIY hard plastic pond
The basis for creating a pond in the garden can be a ready-made structure made of hard plastic. The advantages of this option include the minimum time spent on installation work (compared to others), reliability of use at any time of the year, the ability to create a reservoir of any shape, etc. At the same time, one of the main disadvantages is the financial cost of high-quality material, since cheap, weak material can soon cause the pond to become defective and unsuitable. Creating a hard plastic pond can be described in several stages.
1. The marking of the selected territory is prepared.
2. A pit is dug and cleaned, with a margin of at least 8-10 cm.
3. A container made of hard plastic of the desired shape and size is placed in the finished pit.
4. Using a building level, the horizontal installation of the container is checked.
5. The vessel is filled one third with water. Then, the fixation of the bowl begins with sand, which is filled from the sides.
If you have a ready-made bowl of small size, the work will take no more than 3-4 days. A do-it-yourself hard plastic pond is a good alternative along with other options.
Do-it-yourself pond made of PVC film
No less well known is the creation of private ponds based on various types of construction film, including PVC. The durability of this type of structure directly depends on the strength, thickness and quality of the selected material.
Polyvinyl chloride (PVC) film is the best option for making a small pond with your own hands on the site. It is known for the following characteristics:
- usually does not contain harmful substances;
- sold in rolls of various thicknesses and widths;
- resistant to temperature changes, has good frost-resistant qualities;
- with the correct thickness of PVC film, the durability of the pond will be more than 10 years.
When choosing a PVC material for work, you should pay attention to such characteristics as moisture resistance, resistance to ground salts, ultraviolet resistance, etc.
Do-it-yourself pond from a reinforced concrete bowl
One of the most difficult, in terms of technical characteristics, options for creating a reservoir on a site is considered to be a concrete structure. Firstly, this is a rather labor-intensive, time-consuming and financially expensive process. Secondly, this business requires certain construction skills. However, reservoirs made of reinforced concrete material are durable, strong and reliable. By creating this type of pond, you can fully realize any original ideas and create a water structure of any size.
When using this material when producing your own pond on the site, you should additionally take care of:
- waterproofing the structure;
- additional treatment of the structure with a frost-resistant agent;
- strengthening the structure with reinforcement, etc.
This type of reservoir requires the presence of building materials such as sand, cement, cement primer, crushed stone, etc.
The main work of making a pond with your own hands. Sketch
The main work of making a pond with your own hands is based on a ready-made, individually created sketch. This construction document allows you to graphically display all the nuances of the future structure and work on it. At home, craftsmen and beginners rely on ready-made drawings and ideas, which are richer on the Internet. Construction specialists write that when creating a sketch for constructing a pond, it is important to pay attention to the presence of steps (differences in the ground) in the reservoir. Detail in the drawing will allow you to avoid a huge number of construction problems and inaccuracies.
We have already briefly mentioned the main stages of work on making a pond above, but it is worth considering in more detail the issues related to the preparation of the pit and the laying of the substrate and film.
Digging a pit, laying the substrate and film
The physical work involved in making a pond with your own hands begins with digging a pit. But before you start digging a hole, you must first clear the area of possible debris and leaves. Next, mark the selected area and only then remove the turf. Experts recommend digging from edge to center, while constantly adjusting unevenness and observing the edges of the marked area. Don’t forget about a reserve of 10 cm of soil (even such minor errors in the process can be very significant).
Next, the finished pit must be equipped with high-quality waterproofing. This is done to ensure that water from the pond does not go into the ground. In construction, there are several options for how to form the so-called substrate in a pit:
1. Using various types of stones, lay and compact the foundation pit;
2. Use geotextiles, which should be covered with sand;
3. Use film.
The most common of the above methods is the last one.
The cushion inside the pit made of PVC film requires special attention, since incorrect installation work can result in damage to the film layer, for example by tree roots, etc.
When laying this material at the bottom of the pit, it is important to follow some rules:
- Usually the topography of reservoirs is characterized by folding, so professionals advise making one large fold and avoiding the appearance of many small ones;
- in order to secure the film in the pit, it is better to create an additional trench;
- you should ensure that the film material is stretched so tightly in the pit, at this point it is important that the PVC material lies freely, otherwise after filling the pond with water, it may rupture;
- In order to lay out the film with stones, it is best to use small types. One more thing, small rounded stones without ribbed surfaces would be a good option;
- It is recommended to cut off the edges of the film after the foundation pit has stood for more than 2 days.
Do-it-yourself pond care
In order to turn the pond into a multifunctional system, additional filtration systems, pumps and other equipment are installed. There are several methods of caring for a pond at different times of the year:
- mechanical;
- biological;
- chemical;
- UV.
The mechanical method involves using special filter containers that clean the pond from small particles. By choosing a system with fine nozzles, you can neutralize even the tiniest particles.
To normalize the biological parameters of water in the pond, a biological method is used. Its operating principle is to use filters that are capable of neutralizing biological residues, etc.
The chemical cleaning method allows you to normalize the acidity of the water in the pond, saturate it with oxygen, etc. However, if fish live in the pond, this method can only do harm.
The last method is to use ultraviolet lamps, the main function of which, in this case, is to disinfect water. Ultraviolet light copes well with harmful viruses and bacteria.
To the above methods, you can add the most basic physical work, which will keep the reservoir clean. The owners are required to thoroughly clean the water from leaves, regularly change the water, clean it from silt and algae, etc. Experts recommend growing a number of waterfowl plants, which are considered natural filters. This is not only useful, but also very beautiful.
For more information on how to make a pond on your property with your own hands, watch the video:
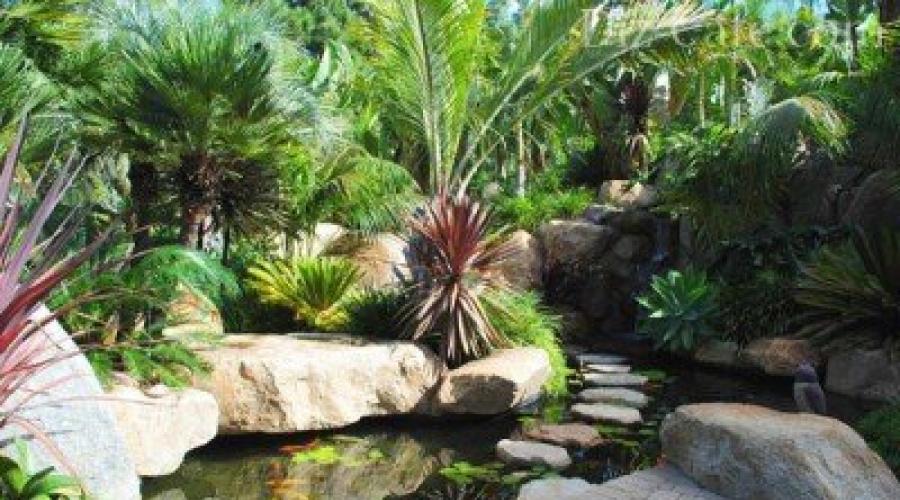
Contemplation is the way to restore your inner strength and distance yourself from the hustle and bustle. Admiring nature in any of its manifestations - be it a leaf, a blade of grass or even a small pebble, we fall into a kind of trance, delving into our “I” without reference to current events. This is probably why there is a massive “flight” of city dwellers away from noisy habitats, closer to Mother Nature, where on their own, even a very tiny piece of land, they can relax and rest their souls. How to create a relaxing atmosphere in your garden? Nothing could be easier! Instead of a couple of beds with potatoes and tomatoes, create a small pond at your dacha - now you will have more time to relax and contemplate the surface of the water - and this, as you know, is the best cure for stress and loss of strength. Do you think that such a complex hydraulic design is beyond your capabilities? With our recommendations, you will be “knee-deep in the sea,” not to mention a small pond, which you will be able to manage on your own.
So, you realized that your life is no longer conceivable without a lovely lake designed to please your eyes and calm your nerves. How to create a pond at your dacha with your own hands so that it harmoniously complements the garden landscape and lasts long enough, rather than becoming a problem area that requires tireless care?

An original feature of a small pond decorated with boulders can be an unusual path made of flat stones
Let's start by choosing a pond style and choosing a location to plant it. Then, we will tell you how to make a pond technologically correctly and equip it. Chosen in the right style and laid with all the subtleties, an artificial pond will become a real pearl of your garden and a wonderful place for peace.
A short excursion into history

A special charm to the landscape pond is given by its smooth outlines and decorative vegetation decorating the water surface.
A landscape pond with natural contours will always be appropriate in the depths of the garden next to the gazebo or not far from the terrace of the house - after all, you should be able to sit comfortably to watch the surface of the water.
The design of the reservoir can be more restrained according to the Japanese principle - boulders of various sizes, conifers, the absence of multi-colored herbs. Or in the Chinese style - more lush and bright, with the obligatory accent in the form of a tree with variegated foliage and a curved bridge. A landscape pond can also be created in the “nature garden” style, which involves planting only local plants characteristic of a given region and the absence of any exotic plants.

The most laconic shape is a formal pond with rectangular outlines.
A formal pond with a geometric shape - a square or rectangular configuration - looks good next to the house, emphasizing its vertical and horizontal lines. Such a pond goes well with a courtyard or patio, especially if there are straight flower beds or linear paths nearby.

An unusual coloring of a pond can be given by a path passing over its surface - either in the form of a bridge, or with individual stones or slabs
An interesting technique that is widely used in modern landscape design is the laying of paths lined with terrace boards and thrown in the form of a bridge over a body of broken geometric shape. A similar path through a pond can also take the form of a concrete path or individual square slabs, as if floating above the water. Cascades of small ponds of different sizes, where water flows from one bowl to another through small waterfalls, look original.

A system of cascading ponds at the dacha will not only add unusualness to its landscape, but will also fill the garden with a pleasant murmur

Formal round ponds will decorate the patio or front group of your summer cottage
Round ponds, along with rectangular shapes, also belong to formal ponds and can decorate a lawn or open lawn, stylistically complement a garden area with a pergola, or be located near a picturesque group of trees. Round-shaped mini ponds in the garden can be made with your own hands much easier than any other configuration, using ready-made concrete rings, wooden tubs, plastic containers and even car tires.
Select location, size, material
A correctly chosen location for a reservoir will be the key to its long-term functioning without seasonal “blooming” in spring and summer, when green algae are activated under the influence of ultraviolet radiation. The pond must be in the shade for a certain period of daylight hours so that algae do not multiply so intensively. On the other hand, placing a reservoir in a completely shady area will delay the development of ornamental plants. It is important to maintain a golden mean here.

By placing a recreation area with a barbecue in close proximity to the pond, you can always admire the beauty of the water surface
It is important to know that the pond should be illuminated by the sun for about 5 hours a day and be open from the southwest. It is undesirable to place a pond under shady trees - falling autumn leaves will pollute it.
As for the size of the pond, ideally the pond should occupy 3% of the area of the site. When the garden is small - with a standard area of 6 acres, not every summer resident is ready to allocate 18 m2 for a pond. Of course, the smaller the dimensions, the easier it is to make a pond with your own hands - not so many materials will be required, and labor costs will be minimal. Therefore, when deciding on the width and length of an artificial reservoir, take into account your physical capabilities and the harmony of the perception of the pond as a compositional spot on your site - that is, how its dimensions are combined with other elements of the dacha landscape.

An ascetic solution in the design of a pond using only stones is a specific feature of a pond in the Celtic style

The design of a pond with a waterfall flowing from a small wall made of beige sandstone will fit perfectly into the landscape style of the garden.
In terms of depth, it is recommended to divide the pond into three stages: a zone for coastal plants, a shallow zone for the queen of the pond, Nymphea - winter-hardy water lilies, and a deeper zone for wintering fish - if you plan to breed them.
You shouldn’t make the pond too deep; just dig a winter fish hole about 150-180 cm deep (below the freezing mark of the soil) so that it takes up about 1/5 of the pond’s area.

A cute rectangular pond can be arranged on a small summer cottage, and the edging made of terrace boards will make the pond unusual.

The highlight of an avant-garde pond can be an extravagant installation made of wood, reminiscent of an exotic animal or plant

A continuous supply of water to the pond can be equipped with an old column or a group of brightly colored glass bottles
When you have decided on the location and approximate dimensions of the pond, it’s time to think about what materials to use to make the pond as simple and quick as possible. The most capital and expensive option for arranging a pond is a concrete foundation, which requires the construction of formwork and reinforcement. A less expensive way to lay a reservoir is to use a ready-made plastic container.

The pit for the pond is formed by characteristic ledges - curtains for planting plants

To ensure water circulation in the pond, a pump is installed at its bottom, from which water flows to the purification filter and returns back to the reservoir.
And finally, the most convenient and budget-friendly way to make an artificial pond with your own hands is to use a special moisture-resistant film to line the bowl of the pond. We took this method of laying a pond as the basis for a detailed description.
Step-by-step technology for creating a pond using film
1. Initially, it is necessary to sketch a plan of the future artificial pond to scale, indicating the depth and width of the curtains (shelves for planting plants), and it is also advisable to draw a rough sketch of the decoration of the reservoir. This approach will help to avoid various alterations during the construction of the pond and at the stage of planting. At this stage, think about what will serve as an accent in the composition of your lake - it could be an original stone, wood or sculpture.

Before you start laying a pond on your summer cottage, draw a plan of the reservoir indicating the depths and placement of the main elements of the arrangement
2. Using a regular water hose or scattering sand along the perimeter of the pond in the form of a line, outline the expected contour of the pond. Be sure to check that the shores of your future lake are at the same level.

Having marked the outline of the pond with a hose, dig a pit according to the drawn plan
Periodically measure the level of the banks of the pond during the formation of the pit. If you do not have a water level of the required length, you can adapt a regular long board and install a small 50 cm level on it.
3. We begin excavation work - we dig a pit to the depth of the coastal tier and mark a line from which the pond is deepened to the next mark. Having received the second tier, we lay a line for digging the deepest part of the pond and take out the last portion of the earth.
The process of digging a pond is quite difficult, so it is better to resort to the services of professional excavation workers accompanied by a mini excavator. However, if you still decide to do this labor-intensive part yourself, be prepared for the fact that water may accumulate at the bottom of the hole and you will have to fiddle around in the dirty slurry. A pump specially designed for pumping water with impurities and solids will help you remove water from the bottom of the pit. You can dig a auxiliary hole nearby and dump water into it.
4. After the pit is completely dug, using a cord we measure its dimensions taking into account the depth, adding allowances of about 50 cm on the sides of the bowl - this is necessary to purchase the film of the required size.
The problem that you will inevitably encounter during the excavation process is where to put the earth removed from the pit for the pond? A good option for solving this problem is to raise the level of the site, evenly distributing the soil throughout the garden. You can also use the ground of the pit as an embankment for a stream or as a foundation for an alpine hill.
5. The pond bowl is lined with durable moisture-resistant film. As a rule, in order to protect the main film from damage by stones and plant roots, an additional layer of geotextile is laid under it. Old linoleum or roofing felt is also suitable for this purpose, or you can simply fill the hole with sand and compact it.
When the pit is formed, lay a layer of geotextiles, and then the film, tucking the edges of the panels into a specially dug trench around the perimeter of the reservoir
To make the pond film more elastic, it is better to choose a sunny day for laying it - then it will heat up a little and will stretch better, easily going around all the ledges of the pit.
6. To arrange the edge of the pond, an auxiliary trench is dug along its perimeter to tuck and secure the film. Having laid the edges of the film in the trench, sprinkle it with crushed stone - this way it will be securely fixed.
7. Reinforce the edge of the pond with stone blocks or plastic pipes nailed to pegs - this will prevent soil from falling from the coastal zone into the pond bowl. Line the edge with natural stone and decorate with a beautiful single block or group of boulders.
8. Place the prepared plants in special plastic containers and place them on curtains, line the bottom of the pond with stones and gravel.
9. Now you can pour water into the reservoir. To make it more convenient to select pumping equipment and volumes of hydrochemicals for pond care in the future, do not be too lazy to take the water meter readings before and after filling the reservoir.
10. To prevent the water in the pond from stagnating, it is better to equip the reservoir with a stream - it will ensure constant circulation of water. To do this, the source of the stream is raised above the level of the pond, and water will be supplied to it from the bowl of the pond using a submersible pump. Be sure to think about how to decorate the mouth of the stream - use stones, plantings, clay or glass containers.

Fill the pond with water, arrange a stream, install and connect a pump with a filter, plant aquatic plants
11. Install a submersible pump at the bottom of the pond, extend the pipes to the source of the stream and connect them to a filter to purify the water. It is better to take a pressure filter (with a reverse cleaning system) as a cleaning filter - it is more effective than a flow filter.
Material about the construction of an artificial stream in a country house will also be useful:
Your pond is ready, now you just need to carefully care for it - clean it of contaminants, sometimes use preventive agents to revitalize the water and prevent the spread of algae, and take the plants to the basement of the house for the winter.
The main mistakes when arranging ponds
When creating something with your own hands, it is not easy to avoid some mistakes, especially such as compositional ones, so in order to make your pond correctly, take into account some standard mistakes inherent in our gardeners:
- Decorating the banks of the pond with pellets of the same diameter, which makes the pond look somewhat boring. It is better to combine large stones with smaller ones, but do not fill the entire coastal zone of the reservoir with them.
- The ponds are dug very deep, have steep walls and resemble a kind of stone bag. A little research showed that it is profitable for excavation companies to dig deep ponds, since they are paid by the number of cubic meters of earth removed. Pay attention to the depth of your pond - you should not make it too deep, especially if you are not planning to breed fish.
- A craving for container gardening, which interferes with the normal development of plants, and a fear of filling the pond with soil for planting. On the one hand, container planting allows you to quickly change the plant design of the pond by rearranging and rearranging plants. Gardeners are probably also afraid of the prospect of a dirty pond after filling it with soil, but there is nothing to be afraid of - the soil for aquatic plants is a heavy mixture with a high clay content, which is not washed away by water, and over time will be strengthened by the root system of the plants.
When you plan to create a pond with your own hands, do not forget that it is not easy - practice first by forming a miniature pond at home.

If the dimensions of your site do not allow you to arrange a pond in your dacha, create a miniature pond in a very ordinary cup
If it works out, feel free to start a large-scale project of laying a full-fledged pond on your summer cottage. We are sure you can do it!
The time has passed when summer cottages were associated only with a shovel and potatoes. Today, it is primarily a place of relaxation from the bustle of the city, an opportunity to relax and have a pleasant time in contact with nature.
Having your own lake helps to achieve the desired relaxation, the creation of which is quite possible with your own hands, which will be discussed in this article.
A little history
Before taking on the installation work, let's turn to the origins of this engineering miracle.
The fashion for arranging our own reservoirs came to us from the East, and three different styles can be distinguished:
- Near East . These are places where water has a special value in light of its scarcity. Therefore, the wastefulness of creating an entire artificial lake is inappropriate here. Instead, strict geometric shapes of small sizes with built-in fountains are used.

- China. Here the art of creating reservoirs has developed into a whole philosophy. It is customary to fit their features into the surrounding landscape so that they blend harmoniously with nature. Common attributes include a lonely “dream island” in the middle of the water.

- Japan. The lack of space instilled in the Japanese a craving for asceticism and rational use of every inch of land. In this regard, their artificial reservoirs are created in the form of a small vessel with water - tsukubai, with a stylized stream flowing from bamboo tubes and dwarf trees planted along the shore.

From the East, the decorative element of the garden plot in question successfully migrated to the West and was reflected in the following two directions:
- England. The local design of reservoirs, just like in China, is in harmony with nature and fits perfectly into the surrounding landscape.

- France. The so-called regular style is used, characterized by precise division into zones, the use of regular geometric shapes and reservoirs rising above the ground.

Creating your own pond
Making a country pond with your own hands is not easy, but it is quite possible. Let's look at all the stages in order.
Deciding on a style
The design of a pond in your dacha should match its surroundings and please you. These are the two most important criteria.
So, if you place it in the depths of the garden, then you can follow the Chinese and the British by disguising the artificial pond as a natural one. If you are planning the location of the tank near the house, then the regular style or geometric shapes of the Middle East will look more appropriate.

Choosing a location, dimensions and suitable building materials
Once you have decided on the general concept, you need to make other equally important decisions:
- Location . An artificial pond at the dacha should be illuminated for about five hours a day and be open on the southwest side.
This will provide two main, albeit contradictory, conditions:
- It will limit the intensity of algae proliferation, which will protect the water from violent seasonal blooms.

- Will ensure normal development of ornamental plants decorating the pond.

- Dimensions. Ideally, it is assumed that the home lake will occupy 3% of the total area of the site. But not every gardener will decide to allocate 18 square meters of his standard six acres for decorative landscaping. In addition, the larger the pond, the higher the cost of creating it.
Therefore, be guided when choosing the appropriate sizes:
- Your material capabilities.
- Compatibility with existing buildings.
- Personal preference.

As for depth, the reservoir is usually divided into three stages:
Advice: so that the fish have a place to spend the winter, it is enough to dig a hole of appropriate depth in the middle of the tank, and not make the entire pond so. This will preserve the population and save your material costs.
- Material. There are three possible options, differing in their reliability, cost and complexity of implementation:
| Name | Features of application |
| Concrete | Installation of formwork and reinforcement, mixing or purchasing ready-made mortar - all this leads to considerable costs and difficulties. Of course, the strength of such a structure will be at a high level, so it is recommended to use such a labor-intensive method for large multifunctional objects. |
| Plastic | A finished container made of polypropylene is much easier to install. In addition, manufacturers offer a wide range of shapes and sizes. But even though the project will ultimately be cheaper than concreting, it still remains quite expensive and limits the flight of designer imagination. |
| Film | As they say: “cheap and cheerful.” The low cost of the material, the ease of its installation and the ability to create a bowl of any shape make this option the most rational for a summer cottage. |

Installation work
Now let’s look at how to make a pond at your dacha on your own:
- It all starts with a sketch. Try to depict everything on it in as much detail as possible and taking into account the scale. Also think about what will be the “highlight” of your composition: an unusually shaped stone, a decorative tree, or even a sculpture.

- We mark the proposed contour with sand at the selected location. At the same time, we check the level of the banks using a spirit level, which should be done periodically throughout the construction work.

- We carry out earthworks:
- We remove the first ball of earth with a depth equal to the height of the top step.
- Then we draw the outline of the next hole and dig it.
- The last step is to create a hole in the center for wintering fish.

- We measure the dimensions of the resulting pit, adding 50 cm of allowance, and according to the data obtained, we buy thick plastic film.
- We place sheets of old roofing felt or linoleum in the bowl to protect the polyethylene of the base layer.
- Lay the film on top.
Tip: it is advisable to lay polyethylene on a hot sunny day. This will give the material greater elasticity and allow it to go around all dangerous sharp areas without damage.

- We dig a small trench around the perimeter, tuck the edges of the film into it and fill it with gravel.
- We strengthen the edge with stone blocks to prevent the soil from crumbling. We lay it out with decorative stone.

- We place the prepared plants in plastic containers and install them on curtains.
- We lay out the bottom with gravel.
- Fill the reservoir with water. At the same time, measure the volume of liquid used for this on the meter to make it easier to calculate the required amount of chemicals and select the appropriate pumping equipment.
- To prevent H 2 O from stagnating in the pond, we bring the source above the level of the bowl and connect to it the hose of a submersible pump, located previously at the bottom of the tank. We decorate the mouth of the resulting stream with stones and plants.

Conclusion
Having your own pond in your summer cottage is everyone’s dream. But the apparent complexity and high cost of this venture can stop many.
We looked at a way to build a reservoir on our own and without significant financial costs. Patience, accuracy, compliance with the above recommendations and creative imagination will allow you to achieve the desired result.

The video in this article will provide you with additional information that is directly related to the materials presented ().
Make your dreams come true!


A body of water always attracts attention and evokes positive emotions in people. This is due to the fact that natural or artificial reservoirs promise a pleasant pastime - fishing, swimming, growing aquatic plants and simply contemplating beauty. Even if the countryside cannot boast of having a pond, then you don’t have to worry and make an effort to create it yourself in your dacha.
 Even if the dacha plot is not large, modern technologies make it possible to create small but very nice ponds. You can build a decorative homemade mini-pond from a ready-made container or use available materials (car tire, barrel, plastic basin, etc.).
In the photos of landscape design magazines or on the Internet you can find a lot of useful ideas, and even step-by-step instructions.
Each new project requires a serious approach and specialist consultations.
It is known that even with a small budget you can organize a pond and use available materials.
Before deciding what shape the pond will be, you should decide on its location. It is recommended to take into account the general style of the site and the preferences of its owners.
The shape of the future reservoir can be either geometrically correct or arbitrary with bends and bays.
 Of course, much will depend on whether you plan to use your home pond for swimming, whether you intend to raise fish in it, or whether you will landscape decoration with beautiful plants and frame.
It should be remembered that if the surface of the reservoir is exposed to the sun for more than 8 hours, the water in it may turn green and bloom.
A too dark place is also not welcome. Deciduous trees located close to an artificial reservoir will serve as a source of garbage.
A place blown by the wind is unacceptable if the owners intend to swim in the pond.
You should also take into account the terrain.
If you intend to use decorative elements in the form of lighting, organizing a fountain, waterfall, etc., you should worry about making electrification convenient.
As for the depth of the future pond, it will depend on the wishes of the owner and how the finished form or pit with a waterproofing layer will be used.
If you plan to populate a reservoir with fish, then the depth in it must be sufficient, otherwise cold-blooded fish simply will not have enough oxygen.
For those who have not yet decided what shape to organize a pond and for what purposes it will serve and how to improve it, we recommend that you pay attention to photo ideas, of which you can find a lot of design options on landscape design websites.
Pond at the dacha


Ready-made forms for artificial pools can be made from:

A cheaper option is a pit with a bottom made of insulating film.
The sequence of creating an artificial pool with your own hands using a ready-made container
- choosing a suitable location for the pond;
- designation of the boundaries of the future reservoir along the contour of the finished form;
- digging a pit;
- the form is placed in the pit and filled ¾ with water;
- after shrinkage, all voids should be filled with construction sand;
- complete filling of the container with water;
- landscaping the area and planting suitable plants.
A ready-made container allows you to make a mini-pond or large reservoir on your site several times faster and without additional costs.
Good to know! Plastic containers allow for quick installation, but despite their sufficient strength, under the influence of ultraviolet rays the integrity of the form will gradually deteriorate. Therefore, it is recommended to pay attention to tanks with a fiberglass rubber base.
In the colorful photos of small reservoirs you can see a lot of options that you want to use in your summer cottage.
To reduce the budget, you can create a pond without a ready-made container.
 The film is chosen special purpose, a certain density, resistance to mechanical damage and color.
The film will be more elastic if it is spread before use on a flat surface under the sun's rays. To firmly fix the edges of the film, it is recommended to dig a ditch around the perimeter of the reservoir and secure the film edges in it with soil, gravel and stones. The film allowance must be at least 50cm.
So, you can pay attention to the black film, which will create mirror effect future "lake". If you choose a brown film, then this color will imitate the presence of a soil layer at the bottom of the reservoir.
If you choose a blue film material, it will look like a swimming pool or for keeping fish.
The use of a ready-made form does not leave much room for creativity for the owner, while the film bottom allows you to create reservoirs of a wide variety of configurations.
Step-by-step guide to creating a pond with a film bottom
Video instructions will help you make a pond in your dacha with your own hands step by step.

 If you want to organize a mini-pond, you can use it as a container car tire and film. The tire is deepened into the ground in the desired location, and the bottom is made of durable film. On the Internet you can find a lot of photos of such lifts. A do-it-yourself film pond of impressive size must be completed filtration system.
This equipment can be purchased without any problems at a specialized store. The accompanying instructions will allow you to complete installation without any problems.
No less important is the final stage of landscaping the territory of the dacha and planting plants near the pond.
An important final stage in creating a pond is landscaping the area around the pond, selecting and planting plants.
The surrounding landscape will determine the theme of the pond design. Possible options for framing an artificial reservoir at the dacha can be seen in the photo. Natural materials are most often used, among which stone is the leader. Flat stones or pebbles are laid out around the perimeter of the pond, and the adjacent area is covered with crushed stone or planted with lawn grass.
Beautiful flowerpots, statues, and lanterns are used as decoration. Colorful waterfalls and cascades can be created from stone. Only such solutions are not very suitable for mini-ponds, but are made only for large and medium-sized reservoirs.
If you plan to swim in the pond, then arrange wooden planks that will fit well into the surrounding design.
Plants for decorating a pond at the dacha
 How to make a pond at your dacha with your own hands and decorate it with beautiful plants?
When deciding to populate a pond with fish, you can plant plants such as ponytail and arrowhead in the water. Lilies, nymphs and hyacinths are suitable to cover the water surface. You can decorate the area adjacent to the pond using reeds and ferns, hostas, iris, garden tradescantia, etc.
You can design a pond at your dacha with your own hands, either intuitively, based on your own taste, or by imitating the photo ideas of designers.
The most successful ideas for decorating a pond with plants can be borrowed from photos available on thematic pages of websites. It’s easy to decorate a small decorative pond in your dacha with your own hands. All you need is a few stones, boulders, solar-powered lanterns and plants.
If the theme of the pond at the dacha is emphasized by a rustic flavor, a bridge made of wood will fit perfectly into the overall look. The paths leading to the bridge and the area around the reservoir can be decorated with gravel and tree cuts paved among it (dies).
The landscape stone slide, built from boulders and decorated with jugs, shells and figurines, looks amazing, a kind of craft.
There are many original solutions for decorating a pond at your dacha. Floating flower beds look very stylish. You can make non-sinking structures from polystyrene foam, with a sufficient layer of soil on the base and plants planted in it.
 Decorators advise decorating the space around ponds with stones various sizes. To prevent the root system of plants from growing too much between the boulders, it is recommended to plant them in containers.
It is not very convenient to place plants on steep surfaces, so it is better to decorate such places with flowerpots or figurines.
Reading time ≈ 10 minutes
To improve your site, you can build a beautiful pond at your dacha with your own hands, using modern landscape ideas with photo examples and design techniques. An artificial pond will bring harmony to the surrounding space and add originality to the landscape design.
Natural green pond on the territory of your own dacha
Pond at the dacha
Sometimes an artificial pond in a suburban area is more of a necessity than a decoration. If there is a long stream running through the area or waterlogged soil is present, the disadvantages can be turned into advantages. A pond in the country, built with your own hands, will create an atmosphere of calm and relaxation.
What type of reservoir can be created at the dacha:

The first garden ponds appeared in the countries of the Ancient East, and only then this fashion reached Europe and Russia. Fountains and mini-waterfalls with massive stone borders began to be built near the palaces.
The pond can be:

The pond can be made in different styles:

The improvement of a picturesque pond at the dacha, made with your own hands using landscape design ideas, is shown in the video below with photo examples and detailed instructions.
Smart planning
When arranging an artificial pond in the garden, it is necessary to draw up a detailed project plan and comply with certain conditions.
Actions must be planned step by step:
- Selecting a location.
- Determination of sizes and shapes.
- Selection of necessary materials.
- Stylistic decision.
- Plants and flowers.
- Decorative elements.
First, you should walk around the territory of your dacha, carefully examining every corner and sketching out the shape of the future reservoir on paper.

Place for a pond
This is an important planning stage in which several criteria should be taken into account:
- Soil features.
- Landscape relief.
- Climatic conditions.
- Illumination.
- Green vegetation.
- The presence of a natural reservoir on the territory.
In such a pond it is unlikely that it will be possible to keep large fish or swim in hot weather, but there should be enough space for the location of the structure itself and the drainage of water. The home eco-system should resemble a mirror pond, not a swamp.

How to choose a place:

Reservoir zoning:
- Coastal part. Occupies approximately 12-30 cm, used for shallow water vegetation and arrangement of the entrance area.
- Shallow part. Zone for plants and flowers – from 30 to 90 cm.
- Deep water part. The size can be from 1 meter and must be below the freezing level of the soil. Fish for decoration or breeding may live here.
A great idea would be to complement the beautiful lighting with musical accompaniment. This design looks impressive and impressive.

Material
Construction materials must be strong, reliable and durable. Concrete is most often used, but today lighter materials and structures have appeared, for example, polyethylene or butyl rubber.
The most popular options:

To protect the film when laying out the bottom, you should lay a small layer of geotextile under its surface. This way, crushed stone and sharp stones will not be able to damage the film structure.

Step-by-step instructions for arranging a “flexible” pond
A film-based pond is easier to build than one made from concrete and more reliable than one made from a plastic form. The recommended length of the film should be equal to the length and double depth of the reservoir itself + an additional 40-50 centimeters just in case. The desired film width is the width, double the depth of the pond and 40-50 centimeters for the rest.
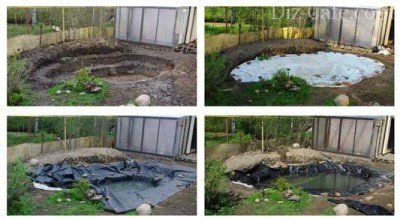
Main stages of arrangement:
- Soil preparation and marking.
- Excavation work to create a pit.
- Installation of bowl or film flooring.
- Filling voids with river sand.

What may be required for work:
- Construction shovel.
- Irrigation hose.
- Pump for determining water filling pressure.
- Compressor (for a fish pond to saturate the water with oxygen).
- Cleaning filter (for fish farming).
- Cord, rope, pegs or light sand for marking the territory.
- Sterilizer for water purification.
- Construction wheelbarrow for earth.
- Butyl rubber film.
- Adhesive for film (Tangit, adhesive tape, etc.).
Making a reservoir:
- Creating a sketch. Drawing on paper the shape, all details, decor and location of auxiliary equipment, taking into account the size and depth of the bottom.

- Transfer the mini-circuit to the soil using a garden hose or river sand. The contours should be marked with sand that differs in color from the ground. According to the drawn outlines, a groove should be dug to a depth of 25 centimeters.

- Removing the fertile layer and digging a hole. To do this, you will need a shovel (a construction excavator for a pool or large pond with a fountain) and a cart for removing soil from the territory.
 The hole is dug according to the depth of the coastal, shallow and deep water zones calculated in advance. The deepest part should be in the center and be dug last. Each time you should fix the depth line using markings.
- Measuring the size of the pit. The walls of the pit are well compacted, and an additional 40-50 centimeters need to be added to the edges to determine the future size of the covering material. The parameters are measured with a cord or rope and then transferred to film.

- Waterproofing film. The bottom of the pit is covered with a small layer of sand and geotextile to ensure reliable protection of the film surface. When the substrate is ready, the film is carefully laid, tightly fixed to the base with glue and pressed well to all surfaces.

- Filling with water. Water is poured in carefully and gradually using a hose, avoiding sudden pressure.

- Consolidation. The edges of the waterproofing are fixed in a pre-dug trench along the contour with a depth of 25 cm and covered with earth and crushed stone, after which they are well compacted.
 The edge of the reservoir is secured with rods, stones or large boulders. This stage is suitable for placing and planting plants and flowers. Be sure to leave a small fold at the bottom so that the film does not tear when filled with water.
- Standing water. The finished reservoir should be left for 1-2 days so that the water settles well, after which the excess ends of the film are cut off. During this period, you can form beautiful sides, arrange the remaining decor and complete the landscaping work.

To strengthen a gently sloping bank, you can use a geogrid or geomat in combination with clay and black soil to make the pond look neat and well-groomed.

The size and shape of an artificial reservoir depends not only on the dimensions of the site, but also on the imagination of the owners themselves. The aesthetic and decorative components undoubtedly play an important role here. If you follow all the recommendations and strictly follow the instructions, you can create the pond of your dreams in your country house. How to make a pond in the garden with your own hands, using landscape ideas with photos and diagrams, is shown step by step in the video below.