How to make a musical triangle with your own hands. DIY musical instruments for kindergarten. Do-it-yourself musical instruments: we make guselki
In order to make children's musical instruments, you need to have courage. After all, if such objects fall into children's hands, they will become a source of sound far from harmony. However, no parent will doubt that such toys are very useful for developing a sense of rhythm and hearing. Not to mention the joy that a home orchestra will bring to a child.
Making the Rain Sound Tool
If you decide to make musical instruments with your own hands, then you should start simple. As such, the “noise of the rain”, which is also called the “staff of rain”, will act. This percussion instrument was once made by Latin Americans from cactus stalks, which were originally well audible. The tool was used in shamanic rituals that were aimed at making it rain.
Preparation of materials

It is quite simple to make such musical instruments with your own hands, as a result, you will be able to get a sound that resembles the sound of rain. To carry out work, prepare:
- awl;
- scissors;
- cereals;
- colored tape;
- foil tube;
- toothpicks;
- glue;
- cardboard.
You can use a baking paper tube instead of a foil tube. As a cereal, rice or millet is perfect. To decorate the instrument, you can use not only colored tape, but also other materials.
Features of the work

Do-it-yourself musical instruments are often made by loving parents. One of the first is usually “rain noise”, since it is quite simple to make it. Holes should be made in the foil tube with an awl, arranging them in a spiral. The more holes you can make, the more the sound of the instrument will resemble the sound of rain.
Toothpicks are inserted into the holes, which can be fixed with drops of glue. With wire cutters or scissors, you can easily cut off the extra ends of the toothpicks. One end of the tube should be closed with a cardboard circle, and then fixed with adhesive tape.
It is very easy to make a musical instrument with your own hands from improvised materials; for this, several spoons of cereal are poured into the tube, only after which you can close the end of which with your palm to check the sound. You can experiment which sound - buckwheat, rice and millet - you like more. The amount of cereal should be determined empirically, it will depend on the size of the pipe.
Instead of cereals, you can use small beads and beads. As soon as a suitable sound can be found, the second end of the tube must be closed with a cardboard circle and secured with tape. When such musical instruments are made with their own hands, at the final stage it is important to decorate them beautifully. This work is done on request. You can stick an appliqué, make decoupage or decorate the ends with cords and ribbons, crocheting them. One of the most practical options becomes colored tape.
Making drums, tambourines and rattles

Do-it-yourself musical instruments for children in the form of drums can be made from mayonnaise jars. They are decorated with colorful pictures. Holes should be made on the sides for threading the rope. As drum sticks, you can use any made of plastic or wood. The latter should be made independently if the men in the house have the skills to work with wood.
To make tambourines, you can use dry canned cans. Holes are made on the sides, bells are inserted, which can be purchased in the departments of sewing accessories, and then the product is decorated by decoupage or appliqué. If you need musical instruments, you can make them with your own hands for a kindergarten. The most common are rattles. For them, plastic or metal bottles from coffee, yogurt, ketchup or other products are suitable. Filling can be any cereal, beads, as well as buttons of different sizes.
Making a pipe

The pipe can be made from materials that you can find while relaxing in nature. For this, reed, reed, and also birch bark are suitable. You can use any other tubular plants, dense leaves or bark. The tube should be left to dry, then a platform is made in it with a knife and a small rectangle is cut out.
You will need to cut a rectangle out of birch bark, making one end thinner. After it is strengthened with adhesive tape to the tube and bent a little. If you wish, you can make a few more holes. This option is not the only one that can be used to make a pipe. A cocktail tube is perfect for this.
The one that has an accordion can be used as a base. The smaller part should be flattened, and then cut off pieces of the upper part with scissors. The end result should be a corner. It should not be too small or large, otherwise the pipe will not sound.
Making castanets

Do-it-yourself musical instruments for kindergarten are made today by many parents. These can be castanets, for which you need coins. For this Spanish tool, you need to cut a rectangle out of cardboard in the amount of 4 pieces, each measuring 6x14 cm. Two rectangles should have dimensions equal to 6x3.5 cm.
Such a noise musical instrument is also made with the use of glue and four large coins. Large rectangles need to be folded in half and glued in pairs. From small strips, glue a ring for thumb. Inside the rectangle, for each opposite side, you need to glue a coin, stepping back from the edge of 1 cm. When the cardboard castanets fold, the coins should touch, creating a kind of sound.
Percussion instruments

You can make another model of a baby drum using:
- ceramic 14 cm pot;
- balloons;
- plasticine;
- sushi sticks.
From the ball it is necessary to cut off the neck and pull it over the pot. The hole at the bottom of the pot is closed with plasticine. On this we can assume that the drum is ready. It remains only to make sticks. Sushi sticks are perfect for them; at the end of each of them, a plasticine ball, which is pre-frozen, should be strengthened. Cut off from the balloon Bottom part, which should be pulled on a plasticine ball. An elastic band from the top of the ball tightens this design.
Tools from improvised materials
You can get very unusual sounds if you make a musical instrument with your own hands. They can become a musical slingshot. To do this, a tree branch of the appropriate shape is selected, which must be well polished. For safety and long service life, you can varnish it. Holes are drilled at two opposite ends of the slingshot, between which a thread will be pulled with elements fixed on it, borrowed from an old baby rattle. These can also be purchased at the hardware store.
A ratchet can be made from nutshells. For this, two wooden or plastic sticks are prepared, between which a strong thread is stretched in several rows. Previously, it should be put on the shell of pistachio nuts, which are strengthened with knots.
You can also make a musical instrument with your own hands with unusual sounds from a small water bottle. Dried thin branches and cereals are placed inside it, which can be rice. As a result, it is possible to achieve the versatility of sound. If such a bottle is designed, then it can be turned into real maracas. For this, you can also use containers from kinder surprises, which are pre-filled with cereals or other small items.
Making children's musical instruments with your own hands, you can make ringing bracelets. To do this, metal bells are purchased in the hardware store, which should be sewn to a pre-made fabric bracelet. On the hand, it will be held with Velcro.
One of the most simple solutions is a noise maker. To do this, prepare a wooden blank on which you need to fix the ropes with plastic bottle caps fixed at their ends. Additionally, you can use the same bells.
Conclusion
You can also make musical instruments with your own hands for the garden. For this, lids from plastic cans are quite suitable, which are reinforced with glue on a strip of corrugated cardboard, folded in half at the end. To get the sound of the covers, they must be aligned with each other, which will allow you to get impact noise.
Children's music opens the child Magic world musical sounds, helps to plunge into the melodic beauty of the sound of instruments, to awaken creative initiative. In a child, it is important to develop everything of value that nature has so generously endowed him with, creating a favorable environment for the formation of a musical culture, based on the innate abilities of the child, revealing and improving the inclinations and inclinations inherent in him.
The goals of conducting classes about musical instruments in kindergarten, specific tasks and techniques
The aesthetic pleasure derived from playing a variety of instruments, accompanying creative and outdoor games contribute to the expansion of the set of musical impressions, the personal development of the child, stimulate creative activity, develop thinking, attention, memory and volitional qualities. That is why it is so important to carry out work on musical education systematically and purposefully, carefully studying the methods and techniques of teaching.
Any instrument is easy to play: you just need to touch the right key at the right time, and the instrument will sound itself.
J. S. Bach
Goals and objectives of the classes, methodological techniques relevant for different groups
Goals: development of musical and creativity, education of love for music and artistic taste.
- develop rhythmic hearing;
- introduce the classification and sound of musical instruments;
- teach to play the simplest percussion, noise, string-plucked instruments.
General teaching methods:
- verbal:
- educational conversation;
- practical explanations;
- leading and problematic questions;
- puzzles;
- poems;
- visual:
- demonstration and examination of tools;
- discussion of thematic illustrations;
- showing the ways and techniques of the game;
- practical:
- reproduction by children of playing techniques on various musical instruments;
- improving acquired skills;
- production of musical instruments and playing aids from improvised and waste material;
- gaming:
- didactic games;
- mobile music games.
Video: game "Merry Tambourine"
Music lessons involve a competent alternation of the frontal, group, individual format of the teacher's work with children. This approach allows children to become more deeply acquainted with the expressive possibilities of each instrument, stimulates interest in music-making, creative improvisation, and awakens inspiration for writing.
Methodological methods of working with different age groups
Each age period has its own characteristics and requires its own pedagogical approach. Methodological recommendations also differ.
Age: 2–3 years (first junior group)
Game techniques: children get acquainted with musical instruments while playing out a surprise situation. For example, a bear brought a bag with some amazing items (pipes, rattles, drums, cubes), the kids are examining the instruments, trying to make sounds. Then, to the musical accompaniment, rhythmic movements of different strengths are performed with a rattle, which makes it possible to achieve either a quiet or a loud sound. The lesson turns into a small study, knowledge of the new, and gives its discoveries. This creates an atmosphere of unconstrained joyful surprise and enjoyment from communicating with music. At the next lesson, communication with the forest friend continues, the clubfoot bear offers to dance with him to the sound of a tambourine. Kids will be happy to imitate their favorite hero, moving slowly from foot to foot, waddling and trying to follow the rhythmic pattern of dance movements. AT gaming fun children also learn:
- to distinguish the sound of different musical instruments;
- identify sounds by pitch;
- develop a sense of rhythm.
Age: 4 years old
Babies of the fourth year of life additionally get acquainted with a musical hammer and a metallophone, they are happy to take part in rhythmic games with instruments. For example, kids are asked to convey the sound of the wheels of a moving train speeding up or slowing down, or the clatter of the hooves of a running horse. In game didactic tasks, children of this age without much difficulty can:
- play fast and slow sound rhythm on one instrument (a smart bunny jumps fast, a big clumsy elephant walks slowly and heavily);
- to distinguish between high and low sounding of the bell;
- convey the elementary rhythmic pattern of the melody;
- recognize the musical instrument they know by its "voice".
Children of middle preschool age master the art of playing the metallophone
Age: 5 years old
Children of this age master the art of playing the metallophone. This instrument helps to develop an ear for music, a sense of rhythm, as well as musical memory. The teacher pays great attention to showing and synchronous explanation right position body, hand movements. The initial acquaintance with the technique of playing the metallophone takes place in the classroom, and training and consolidation of skills continues during individual communication with children - for example, when a child is asked to depict a rhythmic pattern own name with simultaneous voice guidance. For a correct image of the rhythm, the teacher suggests first slapping and then reproducing the rhythmic pattern on a tambourine or musical mallets. Great importance acquire the reproduction of the melodic line, the observance of the tempo, the coherence of movements.
Playing stringed instruments also develops fine motor skills.
Age: 6 years old
Children get acquainted with new and rather complex string-plucked (harp, zither, harp) and keyboard (accordion, button accordion) instruments. Mastering the ability to play the zither is carried out on an individual basis. Didactic games of a musical orientation are of paramount importance, awakening children's imagination and imagination and developing sensory abilities. In the second half of the year, children begin to master musical literacy. The study of the musical staff and the names of notes takes place with the help of game situations that cause a lively emotional response and cognitive interest; actively used poems, songs, fairy tales.
Stages of acquaintance with musical instruments
Game tricks:
- Junior preschool age:
- rattle: strikes with an instrument on the palm or a hard horizontal surface (table, floor); shaking;
- tambourine: the instrument is fixed in one hand, a blow is struck with the palm or fist of the other hand; shaking;
- bells: the instrument is held in vertical position, strike with a stick, push with a finger or shake freely;
- drum: synchronous, alternating rhythmic beats with sticks or shot;
- wooden spoons: "patty" reception, hitting the "heel" on the "heel";
- metallophone: confident driving with a hammer in the air, a blow with a rebound on one plate.
- Middle preschool age:
- tambourine: a new technique - a blow with the fingertips;
- metallophone: practicing the glissando technique (slow sliding from sound to sound);
- spoons: a new technique - "pancakes" (alternate hits on the "heel" of the left spoon, then on the "heel" of the right spoon).
- Senior preschool age:
- glockenspiel:
- freely unfolding the brush, perform the “hit-rebound” technique;
- achieve correct movement hammer up and down;
- learn to convey a sound rhythmic pattern with the help of percussion;
- xylophone, rumba: "Bourdon" reception (continuous sound);
- Acquaintance with the techniques of playing percussive-noise instruments:
- beaters,
- maracas,
- castanets,
- bells.
- glockenspiel:
Video: concert number (middle and senior preschool age)
Organization of lessons on acquaintance with musical instruments
Lesson structure:
- Introductory, motivational part:
- musical welcome,
- watching a presentation video
- educational conversation,
- topic discussion.
- Main part:
- creative tasks and exercises,
- playing children's musical instruments,
- musical and didactic games.
- Final part:
- final conversation between the teacher and the children,
- gratitude for the active work and interest shown in the lesson.
Interest in music will help awaken professional approach and the personal fantasy of the educator, who can use in his work to activate the creative potential of his pupils:
- poems;
- puzzles;
- games;
- costume performances;
- demonstration of illustrations;
- listening to a fragment of a piece of music;
- viewing multimedia presentations, videos or animated films.
The thoughtful approach of the educator to the organization of the lesson, comprehensive preliminary preparation will create an informal, lively atmosphere, increase the interest and emotional impact of children.
Table: Introductory Lesson Ideas
| Topic of the lesson | Contents of the introductory part |
| "Journey with Emelya to a musical fairy-tale land" | Emelya appears to the sounds of a Russian folk dance tune. Emelya: Hello guys, I really like to travel the world on my stove, I suggest you join me and go on a long journey! Educator: Emelya, we gladly accept your invitation, but first guess our riddle (reads a riddle about a spoon). Emelya: It's a spoon, wow, how did I not guess it myself? It’s true, before a long magical journey, it would not hurt to thoroughly refresh yourself, but I love to eat! Educator: Emelya, this is not just a spoon, but a folk musical instrument. Emelya: How is it? By teapots and jugs? Educator: No, of course, the performer hits the spoon against the spoon, like this. Emelya: This is all very interesting, but what does this have to do with our plans? Educator: Guys, let's show our guest a hint. (Children perform a folk melody on spoons) Emelya: I understand that we are going to travel to the amazing country of Russian folk instruments! |
| "City of Music Masters" | The teacher invites the children to go on a magical journey, the kids look at the map of the fairy kingdom, find on it the image of a musical key, which symbolizes the city of masters of musical instruments. The wave of a magic wand takes children to a fairy-tale reality. Imagination helps to imagine a city in which there are many beautiful houses, but the city square is empty, the city is deserted, as if bewitched. It is necessary to solve riddles, perform exercises and guess which tools (spoons, tambourine, rattle, etc.) the inhabitants are masters of. Then perform a melody, dance, sing, then the city will come to life, filled with cheerful laughter, the sound of musical instruments, songs and dances. |
| "Let's invite the violin to visit" | A teacher of the children's music school in the violin class is invited to the lesson. A piece performed by a professional musician opens up an acquaintance with a surprisingly beautiful instrument. The music teacher's story is accompanied by a demonstration of a real instrument: “Look at the body of the violin, what a flexible body, thin, graceful waist. The part of the instrument that ends with a curl is called the fretboard, strings are stretched over it, and sound is produced from contact with the strings. The beautiful lingering sound of the violin depends on the bow. Touch the bow, and you will see that real, finest horsehair is stretched over the cane. Now hook the string with your fingers and hear a dull, short sound. Only the bow helps the violin to truly sing in a long and gentle voice. Try to draw a bow along the string, you hear, the violin seemed to speak. |
| "Land of Musical Instruments" | The teacher tells the children that a swallow flew in through the open window and brought a letter. The text of the letter: “Dear guys, I know that you are very fond of listening to music, singing and dancing. The queen of our country of musical instruments invites you to visit. Flute Girl. The children decide to accept the invitation and are about to hit the road, but then Pinocchio runs into the room, sings a song and at the same time is very out of tune. The teacher invites the children to take Pinocchio with them so that he learns to sing and gets acquainted with musical instruments. Children move to the music, tapping the rhythm with the help of rattles. |
Video: acquaintance with musical instruments (GCD - directed educational activity, middle group, author I. V. Tyarina)
Topics for developing conversation:
- "Is it possible to live without music?"
- "Keyboard City"
- "Visiting Wind Instruments"
- "Secrets and mysteries of Russian folk instruments"
Stories about different instruments for the introductory part of the music lesson
You can also use information and communication technology (ICT), supplementing the text with the records of the relevant tool and pictures:
- From the first moments of a person's life, sounds surround him. In the natural world, music is everywhere. Listen - and you will hear the melody of birds singing, the rustle of autumn leaves under your feet, the rolling sound of the sea wave, the quiet breath of the spring breeze, the chirping of cicadas on a hot summer day. Music surrounds us everywhere, we just need to learn to hear it. People invented a wide variety of instruments, invented a special musical writing, learned how to record melodies with the help of notes. Today we touch wonderful world musical instruments.
Music is everywhere in the natural world
- Percussion instruments are a loud, noisy team of instruments. Its most famous, powerful and important member is the drum. Guys, why do you think the drum is round and not triangular? (Only a circle allows you to achieve the necessary skin tension force). With the help of sticks, you can get sounds of different strengths - from the rustle of light steps to a menacing rumble. Drumming is the most difficult performing technique and requires real virtuoso skill from the musician.
Percussion instruments - the loudest, noisiest, instrument team
- The family of wind instruments (brass) - leads the parade processions, being a welcome participant in solemn events: the jubilant voices of brilliant handsome men (trumpet, flute, saxophone) perform melodies in honor of the winners of sports competitions, greet the most dear and important guests. Perhaps the name is due to the fact that the magical sounds that delight the listeners will be extracted only by those musicians who put their souls into the game.
The family of wind instruments (brass) leads the ceremonial processions, a welcome participant in solemn events
- The commonwealth of string instruments (violin, guitar, cello) has always been very loved by even the most demanding and strict audience due to its gentle and soft sound. In their form, these instruments are very reminiscent of the human body, sounds are extracted with a bow or fingertips. String instruments occupy the most important places in a symphony orchestra - in front of the conductor and the audience.
In their form, these instruments are very reminiscent of the human body, sounds are extracted with a bow or fingertips.
Video: “How do keyboard and wind musical instruments sound” (cartoon)
Musical and didactic games for the younger group
Variants of game exercises and tasks for kids of two to four years:
- playing to the soundtrack of any popular children's song, tapping "to the beat";
- sound accompaniment to poems;
- sound pictures on the proposed topic (for example, depict a natural phenomenon - rain, wind noise, snowfall);
- fairy tale story in sound (onomatopoeia of fairy tale characters).
"History of squirrels"
In autumn, the squirrels ran along the forest paths, diligently picking mushrooms and nuts for the winter (drumming with their fingers). But fluffy white snowflakes (metallophone) began to quietly fall to the ground, gradually they wrapped the chilled earth with a beautiful snow-white blanket, on which traces of nimble squirrel cubs (triangle) became visible. In their cozy and warm houses in the trees, the squirrels gnawed nuts (spoons). The warmth of their houses was kept by a rug of dry leaves (by rustling noise instruments). And it was cold outside, an icy wind (flute) was blowing.
"On the meadow"
Forest animals came running to a sunny clearing to warm up - diverse music sounds, conveying images of animals: a slowly waddling bear, a quickly jumping bunny, a cautiously sneaking chanterelle. Kids need to guess who is who and show in motion and sound.
Toddlers need to portray the image of the animal in motion and sound
"Droplets and Rays"
Children listen attentively to music depicting the sound of rain. Kids need to tap the rain with claps, convey the smooth movements of gentle sunlight on a musical instrument. Children independently choose the appropriate instrument, come up with dance moves.
"Musical Flowers"
A game to recognize the nature of the melody.
The pictures are on the table. Children listen to the soundtrack, take turns determining the nature of the music, choosing the appropriate flower and showing it.
Each baby has one flower, if a melody sounds that matches the mood of the expression on the face of his flower, then the child raises his card.
The middle of the flower depicts options for the emotional state
The middle of the flower depicts options for the emotional state:
- gentle, affectionate, calm, pacifying;
- sad, melancholy, melancholic;
- perky, joyful, mischievous.
Games for middle and high school age
Middle and senior preschool age children can already cope with the tasks more difficult.
"Rhythmic Ornaments"
The game develops the idea of high and low, long and short, smooth and sharp sounds. Didactic material: pictures from graphic image rhythmic pattern.
The game develops the idea of high and low, long and short, smooth and sharp sounds.
Children are invited to clap, reproduce on instruments, show with the help of voice or plasticity of movements the musical pattern depicted on the card.
"Rhythmic fence"
The game reinforces the concept of a strong beat, develops a sense of rhythm. The teacher slams melodies of different genres (polka, waltz, march) with an emphasis on the downbeat, demonstrating the appropriate card.
The game reinforces the concept of a strong beat, develops a sense of rhythm
"Choose a picture"
An exercise to reinforce the concept of musical tempo. Children listen to a piece of music, determine the tempo (fast, slow, very fast, very slow) and choose a picture depicting an animal whose character and temperament correspond to the musical tempo.
An exercise to reinforce the concept of musical tempo
"Guess the musical instrument"
Musical fragments are played by a musical instrument, children recognize it by sound and point to the corresponding card.
Children recognize the instrument by its sound and point to the corresponding card
"Magic Screen"
The game expands the musical horizons, develops memory and attention. Children must recognize the song, remember the name, pick up a picture depicting an episode from a popular cartoon. From the picture, the child determines the cartoon, remembers and sings a song.
From the picture, the child determines the cartoon, remembers and sings a song
"Lotto for little musicians"
The game trains the ability of pitch hearing. It uses two groups of cards:

The child chooses an instrument and performs a melody ascending, descending or on one sound: up from the first to the fifth, down from the fifth to the first, on the same line.
"The Fourth Extra"
The game reinforces knowledge about percussion, strings, wind and keyboard instruments. The child is offered a sheet with images of 4 musical instruments, where three belong to the same type, and the fourth does not. The picture that falls out of the logical series, the child closes with a card.
The violin does not belong to the group of keyboards
"Musician Cube"
A dice is required to play. big size, it can be made from a packing box or from an element of a modular constructor, images of children's musical instruments are glued to the edge of the cube. The cube should be light, attractive. The players, accompanied by musical accompaniment, throw it in a circle, the music stops, the children stop playing. The child, who has a cube in his hands, calls the instrument drawn on the upper face, approaches the table, takes the corresponding musical instrument and plays a melody, repeating the rhythmic pattern after the teacher.
The child names the instrument drawn on the top face, goes to the table, takes the corresponding musical instrument and plays a melody
"Ladder"
Items for the game: a five-step ladder made of building kit elements, toys, children's musical instruments. The first player plays a melody, the second player determines the direction of the sound movement and moves the toy to the upper step, the lower one, or leaves it on the same step.
The player determines the direction of the sound movement of the melody and moves the toy up the stairs
Video: playing musical instruments (senior group)
Table: riddles about musical instruments
| Mystery | Answer |
| Here are the keys, like on a piano, But for them to play For a good song You need to stretch the fur. | Accordion |
| Three strings, plays loudly That tool is a "cocked hat". Quickly find out What is this? | Balalaika |
| It's easy to go hiking with me, Fun on the road with me And I'm a screamer, and I'm a brawler, I am sonorous, round ... | Drum |
| He has a pleated shirt He loves to squat, He dances and sings - If it gets into your hands. Forty buttons on it With mother-of-pearl fire. merry fellow, not a brawler Our vociferous… | Accordion |
| The string rings, she sings, And everyone can hear her song. Six strings play anything And that tool is always fashionable. He will never get old. That instrument is called... | guitar |
| Carved in the forest smoothly carved, Sings-poured. What is the name of? | pipe |
| musical instrument, He is spirit With a cane he is single, Such a beautiful one. And more graceful than him Apparently not in music. Does everyone understand what I mean? It… | Clarinet |
| At dinner they eat soup, By the evening they will "talk" wooden girls, Music sisters. Play a little too On beautiful bright… | Spoons |
| He looks like a rattle It's just not a toy! | Maraca |
| Very fond of music Two sisters, Natasha and Nina, And so we bought They are big… | Piano |
| Smooth bow movements tremble the strings, The motive murmurs from afar, sings about the lunar wind. How clear the overflowing sounds are, they have joy and a smile. A dreamy motive sounds, it plays ... | Violin |
| They are made of copper. In time, you need to wave your hands, Hit loudly, then rest. Their party is not a trifle, not a trifle, Music also has... | Plates |
| Performed at the concert Our dear Tatyana, Like a star she played A whole hour for… | Piano |
Video: musical and didactic game "Guess the musical instrument"
Project development algorithm
A creative project to get acquainted with musical instruments is a combined and expanded version of the implementation of cognitive and creative activities that combines several multidirectional artistic, aesthetic and practical activities (musical development, fiction, drawing, appliqué, making children's musical instruments, concert performances, etc.). ) that have a common theme.
Project types:
- short-term - from one lesson to one week;
- long-term - from a month to a year.
Project development algorithm:
- preparatory work;
- main part;
- final stage.
Directions and forms of implementation:
- intellectual and cognitive development:
- educational conversations with parents and pupils;
- quizzes and musical didactic games;
- hometasks;
- demo material and visual aids(games-presentations, information stands, sliding folders, a music museum or a corner, albums, an exhibition of children's drawings, etc.);
- festive musical and theatrical events;
- excursions, visits to museum expositions and concerts;
- educational games (musical and didactic, artistic, role-playing).
- practical activities in the manufacture of musical instruments;
- verbal techniques aimed at activating attention and developing memory (poems, tongue twisters, riddles, folklore materials, fairy tales);
- costumed musical entertainment, concert, musical lounge (with the participation of a musical worker).
Table: musical project "Russian Miracle Instruments"
| Name | Russian miracle instruments |
| Characteristic | Long term project in preparatory group |
| Goals | To create conditions for expanding and enriching children's knowledge about the history of the origin of Russian folk instruments, cultivating love and respect for Russian folk culture. |
| Tasks |
|
| Members |
|
| Content | Project implementation stages:
|
Table: musical project "Russian folk instruments", author E. A. Glushko
| Name | Russian folk musical instruments, author E. A. Glushko |
| Characteristic | Short-term project in the senior group |
| Goals | Introducing preschool children to Russian folk culture, its historical origins, contributing to their musical and general cultural development. |
| Tasks |
|
| Members |
|
| Content | Project implementation stages:
|
Video: Kindergarten Music Day
DIY children's musical instruments
Such crafts are easy and simple to make with children.
Maracas "Herringbone" and "Flower", "Noise" from the box
Materials and tools:
- a large bottle of children's champagne,
- smaller bottle of juice
- box,
- sets of colored and corrugated paper,
- sheet of standard size paper
- markers,
- simple pencil,
- scissors,
- PVA glue,
- cereals, peas, salt.
For noise musical instruments, you need containers, filler and paper for pasting
Step-by-step instruction:
- Prepare a long strip of colored corrugated paper four to five centimeters wide, apply glue and shape the body of the juice bottle.
Prepare a long strip of colored corrugated paper four to five centimeters wide, apply glue and shape the body of the juice bottle
- Cut from corrugated paper ribbons of two colors 8 and 10 cm wide, the length depends on the diameter of the bottles. Cut strips on one side of the tape.
Cut corrugated paper into strips of two colors 8 and 10 cm wide
- Apply a strip of glue along the edge of a wide strip and glue a narrow strip of a different color to it.
Apply a strip of glue along the edge of a wide strip and glue a narrow strip of a different color to it
- Prepare another strip for the neck about six centimeters wide and make cuts in the same way.
Prepare another strip for the neck about six centimeters wide and make cuts in the same way
- Glue the body of a large bottle starting from the base, glue the neck in a spiral motion.
Glue the main part of the bottle body, starting from the base, glue the neck in a spiral motion
- On A4 paper, draw a circle of thirteen to fourteen centimeters (with a compass or circle the finished template).
On A-4 paper, draw a circle thirteen to fourteen centimeters (with a compass or circle the finished template)
- Divide the circle into eight parts, round off the edges of the inner triangles in the form of petals.
Divide the circle into eight parts, round off the edges of the inner triangles in the form of petals
- Cut out a flower, draw a round center according to the size of the neck and make cuts along the lines.
Cut out a flower, draw a round center according to the size of the neck and make cuts along the lines
- Draw two blanks with colored pencils or felt-tip pens (optional).
Draw two blanks with felt-tip pens or colored pencils
- Put the blanks on the neck of the bottle, pour the noise material into the bottles.
Put the blanks on the neck of the bottle, pour the cereal into the bottles
- Prepare bright colored strips three to five centimeters wide and two squares, paste over the box; we do not glue one of the back sides, we leave the opportunity for falling asleep cereals in a box. Pour the filler into the box.
Prepare bright colored strips three to five centimeters wide and two squares, paste over the box
- Screw on the lids, close the box: the musical toys are ready!
Musical toys are ready
Instruction:
- Paste over mayonnaise jars with colored paper blanks.
- AT side holes put on colorful ribbons.
Paste mayonnaise jars with blanks of colored paper, thread bright ribbons into the side holes, the tool is ready
A huge contribution to the development of children is made within the walls of the kindergarten. And music is an important part of it. In music classes, preschool children learn to recognize sounds, sing and dance, and learn about new musical instruments. Returning to the group, they most often go about their own business: draw, play with dolls or cars, assemble pyramids or constructors. But why don't you make DIY musical instruments for kindergarten? Children will be able to play a real instrumental ensemble, and at the same time develop their own.
A little theory about homemade musical instruments
The process of creating musical instruments with your own hands is quite painstaking and sometimes requires materials that are not quite usual for a kindergarten: plastic bottles, tin cans, rubber bands for money, buttons, and so on and so forth. Involve your parents - for sure, in every house there are such things that are no longer needed. Explain that the guys will develop creatively in the process of needlework and then show off their inventions at the next matinee.
Here are the main points to consider:
- The sounds reproduced by homemade musical instruments most often have nothing to do with those given by real ones. Your task is to show that you can extract different sounds from improvised means. You will improvise. And it would not hurt to convey the appearance of real instruments too: decor, shape, accessories like a shoulder strap.
- Toys from improvised means often break. Do-it-yourself musical instruments for kindergarten are no exception. Immediately tell the children about the fragility of the products, their special value for your group (after all, they will remain as a memory of each of the kindergarten students).
- All materials must be hypoallergenic and safe.
- Try to come up with tools that the child could make on their own, especially if we are talking about the preparatory group. It is also better to define the concept initially: these will be the same products for each child, or preschoolers will make tools with their own hands in groups - each group has its own instrument.
Playing music and playing it even in this form will benefit children. Perhaps one of them will discover a real talent or a desire to enter after kindergarten in and already there to seriously engage in their hobby.
DIY musical instruments for kindergarten
Here are a few small workshops on creating interesting and unique musical instruments. You will see, everything ingenious is very simple.
Drum
Any metal or plastic can that is hollow inside can become a drum. You won't find them in kindergarten. But you can ask your parents to bring old plastic jars from mayonnaise, jam or barbecue. For a variety of sounds, you can take jars of different sizes and wall thicknesses.
Absolutely any are also suitable as sticks. It is important that the tree (if you choose it) cannot injure the hands of children, that is, it should be covered with a special varnish. For example, this role can be played by sticks intended for eating dishes from Japanese cuisine.
wooden xylophone
Do-it-yourself musical instruments for kindergarten are made from the most different materials! If there is an extra plinth, then you can even make a tool out of it. It is enough to cut it into equal segments 10-15 cm long and fasten it with screws loosely to the base daughter. The base must be processed so that the children do not get splinters. Pieces of the plinth are placed in the same position one under the other.
To extract sound from this handmade musical instrument, a child spends any wooden stick top down. The more solid the stick, the louder and richer the sound will be extracted.

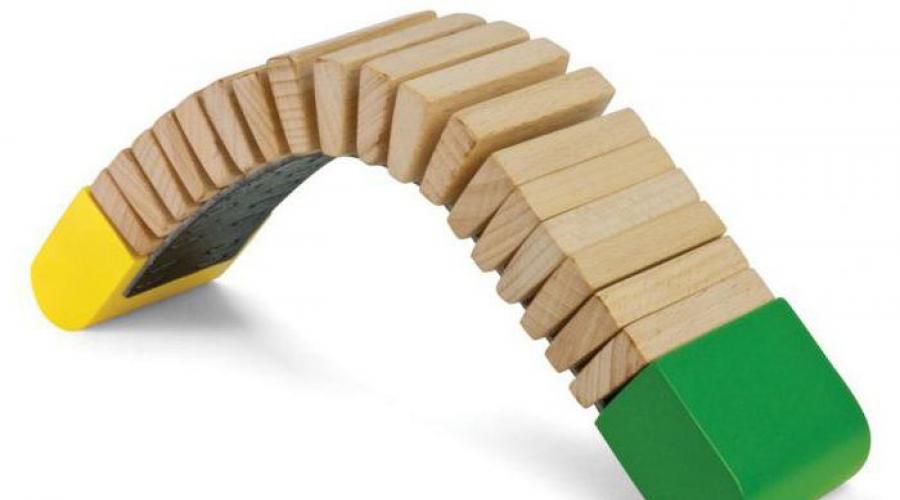
Gusli
The basis can be a shoebox, in the lid of which a circle is neatly cut out slightly offset from the center. Elastic bands for money are wrapped around it or screwed so that all the "strings" pass over the hole. So that the rubber bands do not lie on the surface and can make a sound, they need to be supported with something.
A pencil can serve as a support. However, if you want to raise the “strings” higher, then it is better to make a triangular structure with your own hands, because, as you know, it is the most reliable. Now you can play.

Cookicle
This wind instrument is made from ordinary straws, which are usually offered to children for drinks. It is better not to take those tubes that are attached to juices, since they are small and have a spring for bending in the suitable place. And so, several tubes of the same diameter are taken (they can be replaced with anything: "cases" from pens, sticks from balloons, etc.).
Further, from one of the edges, the second tube is sawn off from below by 1-1.5 cm. The third tube is sawn off twice the distance. Each subsequent one is similarly sawn off so that a kind of uniform ladder is obtained. Then a wide adhesive tape is taken, and the tubes are placed exactly along the edge on it. Then you need to glue it on the back with tape.
If your musical instrument turns out to be large, then it is better to first glue 2-3 tubes separately with small adhesive tape, and only then all together. Do-it-yourself lower holes for a musical instrument for kindergarten need to be closed. This can be done with plasticine, cut off pieces of eraser, or even chewing gum.

Triangle analogue
To recreate the subtle sound from the contact of a metal stick with another metal object suspended in the air, you can take an idea from this musical instrument. For manufacturing, you will need 2 metal tubes, one of which will be hung on any impromptu handle for strong threads. Another child will strike and make a pleasant sound.
Maracas
For making do-it-yourself maracas for kindergarten, any hollow oblong container that can be filled with granules, cereals or larger items can be suitable. The easiest option is to take a simple pencil, pierce a Kinder Surprise plastic egg with it and fix it. Peas or rice are placed inside, depending on the desired sound at the output.
Another option is 0.5 ml plastic bottles. Inside you can put unnecessary buttons or the same cereal. Of course, to make the musical instrument realistic, the bottles should be painted, preferably with acrylic paint, to be sure. With filled plastic eggs, you can do the other way: take small plastic spoons and attach them on both sides so that the tips of the base touch. In principle, spoons can be put on glue, but for beauty they can be glued around the perimeter with colored tape.
Those musical instruments that children will make for kindergarten with their own hands will allow them to learn to improvise with sounds, to understand the world through play. After all, even in the store, children are more attracted to those toys that are able to make some sounds, words, glow. Remember that almost everything that surrounds us can become a musical instrument.
For example, take the usual empty cardboard box. It is enough to knock on it with your hands or sticks - and this is already a drum. Everything that can be filled with something and moved from side to side is a potential maracas. Do-it-yourself musical instruments for kindergarten are a potential source of individual sounds for staging fairy tales. A loud knock is a clap of thunder or the roar of a wild beast. Rustling paper - it's the wind blowing or falling autumn leaves. Music around us.
How to make musical instruments at home with your own hands?
The beauty of homemade musical instruments is that they cost a penny, and the process of making them will appeal not only to adults, but also to children. Just imagine how much delight a kid will have who will independently make maracas, a Chinese drum, castanets or a flute! Of course, homemade instruments do not make the perfect sound, but that's not the point. Similar experience can't be compared to anything. Classes in the manufacture of home-made musical instruments are very useful, if only because the child learns to distinguish between their types, understands the principle of operation of each of them, knows what parts they consist of. And most importantly - joint work brings together, and this is useful for both parents and their kids. So what musical instruments can you make with your own hands? Consider the most interesting and simple options.
Maracas
This is perhaps one of the tools that the baby gets acquainted with while still in diapers. Maracas are a noise instrument. Rattles and other noise toys for babies are the prototype of maracas. Making them at home is as easy as shelling pears, and there can be countless options. So, maracas can be made from:
- plastic bottles;
- pumpkins;
- jars of coffee;
- eggs from kinder surprise;
- cardboard cylinders from parchment or paper towels etc.
The scheme for making maracas is quite simple: fill the prepared container with a small amount of filler in the form of beads, peas, buttons, beads, small pebbles, sand or shot. All holes in the container must be securely closed (if it is a cardboard cylinder, close it on both sides with thick cardboard) so that the filler does not spill out and the tool makes a ringing noise. The maracas themselves can be decorated by painting them with a bright ornament with acrylic paints or sticking cute stickers on them. Handles can be attached to round containers for convenient use of the tool. For example, if you used Kinder eggs for maracas, secure them between two plastic spoons and secure with twine.
Tambourine
To make this tool, you will need a wooden embroidery hoop, 10 metal lemonade lids, 5 metal twigs 2-2.5 cm long, electrical tape and 5 plates of thick cardboard, wood or metal 2-5 mm thick and 1.5x1.5 in size. cm. Between the hoops at the same distance we place the plates and fix them with electrical tape - they will hold the circles of the hoop. We connect the covers in two with each other with a flat part and pierce them in the center with metal twigs. As a result, we should get 5 elements, which, with the help of electrical tape, must be securely attached between the plates at the same distance. Once the last element is attached, the tool can be used for its intended purpose.
Pan flute (pan flute)
This musical instrument is very easy to make. For it you will need scotch tape, 7 straws for a cocktail and 2 pieces of thick cardboard 3 cm wide, and the length will depend on the width of the tubes folded together.

Each of the tubes needs to be cut a little so that they make a sound of a different tone. The difference between them can be 1-1.5 cm. Let the longest tube be 15.5 cm, then the shortest - 5.5-6 cm. When the tubes are cut, lay them out on a strip of adhesive tape so that on one side they the ends remained at the same level. We fix this position of the tubes with adhesive tape, wrapping a row in 2 layers. Next, we attach cardboard to this tape to make the panflute look more presentable. The ends of the instrument must be covered with plasticine so that it can make sounds during the game.
Chinese drum

For this musical instrument you will need tin(approximately 5 cm high) without lid and bottom. Instead, you can put on a jar plastic lids tightly attached to its walls. Next, you need to take a ribbon or a strong rope about 20 cm long. The walls of the can must be pierced between the lids at the same distance so that an imaginary diameter line runs clearly in the center of the can. Through the obtained two opposite holes, you need to stretch the rope, leaving the ends of the same length on both sides, tying knots at the walls of the can and stepping back a couple of centimeters from the edge of the rope. String a wooden bead on the edges of the rope and fix them with a strong knot. The tool is ready.
Bells "wind music"
If you have an old Chinese pendant, called "wind music", lying around somewhere, it's time to give it new life. To do this, disassemble it into its component parts - for the bells we only need tubes. Attach these tubes to a piece of stick with a diameter of 0.5-1 cm, using a strong rope. Arrange the tubes at the same distance in order from long tube to the shortest one. Now this instrument can be used like orchestral bells.

Drums of different heights and diameters
To make drums, you will need several tin cans, for example, from tea or cookies. Instead of a lid, stretch strong paper, securing it with rubber bands, foil or leather. It is better to play music on such an instrument with pencils, at one end of which there is an elastic band. Keep in mind that the sound of the instrument depends on the size of the homemade drum. Therefore, with a little work together with the child, you can create a whole drum kit.

Bells on a cardboard tube or mallet

For this tool you will need:
- cardboard tube (for example, from foil or parchment);
- 12 bells (you can buy them at a needlework store or tear them off old toys);
- thick needle;
- dense threads.
In a paper roll, from one end, you need to pierce holes according to the number of bells. It is important that these holes are at the same distance from each other, located in two rows along the entire diameter of the tube. Gently but securely fasten the bells to the tube with a thread. As a result, the tool should look like this:
Castanets
This musical instrument is a great helper in learning rhythm. Making castanets with your own hands is very simple: take two metal lids, for example, from a can of tea. Attach a piece of fabric to the back of each cover so that the child can put the castanets on his fingers. The result of the work may look like this:

harmonica
Take two combs of the same size and wax paper. Place the combs together so that the teeth stay in the same direction. Combs need to be wrapped around the edges with paper, fastening the structure with twine. You need to play the harmonica by blowing between the teeth of the structure.

rain flute
For this tool you will need a long cardboard tube (for example, from food foil, but it is short, it is better to look in hardware store a similar tube about 70 cm long). Inside this tube you need to insert a spiral made of foil. The spiral must match the length of the tube - this is important. Having tightly sealed one end of the tube, you need to pour a handful of beads, cereals or sand into the structure. Next, you need to securely seal the second end of the tube. Everything, the rain flute is ready. Now, turning it over, you can hear how the filler slowly descends down the tube, making the sound of rain.

Having shown a little imagination, at home with children you can make guitars, whistles, bells, shakers, water xylophones, tambourines, cymbals and other musical instruments. Such items will be especially loved by children, because they are made with their own hands. But the main benefit is that the child is a few steps closer to the world of music.
Home music workshop, developing exercises with homemade musical instruments. Educational video for children.
From this article you will learn:
- how to make musical instruments at home with children - a squeaker, maracas, the sound of rain, musical cups, a singing comb, a Chinese drum,
- educational games for children with musical homemade instruments,
- a bit of history: how people came up with musical instruments and what they are, what is rhythm, what are noise and percussion musical instruments.
DIY musical instruments: maracas
Maracas is the easiest musical instrument to make at home with the kids. You can make it with your own hands even with kids!

How to make a maracas with your own hands:
Step 1. We take jars with lids (tin and plastic, if available, then wooden, birch bark and clay vessels with lids are also suitable). Then we fill them with various fillers: millet, buckwheat, lentils, peas, beans, beads. We fill different jars to different heights (1/4 volume, 1/2 volume, 2/3 volume)
Step 2. Close the lid tightly. We try the sound of the resulting maracas blank with the children. We try to add a filler or, conversely, remove it to get the desired sound.
Step 3. When the desired sound is received, tightly close the lid. If necessary, you can additionally glue it with a glue gun. We glue the tool with colored paper (the kid can help you cut strips for decoration or choose a braid). We decorate the maracas as you like with the child.
Maracas is ready!
Ideas from experience:
Idea 1. Don't do everything yourself. Let the kid participate in the manufacture of maracas - pour grain into it, transfer large beads or beans one at a time into a jar. When shifting, we grab beads, peas or beans with a tweezer grip (forefinger and thumb as “tweezers”). Show your child how it's done.
Idea 2. Experiment with different amounts of filler. What sound will it make if you throw only ten beans or half a can of beans? Or almost a whole can of beans? Try how the sound of the instrument changes depending on the material of the can. Choose what your child likes. And as soon as the sound satisfies you, seal the lid forever.
Idea 3. It is more interesting if we decorate different jars in different ways. It can be braid, and stickers, and paper appliqué, and patterns drawn with gouache and then varnished on top for durability.
DIY musical instruments: musical glasses (cups)
A few years ago, I heard a virtuoso performance on glasses of classics - the musician played "Rondo". It was amazing! Well, the kids and I can play simpler melodies, and most importantly, experiment with water and enjoy the sounds!
How to make musical cups (glasses):
Step 1. We take 5 or more glass jars or cups or glasses (a set of glasses will do) and pour water into them to different levels.
Step 2. We take a spoon or a stick or a mallet (plastic or wooden) and hit the glasses. You get a sound - each glass has its own sound.
Ideas from experience:
Idea 1. If you take the same vessels (a set of cups) and pour different amounts of water into them, then the sounds will be different in height:
- the highest sound will be at an empty glass,
- the lowest sound will be in a glass filled with water.
If the glasses are different, then the sound of the one in which you poured more water will be lower.
If you experiment with the amount of water, you can build a real instrument and play a melody on it. Try experimenting with your child and playing with water and glasses.
Idea 2. Very interesting and amazing fact- if you decide to take a break for a walk or a nap and return to the glasses again later - it may happen that the sound may disappear. Don't worry. To make it appear, you just need to mix the water in our musical vessels or pour it again.
DIY musical instruments: playing the comb
This is a homemade musical instrument that I have known since childhood. I was taught it in our yard. And we played it together.
To make such a musical instrument - a comb is very simple:
Step 1. We take a comb (comb with large teeth on the handle). Cut off a strip of tracing paper. The strip should be slightly larger than the comb in size.
Step 2. We apply the tracing paper to one side of the comb and bring it to the mouth.
Step 3. Sing by putting your mouth to the tracing paper. It is we who sing - we draw words! Tracing paper will start to vibrate and you won't recognize your voice :). Children love it! Tracing paper will tickle your lips. Such a voice is very good for voicing fairy tales and home cartoons invented by a child.
DIY musical instruments: the sound of rain
How to make rain noise:
Step 1. We prepare tools and materials:
- cardboard long narrow cylinder (for example, from under the foil).
- pack of toothpicks
- pliers or sharp scissors
- glue (glue gun), paper and scissors for decorating the finished tool.
Sometimes this tool is made from hogweed, but it is very dangerous, especially for children. After all, hogweed is a poisonous plant!
Step 2 We take an awl and a tube from under the foil and pierce one hole near the edge of the cardboard roll with an awl. We insert a toothpick into this hole until it stops against the opposite wall of the cylinder.
Step 3. We retreat 1-2 cm and make a new hole and also stick a toothpick into it. Next, we make holes in the spiral of our cylinder. The spiral passes inside the entire cylinder and forms barriers in it, through which the cereal will pour, making a noisy sound. It turns out that as if inside our cylinder there is a spiral staircase made of toothpicks.
Step 4. So the spiral is ready inside the cardboard roll. We take wire cutters or sharp scissors and cut off the excess ends of the toothpicks from the surface of the cylinder.
Step 5 We seal one end of our cylinder - the tube. We are waiting for the glue to dry.
Step 6. We put the tube with the glued bottom down. And we pour cereal into it. We listen to the sound. We close the open end with the palm of our hand (so that the cereal does not spill out) and turn the tool very gradually upside down. We listen to the sound.
The sound will depend on the filler - try different fillers. If it is buckwheat, then the sound is more abrupt, if it is flax seeds, then the sound is more “solid”. Find the sound that you and the children will like and suit you.
Step 7. Now you can seal the second hole in our pipe - the base.
Step 8 Decorate our rain noise. It can be pasted over with paper, cloth, cord, painted with gouache and varnished on top.
How to play on the sound of rain:
We play the sound of rain like a noise instrument, not like a percussion instrument. That is, you do not need to rhythmically shake it or hit it. It is necessary very slowly and gradually, without hurrying anywhere, very carefully and gradually turn the instrument over with one end, then the other end up. Precisely slowly and gradually!
There is another - an easier way to make rain noise from a roll of foil. But - the sound is not quite noisy. More like a percussion instrument. How to make such a rain noise you will find in this video:
Do-it-yourself musical instruments: we make guselki

How to make do-it-yourself goose with children:
Step 1. Prepare materials:
- stationery gum (5 - 7 pieces). These will be the strings.
- an empty juice bag (volume - from a liter to two liters, at least).
- two round sticks or twigs or round pencils. The length is equal to the package width or more. These will be the sills.
Step 2. We stretch the elastic bands on the juice package along its length so that they run parallel to each other at an equal distance from each other. These will be the goose strings.
Step 3. We put our two round sticks under the strings so that the strings do not touch the juice box and rise up. One stick is on one side of the package perpendicular to the strings, the other is on the other side of the package perpendicular to the strings.
Step 4. The tool is ready! Let's play! You can pluck a string, you can run your finger along several strings.
Tips from experience:
Idea 1. Try experimenting with rubber bands different thickness. Let the child make sure that the thicker the elastic band, the lower its sound.
Idea 2. Change the angle between the sills and their location based on the juice package. Then you will get strings of different lengths - from the shortest to the longest. And they will make different sounds. A shorter string will give a higher sound.
Idea 3. Try using a different base - a shoe box, tin, plastic. Listen to the sounds that come out. Together with your child, choose the base and the thickness of the "strings" - elastic bands that your children will like best.
DIY musical instruments: squeaker from a pod
Did you make squeakers out of pods as a child? We did and loved to get different sounds with the help of such homemade tweeters! Here's how it's done:
Step 1. Take an acacia pod. We cut off the tail.
Step 2. Open the pod carefully and take out the grains.
Step 3. Trying to play.
I found a short video demonstration of this way of playing on an acacia pod on YouTube - I share:
How to engage with children with musical instruments that you make with your own hands: ideas
These videos will definitely inspire you and your kids for interesting musical ideas with children! These are recordings of the children's TV show "Shishkin's School" of my favorite TV channel "My Joy".
Video 1 for kids: Percussion musical instruments
From this video for kids you will learn:
How to make a maracas from a jar?
How did people come up with percussion instruments?
What can you make a maracas out of?
What are drums?
- play percussion instruments with children
Video 2 for kids: what is rhythm?
This video will introduce kids to the concept of "rhythm" and tell you how you can play rhythm games with your children.
Video 3 for children: noise musical instruments
In this video your kids will learn about noise instruments and how to use percussion instruments as noise instruments. And they will arrange a real orchestra with noise and percussion instruments(maracas, ratchet, castanets).
Exercises with children's homemade tools
Option 1. Accompany rhythmically any tune or arrange a noise orchestra.
Option 2. Musical sketch. Accompany a story or a fairy tale with noise sounds (a horse gallops - these are castanets, it's raining- this is the sound of rain, thunder - a drum, desert and rustling sand - maracas, spring drops or it started to rain - musical glasses or glasses, etc.), history, natural phenomenon, event. So you can improvise with the texts of many fairy tales and poems. You read the text of a fairy tale and point to a certain instrument. The child comes up with how to convey this event or word with this instrument.
If you are playing with a group of children, you can give them different instruments in advance. And to show with your eyes which instrument is now entering the fairy tale. Then the game will also be useful for the development of children's communication skills.
Option 3. Song by couplets. In each new verse of the song, a new group of instruments enters.
Option 4. Song with orchestra. In the first couplet, one instrument plays, in the second, the second instrument joins it (both instruments sound), in the third, the third instrument, and so on until you get a full orchestra (all our musical instruments play).
Songs of the peoples of the world are best suited for such musical improvisations.
Option 5. Dialogue without words. Try to talk to each other with the sounds of instruments. Convey joy, sadness, chagrin, surprise and other states, as well as various events using the sounds of musical homemade tools. Change the rhythm, the volume of the instruments.
Option 6. Echo game. You need to repeat the rhythm after the leader on your instrument. The game is also useful for the development of auditory attention and speech of kids.
Option 7. Game in the circle "Attention". Everyone sits in a circle in a clearing or on chairs in a room. The leader sets the rhythm and all players repeat it on their instruments. Then suddenly the leader changes the rhythm - you need to replace this and adjust to the leader. Another variant of this game - the presenter changes the volume of the sound.
Option 8. Fairy tale with tools. Children are given musical instruments. You can give one child 2-3 tools. Agree in advance what each instrument will represent in the fairy tale. For example, the sound of rain is the word "rain", the blows of spoons are steps, etc. You improvise - tell a little story in which these words occur. As soon as the player has heard “his” word, he must enter into the text of your story with the sounds of his instrument: make noise with the sound of rain, depict the creak of an opening door, cat steps and other events that you have planned in advance. Do not look for a ready-made story - compose as you go.
If it is still difficult for you to compose fairy tales with children on the go and improvise- The free course "Secrets of children's development in the game" will help you (the second video of the course on writing fairy tales - why you need it and how to learn it). You can get the course for free here on our website -. This is a recording of my webinars on the basics of child development at preschool age at the Internet Workshop of educational games "Through the game - to success!" year 2013.
The main thing in games with musical toys made by hand - this is the development of the child's ability to listen to the peculiarities of their sound, to convey a different rhythm, a different emotional state with their help, to be creative in their use. As well as experimentation - what will change if you change the tool - its length, filler and other characteristics.
You can learn more about the workshop of musical instruments from pockets and about musical developmental exercises for kids from the course Tatyana Yermolina on the "Native Path" -
Making musical instruments with your children with your own hands- it is very interesting, exciting and exciting! I wish you interesting creative games! And inspiration for musical improvisations with children on these sunny summer days!
Get NEW FREE AUDIO COURSE WITH GAME APP
"Speech development from 0 to 7 years: what is important to know and what to do. Cheat sheet for parents"
Click on or on the course cover below for free subscription
