How to make a powerful electric motor with your own hands. A real one-cylinder electric motor with your own hands. For production you will need
Read also
Still don't know how to entertain your children? Then try an experiment with a magnetic motor! It seems that this cannot be done at home. But you will be surprised at the ability to create an engine from simple items that you always have on hand. In this article you will find a diagram of the motor, as well as detailed assembly instructions.
How to make a motor - necessary materials
To assemble a simple motor with your own hands, you will need the following items and tools:
- Wire. For the craft, take copper wire with a diameter of no more than 1 mm. and 80 cm long. Try to stick to this size, since a longer wire will not be able to rotate on one battery.
- Sandpaper. Choose a finer grit, as you will have to clean up the wire cuts. Finer sandpaper will make the job easier for you.
- Battery. You will need one 1.5 Volt battery. You can use either a regular device or a battery.
- Paper clips. You need two in total. These will act as spool holders, so choose large paper clips that are made of durable metal.
- Scotch. For the experiment, it is best to use masking tape, as it has a paper backing and has a stronger sticky layer.
- Magnet. Take a small piece of magnet. It should be smaller in diameter than the wire ring and the width of the battery.
- Cardboard. Thick cardboard will act as a base to which you will attach the motor. With it you can carry the craft.
- Supporting materials. Additionally, prepare wire cutters and a simple pencil or pen.
When all the tools and items are prepared, you can begin assembling the magnetic motor structure.
How to make a motor - work progress
- If your wire is in a skein, then use wire cutters to pinch off a length of 80 cm from the workpiece. You need to make a ring with several turns from it. Use the surface of the battery as a base. Align one edge and after 3-5 cm, begin winding the wire onto the battery. Leave the second edge free and even.


- The wire ring will act as a coil, so tie the edges in a knot. But at the same time leave a small part free. Make it even. This is what you should get.


- Thoroughly clean the ends of the wire using sandpaper. For convenience, hold the workpiece with one hand and process the edge of the wire with the other.


- After processing one edge, you will get a light-colored wire. Strip the other end of the wire in the same way.

- Next you will need two large paper clips and a pencil.


- Use a pencil to pick up one end of the paperclip and turn it in the opposite direction from the base. In this case, you should get a small loop in the center of the workpiece. Place one edge of the paperclip on the battery so that the inside of the fold is located around the protrusion.

- Apply the second paper clip in the same way and secure it to the battery using masking tape. Then place the blank on the cardboard and secure it with adhesive tape as shown in the picture.


- Place a wire ring over the battery. Thread the free edges into the loops on the paper clips. Try not to bend the wire. If this happens, be sure to level it.


- Place the magnet on top of the batteries, but under the circle of wire. When the magnet sticks, the ring should spin on its own. If the circle does not start to spin, push it slightly with your hand. That's all, the simplest electric motor is ready for experimentation!


Important! Do not leave the device idle for a long time. At this time, the battery and coil will heat up, which will lead to malfunction of the device.
In just half an hour you can make a magnetic motor with your own hands. In this case, you will need the simplest materials that you can always find at home. Surprise your friends!
You can see how to make a more complex model of a simple motor in the video:
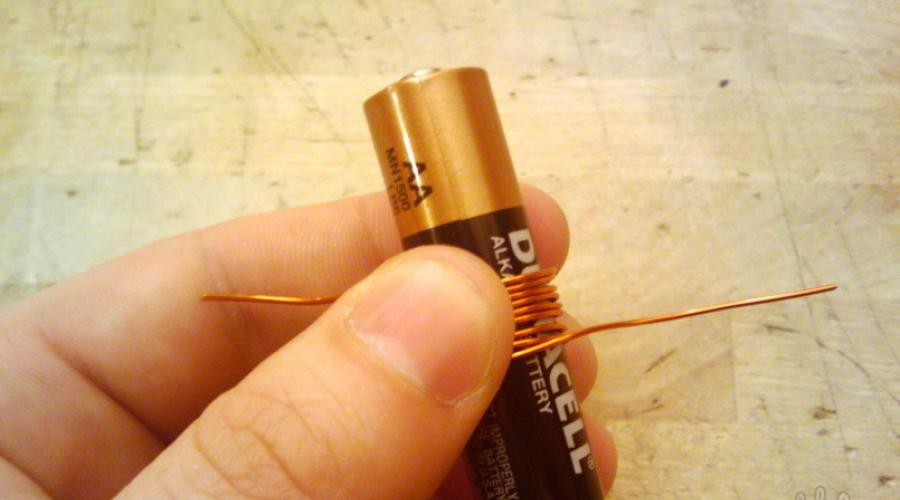
It is always interesting to observe changing phenomena, especially if you yourself participate in the creation of these phenomena. Now we will assemble a simple (but actually working) electric motor, consisting of a power source, a magnet and a small coil of wire, which we will make ourselves.
There is a secret that will make this set of items become an electric motor. A secret that is both clever and amazingly simple. Here's what we need:
1 meter of wire with enamel insulation (diameter 0.8-1 mm).
0.3 meters of bare wire (diameter 0.8-1 mm).
1.5V battery or accumulator.
Holder with contacts for battery.


We'll start by winding the coil, the part of the motor that will rotate. To make the coil sufficiently smooth and round, we wind it on a suitable cylindrical frame, for example, on an AA battery.
Leaving 5 cm of wire free at each end, we wind 15-20 turns on a cylindrical frame.
Do not try to wind the reel particularly tightly and evenly; a slight degree of freedom will help the reel better retain its shape.
Now carefully remove the coil from the frame, trying to maintain the resulting shape.
Then wrap the loose ends of the wire around the coils several times to maintain the shape, making sure that the new fastening coils are exactly opposite each other.
The coil should look like this:


Now is the time for the secret, the feature that will make the engine work. This is a secret because it is a subtle and non-obvious technique and is very difficult to detect when the motor is running. Even people who know a lot about how engines work can be surprised by a motor's ability to perform until they discover this subtlety.
Holding the spool upright, place one of the free ends of the spool on the edge of the table. Using a sharp knife, remove the top half of the insulation, leaving the bottom half in the enamel insulation.
Do the same with the other end of the coil, making sure that the bare ends of the wire are facing up at the two free ends of the coil.
What is the point of this technique? The coil will rest on two holders made of bare wire. These holders will be attached to different ends of the battery so that electric current can flow from one holder through the coil to the other holder. But this will only happen when the bare halves of the wire are lowered down, touching the holders.
Now you need to make a support for the coil. These are simply coils of wire that support the coil and allow it to rotate. They are made of bare wire, since in addition to supporting the coil, they must deliver electric current to it.
Simply wrap each piece of bare wire around a small nail and you have your desired motor part.
The foundation of our first The electric motor will have a battery holder. This will be a suitable base because with the battery installed it will be heavy enough to the electric motor did not tremble.
Assemble the five pieces together as shown in the picture (without the magnet first). Place a magnet on top of the battery and gently push the coil...


If everything is done correctly, the REEL WILL START ROTATING FAST! We hope that for you, as in our experiment, everything will work the first time.
If the motor still does not work, carefully check all electrical connections. Does the reel rotate freely? Is the magnet close enough (if not, install additional magnets or trim wire holders)?
When the motor starts, the only thing you need to pay attention to is that the battery does not overheat, since the current is quite large. Simply remove the coil and the chain will be broken.
Making something useful out of useless children's toys or household appliances is not a problem for a dreamer. And it’s good that many electrical appliances become outdated and break down. It makes no sense to send such things for repair - it’s easier to buy something new. And true “homemade people” are just waiting for this. They immediately have a whole bunch of ideas that require immediate implementation.
Second life of children's toys
There are times when a self-propelled toy breaks into pieces. Probably, in order to calm the child down, you urgently need to buy a new one? Not at all necessary. You just need to start the process of family-wide creative thinking. And to do this, remove the remaining usable parts from the broken car along with the motor. Then collect all the toys in the house and choose the one that can be brought to life again. Probably, you will need school knowledge in physics, chemistry and electrical engineering.
Repair of an old helicopter
 Suddenly an old forgotten helicopter with an unusable engine and broken blades, which had long been lying on the mezzanine, caught my eye. He apparently waiting for my finest hour and now with pleasure showed off the blue and white sides with the half-erased inscription “USSR-0098”.
Such things must be handled carefully. The old man doesn't like fuss. You will have to carefully remove the remains of the large main screw by unscrewing several small screws. To get into the engine compartment, you need to remove the plastic battery box from below. The engine is held on by three bolts and, as expected, has two wires “plus” and “minus”, which are connected through a chip block to the power switch. All this must be carefully unsoldered and unscrewed.
Having pulled the engine out to a white light, you need to inspect it and compare it with the motor from the car. The fact is that 250 -270 rpm is enough to create lift. and power 1 - 2 watts. The difference in engine characteristics turned out to be small. Then you can safely install a fresh engine on the helicopter. And then go to the model shop for a brand new main rotor. When everything is ready, the repaired rotorcraft is tested in the presence of the entire creative family.
Modern children's helicopter models are repaired using the same scheme. Only now they are radio-controlled, and therefore you will have to fork out money for a control panel, on which the rotor speed and the speed of the helicopter depend.
New engine for toy car
 In order to make a small children's car, you need: wheels, the car body itself, wires, a control panel, various electronic boards and a motor. If you have all this goodness, they begin to create a model. There is no need to look for the engine, since it is already there. The car body itself can be make it yourself made of wood or plastic and decorated to your taste. It’s good for those craftsmen who have a small 3D printer in their home that can build any shape of model.
Often the machine is made quite simply. They take a long-abandoned small children's car with wheels, disassemble it down to the screw and try to automate it using a ready-made motor. The following are used: glue, electrical tape, small gears from watches, gearboxes from old models and much more. And people for whom such fun has become a real hobby often achieve great success in making homemade motors.
 When several new models of children's cars have been made and tested, all that remains is to do something generally useful. It is necessary to design a fan that would freshen the air and inspire new ideas. For this you need just a few items that are at hand. Namely:
- a motor from a children's toy (you can't go anywhere without it);
- CD discs, 6-7 pieces;
- plastic bottle cap;
- cardboard tube approximately 10 cm high and 3 - 4 cm in diameter;
- switch;
- glue.
Manufacturing begins by cutting the disk into 8 equal parts from the edge to the center, not reaching approximately 1.5 cm from the hole. Then the resulting sections must be turned with one edge outward to form blades. The manufactured disk is placed on a plug, inside of which a hole is made for mounting on the motor.
Now they are making the leg and stand. A cardboard tube can easily pass for a leg. Wires and batteries will be hidden inside it. The remaining few disks can serve as an excellent stand. All this is well glued and painted in different shades. The fan is ready for operation.
Motorized ship
 In order for the child not to hang out at the computer for days, he needs to be gradually accustomed to making various and interesting things that he can make with his own hands. Spring is coming, the streams will run, and you will need a small boat that will symbolize the coming long-awaited warmth.
Necessary materials The child will find it in his room. Here you need:
- AA batteries 3 pieces;
- polystyrene foam, electrical tape, glue;
- motor from a CD drive or toy;
- plastic cap from a lemonade bottle;
- two pieces of plastic and iron washers.
The first step is to make a propeller. Slots for the blades are prepared in the cork. Flat ice cream sticks are the finished blades of the future boat. Then a hole is made in the plug to fit this screw onto the motor. All this is well glued. The power plant is ready.
Next, the shape of the ship is cut out of the foam. The front part of the boat is made triangular, a place is prepared at the stern for a propeller with a motor, and in the middle there is a recess for batteries. Everything is connected and glued. They carry out tests in the bathroom and look forward to the first spring puddles.
Glider car
This is the most exciting toy created and tested by a child. On the ground, such a machine moves on wheels, and on the water on a special boat. Produced in 2 - 3 hours.
Necessary materials:

They are making a power plant. It is an engine with a propeller. The blades are cut using the neck of the bottle.
It should look like a rose. You can see from the photo that it is then screwed onto a plug attached to the motor.
Then they make the chassis. To do this, use a skewer. They put plugs on it that serve as wheels. They attach everything to a square bottle, inside of which the batteries are placed. Connect with wires according to the electrical diagram. The glider is ready. If desired, you can replace the plastic propeller with a more rigid one. Then the driving performance of such a car will be appreciated not only by the designer himself, but also by his friends.
Crawling robot
 Manufacturing the robot takes only a few hours. It's not quite the robot people imagine. He does not walk, does not swim, but crawls chaotically on a smooth surface. This effect is created due to the unbalanced rotation of the motor rotor. For real cars this leads to a tragic accident, but here it only causes a smile.
So, to create a robot you need a motor and a battery. A small oblong piece of foam plastic or foam cardboard is placed on the engine axis and glued. This serves as a destabilizer. To the very tip of it attach a decorative light element.
A battery is installed on top of the motor and covered with various interesting details. They make his legs out of toothbrushes, his eyes out of balls, decorate him with colored wire or paper clips, and so on. When turned on, the engine vibrates significantly, which causes the toy to crawl chaotically.
Other ideas
 In addition to all of the above, motors are used in homemade products such as mini drills and drills. Such devices do not require unnecessary parts. They have one task - to rotate the fixed drill.
To do this, select a collet or regular chuck on the motor axis that will clamp a small drill. Then solder the wires from the engine to the batteries through the switch. When the assembled device has successfully worked, it is placed in an antiperspirant case or some other case that is most suitable for a motor with batteries. This whole little device fits in the palm of your hand. The switch is always located under the thumb.
Such devices are necessary for radio amateurs for drilling holes in printed circuit boards. They can also be used by cabinetmakers who engage in fine volumetric wood carving. Only instead of a drill, they insert a finger micro-mill for sampling and grinding hard-to-reach places.
As you can see, with a little imagination and diligence, a child, with the help of his parents, can create truly original toys and other useful things.
Who would have thought that a simple inverter could be made without the use of transistors, microcircuits and complex circuits. Last time I showed . As it turns out, this is not the only way to build an inverter. I will show how you can convert electrical energy from 12 V DC to 220 V AC.
What will you need?

Step-up transformer. Naturally, before it worked as a buck, but we will use it in reverse. Such transformers can be found in receivers, electronic watches, and old tape recorders.

Inverter assembly
In fact, our circuit consists of only three parts connected in series to each other. This is a transformer connected to the circuit with a low-resistance winding (the high-resistance winding is the output of the inverter). Batteries - batteries or accumulators. And a switching element, in the role of which an electric motor will be used, which can be removed from broken children's toys.
Here's the motor itself. You can’t just insert it into the circuit - it won’t perform switching. We need to improve it.

To do this, we disassemble the motor.

We remove the back part, first bending the holders.

The anchor needs to be improved. This consists of disconnecting one winding from the contacts. To do this, we cut off the wires of any one winding.

We assemble the motor.

After such modification, the motor will not be able to rotate fully, since one winding will be turned off. But if you start it by hand, then the motor has enough power to maintain rotation. And the absence of one winding will periodically break the power circuit between the power elements and the transformer, where the motor is connected in series.
We connect it to the circuit.


We connect a multimeter to the output of the transformer. Then turn on the power. It happens that the motor starts on its own, but usually it doesn’t. Then we start the shaft by hand, turning it lightly.

The inverter is working! The multimeter readings jump from zero to about 250 V. This is normal, since this is a technical inverter for powering primitive devices.

We try to connect the charger. Everything works fine - the phone is charging.

We connect the light bulb - the lamp shines.

Of course, there is no need to talk about the quality of the converted energy, but in difficult life situations such a craft may well come in handy.
Almost everything in our lives depends on electricity, but there are certain technologies that allow you to get rid of local wired energy. We propose to consider how to make a magnetic motor with your own hands, its operating principle, circuit and design.
Types and principles of operation
There is the concept of perpetual motion machines of the first order and the second. First order- these are devices that produce energy on their own, from the air, second type- these are engines that need to receive energy, it can be wind, sun rays, water, etc., and they convert it into electricity. According to the first law of thermodynamics, both of these theories are impossible, but many scientists do not agree with this statement, who began the development of second-order perpetual motion machines operating on the energy of a magnetic field.
Photo - Dudyshev magnetic engineA huge number of scientists at all times worked on the development of a “perpetual motion machine”; the greatest contribution to the development of the theory of a magnetic engine was made by Nikola Tesla, Nikolai Lazarev, Vasily Shkondin, and the variants of Lorenz, Howard Johnson, Minato and Perendeva are also well known.
 Photo - Magnetic Lorentz motor
 Each of them has its own technology, but they are all based on a magnetic field that is formed around the source. It is worth noting that “perpetual motion machines” do not exist in principle, because magnets lose their abilities after approximately 300-400 years.
The simplest is considered to be homemade anti-gravity magnetic Lorentz engine. It works by using two differently charged disks that are connected to a power source. The disks are half placed in a hemispherical magnetic screen, the field of which begins to gently rotate them. Such a superconductor very easily pushes the MP out of itself.
simplest Tesla asynchronous electromagnetic motor based on the principle of a rotating magnetic field, and is capable of producing electricity from its energy. An insulated metal plate is placed as high above ground level as possible. Another metal plate is placed in the ground. A wire is passed through a metal plate on one side of the capacitor and the next conductor goes from the base of the plate to the other side of the capacitor. The opposite pole of the capacitor, being connected to ground, is used as a reservoir for storing negative energy charges.
 Photo - Tesla Magnetic Motor
 Lazarev rotary ring so far it is considered the only working VD2, in addition, it is easy to reproduce, you can assemble it with your own hands at home, using available tools. The photo shows a diagram of a simple Lazarev ring engine:
 Photo - Koltsar Lazareva
 The diagram shows that the container is divided into two parts by a special porous partition; Lazarev himself used a ceramic disk for this. A tube is installed in this disk, and the container is filled with liquid. For the experiment, you can even pour plain water, but it is advisable to use a volatile solution, for example, gasoline.
The work is carried out as follows: using a partition, the solution enters the lower part of the container, and due to pressure, it moves upward through the tube. So far this is only perpetual motion, independent of external factors. In order to build a perpetual motion machine, you need to place a wheel under the dripping liquid. Based on this technology, the simplest self-rotating magnetic electric motor of constant motion was created; the patent was registered to one Russian company. You need to install a wheel with blades under the dropper, and place magnets directly on them. Due to the resulting magnetic field, the wheel will begin to rotate faster, water will be pumped faster and a constant magnetic field will be formed.
Shkondin linear motor brought about a kind of revolution in progress. This device is very simple in design, but at the same time incredibly powerful and productive. Its motor is called a wheel-in-wheel and is mainly used in the modern transportation industry. According to reviews, a motorcycle with a Shkodin engine can travel 100 kilometers on a couple of liters of gasoline. The magnetic system works for full repulsion. In the wheel-in-wheel system, there are paired coils, inside of which another coil is connected in series, they form a double pair, which has different magnetic fields, due to which they move in different directions and a control valve. An autonomous motor can be installed on a car; no one will be surprised by a fuel-free motorcycle with a magnetic motor; devices with such a coil are often used for a bicycle or wheelchair. You can buy a ready-made device on the Internet for 15,000 rubles (made in China), the V-Gate starter is especially popular.
 Photo – Shkondin Engine
 Alternative engine Perendeva is a device that works solely thanks to magnets. Two circles are used - static and dynamic, with magnets placed on each of them in equal sequence. Due to the self-repelling free force, the inner circle rotates endlessly. This system has been widely used in providing independent energy in households and industries.
 Photo – Perendeva Engine
 All of the inventions listed above are in the development stage; modern scientists continue to improve them and look for the ideal option for developing a second-order perpetual motion machine.
In addition to the listed devices, the Alekseenko vortex engine, Bauman, Dudyshev and Stirling apparatuses are also popular among modern researchers.
How to assemble an engine yourself
Homemade products are in great demand on any electricians forum, so let's look at how you can assemble a magnetic motor-generator at home. The device that we propose to construct consists of 3 interconnected shafts, they are fastened in such a way that the shaft in the center is turned directly to the two side ones. Attached to the middle of the central shaft is a disk of lucite, four inches in diameter and half an inch thick. The outer shafts also feature two-inch diameter discs. There are small magnets on them, eight on the large disk and four on the small ones.
 Photo - Magnetic motor on suspension
 The axis on which the individual magnets are located is located in a plane parallel to the shafts. They are installed in such a way that the ends pass near the wheels with a flash per minute. If these wheels are moved by hand, the ends of the magnetic axis will be synchronized. To speed things up, it is recommended to install an aluminum block into the base of the system so that its end slightly touches the magnetic parts. After such manipulations, the structure should begin to rotate at a speed of half a revolution per second.
The drives are installed in a special way, with the help of which the shafts rotate similarly to each other. Naturally, if you influence the system with a third-party object, for example, a finger, it will stop. This perpetual magnetic engine was invented by Bauman, but he was unable to obtain a patent because... At that time, the device was classified as a non-patentable VD.
Chernyaev and Emelyanchikov did a lot to develop a modern version of such an engine.
 Photo - How a magnet works
 What are the advantages and disadvantages of actually working magnetic motors?
Advantages:
- Full autonomy, fuel economy, the ability to use available means to organize the engine in any desired place;
- A powerful device using neodymium magnets is capable of providing energy to a living space up to 10 VKt and above;
- The gravitational engine is capable of working until it is completely worn out and even at the last stage of work it can produce the maximum amount of energy.
Flaws:
- The magnetic field can negatively affect human health, especially the space (jet) engine is susceptible to this factor;
- Despite the positive results of the experiments, most models are not able to work under normal conditions;
- Even after purchasing a ready-made motor, it can be very difficult to connect it;
- If you decide to buy a magnetic pulse or piston motor, then be prepared for the fact that its price will be greatly inflated.
The operation of a magnetic motor is the pure truth and it is real, the main thing is to correctly calculate the power of the magnets.