How to make an interior arch - design, drawings and assembly procedure. Do-it-yourself arched doors: how to properly install an arched entrance door with your own hands
The topic of this article is the manufacture of arched doors, their installation and the intricacies of these processes. We will talk about the types of doors with arches, note their varieties and the features of each type. We will also give recommendations on how to independently make an entrance door in the form of an arch from solid wood.
Today, arched openings of various shapes and styles are used in the construction and decoration of most premises. They are used as entrance and interior doors.
From the whole variety of doorways in the form of arches (see), the following classification can be made:
- Semicircular arches. They are the most common and are also divided into subtypes:
- Classic (semicircular) - they have a smooth radial shape.
- Ellipsoidal - made in the shape of an elongated oval.
- Modern - have intricate shapes with various protrusions.
- Romantic - shaped more like a rectangle, with the upper edges slightly rounded.
- Horseshoe arches. They are shaped like a horseshoe. They can have not only a smooth semicircle, but also an elongated, pointed top. Most often, openings of this type are used to decorate rooms in national styles.
- Gothic (pointed) arches. These structures have an elongated, pointed shape, without smooth transitions.
What types of arched doors are there?
Arched doors have many varieties and are classified according to various factors: installation location, material of manufacture, design features
Types of arched doors at installation site
There are two main categories here:
- Arched interior doors- located inside residential and other types of premises. Most often they are made of wood and have glazing. Stained glass compositions are often used for glazing such structures (see).
- Entrance doors in the form of arches- are used mainly in the entrance groups of establishments: shops, organizations, shopping and entertainment centers. Made from plastic profile.
What are arched doors made of?
Due to the complexity of manufacturing this type of door leaf, the variety of material for their production is not very abundant:
- Plastic. This material is used to produce profiles from which not only entrance doors are made, but also windows.
- Solid wood. Wooden door leaves in the shape of arches are used for entrance areas in the private sector, as well as inside any type of premises.
Structural features of arched doors
Based on the characteristics of operation, the complexity of installation and the cost of the finished product, the following arched door structures can be distinguished:
- Canvases that repeat the contours of the opening one to one. The peculiarity of such doors is that their production takes a long time. They stand quite high. Such models are made from wood (see), since arched plastic doors are made using a different technology.
- Standard canvases with an arched part fixed above them. Such doors are somewhat cheaper, since their arched part is mounted separately and does not open together with the door leaf. It also becomes possible to use not only hinged, but also sliding versions of the canvases.
Important! The opening height for such doors should be large enough. It is calculated according to the formula: Vpr = 210 cm + half the width of the opening.
- Single doors. They are usually used as interior and entrance options for private houses and public spaces.
- Double doors. For wide openings it is advisable to use two sashes. One of them can be fixed in the opening using a latch. Relevant for entrance groups. In this case, more often than not, the “working” part of the door is 2 times wider than the fixed part.
Making an arched door yourself
Despite the difficulty of making such canvases, it is possible. Now you can see for yourself. You and I will learn how to make wooden arched entrance doors.
It is better to order the box part according to your dimensions, and we will make the canvas with our own hands (see).
We prepare everything you need

First you need to prepare tools, boards and available materials.
We will need:
- Jigsaw with wood saws.
- Electric milling machine with two types of cutters: disk (for grooves) and cylindrical.
- Sanding machine with sandpaper of different grain sizes. The best one is tape.
- Boards, 5 centimeters thick.
- Wooden wedges.
- Two small bars and 4 wood screws. The length of the screws should be 30mm greater than the thickness of the bars.
- Carpenter's waterproof glue. PVA is possible.
Making a blank for the arched part of the canvas
To make the arched part of the door leaf, we first need to measure the final width of the opening. That is, from the total width we subtract the thickness of the “box” part and a 2mm gap between the door and the opening (frame).

After this we do the following work:
- In order for the arch to turn out beautiful, its radius must be made equal to half the width of the doorway. Based on the width of the prepared boards, we calculate how many pieces will be needed. The boards will be positioned horizontally.
Important! Before making an arched door, you need to select well-dried boards. Since if they are damp, the canvas will warp over time.
- Now, using an electric router, we make grooves for a tighter connection. To do this, we take a disk-slot cutter. We make the grooves in such a way that the protruding part is about half the thickness of the board. That is, 2.5 millimeters. The same goes for the internal groove.
- Next, we clean the entire surface of the grooves from dust and apply wood glue to them. After this, we connect all the boards and leave them to dry.
Important! In order for gluing to occur better, you need to take a board and attach pre-prepared bars to it with self-tapping screws. The distance between the bars should be 10–20 mm greater than the width of the glued workpiece. Place the workpiece between the bars and spread it apart with wedges.
Cut out a semicircle from the blank
For this operation, we recall the experience of installing plasterboard arches.
We use one of two options to outline the arched shape:
- If the arch has an even semicircle. Mark the middle at the bottom of the workpiece. Then we take a pencil and tie a non-stringent thread to it. Cut the thread exactly to the length of the arch radius. Apply one end of the thread to the mark and draw a semicircle with a pencil.
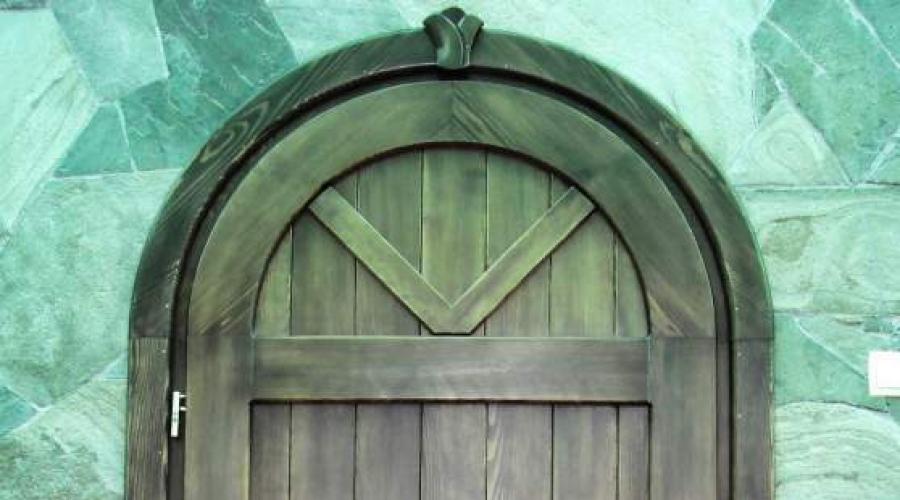
- If the shape of the arch (as in the photo) has an elongated semicircular or pointed shape, then we use a different method. To outline the boundaries of the bend contour it is very convenient to use a long metal ruler. We also make a mark for the middle and draw a line from it strictly vertically to the length of the radius of the arch. Next, we place the ruler on the edge and bend it so that one edge touches the radius mark, and the other coincides with the edge of the workpiece. After this, draw a line with a pencil. On the second side we follow the same steps.
Important! Make sure you get a symmetrical arched neckline.

Next, take a jigsaw and carefully cut the workpiece according to the markings. After this, we take a grinding machine with the coarsest sandpaper and process the surface of our arched part of the door on both sides. After this, we repeat grinding with a finer abrasive.
Now the most beautiful part of our door is ready. Arched interior doors can be decorated with the same elements. However, it is worth considering that glazed arches will be more elegant for interior spaces. And their manufacture requires carpentry skills.
Finishing the door leaf
Now we have to make the rest of the door. It will be assembled according to the same principle as the previous part. The only difference will be that the boards will not be positioned horizontally, but vertically.
You should also provide a horizontal part at the very bottom of the canvas. This will help extend the life of the door.
As a result, our door leaf will consist of 3 parts:
- Horizontal bottom cross member.
- Shield made of vertical boards.
- Upper cross member. It is also the arched part.
After all 3 parts of the door are ready, we connect them using the tenon method. To do this, we use a milling cutter to perform the appropriate operations and place all 3 parts on glue. Don't forget to support the canvas with wedges.
The final stage is treating the entire surface of the door with a protective agent and finishing coat. Pinotex or any other wood protection is suitable for this.
If the door will always be on the sunny side, it is not recommended to cover it with laminating coatings. In this case, it is better to use ordinary colorless varnish for exterior use.
You can make an arch in a doorway in various ways. Each of them is selected based on a specific situation. It is necessary to take into account the construction skills that the home master has, as well as financial capabilities.
It is worth noting that it is possible to install a high-quality arch in a doorway with your own hands only when all the features of this design are taken into account. The fact is that this finishing option has its pros and cons.
The advantages include the following aspects:
- Visual increase in space. In this case, two factors are combined at once. The first is that an opening without a door unites two rooms, this erases some existing border. The second is based on the shape of the structure.
- An excellent option for zoning. Indeed, an arch can be an excellent solution to the problem of dividing a single area.
- Nice decorative look. This design can decorate any interior. It should be borne in mind that the overall design must be harmoniously thought out.
We must not forget about the existing shortcomings. They lie in the fact that the peculiarity of this product is openness, since there is no door leaf. Therefore, there is a complete lack of sound insulation and the penetration of foreign odors, if we are talking about the border with the kitchen area.
 When designing an arch, you should think about the fact that the feeling of security will disappear
Existing options
What is special about installing an arch in a doorway? The fact is that there are different types of these structures:
- Ellipse. This configuration is considered to be classic. It is made round. All transitions are very smooth.
- Round. This option allows you to expand the opening. This method is suitable for cases where zoning is required.
- Trapezoid. Assumes the absence of rounded areas.
 Arch - various types of structures
 On a note! You can often hear that an arch and a portal are two different architectural elements. In fact, the portal is the simplest solution to the arched structure. It is made in the form of a rectangle, sometimes supplemented with rounded corners.
Features of the construction of arches
You can make an arch in several ways, but you need to take into account the height of the openings.
For low openings
This method of creating an arch involves pre-marking the surface. The marked area is cut out (hollowed).

The general technology is as follows:
- The opening is being dismantled. The old box is removed. Part of the crumbling plaster is removed.
- The height of the future structure is determined. Lines are drawn along two vertical sides. They must be equal and made exactly at the specified height.
- To obtain the radius of the arch, the existing width is measured. This value is divided in half.
- A horizontal line is drawn between the vertical posts. It should be located at a level that will correspond to the beginning of the rounding.
On a note! It is important to consider that the distance to the ceiling should not be less than 30 cm.
- The center is marked on the drawn line. The self-tapping screw is screwed in. A cord is attached to the screw, which must be equal to a given radius. A pencil is attached to the end of the rope. This tool marks the bend.
- Trimming is done according to the existing markings. If the wall is strong enough, then chiselling is performed. To make the work easier, pre-drilling is done.
 It is necessary to comply with the requirements for the construction of the arch
 Thus, the required shape is obtained. Next, you should process it carefully. This is done by grinding. The resulting structure is treated with putty or plaster. They can serve as final finishing material.
For high openings
The door arch can also be made in another way. It lies in the fact that plasterboard and a metal profile are used as the main material. The technology assumes that everything will be done along an existing opening. The following actions are performed:

On a note! The created sheathing should be recessed to the thickness of the gypsum plaster boards used. Minor errors may occur. They can be easily fixed with plaster.

On a note! If you need to install an arch very quickly, the best solution would be to use a ready-made structure. These products are made from various materials and have standard configurations.
After all the procedures, an almost finished design is obtained. All you need to do is install a fragment of a gypsum plasterboard that will close the open arc-shaped space. The procedure is performed as follows:
- The bending section is measured.
- The resulting size is transferred to the drywall.
- The required fragment is cut out.
- This part needs to be bent. To do this, it is cut from the wrong side into strips.
- Carefully place into place and secure.
 Finished plasterboard arch
 The completed structure requires additional decorative finishing. It should be noted that drywall makes it quite easy to create an arch with your own hands. If you use wood as a material, you must have sufficient experience to properly process and install such a product.
Fiberboards and plywood are used as substitutes for gypsum boards.
 Plywood is often used to create arched openings instead of drywall.
 There are some tips that will help you get a beautiful arched opening:
- The general appearance of the arch should correspond to the interior design.
- To get a more original design, it is designed individually from different sides.
- Existing communications should be laid in advance.
To summarize the above, it can be noted that there are various ways to make a door arch. You just need to be patient and adhere to certain rules and recommendations. Then everything will definitely work out.
The arch is considered one of the key architectural forms. Moreover, despite their long history, vaulted structures remain more of a decoration and are not found in homes as often as before. Rounded openings have always been their characteristic feature, but now the variety is limited only by technological capabilities. Nowadays, the use of round elements is relevant for tall bulky doors, gates, entrance areas, and transitions between rooms. The shape of the vault is also typical for the windows of public buildings and houses with improved layouts. In general, there is a trend towards more frequent use of arches elsewhere. At the same time, they become less and less elegant. Designers continue to introduce the arch design into the doorway. Vaults without doors have their strengths, and practical designs with door panels are not only convenient, but also retain an attractive design.
Arch - origin and history
The oldest ruins with arches are about 4 thousand years old. Thus, the date of appearance of vaulted structures is considered to be the beginning of the 2nd millennium BC. e. The impetus for the development of architecture was given by the technologies of Ancient Egypt and Mesopotamia. The peoples of these very civilizations built the first arches from bricks. They knew how to build not only open, but also more complex closed structures. The techniques were mastered by other states, including Greece and Rome. The architecture of Ancient Greece and its colonies that has survived to this day is represented by a countless number of buildings. When Roman times arrived, much was destroyed, but new structures also appeared. The peak of development of ancient architecture occurred precisely during the period of the Roman Empire. Arches were erected everywhere, and the engineering complexity of the structures increased significantly. The environment for the development of architecture was Gothic and Renaissance architecture.
Features of rooms with arches
Rooms with arches are often left without doors, but given the practical inconvenience of such a layout, residents have to use alternatives. In places with high traffic, structures with an empty door are designed, and doors are installed for private rooms. In large houses, the arches of the guest rooms are decorated with curtains. The side racks are made of improved materials, ideally from rounded logs. A simple, flat box doesn’t look the best. The vaults are made more decorative against the background of other elements. All these features do not apply to the arched entrances to the kitchen or the passages in the Brezhnevka corridors. They can be simple and fit harmoniously into the decor. At the same time, the vast majority of structures are characterized by the absence of a threshold, although theoretically it can even improve the appearance of the arch. Vaulted openings can be active, that is, connecting several rooms, and passive, opening views of several rooms at once.
Advantages and disadvantages of arched structures in a doorway
An arched span in a wall is primarily a decorative technique. Moreover, the very idea of design is often developed, and instead of an arch, housing gets something else, for example, doors with a blank glass transom. In addition to aesthetic advantages, the increased stability of vaulted openings is noted. They crack less often, warp to a lesser extent and do not shrink. The frame of arched structures, in turn, has greater strength. Don’t forget about additional ventilation options. Additional square meters in doorways will improve ventilation during the hot season. At the same time, the disadvantages of the design are felt even at the installation stage, because the assembly technology is more complex than that of square boxes. This disadvantage is also associated with a high price. You should also understand the practical inconvenience of open arched passages in terms of sound and heat insulation, and visual accessibility of the room.
A few more useful qualities of arches:
- zoning;
- visual expansion of space and raising of ceilings.
Types and shapes of arches
Distributed:
- Classic.
- Romance.
- Trapezoid.
- Portal.
- Modern.
- Ellipse.
- Half-arch.
Each version of the arch has its own name, most often logically related to the shape. A classic is an ordinary arch with a rectangular span and a semicircular ceiling. They blend harmoniously into the interior or exterior and make the space more perfect from a geometric and aesthetic point of view. Romance is a rectangular vault with rounded upper corners. Suitable for wide openings. The name “trapezoid” was assigned to the arches with the corresponding intrados. But a span like a portal is almost no different from a rectangular opening. Moreover, its name is the same as that of the ceiling - the latter is also called a portal. Arched structures of the “modern” type act as a transitional form between classic and portal. An ellipse is practically no different from it, having a slightly larger radius of curvature. It should also be noted that semi-arches are a small architectural form in which an arch and a straight wall are adjacent.
Round
This is the name for arches with a semicircular or rounded ceiling, as well as various options with a pronounced “circle” pattern, and even buildings that exactly repeat this figure. Round vaults have become popular recently, as they are increasingly used in various ceremonies and processions. They are collected and decoratively decorated for events in the spirit of an “English wedding.” We are talking about a round metal structure with supports and openwork shapes, which are covered with flower arrangements. Round arches become the backdrop for the bride and groom. However, round vaults are the same round ceiling openings that people see almost every day. Arches with a rounded entablature were widespread in Ancient Greece, Egypt and Rome. If in our time arches have portals only with an internal side (intrados), then in that period they often also had an external side (extrados).
Rectangular
Rectangular arches are a solution to the problem of design incompatibility. They are appropriate in almost any interior, and especially in a technological and modern one, where semicircular arches may be meaningless. Straight lines will correctly complement the decor with the same smooth furniture and transitions. Portal-type structures are formed with four right angles, but the top two are sometimes slightly rounded. The platbands are made wide, with a pronounced volume, and glued lumber is suitable for this. It is also cheaper when compared to solid wood. Systems are also assembled from plasterboard. Working with these materials is carried out according to a simple scheme, and the frame turns out neat and perfectly flat. The finished passage would benefit from some decor, but again with straight lines. Among the door models, the most suitable are sliding and folding.
Forged arches are suitable for delimiting zones in a summer cottage.
Arches in the shape of an ellipse
Elliptical openings have more stylish qualities than other options - the owners will be able to emphasize their good taste. Elliptical designs are a kind of intermediate version between a round vault and a portal. Elements are sometimes erected right up to the ceiling, because the larger it is, the better the appearance of the room becomes. An arched opening with an elliptical top also goes well with doors. The shape has a place in an antique setting like a castle interior or in something reminiscent of a loft with an industrial finish. There are options with shoulders, horseshoe arches and other varieties with a special surroundings. The elliptical arches are in many ways similar to the Romantic version with a flatter top and the Art Nouveau version with a pointed top. Without ellipsoidal shapes, masterpiece interiors in the Art Nouveau style - the Art Nouveau movement - would be impossible.
Trapezoidal arches
The advantage of this option is that it is easy to implement, and at the same time, this shape is more perfect than a simple rectangle. The trapezoidal passage contains a certain geometry that would not hurt to play with other lines. Elements such as the shape of the ceiling, various angles, table tops and columns. In terms of decorative capabilities, trapezoids are slightly inferior to rounded versions, but much still depends on the configuration of the upper element, its size, expression and proportions. The bottom or top corners of the intrados can be rounded. The trapezoidal arch can even be converted into a more complicated version with an abstract angular pattern. The increased stability of the upper transverse beam is used in long corridors, passages and structures made of heavy building materials, and these include houses made of logs and timber.
Figured arches
When creating something like this, you should “weigh” all the points regarding the decorative component and compatibility with the design and furniture. A bold and interesting solution in a sketch may look inappropriate and strange in reality. This is especially true for cascade options with several slots. In practice, arches with a discreet patterned design and without additional holes have proven themselves well. Compositions are formed in studio apartments with a distinct design direction, in a retro or space style, for example. Many people try to repeat the idea in a less accentuated interior, and sometimes it doesn’t work out. And yet, adherence to simple design principles opens up opportunities for universal application. You should start by adding one, maximum two elements to the arc: an even figure or curved lines. It is better to maintain symmetry. The compositions are equally good both asymmetrical and balanced.
Figured structures are transformed with the help of stained glass windows in some segments.
Dimensions
The height is limited only by the ceiling level - there must be a margin. The parameter is also coordinated with other doorways so as not to violate the integrity and organic nature of the design. For round and curly shapes, an exception is actually possible, since this is a prominent element. The width is selected in connection with the main idea of the interior decoration, its message. We are talking about the expression of interior space and openings between rooms. As for the exact parameters, the height of the top of the arch (lifting boom) should end at a level no higher than 2.9 m for a room with a height of 3.2-3.3 m and up to 2.2 m for a room with a height of 2.5 m For an ordinary arch, the ratio of height and width is 2:1 or 3:1. For design ideas, the indicator does not matter. If it was not possible to choose an individual option, then it is better to settle on the proportion of 1.6:1 - a ratio calculated back in the Middle Ages.
Materials for making arches
Apply:
- tree;
- beam;
- drywall;
- stone;
- brick.
The first arches were assembled only from stone, and this is how the famous masonry techniques appeared. Nowadays stone is used only with highly effective fastening and adhesive materials. In recent years, drywall has become popular. The structure is assembled on a metal frame and is often supplemented with shelves and niches. The resulting systems are suitable for organizing built-in lighting. The low cost, combined with all this, explains the high demand among consumers. Wooden options, in turn, have advantages in terms of environmental friendliness and durability. At the same time, mold can ruin the appearance of the box. For simpler interiors, arches are assembled from lightweight materials that imitate stone, wood or anything else. The last option, a brick arch, will not be easy to assemble, and it will require a lot of work on its appearance.
Materials for decorative finishing
On budget options, plastic corners are installed, sometimes covered with facing material, and the ends are trimmed with decorative molding. In the most expensive interior options, stucco is added. The area of the castle stone is often emphasized. They also resort to finishing with valuable rocks and minerals. For example, travertine, marble, granite, malachite and the like. In a luxurious interior, the doorway and platbands must be decorated. In this sense, Venetian plaster will be a win-win option. If the design corresponds to a less “flashy” style, then you can work on the geometric component. In the Art Nouveau style, decorative strips and overlays and glass are used. A simple setting does not require any decorative ideas. It is enough just to emphasize the texture of the arch material, and decorate the space near it with flexible acrylic tiles.
Arch design and objectives
The element performs the following functions:
- Aesthetic: masking imperfections, visually expanding space, improving the interior.
- Practical: strengthening walls, storing things (shaped compositions), dividing zones, combining rooms.
Vaulted passages are usually incised and shaped. The second subtype includes options with side columns, original ceilings, additional figured holes, and a sectional structure. Intrados and racks are decorated with decorative relief. Without beautiful arches it is difficult to imagine a classic interior with 18th-century motifs, which remains relevant for large private estates. You can use a vault to strengthen the partition or organize new passages/corridors between rooms at a convenient angle. Arched compositions become a new storage place: the surfaces of the room can be freed from excess load, for example, from unnecessary decorative items. The arch system will combine several rooms into one thoughtful composition. In large studios, these structures are used as space delimiters.
Room zoning element
The object performs the zoning function in two senses: as a way to unite space and as a separator. Apartments with a modern layout have many combined rooms and short hallways. Therefore, their space should be divided into segments for relaxation, lunch, cooking, working at the computer, and watching TV. In addition to such ideas for application, the arch will come in handy in vestibules, which are increasingly “appearing” next to living rooms. Vaulted structures easily solve the problem of inefficient use of space near doors: just remove them and make a free passage or hang curtains. Arches also regulate the level of isolation. A narrow arch in the wall gives a high indicator, and a wide one reduces it. An opening of more than half a wall will connect two rooms into one, removing the feeling of a boundary.
You have decided to make a European-quality renovation, maximizing the living space, but you cannot demolish the load-bearing partitions. The installation of arches is one of the solutions to this problem. Using a material such as drywall, you can successfully complete the job yourself in a short time.
Types and features of door arches
Before you start making an arch, you need to choose which configuration best matches the decoration, furniture and purpose of your room.
Arch configurations
There are seven main types of arches, differing in the upper outlines and the shape of the corners of the junction with the side vertical wall:
- “Classic” - used for high openings in any interior and is an arc with a radius of half the width of the opening.
Classic arches are most often installed in long corridors or at the entrance to the kitchen
- “Modern” - used for wide open openings and is characterized by a gentle bend of the arc, while the line of transition to the vertical is sharp and broken.
Arches of the “Modern” type are used in rooms with classical finishing; they are installed after dismantling the window and balcony block or as an entrance to the office
- “Romance” - the top is horizontal, the corners are rounded, the opening is wide and low.
Arches of the “Romantic” type are made in wide and low openings
- “Elliptical” - characterized by a slight gentle bend at the top.
An elliptical arch unites rooms where there are no height restrictions and looks softer than “Romantic”
- “Trapezoid” - according to the trapezoidal shape of the corners of the junction of the top and the side slopes.
The "Trapezoid" configuration fits well with classic finishes
- “Portal” is an outline in the shape of an elongated rectangle.
The “Portal” configuration looks like a long rectangle connecting rooms of low height, usually with wooden paneling
- “Half-arch” - one side is completely vertical, the second is made in the form of a semicircle. Often used by designers in modern interiors: minimalism, hi-tech, art deco.
The “Half-Arch” configuration is a variant of the classic arch for low rooms
We select a suitable configuration and evaluate it visually by cutting out and securing the paper outline of the arch in the opening. After that, remove it and save it for cutting.
When choosing from a variety of beautiful pictures, try to evaluate whether you can make such an arch yourself and whether your choice matches your available finances.
Preparing to make an arch
Before performing work, it is necessary to select the right materials and tools depending on the size of the opening, the type of wall or partition and its thickness.
Selection of materials
To make an arch you may need:
- Plasterboard sheathing. Along the mounted frame, the arch is sheathed with 9.5 mm thick plasterboard, which provides strength and the ability to easily bend and cut out the desired shapes. For work, use sheets measuring 1200x2500 or 1200x3000 mm with the following markings:

- Frame. It is most often made from galvanized ceiling, load-bearing (PN 60x27 mm) and corner (PU 27 mm) profiles with a length of 2400 or 2800 mm. There is a special arched profile that easily accepts any bend. Profiles are used for installation in all walls, excluding wooden or thin partitions, where it is preferable to use wooden bars or strips. For small openings, plywood can be used.
For the manufacture of the frame, profiles for various purposes are used
- Fastening elements:

- Materials for preparing for finishing after installing drywall. Reinforcement of joints, which prevents cracking and imparts strength, is carried out with special lining paper, fiberglass mesh or perforated corner. The final finishing, elimination of seams and cracks is done with acrylic or gypsum putty, cleaning is done with fine, medium and coarse sandpaper.
To reinforce corners and large recesses at joints, use fiberglass mesh and perforated corners
Tools required for work
The following tools are prepared according to the work being carried out:

Preparing the opening
We carry out the following preparatory work:

Video: preparing the opening
DIY arch installation
Let's look at the installation technology using the example of a classic type arch. First, let's cut the drywall:

Using a knife or jigsaw, carefully cut out the front part of the casing along the drawn line. Then we mark it and cut out the second part.
A high-quality and even cut is obtained when using a jigsaw. Other tools can damage the edges. To prevent damage to the edges, before cutting, place wide paper tape on the cutting line.
Installation of a profile frame
The opening most often has a geometrically irregular shape. We draw a level line on the walls of the opening, and from it we mark the bottom of the frame elements and the front linings to ensure the alignment of the upper cladding of the arch.
The method of performing work is determined by the prepared profile:
- We install the ceiling profile, framing the top of the opening on both sides, retreating from the plane of the walls inward by the thickness of the drywall. We measure the length of the side profiles using the cut out front plasterboard lining.
We mount the profile on the top of the opening
- According to the length of the arc of the front stitching, we cut off two pieces of the profile corner.
- We take one of them and use metal scissors to make parallel cuts to the corner of the shelf, 3–5 cm apart.
We make cuts on one shelf of the corner, which will allow you to easily bend the profile
- Carefully bending, with the notched side we screw a section of the corner with a pitch of 120 mm with self-tapping screws to the arched edge of the plasterboard front part.
Carefully bend the profile and screw it to the cut out plasterboard arch
- We just bend the second piece of the corner along it.
- We sew on the front part with a screwed corner, fastening it with self-tapping screws to the perimeter frame in increments of 120 mm.
The front part is attached to the frame with self-tapping screws
- We cut lintels from the ceiling profile with a length equal to the thickness of the opening minus 15 millimeters, and install them every 200–250 mm.
- At the ends of the jumpers, use metal scissors to cut off 20 mm from the rack part of the profile, leaving the lower flat part. We attach the jumpers to the screwed corner, retreating 5 mm from the edge attached to the drywall.
Jumpers from the profile are prepared for installation by cutting off the side rack part
- We attach the remaining curved corner to the second end of the jumper with a whole shelf and install the second front lining.
We mount the jumpers, attach the second corner to them and screw the second front part
Video: flexible profile for gypsum plasterboard
Arched profile frame
According to its characteristics, the arched profile is more plastic and stronger than the corner. It is used for fastening curved elements:

Installation of a frame made of wooden blocks
Constant changes occur with a wooden frame - unlike a metal frame, it reacts to seasonal deformations of the building, changes in humidity and temperature. If you sew drywall onto a wooden frame directly, over time cracks will appear at the joints caused by deformations at the fastening points. To overcome this drawback, plywood is used as an intermediate material, which gives the structure additional rigidity, and plasterboard is already mounted on it. The frame is attached directly to the front of the plywood arch. The work is performed in the following order:
- We calculate the dimensions of the sheathing using the formula 2 thickness of gypsum board + 2 thickness of plywood.
- We subtract the resulting figure from the thickness of the opening to obtain the width of the frame bar. If it turns out to be more than 120 mm, which corresponds to the average width of the board, we make a frame from a double 40x40 bar with insertion of bosses. To do this, we connect the cut bars with two bosses every 150 mm.
- Using the cut out front surfaces of plasterboard, we make the same figures from plywood 3–4 mm thick.
- We screw them with self-tapping screws to the bars - first to those framing the rectangular parts, and then to the stiffening ribs parallel to the sides - vertically, every 120 mm.
We attach wooden blocks to the front lining of the plywood arch
- We install plywood lining with a wooden frame at the top of the opening, deeper than the plane of the wall to the thickness of the plasterboard.
We install a frame with bosses sewn onto plywood into the opening
- We cover the opposite side with a second plywood sheathing.
- We check the ratio of the curved sides with a level, a construction square, and trim or clean it with sandpaper.
We screw the second front plywood lining onto the frame
Laying communications
If the design project involves the installation of lamps, we lay the cable along the mounted structures to the installation location of each light source and secure it so that the end of the cable hangs over the lower plane.
The cable is attached to the structures, the ends extend beyond the plane of the filing
After striping the strip and finishing it, the holes are cut out with a crown and the lamps are installed.
Holes of the required diameter are cut out in the lower strip of the arch, into which lamps will subsequently be installed.
Drywall installation
We cover the finished frames with plasterboard:
- made from an arched profile - on both sides along the finished frame;
- from wooden blocks - on top of plywood. If there is no cut arc in the prepared rectangles, we do it locally, focusing on the lower edge of the plywood;
- Face coverings are installed on the metal frame during its assembly.
Then we check that the curved cuts correspond to each other with a level or a construction angle, and level them by running a float with attached medium-grain sandpaper several times simultaneously along the bottom of both sides.
After sewing up the front sides, we sew drywall onto the bottom of the arc:
- We make accurate measurements of the length of the curved part of the front surface.
- We cut out a strip of gypsum board 100 mm longer than the measured distance and a width corresponding to the distance between the front surfaces.
- We apply marks on the prepared strip at the locations of the jumpers and lamps.
- We drill holes for the lamps.
We sheathe the arched bottom with this strip, doing the work in one of two ways:
- “Dry” - we make parallel cuts every 50 mm for half the thickness of the sheet and fasten it to the frame from the center of the arc with self-tapping screws in increments of 100 mm.
We make cuts on one side of the stitching, bend the strip and secure it
- "Wet":
- Using a special roller with needles, we pass the side without markings several times. If there is no roller, randomly use a knife to make shallow cuts 20–30 mm long, every 15 mm, across the entire surface;
Using a special roller, we apply punctures in the plasterboard strip
- if possible, we make a U-shaped box from boards according to the size of the opening;
- moisten the treated side with a sponge and water;
To obtain an accurate and even bend, the strip must be laid on a pre-assembled box
- after 40 minutes, screw the finally curved strip from the center of the arc onto self-tapping screws;
- trim off excess length.
- Using a special roller with needles, we pass the side without markings several times. If there is no roller, randomly use a knife to make shallow cuts 20–30 mm long, every 15 mm, across the entire surface;
If there is no box, you can lean the strip against the wall with the wet side down, and after starting to bend, re-wet it.
The wet bending method is more difficult, but it gives a more even surface on which you only need to putty the screws.
Video: methods of bending the bottom strip of sewing
Making vaults by gluing
Work can be performed on a partition of medium thickness:

Pre-finishing
A perforated corner is installed on drywall joints for reinforcement
If the unevenness is deep, the putty is applied in several layers.
After each layer of putty has dried, the surface is sanded with medium-grain sandpaper.
If there is no reinforcing corner and paper, after applying the first layer of putty, unwind a roll of fiberglass mesh of the required width, cut off the required length, press it with a spatula, fix it on the corner, cut the mesh wrinkles on the arched surface and place its ends on top of each other.
Glue the mesh to the corner on a layer of putty
If the bending was done using a dry method, the bends from the cuts will most likely be slightly visible.. In this case, for leveling, we additionally apply another continuous layer of acrylic putty. After drying, sand and apply finishing putty.
We also independently replaced the door with an arch in our apartment with an old layout. The first difficulty was that the entrance to the hall with a double door 1600x3000 mm was located on the corner, close to the entrance door. A large open doorway into a small room, where people enter in street shoes and clothes, was not suitable. After lengthy debate, we decided that we would make a semi-arch in a semicircle to the entrance doors in order to extend the blank wall into the corridor. Height - 2500 mm, arch radius - 1500 mm. We sew up the opening above the 2500 mm mark and 1000 mm from the floor on the side of the arc, and in the rest of the space we make stained glass. The old partition was made of double shingled boards and plastered, the opening was only 90mm thick. We framed the entire old opening with a 60x10mm planed batten on all sides, and above 2540 mm we made a frame out of it for the blind lining of the wall. We bought an arched metal profile 3000 mm long. A quarter circle with a radius of 1500 mm was drawn on an old cardboard refrigerator packaging. The profile was bent along it and installed in place, securing it to the upper frame under the wall lining. At a height of 1000 mm from the floor, a side frame was completed from the lath for lining the wall, secured to the profile and lath on the opening. Based on the measurements of the frames and the drawn quarter circle, the upper and lower linings were cut out of plasterboard and secured to the frames with self-tapping screws. We measured the profile that remained uncovered and, using it and the semicircle drawing, we marked and cut out arc linings from plasterboard 60 mm high, aligned with the profile along the bottom of the arc. Pieces 15 mm long were cut from a 60 mm lath and secured to a bent profile at 150 mm intervals. We attached the side plasterboard linings to the profile. Then we bought 6 corners for tiling and 3 plastic panels of the same beech color. We lined all the openings and the bottom of the arc with panels using tile corners. Before this, we completely puttyed and leveled the plasterboard linings with the wall, covering the joints with fiberglass mesh. To ensure that the putty lays evenly, I advise you to completely prime the drywall with an acrylic compound. The final touch is to buy a beech-colored plastic holder for glass, stick it on liquid nails and glazing. The only thing I regret is that after exchanging the apartment, the hard drive on the computer burned out and there were no photographs left of the resulting miracle, which I am proud of.
Finishing
There are many design solutions for finishing. Take your time to look at them. When making your final choice, have full confidence that you will be able to complete the work yourself and handle the financial issues. After that, feel free to realize your fantasies. You will succeed.
Video: DIY plasterboard arch
Making an arched opening with your own hands is quite possible. It is important to work carefully and know what you want to get as a result.
An arch in the interior is an architectural technique that allows you to divide the space of neighboring rooms. Arched vaults allow you to add individuality to the layout of a typical apartment. Before delving into the technological intricacies of how to make an arch in a doorway, you should decide on its configuration and finishing option. Only a correctly selected form and design will give the interior of both rooms the necessary coziness and comfort.
Forms
There are several options for doorway shapes. When choosing, you should take into account the features of both rooms - ceiling height, width of the doorway, etc. Some designs look good only in high rooms, others require widening the doorway.
- Classic arch - suitable only for rooms with high ceilings (from 3 m). The correct bend radius is half the width of the doorway. Those. with a door leaf width of 90 cm, an arch will occupy at least 45 cm up from it. If we take into account that during the work the opening width, and therefore the bending radius, will increase, then a 2.5 m ceiling height may simply not be enough.

- Modern - used to design a doorway inside standard apartments. The radius of curvature exceeds the width of the door. Corners can have rounded or sharp edges.

- Romance is a good option for a wide opening; a direct insert is made between the rounded corners, either horizontally or at an angle.

- A portal is a common treatment of a doorway in the shape of the letter “P”.
The configuration can be wavy, polygonal - it all depends on the imagination, taste of the home owner, and the properties of building materials.
Material
The arched system can be made of concrete monolith, brick, wood, metal, plastic. They can also be made from chipboard, gypsum board, fiberboard, plywood, etc.

In addition, an infinite number of options for combinations of building materials and finishing, installation of lighting, metal and glass stained glass is possible. There are also options for finished products.
Process

First of all, you should decide on the configuration and finishing method. This can be done in two ways:

The appearance is chosen according to the interior design, and it must correspond to the interior of both rooms. From different sides, the arched system can be designed in different styles.
First, the old door frame is dismantled. The hole is expanded to the required size. The simplest option is to install a finished structure.
Note! If the building material is stone, brick, concrete, then you should take care of the foundation for their installation, as well as tying the masonry to the wall using reinforcing elements.

Sheet materials. The best option is to make a full-length template before you start making an arch in the doorway. In this case, it is necessary to provide for the installation of a lighting system, stained glass, and other built-in elements.
- Aluminum guides are attached.
- Before bending the metal profile, it is necessary to cut it every 5 - 7 cm.
- Next, frame parts are made using the template.

- The finished frame is mounted using self-tapping screws.
- Then a strip of the required dimensions is cut out to cover the structure. Its length should be 10 cm longer and its width 3 cm.
- To bend the gypsum board you need to wet it. Plywood and fiberboard are bent using water and a hot iron.

Note! Finishing work begins only after all modules have completely dried.
Theoretically, installing an arched structure yourself is not difficult. Installation work does not require expensive professional tools. A drill, a hammer, a hacksaw, and metal scissors are enough - available to almost every home craftsman. If you have no experience with such tools, it is better to turn to the services of professionals.
Video
If you want to learn how to make a plasterboard arch, watch the following video:
And this is how they install a finished wooden arch with decorative weighting elements:
Photo
