How to make a matrix for a fiberglass boat. DIY fiberglass boat
Read also
Building a fiberglass boat with your own hands
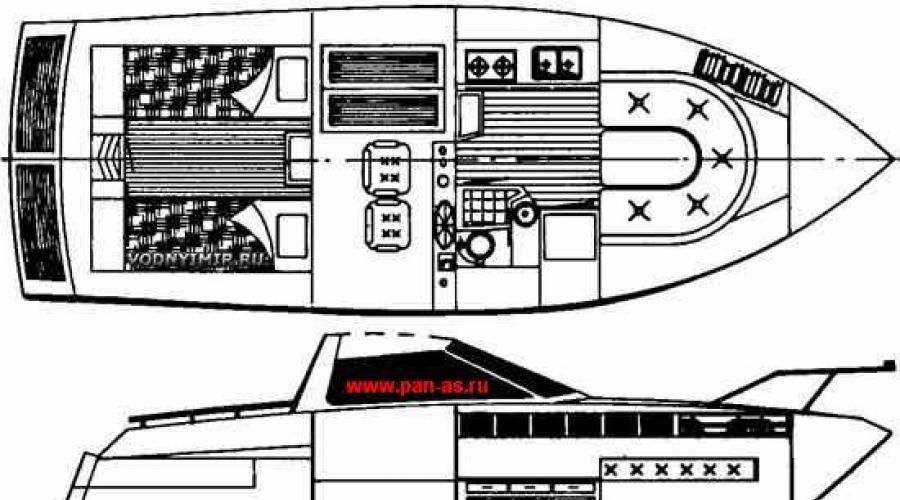
From the editor: This article introduces readers to the method of self-building small vessels made of fiberglass, recommended by Bruce Roberts-Hudson* for the hulls of boats and yachts of relatively large sizes (7.5-18 m long). For example, for the construction of the boat “WAVERUNNER-285”, general layout drawings and a sketch of the hull contours of which are given here. This is a fairly seaworthy planing boat that can be used for sea trips and tourism. The vessel has an increased freeboard and significant width, which allows you to place a comfortable salon with a galley and toilet in the bow, and a double sleeping cabin in the aft section, under the cockpit. The control station is located above the engine compartment; it is protected by a sloping windshield, which also creates a wind shade in the aft cockpit, equipped with soft sofas.
Thanks to the large width along the chine, the boat has high stability when parked, and the increased deadrise of the bottom in the stern contributes to a smooth ride in rough seas. All sheets of outer cladding can easily be unfolded flat, so waterproof plywood can be used for cladding. The drawings are developed in two versions - plastic and wooden construction.
Basic data of the boat "WAVERUNNER-285"
Maximum length, m 8.73
Length according to vertical line, m 7.33
Maximum width, m 3.05
Draft, m 0.51
Engine power, l. With. 250-500
Speed, km/h 28-56
General view of the boat, the construction technology of which is discussed in the article
General location of the boat

The boat is designed to install one or two engines with a total power of 250 to 500 hp. With. with a direct reverse gearbox, which allows you to reach speeds from 15 to 30 knots (28-56 km/h). The boat can also be equipped with propulsion systems with angular sterndrives or powerful outboard motors.
This boat is also called the “Scandinavian Express” - thousands of similar family boats ply the waters of the traditional holiday destinations of Swedish, Norwegian and Danish yachtsmen.
The experience of foreign amateur shipbuilders shows that a ship built independently costs the owner 50% and even 75% less than one purchased from a shipyard. But the main incentive for many amateurs remains the joy of creativity and learning the intricacies of various professions that a small boat builder needs to master.
The proposed technology for constructing fiberglass hulls is not the last word in small shipbuilding - it simply reflects the experience gained by many amateur shipbuilders in the independent construction of single ships or a small series by united owners. The method involves manufacturing the necessary equipment with minimal costs materials and labor and is most suitable for the construction of hulls of boats up to 18 m long or yachts with simplified lines, the outer skin of which unfolds onto a plane.
As when building ships from other materials, it is necessary to start by laying out theoretical frames and a full-size outline of the stem on a plywood panel or a sheet of cardboard. The shield or plaza must have a width equal to the width of the building under construction plus 300 mm; its height should be approximately 400 mm greater than the height of the housing. This will allow you to assemble the transverse patterns of the frames and stem directly along the plaza layout. The upper ends of all frames must be extended to a certain height, which on the plaza is depicted by a horizontal line perpendicular to the DP line and called the Shergen line. The position of this line must be chosen taking into account the fact that after assembling the matrix for molding the body, you will have to work in it and it is important that the sherge strips located at the top do not create inconvenience. Shergen strips significantly simplify the installation of patterns on the matrix base and checking the correctness of the contours.
When marking patterns using plasma, it is necessary to take into account the thickness of the slats and sheet material with which the inner surface of the matrix will be sheathed. That is, it is necessary to set aside the mentioned sum of the thicknesses of the slats and sheathing from the theoretical line of each frame and, using this marking, cut out the pattern parts and assemble them. To transfer the line from the plaza to the material, you can use tracing paper or, having laid out nail heads along the line, put a blank on top and press it to get impressions of the heads on the wood (see, for example, page 132 of the book “15 Projects of Ships for amateur built", 1985, L-d, "Shipbuilding" - approx. ed.).
Separate parts of the transverse patterns are connected using overlays and brackets made of pieces of plywood 8-10 mm thick, if we are talking about a body about 10 m long. It is better to glue the overlays to the patterns and secure them with nails or screws. When installing the overlays, you should take into account that you may subsequently need to remove the mold from the edge of the pattern, so the edges of the plywood and metal fasteners must be placed at a sufficient distance from the working edge of the pattern.
Before assembling the patterns into a matrix, you should think about the convenience of molding the outer skin. For this purpose, it is necessary to provide the ability to tilt the matrix on both sides so that you can work while standing side by side on the floor, or to attach two round rims to the matrix large diameter, which will allow you to turn it to any position, rolling it across the floor. In any case, the matrix must be a sufficiently strong and rigid structure so that during construction the shape of the body provided for by the project is not distorted. Large matrices are assembled on longitudinal beams that form a horizontal base; walkways are mounted inside for the convenience of gluing the body.
Having installed the longitudinal bars of the matrix base, it is necessary to mark the position of all the patterns on them and stretch a steel wire along them - a string indicating the vessel's DP. The second string can be pulled at the height of the shergen line. On the shergen-bar of each pattern and on its bottom part, the DP risks must be pre-designated, according to which each pattern is installed on the base. At the same time, using a plumb line, the verticality of each pattern is controlled, and to control their perpendicularity to the DP of the vessel, you need to make a large carpenter right triangle. At the same time, the stem pattern is installed.
We recommend placing the frame patterns located forward of the midship frame on the marking line so that the forward edge of the pattern coincides with this line, and align the aft patterns with the theoretical frame line with their aft edge. In this case, you can avoid the small size of the patterns or significantly reduce its volume when covering the matrix with longitudinal slats.
Design of a matrix for the manufacture of a plastic boat hull

1 - longitudinal beams of the base; 2 - plywood brackets; 3 - sewing the transom with slats;
4 - transverse templates for the transom; 5 - transom stand in DP; 6 - lining strips;
7 - upper slipway beam at the level of the shergen line; 8 - patterns for frames; 9 - rail along the upper edge of the side; 10 - plywood overlay in the spaces between the patterns;
11 - brace; 12 - stem pattern; 13 - keel pattern; 14 - slats that form the cheekbone;
15 - boards patterned according to frames; 16 - beams of suspended scaffolding; 17 - flooring used when molding the hull; 18 - cheekbone rounding radius, formed using epoxy putty with filler; 19 - sheet material (plywood, hardboard);
20 - recess for the keel matrix; 21 - shergen-plank pattern.
Layout on the plaza of the contours of the matrix patterns

1 - hornet line; 2 - development of a convex transom sheet; 3 - the size that should be set aside from the contour of the theoretical frame (the thickness of the sheet lining of the matrix plus the thickness of the slats); 4 - pattern; 5 - main line.
It is best to start installing patterns from the midship frame. After making sure that this pattern is placed vertically and perpendicular to the DP, fasten it securely to the base beams, install braces in order to use it as a base for installing patterns for other frames. Having installed all the patterns, including the stem pattern, and the stand located in the transom DP, securing them with braces to prevent any movement, you can begin lining the inner surface of the matrix with longitudinal slats.
For this purpose, slats with a thickness of 12-15 mm and a width of 50 mm are used. For the bottom, slats up to 100 mm wide may be more convenient. The length of the slats should exceed the length of the body by 100-150 mm for ease of adjustment. First, two slats are installed along the cheekbone - one is placed along the side, and the second along the bottom. Then the slats are placed along the upper edge of the side. The excess ends of the slats are released behind the hull - they are used when installing the transom. If the transom has a bend, then you need to install one or more templates located across the transom and attached to the rack in the DP. Then the surface of the future transom is sheathed with vertical slats. Usually there is no need to fasten the side and transom rails together - it is enough to place plywood overlays on the outside near the place where they join to get a smooth mating of the surfaces. It would not be superfluous to check the correctness of the transom contour by attaching to it from inside the matrix a template cut out of cardboard according to a theoretical drawing.
Stringer design with single-layer sheathing:
a - decorator (can be made from one or several blocks of foam plastic, depending on the cross-sectional dimensions of the stringer); b - typical cross-section of a stringer in the form of a trapezoid; c - deck shelf (internal fender); g - foundation beam for the engine

1 - foam decorator; 2 - covering from layers of fiberglass; 3 - outer skin; 4 - bulwark; 5 - “wet square”; 6 - molding of the shelf to the side plating; 7 - foundation square; 8 - metal bushing that prevents the foam from being crushed under the bolt; 9 - bolt; 10 - rubber gasket.
With another method, you can assemble the transom matrix as a separate unit and then mount it in its place. Simultaneously with covering the transom with slats, they begin installing slats on the sides and bottom of the matrix. To prevent skewing of the matrix and twisting of the body, the slats must be placed alternately on one side and the other, driving nails into the edges of the patterns. When all the slats are installed, transverse strips of plywood 10-12 mm thick are placed on the outside of them, which ensure the connection between all the slats and the smoothness of the contours in the spaces between the patterns. One part of the stripes is located from the chine to the keel, and the other - from the chine to the upper edge of the side. The slats are attached to these strips using nails that are driven through each slat. In this case, one person hammers the nails, and the second supports the outside of the plywood strip with a massive blank to ensure a tight connection between the strip and the trim.
After making sure that the contours indicated by the slats are smooth, you can proceed to the internal lining of the surface of the matrix over the slats sheet material- three to four millimeter plywood, hardboard, etc. The sheet material must be glued to the slats with any glue, for example, bustylate, and try to use as few nails as possible. Their heads leave a mark on the surface of the body when removed from the matrix, and puttingtying them requires a lot of effort. Sheets of lining should be placed sequentially, in small sections. Having adjusted one sheet in place, cover the surfaces of the slats adjacent to it with glue, then lay the sheet in place and press it with sandbags, bricks, etc. The joints between the individual sheets are carefully adjusted and puttyed after the glue has hardened. Epoxy putty is also used in all joints in order to make them along a radius along which the glass reinforcing material can be laid.
Structural components of a hull kit with three-layer skin:
a - deck shelf; b - deck connection, with a side without a bulwark; c - installation of the deck panel on the shelf; g - molding of the deck and bulwarks; d - section along the cheekbone

1 - wooden filler; 2 - shelf decorator made of three foam blocks; 3 - hull casing; 4 - outer layer of fiberglass; 5 - inner layer of fiberglass; 6 - “wet square” - molding the deck to the side; 7 - foam insert; 8 - transition of the three-layer side sheathing into the bulwark; 9 - width of gluing of the inner and outer layers of fiberglass of a three-layer deck; 10 - bevel of the edge of the deck panel at 45°; 11 - molding with a width of 100 mm; 12 - covering the bulwark with fiberglass; 13 - “wet square” with a shelf 125 mm wide; 14 - epoxy putty with filler; 15 - three-layer deck filler, balsa; 16 - matrix; 17 - reinforcing layers along the cheekbone
The quality of the outer surface of the future case also depends on the quality of the surface finish of the matrix. Therefore, the surface of the plywood must be carefully puttied, sanded, and then painted with two or three layers of pentaphthalic paint. Before the last layer, sand the surface well “wet” with fine waterproof sandpaper. It should be remembered that any negligence in preparing the matrix will manifest itself as corresponding defects on the finished body.
The day before the outer skin is formed, the surface of the matrix is covered with a release layer, which prevents the laminate from sticking to the matrix. As this layer, amateurs most often use floor polish, wax, Vaseline, etc.
It is very important to ensure good quality decorative (painted) layer of binder and the first layer of fiberglass. If the building is being built under a canopy, they should be applied in warm, dry weather at a temperature of 20-25°C and a humidity of no more than 65%. The decorative layer is applied with a brush or spray; its thickness should be in the range of 0.4-0.6 mm. Even if you intend to paint the body in the future, it is recommended to still apply a layer of unpainted resin - it will give the surface of the skin a glossiness and smooth out the texture of the fiberglass, which appears in fiberglass.
It is best to carry out the work of molding the body by two or three people. When building a boat 10-15 m long in one day, it is recommended to apply no more than two layers of laminate to avoid deformation of the matrix or peeling of fiberglass from it. Thin fiberglass fabric is laid as the first layer, which is carefully rolled with rollers to the surface of the matrix. It is very important to exclude the appearance of air bubbles, which will create many problems after removing the finished hull from the matrix and during the further operation of the boat.
Laying two layers of glass material per day is a unique form temperature control and provides high quality fiberglass. Working this way, two people can glue the hull of a 15-meter boat in a few days.
Cross section templates according to the stem pattern

1 - matrix lining strip; 2 - stem pattern; 3 - sheet material; 4 - radius roundings (epoxy putty with filler).
The number of layers and grades of glass materials are usually indicated on the drawings. After the required number of layers has been laid over the entire surface of the hull, additional layers are glued along the keel and in other places indicated on the drawings. A good rule of thumb is to ensure that the edges of the glass layers overlap each other at the chine, keel and transom edges and along the length if short pieces are used. Every day you need to trim off the excess fiberglass along the upper edge of the side no later than a couple of hours after finishing gluing the next layers, when the binder has gelatinized. This operation should not be left for another day, since the “burr” will have to be sawed off and, in addition, it creates inconvenience for molding subsequent layers.
If a body of a three-layer (sandwich) structure is being built, then before installing the core slabs, it is necessary to lay all additional layers of glass material. The best method gluing foam in such structures is the “vacuum bag” method, in which a rubber-fabric panel is laid on the surface of the foam, sealed along the edges and then air is pumped out from under it using a vacuum pump.
Cross section of the matrix with a body made in it with a longitudinal set

On the right is a body of sandwich construction, on the left is a single-layer casing.
Atmosphere pressure tightly compresses the “bag” and along with it the laminate. The single-layer skin is necessarily reinforced by a framing system consisting of stringers, frames, floors and bulkheads. With three-layer sheathing, it may be necessary to install stringers and frames, as well as stiffeners in certain places. Stringers and frames usually have an identical design, consisting of a foam core of the required cross-section and a fiberglass lining. Usually, longitudinal stringers are first installed on the skin, then split (or intercostal, as shipbuilders sometimes call interrupted ties) frames are glued between them. Usually the frames go from the upper edge of the side to the lower stringer, which serves as a support for the floors. It is recommended to first install foam plastic covers for all beams in the set, and then cover them in one go with strips of fiberglass. Of course, care is required during any movements inside the case with the supplied decorators, so as not to move them out of place. To speed up the hardening of the binder, which is used to glue the decorators, you can use local heating using small electric lamps.
To simplify the work, it is advisable to use foam plastic slabs with a thickness equal to the height of the stringer or frame profile, cutting it into bars of the maximum possible length into band saw(if you don't have it, you can do this work hand hacksaw). Then the side edges of these bars are processed to a trapezoidal section; if necessary, the base is adjusted along the contour of the bottom. The cross-section of the set parts may vary depending on the role played by the connection and its location in the body. For example, a stringer - floor support should have a flat top edge on which plywood flooring is laid, and the side edge is cut to fit snugly against external cladding. Thus, this stringer may have a triangular cross-section. The longitudinal beams of the engine foundation may have vertical walls with inside and inclined, facing the sides. The individual bars of the set of connections are joined together using an epoxy binder.
Deck Matrix

1 - base bars 60X100; 2 - slats 20X51;
3 - patterns for the deck; 4 - sheet covering matrices, plywood, hardboard; 5 - adhesive tape - limiter of the contour of the molded deck panel;
6 - fastening sheet material with nails around the perimeter of the matrices.
Glass mat and fiberglass are used for gluing stringers and frames. In some cases, in order to obtain a beam effect T-section, more durable and rigid in bending, additional layers of reinforcing material are laid along the upper edge of the stringer. The width of the moldings adjacent to the body can be different - from 40 to 120 mm - usually these parts are indicated in the body drawings.
Frame floors and semi-bulkheads are used to reinforce the bottom and install various equipment. Semi-bulkheads can be made from waterproof plywood or pre-formed flat sheets of fiberglass, which are then fitted to the contours of the hull and attached to the skin using “wet angles” - L-shaped moldings made of several layers of fiberglass. The bottom stringers and, first of all, the engine foundation beams should be installed first. This work must be carried out with the utmost care, since the correct positioning of the motor in the housing and the subsequent installation of the shaft line depend on it.
Cross section of the hull of an 8.5 meter boat

1 - seat molded using a special matrix; 2, 3 - rounding along a radius of 50 mm;
4 - tank bed fresh water; 5 - enhanced flora; 6 - foundation brackets for the engine;
7 - fuel tank; 8 - engine
Transverse bulkheads are installed when all stringers and frames are glued. Most often they are made from one or two layers of plywood, and two-layer ones are most often used if the width of the plywood sheet is not enough to cover the entire width of the boat. The bulkhead is molded to the hull on both sides using “wet angles” with flanges about 100 mm wide. To strengthen the connection at the edge of the bulkhead along its perimeter, it is recommended to drill through holes with a diameter of 30-40 mm with a distance of about 150 mm between centers, then chamfer the edges of the holes and then perform molding. At the edge of the bulkhead, a tongue and groove can be selected according to the thickness of the fiberglass molding so that the connection becomes invisible after painting the bulkhead. Some builders attach bulkheads to frames molded to the hull using bolts. In the open part, all these connections and bolts are covered with decorative strips of wood. It is recommended to build main bulkheads to their full height, including parts protruding above the deck. This will simplify the future production of the deckhouse and deck. In the span between the bulkheads, reinforced floors are installed, and additional ones are installed in the engine compartment in order to more reliably fasten the longitudinal beams of the foundation under the engine and support the fuel tanks, which are most often installed at the sides. By the way, you should be careful about installing fuel tanks built into a fiberglass housing. As a rule, such containers are not sealed, and finding and eliminating leaks during boat operation is a difficult task. It is best to make these tanks independent and, before installing them in the boat, carefully test them for leaks by pouring the liquids for which they are intended.
Additional reinforcements are installed under the helm port and steering gear, pumps and latrine. After this, it is recommended to cover the entire inner surface of the body with a layer of binder, possibly with pigment.
At this stage - before the manufacture of the deck and superstructure, it is advisable to install the most bulky equipment in place - the engine, fuel tanks, fresh water tanks, etc. It is better to postpone the installation of pipelines and on-board electrical networks until the period when the deck and superstructure are installed . For single and small-scale construction of boats, the deck and superstructure are assembled on site from prefabricated fiberglass sections - panels and individual parts. There are two possible deck construction options - single-layer or sandwich, with light filler between the outer and inner layers fiberglass. The three-layer deck has a number of advantages, for example, it well thermally insulates the cabins from external environment Due to the foam layer, it has high rigidity and strength with a minimum number of beams in the set. Single-layer construction is more suitable for large work boats and fishing boats where heavy and a complex system below-deck set, which can withstand heavy loads from deck equipment.
Section of the hull of a 12.5-meter boat

1 - matrix; 2, 6 - carlengs; 3 - fiberglass deck; 4 - removable plywood flooring above the engine compartment; 5 - wooden beam;
7 - shelf; 8 - cabin wall, made of fiberglass, made in a flat matrix; 9 - deckhouse roof, made in the deck matrix.
As a lightweight filler for a three-layer deck, rigid foam plastic or end sections of balsa wood are used (balsa is not used in domestic shipbuilding, as it is an exotic material, unavailable even for shipyards - editor's note). The ship's drawings indicate the thickness of the core as well as the below-deck system. Usually, on boats up to 12 m in length, beams alone are sufficient, and the decks of ships of greater length are also supported by a pair of longitudinal braces - karlengs.
When starting to make a deck, you need to cut out wide board, length along the width of the body, template and counter-template for the destruction of beams. Using this template, a matrix is made for gluing the panels of the deck and roof of the cabin. The width of this matrix is equal to the maximum width of the boat hull along the deck, the length is 300-400 mm greater than the longest deck panel. For boats up to 18 m in length, a matrix of about 5 m in length is sufficient. The deck matrix is made without sheer side line - it is recommended to place the molded panel in the hull at a time when the plastic has not yet completely hardened and can be easily bent according to the sheer side line, if any .
The matrix is made in the same way as for the main body. First, several transverse patterns are assembled, for marking which a counter-template for the destruction of the beam is used. The patterns are installed on the longitudinal beams (similar to the patterns of frames), they are securely fastened and sheathed first with slats, then with sheet material, which is placed on glue, secured with nails only along the outer edges. The surface of the matrix is puttied, sanded and painted.
Several temporary beams are inserted into the boat hull in those places that are supposed to be covered with a deck. Using strips of plywood fastened with nails, templates of the deck flooring are removed from these places, transferring the outlines of the side line onto them. Typically, such templates are made only for one half of the panel along the DP, since the second half of the other side is symmetrical. The template is then laid on the deck matrix and the contours of the future deck panel are defined using adhesive tape applied to the surface of the matrix. Next, a separating layer (blacking agent, wax, etc.) and a decorative (or unpainted) layer of binder are applied to the designated area of the matrix.
To prevent the panel from warping, no more than two layers of laminate are glued daily. After gelatinization of the last layers of fiberglass is completed, the panel is removed from the matrix and transferred to the body while the plastic has not yet completely hardened. Here the panel must have sufficient support in the form of temporary beams installed every 0.8-1 m, and one or two longitudinal slats embedded in them. It is important that the deck panel does not suffer any unplanned deflection.
The below-deck set, provided for in the boat's drawings, is made in the same way as stringers and frames, while the panel is still in the matrix. Then the inner surface of the panel is covered with a layer of colored or pure binder. In this case, it is necessary to avoid getting this binder into places that will be molded to the main hull or deckhouse structures. If the deck is of a three-layer structure, then along the edges of the panel the core must be cut at an angle to mold the load-bearing layers of fiberglass to the sides. All deck panels are molded externally and internally, with the width of the molding being 75-100 mm from the joint. Some of the molding layers can be made narrower to avoid excessive thickening at the edges of the “wet angle”. All traces of the release layer should be carefully removed from the surface of the fiberglass in the molding areas, as well as from the rest of the panels before painting them.
The side walls of the cabin can most often be glued on flat matrix tables and assembled on the deck into a single structure using “wet angles”.
In conclusion, we should remind you about safety precautions when working with fiberglass, the components of which are far from harmless to health. You need to work in rubber gloves, use protective masks when molding and especially when sanding.
Using the technology described, an amateur boatbuilder can build a boat for less than 50% of the cost of a finished vessel of the same size and quality built at a shipyard.
G.V. Lipovetsky, "Boats and Yachts" No. 83.
Pan-As website, homemade crafts website - the website has everything you can do with your own hands: crafts, homemade products, jewelry, children's crafts. Make them yourself, with your own hands, and get real pleasure from it.
Related materials:
The desire, at least for a short time, to become the captain of even the smallest ship, obviously lives in us from early childhood. It does not float away in a paper boat along a spring ringing stream, nor does it dissolve in children's dreams about long sea voyages. And if there is a body of water nearby, along which you can periodically make, if not long or sea, but quite water travel, then you can make a boat, for example from fiberglass, with your own hands - this article is for you. Moreover, a hammer is either not required at all, or almost not required.
What kind of boat will we build?
Here, the decisive factor may be not only the depth of your wallet, but also the depth, as well as the width and salinity of the nearby body of water, and therefore the rules of navigation on it. We, of course, will not build a sea yacht, but will talk about materials, techniques and methods for constructing small rowing boats and boats on which a small engine can be installed, i.e. about the structures being quite light and not particularly large.
And even in this segment of shipbuilding, there are so many designs, technologies and approaches that we will take as a basis the most simple and effective ones, in our opinion. At the end of the 70s of the last century, on numerous bodies of water Soviet Union oar pleasure boats made entirely of fiberglass went on a long voyage. The new “ship” was much lighter and more maneuverable than its heavy wooden predecessor, so it was dismantled at boat stations first. In addition, such a boat was easy to repair and served no less than a wooden one. What prevents you from simply taking and repeating this technology in sizes convenient for yourself. Nothing, but is it necessary? Let’s figure it out as we describe the process.
Making a fiberglass boat with your own hands
Such a boat is made, regardless of complexity, according to one scheme:
- we make a layout;
- apply a separating layer;
- we lay glass fabric (or fiberglass) with a binder (epoxy or polyester resin, polyurethane compound) of the required thickness;
- we process and install equipment, components, and other elements.
When choosing this technology for manufacturing a boat, you need to take into account two points, namely, that making a model for the production of one single boat is a waste of money, and the thickness of fiberglass for the strength and rigidity of the vessel should reach 10 - 15 mm, which is even more expensive.
Such vessels are given rigidity through additional structural elements. Therefore in individual production V pure form this technology is almost never used, but is used in conjunction with others construction materials, such as plywood.
Homemade plywood boat
Many creators of homemade boats prefer to work with this material, since it is publicly available, easy to process and, most importantly, bends at small thicknesses. If we are talking about an individual fishing boat made of plywood, which will be used on the nearest pond, without the risk of damaging the bottom on sharp coastal stones, then plywood with a thickness of 6 - 8 mm will be quite sufficient. Yes, and you can cut out such a boat from one sheet of plywood.
To connect the boat elements together, thin copper wire is used, threaded through holes drilled along the edge opposite each other with a pitch of approximately 150 mm. The sides and transom are placed on the bottom.
The joints from the inside and outside are glued with three layers of fiberglass, increasing in width from the inside to the outside. On top they glue a rail (shoulder), extensions for oarlocks, stops for the seat, and always several slats on the bottom for rigidity. You can screw everything onto self-tapping screws, which you will then need to unscrew and drive into the remaining holes. wooden dowels on epoxy resin. It is better to glue stainless steel tubes into the holes for the oarlocks, or, at worst, brass tubes. If you glue a keel rail to the bottom, the boat will behave better on the water. In principle, after painting this structure with several layers of pentaphthalic paint, you can go swimming. But if the entire structure is covered in 2 - 3 layers of fiberglass on one of the above-mentioned binders, then the service life of your vessel will at least double and may well be about thirty years. If you do this, then don't skimp on the store-bought gelcoat or make it by adding dye to the epoxy. It must be remembered that over time this coating should be updated.
You can buy ready-made oars, or you can make them yourself, preferably from laminated wood. Their length should not be less than 2 m, optimal size– 2.2 m. For the blade, use 6 mm thick plywood.

Using this principle, you can build a fairly large boat by strengthening the hull with frames and other necessary elements. Of course, thicker plywood is taken. Pre-make a model of the vessel from thick cardboard. By scaling the elements, get drawings of the parts. In general, there are enough drawings of boats and boats on the Internet for every taste, and there is also a magazine called “Boats and Yachts”, which also publishes interesting projects.
Foam boat
You probably won’t find a simpler method of building a boat than this. A large enough piece of foam is a boat in itself. Fasten the rowlocks, set the oars and set off. Naturally, this is a slightly simplified version of a water vehicle, but a lot of simple catamaran boats are built precisely according to this principle:
- take two polystyrene foam blocks, using nichrome wire and charger car device give them the shape of catamaran floats;
- keel slats are glued, covered with several layers of fiberglass with reinforcement of the bow and tail;
- build a wooden or metal platform;
- provide the craft with any propulsion device (from a paddle wheel to a light engine).
That's all. But if we still talk about a boat or a small boat, then polystyrene foam can serve as a permanent model, also increasing the survivability of the vessel.
Everything is the same as in the case of making a purely fiberglass boat, but the model is made of foam plastic with a thickness of 5–10 cm and a density of 35–50 kg/cm2, which is glued together polyurethane glue. We will not talk about methods of giving polystyrene foam the required shape, except for what has already been mentioned; there are enough of them and they are all quite simple. Moreover, you choose the shape and complexity of the configuration of your ship yourself.
So, when your foam plastic vessel pleases the eye with its smooth contours, you can simply cover it with many layers of fiberglass to the required thickness, gluing in all the components that need reinforced fastening or providing places for their fastening. And then - according to the scheme: putty, sanding, gelcoat and champagne...
Although, no. We got excited with the champagne. Our boat is light and durable enough for use long time, but it’s unlikely to break a bottle of champagne on its body. But if you cover the foam plastic model before the fiberglass, at least in the most critical places (bottom, bow, stern, protruding elements) with only 4 mm plywood, then the strength of the vessel will increase significantly.
All of these are nothing more than techniques for working with the material, and which of them to use is up to you. Our task is to show that you can do this kind of work and can save significant financial resources.
Dear readers, if you have any questions, please ask them using the form below. We will be glad to communicate with you;)
Experience boat building made of fiberglass impregnated with synthetic resins (for example, epoxy or polyester) showed that it is possible to make cases from it of any kind, the most complex shape, and the resulting “shell” has very high physicochemical properties. According to a number of indicators such boats turned out to be better than metal ones, not to mention wooden ones.
Disadvantages of wood as a shipbuilding material is well known: it swells, increases in weight, rots, and is destroyed by woodworms. At long-term storage The wooden hulls of ships are drying out. To a large extent, these defects of wood can be eliminated by covering it fiberglass. The peculiarity is this the buildings lies in the fact that all materials (wood, metal fasteners and plywood or cardboard) are subsequently immured between the inner and outer layers of fiberglass and, being securely connected to these layers, are organically included in the hull structure. In addition to its protective properties, fiberglass increases the strength of the hull and simplifies spring repairs of the vessel.
For protective pasting of the ship's hull, the most suitable fabrics will be T 1 or T 2 grade fabrics or rare weave glass fabrics - the so-called “mesh” of SE grades (SSTE-6 or SSTE-9). Due to their low density, they are easily impregnated with resin and, due to their elasticity, fit the body well. Satin weave fiberglass of the ASTT (b) C 2 brand and rope fiberglass of the TZh-07 and TZhS-06-0 brands are also suitable. Aviation fiberglass of grades A and AC is recommended to be used only for gluing light alloy hulls.
Electrical insulating fabrics of the LSM, LSMI, LSE, LSB, LSK brands are produced already impregnated with synthetic resins, from which it is almost impossible to clean them. The presence of resin limits the choice of glue (only perchlorovinyl glue can be used) and complicates the application of paint and varnish coatings. For this reason, electrical insulating fabrics are used only in the absence of any other fabrics.
Wooden cases can be covered with epoxy compounds and polyester resins, which are cheaper than epoxy. For the manufacture of fiberglass, unsaturated polyester resins are used: PN-1, PN-2, PN-3, PN-1S, PN-3S, 911-MS, NPS-609-21, NPS-609-22, NPS-609-22M and others, curing at t=18-25°C. Styrene, which is included in resins, is released during the manufacture of fiberglass, having a harmful effect on the human body. The least toxic are styrene-free resins NPS-609-21 and NPS-609-22M, so they are best used in amateur shipbuilding. The compositions of binders based on cold-curing unsaturated polyester resins are given in table 3.
Table 3. Compositions of cold-curing binders based on unsaturated polyester resins
|
Polyester resin grade |
Initiator and Accelerator |
Number of parts by weight per 100 parts by weight of resin |
|
Isopropylbenzene hydroperoxide (hyperiz) |
||
|
Cobalt naphthenate (10% solution in styrene) |
||
|
Cobalt naphthenate |
||
|
Cobalt naphthenate |
||
|
Cobalt naphthenate |
||
|
Cobalt naphthenate |
||
|
Cobalt naphthenate |
||
|
Benzene peroxide |
||
|
Dimethylaniline |
||
|
Cobalt naphthenate |
||
|
Soucrifier brand T-1 |
||
|
Polyester acrylate 7-70 |
Pasting is carried out at a temperature not lower than +18 ° C and a relative air humidity not higher than 65%. Isopropylbenzene hydroperoxide (hyperiz) is used as an initiator to ensure the transition of the resin from liquid to solid state. At room temperature, the resin with hyperizum introduced into it polymerizes within several days. The additional introduction of cobalt naphthenate speeds up the process, as it activates the action of hyperiza, and the curing of the resin occurs within several hours.
Preparing the wooden frame
Before pasting on a wooden body, it is necessary to round off all sharp edges and corners on which the fiberglass fabric does not adhere well due to a sharp break in the threads. It is necessary to recess the fastener into the sheathing and fill the recesses above it with putty, remove any existing glue smudges. Uneven, rough surface need to be planed. Trim splits and burrs with a chisel or sharp knife. Treat the sheathing with fine sandpaper and a rasp. Then soak it in hot drying oil or ethinol varnish: in this case, the wood will absorb less water. The drying oil should dry well: it is better to let the body sit for several days.
2-3 hours before pasting, the body is wiped with white spirit (or gasoline) to remove dust and degrease. It should be remembered that even the slightest traces of fat impair adhesion.
Preparing and cutting fiberglass
During production fiberglass To reduce dust formation, they are moistened with a special oil, oil emulsion or paraffin solution. To ensure better impregnation of the fabric with the binder when gluing the body, this lubricant must be removed. Paraffin lubricant is removed with gasoline. Other types of lubricants are removed with white spirit or acetone, observing all precautions and safety regulations. The washed fabric should be dried for 2-4 hours, preferably in a draft.
When cutting fabric, you should strive to cut pieces equal to the length housing. It is desirable that the strips laid along the keel and waterline do not have joints: at the edge of the joint, when hitting an obstacle, the material can lift up and peel off over a considerable distance; in this case the whole canvas will break through. When cutting fabric, it is necessary to allow allowance along those edges that will lie overlapping.
To obtain the desired length, you can sew together pieces of fabric, trying to ensure that the seam does not fall on the fullest, midsection of the body. When sewing, the edges of the fabric should not be folded; you can use linen threads soaked in drying oil, or glass threads pulled from the edge of the fabric. It is not recommended to sew panels along the longitudinal edges to avoid the formation of folds and distortions due to uneven thread tension in each strip of fabric. When working with fiberglass, you need to wear safety glasses to prevent fiberglass particles from getting into your eyes, and a gauze bandage or a respirator to protect your respiratory system. The room where work is carried out must be constantly ventilated, and it is better, if the temperature allows, to work in the open air.
Preparation of binders
Binders should be prepared in quantities that can be consumed in 1.5-2 hours of work. Prepare the binder in an enamel bowl. Do not use copper, brass or rubberized utensils as these materials may adversely affect its curing.
The binder components are mixed in a certain sequence. If you are going to paste over the vertical sides or bottom of a boat with its keel facing down, then a few hours before the start of pasting, a prepared dose of thixotropic filler - white soot grades U-333 or A - 5-7% of the weight of the resin or aerosil is introduced into the resin in portions with thorough mixing. - 1-1.5%. The filler increases the viscosity of the resin and prevents binder leaks. After 2 hours, the resin with the added filler is thoroughly mixed again. Before gluing begins, weigh out required amount resins and separately accelerator and initiator. For polyester resins of PN grades, an accelerator is first introduced and only after good (for 10-15 minutes) mixing - hyperiz. The composition is mixed well again.
Attention! The accelerator and initiator should not be connected directly, as this may cause an explosion. When using epoxy resins ED-5 and ED-6, dibutyl phthalate is added to them - 15 parts by weight. per 100 parts by weight resin, with which it can be stored for a long time. The accelerator is polyethylene polyamine (10 parts by weight), which is introduced immediately before pasting the body. When mixing the binder with polyethylene polyamine, heat is generated, which can cause the mixture to quickly harden. Therefore, it is recommended to introduce the accelerator in parts, mixing well. If pasting is carried out at temperatures below +18°C, a co-accelerator - dimethylaniline - can be added to the binder in an amount of 0.025-0.1% by weight of the resin. It dramatically accelerates the gelatinization of the resin. You need to work with rubber gloves. After finishing the pasting, wash your face with hot water and soap and lubricate it with nourishing cream.
Procedure for pasting the body
Before work you need to prepare the following tools: sharp knife, tailor's scissors for cutting fabric, end brushes, spatulas, roller for rolling fabric and enamel dishes. The treated surface of the outer skin is primed with a thin layer of binder prepared without thixotrionic filler. The size of the area is determined so that it can be covered in no more than an hour and a half.
After 30 minutes, another layer of binder is applied (if necessary, with a stixotropic filler), and immediately the first layer of fiberglass is laid on it, which is carefully smoothed, tapped with end brushes from the middle of the panel to the edges. complete removal air bubbles and achieving uniform impregnation. Subsequent layers are laid in the same way until a protective layer is obtained. required thickness. Roughly we can say that four layers of fiberglass mesh form protective covering thickness 1-1.5 mm. Thick fiberglass fabric provides sufficient protection for the case in 1-2 layers.
The hull is usually covered from top to bottom, i.e. from the side to the keel. The first layer should overlap the bilge beam by 50-70 mm, extending to the bottom, and the deck by the same amount. Subsequent layers should be laid so that the overlap at the edges of the fabric is at least 20-30 mm. It is advisable to protect the most vulnerable places of the hull, for example the cheekbone, the connection between the side and the deck, with an additional layer of fiberglass by gluing a strip 50-100 mm wide to the main layer.
When gluing the bottom, cover the lower part of the side gluing. Proceed similarly when gluing the deck, transom and stem. The lower edges of the bottom panels extend 20-30 mm onto the outer timber keel (if there is one), but it is usually not completely covered. The edges of the fabric on the wooden keel and on the stem are best sealed with a lath with a metal trim. Pasting must be carried out continuously until a protective layer of the required thickness is obtained, otherwise the binder will harden and the surface will have to be cleaned to continue work. If it is necessary to paste over the bottom in a ceiling position, the fiberglass fabric is pre-impregnated with a binder on the tables. After impregnation, the panels are wound onto round rods with a diameter of about 70 mm, and no later than 30-40 minutes later they are unwound and laid on the body, breaking through the resulting bubbles with end brushes and rolling the fabric with rollers. The inside of the body is usually not covered with paper; It is enough to cover the casing and the set with a layer of binder. To paste a body covered with bakelized plywood, an epoxy resin-based binder should be used, since polyester binders in this case do not provide sufficiently strong adhesion.
While the glue has not yet completely dried, “wet putty” is performed. Irregularities (risks, glue sagging) are smoothed out by wetting with a solvent. It is often necessary to use putty after the fiberglass has hardened. For putty, use the same glue that is used to glue the fabric, with the addition of filler - quartz sand or marshallite (chalk and cement are not recommended). The putty surface is leveled and immediately wiped with a swab dipped in solvent. After the putty has completely dried, you can begin preparing the body for painting - remove the gloss with glass sandpaper. TO matte surface Paint sticks much better, especially enamel.
During the operation of ships covered with fiberglass, protective layer may be damaged. Repairing damaged areas is carried out in the same way as applying a layer fiberglass onto the body, but more careful preparation of the surface is required, since there may be oil, dirt on it, or the wood itself will be wet.
Building boats from plywood with a fiberglass exterior is quick and cheap. I made several such boats, but later abandoned this technology. Despite the protective layer of plastic, plywood quickly absorbs moisture, the weight of the hull increases and the speed characteristics of a planing boat decrease. And of course, the strength of plywood is significantly lower than the strength of monolithic fiberglass. With poor ventilation and in conditions of high humidity, plywood is quickly destroyed by microorganisms and delaminates.
Fiberglass does not have these disadvantages, but building boats from it is very labor-intensive. You must first make a block or matrix, mold a plastic case onto it, then glue the set into it. Making a block or matrix is justified when building at least 4-5 boats, but it is quite difficult to find so many people who like to build identical hulls.
I used a different technology. The design of the hull kit is practically no different from a boat with plywood sheathing. First, frames cut from plywood 12-16 mm thick are installed on the slipway (all their connections are glued together epoxy glue); then the keel cuts into them, and then the stringer. I recommend making the bottom stringers from oak, and gluing the side stringers from several pine or spruce slats. Remove from the edges of the set adjacent to the outer skin.
The entire outer surface of the hull is divided into sections within which it can be sheathed with one flat sheet of fiberglass. A template made of cardboard or thick paper. Plastic in the form of sheets is glued on the table, and hot irons are used to speed up polymerization. All work on the production of plastic sheets must be carried out outdoors, since heated resin abundantly releases volatile components that are toxic. Tracing paper is spread on the table, serving as a separating layer, 3-5 layers of fiberglass are applied to it, then epoxy resin, prepared with a plasticizer and hardener introduced into it, is applied to the entire area of the fabric, as evenly as possible, and ironed. The viscosity of the heated resin decreases, thanks to which the binder well saturates all layers in the fiberglass package. In those places where the binder was not enough, you can apply a new portion of resin and iron it again. It should be remembered that the optimal ratio (by weight) of binder and fiberglass is in the range from 40:60 to 50:50.
The more irons are used for ironing (it’s more convenient for two people to work), the faster the plastic is produced. Irons must be periodically cleaned of adhering resin using a sharply sharpened shoe knife or a piece of iron from a plane. The process of partial polymerization occurs after 20-30 minutes, and the material becomes rigid. You cannot hold the iron in one place, as the heated area may stick strongly to the iron and the plastic blank will be unusable.
After the material becomes sufficiently rigid, but it can still be easily cut with a knife, leaving smooth cut edges, a template is placed on the fiberglass sheet and the sheet of future sheathing is cut along the edges using it. The edges of the boat hull kit, to which the plastic will be glued, are pre-coated with epoxy glue. The ends of the plywood frames have to be lubricated with glue several times. Then the plastic blank is placed on the set with tracing paper facing outwards and attached to it with small nails, ensuring a tight fit of the surfaces to be glued.
The tracing paper from the casing is subsequently removed with sandpaper. This can be done using a drill, gluing the sandpaper onto a fiber disc.
If, when laying the sheet on the set, it sag between the frames, then it should not be glued. You need to attach the workpiece vertically in the sun or near the battery steam heating to continue polymerization of the binder. In this case, it is necessary to periodically check that the workpiece does not become so rigid that it will be difficult to pierce the plastic with small nails or that it will be difficult to bend the sheet along the contours.
Thus, the entire surface of the hull is covered with pre-glued sheets, starting from the stern. On stringers, the edges of individual sheets are glued end to end; on frames due to their small thickness - overlap. The overlap of the edges should not exceed the thickness of the plywood of the frame.
Connecting the edges of fiberglass sheets on stringers (a)
and frames (b)

1 - fiberglass sheets; 2 - epoxy putty; 3 - stringer;
4 - nail; 5 - frame.
Then all irregularities are filled with epoxy putty and the body is allowed to stand for two to three days. After this, the body can be sanded, and then covered with additional layers of fiberglass to the desired thickness of the skin. When applying the last layer of fiberglass, a coloring pigment is added to the epoxy resin. Next, the skin is sanded, if necessary, painted, turned over and work begins on the inside of the body.
The boat I built in this way has been sailing for 8 navigations. Its length is 8.5 m, side height 1.2 m, width 2.6 m; engine - "ZMZ-53". During operation, there were several cases of collisions with driftwood, and although the set was damaged by strong impacts, there were no leaks. The kit does not lag behind the skin, and repairs after encountering a snag do not require much time. Now I’m finishing the construction of a ten-meter yacht using the same method. In what happens lightweight design, strong, durable - there is no doubt.
Fiberglass boats have gained popularity for their durability and reliability. Fiberglass has a number of significant advantages over other materials. The vessel can be assembled quickly and without any special expenses. DIY fiberglass boat - budget and decent option for fishing trips.
A plastic small boat is intended primarily for fishing. It can also be used for water tourism and sports activities. Operating conditions of the boat on the water: waves no more than 60 cm high, wind force - up to 4 points on a ten-point scale. A fiberglass boat is an excellent alternative to inflatable boats.
In the first place among the advantages is strength, which exceeds this indicator aluminum boat the same class. Such a vessel will last a long time, with proper care - up to 20 years.The fiberglass body has excellent hydrodynamics and shape, and has high physical and chemical properties. The repair can be completely done with your own hands. One of the most important advantages of a plastic boat is the ability to customize it according to your wishes.
Fiberglass is the only material that allows you to create a shape of any complexity yourself. Independent design of the bottom makes it possible to equip it with steps of any configuration. Can be achieved maximum efficiency performance of the vessel, placing the redans in the most suitable places. In addition, the design of a homemade boat will reflect the character of its owner.
 There is a method for making a homemade boat from plywood and fiberglass, when plastic is used only for the outer covering of the boat. But this technology does not justify itself. The layer of plywood lying under the plastic quickly picks up moisture, which increases the weight of the vessel. Plywood quickly degrades due to the influence of microorganisms and the delamination process, because plywood is significantly inferior in strength to plastic.
How to make a boat? By carefully following all the rules, even a beginner can complete this task. Technological process simple and budget friendly. The ship's hull is created using reinforcing filler impregnated with a polymer composition.
Materials and drawing
Raw materials used as reinforcing filler in the manufacture of the frame:
- body base, sides – roving fiberglass fabrics TP-07, TP-03, TP-056;
- local strengthening of individual sections - structural fiberglass fabrics T-11, T-13.
Fiberglass can be different types by type of weaving, thread size. Mostly they choose “oblique” or satin weaving. The threads must be twisted. The material is sold in the form of sheets, rolls, tape.
 Fiberglass fabric is sold impregnated with a greasy composition. In order for the fabric to be better saturated with the binder, the sizing should be removed using gasoline, white spirit or acetone. The fat-free fabric is dried in air for about 2-4 hours.
To glue the reinforcing material, you will need resin. There are three types of resins used in the shipbuilding industry: epoxy, vinyl ester, and polyester. The most important characteristics of resins when building a fiberglass boat from any type of fiber are adhesion and impregnation.
A cheap option is to use polyester resin, which allows you to create a single piece of fiberglass in one operation. You can use TM Ashland resin. To create a decorative body coating with protective properties, you will need a gelcoat. You will also need plywood at least 1.2 cm thick that is moisture resistant.
Making a boat is impossible without a competent drawing. The design of a future watercraft can be done using the AutoCAD program. First, a 3D model is created, then diagrams of frames and patterns are created. Ready-made drawings are taken from specialized sites on the Internet. Now you can start making a fiberglass boat with your own hands.
Matrix
The direct production process of making a fiberglass boat with your own hands begins with the construction of a matrix. First, a frame is made onto which the frames are attached. Next, they should be covered with twelve-millimeter plywood, trying to achieve as smooth a surface as possible. The edges of the boat are made more rigid; a double layer of plywood is used for the sides.
 Now you need to take a long time and carefully level the sides using polyester putty. It is necessary to eliminate all errors so that the design of the boat is stable. You can work with special template spatulas.
At the stage of matrix alignment, it is possible to provide such an important part of the boat as the keel. It ensures smooth movement of the oar or motor boat, excluding agility. A homemade keel made of wood is filled with polyester resin.
By marking, all errors in the constructed matrix are identified. Using sandpaper, the edges are smoothed and smoothed, giving the future vessel symmetry. The finished form, free of dirt, is degreased, and an anti-adhesive compound is applied to it in 4 layers. It is necessary as a separator to prevent the resin from sticking to the surface of the mold.
Gel coat coating
After the wax layer has dried, a gelcoat is applied, which is outer surface boats. This is a crucial moment on which the appearance of the vessel depends. Gelcoat provides protection against scratches, ultraviolet radiation, and abrasions. It must be applied, achieving uniform coverage, avoiding bubbles and drips. Now you can begin laying the cut parts on a completely dry layer of gelcoat.
Case manufacturing
Fabric cutting is carried out by cutting off sheets corresponding to the length of the body. Canvases for laying along the waterline and keel should not have joints. If there is an impact on an obstacle, the material in this place can lift up and then peel off. Allowances should be left when cutting along the edges for overlaying.
To sew pieces of fiberglass to obtain the required length, you can use glass threads, pulled out from the edge of the material, or linen impregnated with drying oil.
The fiberglass layer is evenly coated with a binder polymer resin. To do this, it is recommended to use a stitching roller. Air bubbles must be avoided, since voids remaining in some places weaken the structure. Next, the next layer of fiberglass is laid according to a similar pattern. Up to five layers of fiberglass can be applied. To obtain a more beautiful top layer, it is recommended to use a special “top” fiberglass.
Power frame and floor
To strengthen the body it is necessary to lay three wooden bars along the mold, which is then covered with two layers of fiberglass. The frames are installed every 30 cm, also applying fiberglass to them.
It is necessary to create a double sealed bottom, making the boat unsinkable even if it capsizes. The floor is covered with plywood sheets with moisture-resistant properties. The finished floor is covered with a couple of layers of reinforcing fabric, necessarily impregnated with polymer resin. The composition is allowed to dry completely.
Final stage
All that remains is to remove the finished boat from the mold, trim the allowances, sand the surface, mount the roof and timber to protect the sides. You can also do additional elements: seats, oar mounts, drawers. Using fiberglass, you can make any necessary accessories for the vessel with your own hands. After this, they begin painting.
Using a similar method, you can make your own fiberglass boats. Of course, the drawing and design of a boat is more complex than a boat, and more effort will be required. But the cost of a homemade product will cost half as much as the same finished vessel.
Repair
Repairing a fiberglass boat or boat is required when typical damage occurs:
- defects in the decorative layer;
- cracks in the body;
- holes and half-holes;
- divergence of angles;
- shells.
 Basic materials for repair: fiberglass, epoxy resins. When starting repairs, it is recommended to place the damaged area closer to the horizontal level. The surface must be clean, dry, and free of grease. A hairdryer, technical or household, may be required. Before starting to seal defects, the fiberglass fabric must be degreased, rinsed in a solvent, and dried thoroughly.
During emergency repairs, do not dry it over a fire, as soot will form. Before laying on the damaged area, the fiberglass fabric is soaked in a diluted compound (polyester or epoxy resin), and then wrung out by pulling it between two sticks. The repair area must be cleaned with coarse sandpaper down to the fiberglass layer, making it slightly terry.
Repairing damage
Minor damage in the form of scratches is repaired with epoxy resin without filler or primer. A through-type scratch is removed by puttying with a compound with filler, after which the treated area remains to be sanded and painted over.
Small cracks can be simply covered with epoxy resin. If the housing is cracked, then the damage is removed from both sides decorative layer to fiberglass. After drying, it is filled with epoxy resin. To do this, press on each side of the crack, allowing it to open, and coat it. After this, the edges are combined and fixed. A strip of fiberglass fabric impregnated with the compound is placed on top, on both sides. After hardening, the repair area is sanded, covered with a layer of resin, sanded again and painted.
A half-hole is characterized by a break with a remaining piece of plastic. If the break is small, then you need to set the protruding piece back. To do this, it is necessary to treat all surfaces with the compound. Using a stop and a mallet, the piece is placed in place, with a bulge formed on one side and a dent on the other. Impregnated fiberglass fabric is placed on the convex area and secured with a weight. After polymerization, the half-hole is puttied with resin and filler. Further actions, grinding - laying the impregnated sheet, are repeated twice. Then sanding and painting are carried out.
The hole is sealed using a foam punch, preferably along the outer contours. Several patches are made from thick fiberglass fabric with tolerances of 3 to 5 mm, so that the thickness of the package corresponds to the thickness of the body. After installing the punch, the patches are glued. The algorithm for further actions is the same as in previous cases.
 The discrepancy between the corners is eliminated in the same way as sealing cracks, but fiberglass is used in the form of a tape. The sink is the most unpleasant type of damage. Sometimes this is a manufacturing defect. It can form between the layers due to the ingress of water, which pushes the layers apart in winter. To repair, you will need to open the sink by drilling a hole until it enters the cavity.
Then a wide incision (up to 5 mm) is made in the place of its largest size. The opened cavity is dried with a hairdryer and filled with compound using a syringe. The processed shell is clamped into a press. Then the usual algorithm of puttying, sanding and painting is performed.
Fiberglass is an excellent material for the manufacture of boats and boats, available for use. Self-made fiberglass boats are durable and strong, easy to repair. It should be taken into account that the components of the materials used in the work are not safe for health. It is necessary to work in rubber gloves, protective masks, goggles, and in a well-ventilated place.