How to make a round wall from plasterboard - detailed instructions. How to make a plasterboard ceiling with lighting The main stages of work on creating a plasterboard niche
From the author: We are glad to welcome readers who are thinking about how to make their home beautiful and original. Simple and in an accessible way change the design of the room is installation suspended ceiling with your own hands. In addition, this will help improve the soundproofing of the room and add coziness to it. Modern views plasterboard ceilings allow you to choose the design option that best suits your taste. Want to know more about this? Then read on!
The secret of the popularity of drywall
Drywall - finishing material, which is very popular due to its affordable cost, ease of installation, and low time investment in creating any decorative detail with its help. In addition to the listed properties, plasterboard sheets They are also fire resistant and not afraid of moisture. Level the surface of walls, create arches or niches in a room, hide wires or other communications, create any form of structure - a lot is possible with the help of this building material.
Plasterboard sheets also have disadvantages, which include their fragility and inability to withstand heavy weights. Therefore, builders do not recommend attaching anything heavy to surfaces finished with this building material. You should carry out the transportation and installation of gypsum boards very carefully so that they do not crack or become deformed.
Drywall has breathable properties, since the G-4 gypsum used for its manufacture is able to absorb excess moisture and, conversely, release it in dry air. The gypsum core is covered with cardboard for cladding; for better gluing of these materials, special adhesive additives are used.
Certain substances are added to the plasterboard sheets obtained in this way, enhancing certain of their properties (fire resistance, moisture resistance). Choose gypsum boards in accordance with the characteristics of the room in which you will install the suspended ceiling.
Varieties of design options
You determine what the finished suspended ceiling should look like, based on the size of the room, its purpose, and operating features. There are several main varieties with which you can realize your ideas. Let's take a closer look at each type.
Single-level
Such ceilings can act as either ready-made interior elements or the basis for the subsequent installation of a multi-level structure. For creating single-level ceiling basic construction skills are enough, the main thing here is to firmly attach the metal or wooden frame closer to the base.
In any construction work Technology is always important; it is what guarantees the quality of construction and the durability of the repair result. But, often, builders make technological mistakes, some from ignorance, and some from inertia. Many builders deliberately violate technology, seemingly with good intentions, trying to speed up the installation process and reduce material costs. Let's look at the main mistakes using the example of working with a metal profile.
1. Violations of frame installation technology
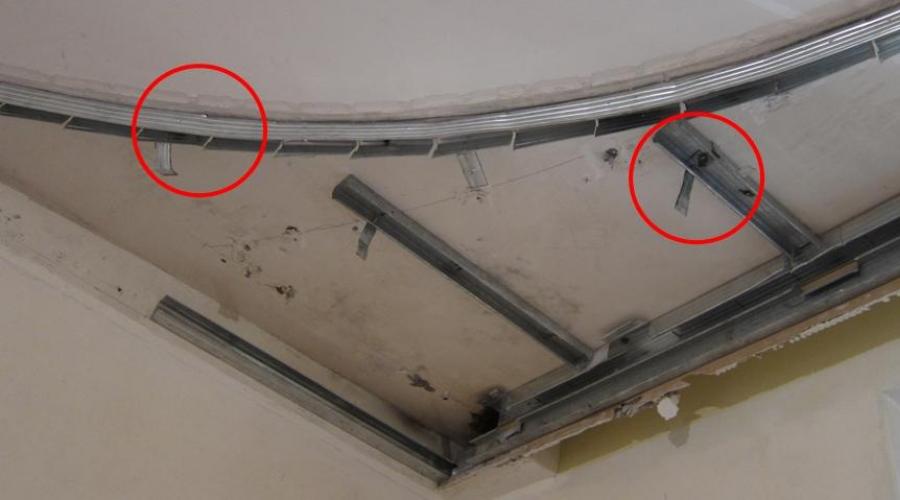
Failure to follow the technology with metal profiles or the profiles not matching their purpose are perhaps the most popular mistakes of builders and everyone who makes repairs with their own hands. This is especially true for profiles for curved ceiling surfaces.

By to this photo it is clear that the master, unfortunately, in principle does not understand how to fix the ceiling profiles (PP 60X27). To fix them, you should always use hangers; the profile should look down with its smooth side, because it is on this base that the sheets of drywall are screwed. The design does not have an additional metal strip along the entire length of the profile (cut along the same curved line from a galvanized sheet), which ensures the rigidity of the entire structure. As a result, this design will be flimsy, and the fastening of the drywall will be unreliable, which will lead to the appearance of a crack after repair.
2. Errors when cutting profiles

To uniformly cut the profile for the purpose of installing curved structures, you should never use an angle grinder (grinder). At high speed, the metal overheats, and in addition, the galvanization burns out at the cut site, as a result of which in the future this place will be susceptible to corrosion. The work of cutting metal profiles should be performed only with special metal scissors (manual or electric). The smooth profile is cut carefully, strictly observing the integrity of the opposite shelf on which the side sheet of drywall will be attached.
3. Wrong selection of profile
A common mistake among builders of various qualifications is when the structure of the box for partitions is made from ceiling profile, instead of rack-mount (PS 50/50) and guide (PN 50/40).

Stability, reliability and sound insulation similar design immediately comes into question.

Using a ceiling profile to frame partitions is a complete divergence from technology. For the construction of partitions or walls, a guide profile 50/40, 75/40 and 100/40 is used (which is fixed to the floor, ceiling and wall), and a rack profile 50/50, 75/50, 100/50.
4. Refusal of suspensions and violation of the frame
When building a suspended ceiling, builders are faced with the problem of the foundation - what should the frame be secured to? In the best case, it is concrete, but if it is wood or a complex surface obtained experimentally, then problems arise, as in the photo. IN in this case builders in selected places decided to completely abandon the use of hangers for the frame of a two-level ceiling type P-112.

As a result, the main profile 60/27 is rigidly screwed to the supporting profile without a two-level connector. The supporting profile itself is pressed to the boards, also without hangers. This technology will lead to the fact that, over time, cracks will inevitably form along the surface of the entire plasterboard ceiling. The scheme is also broken frame, - step profiles are chaotic, with a wide indentation of the supporting profile from the wall. If the technology is followed, the supporting profile is fixed from the wall in increments of 10 cm. The suspended ceiling system can only be mounted on special perforated or spring hangers. The profile pitch should be uniform every 50 cm (and in the case of heavy chandeliers- 40cm).
5. Bending the profile walls
A striking example of incorrect work with the profile is shown in the photo below. The partition is again built from a ceiling profile, in violation of technology. And besides, for the jumpers the profile was simply bent.

And here, the supporting crossbar of the partition opening is made of a rack profile, which is also turned horizontally, and its stiffening ribs are unbent.

This is extremely wrong. By unbending the walls of the profile, the rigidity and integrity of the entire structure is compromised, as the reinforcement is also reduced. Here it was necessary to use a special guide profile for partitions of the appropriate size 50/40, 75/40 or 100/40.
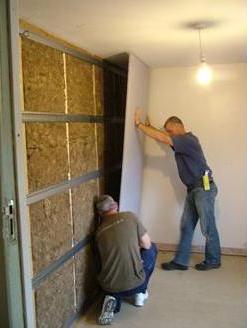
6. Fixing the gypsum board sheet with the wrong side
Some builders consider the question of which side to fix the drywall to be unimportant - the front or the back? The photograph shows how, when covering a wall with gypsum board sheets, some of them are sewn with the back side facing out. The peculiarity of this plasterboard is that it is moisture resistant and these properties are contained both in the core of the sheet and in its cardboard on the front side, preventing excessive wetting of the sheet during wet areas, as well as the formation of fungus.

7. Error in attaching drywall sheets
Another popular mistake that leads to the appearance of cracks at the joints of drywall is its improper fixation. It is the installation of drywall sheets in staggered order that will protect against the appearance of cracks. Below you can see how the sheets are screwed to the profile in one row, and in addition from small cuts. This is the sheathing Low quality. Sheets must be taken to the maximum bigger size, and do not join small pieces over an area of 1 sq/m.

Even experienced craftsmen It’s worth improving your knowledge, for example, at the KNAUF Training Center. Remember - the reliability and quality of the designs of systems made of gypsum plasterboard and profiles is associated with adherence to technology!
Under the influence of trends familiar to everyone " Housing issue“built a ledge from plasterboard and columns from stone.
The project was drawn like this. After the arches, this project seemed like child's play :)
![]()
In fact, it turned out to be such a protrusion.
![]()
I made a groove from the switch box to the ceiling. A wire was laid into this groove to connect the backlight.
![]()
I marked the axis of the entire structure and, on both sides of the axis, drew with a pencil the outline of the protrusion on the wall and ceiling. I built a frame from metal profiles and sheathed it.
The profiles were placed taking into account the holes for the lamps. Those. profiles are located between the holes for the lamps.
![]()
![]()
I puttyed and sanded with fine sandpaper 3 times. I did not glue the flexible corner onto the corner of the protrusion.
![]()
I chose the following arrangement for the lamps: a large lamp in the center of the ledge and two small lamps located on both sides of the large lamp. A total of 5 spotlights were used to illuminate the ledge.
We mark the contours of the columns on the wall and attach the artificial stone with stripes in a checkerboard pattern using tile adhesive.
![]()
This is how the column turns out. I ordered three square meters of stone. Little remained after the construction of the structure.
![]()
Part of the central column was not filled with artificial stone. This is where the TV mount will be located. I made sockets for power at the bottom.
I had to pull the “zero” from the socket into the protrusion to connect the transformer. Again, he additionally scored. I had to tinker with the lighting.
![]()
Selecting wallpaper to match the stone was not such an easy task...
![]()
This is what happened as a result.
This sheet material is currently the most popular when facing internal partitions, and installation of a plasterboard wall is the simplest and most productive in construction. Therefore, it makes sense to consider what wall cladding with this material is in more detail.
Marking the room
The first action before the start of construction work is the layout of the premises. If you decide to install drywall to finish the surfaces, you should consider some points.
The standard dimensions of sheets of this material are 1200 - 1300 x 2500 - 4800 mm with a thickness of 6.5 to 24 mm. Moreover, almost each size is intended to perform its specific task.
To reduce the labor intensity of the work, reduce the consumption of fasteners and cut the material as efficiently as possible, these data should be taken into account when planning the room. For example, the ceiling height is considered comfortable at 2.5 meters, which corresponds to the size of the sheet. Often this parameter is taken to be 2.53, we will indicate the reasons below. Likewise, the width of the premises should preferably be a multiple of the whole number of sheets. Or a multiple of half the size, then the cutting of the material will be optimal.
When determining the size of the premises, it is also necessary to take into account the thickness of the internal walls and partitions, since this factor will also affect the cutting of the material. This means that we are moving on to deeper detail - to determining the dimensions of the sheathing and selecting materials for its manufacture. And behind each such detail lies the amount of labor intensity and financial costs.

Types of drywall
Based on the properties incorporated by the developers into such building materials, gypsum plasterboard is divided into the following types:
- ordinary drywall. It consists of a layer of gypsum dough and a cardboard coating on both sides, used for finishing rooms with humidity within normal limits. Widely used due to ease of use, good machinability, light weight and cost-effectiveness;
- GKL with fire-resistant characteristics. Convenient to use for utility rooms such as summer kitchens and others non-residential premises. Can be used near heating devices, stoves and fireplaces;
- moisture-resistant plasterboard, allowing its use in premises with high humidity– baths, bathrooms, toilets and others. Thanks to the use of special additives, it is protected from the effects of fungus and mold. Ideal for finishing country houses, where humidity is usually higher compared to city apartments;
- fire - a moisture-resistant material that is almost universal.

According to their purpose, plasterboards are divided into the following categories:
- arched - with a thickness of up to 6.5 mm, allowing large deformations in several planes at the same time; such properties are also given to it by reinforcing additives of a fibrous structure;
- ceiling - thickness up to 9.5 mm, lightweight design;
- wall – for finishing walls and installing partitions, thickness 12.5 mm.
At this thickness, which is the most popular, the weight standard sheet 1.2 x 2.5 meters is 30 kg.
Tool for working with drywall
The material does not have high mechanical properties and easy to process simple tool. You can use this tool:
- saw - hacksaw for wood. Purpose – sawing plasterboard sheets into parts during installation;
- circular saw - for making long straight cuts when cutting;
- jigsaw – cutting out parts complex shape by marking;
- construction knife – trimming the edges of parts after sawing;
- tape measure - measurements when marking and cutting;
- construction plumb line – control of the position of the sheet in space during installation;
- carpenter's level - the same;
- electric drill – drilling holes for fasteners;
- screwdriver - installation of fasteners when fixing plasterboard parts, assembling a frame from metal profiles;
- a set of spatulas, including narrow, medium, wide, angled metal and rubber;
- paint brush – for applying primer;
- foam roller - for the same purpose;
- drill attachment for stirring dry mixtures;
- sandpaper No. 4 or No. 5;
- container for stirring mixtures.

This is the main set of tools with which leveling, priming, and decorative finishing plasterboard walls.
In addition, you will need materials:
- primer - to strengthen the surface of the walls;
- acrylic putty – repair and surface preparation plasterboard boards to applying the main leveling layer;
- tape - serpyanka made of fiberglass;
- drywall fasteners – specially shaped self-tapping screws;
- insulation for laying under sheets of plasterboard during the construction of partitions for the purpose of insulation and sound insulation;
- GKL various sizes, including 6.5 mm thick – for creating spatial forms of parts; 9.5 mm thick – for ceilings; 12.5 mm thick - for wall cladding, up to 24 mm thick - for laying floor coverings with dry screed.

Assembling a gypsum board wall
To build a wall from this material, you will first need to build a base for it - a metal or wooden frame for drywall. The choice of material for the wall is far from an idle question. Despite the apparent benefits of using wood, the developer faces many difficulties associated with the properties of the material:
- the need for antiseptic treatment of every part, which will help get rid of the risk of rot or fungal diseases. Fire protection treatment, especially if the frame will be laid inside hidden electrical wiring, which is what happens most often. In addition to processing wood, electrical installations must be placed in a flexible corrugated hose made of special materials;
- careful selection of material based on straightness and absence of helical deformations;
- changes in the size of parts with fluctuations in the humidity conditions in the room, which is especially important for suburban buildings with periodic visits, which results in warping of the frame and swelling of the wall surface.

All these difficulties will inevitably require, in addition to material costs, also large quantity time.
All these shortcomings are free metal frames, made of galvanized steel in the form of bent perforated profiles.
Several types are available, designed to perform various elements designs:
- Ceiling profiles, designated as CD, with dimensions cross section 60 x 27mm.
- Ceiling guide profiles CW 28 x 27 mm.
- Rack-mount, UD – 50 x 50, 75 x 50 and 100 x 50 mm.
- Guide profiles with dimensions of 50 x 40, 75 x 40, 100 x 40 mm.
The standard length of profile guides is 3 meters, ceiling and rack - 3 or 4 meters.
U-shaped straight hangers for connecting ceiling and CD profiles are produced as auxiliary parts.

In addition, you will probably need corner framing profiles and, possibly, arched ones.
A metal profile frame for a wall begins with marking its location. It is done on the floor and then transferred to the ceiling using a plumb line and a painting cord, which will ensure strict verticality of the structure.
The construction of a wall or partition must begin with the creation of a frame, using UW guide profiles and CW rack profiles.
Fastening the base parts must be done in increments of at least 60 cm.
When choosing the spacing of the racks, you should remember that the dimensions of the plasterboard sheet are multiples of 600 mm, so the racks are installed based on this parameter. Attention! At the location of the door on the floor, you need to break the frame.

- on one side of the frame you need to stretch the vapor protection film, for which it is used polyethylene film about 200 microns thick. It is pulled onto the frame and secured with construction tape;
- you need to understand how to attach a sheet of drywall. Important! To perform this work, self-tapping screws of a special design are used.
- Pay attention to the shape of the screw head. It allows you to attach the sheet flush without destroying the surface of the coating.
- similarly install the remaining parts of the wall cladding on one side, making a cutout for the doorway;
- the openings between the racks must be filled with insulation, which at the same time serves as a soundproofing device. Otherwise, the double hollow wall will act as a resonator, amplifying sounds. For this purpose they are used various materials, both slab (mini-slab) and roll, such as isover, the installation of insulation of more than 2 layers will entail the need to construct a three-dimensional frame. Insulation of walls and sound insulation will allow living to be quite comfortable;
- before sheathing the second side of the frame, you need to install a second layer of vapor protection, proceeding in the same way as for the first side;
- sheets of plasterboard are sewn over the vapor barrier with screws with a diameter of 6 or 8 mm. Their installation is carried out in increments of at least 250 - 300 mm. Therefore, performing this operation manually with a screwdriver is not possible; you cannot do without a screwdriver.

Attention! Cutting galvanized frame profiles must be done manually with a hacksaw and a broom. The use of a hand sander burns out protective layer, subsequently the metal in this place will actively corrode. After cutting, the end must be painted over with a special protective paint, 85% consisting of fine metallic zinc.
Leveling walls with plasterboard
Often during construction or renovation, planning the surface of a wall or partition is much easier to do using gypsum plasterboard than with plaster. Usually this is also done using a frame, when plasterboard is attached to the wall on a profile. Before attaching the profile to the wall, you need to determine the point of its closest location to the wall and install floor and ceiling guides. Then installing the racks will not cause problems, since all of them are already structurally distant from the walls.

As a result of the work performed, it turns out flat wall and all that remains is to prepare its surface for application finishing coating.
There is a way to level a wall with plasterboard without a frame. It should be noted that the quality of the base surface must be quite high. Before attaching drywall to a wall without profiles, you must carefully remove all protrusions that could interfere with it. Installation technologies can be like this:
- attach the gypsum board part to the wall and drill the mounting holes. At the same time, on base surface there will be marks from the drill, which will be marks for the mounting holes;
- remove the part and use these marks to drill holes for installing plastic inserts;
- apply cement or cement adhesive to the wall gypsum base, level with a comb spatula. You can also use polyurethane glue;
- install the part in place, secure it with screws.
Knowing how to glue drywall to a wall, you can easily deal with the rest of the covering elements.
Surface putty
To final prepare the surface of the walls for the finishing coating, it is used to finish it with putty. This is done like this:
- primer with the recommended composition, gluing corners and joints with sickle tape;
- applying a primary layer of putty, sanding after drying;
- finishing the surface with a finishing composition of putty, drying, grinding;
- thorough cleaning of the surface of the walls and the entire room from dust;
- finishing primer of walls for final coating.
Knowing how to make a plasterboard wall, any developer can cope with this task on his own. You just need to use the information received here correctly.
At the same time, invited specialists will perform this work at a price per square meter from 600 to 800 rubles. However, in any case - good luck to you!
Many residential owners, when carrying out DIY repairs, use drywall. With the help of this material it is very easy to realize the most original ideas. GCR is very easy to process. Using your imagination, you can create various Walls, sheathed with this material, become perfectly smooth and suitable for laying almost any finishing coating. Next, we will analyze some features of finishing gypsum board surfaces.
General information
Using plasterboard structures on the walls (photos of some of them are presented in the article), you can significantly improve the appearance of the room. The use of such systems makes it possible to construct arches, shelves, vaults, columns, and partitions. Plasterboard structures on the walls can be equipped Thanks to well-chosen lamps, the room is created cozy atmosphere. As a rule, in frame structures are used Spotlights. Also pleasant and soft lighting created using special LED strips.
Shelves and niches
In any room, many little things appear over time. As a rule, they are placed on shelves or in niches. Such plasterboard structures on the walls look very original and fit perfectly into the interior. Built-in or protruding shelves are equipped with lighting. It is quite possible to place books, small figurines and other decorative elements on them.
Often plasterboard structures on walls are built to install a TV. This opportunity appeared relatively recently. TVs have become thinner and lighter, which means they take up less space and do not require permanent shelves. Plasterboard structures on the walls can easily withstand the weight of some pieces of equipment. The thicker the material, the stronger the entire system. There are a variety of niches. Structures can occupy the entire wall, their number and location vary.
Space zoning
Partitions are often used to separate rooms. In many living rooms such additional walls from plasterboard. Often, when zoning space, all kinds of vaults, arches, and semi-arches are used. can be very different. Drywall is a fairly flexible material, which allows it to be given a variety of shapes. Partitions can be solid, that is, they occupy the entire space from floor to ceiling. The designs also provide shelves, windows, and patterned slots. They can also be illuminated. The undoubted advantage of partitions is their light weight in comparison with concrete or brick.
Surface cladding
Plasterboard walls meet the highest requirements for environmental friendliness and hygiene. The fact is that natural raw materials are used in the manufacture of gypsum boards. In particular, gypsum. Cardboard is used as an addition to it. Thanks to this, gypsum plaster does not cause allergic reactions in humans and is generally safe for the occupants of the premises. The undoubted advantage of the material is its Smooth surface. Frame structures perfectly hide base defects. In addition, you can disguise engineering Communication, pipes, wires inside a plasterboard wall. The photos of the premises presented below are proof of this. The images do not show any wires or any other communication elements.

Drywall installation
The work can be done in two ways. Installation of drywall on a wall that has defects and unevenness is done using load-bearing frame. Can be used as sheathing elements wooden beam or If the surface is sufficiently smooth and does not have significant flaws, then the installation of drywall is carried out with glue. Let's look at these options in more detail.
Benefits of using a frame
Walls made of plasterboard (a photo of this surface cladding option is presented above) can be constructed using wooden or metal sheathing. Here it should immediately be noted that the second option is more preferable if the base has serious unevenness. If the defects on the wall are insignificant, you can arrange a sheathing of wooden blocks. However, assembly in this case will be more difficult. In addition, the frame elements should be thoroughly dried. Otherwise, after a while, cracks will form on the surface. When using a metal profile, the design is more reliable and durable.

Glue method
This finishing option requires more thorough preparation of the base than in the case of lathing. It is necessary to remove the previous coating from the surface and clean it of dirt and dust. Before installing drywall on the wall using glue, the base should be primed. The fixing solution is applied to the surface of the gypsum board sheet. After this, the element is pressed tightly against the wall surface. Correction of evenness must be done using a level. This option saves usable space rooms, however in this case there is no way to disguise communications under the structure.
Niche arrangement
To build such a structure you do not need to have special knowledge or skills. It is enough to read some recommendations and follow them. For the device you will need:
- Metallic profile.
- Reinforcing tape.
- Glue.
- Grinder or metal scissors.
- Putty.
- Electric drill.
- Pencil.
- Roulette.
- Plumb.
- Level.
- Putty knife.
- Self-tapping screws.
- Screwdriver.

Purchase Consumables follows with a small margin. It is necessary in case of inaccuracy in calculations or damage to elements. To begin with, it is recommended to decide on the location of the structure. Next you should consider its configuration and size. Then you need to take measurements. Before constructing from plasterboard, it is advisable to draw up a layout future design. The drawing indicates all dimensions, as well as additional elements. In particular, this applies to wiring for lamps. It should be taken into account that the size includes the thickness of the plasterboard, as well as the width of the frame. If you intend to build a niche under household appliances, then it is necessary to provide free space for air circulation.
Marking
After the place for the future structure has been prepared, the drawing can be transferred to the wall. To mark the location of the frame elements you will need a plumb line, tape measure and pencil. The depth of the future niche is measured from the wall. The sheet thickness is added to the resulting value. Next, mark the line along which the profile will be fastened. Markings are made on the ceiling in a similar way. Installed along the intended lines

Further actions
At the next stage, the metal profile is cut into pieces of the required length. The elements are attached to the frame racks using self-tapping screws. If it is necessary to connect profile sections using jumpers, the evenness of the joint should be checked with a level. After securing all the frame elements, you can begin the sheathing. GKL sheets are fixed to the profile with self-tapping screws. First they are sheathed side surfaces, then the rest. Processing of joints is carried out using reinforcing mesh. The putty is applied in two layers. Then the screw heads are masked and the entire surface is puttied. After the solution has dried, the structure is primed. Further, at your discretion, you can decorate the niche with wallpaper, decorative plaster or just paint it.
Additionally
If built-in lighting is assumed, then the wiring is done after installing the frame. It is necessary to drill holes in the gypsum board sheets according to the size of the lamps. To create curved structures metallic profile slightly cut. Next, it is given the required shape. In this case, a wooden frame will not work. When using bars as sheathing elements, they should first be treated with antiseptic compounds.

Conclusion
Many residential owners note that drywall is universal material. By showing your imagination, you can create unique decorative elements, multi-level structures, and non-standard configuration systems.