How to make a round extension to your house. Brick extension to a brick house: design, permit, construction. Beams are laid using this technology
Read also
For many of our compatriots, a country house is a place not only for seasonal, but also for year-round living.
If a dacha is used for housing throughout the year, then over time people have a desire to expand free space, adding extra to the house square meters area. Adding an extension to a house with your own hands is done quite quickly - for this you need to have a project and follow all the prescribed technologies. This is a great alternative to building a new home or expanding space in other ways.
There are several types of extensions to country house which are built most often: garage, living room, kitchen, terrace, veranda, lounge, children's room. For the construction of an extension, the most different materials– here everything will depend on the work conditions, soil, functional purpose premises under construction and many other factors. At the same time, it is strongly recommended that, before starting work, you take care of developing a project for the future structure. You can do the project yourself if you have experience in this field, or you can hire specialists for this work.
Do you need a foundation?
A foundation is necessary in almost all cases when it is planned to make an extension to a country house. The exception is very light structures like canopies and their varieties, which can be supported by several external supports. Construction of extensions to country houses carried out using columnar, screw, tape or monolithic foundation. The choice of one type of foundation or another will depend on several factors: soil conditions, construction material of the structure, the level of the total load on the foundation and other specific features.
In most cases, a traditional strip foundation or a shallow strip foundation is chosen for extensions.
It fits well under any type of structure and connects perfectly with an existing foundation country house. Work on its installation is carried out in the following sequence:
- The first step is to mark the terrain at the construction site.
- Then they are executed excavation: a pit is dug, its walls are strengthened, trenches are made for pouring cement mortar, and wooden or plastic formwork is installed. If the extension to country house If it is supposed to be one-story, then a strip foundation 30-40 cm wide and 40-50 cm deep will be enough.
- It is also mandatory to reinforce the foundation using a reinforcement network. Reinforcing structures for reinforcing foundations can be made with your own hands, or you can buy ready-made ones in a specialized store.
- In addition, it is necessary to carry out preparatory work by connection and country house. For this purpose in concrete base In a country house, holes are drilled at a certain pitch, the diameter of which should be slightly larger than the reinforcing bars. After this, reinforcement is inserted into the holes, which is fastened metal frame extension foundation.
- Specialists for strip foundations It is recommended to choose cement grade M400 and higher. It must be prepared in accordance with the instructions, and then filled with it into the previously prepared trenches.
It must be remembered that the cement mortar takes several weeks to set and gain the necessary strength characteristics.
During this time it is prohibited to carry out any construction works, which affect the solidifying solution. If construction is carried out in the hot season in dry weather, then during the hardening process the cement mortar must be periodically watered with water so that cracks do not form on it.
Construction of extension walls
The walls of an extension for a country house can be made of a variety of materials. To solve this problem, the following are usually used: a wooden frame made of bars, timber, foam concrete blocks, brick and other building materials. The choice of a specific material for building an extension will depend on several factors and the financial capabilities of the owners.
It will be easier to build the walls of the extension with your own hands using a frame, timber or foam concrete blocks.
Frame extension.
Construction in this case will not require special skills and knowledge, unlike the construction of brickwork. In addition, these types of materials have many advantages over traditional brick:
- Relatively low price;
- High level of environmental friendliness of materials;
- Light weight, so there is no need to construct a powerful and expensive foundation of great thickness;
- In the case of a wooden frame, it is possible to install any heat-insulating materials in the free space between the structural elements;
- Foam concrete blocks do not need to be insulated at all, because they retain heat well inside the house even in the most severe frosts.
When building walls, you should also not forget about waterproofing the structure.
Hydro insulation materials must be laid at the junction of the walls with the foundation, as well as in the area of contact with the roofing material. As a waterproofing material for extensions, you can choose traditional rolled insulation materials such as roofing felt or roofing felt, additionally processed bitumen mastic. In addition, if the construction of an extension at the dacha is carried out from foam concrete blocks, then it is also recommended to additionally reinforce them. In this case, reinforcing bars must be laid in 1-2 rows.

Block extension.
In addition, when using wooden frame or foam concrete blocks, it is necessary to carry out the top and bottom trim designs. For this purpose it is installed wooden formwork, a smaller reinforcement network is laid and the whole thing is poured cement mortar. Naturally, the strapping also needs several weeks to completely harden and gain strength.

Brick extension.
Building a brick extension is a labor-intensive and costly task. It is very difficult to build such a structure with your own hands, so qualified specialists are usually invited to solve this problem. IN last years the construction of small structures made of brick is practically not practiced, because other materials that have better working and performance characteristics, and also cost much less.
Roof structure
Experts advise covering the roof of the dacha extension with the same material that was used to finish the roof of the main house.
The best option is full compatibility roofing material extensions and country houses.
A variety of materials can be used as roofing materials: roofing felt, slate, ondulin, metal tiles.
When using a slate roof, roof installation work includes three main stages: installation of a wooden frame, laying a waterproofing and vapor barrier layer, installation slate sheets. The wooden frame can be made from ordinary bars, which are recommended to be attached to the wall of a country house (if this is problematic, the attachment can also be made to the walls of the extension). You need to understand that slate materials are not highly resistant to negative impacts, therefore, installation of waterproofing and vapor barrier is a mandatory activity.
Slate roofing at the dacha it is mounted in rows proceeding from bottom to top. The initial sheets are attached only to the bottom roofing nails, and the second sheet in the first row is mounted with an overlap. In this sequence, installation is carried out to the end of the roof. If necessary, slate cutting is carried out with a grinder.
Outbuildings and extensions
Get by at the dacha without outbuildings and buildings is very difficult, and to be more precise, simply impossible. It is worth familiarizing yourself with some examples of dacha creativity.
When various reasons If there is a need to expand the living space of a private house, then the most economical and technologically simple option is frame extension. Its advantage is the speed of construction with your own hands with minimal skill in working with carpentry tools. Step-by-step instructions for the construction stages with photographs will help you make a useful and beautiful extension like in the video, which will last for many years.
Purpose of the extension
To ensure that the extension does not have to be transformed later, the nuances of the design should be considered even at the planning stage. First, decide on the purpose of the new premises.
- Additional room. The construction of an additional room is equivalent to the construction of a small house. All structures of a new building must be thoroughly insulated, otherwise heating such a room will be ineffective due to large heat loss. You should not skimp on waterproofing and insulating the foundation, otherwise dampness and mold on the walls will make it impossible to live in such a room.
- Kitchen or bathroom. Take care of the let down engineering communications before you start building the foundation. Places where water mains or sewer pipes through the foundation it is necessary to insulate well. This is easier and cheaper to do during the construction phase.
- A veranda is a lightweight extension to an open or glazed house. Is used for summer holiday. The building is not heated, so the design is extremely simple: the flooring, walls and roof are on supports. Do not forget about harmony; the veranda must be combined with the house in scale, style and materials of construction.
Selecting the base
The veranda can be attached or built-in. If the second one is planned at the stage of building a house, then for the first one you will need to build separate foundation. With a gap from the wall of about 40 mm. Otherwise, during shrinkage, the monolithic base will collapse due to the different weights of the veranda and the house. The seismicity of the soil and the weight of the future building are taken into account. A lightweight foundation built on soil prone to heaving will “lead” and the extension will move away from the house. Such a base is designed for light walls; shrinkage is inevitable under the weight of the brickwork.
Different materials are used for construction: concrete, brick, stone, piles made of wood, metal or concrete. It is important to choose the right depth and type of foundation for the extension:
- tape;
- slab;
- columnar;
- pile;
- pile-grillage.
In private construction, when constructing a base for a veranda, columnar or strip structure. Let's take a closer look step by step instructions arrangement of foundations.
Strip foundation
For large and heavy buildings choose belt type grounds. It is advisable to make it from concrete in this sequence.

Important. Before erecting walls, waterproofing must be applied to the foundation. Use rolled materials or mastic.
Columnar foundation
For easy frame veranda It is appropriate to erect a columnar foundation, which is made of brick, rubble stone or concrete. Or combine these materials. The holes for the pillars are dug to a depth below freezing of the soil. The step between the pillars is about 60 cm. Sequence of work:
- dig square holes 50 x 50 cm. Sand is poured onto the bottom and compacted thoroughly;
- lay a layer concrete mortar, and after complete setting, they begin to erect brick supports. Use a level to ensure that the masonry is strictly vertical;
- a concrete support is made similarly to a strip foundation: it is wrapped inner part formwork is waterproofed and a reinforced frame is inserted. The form is filled with concrete, and the top is leveled. Wet the concrete a couple of times a day to avoid cracking;
- after completely dry the formwork is removed, waterproofing is applied to the post, and the top is covered with several layers of roofing material - the material will protect wooden beam floors from getting wet;
- the remaining voids are filled with backfill: soil mixed with crushed stone is filled in, compacted every 15 cm of the layer.
Important. The height of the foundation pillars is calculated so that the distance to the finished floor of the extension is 30 cm.
Floor: wood or concrete
A concrete or wooden floor is installed on a strip foundation. The base on pillars is obviously designed for arranging a wooden floor. Let's look at both technologies.

Construction of frame and walls
Wall structures are erected from timber, attached to previously assembled crown beams. The wall elements are assembled on a flat area in a horizontal position, and then the finished wall panel is mounted in vertical position or each beam is connected to the beam in series. Step-by-step instruction:
- On the lower beams of the harness, make a cut for vertical posts every 50 cm.
- Mount the racks, securing them with corners and self-tapping screws.
- Assemble the top harness.
- The veranda is connected to the house by attaching a vertical beam to the wall.
- Secure all posts adjacent to the house with anchor bolts.
- It is better to immediately sheathe the finished “skeleton” of the veranda with outside plywood, boards or OSB. This will give the structure rigidity.
- After erecting and insulating the roof, install windows and doors.
Ceiling and roofing
The shed type of roofing can be combined with almost any roof of the house, therefore it is the most common configuration. Let's consider it.

Insulation of walls and floors
Used as insulation material for walls mineral wool. The mats are easily and quickly laid between the frame bars, as can be seen in the photo. When laying insulation in several layers, the mats are shifted relative to each other to prevent heat loss through the joining seams. The insulation is covered on both sides with steam and wind insulation material, which will protect the material from moisture accumulation, and the top is sheathed finishing material. Internal walls can be sheathed with chipboard, plasterboard and covered with wallpaper or lined with clapboard. For outer wall use wood, siding or materials that match the finish of the home.
Wall pie towards external wall looks like that:
- internal lining;
- vapor barrier;
- insulation material;
- windproofing;
- external cladding.
Floor on wooden joists insulated in the same way as walls: mineral wool is laid on the subfloor between the joists, having previously covered the boards waterproofing membrane. A second layer of waterproofing is laid on top of the insulation and then leveled with plywood. After this, the finished floor covering is installed.
A concrete floor can be insulated similarly to a wooden one, apply a dry screed, make concrete screed and install water or electric heating.
Do-it-yourselfers often overlook the need to comply with safety regulations. Use the funds personal protection and well-oiled reliable tool and then you will have only the warmest memories from the construction of the extension.
Frame extension on stilts: video
Frame extension to the house: photo


Circumstances in life can change in a variety of ways and you may need to increase the space in your home. One of the significant advantages private building the fact is that it is easy to make more of it. Before expanding, it is important to familiarize yourself with how to properly build an extension to a house, even if it will be built by workers.

Various extensions to houses
Projects of structures made of various materials
The extension can have many options for shapes, designs and technical capabilities. Not only the construction material may also differ. Each frame extension to wooden house requires compliance with certain rules and has its own characteristics. A certain type of project may have its pros and cons. That is why it is important to carefully weigh everything and decide what type of project fits better Total.
Material plays a role in construction key role. The functionality and cost of the building depend on what raw materials are chosen for construction. For example, a timber frame building can be lived in both summer and winter. If the wall material consists largely of glass, then this type is repurposed only for the warm season. So, there are several types of materials:
- foam blocks,
- beam,
- brickwork,
- frame assembly.
 <
<
Form and purpose of the extension
The buildings differ not only in the material chosen for construction, but also in the shape of the structure. Such structures are divided into the following types:
- Additional room.
- Veranda with open or closed type.
- Enlarged porch with canopy.
Additional room
This project involves the construction of another additional room in which you can live all year round. Typically, such projects are made from raw materials that retain heat well and do not allow cold to pass through. Wood serves as an excellent heat insulator, and all rooms are made mainly of wooden beams. You can use foam blocks or bricks, but in this case it is important to be well insulated. This type of project has a number of positive and negative qualities.

- You can significantly expand the usable area of your home.
- Unlike a separate building, it is easy to install light and heating.
- In this case, building an extension to a wooden house will perfectly complement the existing interior and exterior without compromising its integrity.
- Even after the end of the construction cycle, the room can be easily converted to suit any needs (bathroom, pantry, kitchen or living room).
- Good insulation and a strong foundation are required, which guarantees an increase in the overall price of the structure.
- The implementation of this project requires a lot of free space. This is a significant drawback for those who have a small area.
Enclosed veranda
The project in the form of an attached veranda has two main varieties. The extension to the house, made of brick and timber, is surrounded by four walls that protect it from external factors. Enclosed verandas are rarely heated; they are often used seasonally. The traditional finishing material is glass. This extension fits perfectly into almost any design. The enclosed veranda will be an excellent place to relax in any weather.

On our website you can find contacts of construction companies that offer the service of installing an extension to a house. You can communicate directly with representatives by visiting the “Low-Rise Country” exhibition of houses.
- Easy installation.
- No insects or pests.
- You can rest during rain or strong wind.
- If you need an unusual extension to your home, projects can be easily found on the Internet.
- If you use glass surfaces, then after each rain you should clean them from water stains.
- For many, the meaning of a veranda is fresh air, but this is not the case indoors.
The frame extension attracts with its simplicity and functionality. Often such projects are made from wooden beams. Similar verandas are used in conjunction with wooden houses made of the same material. This option is much easier to implement than a gazebo. In addition, such extensions generally do not take up much space and require a minimum amount of raw materials. Such projects have gained great popularity due to their practicality and many positive aspects.

- Access to fresh air.
- Saving on building materials.
- It is easy to install electricity and internet.
- Takes up little work space.
- Annoying insects.
- It is impossible to stay in snowy or rainy weather or in strong winds.
Porch with canopy
If you need a beautiful extension to a wooden house, porch designs are a great option. This building is mainly of a design nature. Usually the porch is made as a decoration of the house. Old extension projects did not provide any useful functions. Now there are new options for constructing a porch that is highly functional. They are equipped with special armchairs or chairs and can be used as a small gazebo.

- Simple assembly of the structure.
- You don't need a strong foundation.
- Visibly decorates the facade of the built house.
- Suitable for almost any home made of brick or wood.
- Installed decorative elements are not protected from vandals.
- No protection from bad weather conditions.
Construction of a frame extension to a house
Any construction requires careful planning. Adding an extension to a brick house is hard work that requires experience and skill. The same can be said about the implementation of a specific project for wooden structures. It doesn’t matter which type was chosen, the construction principle is the same. The entire construction cycle of a structure can be divided into several stages:
- Construction of the foundation.
- Walling.
- Installation of roof and ceiling.
Foundation arrangement
The basis of any building is the foundation, which means it must be made of high-quality materials. If unsuitable raw materials with low performance indicators are used, the extension to the frame house will be damaged. If the foundation begins to collapse, you may have to dismantle the walls and roof, which can result in serious financial costs. In addition to purchasing high-quality materials, it is necessary to strictly follow the technological process.

Any laying of a new foundation to the old foundation requires accurate calculations. The ideal option is to lay the foundation for two structures at once, but this happens very rarely. For docking, special reinforcement is used, which allows it to cling to the foundation of the house. When pouring, it is important to know and consider two factors:
- Identity of composition.
- Uniform depth.
Concrete must completely replicate the composition and structure. This will ensure a uniform structure and a stronger connection. Uniform depth allows the foundation to sink at the same level. If this is not taken into account, cracks will develop along the foundation and the structure of the house will be severely damaged.
Walling
After the foundation is formed, you need to proceed to the next stage - building the walls. There is an unspoken rule - to use material identical to the main building. So, if an extension is being made to a panel house, you need to use walls made of panels, if the house is brick, use bricks, etc. But what to do if there is no similar material? You can use an additional layer of the same cladding. Completely finishing a house is a costly affair, but the problem of unification will be solved.
It is important to remember that if you need an extension to an old wooden house, the projects will have to be chosen in the general style. It is necessary to use the material from which the house is made. The closer the similarity, the more organic the building will look.

At the time of planning, you need to understand whether the extension will have its own fourth wall? If the project has it, then what is the gap between the two buildings? If the additional room is well heated and you plan to live in it all year round, then an additional partition is pointless. In a poorly heated room, an air cushion will protect the house from the cold.
A flat floor is the basis of a comfortable life. In order not to suffer later, it is important to make a smooth and even rough base for the floor covering. When performing pouring and screeding, it is important to use modern equipment, such as a laser level. It is important to know that without proper experience in construction and expensive equipment it is impossible to do the perfect job. A “crooked” subfloor will cause complications when building a heated floor. If you lay parquet on a low-quality surface, then squeaking and sagging are a guaranteed result.

Roof and ceiling installation
As with the walls, the roof top should be an extension of the main house. Due attention should be paid to beams and floors. They must comply with all modern fire safety standards and regulations. If the chosen project does not involve permanent residence, then you can do without insulation. The same applies to the ceiling. For example, in a veranda or porch you can do without a ceiling. It all depends on the plan of the extension and the design of the main building.
Video description
If certain points are not clear, you can watch a video that will explain how to build an extension to a frame house:
Conclusion
When planning the construction of additional square meters, it is worth taking into account that this is a complex technological process. If you take on construction yourself, the risk of making a mistake is increased. To avoid unnecessary expenses, it is better to seek help from professionals who know their business. Having in their arsenal a sufficient amount of experience and professional expensive equipment, they will perform high-quality work in the shortest possible time. As a result, the owner will receive high-quality work without overpayments, wasted time and unnecessary nerves.
Filimonov Evgeniy
Reading time: 8 minutes
A A
Frame extension to the house
How to create a frame extension to a house, the reliability of the construction of the foundation, walls, floor and roof. Stages of work, tips for insulation. Types of extension.
Over time, the living space gets used to it and you want to expand it; for this case, you will need a frame extension to the house, which will be an excellent solution. So that all the pitfalls do not cause problems, below we describe in detail what the extension is intended for. How to choose the right foundation, features of creating a strip and columnar foundation. What to choose for the floor: wood or concrete, how the walls and frame are erected. How reliable flooring and roofing occurs. What is the proper insulation of floors and walls?
What is the technological feature of the extension, what methods exist for installing a frame extension to a wooden floor. Stages of building a frame house with your own hands. How to create a construction project, how to build an additional living room, kitchen or bath, features of installing a veranda.
How to choose a frame extension to a wooden house, fastening to a wooden structure, the importance of finishing. What materials and tools are used, how the site is planned, how to choose flooring material: concrete or wood.
When, for various reasons, there is a need to expand the living space of a private house, the most economical and technologically simple option is a frame extension. Its advantage is the speed of construction with your own hands with minimal skill in working with carpentry tools. Step-by-step instructions for the construction stages will help you make a useful and beautiful extension that will last for many years.
To ensure that the extension does not have to be transformed later, the nuances of the design should be considered even at the planning stage.
First, decide on the purpose of the new premises.
- Additional room. The construction of an additional room is equivalent to the construction of a small house. All structures of a new building must be thoroughly insulated, otherwise heating such a room will be ineffective due to large heat loss. You should not skimp on waterproofing and insulating the foundation, otherwise dampness and mold on the walls will make it impossible to live in such a room.
- Kitchen or bathroom. Take care of the installation of utilities before you start building the foundation. Places where water or sewer pipes pass through the foundation must be well insulated. This is easier and cheaper to do during the construction phase.
- Veranda is a light extension to an open or glazed house. Used for summer holidays. The building is not heated, so the design is extremely simple: the flooring, walls and roof are on supports. Do not forget about harmony; the veranda must be combined with the house in scale, style and materials of construction.
Selecting the base
The veranda can be attached or built-in. If the second is planned at the stage of building a house, then a separate foundation will need to be built for the first. With a gap from the wall of about 40 mm. Otherwise, during shrinkage, the monolithic base will collapse due to the different weights of the veranda and the house. The seismicity of the soil and the weight of the future building are taken into account. A lightweight foundation built on soil prone to heaving will “lead” and the extension will move away from the house. Such a base is designed for light walls; shrinkage is inevitable under the weight of the brickwork.
Different materials are used for construction: concrete, brick, stone, piles made of wood, metal or concrete.
It is important to choose the right depth and type of foundation for the extension:
- tape;
- slab;
- columnar;
- pile;
- pile-grillage.
In private construction, when constructing a base for a veranda, a columnar or strip structure is most often used. Let's take a closer look at the step-by-step instructions for arranging foundations.
Strip foundation
For large and heavy buildings, a strip type of base is chosen. It is advisable to make it from concrete in this sequence.
- Using string and pegs, markings are made along which the trench will be dug.
- The soil is selected to the depth of the base of the house foundation. Sand is poured onto the bottom and compacted. A layer of crushed stone is laid on top, which is also compacted with a hand tamper.
- Prepare formwork equal to the height of the future foundation. Waterproofing is laid inside along the perimeter and welded reinforcement is installed on the crushed stone layer.
- Prepare a concrete solution in a ratio of 1:3:6 (cement, sand, crushed stone).
- Pour the prepared mixture onto 1/3 of the formwork. After hardening, fill the remaining height. The solution is compacted with a vibrator to remove air bubbles. Or tap the formwork walls with a hammer.
- The upper part is leveled. Cover with film. While the solution gains strength, the surface is periodically wetted to prevent cracks from occurring.
Expert opinion
Filimonov Evgeniy
Ask a question to an expertImportant. Before erecting walls, waterproofing must be applied to the foundation. Use rolled materials or mastic.
Columnar foundation
For a light frame veranda, it is appropriate to construct a columnar base, which is made of brick, rubble stone or concrete. Or combine these materials. The holes for the pillars are dug to a depth below freezing of the soil. The pitch between the pillars is about 60 cm.
Sequence of work:
- dig square holes 50 x 50 cm. Sand is poured onto the bottom and compacted thoroughly;
- lay a layer of concrete mortar, and after complete setting, begin the construction of brick supports. Use a level to ensure that the masonry is strictly vertical;
- a concrete support is made in the same way as a strip foundation: the inside of the formwork is wrapped with waterproofing and a reinforced frame is inserted. The form is filled with concrete, and the top is leveled. Wet the concrete a couple of times a day to avoid cracking;
- after complete drying, the formwork is removed, waterproofing is applied to the pillar, and the top is covered with several layers of roofing material - the material will protect the wooden floor beam from getting wet;
- the remaining voids are filled with backfill: soil mixed with crushed stone is filled in, compacted every 15 cm of the layer.
Floor: wood or concrete
A concrete or wooden floor is installed on a strip foundation. The base on pillars is obviously designed for arranging a wooden floor.
Let's consider both technologies:
- Concrete. Inside the foundation, soil is selected to a depth of 35 cm. A sand cushion is arranged and compacted well. Then you can fill it with crushed stone, but expanded clay is used to insulate the screed. A 20 cm layer is enough. A reinforcement grid is laid on top. Using a level, beacons are set, along which the cement screed is subsequently poured. Lay tiles or wooden flooring on top.
- The wooden floor is installed along the floor beams, which are laid on the base on top of the waterproofing. The beam is connected to the foundation with through fastenings, anchors or self-tapping screws. In the corners they are connected with a straight lock and additionally fixed with corners. Next, the logs are installed, insulation is laid and the flooring is laid.
Construction of frame and walls
Wall structures are erected from timber, attached to previously assembled crown beams. The wall elements are assembled on a flat area in a horizontal position, and then the finished wall panel is mounted in a vertical position or each beam is connected to a beam in series.
Step-by-step instruction:
- On the lower beams of the harness, make a cut for vertical posts every 50 cm.
- Mount the racks, securing them with corners and self-tapping screws.
- Assemble the top harness.
- The veranda is connected to the house by attaching a vertical beam to the wall.
- Secure all posts adjacent to the house with anchor bolts.
- It is better to immediately sheathe the finished “skeleton” of the veranda on the outside with plywood, boards or OSB. This will give the structure rigidity.
- After erecting and insulating the roof, install windows and doors.
Ceiling and roofing
The shed type of roofing can be combined with almost any roof of the house, therefore it is the most common configuration. Let's consider it.
- The rafters are installed at one end under the slope of the roof of the house, and at the other they are supported on the wall of the veranda. Fixed with metal corners. The main thing is to accurately select the slope angle.
- The rafter legs should protrude beyond the wall by at least 30 cm. Such an overhang of the roof will protect the walls of the veranda from precipitation.
- The issue of roofing is decided in advance. Usually they choose the material with which the house is covered. Under a soft roof, solid material is laid on the rafters: plywood, OSB sheets or thin sheathing. Slate or metal tiles are laid on the rafters if the logs are installed with small pitches.
- The structure is covered with waterproofing, which is selected individually to the coating material.
- Laying the roof begins from the bottom of the rafters.
- For insulation, mineral wool is used, which is laid between the rafters. The ceiling is covered with boards or panels and decorated.
Insulation of walls and floors
Mineral wool is used as insulation material for walls. The mats are easily and quickly laid between the frame bars, as can be seen in the photo. When laying insulation in several layers, the mats are shifted relative to each other to prevent heat loss through the joining seams.
Expert opinion
Filimonov Evgeniy
Professional builder. 20 years of experience
Ask a question to an expertThe insulation is covered on both sides with steam and wind insulation material, which will protect the material from moisture accumulation, and the top is sheathed with finishing material.
Internal walls can be sheathed with chipboard, plasterboard and covered with wallpaper or lined with clapboard. For the exterior wall, use wood, siding or materials that match the finish of the house.
The wall pie towards the outer wall looks like this:
- internal lining;
- vapor barrier;
- insulation material;
- windproofing;
- external cladding.
Floors on wooden joists are insulated in the same way as walls: mineral wool is laid on the subfloor between the joists, after covering the boards with a waterproofing membrane. A second layer of waterproofing is laid on top of the insulation and then leveled with plywood. After this, the finished floor covering is installed.
A concrete floor can be insulated in the same way as a wooden floor, using a dry screed, making a concrete screed and installing water or electric heating.
Do-it-yourselfers often overlook the need to comply with safety regulations. Use personal protective equipment and well-functioning, reliable tools, and then you will have only the warmest memories from the construction of the extension.
The construction of wooden houses has not lost its popularity even with the introduction, and an extension to a wooden house only complements it and emphasizes its individuality. Quite often, over time, it is necessary to increase the living space of the house or create a veranda near it. In such cases, an extension is erected, which can also be made from a variety of building materials.
It is distinguished not only by its strength, but also by durability, environmental friendliness, and has excellent technical characteristics. The construction is made from wood that has undergone pre-treatment: drying and treatment with special insect repellents.
An extension to a wooden house can be as:
- rooms,
There are various options for extensions, which differ significantly in construction technology.
 Summer kitchen attached to the side of a wooden house
 Frame extension
The simplest and most common way to build an extension is a frame structure. This construction technology came to us relatively recently, but already during this time it has been able to win the recognition of most people. This is due to the fact that the construction process takes minimal time. The entire structure is not inferior in properties to the foam block structure. The frame extension to a wooden house is distinguished by its originality. The frame can be made of wood or metal.
You can use not only a wooden, but also a metal frame in the construction of an extension. It is not exposed to weather and climate conditions, and is also resistant to temperature changes.
Before starting construction, it is necessary to clearly determine for what purposes such an additional structure will serve. The process of its insulation and the use of any materials will depend on this.
If the frame extension will be used as a room, then the insulation in it can be:
- mineral wool,
- polyurethane foam,
- Styrofoam,
- expanded polystyrene and more.
To make a metal frame, channels, pipes and fittings of different diameters and sizes are used. There are load-bearing beams that are larger in diameter, and there are auxiliary beams that can be smaller in diameter. All elements of the metal structure are fastened together using welding: electric arc welding or semi-automatic.
 Wooden frame for house extension
 A wooden frame differs from a metal one in its lightness. It is also strong and durable. You can also emphasize its environmental friendliness. Wood is considered a warm material, but despite this, the wooden frame also needs to be insulated using similar insulation and insulating materials.
Both the wood and metal frame must be connected to the wood wall. Difficulties in fastening can only arise if the house is built from rounded timber, since its walls are uneven.
To secure the frame to the wall, reinforcement is first installed in the wall, on metal “bolts”, fixed inside the house. All gaps that exist between the frame and the building must be sealed with plaster or polyurethane foam.
Walls of this design can be covered with any modern finishing material. As a rule, plastic or siding is used as the facade finishing of a frame extension. But for a structure made of wood, it would be more rational to use wooden lining. It has an attractive appearance and sufficient strength.
Before installing wooden lining, it must first be coated with several layers of varnish. Such actions can significantly extend the service life of such finishing material and help protect the facade from insects and weather conditions.
Wooden lining can be of different sizes, which is convenient for choosing the best option. If you use siding or plastic, then you need to attach sheets of plywood or OSB to the frame. Their use makes the structure more durable and heat-intensive.
 Extension, finished in the same way as the main house
 If in conventional finishing siding or plastic must be attached to a special frame made of small wooden blocks, then during frame construction these finishing materials are mounted directly on the surface of OSB or plywood using special screws.
As for the interior finishing work, they are carried out according to the principle of exterior decoration. Sheets of OSB or plywood are laid on top of the insulation that has been previously laid. Drywall can also be used inside the building, which is distinguished by its practicality and ease of use. It is plastered and then painted.
Read also
Storage rooms in a residential building
The roof in the extension can be made pitched, since in this case it is necessary to ensure a fairly high-quality tightness of the connection between the roof of the extension and the roof of the main building. Metal tiles, ondulin and other materials that can be aesthetically combined with a wooden structure are used as roofing materials.
In this video you can see how to make a frame extension to a house step by step
Very often, an extension to an old wooden house is framed, since it does not have much weight and cannot impact the walls of the building, which will make it possible to operate the house for a long time.
 Frame extension to an old house
 Before adding anything to an old wooden house, you need to assess the condition of its walls: whether they need to be strengthened or restored.
Porch extension
A frame extension also includes a porch extension, since such a structure is mainly made on the basis of a wooden frame. The porch has no walls, but has a concrete base. It can be made during the construction of the house itself, or it can be poured over time.
In the latter option, it would be better to make a small foundation under the porch, which should be connected using reinforced concrete to the foundation of the house.
This is necessary in order to ensure the strength of the structure with its additional extensions, since the soil in the areas may be different, and depending on weather conditions, it tends to sag, which will lead to possible deformation.

The porch is made of both metal and wood. It all depends on financial capabilities. The construction of an extension with walls will be similar to a frame structure, only insulation and insulation materials may not be used.
A metal porch with railings will look very original, since these unique fences can be made with elements of artistic forging. The roof of this design is usually made of polycarbonate. The translucent material harmoniously complements the extension to a wooden house.
 Metal porch roof made of polycarbonate
 Advice. Polycarbonate has different thicknesses - those types of this roofing material with a thickness of at least 0.7 mm have greater strength and durability.
Room extension
As soon as a private house no longer has enough usable space for each family member, they immediately begin to think that adding a room is simply necessary. This is already a residential extension, and its construction will need to be approached responsibly.
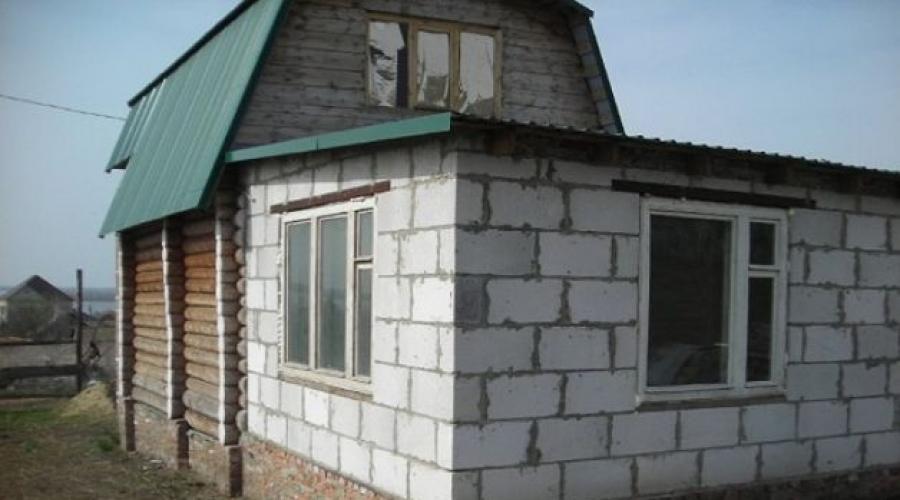
The extension of the room can be made of brick, foam block, wood, cinder block.

The use of any of the materials implies the construction of a foundation for them. The difference in building materials (the main structure is made of wood, and the extension is made of any other material) can play a big role in the strength and reliability of the house as a whole.
A brick extension to a wooden house is built on a monolithic or strip foundation. It has high strength and durability. Brick itself is considered a cold material, but with proper and high-quality insulation it can maintain a constant temperature in the room.
When choosing the type of foundation for an extension, you need to start from the main foundation. Any foundation can be laid for a wooden house, depending on the groundwater, since wood is a lightweight building material. But more often a pile foundation is used. It is better not to use this type of foundation under brick walls, since the weight of the entire structure will be quite large.
It is for this reason that it is better to give preference to a monolithic foundation, which in its structure is considered an integral structure and can withstand a variety of loads on it.
To build a monolithic foundation for a brick extension, a trench is first dug, the depth of which largely depends on the size of the extension itself. As a rule, it is at least 0.5-0.7 m.
Layers of sand and crushed stone are laid at the bottom of the trench, forming a cushion for greater strength and durability of the base. It is better to mix the concrete solution in a concrete mixer so that it is freshly prepared, since concrete tends to harden very quickly, and it is simply not possible to make the base a monolith.
 Project of a brick extension to a wooden house
 Formwork is pre-made around the perimeter of the trench. It can be non-removable, that is, after manufacturing its elements are not removed.
The solution for such a foundation consists of:
- cement grade 400 or 500;
- sand, preferably river sand and without impurities;
- crushed stone that is not too large, you can use granite (it is not subject to deformation and can withstand sufficient loads);
- water;
- fittings.
A metal frame in the form of a mesh is made from reinforcement. It is placed in a trench on sand and crushed stone. After this, cement, sand, crushed stone and water are mixed. All proportions that are necessary for a high-quality foundation must be strictly observed, since the strength of the entire structure will depend on this.
Concrete solution is poured into the trench in parts, and it is necessary to ensure that none of these parts begins to harden. Otherwise, the foundation will no longer be a monolith and will lose its strength.