How to make rabbit cages. Step-by-step instructions for making rabbit cages with your own hands. Material for making rabbit houses
Read also
Construction of cages for rabbits involves certain questions: how many and what breed of rabbits will you breed, and will you engage in breeding. After this, we select the type of enclosure and begin work. We use the most affordable materials - plywood or wood, mesh and slate. Since rabbits will gnaw cells from the inside, we do not use in our work anything that can harm their health: chemical antiseptics, materials with metal shavings.
The main types of enclosures - what are common and how are they different?
Rabbits are capricious animals to keep. The enclosure can be placed both indoors and outdoors. outdoors. But street cages only suitable for southern regions, otherwise in winter period eared ones will freeze. Optimal temperature keeping rabbits - from 10 to 20 degrees. In enclosures, drafts, direct sunlight and humidity above 75% should be avoided. Taking all this into account, find the most optimal place and start choosing the type of enclosure.
There are several types of cages for rabbits:
- simple cells, with or without queen cell; with or without an enclosure for walking;
- I. N. Mikhailov cells;
- cells of N.I. Zolotukhin.
Regardless of the type of enclosure, it is placed at a height of at least 70 cm from the ground in one or several tiers. This can be done using high legs or wall mounts. This way the rabbits will be protected from rodents and other animals, and the indoor air will circulate better. The size of a rabbit's home depends on the breed, gender and age.
Simple cells - advantages and disadvantages
To make enclosures with their own hands, they try to use natural materials, for example, boards. Since rabbits chew everything they come across, chipboard should not be used. It is both harmful to animals and will crumble quickly. Rabbit housing is often protected from the inside from animal teeth iron sheathing. But this can only be done if the temperature is stable both in winter and summer. Otherwise, the iron will become very hot from the sun or cool in winter.
Particular attention is paid to the floor of the enclosure. Rabbit urine is very caustic and therefore corrodes wood. Most often, the floor is made of mesh. Sometimes the lattice is filled with wooden slats. This way all the feces will flow down. It will be much easier to clean the cages, which means the rabbits are less likely to get sick.
When making cages for decorative rabbits, they do not use mesh, because due to the lack of pads on their paws, they simply cannot sit on such a floor for a long time.
Attach the queen cell to the enclosures if you plan to breed rabbits. It is in the queen cell that the female gives birth and nurses the rabbits. Only when they get stronger does she move to the main room. The quality and quantity of the offspring is influenced by the attached enclosure for walking, since the high mobility of individuals contributes to their reproduction.

Mikhailov cages - mini rabbit farm
Mikhailov’s design is more complex enclosures, suitable for large farms. They are often used in industry, helping to significantly reduce labor costs. The construction of such an enclosure is patented, has automatic cleaning and feeding, and heated queen cells. Most often this is a three-level house with a middle floor for feeding and top floor for walking. Building it yourself is quite difficult; it requires good construction experience and significant financial costs.

Zolotukhin cells - saving space and building material
Zolotukhin cells are easier to manufacture. The main ones distinctive feature the fact that the floor is made at a slope. It uses not the usual mesh, but plywood or slate. The mesh is installed only near the cell wall. According to research, rabbits relieve themselves near walls in 90% of cases. Zolotukhin’s design takes up little space; the cells in it are arranged in three rows of two. This saves both space and material for work. Such enclosures are well suited for keeping large quantity rabbits, it is not advisable to use them for several individuals.

Making a regular cell
To save material and space, the cells are made at least in pairs. For the base, take a board 3 m long by 0.7 m. This way you can fit two compartments 1.5 meters long. These cage sizes are suitable for young animals or males. For females, a smaller size is sufficient. First of all, you need to prepare drawings with dimensions based on tips and illustrations.

To make this design you will need:
- 2 sheets of plywood (1.5 by 1.5 meters);
- 10 three-meter bars (30 by 50 mm);
- 3 m mesh with 15 mm cells;
- screws and tools for work.
The size of the cells in the mesh used should not exceed 20 mm, otherwise the rabbits will get stuck in them.
Before making a homemade enclosure, many farmers advise treating the wood with antibacterial impregnations. It is worth choosing the safest formulations, since otherwise you can poison the animal. First of all, a frame with a height of 1.2 in front and 1 meter in back is made from bars.
Then the floor is hemmed with mesh. There is no need to reach the edges with the mesh; the queen cells will be located there, and the floor in them will be made without holes. The back wall is made of plywood, attached to the bars with self-tapping screws. At the edges, queen cells are also made from plywood. The ceiling in them is lowered a little so that they look more like a hole. A small hole with a diameter of 16 centimeters is made in the side wall. This queen cell can be made removable if desired.
A feeder is made in the center. It is more convenient to divide it into two parts: for feed and for hay. The first is a tall box with a bowl base. And the second is a trapezoidal box made of mesh.
The roof is made of plywood with overlaps of 5-10 centimeters. You can make it in two parts, leaving a gap in the middle. It will be convenient to fill feeders. Then the doors are made using bars and mesh.
Using the same step-by-step instructions, you can make a cage with two or three floors. But in this case, the roof is covered with some kind of protective material. For example, upholstery sheet iron or polycarbonate. Then your rabbit house will last longer.
Making a Zolotukhin cell
Making an enclosure using Zolotukhin’s method with your own hands is not much more difficult than building an ordinary cage. For this you will need:
- wooden beams;
- net;
- boards;
- sheet iron;
- polycarbonate;
- slate.
The enclosure will be built in the following dimensions: 2 m wide, 1.5 m high, 80 cm deep. The floor slope is 5 centimeters, and a 20-centimeter strip of mesh will be located at the back wall.
First we build a similar frame for the enclosure. We leave room in the middle for a hay barn. But the floor, unlike a regular cage, is lined not with mesh, but with durable slate. Don't forget to make an indent of 20 centimeters from the back wall.

The rear walls are made of polycarbonate. They need to be secured at an angle so that the top of the wall meets the slate edge of the floor of the next floor. And at the very upper tier she's straight. This arrangement allows rabbit droppings to roll down the walls.
Closed queen cells are made on the sides of the structure, similar to a regular cage. We make all the other walls and doors of the enclosure from mesh.
The feeder in Zolotukhin’s model is also not easy. It is inserted directly into the door and is held on by hinge nails. Thanks to this, you can pour food and clean the feeder without opening the door. It occupies approximately 2/3 of the width of the door. The outer wall of the feeder is twice as high as the inner one.

It is not for nothing that Zolotukhin cells have long been very popular: they are easy to manufacture and easy to maintain.
It is best to start building enclosures from the very simple option. Later, based on the experience gained, you can move on to more complex structures, including to Mikhailov’s mini-farm.
Subsistence farming has always been profitable. You can keep chickens, pigs, and goats, but rabbits have always been especially popular, because they are unpretentious and do not require special food. But they definitely need special cages for rabbits; it is not customary to simply keep these animals in a barn.
Cell sizes
Before you build rabbit hutches, you need to find a blueprint to work from. You can find a ready-made one on the Internet or draw a drawing yourself. To do this, you need to know the size of rabbit cages. Beginning rabbit breeders should know that one cage is not enough for them to breed these animals. We need several houses for rabbits, at least three.
For adult rabbits
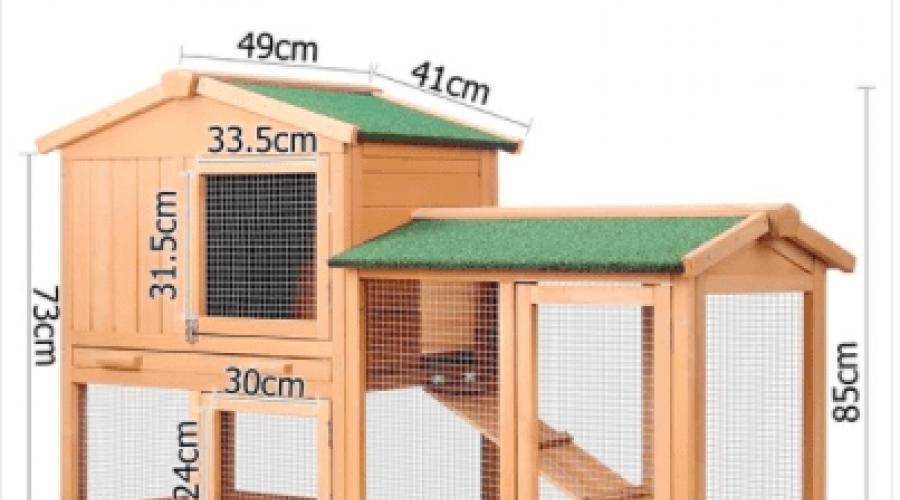
Two adult rabbits will fit in a two-section house. Her minimum dimensions: length – 140 cm (preferably 210-240 cm), width – 60-70 cm, height – 50-70 cm. Between the two compartments there is a feeder for grass and hay. The rabbit house can be made on two floors, which will help save space.

House of two sections for adult rabbits
Cage for young animals
In cages for rabbits, namely for young animals, baby rabbits are kept in groups. Making a cage is simple: the minimum dimensions of a home for young animals are: 200–300 cm by 100 cm, height – 35–60 cm. One young animal should have at least 0.12 square meters area. Sometimes separate cages are not made for young animals, but are kept in ordinary ones for adults, calculating the number of individuals according to the area they need.
House for a female rabbit with offspring
A house for rabbits with children for breeding consists of a feeding and uterine part, which are separated by a partition. There is a hole in it. It should be located slightly above the floor (10-15 cm) so that the rabbits cannot get out of the nest. Houses for rabbits (mother cell) have dimensions of 0.4 by 0.4 m and a height of 20 cm. It is placed in the uterine compartment just before the birth. Here rough drawing cells with queen cell.

Drawing of a cell with a queen cell
For giant rabbits
The size of the cage also depends on the size of the giant rabbits. If you have purchased giants, they will be cramped in standard enclosures; they need larger houses. To breed giant rabbits, you need a dwelling 0.75 m wide, 0.55 m high, and 1.7 m long. This is the minimum, it would be nice to make it larger.
Rules for making a cage
If you decide to build rabbit cages with your own hands, you need to know some rules so that you don’t have to make a new one in a few months.
- Rabbits are rodents, so for those who want to preserve cages for rabbits, it is better to protect all parts of the wooden frame that are located inside the cage by covering them with metal. It will only take a few hours, but the rabbits’ cage will then last 10 years longer.
- Antiseptic cannot be used. Pets can get poisoned.
- The roof should not be damaged by moisture. It is better to use slate for it. If your rabbits will live outside, do not make a metal roof. Under the influence of the sun it becomes hot, and the animals will feel uncomfortable in this stuffy space.
- For the frame of rabbit houses, timber (50x50 mm) is used. Can also be made from metal. Chain-link mesh, the cells of which are 25x25 mm, is suitable for cladding. The mesh is needed for the facade, for the sides of houses and doors. The back part is always made deaf, because... drafts are harmful to them.
- In order to build a floor, take a mesh with cells of 25x25 mm or 10x25. Because of this, feces do not accumulate inside the cell, but are collected in a special bunker or rolled down an inclined path to the ground. You will not see a solid floor in the rabbitry.

When building a rabbit cage, there are some rules you need to follow.
Rabbits have very caustic urine that soaks into the solid floor and causes the wood to rot. If not a mesh, then the floor can be covered with bars, between which there are gaps of 0.5 - 1 cm. Experienced rabbit breeders advise laying a small sheet of plywood on the floor. Then rabbits will not have pododermatitis. But it must be constantly taken out and washed and dried.
How to build a rabbit hutch
If you want to build correctly with your own hands, then this will help you step-by-step instruction. This is the simplest cage that can only be kept indoors. According to these instructions, it is possible to make cages for rabbits and for the street, but use OSB.
You can make the drawing yourself, focusing on the size of the rabbit cage: size 1.5 by 0.7 m and height 0.7 m. But it is advisable to make cages for rabbits in pairs, which saves material, so the frame is taken as a basis: 3 m by 0.7 m, 1.2 m in front and 1 m in back. It is not difficult to make a drawing of such a cage.
How to make a rabbit cage with your own hands? Here are the step-by-step instructions. Prepare all necessary materials:
- plywood, 2 sheets (* 1.5 by 1.5 m), thickness – 10 mm;
- bars, 10 pieces: length 3 m, 30*50 mm;
- metal mesh with 15 mm cells, 3 m;
- self-tapping screws 30 and 70 mm, 2 kg;
- tools for work.
Making the frame. On solid smooth surface we assemble a frame measuring 3 m by 0.7 m and a height of 1.2 in front and 1 m in the back of the structure. The frame must be on legs.

We attach a mesh to the floor of the future cage; it may not reach the edges of the cage, because there will be a queen cell there. The floor of the queen cell is solid.
Let's do back wall: cut it to size and attach it with self-tapping screws over the entire area. Plywood sheets fasten along the edges of the cage where there is no mesh - these are future queen cells.
Start working on queen cells. To do this, attach a block located vertically, screw a wall to it, and make a hole in it according to the rules. The bars are attached to the walls of the queen cell, and the lid of the queen cell is attached to them.

Rabbit cage: making queen cells
Making a feeder: You need to make a feeding device. We attach a vertical bar in the middle of the cage, two feeders 7 cm high and 30 cm wide are attached to it. Two bars are attached above the feeder at a distance of 20 cm, these are guides. From plywood you need to make a frame for the feed, a special device, the top of which fits between the guides, and the bottom fits directly into the feeder.

Rabbit cage: making a feeder

Rabbit cage: feeder mounted on frame
Next to the main feeder there is a hay feeder, which is made of steel wire.

Rabbit cage: hay feeder
We cover the free space with plywood, install a roof with an overlap of 5 cm in front and 10 cm on each side and at the back. There should be a hole in the middle into which the food will be placed. It is better to install a lid on top to prevent rodents from getting into it. All that remains is to install doors 30 by 50 cm. To make them you need a mesh. The cage is ready.

If you don’t like this DIY rabbit cage design, there are detailed video instructions. There's a step-by-step explanation there. True, you will have to do the drawing yourself.
Rabbit cages differ depending on what animals and how many will live in them. Building rabbit houses correctly is a whole science, and we will try to understand it further.
The optimal cage sizes, in particular for young animals, are calculated based on the number of heads that will live there. Both replacement young stock and market stock are usually kept with seven heads in one compartment. The length of such a house is on average from 2 to 3 meters, width 1 meter, height - up to 60 cm. After fertilization, I place the females separately - one individual in one house.
The dimensions of the cage where it is planned to move the pregnant rabbit are as follows: 120x70x60 cm. For some farmers, the size of the cage structures may be smaller, but it is necessary to strive for exactly these parameters. If the queen cell is retractable, its dimensions should match the height and depth of the main compartment. The length of the uterine compartment along the front wall is 40 cm, depth 70 cm, height 60 cm. The size of the window for the babies to exit to the mother: 15x15 cm or a circle with a diameter of 15 cm.
At home, the structure of the cage in which adult males will live can be one- or two-section. The sizes of cages per section range from 80 to 110 cm and a width of at least 60 cm. Dimensions of a cage for two sections: length up to 130 cm, width the same as that of a single section. Thus, the aft part of the two-section structure accounts for 90 cm, and the nesting part - 40 cm. Adult rabbits in a one-section house can be kept 2-3 heads, in a two-section house - 5-6 heads.
Young males are kept in groups only for up to 3 months, then they are removed one at a time. Dimensions of a single bachelor's dwelling: 70x70x60 cm (length-width-height).
Instructions
It’s not difficult to make cages with your own hands, because their construction will require the most simple materials. Follow the instructions step by step - and now the house for furry pets is ready! On next video the farmer talks in great detail about the size and construction of the rabbit houses. Completed this design according to the Zolotukhin method.
Materials and tools
- wooden boards or timber;
- slats;
- Chipboard and plywood;
- sheathing for protruding wooden parts (for example, thin tin);
- roof covering material (polycarbonate, smooth slate, linoleum);
- durable mesh for walls, hay and part of the doors;
- hammer, nails, self-tapping screws, screws, screwdriver, hinges, latches, feeders and drinking bowls;
- tape measure for measurements.
Manufacturing
Step-by-step instructions will help you not to confuse anything and quickly finish the job.
- We knock together a rectangular frame from timber. If there are several separate tiers, you need to leave a distance of 10-15 cm between each (for a pallet).
- We stuff transverse slats between the front and rear beams; they will hold the first tier. We do the same with the subsequent ones.
- We nail the side “legs” made from boards to our rectangles. The legs are measured in advance so that there is a height reserve of 30-40 cm from the ground. This will make it easy to grab the cages by the bottom for carrying and cleaning.
- Next, we twist the doors using slats and screws and cover them with mesh. We fasten the mesh from the inside with a construction stapler. Don't forget to tilt the front side of the door to accommodate the haybox.
- The doors have hinges and a small latch is attached; it is most convenient to make a hinged door “from top to bottom”.
- The sennik is made in the shape of the letter V and covered with mesh.
The final stage
- Next, we build a queen cell with blank plywood walls and a removable plywood bottom. This bottom can be removed and dried after the young animals have grown. You can then reuse the plywood.
- We also make the queen cell door solid and fasten it on hinges.
- We place an inclined tray under each tier. We make an inclination towards the back wall to make it convenient to remove manure.
Such homemade cells will serve rabbits for more than one year. They can be moved from the barn to the street in the summer, and even add tiers higher. But as practice shows, three tiers are usually quite enough.
Look step by step construction to make cages for rabbits specified instructions, in the next video. Making it using this method will take you literally half a day.
Other types
Other types of rabbit houses include a design for a female rabbit with a nest. This is an autonomous structure that does not involve any tiers and is built separately. As you can see in the photo below, it is portable and can be placed both outdoors and indoors.
Manufacturing instructions
You will need the same tools and materials as when assembling regular rabbit houses. Unless you need less mesh - only for the door of the general compartment. Next, we offer brief step-by-step instructions for assembling a cozy rabbit house for mother and young animals.
- Based on the dimensions (we take the same ones as indicated at the beginning of the article, 120x70x60), we put together a frame.
- We make the side and back walls from thin boards or plywood.
- After this, we separately assemble the door for the queen cell and the door for the main compartment. For the second, we nail the mesh.
- We put the doors on the hinges, screw on any shape of the latch and the handle for opening.
- The final stage is the roof. We cover it with a water-repellent material, you can take linoleum, polycarbonate, but not iron, so that it does not heat up in the heat.
That's it! You can take such a house for a female and cubs into the garden, or place it in summer kitchen so that pets are always under supervision. The following drawings will best represent what the cells look like.
Photo gallery
Video “German houses for rabbits”
The cells in the video are made using German technology. They are intended for single keeping of adults or for young animals up to 3 months.
Experienced rabbit breeders know very well how important it is for rabbit cages to have correct design, and were made from quality and safe material. Since their ability to reproduce depends on these factors. The cage can be purchased ready-made or made with your own hands. Last option preferable, since during construction the breed and the number of animals placed in it are taken into account.
Required materials and cage design
 Regardless of what type of nursery will be built, they all have the same basis:
- frame;
- walls;
- ceiling;
- doors.
A rabbit cage is made from wooden material or mesh, but in no case made of iron. In hot weather it will become very hot, and in cold weather animals can freeze to it.
The frame is built from thick beams, and the length of the legs must be at least 35 cm. If the nursery will be located outdoors, then it is better to make them even higher - from 70 to 100 cm. In addition, a cage of such a height is much more convenient to maintain, and the animals will be protected from predators. The walls are made of plywood, boards or mesh. For the floor in the feeders, slats or mesh are used, since waste spills through them well. The roof is made from the same materials as the walls. If the industrial rabbit cage will be located outside the premises, then an additional roof will be required to protect it from precipitation.
Every detail in the nursery must be smooth and safe, without splinters or sharp ends on the mesh, so that the animals cannot get hurt.
Types of cages for rabbits
Nurseries differ from each other according to the type of construction:
- regular with or without queen cell;
- I.N. Mikhailova;
- N.I. Zolotukhina;
- with an aviary for walking.
 In the first version, the cage has high legs and two individual places for feeding and nesting. They are separated from each other by a continuous partition with a hole. The door to the nest is made of solid wood, and the door to the feeding area is made of a frame with mesh. If there free place, then an enclosure for walking is added to the cage. The entrance to it can be made through the back wall, or it can be arranged from below under the housing, as in the photo below.
Often, nurseries with an enclosure are used for mating, since active movement not only has a positive effect on the health of rabbits, but also improves their reproductive abilities.
 Mikhailov's industrial cells are considered the most complex and advanced; they look like small farms. They provide ventilation, shelves, heating of the queen cell and drinkers, as well as a unique waste removal system - everything is poured into one container.
Below is a photo of a drawing of a Mikhailov cage for rabbits, according to which you can make it yourself. 
Cell N.I. Zolotukhina
The main difference between this author’s nurseries and others is that instead of mesh or slats for the floor, they use plywood or flat slate, and there is no pallet. The floor is installed with a slight slope. A mesh is installed along the back wall, 10-20 cm wide. Feces and urine are removed through it, especially since in most cases rabbits relieve themselves against the back wall. 
The feeders used are tilting, to clean them, just tilt it towards you, and not remove it completely from the cage. It is imperative to divide it in half with a net so that the rabbits cannot crawl through. 
Zolotukhin also suggests not equipping the queen cell on summer time. It is enough just to fence off required size Place a board up to 20 cm wide and place it in the corner of the hay. The rabbit will make a nest for herself. Thanks to this method of cultivation, living conditions in a rabbit cage are closest to natural. As a result, baby rabbits are born less susceptible to infectious diseases. As soon as they grow up, the board is removed, resulting in more space for walking. In winter, instead of a board, it is necessary to install a house for a female rabbit with offspring.
In the video below, Zolotukhin talks about the principle of operation of cages for rabbits, made with his own hands using the method he invented.
To build cells using the Zolotukhin method, you do not need to have specific skills or expensive building materials. Enough mesh, boards, flat slate or plywood, as well as sheet metal. The frame, nest doors and partitions are made of wood. The floor is made of slate or plywood and mesh. Mesh is also used for doors in feeders. Sheet metal beat bars and other protruding wooden seats to prevent rabbits from chewing them. There should not be much light or drafts entering the nest, so the door is made solid and not made of mesh. A threshold at least 10 cm high is nailed to the edge of the floor in the queen cell so that the rabbits cannot fall out when the door opens.
 The back wall of the upper tier is made straight, and the lower ones inclined, so that waste from the upper does not fall into other cells, but rolls down the wall outward.
Stages of creating a cage for rabbits
Step-by-step instructions on how to make your own rabbit cage with a built-in queen cell and feed bins:

- A cage roof and a sliding door with a handle for feeders are installed.
- Doors with mesh and solid doors for nests, as well as latches for them, are attached to the frame.
- If the nursery will be located on the street, then an additional waterproof roof should be made. To do this, a frame made of slats is nailed to the existing roof, and a roofing material, for example, slate. Don’t forget about the slope, so if the height of the nursery at the front is 70 cm, then at the back wall it should be 60 cm. This is necessary to drain precipitation from the roof.
Before you start making a rabbit cage, you need to make detailed drawings with dimensions.
The proposed option is convenient in that it has a large-capacity feeding hopper. It holds at least 6 kg of feed. Also similar design allows you to install additional tiers. The main thing is to place a tray between them to collect waste or an inclined surface along which they will roll into the container. But you shouldn’t make too many tiers, as the food is poured on top.
The mesh size for rabbit cages should not be larger than 2x2 cm, otherwise they may fall through and get stuck.
Before you start making a rabbit cage with your own hands, you should decide on a place to install the nursery. It must be protected from strong winds. It is not advisable to install a nursery on the south side, since in the summer the animals will be exposed to the heat of the sun all day. The size of the cage is also affected by the breed of rabbits, some of them are noticeably larger than others. Optimal size cages for rabbits of different colors - 150x70x70 cm. It varies depending on the number of animals. It is better to make the roof removable, this will make it much more convenient to disinfect the cage.
 If the rabbits will live in the nursery in winter, then it is better to make the floor from wood. Bottom part It is made solid in the form of a pallet, so it must be pulled out. And on top of it is installed a floor of slats, packed in increments of 1.5 cm. It is better to make feeders and drinking bowls removable to make them easier to clean. In order to prevent the offspring from freezing in winter, the walls should be additionally insulated with any thermal insulation, for example, polystyrene foam. The insulation must be hermetically sealed in film so that it does not absorb water. In the uterine section, you can lay a heating system with a warm floor or a heating pad.
For dwarf and decorative rabbits, other nurseries are made, and always with an aviary. A cage for such rabbits is most often built with your own hands in the form of a house, with many ladders and shelves. If the pet will live in the house, then it is best to purchase ready-made option because they have an attractive appearance.
Step-by-step instructions for building a cage for rabbits - video
Raising and breeding rabbits is a profitable activity. If you create for animals optimal conditions residence and growth, then with a minimum of costs you can get quite a big benefit. Of considerable importance self-cooking nutritious feed and making your own rabbit cages. The article offers a guide to the process of making houses with photos and watching videos.
Preparatory work
 Before you build a rabbit cage, you need to thoroughly think over the design and make a drawing. The dimensions will be indicated on it, and the details of the rabbit cage will be drawn separately. Dimensional drawings or diagrams will help you accurately calculate the quantity necessary materials, which is quite difficult to do without accurately drawing all the details. The drawing will also be needed if the design changes during the assembly process, it will be clearly visible which elements need to be redone and which ones should be left the same.
Types of cells by design
General requirements Do-it-yourself homemade rabbit cages include:
- required space, expressed by floor area;
- ease of manufacture;
- ease of cleaning, disinfection, feeding and transplanting;
- long-term operation;
- inexpensive cost of materials and the resulting final product.
Common and convenient option Cages for a domestic rabbit with your own hands are recognized as double rooms connected in pairs. Such designs are perfectly used when raising young rabbits, but there are also other options for connecting and placing rabbit houses:
- single-section;
- compact sets consisting of three sections;
- group cells big size for young animals.
So as not to waste extra space, cages are made depending on the age of the animal, its breed (height) and the number of representatives in the house. The standard sizes are:

Main stock rabbits are raised in single-tier and two-tier cages, but in a rabbitry it is better to use single-tier houses. If animals are bred for meat, then houses can be built in three tiers, although this multi-storey building It is not particularly popular for rabbits.
In a multi-tiered structure It is difficult to clear manure, it is inconvenient to feed, preventive examination of pets of the lower and upper tier takes much more time. Mechanical distribution of feed is practically impossible. A lot of effort and expense is required to heat such piles; ventilation and lighting of the premises becomes difficult.
A cage for rabbits made of mesh is made with your own hands with holes 2.5 by 5.0 cm or 2.5 by 2.5 cm. Galvanized or metal with plastic coated mesh with smaller cells. Sometimes the floor is made of hardwood, it is assembled from slats with a cross-section of 2.5 by 3.0 cm; during the manufacturing process of the floor, the sharp edges of the slats are rounded and cleaned sandpaper. The slats are placed at a distance of 1.6–1.8 cm from one another.
Young rabbits during the period of fattening and growth They are kept in one room, so a separate house is made for them, the appearance of which can be seen in the photo.
Newborn baby rabbits with female rabbit also placed in a common separate room, then the house is made into two sections for the main livestock of young animals and the uterine compartment. It is recommended to keep male rabbits in a different compartment. Crowded cages will have a negative impact on the growth of young rabbits, as they will not be able to be active. Do-it-yourself houses are located on a certain elevation from the general floor in the room or the ground.
Material for making rabbit houses
 It is advisable to choose for cell construction natural material(thick plywood, bars, boards, wooden slats). The grid is described above and the dimensions of its cells are given. Used to cover the roof various materials, you can use the remains from covering the house. For connection wooden parts you need screws and nails, you will need iron sheets and devices for hanging cage doors, locking devices in the form of hooks or latches.
One of the options The material for the walls is adobe, brick, various waste building materials. The roof is covered with roofing felt, roofing felt, or a straw covering can be made. Straw is used for winter insulation walls and floor. If they make cages that can be carried or moved, then this is especially important for choosing the optimal location in the winter cold and turning the facade of the house in the warmest direction.
Choosing an installation location
Popular with farmers installing rabbit houses outside, that is, in the open air. Home cages are placed at a height of 0.5 m from the ground and equipped with a good-quality roof. In this case, the problem with ventilation is spontaneously solved, and the animals receive natural Sun rays. In winter, in addition to insulation, the cages are wrapped in polyethylene to protect against cold winds.
The houses face the south side with their entrances and are located in windproof and quiet areas. strong wind places, without drafts. To make it easier to clean up after your pets, a ditch is made under the cage to drain waste. IN summer period the cages are covered with suitable material from direct sun or a removable canopy is made.
Making cages for rabbits with your own hands
Offered step-by-step instructions for the construction of rabbit houses, details can be seen in the photo and video:

Options for cage arrangement and features of animal separation
 Houses for female rabbits with offspring make them paired and place two females in them with a litter of separate rooms. The cage can be made as an option for temporary overexposure or permanent housing for rabbits, it all depends on the size. The last type of room involves dividing it into two 45 cm wide and separating it from the feeding area by a partition with continuous filling. Sometimes it is more convenient to make the partition removable. After dismantling the wall, such a room is used to keep young rabbits without a mother.
In order to most completely isolate the housing and feeding area, a hinged shield is made, which does not stop the animal from moving between compartments. If there is no partition and hinged shield, then a queen cell is placed in the compartment. In the nesting compartment, a shelf is made for the suckling queen during her rest. Its recommended dimensions are 26–30 cm; the shelf is placed at a height of 25–32 cm from the floor surface.
If the cage has a solid floor made of tightly planed boards, then it is provided slight tilt towards leading edge , where a small gap is left, about 2–2.5 cm wide, for liquid to drain. This cage design is suitable for keeping young rabbits, if size allows. The queen cell is removed, and the rabbit uterus is transplanted to another room.
In order for the rabbits to feel at ease, up to 2.5 months the size of the area per pet should be calculated at 0.2 square meters. m per individual. As the rabbit grows, the housing area per head is calculated at 0.35–0.4 square meters. m per animal. If the conditions are not met, then the rabbits are transplanted from other housing facilities or an enclosure is made for young individuals.
In the summer season or in a warm climate zone, cages are allowed, four walls completely covered with mesh, the roof remains solid. Half of the cage is separated by a partition and used for raising young animals, taking into account living standards. The second half is used as a walking area for rabbits, which develop poorly without movement. In warm weather, this option is considered ideal.
In summer, mesh cages contain a uterus with a brood, while a hole measuring 25 by 42 centimeters is made in the middle wall, stopping the movement of small rabbits with a closing valve. In such houses you can accommodate up to 15 heads of young individuals.
On the front side of the door on hinges or hinges made from different materials . The right one, which opens the entrance to the sleeping compartment, should preferably be made of a solid covering; it is rarely used and is constantly closed. Its use is provided only in case of replacement of the litter. For the convenience of the rabbits, the bottom of this room is lined with solid material, for example, linoleum, and a layer of hay or small sawdust is poured on top.
The left door operates more often and should not be blind; it is often made of mesh, so it is more convenient to watch the pets feed, add food to them and pour water. The feeder in the feeding department is carried out in vertical position. The material for its walls is steel wire, which is located at a distance of 30 mm from one another. At intervals, the animal pulls out its food (grass or hay).
 Rabbit poop area provided in one of the corners of the dining room. To prevent urine and feces from being retained, the floor is made of mesh, through which waste products fall into a drain pan or gutter, from where they are easily washed out with water. To prevent the development of unsanitary conditions, you need to ensure that no food waste or feces is left on the mesh bottom.
Having completed the construction of the rabbitry, I want the building to serve faithfully long time, so some people unknowingly begin to treat wood with various antiseptic solutions. This should not be done, as pets love to chew on the cage and chemicals. harmful substances may cause poisoning of animals.