How to make a chair from scrap materials. How to make a chair from wood with your own hands: drawings and dimensions, plus assembly instructions and explanations for working with lumber
Every person wants to make the environment of their home or apartment as cozy and comfortable as possible, but at the same time unlike any others.
You can achieve a unique interior with the help of hanging chairs. They can be purchased at furniture stores or make it yourself.

Today on the Internet and in specialized magazines you can find drawings of the chairs of the different designs and shapes.
In our article we will look at how to make such a chair with your own hands.

Types of hanging chairs
Today manufacturers offer huge assortment hanging chairs, among them there are those that you can make with your own hands.

Such furnishings can become an unusual accent in the design of a room. Below we will look at several options for chairs that you can create yourself.

Chair in the form of a swing
In the manufacture of original hanging swing chairs, the most different materials. Such models are characterized by an elegant appearance, a fairly simple design, and a hard or soft frame. They will perfectly decorate the cottage.

They can also be used as an original piece of furniture for a bedroom or children's room, or terrace.
Chair in the shape of a cocoon
This is one of the most common models of hanging chairs. The difference between such a chair is the presence of hiding inner part wall chairs.

This product was created to enjoy solitude; children also really like it, as it looks like a hanging house. To make a cocoon, only natural materials are used.

Chair in the form of a nest with a frame made of hoop
These chairs are the most popular. They can be equipped big amount decor and perfectly complement modern interiors. For such models, a variety of weaving techniques are used.

What are the chairs made of?
When choosing materials for a chair, it is necessary to take into account its specifics.
If you decided on the swing chair option, then you will need thick fabric, different types artificial ropes and blocks of wood.

To make a chair in the shape of a cocoon you will need rattan, willow twigs, bast, bird cherry or willow branches.

For a chair in the form of a nest, a hoop made of plastic or steel, durable fabric resistant to wear, synthetic filling, special cords for weaving, and various pieces of wood are suitable.

For the seat itself, the following techniques are used:
- Macrame;
- Patchwork technique;
- Knitting;
- Tatting.

Do not forget that the selected materials and fasteners correspond to the planned load.
Note!


Master class on creating a chair
This is the simplest type hanging chair of all the things you can do yourself. To make it you will need:

- dense material – 2 m;
- wooden beam - length 1 m, radius 3 cm;
- several carbines (0.11 m), designed for a weight of up to 0.16 tons;
- cable with a diameter of 1-1.15 cm with a tensile load of up to 3200 kgf;
- paints, brushes, nylon threads.
The tools you will need are a drill, sewing machine, iron, scissors, ruler.

Step by step we create miracles
Step 1. Fold the material in half, measure 0.18 m from the top and cut off the resulting triangle.

Step 2. Fold the edges of the fabric by approximately 1 - 1.5 cm and carefully hem them.

Step 3. Make pockets for the cable. To do this, you need to bend the edges on the long part by 4 cm and stitch them on a typewriter.
Note!


Step 4. On each side wooden beam make 2 holes. There should be a gap of 5 cm between two adjacent holes, and approximately 0.8 m between pairs of holes.

Step 5. We insert the rope into the central holes and secure it with knots. First, we make a knot for the carabiner in the middle of the rope.

Step 6. Pass the ends of the cable through the prepared fabric, insert them into the free holes and secure with knots.

Step 7. We attach a pair of carabiners, which are connected to each other, to the hook previously attached to the ceiling. This will add reliability to the design. We insert the rope into the last carabiner.

You can decorate the swing chair with bright pillows.
Note!

Hanging chairs are a fairly popular piece of furniture. They can easily become the highlight of your interior.

We hope that this article has convinced you that sewing a stylish bean bag chair or a fashionable hammock chair with your own hands is not at all difficult.

Such self-made products have a unique charm. They will definitely amaze your guests with their uniqueness.

DIY chair photo


Sometimes old unnecessary things can be turned into decent and functional decoration for the garden. In today's review we will talk about old chairs, from which, with a little imagination, you can make really interesting decorative ones, and in some cases even functional items: garden flower stands, hangers, shelves, swings, benches, etc. Below are examples of what can be made from unwanted chairs. Let's get started...
1. Hanger.
Necessary thing in everyday life - a hanger, it can be in the form of coat hangers or wall-mounted. Option with wall hanger easy to implement, to do this you just need to remove the back of the chair, tie a rope on its upper part, drive a nail into the wall and hang this design on it.
In general, hangers are also not difficult to make; for this you need to stock up on curved hooks, the size of the crossbar in the closet and the backs of unnecessary chairs. Using a thin drill in the upper part of the back of the chair, you need to create a hole into which to insert pre-prepared hooks, covered at the base with a generous layer of glue.


2. Swing.
A great idea for making a swing seat. You need to take a seat with a back from an unnecessary chair, nail two crossbar boards from below, drill holes along the edges of which to thread ropes. Secure the finished rocker to a strong tree. Children will be delighted, especially if the seat is painted in some color bright shade.


3. A chair made from an old stump.
There is an old, unsightly stump in the garden, so why not turn it into an attractive chair. To do this, take the seat of a chair and glue or nail it to the top of the stump. The seat can be painted in a bright shade or decorated using decoupage technique.

4. Rocking chair.
Many people dream of a rocking chair, but it can be made from an unnecessary chair. To do this, you need to order semicircular crossbars from the carpenter or remove several planks from wooden barrel, and secure the chair to them.

5. Bed for a pet.
Below you can see how loving owners make their beloved pets happy. To make such a bed, you need to prepare a box in which to put a foam mattress, make the headboard from the back of a chair, and make the foot from the legs of the chair.


6. Bench or bench.
On three chairs without seats installed in a row, you can lay a board upholstered in a pleasant-to-touch material with a foam rubber layer. Various options improvised benches can be examined in the photo below.


7. Stand for a bowl of a large dog.
A large pet can be fed from a bowl attached to the seat of a chair; to do this, simply use a jigsaw to cut out a circle in the seat of the chair to the size of the bottom of the bowl. This way, the dog will not be able to throw the food or water bowl around.

8. Shelf.
The back of the chair, as well as part of the seat, will make an excellent shelf for small items; options for such shelves can be studied in the photographs below.


9. Sleigh.
And here’s another great idea on the topic “what you can make from old chairs with your own hands” - a sled. Very interesting idea, but requires design; the location of each part must be carefully thought out so that the sled is ultimately safe to use.

10. Flower stand.
The most popular idea for using old chairs is the garden flower stand. To make such decorative element It is necessary to cut a hole in the chair seat to the size of the future pot installed in it. The photo below shows the process of making such a stylish garden flower stand. 


More examples of flower stands:


11. Box for storing magazines and newspapers.
From the legs of chairs you can put together a magnificent box for storing correspondence - newspapers, magazines, letters.

The box can also be made from flat boards and secured between the legs of a chair at an angle, as in the photo below.

12. Bright chairs.
This item involves restoring an old chair, or rather sanding it, and then painting it in a bright acid shade, as a result the chair turns out to be so fashionable that it is simply impossible to guess about its previous deplorable condition.

Flower stand from an old chair:
After this review, the question of what can be made from an old chair should stop bothering you; all that remains is to choose a suitable idea and begin to implement it. It would seem - old chair, well, what can you make from it, someone might say “throw it away and forget it,” but at the dacha the ideas presented above will be very relevant, so if you have such retro items in your home, do not rush to dispose of them, at present, given the nostalgic direction is in great demand.
The interior portal "Decorol" invites its readers to subscribe to receive interior ideas for themselves. email, the subscription form is in the sidebar.
Furniture can be made not only from boards, but also from any available material. The only question is how strong, reliable and durable it will be. Let's look at how to make cardboard, wine corks, hoop and thread.
Bottle chair
The chair needs identical bottles (do not remove the lids). We make modules out of them to make the furniture durable. For one module you will need three bottles. One bottle should be whole, cut the remaining two into two unequal parts (the top should be smaller). Now insert the top with the cork down into the second half. Place the whole bottle on top. Cover it with the second half of the third bottle. Rewind the section of the module with tape.
Now fasten two or four modules together with tape or packing tape. You need to collect as much as you need for the chair. To understand which blocks need to be formed, fold the modules into the shape of a chair with armrests, and then tie them together.
For example, you connect the armrests, back, and bottom separately, and then fasten all the parts together. Don't skimp on packing tape, as the bottles shouldn't move around.
Instead of plastic bottles you can take iron cans from baby formula and make a chair. As soon as the body is ready, cover it with foam rubber. Separately sew the cushions for the seat and back of the chair. Attach them to the foam rubber. Cover with furniture fabric. Now you can cut the cape and decorate the chair. If you make the body motionless, the furniture can last for several years.
Hanging chair
For this model you will need an iron circle (hoop), a polyester cord (thickness 5 mm, length 900 meters), hook No. 9, gymnastic ring, hook. Try to use the longest cord possible, as the knots may unravel over time under the pressure of the weight.
Crochet a “seat” to the size of the hoop. Any napkin pattern or pattern will work, even a simple arched grid. Please note that the bottom will sag under weight. Therefore, if you want a hard chair, the napkin should be smaller in size than the hoop. That is, we pull the bottom onto the base. You can not knit the seat, but use macrame to make a hanging chair with your own hands.
Next you need to knit or weave the top. To do this, weave a small piece of cords (the number depends on the weight of the person, and the length depends on the height of the ceiling), and pull it through the mount. You begin to expand the knitting, weaving the cords together. After 20 centimeters you braid the gymnastics ring. In this case, distribute all the cords into even number, and fill the rest of the space with other polyester pieces.
Continue weaving all the cords together, forming the back of the chair (reminiscent of a tent). Next, use the same cords to braid the hoop. Therefore, the segments must be long and the fastening must be reliable. In fact, the chair is ready, but for beauty you can tie the bottom a little and decorate it with fringe.

How to make a chair with your own hands from papier-mâché
This model requires a lot of time to make, but the result is worth it. This chair is suitable for babies. You need to take a large one, inflate it, place it in a bag, and attach a cardboard round bottom to the bottom with tape (the “pipe” is on top).
Next, cover the ball with newspapers, wallpaper using wallpaper glue and PVA. To make it easier to cover the ball, place it with the tip down in the basin. The process is the same as when making papier-mâché: glue the first layer and leave it to dry. This is how you need to glue until the thickness reaches one centimeter.
Next, turn the ball over and lower it. make an oval shape (it looks like a shell). Now all that remains is to make an upholstered chair with your own hands. Take a blanket, blanket, foam rubber or other filler. Using a construction stapler, secure the fabric to the body on all sides.
Lastly, upholster the body. decorative fabric. You sew a seat cushion, cover it with the same material and insert it into the chair. Attach wheels to the bottom. It turned out soft Baby chair for babies. The backrest and armrests may not support adults.

Bag chair
You can sew a bean bag chair for children. Not only professional seamstresses can make it with their own hands. For this you will need patterns. They can be of any shape, but the most popular is pear-shaped with an oval end. Make patterns twice - on raincoat and upholstery fabric.
It is undesirable to use lining fabric for the inside, since it will unravel under the weight of the weight. It is better to buy raincoat material, it is durable and waterproof. This is especially important if there are small children.
Sew patterns, fill them with special foam balls. Do this outside or in the garage, as they are magnetic, stick to your hands and fly apart. different sides. The result is an inner bag. Now you sew a cover from the same nine patterns (six wedges, one top and two halves of the bottom), only sew a zipper to the bottom or between two wedges. As you can see, it’s not difficult to make a bean bag chair with your own hands.
It is impossible to predict which shape is best for a sitter. Only with your first experience will you be able to understand how many granules you need to pour, what fabric to use, what patterns you should have.

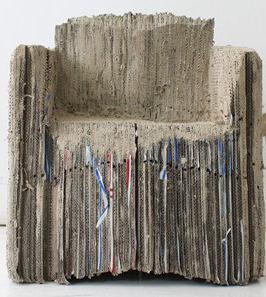
How to make a rocking chair with your own hands from cardboard
Cardboard, when folded correctly, creates durable material, capable of supporting an adult man. There are several options for making a cardboard chair.

Tire chair
If there are two car tires, a piece of felt, thick and thin foam rubber, flexible plywood, then you can do garden furniture. So, how to make a chair with your own hands from tires:
- wash and dry the wheels;
- put the tires on top of each other;
- fasten them together with self-tapping screws;
- cover the top with felt;
- fasten it with a construction stapler;
- cut off the excess felt;
- turn the wheels over;
- According to the size of the tire, cut out two circles from dense and thin foam rubber;
- insert a thick piece into the wheel;
- cover the top with a thin circle;
- cut out another circle from thin foam rubber that covers the entire tire;
- secure the material with a stapler;
- screw the flexible plywood with self-tapping screws;
- Wrap the resulting backrest on both sides with thin foam rubber;
- fasten the material with a stapler;
- sew a cover that covers the entire chair;
- put it on.
It is better to sew the cover from thick fabric with padding polyester lining. If the chair will be in the house, then upholster the entire body with fabric, then put on a cover.
Hammock chair
A hammock chair that will be loved by both adults and children is suitable for a dacha or balcony. To do this you will need a thick stick, thick fabric, cords, belts, and fastenings. Cut out a rectangle from the fabric (its size depends on the parameters of the person sitting). Sew it in half if the fabric is not very thick, or just finish the edges.
Sew the straps along the width of the rectangle. Drill two holes at the stick and thread the cords with the fastening. Attach the belts gathered into a bundle to it using clamps. Hang the hammock from the ceiling. There is another way to make a child seat with your own hands.
Weave cords using the macrame technique or crochet a long and wide rectangle. Tie strap handles on the sides and tie them around the stick. Also secure the cords with the fastening. The result is a mesh hammock. Now sew a mattress and a cover for the chair. The shape of the hanging chair can be any. The main thing is that the material is solid, without cuts (that is, the seat is made of solid fabric or long cords).

Conclusion
There are many ways to make a chair with your own hands. These can be bottles, cans, cardboard, newspaper tubes, car tires, fabric, threads, boards, plywood, boxes. In appearance it is no worse than the purchased one, it will decorate any interior.
Frameless furniture Russian markets appeared quite recently. But thanks to its many benefits, it quickly became popular. But the price for such a new product is often too high.
In the meantime, making an upholstered chair with your own hands is not at all difficult. This kind of work will not take you much time. And for sewing and decorating something like this original decoration your room can attract children.
Preparatory stages
Before you start, prepare detailed drawing. If you don't carefully calculate everything required dimensions, then you may not get the result you expected.
The easiest way is to make an upholstered chair in the shape of a pear or an ordinary bag.

Figure 1. An example of a drawing of a simple-shaped chair.
But you can give it the shape of a pyramid or, for example, a cube. Ottomans are often made for children's rooms in the shape of a drop or a funny animal, for example, a dragon.
An example of a drawing of a chair of a fairly simple shape is shown in Fig. 1. Naturally, you can change the dimensions given in it at your own request.
Next you should choose the fabric. You will need two types of matter. For the inner cover, purchase a fairly thick fabric with a tight weave. Otherwise, the filler balls may come out of the bag over time. Satin, coarse calico, and fabric intended for sewing napkins are well suited for this purpose.
But the outer cover can be sewn from any material. Denim will look good in any interior, faux leather, fur or furniture velor. The color of the material depends only on your taste, preferences and appearance rooms.
In order to, you will need to buy special filler. Typically, frameless furniture is stuffed with expanded polystyrene. It can be purchased at stores that sell furniture repair products.

Be careful when purchasing this product remotely (for example, from a catalog or online). This filler is very light and voluminous. To transport 10 kg of “balls” you will need a cargo gazelle, because in a normal a car he won't fit. When buying filler, pay attention not to the weight, but to the volume of the package. To sew an upholstered chair, you need a bag with a volume of 200-250 liters.
If desired, polystyrene foam can be replaced foam chips. It can be obtained by crumbling, for example, decorative tiles used for finishing the ceiling.
Some experts advise stuffing frameless furniture with hay or buckwheat husks. But using natural materials, remember that they should be changed approximately once every 5-6 months. Fillers of plant origin absorb moisture well, which is why mold fungi can grow in them. In addition, such materials are quickly compressed, and the soft chair will lose its volume and elasticity.
Return to contents
Sewing a frameless version

In order to make an upholstered chair of the dimensions indicated in the drawing, you will need the following materials:
- fabric for the inner cover (width 150 cm) - 3 m;
- fabric for outer cover(with a width of 150 cm) - 3 m;
- zipper, 22 cm long;
- sewing threads;
- materials for decoration (piping, braid, ribbons, trim).
Start by cutting out all necessary details. Don't forget to leave seam allowances! They should be 1.5-3 cm.
First you need to prepare patterns for all the elements of the soft chair. They are usually made from paper or polyethylene film(if you want to make patterns designed for reusable). When creating patterns, there is no need to take allowances into account.
The finished pattern is placed on the wrong side of the fabric and traced around the office with chalk or a piece of soap. Between the pattern pieces leave a space equal to the allowances. If you provide the same allowances for all parts, then the elements do not need to be marked separately. It is enough to fold the fabric in several layers and trace the pattern once.
Sewing should begin with the manufacture of the inner cover. The “petals” are sewn to the bottom one by one. Then the sides of the long parts are sewn together. It is necessary to leave a hole in one seam for stuffing. The top piece is sewn on last.

Next, the cover is made. It is done in a similar way, only a zipper is inserted into one of the seams. To do this, the seam is sewn from below, to a length of 3-5 cm. Then a pass is made, equal to length zippers, and stitched to the end. The parts sewn in this way are turned right side out, and the allowances for the fastener are folded and ironed. The zipper is placed under the workpiece from the inside out and pinned to the seam allowances. First, lay the stitch on one side, trying to position it as close to the teeth as possible (usually special paws are used for this). sewing machines), then on the other. Finish processing the fastener by laying double seams at the beginning and end of the zipper.
Additional decor will make the chair a unique part of your room. It can be decorated with embroidery, appliqués, and decorative braid. Such finishing depends only on your personal taste.
Not only folk craftsmen know how to make exclusive items from scrap materials. comfortable furniture. The advantage of such an activity is obvious - it is the opportunity to translate into reality the most bold ideas for variety of living space. An additional bonus is the low cost of making homemade soft chairs with your own hands. Following the advice of designers, you can make a soft chair for a pleasant time in own home. At home, you can exactly repeat all the stages of factory production of this modern and convenient attribute for decorating a children's or living room. On the Internet you can find both the simplest and most complex schemes.
The first step in making homemade upholstered furniture serves as the choice of fabric for external design soft parts designs. Each master selects upholstery depending on physical properties and price aspects and features that they have different drawings. Let's consider the most common fabrics for decorating chairs in our time:
- velor – velvety to the touch, gives the furniture a certain charm;

Velor upholstery
- flog is a distant analogue of velor, easy to clean, so designers use it to decorate children's upholstered furniture;

Upholstered flog
- chenille is a fabric based on a combination of natural and synthetic fibers, has particular wear resistance (a well-thought-out structure prevents the formation of pellets);

Chinille in upholstery
- jacquard - the upholstery is considered durable, but over time the loops turn into puffs;
- natural tapestry is the most expensive and beautiful view upholstery fabrics;

Upholstered jacquard
- faux suede – universal option for armchairs in a sunny room, UV-resistant and easy to clean;

Faux suede upholstery
- leatherette is a durable material that allows you to play with decorative embossing.

Leatherette upholstery
Material, fittings, tools for frame attributes
Creating a frame chair from scratch presents some difficulties. But the finished product will have a more respectable appearance. You can verify this by looking at the photo. finished products home craftsmen. You can also use an old Soviet “grandmother’s” chair for the base.
To make a simple frame for an upholstered chair, you need to select durable sheets of 20 mm plywood for cutting out parts yourself. A standard set of repair tools with an electric drill, a jigsaw, a steel ruler, emery cloth, metal rims, masking tape, a pencil, a tape measure, thin nails, self-tapping screws, wood glue, stain, and glossy paint will also be useful. For upholstery you need: artificial leather or fabric, foam rubber (filler).
Step-by-step creation of upholstered furniture with a wooden base
- If you don't know how to make a drawing for the base, then look ready-made options schemes on the network. As a rule, they are transferred to a cardboard template with a pencil. Only after this they begin to perform the operations of the described algorithm. This will help you save on excess material, or vice versa – avoid purchasing missing parts.
- Using a cardboard template, future constituent elements are cut out from plywood sheets:
- banana-shaped sidewalls;
- cross bars.
It is important to determine the required angles of inclination, bending and dimensions of the future frame. Photos will help with this finished chair created according to your design.
- The next stage is surface treatment wooden parts by stripping and grinding. The ends are worked with special care to improve the quality of the work done. These parts are first impregnated with heated drying oil and only then bends are formed with a hammer, if they are provided for in the sketch. Each component element is cut out with an electric jigsaw.
- The sidewalls are painted or treated with varnish-stain. The ends of the side parts are reinforced with metal rims.
- The further course of action is related to the covering of the frame. Using an electric drill, make the required holes. The rims are fixed with screws.
- First, the back part of the back is covered with artificial leather or fabric, then the remaining fragments of the structure, incl. and seats.
- The upholstery material is secured with wallpaper nails, which are characterized by large heads. In the back of the frame chair, the upholstery is fixed along the edge, along the transverse parts, to better cover the slats.
Pattern round chair
Wooden frame We cover the frame with fiberboard cardboard
Experienced furniture makers recommend additionally treating the fastening points with wood glue. This move is needed to increase the durability of the furniture you create yourself.
Secrets of reliable upholstery: how to sew
The process of stretching the upholstery of soft chairs has its own nuances:
- Foam rubber is cut to the size of the seat (average thickness - 5 cm). The part is glued to the surface of the plywood sheet.
- Horizontal and vertical fabric straps are secured to the back with a construction stapler. Similar belts are added to the armrests and sides from the inside along the shape.
- A piece is cut from a piece of foam rubber 0.1 cm thick, which will be larger in size than the area of the seat (the difference is 4-5 cm). Take a piece of synthetic padding fabric of a similar size with an elongated front part and fasten it with your own hands.
- After the manipulations have been completed, the upholstery is covered with furniture fabric. Using a stapler, the textiles are secured to all corners of the cover and the synthetic foam layer to the frame of the chair seat.
- The sides and armrests are also covered with synthetic padding, securing spray glue over the entire surface. Only after this the parts are sheathed with fabric, securing the flap along the staples.
We cover the chair with foam rubber. Additionally we put padding polyester