How to make a well house with your own hands. How to build a strong and attractive house for a well with your own hands: three step-by-step instructions. Finishing of the well house
Read also
The only source of drinking water in a country house is often a well. A well house helps preserve the purity of life-giving moisture and give the structure an attractive appearance. A template copy can be purchased ready-made, but it is much cheaper and more interesting to build a house for a well with your own hands. The design differs in size, configuration and finishing material. The proposed drawings will help you choose the appropriate option for making it yourself.
Purpose of the house
The main function of a well house is practical. The quality of well water is negatively affected by many factors:
- direct rays of the sun;
- precipitation;
- excess heat;
- animals and insects;
- wind blown debris;
- chemicals sprayed on nearby plants.
A properly equipped house prevents foreign substances from getting inside. In addition, a competent design will prevent water from freezing during severe frosts. Throughout the year, the structure creates protection from curious children, preserving their life and health. In addition to its practical purpose, a well house made with soul and soul will be an excellent decorative decoration for the site.
Water is supplied from the well in two ways - using a gate and a bucket attached to it or a pump. When choosing a house design, this factor must be taken into account.
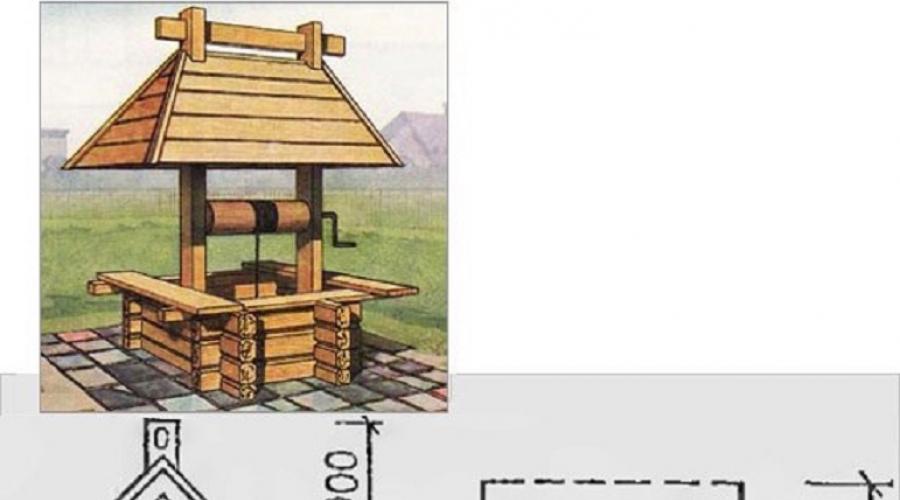
One of the options for a professional drawing with dimensions is presented below:
Variations of the structure
The protective structure can be open or closed. In the first case, the likelihood of water freezing in severe frosts increases significantly. Insulating the well ring with an expanded polystyrene foam coat followed by decorative finishing will help save the situation. A closed type design is more practical from the point of view of frost protection. The air layer itself retains heat, and in combination with thermal insulation material it will cope perfectly with the functions assigned to it.
The choice of materials when making a house for a well is based on the general architectural concept of the suburban area. If the main structure is a wooden frame, it would be logical to use logs to finish the well ring and boards for the roof. If the exterior of the house contains elements of brick or stone, the corresponding material is used when assembling the structure for the well with your own hands. The top is sheathed with material identical to the roofing of the main building. The proposed design is not an unshakable postulate and is relevant if the house is located within sight of the main building. A well located further away allows you to expand the boundaries of the choice of finishing for the house.
Comment! A wooden house, especially with carving elements, is incredibly attractive, but requires regular maintenance. Otherwise, the appearance will quickly lose its former luster. Siding mounted on a metal profile frame is much easier to maintain.
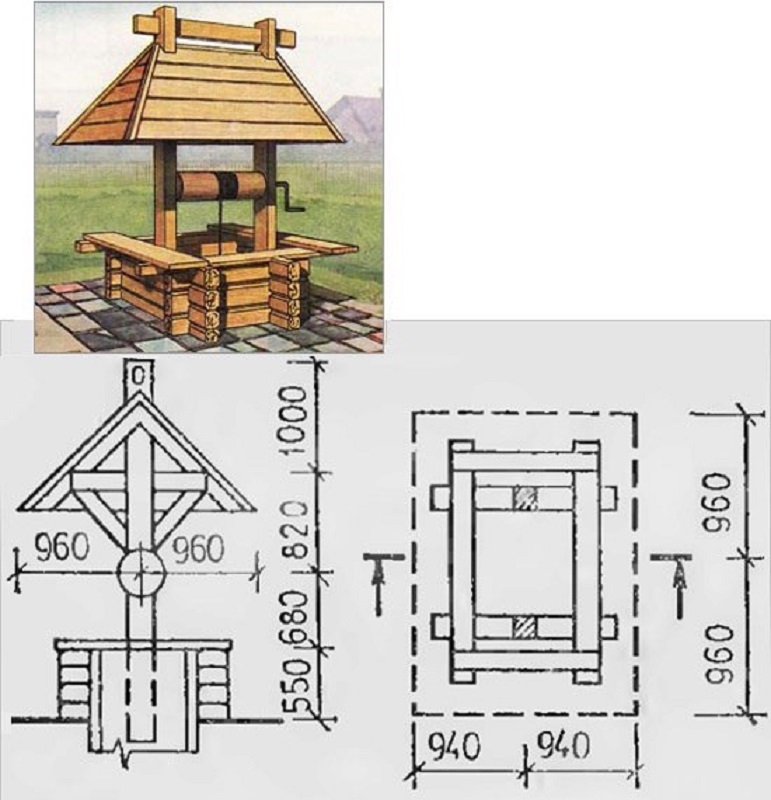
Another example of a drawing with dimensions will help you navigate the choice of configuration:
Simple open house design
It’s quite easy to design a structure for an open well with your own hands. Main design elements:
- 2 racks;
- canopy;
- gate

Since the racks are dug into the ground next to the well, the installation of supports for the canopy is carried out after decorating the well ring.
Basic steps for making a well canopy:

The order of work may vary. In some cases, the supports are first dug in, then the rafter system is attached, after which the roof is installed. It is more difficult to assemble the rafter system of an open house directly on fixed supports. Sometimes the entire structure is first assembled together and then dug over the well. The weight of the structure and personal experience will tell you how to make it more convenient with your own hands.


The procedure for making a closed house
An open house does not provide the well with 100% protection from adverse factors. It is much more efficient to assemble a closed type structure with your own hands. A detailed drawing indicating dimensions and a diagram of the assembled version is shown in the photo:
Frame design
To make the frame you will need timber and boards. As in the case of an open canopy, it is important for the structure to correctly select the dimensions of the main elements. Excessively thin parts will lead to deformation or breakage of the structure above the well as a result of wind loads. A large margin of safety will also be unnecessary, as the structure above the well will turn out to be bulky.
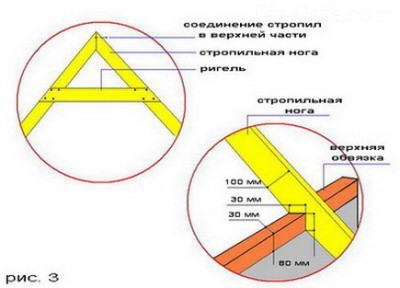
The photo shows a detailed drawing of the roof of the house:

It is optimal to select the following material sizes for work:
- The thickness of the board is 4 cm, the width varies from 120 to 150 mm.
- The section of the beam is 80x100 mm; for heavy roofing, it is better to take 100x100 mm.
- To work, you will need 4 timber supports and 4 boards for the lower and upper trim.
The boards are cut in advance, taking into account the dimensions of the well, and then nailed to the support posts. 100 mm nails are used as fastening elements. The algorithm for making a frame for a well house includes the following steps:
- the first pair of supports is fastened with boards at the top and bottom;
- the second pair of risers are connected in a similar way;
- the blanks are placed around the well;
- The elements of the house frame are connected by strapping.
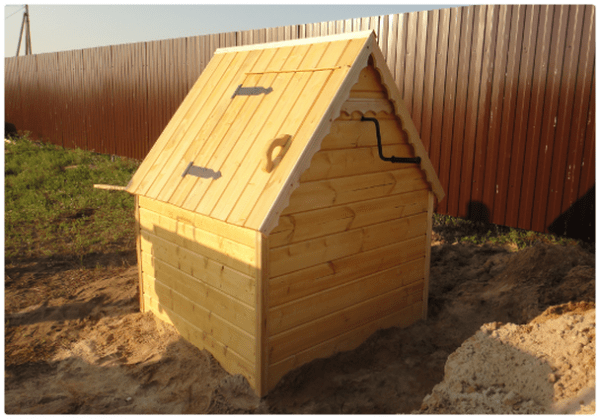
The photo shows an example of a finished house over a well:

Roof installation
The design of the roof of the house over the well begins with the assembly of roof trusses. They represent a rigid structure onto which the sheathing is subsequently attached. For the rafter legs of the house, boards are taken, the thickness of which is at least 3 cm. The length is selected individually, depending on how high the house above the well you want to get. The next elements of the rafter system are crossbars and jibs; a board thickness of 2.5 to 3.0 cm will be sufficient. The set of elements for the rafter system of the house above the well includes:
- jib - 8 pcs.;
- crossbars - 3 pcs.;
- rafter legs - 6 pcs.
The parts are cut at an angle, the upper ends are connected to each other using self-tapping screws. The crossbars perform the function of additional fixation; they are installed 0.3 m below the point of the upper connection of the rafter legs. The rafters are fastened to the frame using nails 120 mm long.
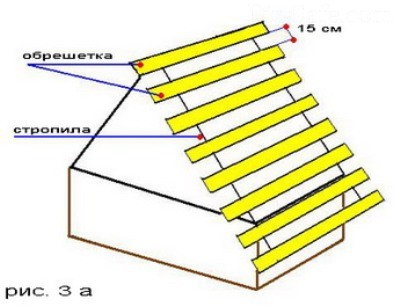
In order for the well house to have sufficient strength, the rafter system is strengthened with jibs. When the structure is assembled, lathing is carried out. The fastening step of the boards is 15 cm. First, the sheathing is covered with roofing felt, then the finishing roofing is installed. Corner joints are usually covered with boards.
Gate installation
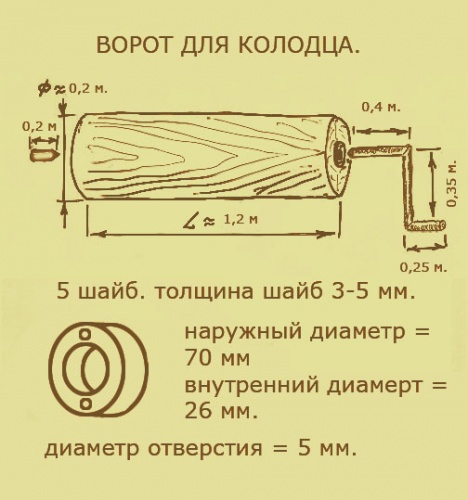
Decorating a house with your own hands above a well necessarily touches on the issue of installing a gate. To make it you will need a round log with a diameter of more than 200 mm.
Comment! The larger the diameter of the gate, the easier it is to lift the bucket of water.
The size of the gate depends on the distance between the two supports on which it is attached. It is optimal to choose a length that is 4-5 cm shorter. The approximate dimensions of the gate for the house above the well are shown in the drawing:
The main stages of making a gate for a house over a well:
- The required length of the collar is cut.
- After removing the bark from the log, it is carefully cleaned and sanded.
- The edges are covered with steel wire; this measure will preserve the geometry of the log.
- Holes are drilled in the center of the ends to a depth of 50 mm. The diameter is 20 mm.
- On top of the holes, metal plates are installed, on which the corresponding holes have already been prepared. This element will protect the wood from destruction.
- Similar holes are prepared in the supports, at the points where it is planned to fix the gate.
- The areas are covered with metal plates with holes.
- Metal bushings are inserted into the holes on the supports.
- The ends of the logs are equipped with metal rods. For the left part, a length of 200 mm is sufficient, the right element is represented by the letter “G”.
- Finally, the gate is hung on the posts.
The finished gate before being secured in the well house in the photo:

Arranging the door of a well house
So that over time the door does not move as a result of deformation of the structure, the boards for the house must be chosen dry. The sequence of work for manufacturing a door includes the following steps:
- 3 bars are secured to the frame as door openings.
- Based on the frame parameters, the door is assembled on the ground. Its dimensions should be slightly smaller than the internal outlines of the frame. The boards cut to the required size are connected at the bottom and top with bars. For rigidity, another block is nailed diagonally.
- Install metal hinges on the door and frame.
- After hanging the door on the frame, the latch and handle are attached to the structure.
- At the end, the quality of the work performed is checked. The door should not touch the frame during opening or closing and should not jam.
The photo shows the finished door on a structure for a well:

Finishing
Usually the lower part of the well house is lined with wood. The choice of a craftsman who builds a structure with his own hands is presented:
- Block house imitating a rounded log. In this case, the well will resemble a log house.
- Wooden lining looks impressive.
- An ordinary board represents the most budget-friendly option for designing a house for a well.
Attention! Treating the material with protective compounds will help preserve the integrity of the wooden structure for a long period. This includes antiseptic impregnation that prevents rotting, and means of protection against damage by pests. Varnish is suitable as a finishing coating for a well house.
A neat and beautiful wooden structure for a well is shown in the photo:

There are many options for finishing the roof of a well house. As in the case of an open-type house, it is important to foresee the weight of the roofing in advance so that the entire structure does not deform under the weight of the material.
For large slopes, installation of sheathing will be required. The boards are fastened in increments of 15-20 cm. The main roofing material is pressed onto the sheathing. This is how slopes and pediments are designed. If the well is of small diameter and the roof of the house has a compact area, the boards are installed directly on the frame.
Advice! To protect the walls of the house from moisture, the boards of the slopes extend beyond the dimensions of the main structure by 10 cm.
In addition to the classic board, the following are used as roofing:
- euroruberoid;
- siding;
- corrugated sheeting;
- metal tiles;
- bitumen shingles.
The roofing material is installed exclusively on the slopes; the gables are covered with wood treated with protective agents.

Conclusion
A competent drawing, taking into account the size of the well, is the basis for the correct design of the house. It is important to correctly calculate the weight of the structure so that the frame can withstand the load and not deform. The appearance is largely determined by the material chosen for finishing.


Often, owners of country houses or dachas on or near their property have a well, which must have a house, or at least a roof. Currently, houses for wells are available for sale in a variety of types, shapes and sizes: from a small wooden roof without decorations, to a carved house decorated with openwork patterns, images of animals or other elements. But, you must agree that a house for a well, created with your own hands, will please you much more.
The purpose of the well house
The well house performs several functions at once.
Firstly, it protects the water from insects, leaves, sediments containing harmful impurities, as well as various types of chemicals that are used to spray cultivated plants on the site.
Secondly, it protects from direct sunlight, which negatively affects the quality of water.
Thirdly, during the cold season, this structure prevents the water in the well from freezing.
Fourthly, it plays the role of a fence, which is very important if there are children in the house.
Well, and, of course, a well house can serve as an unusual decoration for the site.
Instructions for creating a house for a well
Let's consider the technology for creating different options for houses for a well. Regardless of which option you choose to build it, you will need to prepare the following tools and materials:
- plane, preferably electric;
- jigsaw;
- screwdriver
- nail puller;
- hacksaw;
- construction level;
- hammer;
- three-meter tape measure;
- handle;
- rounded laminated veneer lumber;
- edged boards;
- fastening parts (nails, screws, self-tapping screws, etc.);
- slate or any other roofing material;
- If you plan to install a door, you should prepare the necessary fittings: handles, door hinges and latches.

All parts must be given the proper dimensions, cleaned and treated with antiseptic agents. Such preparation will increase the service life of the wooden material.
Option #1. House - roof with two slopes
We build the frame
To create the frame you will need an edged board and timber. There is no need to take materials that are too massive or, conversely, too thin. Since the former will give the structure an unattractive appearance, and the latter will make it too fragile. Therefore, for work it is better to take a beam with a cross-section of 8 x 10 cm, and an edged board 4 centimeters thick.
The first step is to prepare four racks, 8 cm wide. Next, you will need edged boards 12 cm wide and long enough for tying the racks. The boards are nailed to the posts one by one with nails, the length of which must be at least 10 cm. Such nails will allow you to securely connect the parts together. The result of the work done should be a stable and durable frame.
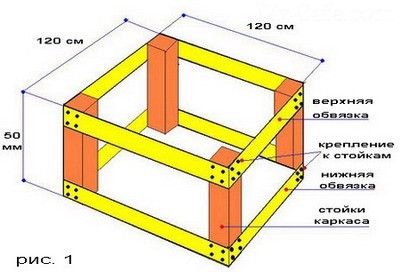
Advice ! To make the work easier, it should be carried out in the following sequence: first connect the first pair of racks using boards, and then the second. Place the resulting two structures around the well and combine them with the remaining boards.
We are building a roof
The first step is to create a rafter system on which the sheathing will subsequently be installed. The rafters are made from boards more than 3 cm thick and 180 cm long. The longer the boards are, the higher the structure will be.
For crossbars and crossbars, boards with a thickness of 2.5 cm are suitable. In total, six rafters, eight crossbars and three crossbars will be needed for the work.
The upper ends of the rafters are connected in pairs to each other, having previously cut them at the appropriate angle, and secured with self-tapping screws. In order to make the structure more durable, 30 cm below its top is mounted.
A recess is made at the place where the rafters are attached to the frame. Then the resulting structure is installed on the frame and secured with nails 12 cm long.
The fastening of the rafters is strengthened by installing jibs. You can also install a ridge to strengthen the junction of the rafters.
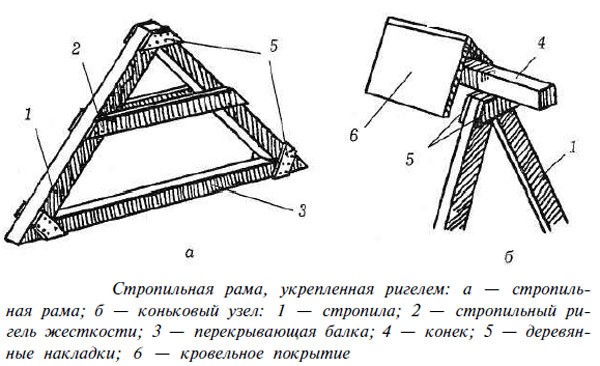
Roofing felt is placed on top of the sheathing, and slate is placed on top of it. The resulting corner joints are covered with wind boards.
Door installation
The house door is made quite simply. First, the boards are cut so that their width is 20 cm and length 85 cm. The cut boards are laid in a row, tightly next to each other, and secured with two wooden blocks with a cross-section of 2.5 x 3 cm. One block is attached closer to the top edge of the door, the second one is closer to the bottom. Fastening is done with self-tapping screws, four for each board. In order to fasten the boards more firmly and prevent them from moving relative to each other, another block is nailed diagonally.
The house for the well is almost completely ready, all that remains is to sheathe the gables, install a handle and latch on the door and hang it on the hinges. In order for the material to last longer and the finished structure to have a pleasant appearance, the outside is treated with an antiseptic and coated with waterproof paint and varnish.
You can also familiarize yourself with the technology for creating this version of a well house in the video below:
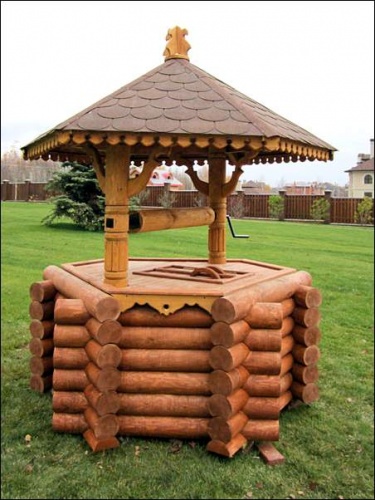
Option #2. House for a well in the form of a log house
This type of well house is often found in villages. It is made from logs and has a classic rustic style.

To build this version of the house you will need: rounded logs, edged boards, roofing, metal pipes or metal rods with a radius of 12 mm.
Let's look at the procedure for completing the work of building a house for a well in the form of a log house.
First, logs with a diameter of 100 mm are piled into a log house. Curly protrusions are made on the protruding edges of the logs to decorate the well.
The next step is to create a gate to raise the water. The base of the gate is a rounded log with a diameter of 20 cm or more. The length of this log should be 6-10 cm less than the gap between the posts so that it does not get caught on them when turning the gate. To eliminate the possibility of deformation of the log, the sides are covered with metal wire. Next, holes with a diameter of 3 cm are made in both ends of the log, as well as in the racks. In the gate, these holes should have a depth of 5 cm, and pass through in the racks. In addition, the holes in the gate and on the posts should be located opposite each other. Then you need to prepare the pipes for attaching the gate to the posts. To do this, you can use a water pipe or metal rods with a radius of 12 mm. One pipe is inserted through the right post into the right end of the gate. This pipe remains straight and can be of any length.
Attention ! In order for the gate to hold as securely as possible, the end of the pipe protruding from the outer edge of the post should be more than 5 cm.
The second pipe is inserted through the left post into the left end of the gate. This pipe is first bent in two places at an angle of 90 degrees as shown in the figure below.
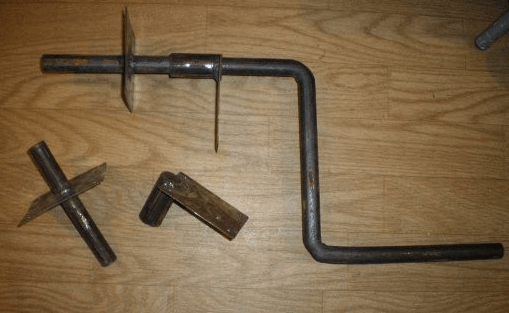
This pipe will serve as a handle that turns the gate.
Advice ! Before bending, it is better to heat the pipe, then the bend will be not only even, but also smooth.
After the gate is installed, they proceed to installing the roof of the well house. The roof is covered with roofing material. To make the house look attractive, it is better to take a brightly colored material.
The roof should be sized so that its edges extend beyond the perimeter of the log house; this will prevent rainwater and other precipitation from entering the well.
The final stage is to treat the outside of all wooden surfaces of the structure with antiseptic agents and then varnish.
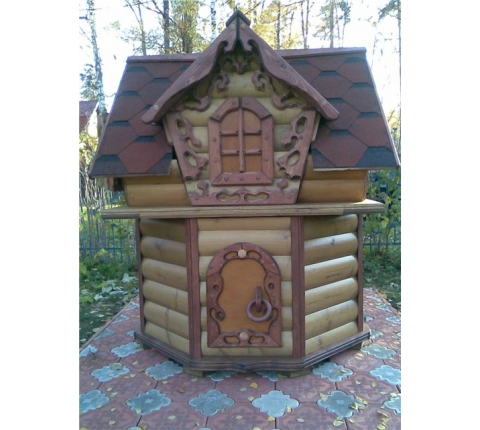
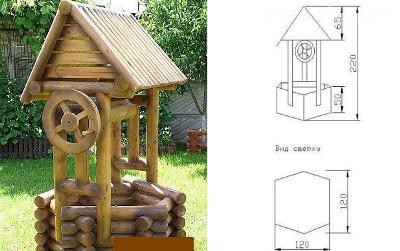
Option #3. House for a well with a hexagonal frame at the base
This version of the well house differs from the previous design in that the log house has an unusual hexagonal shape.
In addition, to give it asymmetry, the slopes are made of different lengths and covered with edged boards.
This building is small in size, which is especially appreciated if there is no free territory on the site. An additional decorative element is a wheel mounted on the gate to raise the water. The height of the finished house is 2.2 m, and the base has a diameter of 1.2 m.
Decorating a house for a well
There are many options to turn an ordinary well house into a whole work of art.
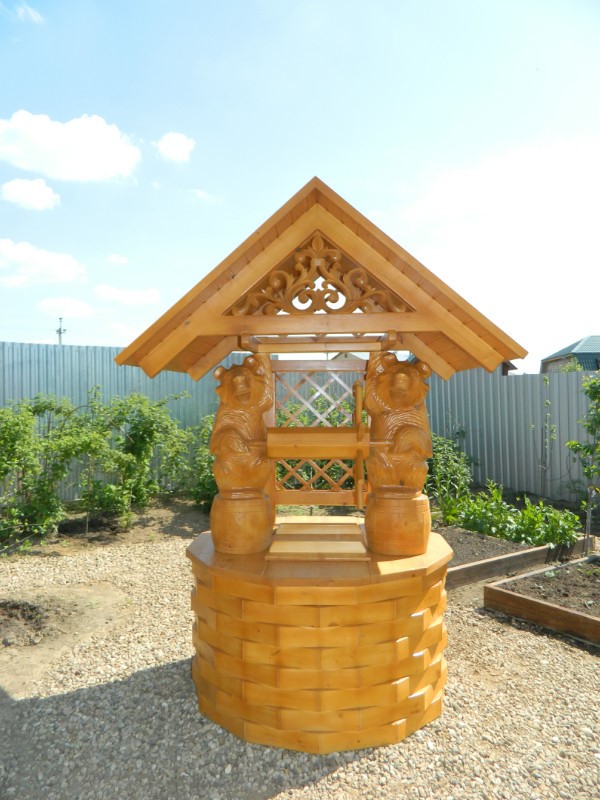
The most popular way to decorate a house is traditional wood carving. Using this method, you can decorate the house with intricate patterns, images of animals, ornaments and other decorative elements. A well with a carved wooden house will decorate any site, especially if the main buildings are also made of wood.
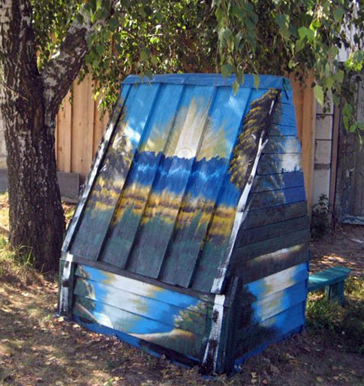
If you don’t have enough time to carve, you can use a simpler and faster method - decorating with paints and varnishes. So, the house can be painted in contrasting colors, or a whole picture with an interesting plot can be depicted on it.
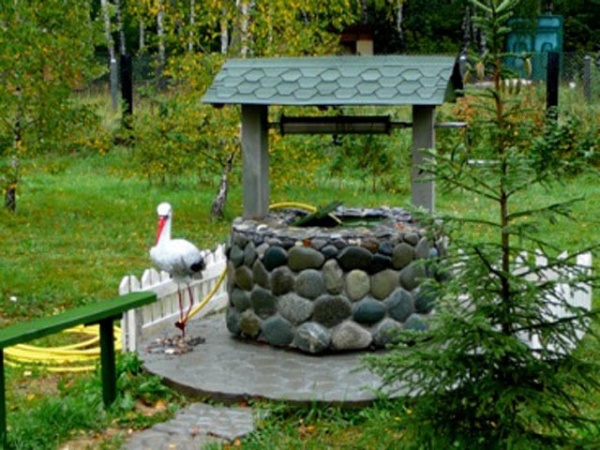
Another decorative option is to use brick, mosaic tiles or other facing materials to decorate the well.

Some people line the well all the way to the roof with natural stone.
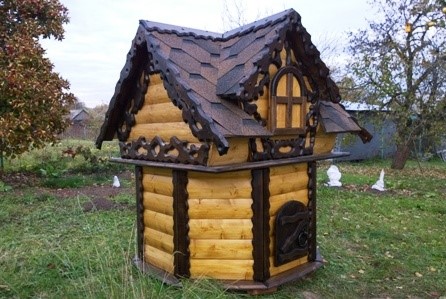
You can also use thematic design of the well, for example, make it in the form of a fairy-tale tower or a character. Children will especially like this decor option.

A well house can become one of the main decorations of your site. It all depends only on the possibilities of your imagination and desire to bring your plans to life!
Probably, each of us associates a well with a wooden frame, a gate and a bucket on an iron chain, a neatly folded gable roof and a peasant woman standing next to her with a rocker resting on her shoulders. It is unlikely that you will find something like this as soon as you dig a well in your dacha. No log house, no roof, just bare concrete rings. But everything is in your hands, since they are exactly what you will need when you start making your own house for a well. Don’t be alarmed, there is nothing complicated about this, you just need common sense and a powerful desire, coupled with knowledge of some of the features of the work, and now you are building your own little architectural miracle.
The main purpose of the design is to protect water from dirt, insects, branches, etc. You can, of course, simply cover the top of the well with some kind of lid, but bare concrete rings are unlikely to delight anyone (and it’s more difficult to collect water ), so the second function of the house is purely aesthetic. Moreover, such a house can be a whole work of architectural art and be the envy of your neighbors.
To install a log house, you can seek the help of professionals, but we know very well that things made with your own hands always bring more pleasure, and they also save a lot of money.
Let's look at different house designs, study their pros and cons, and also learn how to make a house for a well yourself.
Designs, diagrams and drawings

First, let's decide how many walls our house will have. You can choose a rectangular or hexagonal frame.

The tetrahedral version looks more traditional, but the hexagonal version also has its advantages. The design of such a log house will allow you to save space; it takes up less space and is well suited for small areas. Otherwise, it’s more a matter of taste; each option can be played up, decorated, decorated in its own way.

There are more simplified open-type schemes without walls. They perform their function just as well, but are easier to manufacture. There are also closed and open designs. The closed structure differs in that it completely hides the well, while the open one consists of walls along the height of a concrete ring and a roof.
Self-installation
Typically, wood is used as the material for building a house. It is easy to process, durable and looks good. Both timber and logs are used to make sheathing. Bricks or cobblestones can be used to cover the above-ground part. This material goes well with wood.
List of building materials for all work:
- A wooden beam, the cross-section of which is 5 x 5 cm, or logs for a log house (depending on the design).
- Roofing material. It must be light, otherwise the supports may break.
- Log for making a lifting mechanism.
- Protective impregnation for wood, paint, varnish.
- Metal hinges, handle, latch or other latch.
- Nails, screws.
- Metal corners and bushings.
- Bucket, chain.
- Door materials.
A general set of tools that you will need in any case:
- To process logs we will need an electric planer, and for timber and boards - a jigsaw.
- You also need to have a grinder.
- Building level.
- Roulette.
- A hammer and preferably a nail puller.
- Hacksaw.
- Screwdriver Set.
Where the frame is installed depends on the design of the house. It is easier to make a canopy or just a roof, in which case pouring a foundation will not be required.

As the foundation itself, concrete formwork or a tile base is usually used. You can use the well blind area, modifying it a little. Do not forget to take care of the drainage of rainwater in advance by using special gutters in the formwork for this purpose. It is also recommended to add a little liquid glass to the formwork solution to protect it from moisture and dampness, but this is not a necessary condition. Consider the size of the base so that when the house is ready, it will be convenient for you to collect water; the design should, first of all, be comfortable and practical.

Now let's look at a simpler and cheaper option for assembling from timber:
- Four pieces of timber are cut for racks and eight for sheathing. We calculate how much timber is needed for the cladding and do the same. We treat the material with an antiseptic. Be sure to add insulation.
- First, the lower sheathing and racks are assembled, then the upper. The level of the top sheathing should not be higher than the concrete ring. Then the cladding is done using a building level.
- The racks are made from boards with a cross-section of half a centimeter. We make a gate in the same way as in the first option, wrap a chain around it and install the skate. If the roof is closed, the racks are attached to its frame.
- Next, the roof is assembled according to approximately the same principle as in the version with a log house.
There is an even simpler type of house, it involves the presence of only two roof slopes and is made of boards.

How to make it:
- Place four posts at pre-marked distances. Don't forget to treat the boards with impregnation.
- Nail the boards at the top and bottom, connecting the posts.
- Next, cut the rafters and fasten them at the top. Install a deadbolt for added strength. It is mounted thirty centimeters below the ridge point.
- Cut a cut where the rafters will meet the top boards and fasten them to the frame. Install two jibs for reinforcement and connect the rafters with a ridge of two boards. Subsequently, the sheathing is installed on these two boards.
- Roofing felt is quite suitable as a roof; slate is placed on top of it, and the corner joints are covered with wind boards. A budget option would be to use corrugated sheets or ondulin.
An integral element of the house is the door. To make it, attach 3 bars to the frame, which will serve as the door frame. Based on the dimensions of the frame, assemble the door, remember that its size should not exceed the internal size of the frame. To add rigidity, attach a piece of wood diagonally and then attach the hinges to the door and frame. Hang the door on the frame and install the handle. Check whether the door catches the frame when closing and opening.
 So, our house is ready and we can move on to the decorative finishing stage. There are countless design options. You can decorate the facade of the house with carvings, paintings, and platbands. If you want to make a house in an oriental style, a hexagonal design, a diamond-shaped roof covered with tiles, is more suitable for you. You can also decorate the well with flowers, hang pots under the roof, and decorate the walls with climbing plants. A nautical theme is perfect, the gate is a great place for the helm, you can string ropes between the posts, and cover the roof with canvas. You can find old boards and decorate the house in an old, medieval style, or paint the existing material with gray paint. For modern dachas, a transparent polycarbonate roof and forged metal supports are suitable. A popular option is the mill house. In this matter, everything depends on your imagination and taste preferences.
If installing a well on your site is impossible (no space, poor soil, deep aquifer), you can still build a log house that will serve a purely decorative function. To complete the illusion, you can build a container of water inside.
Cost of materials and work
You can buy a ready-made house at completely different prices. A simple structure made of boards and a gable roof costs from 7 thousand rubles. The options are more interesting, but with walls they will cost you more. Such houses are sold at prices starting from 15 thousand rubles.
If you do all the work yourself, then the prices for materials will depend on what type of house you have chosen, as well as your design decision and preferences in the choice of material. On average from three to seven thousand rubles. However, one thing is for sure, the final price will be cheaper than ready-made models on the market.
Results
If you have already decided to install a well house on your property, here are the main points you should keep in mind:
- The cheapest and easiest to make design is an open house without walls. The most expensive and difficult to install is the closed hex version.
- It is very important to treat all parts with impregnations and varnishes before installing the structure directly above the well. Doing this after installation can contaminate your well water with chemicals.
- A wooden block nailed to the door diagonally will prevent it from skewing.
- If your site does not have suitable conditions for a well, you can always install a decorative log house.
Finally, do not forget to properly care for the well, and it will always delight you with clean and tasty water.
A well is often installed in country houses and summer cottages. As a rule, it looks like a nondescript structure with a gate on posts. Anyone can turn it into an attractive and functional building. This requires initial construction skills, desire and suitable materials to create this structure. Construction and shopping centers sell not only ready-made houses for wells, but also all the parts for their construction.
Why do you need a well house?
Convenience and cleanliness of water
A well house is necessary because it performs several functions at once:
- Its design eliminates the possibility of leaves, insects, dust, debris, as well as chemicals used when spraying plants near it, getting into the water.
- Protects against penetration of sunlight, which negatively affects water.
- Prevents water from freezing in winter.
- Will not allow access to children and pets.
- It will serve as a decoration for the yard, which will emphasize the uniqueness and complete the composition of the site.
Design Features
Various forms of structures for wells are allowed. They can be in the form of a simple shield covering the top of the well shaft or look like a log house. The roof is usually gable, shed or umbrella-shaped. The angle of the roof can be flat or sharp. Doors are usually placed on one or both sides. They can be single-leaf, double-leaf, solid or sliding panels.
For the roof, a material is selected that is harmonious in color and texture with the buildings on the site. It can be painted or covered with soft tiles. Finishing with stone and other textured materials looks beautiful. In this case, a layer of cement mortar is applied to the well ring, and stones are placed on it. The same principle applies to tiling with mosaic tiles.
To create all these design details, it is not necessary to purchase them from a hardware store. The materials remaining after building the house will do just fine:
- Cement applied to a well ring can easily be turned into a relief pattern in the form of brickwork. While the solution has not hardened, you can draw lines imitating bricks. When it hardens, paint it in the appropriate color.
- Ceramic tile fragments can be split into fragments and laid out like puzzles, in the form of a composition around the base of the well.
- Enclose the base with round logs, giving it any geometric shape. The stands can be decorated with dry tree bark. Plant flowers nearby and decorate the roof slopes with curly carvings.
Preparatory stage
First of all, it is necessary to clear the area around the well of debris and grass. Then you need to level this surface and fill it with crushed stone. To do this, make a layer of 15 to 20 cm, which must be compacted. First you need to fill the surface with large crushed stone, and then with smaller ones. The result will be a platform that should be larger than the well house.
Wood is traditionally used to build a well shelter structure. This material is easy to process, durable in use and has a beautiful natural appearance. At the preparatory stage, you need to cut all the parts in accordance with the drawing. This will speed up the process of assembling the house.
Blueprints
The dimensions of the future house are based on the diameter of the well ring. After receiving all the measurement data, a design drawing is drawn up, the material of manufacture is selected and further construction activities are planned.
As an example, the creation of a structure for a well house from wooden boards and beams will be described. This house has a gable roof with a roof made of soft tiles.
A variant with a gable roof is presented
1 - frame base; 2 - pediments; 3 - vertical stand; 4 - roof ridge; 5 - gate; 6 - gable trim; 7–8 - roof slopes
Selection and calculation of materials
To build a well house you will need the following materials:
- 4 wooden beams (rafters) with a section of 50x50 mm, 84 cm long;
- 1 wooden beam (roof ridge board) with a section of 50x50 mm, length 100 cm;
- 4 wooden beams (base) with a section of 100x100 mm, 100 cm long;
- 2 wooden beams (for fastening the rafters and base) with a section of 100x50 mm, 100 cm long;
- 2 wooden beams (column support) with a cross-section of 100x50 mm, length from 72 to 172 cm (depending on the method and height of fastening);
- Log (for the well gate) with a diameter of 20 to 25 cm, a length of 90 cm;
- Board (on which buckets are placed) with a cross-section of 30x300 mm, length 100 cm;
- Boards (for gables and roof slopes) with a section of 20x100 mm;
- 4 metal corners;
- 2 metal rods with a diameter of 20 mm: one is from 20 to 30 cm long, the other is L-shaped, measuring 40x35x25 cm;
- 2 metal bushings (pipe scraps);
- 5 metal washers with a hole diameter of 26mm;
- 2 door hinges, handle, latch;
- Nails, screws, self-tapping screws;
- Roofing material (soft tiles);
- Chain and water container.
First you need to level and trim the wood. All wooden parts can be subject to rotting and damage from wood-boring insects. To prevent this from happening, the structure must be treated with antiseptic solutions, antifungal substances or oil protective agents.
The wood for building the frame must first be dried. This will prevent it from warping in the future.
Required set of tools
It is almost impossible to build a well house structure without special tools:
- Shershebel and circular saw (with these tools you can quickly and efficiently process all wooden structural elements).
- A jigsaw or hacksaw (convenient for sawing boards lengthwise).
- Impact drill or hammer drill (for drilling holes in the concrete ring when attaching racks).
- Hammer (it is better to take a medium size).
- Screwdriver (Phillips head).
- Building level.
- Roulette.
- Pencil.
Step-by-step instructions for making a well house
- Measure the diameter or width of the well head. Based on these dimensions, the perimeter of the wooden base of the structure will be calculated.
Frame base
- Make a wooden frame from a beam with a cross-section of 50x100 mm. It is more convenient to do it on a flat surface, checking the structure using a building level.
- Attach 2 beams (vertical posts) with a cross-section of 50x100 mm and a length of 72 cm to the frame, perpendicular to its base. At the top, connect them with a beam with a cross-section of 50x50 mm, which will act as a ridge.
The design is ready for installation on a well ring
- Connect the vertical posts to the base of the frame (in its corners) using rafters. In order for the rafters to fit tightly, it is necessary to cut the upper ends of the racks on both sides at angles of 45 degrees.
The upper ends of the vertical posts are sawn on both sides at an angle of 45 degrees
- Attach a wide board to the base of one of the sides of the frame (in the place where the door will be). In the future, buckets of water from the well will be placed on it. Its width should not be less than 30 cm.
- Place boards of smaller width on the remaining sides. This is necessary for the strength of the structure and to hold it on the well ring.
Fastening the structure to a concrete ring
- Attach the finished frame to the concrete ring of the well using bolts. To do this, you need to align the holes of the posts and the concrete ring, insert the bolts into them and tighten the nuts.
Vertical beams are bolted to the concrete ring
- Install the gate with the handle on the vertical posts. Secure it to the structure.
The gate is secured with metal plates to the vertical posts
- Attach a door with a handle and latch to the frame.
The surface of the slopes is ready to be covered with roofing material
- Cover the gables and slopes of the frame with boards. The outermost boards of the slopes must extend beyond the structure. This will act as a visor and protect the gables from getting wet.
- Secure the roofing material to the roof slopes.
The frame must have the correct geometric shape, since displacements and distortions in the future will negatively affect the integrity of the structure. The joints of wooden frame elements can be additionally reinforced with metal corners. Self-tapping screws with a rare thread pitch with a diameter of 3.0 to 4.0 mm and a length of 20 to 30 mm are suitable for this.
When the structure is installed on the well ring, you can begin making the gate. This device is necessary for raising and lowering the bucket.
The larger the diameter of the gate, the easier it is to screw a chain with a bucket of water onto it.
Well gate
- A round log 90 cm long and 20 cm or more in diameter. The length of the gate should be 4–5 cm less than the distance between the vertical posts. This makes it possible not to touch the post with the edge of the gate.
The dimensions of the metal elements must exactly fit the gate openings
- It must first be cleared of bark, leveled with a plane and sanded.
- To maintain a cylindrical shape, wrap the edges of the log with wire or tighten it with a metal clamp.
- At the ends of the log, in the center, drill holes with a diameter of 2 cm and a depth of 5 cm.
Before making the gate, the log must be dry and without cracks
- Attach metal washers with similar holes on top. This is necessary to prevent destruction and cracking of wood during operation.
- Drill the same holes at the same height in the vertical posts. Then insert metal bushings there.
- Drive metal rods into the finished holes of the log: on the left - 20 cm, on the right - the L-shaped handle of the gate.
Metal parts for manual gate
- Hang the gate with metal parts on vertical posts.
- Attach a chain to the collar and hang a water container from it.
DIY house door
- Attach 3 bars (intended for the door frame) with a section of 50x50 mm to one side of the frame;
The beams are attached to the rafters and the base of the entire structure
- In accordance with the dimensions of the frame, assemble the door from identical boards. The fitted boards are fastened with bars at the top, bottom and diagonally;
It is better to do this on a flat surface of the ground. The size of the door must be selected smaller than the internal dimensions of its frame. In this case, the door will not touch the wooden base.
- Attach metal hinges to the door;
- Then install the door on the frame and secure the hinges with screws or nails;
Door hinges secured with nails
- Attach the handle and latch to the outside of the door;
- Check the door. It should not get caught when opening and closing.
Installation of roofing material
The last step in building a well house will be installing a waterproofing layer on the roof. This will preserve the wood and extend the life of the structure. As protection against water, roofing material or, as in our case, soft tiles are used.
Do not install slate or heavy tiles on top of the waterproofing. From such a weight, after a few years the structure may warp and collapse.
Soft tiles were chosen as the roof.
Video: Making a house for a well
The finished well house can be decorated at your discretion. You can lay out flower beds and flower beds around it, paint it in the color you like or decorate it with carvings. There are no rules in the design. The building should fit harmoniously into the environment of the site and delight you for many years.
The construction of a well usually ends with the construction of a house, which both decorates and protects the structure. There are many different options for finishing this element, but the procedure and principles of operation are generally almost the same.

Peculiarities
A well in your own yard or country house is often not a luxury item, but a real necessity in those places where there is no centralized water supply. However, a simple concrete ring sticking out of the ground gives aesthetic pleasure to few people, and the ease of use in this case is below average. To correct this situation, it is necessary to improve the well by installing a special gate, which significantly facilitates the rise of water. Today, in large construction stores you can purchase ready-made well fences, but, as a rule, they either do not have the most presentable appearance or are very expensive.
Therefore, most often, home craftsmen build well houses with their own hands - in this case, you can show your imagination and arrange everything exactly as you need.


Let's figure out why this fence is needed in general.
- The well house protects the well water from contamination due to the ingress of dust, leaves, stones, and so on. This requires a tight-fitting lid - open wells are only suitable for process water (watering, washing), so if you intend to at least wash dishes, then the lid should become an indispensable attribute of the design.
- The house prevents any type of sediment from getting into the drinking water. Rain and melt water contain a large amount of acid-base elements, human waste, fertilizers and other impurities dissolved in them; their entry into the water source is fraught with dangerous pollution. To avoid this, the roof of the house is usually made gable - this makes it easier to remove precipitation.
- The house prevents the penetration of chemicals into the well, which are often used to spray green spaces.

These are important, but not the only functions of the houses - the walls of the well house do not allow the water to freeze in winter, and in addition, and this is very important, they ensure the safety of small children. They often put latches on the houses and install locks that prevent inquisitive kids from bending over and falling into the water.
To make the rise of water as easy as possible, gates and racks are installed - usually this is an ordinary log with a rotating handle, to which a metal chain is attached.
Of course, the ideal well house should require the simplest maintenance and fit seamlessly into the landscape design.


Blueprints
There is a wide variety of houses arranged for hydraulic structures; most often they are made in the form of a cover, a house or a gazebo.
The first option is optimal in conditions of a limited budget, as it is quite economical. This is a simple cap that covers the entrance to a well shaft at ground level. Equipping such protection is quite quick and simple, but it is necessary to constantly monitor the lid so that it is closed at all times.
A structure in the form of a house or gazebo is often installed in dachas, where it perfectly complements the landscape design. As a rule, such a gazebo has a special protective door that prevents precipitation from entering and also protects water from debris. The material for the manufacture of such houses is wood, which is durable and environmentally friendly.
When drawing up drawings and diagrams of houses for a well, it is very important to take into account the material from which it will be constructed.


Most often used:
- brick;
- stone;
- concrete blocks;
- metal structures;
- logs


Houses made of stone and brick are built quite quickly and simply, they are reliable and can last for many years. The only drawback of such a structure is its low attractiveness, so such houses will require finishing, which leads to additional costs of time, effort and money.
Houses made of concrete are very popular; this material allows you to build a structure of any shape - you can design it in the form of circular axes, or you can build a small hill. There are a lot of options, but each of them, just like brick, will require decorative finishing - most often they use mosaics or stone fragments.


A house made of metal structures is optimal for areas in high-tech style; it is distinguished by its laconic shape, strict geometry and conceptual design.
However, the most popular material for arranging houses has been and remains logs.– wood products look harmonious in any landscape, a wooden house has an exceptionally attractive appearance, and in addition, it reliably protects the entrance to the mine. The only disadvantage of this material is its susceptibility to rotting under the influence of external atmospheric factors. However, if you use stained wood and treat it with special protective compounds, its service life will extend for many years.
The house may also be made of plastic, but such options are more often used to create decorative structures.
The choice of material is far from the only issue that needs to be resolved at the pre-construction stage; it is very important to draw up a drawing, and for this you should choose a design for the structure.


Well houses can be open or closed.
Open models include several basic elements:
- ground part;
- lift stands;
- roof with rafter system;
- door on the log house.
Such options are widespread in villages; they are optimal if several owners use the well.


The closed-type design includes a slightly different set of components:
- stand with gate (lift)
- doors with a lock;
- rafters and roofing.
Each of these structures is individual and unlike the others, the walls here can either form a single whole with the log house, or their role is played by the roof slopes, but regardless of the features of the structure, they reliably protect the well from bad weather, and also make it safe for children and children to move around the site pets.


Traditionally, several design options are used.
- Roof house- the simplest house, which is made in the form of a simple triangular gable roof.
- A slightly more complex option is construction of a house in the full sense of the word. Such products are most often made in the form of a quadrangular frame and a decorated roof, or they use concrete rings - in this case the structure has a round shape.
- Looks very original gazebo houses. In this case, the structure is not completely closed, but partially open, the roof is mounted on supports, and the door is not installed in the roof itself, but near the base. At the same time, the base itself can be anything - a round ring, logs with a square base, as well as an octagonal house look very harmonious.


The design of the future well house and the features of its further construction depend on the chosen form. Traditionally, the dimensions of the house should correspond directly to the structure of the mine: a series of concrete rings or the shape of a log structure. Keep in mind that if the roof is made too small, the water will not be protected from dust and dirt, and a cover that is too spacious will make the use of the water source inconvenient.

How to build?
Regardless of what type of well house construction you choose, the set of tools you will need is approximately the same. If you plan to work with wood, then you will need:
- plane
- saw;
- screwdriver;
- level;
- roulette;
- pencil;
- hammer;
- nail puller
- But you also need to prepare materials:
- edged board;
- rounded timber;
- door latch;
- fasteners.


First, you need to draw up a drawing; to do this, you need to decide in advance on the dimensions of the structure and calculate the dimensions of the base, gables, gates and doors, as well as calculate the area of the roof slopes and ridge posts.
Let's consider a method for making a house with a gable roof. Most often, timber (for the frame) and edged boards are used for such structures. First, assemble the frame. Its assembly usually begins with carefully cutting out the necessary parts for the bottom trim, supports on which the roof will be attached, connecting boards and crossbars. Typically, the dimensions of the lower trim strictly correspond to the external size of the well, and the parameters of the racks are selected in such a way as to form the required roof slope. Accordingly, the side connecting supports and the top crossbar correspond to the size of the roof: the first is its height, and the second is its width.

The frame parts are fixed using long nails in the following order:
- first you need to fasten 2 racks at the top and bottom; to do this, boards are nailed to them;
- install special parts on the shafts and secure them with strappings;
- It is very important that the ends of the bars at the junction with the top crossbar are cut at an angle of 45 degrees.
To make the structure more durable, corners are stuffed into the joints, a wide board is fixed to the bottom of the frame from the inside, which can later be used as a shelf for a bucket, the remaining sides are reinforced with narrower boards - they are used to hold the head.


Another point that needs to be given special attention is the manufacture of the gate. It is necessary for winding/unwinding a chain, with the help of which a bucket or other container is lowered into the water and raised to the surface. The log for the gate must be thick, preferably oak, as this species is characterized by increased strength. Many people refuse to install a gate in favor of installing a pump, but experts do not recommend this: like any equipment, the pump can break, in which case a backup option will not hurt.
The length of the logs should be 5 cm shorter than the length between the two posts. The log must be sanded, and a wire wrap is made at the ends and holes are drilled in the center; their depth should be approximately 4-6 cm, and the thickness should be about 2. These holes are reinforced with washers, and metal rods are driven inside - short and long. The long one is later used as a handle for turning the gate. To secure the gate in the sidewalls, you should make cutouts in them and insert pieces of pipe of the required diameter. Then the chain with the reservoir is secured - and the gate is ready!


And finally, at the final stage, the roof is built and the cladding is done. The construction of the roof begins with fastening the rafters, usually boards 3-5 cm thick are taken for them. In general, the roof structure includes 3 crossbars, 8 jibs and 56 rafters. The work is carried out in accordance with the following step-by-step instructions:
- the ends of the rafters are cut at an angle and connected to each other with self-tapping screws;
- the frame is fastened to the rafters - this will require 12-centimeter nails;
- rafters are strengthened by installing jibs;
- over the rafters, in increments of 15 cm, the sheathing is stuffed, and the length of its slats should be such that it protrudes from the rafters by 10 cm;
- a waterproofing material is laid on top, for example, roofing felt, and slate is laid on it; the roof can also be constructed from corrugated sheets;
- the cladding is made of boards.
