How to make a corner cabinet out of an ordinary cabinet. How to make a wardrobe with your own hands. Assembling a corner cabinet, detailed instructions describing the process
Read also
The design of the corner cabinet is very diverse and therefore this model occupies a leading position in popularity. The furniture is very multifunctional, which means it is necessary in almost every home. No matter what kind of room you have, a corner cabinet can easily help revive your interior.

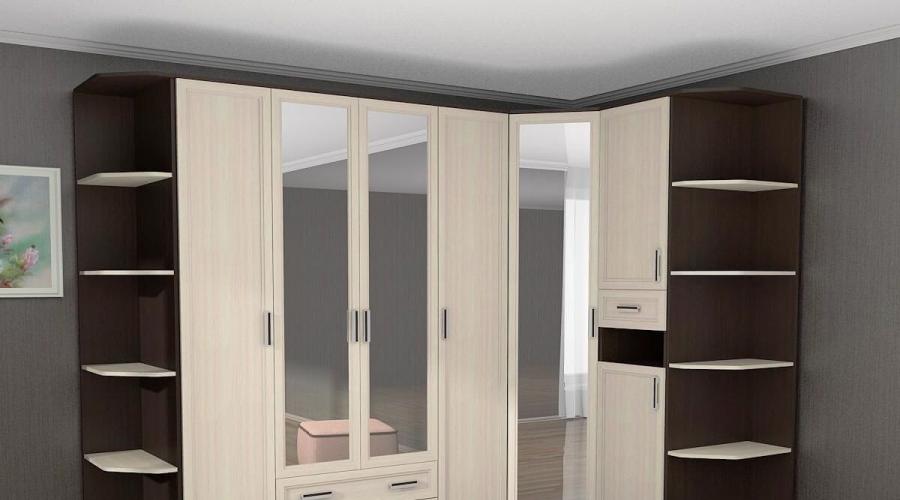
Convenient and compact corner cabinet
When wondering how to make a corner cabinet with your own hands, you should understand that this is a painstaking and not quick task. Moreover, if in the end you want to see a product that is in no way inferior to the store version.
Before you start work, make all the necessary dimensions, draw up drawings, prepare material and tools, and the information presented below will help you with this.
A do-it-yourself corner wardrobe will easily help you solve the problem of storing your wardrobe, personal belongings, shoes, cutlery and much more. It is practical and roomy, but does not take up much space, freeing up space for more necessary uses. The dimensions of corner cabinets directly depend on the geometry of the room, how many corners it has, and how much space there is to install the cabinet. Even uneven walls can be easily eliminated if you make the correct calculation of the corner cabinet and give the room a noble look, adding bright notes.

Large and spacious wardrobe
The dimensions of the corner cabinet directly depend on the wishes of the master. But in general, it is always made under the ceiling or built-in, so it will become more spacious. Undoubtedly, the drawing of the corner cabinet shows that it has plenty of advantages (spaciousness and small dimensions), but there is also one significant disadvantage - inaccessibility to the farthest point of the cabinet, especially not the upper shelves.
Drawers will also not be a convenient option, since they can only be placed on one square of the cabinet. The instructions for assembling a corner cabinet show that this option is not popular and is very rarely used in practice.
Often, a custom-made corner cabinet is installed in the kitchen, and this is not just like that:
- with its help it is easy to hide pipes, wiring, drains and other plumbing fixtures that are unpleasant to the eye;
- You can put away dishes that you rarely use in the back of the cabinet.
Before assembling a corner cabinet, check its dimensions in advance. This is the main point in the work.
Dimensions and shapes of corner cabinets
Buying a ready-made model in a store can be cheaper than ordering it to your own specifications. But at the same time, it will not become so practical and suitable. Any design, ready-made or assembled independently, has its own appearance:
- triangle - the drawing of a triangular corner wardrobe is quite simple and clear. In apartments where there are regular shapes and impressive dimensions, installing such a model will not be difficult. It is located in any corner, it can be convex, smooth, wavy, with various doors;
- diagonal - outwardly appears the same as a triangle, but one of the sides is noticeably longer than the other. This option is installed in places where there are window and door openings;
- trapezoid is an excellent office option, also suitable for children's rooms and living rooms. It is distinguished by its spaciousness, but at the same time by its minimal dimensions. Installation is possible even in the smallest room.
Triangular Diagonal Trapezoid
Custom cabinet sizes
Assembling a corner cabinet of a non-standard size is no less interesting than a regular one. Drawings of corner cabinets are drawn up in advance, taking into account all the features and nuances. Most often this becomes necessary when:
- minimal room area, where every centimeter is important;
- non-standard room layout;
- large room area.
1
2
3
It is almost impossible to choose the design of such a corner wardrobe in a store; you will have to rely entirely on your imagination. In some cases, this is even good; you can create a unique model, excluding similar options.
1
2
3
4
Remember that for assembling any corner wardrobe there are cliches that should not be violated. The service life of the product and its strength depend on them. Each corner cabinet has its own dimensions, which can be changed, but not completely ignored.
Knowing how to make a modern wardrobe in a corner with your own hands, you can save a lot of money. Don't limit yourself to anything, use additional materials such as plastic, wood, processed glass and mirror surfaces. For example, a corner cabinet with photo printing has become a real feature of our time, so why not use this idea in your work? There are no restrictions in this area. A corner wardrobe with an original photo print will surprise both adults and children, and the mirror surface will delight you with its functionality. Don't waste time, get started as soon as possible.
4146 0 1
Corner hinged cabinets - varieties, drawings and DIY assembly tips
In the corner furniture niche, the top sellers are cabinets with hinged doors; they have existed for hundreds of years and during this time they have acquired many models. Let's take a detailed look at the popular corner designs and find out which ones you can actually make with your own hands, and what to pay attention to.
Types of corner hinged cabinets
Despite its apparent simplicity, choosing such a cabinet is problematic, because these designs have the largest number of variations. This paradox is caused by the fact that the list of advantages outweighs the list of disadvantages.
The advantages stand out as follows:
- There is no more functional use of unused corners in a room. From floor to ceiling, the space is occupied 100%, and this applies to both large and small rooms;
- As practice shows, a door leaf with hinges is the most durable and reliable design. The main thing is to choose the right type of canopy, but we will talk about this a little later;
- The swing mechanism is silent, which cannot be said, for example, about sliding doors;
- When the sash opens, a person has full access to the contents;
- Such cabinets are divided into separate isolated sections, which is convenient during operation;
- Even expensive hinges for swing doors are much cheaper than the average sliding system;
- Inserting most of these canopies does not require professional knowledge and is accessible to a home craftsman, and an overly expensive tool is also not needed here;
- Absolutely all existing types and directions of design have swing models in their arsenal.
There is only one noticeable disadvantage in corner hinged cabinets - to open the door, you need a place next to the cabinet.

Designs with two doors
A two-door wardrobe is considered a classic; this option is chosen by owners of small rooms. The fact is that the normal door width ranges from 350 mm to 650 mm. Narrow sashes do not look good, while wide sashes place a large load on the hinges, which invariably leads to distortions during long-term use.
The most spacious design with two doors is considered to be trapezoidal. In essence, the owners get a mini-wardrobe, where in the center there is a sector for large items and long outerwear, and on the sides there are 2 sections with shelves and drawers. Plus, outside it is possible to put 2 modules with open shelves.


Single door cabinet
Here we actually have the same trapezoidal cabinet, only with smaller dimensions and a wider front door. Such furniture is not very convenient to use; it is difficult to reach the far corner. But for those owners who prioritize capacity, this is an excellent option.

Single-door cabinets also include cabinets in which only one section is closed. Most often, such models are made for the hallway. On one side, they have hooks for outerwear and open shelves for small items, and the adjacent section is covered with a door.

L-shaped cabinet
In L-shaped cabinets, the number of doors is not limited; in this case, the main thing is the shape, the furniture seems to flow around the corner. Such designs look more elegant. Previously, they were assembled from 2 sections installed at right angles, but this was extremely inconvenient.
Now a trapezoid fits into the center of the corner, on both sides of which 2 wings are arranged. This layout allows you to open adjacent doors without problems, and most importantly, the capacity of the structure increases.

Radius cabinet
Radius designs appeared relatively recently. From a functional point of view, they are no different from their L-shaped counterparts, the only difference is in the configuration of the doors, they are rounded. You can’t assemble this façade with your own hands, and not every workshop will undertake such work, so the price of this furniture is exorbitant.

Design
In such cabinets, the most important element is the door, so we can only talk about the design of the doors and the material from which they are made.
What are swing facades made of?
| Illustrations | Recommendations |
 |
laminated chipboard.
At the moment, laminated chipboard occupies at least half of the entire furniture market. The material is relatively inexpensive, but at the same time it looks decent and is well processed. In the West, chipboard was abandoned. Formaldehyde was found in the binder of the slabs. Our manufacturers claim that the laminated coating completely blocks all harmful fumes. |
 |
MDF.
MDF boards are 30 - 40% more expensive than laminated chipboards, but they are considered completely environmentally friendly, or rather, no terrible poisons have yet been found in MDF in the West, so for easily susceptible, gullible people this is the best option. |
 |
Glass.
Glass facades are not a cheap pleasure, plus do not forget that glass is a breakable material. Even high-strength tempered glass has so-called critical points. A light click on such a point is enough and the door leaf will completely fall apart. |
 |
Natural wood.
Nowadays, completely natural wooden furniture is mainly made to order. High-strength expensive wood species go here. In addition, the array is impregnated and dried using special technologies, which explains its high price.
|
Types of doors
| Illustrations | Recommendations |
 |
Glossy facade.
Soviet lacquered wardrobes are now a thing of the past. The chic gloss is applied using automotive enamels or acrylic-based paints and varnishes. The gloss looks very impressive, but such doors are easy to scratch, plus every fingerprint of your finger will be visible from afar. |
 |
Matte.
Matte coating is deservedly considered the most practical, which is why such doors occupy at least half of the market. It doesn’t matter what material the doors are made of, now absolutely all cabinet models have matte fronts. |
 |
With a mirror.
A mirror is not just a useful and convenient option; the more such doors, the larger the room seems. If the facade is made from floor to ceiling, then the cabinet, figuratively speaking, becomes “invisible”.
|
 |
Veneered facades.
Veneer is a thin cut of natural wood. It is glued to MDF, chipboard and furniture type-setting wooden boards. Such facades are indistinguishable from natural wood, but their price is much lower. |
Accessories
It is not possible to describe all existing furniture fittings within the framework of one article, so I will focus only on those mechanisms and devices that are available to an amateur in terms of DIY installation, and we will start with hinges.
| Illustrations | Recommendations |
 |
Overhead awnings.
The long-known four-hinged design allows the door to open at an angle of 90º.
|
 |
Semi-overlay loop.
Often used in corner structures. It has a certain bend, which, when opened, provides a small gap between the sash and the base, which allows the sash to be opened without touching neighboring blocks. |
 |
Inner loop.
A close relative of the overhead and semi-invoice, only here the sash is not superimposed on the frame, but is recessed into it. But when it swings open, it also comes out with a gap and opens the doors completely. |
 |
Corner hinge.
It is rarely installed on façade doors; its main purpose is to ensure comfortable opening of mezzanine doors and small cabinets. There is a whole line of such models that open at an angle from 30º to 175º. |
 |
Piano.
A classic of the genre, these loops were actively used in the middle of the last century. Such mechanisms last a very long time, installation is extremely simple, you won’t need anything other than a screwdriver, an awl and self-tapping screws, but the appearance is not for everyone. |
 |
Heel.
There are many models of such canopies, but the operating principle is the same. They are installed at two extreme points - above and below. There are hidden and open designs. Often these hinges are installed on glass sashes. |
 |
Screw-in.
The simplest hinged design, both parts of which are literally screwed into the base. A hole with a slightly smaller screw diameter is pre-drilled, after which the element is screwed into the base. The problem here is that these mechanisms are visible and are installed only if the appearance matches the design idea. |
 |
Butterfly loops.
In general, these hinges are mounted on interior doors, but there are models that are also suitable for cabinets. Here adjacent elements fit into each other. These canopies are screwed on with self-tapping screws. |
In addition to the hinges, the door handle is considered an integral part of the swing facade. There are overhead and mortise handles. The overhead version is simpler; such handles are either screwed into a drilled hole or fastened with self-tapping screws. To install mortise models, you will need a milling cutter, so I do not advise amateurs to use them.

Furniture handles are made of wood, plastic and metal, but since the load on these elements is minimal, the main attention should be paid to the design of the products.
For those who are planning to construct cabinets with their own hands, I recommend paying attention to the elements of assembly fittings. Metal or plastic furniture corners are perfect for open assembly of elements - this is the simplest and most convenient option.

For those who are annoyed by open fastenings, there are confirmations. This is a furniture screw with a hex head. To install confirmations, you will have to buy a special confirmation drill. After screwing in, the head of such a screw is covered with a plastic plug in the color of the upholstery.

Location
The big advantage of corner designs is that they are universal; such a cabinet fits into the interior of any living room. The appearance of the facade depends on the design, but the content varies depending on the purpose of the room. Moreover, in the living room and children's room the layout is as desired, but for the hallway and bedroom there are their own laws.
Corner wardrobe in the hallway
It’s good if the hallway allows you to install an L-shaped multi-sectional structure that will fit everything, but you often have to deal with miniature halls. In this case, one or two-door designs are used.
It is important here that the cabinet consists of 3 sections:
- The first one is made closed. It is intended for outerwear, shoes and hats that are awaiting their season;
- The second section can be either open or closed. It is also intended for outerwear, but for the one that is currently in use;
- It is advisable to leave the third section completely open. It is filled with small drawers and shelves that are intended for small items.
A mirror in the hallway is a must. The owners decide where to install it, but you shouldn’t hide it inside the closet.

Corner wardrobe in the bedroom
In this room, the functional content of the corner cabinets depends on the size of the structure. The general rules include the following:
- Shelves with underwear, shirts, blouses and other frequently used items are located within walking distance, that is, at the middle level, from the waist to the eyes;
- A separate, preferably closed, sector is allocated for bed linen. Moreover, shelves with bed linen cannot be placed lower than 40 cm from the floor;
- Shoes are stored in the lower level; here you can also provide a sector for a vacuum cleaner;
- On top we have hats and large, rarely used items, such as suitcases and blankets.

Conclusion
From the article you learned about the most popular models and practical functionality of corner structures. The video in this article shows the intricacies of assembly, if after studying you still have questions, write in the comments, I will try to help.

Modern furniture has a high cost, and various materials can be used for its manufacture; in addition, models differ in size, shape, appearance and content. An excellent solution for a living room, bedroom or other room would be a corner wardrobe that does not take up much space, is distinguished by its high capacity and interesting appearance. Creating a corner cabinet with your own hands is easy if you carefully understand this process.
Immediately before the process of creating a structure, you should decide on the dimensions, materials and tools that will be used, and also think about the purpose of the cabinet. Initially, a project is formed, for which drawings are created, according to which parts are prepared that are firmly connected to each other. A decision is made whether the corner cabinet will be triangular or L-shaped, trapezoidal or five-walled.
If you decide to assemble the furniture yourself, you should prepare for this process and purchase the necessary materials and tools:
- direct material for creating a cabinet, and the formation of a structure from plasterboard, which is distinguished by its affordable price, ease of use, environmental friendliness and durability, is considered relevant;
- profiles from which the frame will be formed;
- pendants;
- screws and glue;
- mirrors, if you plan to decorate the closet with them;
- accessories that ensure ease of use of the structure;
- rollers and guides, if compartment doors are made;
- cabinet cladding material;
- drill, screwdriver, grinder, sharp knife for cutting drywall, level and other small tools.
Working with drywall is considered so simple that it usually does not require specific tools.

Tools

Drywall sheets
Preparing parts
A do-it-yourself plasterboard cabinet is made only after first creating a diagram. Initially, you should decide on the dimensions of the structure, for which the dimensions of the corner where you plan to install the furniture are taken into account.
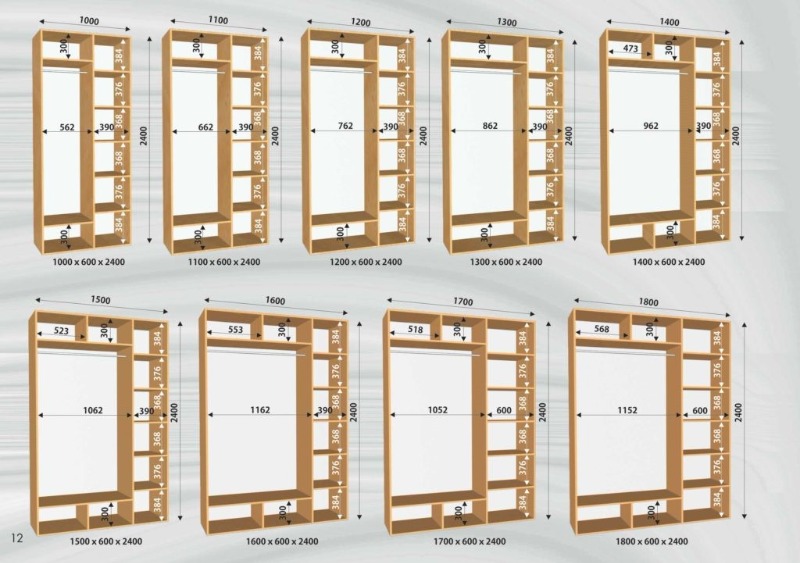
You need to decide what parts the corner cabinet will consist of. Usually there is one large section for things that are placed on hangers. The other section is narrow and divided into several small compartments, which are separated by shelves. Often, an additional open pencil case is formed on one side. The standard dimensions of such elements are:
- the height of the cabinet itself can vary from 180 to 220 cm;
- the width of two different corner cabinet elements can be from 45 to 80 cm;
- It is advisable to leave a distance between shelves ranging from 30 to 35 cm;
- drawers and shelves usually have a width of 40 to 45 cm;
- It is advisable to make boxes with a depth of 25 to 30 cm.
It is considered optimal to have two large sections at the top, called mezzanines, which are used to store large and rarely used products and things, and at the bottom there is a narrow compartment for shoes.
After determining the dimensions and compartments of the structure, you need to perform the following steps yourself:
- determine the angle where the cabinet will be located;
- depending on its parameters, determine the exact dimensions of the cabinet;
- create a sketch that will allow you to calculate the base, cover and plinth;
- divide the entire interior space of the cabinet into separate sections, for which vertical and horizontal partitions are used;
- calculate the doors of the structure;
- calculate the required number of ends covered with end tape.
Based on the resulting diagram, you can prepare the main parts of the cabinet. To do this, the main elements of the frame are made in accordance with the sketches. Metal profiles are cut with a grinder, and the sections are cleaned. Next, based on pre-made drawings, parts of plasterboard are formed, and it is advisable to use a thin and sharp knife to cut this material. All elements must have the same thickness.

Materials
Selecting a location and marking
It is advisable to decide on the installation location of the cabinet in advance, since the structure itself is made according to the existing parameters of a given angle. It is usually installed in the living room, but can be intended for a bedroom or children's room. The filling and dimensions depend on the number of things that will be stored in the furniture.
After determining the installation location, markings begin, which allows you to determine where the main elements of the cabinet will be located. Since the product will be created from plasterboard, all frame elements will have to be attached to the wall, so fastening areas are outlined. You will have to navigate by them during fastening and creating the frame.

Surface preparation and marking
Frame installation
How to make a corner cabinet with your own hands using drywall? To do this, you first need to start installing and fastening the frame. The whole process is divided into stages:
- if it is planned to have lamps in the cabinet, then the areas where they will be fixed are marked, after which electrical wiring is supplied to this place;
- shock-absorbing rubber insulation is glued to the guide profile, and it is important to place it on the part that will be laid further on the base of the furniture;
- all guides are fixed along the lines of previously applied markings, and dowels and nails are used to secure them;
- then direct hangers are fixed on the wall, and for this you need to constantly focus on the markings;
- fasteners for securing the hangers depend on what material was used to create the base, since if it is concrete or brick, then it is advisable to use dowels with nails, and if the base is wooden, aerated concrete or expanded clay concrete, then strong screws or even nails are suitable, and it is also allowed use special dowels equipped with spacer whiskers and notches;
- racks located vertically are inserted into the fixed guides, after which they are secured with suspensions, and for this it is advisable to use short self-tapping screws equipped with a press washer;
- Strong and reliable stiffeners are installed between the rack profiles, and the more of these elements are used, the more stable the structure will be, and there should be especially many of them in areas where it is planned to store heavy objects.
It is allowed to use not only metal profiles, but also wooden slats to create a frame, but this solution is used extremely rarely, since wood can absorb moisture or dry out, so the dimensions of the cabinet will change, which will lead to distortions or increased fragility.

Pasting profiles with damper tape

Metal profile is easy to cut

Ready frame
Frame covering
A corner cabinet made of plasterboard is created quite simply, since after the formation of a high-quality, durable and stable frame, you can begin covering it with plasterboard elements. To do this, follow the steps:
- blanks are made from plasterboard, for which parts are cut in accordance with the drawings, and it is recommended to use a hacksaw or electric jigsaw for these purposes;
- To create a cabinet, it is advisable to choose durable wall plasterboard, the thickness of which will be at least 1.25 cm;
- all edges are processed with an edge plane;
- finished plasterboard elements are inserted into the corresponding sections of the frame, after which they are screwed with special screws for metal;
- the sheets are finally fixed, for which it is important to calculate the number of screws so that there is a distance of 20 cm between them;
- all screw heads are recessed by 1 mm;
- in areas where shelves will be located, furniture corners are installed;
- rods and lamps are installed;
- Based on the available dimensions, the creation of doors begins, which can be ordered ready-made.
After the work is completed, you will receive a full-fledged cabinet, but in order for it to have an attractive appearance, you should take care of the use of finishing materials.

Drywall marking

Drywall cut

Fastening drywall panels

Screwing in screws with a screwdriver

Finished wall
Finishing
Finishing involves the following steps:
- all surfaces outside and inside are covered with a high-quality primer;
- joints are filled with gypsum plaster;
- then the serpyanka is glued;
- Painting corners are mounted at the corners;
- putty is applied, which is sanded after hardening;
- It is advisable to make two layers of putty;
- then the primer is applied again;
- then final finishing materials are applied, which can be represented by decorative panels, tiles or other materials.
It is advisable to use a mirror during finishing to increase the comfort of using the structure.

Perforated angle for processing corners

Cabinet Finish
Drawings and diagrams
The most important thing when creating a corner cabinet is to build a correct and accurate diagram and drawings. If they contain any errors, then it will not be possible to build a complete, durable and stable structure.
Drawings and diagrams can be obtained in different ways:
- independent creation, and the process can be performed manually or using special computer programs;
- ordering from specialists, which will require significant financial investments;
- search for ready-made drawings, but you should only use them if you are sure that they are correct and accurate.
Corner cabinets are considered an excellent solution for different rooms. They can be created from different materials, but the most optimal is the use of plasterboard, which is used to cover a frame made of metal profiles. Such a cabinet will not require significant investment and is also easy to create. During independent work, your own wishes and the existing dimensions of the selected angle are taken into account, so the design will be ideal for the installation location.
Owners of small apartments often opt for cabinets installed in the corner, but before ordering such furniture, you need to have a drawing of a corner cabinet with dimensions on hand. After all, such structures must stand clearly on the wall, without deviating even a degree from the angle.
Corner cabinets are popular because they are quite ergonomic and allow you to save space in a small room. In addition, you can make a cabinet with your own hands using a drawing and detailed instructions. We will talk about this below.

Types of corner cabinets
In order to create a unique, functional design, furniture makers are experimenting with different shapes of cabinets. There are the most popular product configurations that should be studied before drawing up a drawing.
Table No. 1. Types of corner cabinets.
| Illustration | Description |
|---|---|
 | Such structures are installed in the corners of small rooms. In this case, most often they are fixed directly to the wall - this shape allows you to properly smooth out the corners. The cabinet does not have full side walls, so its shelves are triangular. |
 | In this design, there is a wall on one side. Therefore, such a cabinet is considered more practical than the previous option. There is more free space inside. |
 | One of the most popular forms of cabinets. The design consists of two parts that connect at the corner. Such products are distinguished by their spaciousness. |
| A special feature of the design is the presence of small but functional side walls. Due to this, additional modules can be placed inside the cabinet. |
The most difficult design for self-production is a triangular or trapezoidal cabinet - due to the fact that the product involves the presence of diagonal elements, which it is advisable to prepare in the presence of a professional.
Table No. 2. Types of corner cabinets according to installation method.
The designs differ from each other and in the type of doors. They can be hinged or sliding (compartment). In the first case, door leaves should not be made larger than 45 centimeters, otherwise the load on the hinges will be too strong. In the second case, the doors can be quite massive, even more than 45 centimeters wide.
Prices for various corner cabinets
Corner cupboard
Material selection
Table No. 3. The most common materials for making cabinets.
| View | Description |
|---|---|
 | This is the most environmentally friendly and expensive option for making furniture. Cabinets of this type are distinguished by their strength, durability, and at the same time they have an impressive weight. In addition, wood products have an unusual decorative appearance, they have a unique texture. It is recommended to choose the most durable wood options - oak, pine. It should be taken into account that such material is deformed when exposed to high temperatures and humidity. In addition, it is exposed to pests. |
 | This material is a mixture of wood chips, various fibers and resin. The main advantage of the material is its affordable cost. Thanks to proper processing, MDF boards are durable and quite easy to process. In addition, they do not deform over time and have a very fine texture that does not stand out. Another obvious advantage is the large size of the slabs. |
| This is a fairly strong material that is suitable for creating a cabinet frame. It is recommended to use only multi-layer plywood for such purposes. Like natural wood, this material can become deformed as a result of exposure to moisture. | |
 | This material is often used to cover the frame of corner cabinets. It is lightweight, so installation will not seem difficult even for a beginner. In addition, some types of drywall have good resistance to humidity and temperature changes. |
Prices for sheet plywood
Plywood sheets
Creating a Project
Before you start creating a drawing of the future structure, it is important to determine the place where it will be installed. At this stage, the following points should be taken into account: the number of shelves, drawers (if required). All this will allow us to develop the most detailed project.
It is important to observe the following nuances:

The diagram of a corner cabinet is drawn starting from the sides, because they are load-bearing and represent the appearance of whole boards. Then you should determine the height of the structure (usually from 2.2 meters).
Only then do you need to calculate the dimensions of the horizontal parts and the rods (if it is a wardrobe). Most often, large shelves are installed at the top of the cabinet, and a bar directly in the corner. The last step is to add additional designations to the diagram where mirrors, lighting and other elements will be located.
Corner cabinet made of wood or MDF
To manufacture and assemble the cabinet you will need the following materials and tools:
Prices for popular models of jigsaws
Jigsaw
Video - How to assemble a corner wardrobe
Manufacturing of elements
Experts do not recommend cutting the material at home, because there is a high probability of getting crooked parts. It is advisable to contact a furniture shop with your cutting diagram, where specialized equipment is available.
At the same time, some craftsmen prefer to prepare parts for the cabinet themselves. In this case, you must have at least minimal experience in furniture making.

Step-by-step instruction.
Step 1. We cut out the parts of the walls, shelves, doors, drawers from the sheet. For such purposes, a circular saw or hacksaw is usually used. In this case, the second option is chosen very rarely, because damage may remain on the parts.
Step 2. It is necessary to process the edge of each part using polymer tape. It is applied to the edge and then fixed with an iron or hot air.

Step 3. The edge tape will need to be carefully smoothed using a cloth. After that, the remaining pieces of tape must be carefully cut off with a sharp blade.

Assembly of the structure
When all the parts and tools are ready, you can begin the process of assembling the structure.
Table No. 4. Assembling corner cabinet parts.
| Illustration | Description |
|---|---|
| You need to double check that the dimensions are correct. Therefore, before starting work, it is necessary to measure the walls. | |
| Next, you should install the legs on the bottom of the corner structure. They are fixed using self-tapping screws. Moreover, some models require the presence of a special base at a distance of 5 to 10 centimeters from the floor. In any case, the doors should not touch the floor, so installation of a support is required. |
| The bottom with support must be placed in the corner. It must be stable, so it should be installed level. To do this, use a building level, which can be used to raise and lower the legs. |
| Installation of the walls of the structure. They are secured with special ties or metal corners. In most cases, the first option is used, because such fasteners securely fix the parts and remain invisible. |
| Fastening the subsequent lower segment of the structure. The legs are installed on it, and then it is fixed to the main body. To do this, it should be installed flush against the corner structure of the cabinet and leveled using a building level. |
| Installing the sidewall. It is fixed at the junction of the lower parts. In this case, it is better to install it even before fixing the parts of the bottom. |
| Connecting base elements using furniture ties. To do this, pre-drill holes. |
| Installing the next side wall. At this stage it is necessary to install the top panel of the frame. This will give it more stability. Otherwise it may become loose. |
| Sidewall fixation. Before securing it with furniture ties, you need to adjust the position according to the level. | |
| Other panels of the structure are installed in the same sequence. Their number will depend on the size of the cabinet. It is worth noting that it is much easier to assemble a cabinet with such small fragments. |
| It is necessary to complete the assembly of the frame and then check its stability. |


Installation of internal parts and doors
Table No. 5. Stages of installation of internal elements and fastening of doors.
| Illustration | Description |
|---|---|
| Installation of vertical elements and drawers. There are two ways to install shelves. In the first case, they are fixed using metal corners and euroscrews, but then they will be motionless. In the second case, you can install special holders on which shelves are installed on top. Drawers are mounted on guides, thanks to which they will slide out quickly and smoothly. |
| Fastening the figured rod to the brackets. Install it on a shelf, which is then connected to the structure. |
| Installing a shelf with a rod. It should be secured inside the corner structure. In the same way, you need to fix another shelf in another corner. | |
This process consists of the following steps: 1. Parts of hinges (furniture) are attached to the walls of the frame. 2. After which another part of the hinges is installed on the doors themselves. 3. Then the hinges must be connected and secured with screws. After which you will need to adjust the position of the valves. |
|
| Next, you need to eliminate the hole between the ceiling and the structure. | |
| The lower hole is covered with a chipboard panel or plinth of the appropriate size. | |
| Upon completion of work, it is necessary to check the stability of the cabinet again. If there are no flaws, then the design can be used. |


Corner cabinet made of plasterboard
Before manufacturing and assembling a plasterboard cabinet, you must prepare the following materials and tools:
- sheets of drywall of the required size;
- metal profiles (racks and guides);
- accessories;
- measuring tape;
- scissors for metal and drywall;
- corners for fixing protrusions;
- self-tapping screws (for drywall);
- set of dowels;
- building level;
- screwdriver;
- putty;
- putty knife;
- sandpaper;
- jigsaw (for cutting sheets);
- additional elements;
- hammer drill (for holes for screws);
- decorative plaster for finishing cladding.
If you have the above materials and tools, you can begin the process of manufacturing the structure.
Prices for popular models of screwdrivers
Screwdrivers
Video - How to make a built-in wardrobe from plasterboard
Frame installation
Step-by-step instruction.
Step 1. It is necessary to apply markings to the walls. At this stage, you should mark the installation locations of the structure to the wall using a pencil. For greater reliability, it is recommended to double-check these values several times.
Step 2. You need to start attaching metal profiles (guides) to the wall using self-tapping screws. At this stage, accuracy is especially important, so do not rush. Each element must be securely fixed, because the metal frame will carry the entire load. The screws are screwed in increments of no more than 100 millimeters, thanks to which the entire structure will be stable.

Step 3. It is necessary to install the rack profiles into the guides. To do this, use self-tapping screws or Euroscrews. Since this is a corner cabinet, the profiles will need to be given the necessary bend so that they fit into the structure without any obstacles. To do this, a notch is made on the beams with metal scissors. Such actions will allow you to quickly bend any profile.
Step 4. If you plan to install a large cabinet, then it is recommended to further strengthen the structure of the profiles. This can be done using the remaining profiles from which the jumpers are formed.
Step 5. Before starting the process of covering the structure with sheets of plasterboard, it is necessary to secure the corners. They are made from fragments of the remaining profiles, but if desired, they can be purchased at any hardware store.

Important point! Instead of metal profiles, wooden blocks are sometimes used to make the frame, but this is not the best solution. After all, wood tends to shrink, which means the plasterboard structure can become deformed, causing cracks to appear in the plaster.
Sheathing of the structure
When the frame is completely ready, you can begin the sheathing process. This is quite easy to do if you follow the instructions.
Step-by-step instruction.
Step 1. It is necessary to fix the plasterboard sheet in the inside of the cabinet structure using self-tapping screws. After which, you should completely cover this part with sheets. It is important to remember that the pitch between the screws should be more than 150 millimeters. At the same time, they are deepened into the sheet by 1.5 millimeters so that the fasteners do not show through from the outside. You can read more about how to make fasteners for shelves with your own hands.

Step 2. Then you need to finish the outside of the structure with plasterboard. Such actions should be performed especially carefully to avoid mistakes.
Exterior finishing
When the plasterboard frame is ready, you should begin finishing its exterior using putty.

Prices for various types of putties
Putties
Step-by-step instruction.
Step 1. First, you need to apply a fairly thick layer of putty to hide the drywall seams and uneven areas. The structure must be left in this form for some time until the putty hardens.

Step 2. You will need to carefully sand the dry surface. This is done in order to remove sagging.

Step 3. The last layer is the final one, so it should be applied especially carefully.
Step 4. When the surface has dried, you need to go over it again with sandpaper in order to prepare for decoration.

Step 5. The last stage is decorating the cabinet. Finishing can be done using decorative plaster and various moisture-resistant paints.
Structural additions for corner cabinets
In order to create a complete look, open modules are installed in the side parts of the corner structure. They are a type of various shelves that are attached to the cabinet or installed end-to-end without fastenings. Thanks to this solution, you can make any large-sized product more interesting. In addition, such shelves are functional elements; they are often made of glass or plastic.

Quite often LED lamps are built into cabinets. It is important to consider the total number of lighting fixtures in the room. Otherwise, this is a good addition, thanks to which the contents of the cabinet will be clearly visible, especially in five-wall structures.
Making furniture is always more difficult for beginners, so experienced craftsmen recommend listening to the following recommendations:

It is also worth noting that the assembly of large-sized structures should not be done by one person. Therefore, it is better to take care of this in advance and involve another person in this matter.
Let's sum it up
Making furniture yourself is an opportunity to save money and develop a project for the “ideal” cabinet. In addition, in the process of work you can show your design abilities.
The problem of limited space and the desire to use every meter of living space pose the problem of what furniture to choose for the house and how to arrange it. Convenience and comfort of use will depend on how rationally the interior elements are thought out.
In addition, not every cabinet can be as functional as possible and act as a decorative element. Only a corner will cope with this task. After all, it occupies a place that usually remains unused - a corner of the room, without cluttering it at the same time. You can buy, or you can make a corner cabinet with your own hands.
Basic corner cabinet configurations:
- Triangular shape.
- Trapezoidal shape.
- Shape in the form of the letter "G".
- Five wall shape.
Triangular and trapezoidal shapes are difficult to manufacture independently. The fact is that there are diagonal elements that require individual schematic detailing and the use of special fittings. It is recommended to prepare the necessary materials in the presence of a measuring specialist.
A five-wall corner cabinet is the most common configuration. Used in all kitchen models of corner cabinets. Two planes adjoin adjacent walls, forming an angle, while the facade consists of three planes, the middle of which is the door leaf.
The shape of the corner cabinet, in the shape of the letter “L”, is quite functional and compact. It consists of two double boxes placed in a corner. The advantage of this model is that it saves consumables compared to installing two separate products.
Doors in any configuration can be hinged or compartment. In the first case, the width of the door leaves should be minimal - up to 450 mm, in order to avoid excessive load on the hinges. In the case of compartment doors, their width cannot be narrower than 450 mm, with a total height of 2200 mm. It is necessary to maintain the ratio of the width of the doors to the height of the facade - 1:5, for normal operation of the cabinet.
 Corner wardrobe with hinged doors
  Corner wardrobe with sliding doors
How to make it yourself
Corner cabinets with hinged doors vary in the number of doors: two doors, three doors, or more. They open using handles or a special mechanism by pressing the door leaf. The material used is wood or chipboard. The surface can be covered with plastic, enamel, paint. The product is decorated with gilding, carvings, mirror and glass inserts. For ease of use of the cabinet, lighting is built in on its inside or outside.
Before you start work, you need to decide on the configuration of the product and draw up a drawing of the corner cabinet. It should show the shape of the cabinet and its dimensions, and include the internal elements. The dimensions of the corner cabinet and its configuration directly depend on the size of the room where it will be located.
 Examples of cabinet sizes
 Required tools and material:
- Chipboard, boards or MDF;
- screws, dowels;
- accessories;
- profile;
- drill and hammer drill;
- screwdriver;
- roulette;
- building level;
- electric jigsaw or hacksaw;
- hammer
- glue;
- mirror.
There are several important features to consider before you start making the cabinet:
- It is better to take laminated chipboard boards ready-made, according to size, or seek the help of a professional to cut them. It is very important that the parts fit together as much as possible during assembly. They must be even and exactly in size.
- Don't skimp on accessories. It must be of high quality and be a complete set. This is especially true for elements for sliding doors, the doors of which must open smoothly and not jam.
- It is worth paying close attention to the surface of the ceiling and floor. It should be smooth. For example, for a built-in wardrobe this is of primary importance, because if this rule is not followed, the structure will not fit into the opening.
The classic five-wall wardrobe, with a square base and a cut corner, consists of two double parts. Two planes built into the corner are located at an angle of 90° to each other and form the back wall. On either side of them are two vertical panels forming the sidewalls. The upper and lower plane are the tray and the cover of the structure. Inside the corner cabinet there are shelves and rods of different sizes for clothes. Hinged doors complete the look of the product.
Such a separate cabinet, in most cases, looks bulky. Therefore, if possible, it is better to install a built-in corner system. The advantage is that less material is required for installation due to the absence of upper, lower and rear modules. In addition, the usefulness of using free space is higher than that of a free-standing structure.
Preparation
In order for the work on making a corner cabinet to proceed correctly and without errors, you need to follow the step-by-step instructions:
- first, you need to decide on the place and room in the house where the product will be placed;
- take measurements of the space and put them on the diagram;
- determine the configuration of the product and put it on the drawing;
- indicate the dimensions of the corner cabinet on the drawing and compare it with the dimensions of the prepared space;
- determine the required amount of material and tools and prepare them.
The dimensions and internal contents will depend on what you would like to fit in the closet and on the layout of the room. It is better to choose the configuration based on your skills in manufacturing furniture structures and the cost of consumables. The height of the shelves and the level of the bar must be placed at such a level that it is convenient for use not only by yourself, but also by all family members.
To facilitate design, you can use the PRO100 computer program. It will help, taking into account the required dimensions, and calculate materials and accessories.

The diagram of the corner cabinet is drawn by hand, starting with the side panels, which will be load-bearing. They must be made from solid boards. Then, the height of the cabinet is determined - from 2200 mm if space is left above it, and higher if the cabinet is ceiling-height. In the first case, you need to install a solid top sheet and a bottom sheet of the same type.
After this, the horizontal parts of the cabinet and shelves with rods are determined. It is better to place large shelves on the upper level of the closet, and a clothes rail in the corner section. Next, the diagram shows the cabinet opening mechanism (). Upon completion, details are applied to the drawing (mirrors, handles, painting).
Assembly
The assembly process corresponds to the sequence of drawing all elements in the project. All wood parts must be selected in the store and then cut to size. It is recommended to buy high-quality fittings - German or Turkish. Depending on the type of cabinet filling and door opening system, the following are purchased: handles, hinges or a sliding system, confirmations, closers, legs, dowels and hooks for clothes.
A corner cabinet actually consists of 2 or more boxes. When preparing these boxes, it is very important to maintain the proportions of height, length and depth. Otherwise, it will turn out skewed and the door mechanism will not close. The modules are fastened with ties. This steel fastener, made of a screw and a nut, prevents the product from loosening and firmly secures the structure, forming a single ensemble.
When installing a hinged cabinet opening mechanism, the doors are secured with canopies and can open in any convenient direction. In the case of a sliding mechanism, guides are attached along the top and bottom of the opening along which the door leaves will move.
Brief assembly instructions
The corner cabinet, depending on its configuration: built-in or free-standing model, is installed in different ways. But there are universal instructions on how to make a corner cabinet with your own hands, which you must follow:
- According to the drawing, you need to cut the material and check the availability of components.
- Place the legs on the bottom of the structure.
- Attach the side panels to the installed bottom using confirmations.
- At the upper ends of the side walls you need to drill grooves for dowels. Moreover, they should be located at the same distance from each other as the holes on the lid.
- Treat the dowels with PVA glue and secure them in the lid.
- Place the cover on the side walls.
- When installing the cabinet in the ceiling, the legs must be installed so that the lid rests maximum on the ceiling.
- After assembling the “skeleton” of the cabinet, you need to install hinges for swing doors, or guides for sliding doors. Hang the doors.
- Install shelf fasteners.
- Install shelves and other fittings.
- Decorate the confirmation hats.
Thus, you can make a corner cabinet yourself, following the instructions for preparing materials and assembling the product. After choosing the cabinet configuration, it is important to correctly draw up the drawing and manufacture the product according to the indicated dimensions.