How to make a full 2nd floor out of an attic. Second floor in the attic: pros and cons. Strengthening old walls
Most often, the attic is used to store old and unnecessary things, tools, supplies that have no use and are a pity to part with. But when the house is already furnished, then due to the growth of the family or the desire to equip an additional cozy room for a comfortable stay, it may be necessary to expand living space and do some loft conversion.
Over time, there may be a need for the so-called “ useful floor" Then attic space receives a beautiful and romantic name - attic, evoking associations with Parisian quarters and the roofs of Montmartre.
The design of an attic in a private house directly depends on the purpose to which the room will serve. When converting an attic space, it is important to follow three steps:
- Layout.
- Insulation.
- Decoration of space.
It is not at all easy, as it seems at first glance, to make an attic space habitable. Such reconstruction involves not only certain financial costs, but also labor-intensive construction work. Planning and subsequent repairs can be done by yourself. First, you need an attic design with the design features of the house, such as the shape and height of the roof, the location of the stairs, ventilation and lighting, and the number of rooms in the house.

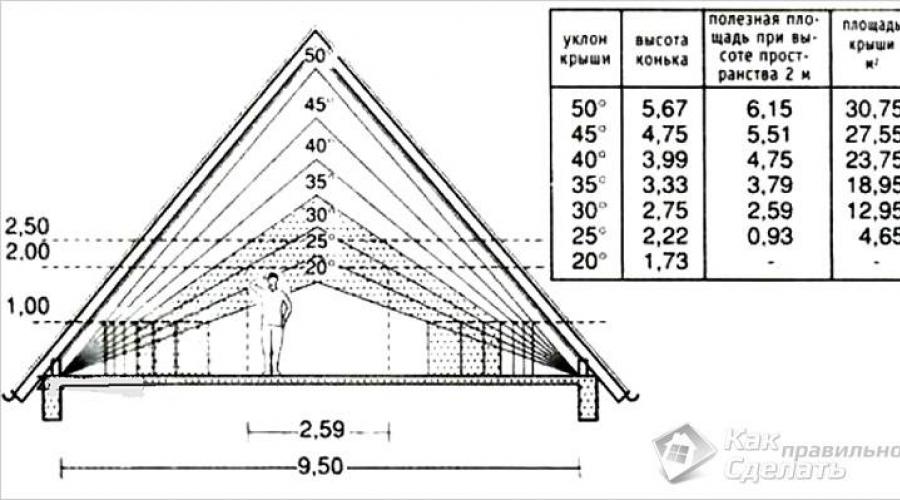
Not every attic can be habitable. Construction requirements provide that attic room was organized with a roof slope of no more than 45º, and the structure of the house did not interfere with free movement in the attic.

The location of a stationary staircase in the house must be taken care of even before construction is carried out. renovation work on the first floor. It is important to decide where it will be installed so as not to block the passage and free up space for furniture.
For ventilation and lighting, the attic must have windows. Where the windows will be located - on the gable or in the roof itself - will depend on the shape of the roof.
Windows located in the roof are called dormer windows.

Unlike regular windows More stringent requirements are imposed on the installation and sealing of roof windows, since these windows are intensively exposed to loads in the form of rain and snow to a greater extent. But roof windows are an excellent design solution that allows you not only to fill the room with light, but also to decorate the exterior of the house.
If the roof is hipped, then skylights are the only way to illuminate the entire attic.
Insulating the attic of a house

When converting an attic, an important point is its insulation. To make the attic comfortable, the appropriate temperature must be provided. Since warm air tends to rise, insulation will prevent it from dissipating.

The pitched roof is insulated with a material at least 10 cm thick. To insulate the attic space, only non-flammable, vapor-permeable and environmentally friendly materials are used. For both floor and roof as insulation will do mineral wool, polystyrene foam, penoizol.
As insulation for the walls and floor of the attic, you can use slab or roll insulation based on glass wool. These modern materials They have the ability to perfectly retain warm air, and due to their low weight, the load on the foundation of the house will not increase significantly.

The insulation is placed between the wall and plasterboard or lining, thereby preserving the interior of the room.
Laying the floor in the attic is done using ordinary boards or plywood, and if funds allow, you can install a heated floor. If the attic space is low, then you should not use thick materials for the floor.
To insulate an attic, a continuous layer of insulation is required around the entire perimeter of the room. It is important to ensure good sound insulation floor, as well as to avoid the formation of condensation - reliable waterproofing of the ceiling.
Finishing materials and elements

Materials for interior decoration are chosen depending on the style. Attic wooden house trim wooden materials– board, plywood, clapboard. At the same time, in the interior of such an attic wooden or wicker furniture. Also effective are decorative cross beams painted in contrasting colors to accent the walls and ceiling.
In order to successfully furnish a room in the attic with your own hands, it is important to follow a few simple design rules:
- The right choice of paint. In a small room, it is better to use light colors for the walls, as they can create a peaceful and calm atmosphere. A bright color can be used to highlight the central wall as an accent.
- Laconic arrangement of furniture. There is no need to clutter the room with cabinets, tables, and chairs. The placement of furniture should be compact; for example, in order to save space, it is advisable to use functional hanging shelves. The bed in the bedroom will take its place against a lower wall.
- The use of accessories that play an important role in creating the interior style. Such accessories that complement the image of the room can be curtains for skylights and textiles. The main rule remains the harmony of texture and colors.
Features of the design of the attic in the country

To better visualize the future room, you need to sketch out the floor plan.
To convert an attic in a country house into a living space, you need to find out the possible technical changes and take into account design features country house building. Reconstruction work can be complicated by low ceilings and asymmetrical attic walls. Then they draw up a list of works and purchase the necessary materials.

To make it convenient to move around the attic and avoid difficulties with placing furniture, the optimal height from floor to ceiling should be 220 cm. The maximum permissible minimum is within 190 cm.
If you still want to convert the attic into a living space, but the height does not allow it, then you will have to redo the roof, which is very expensive.
It is necessary to thoroughly check the structures (sheathing, beams, attic floor, roofing material). If there is such a need, then the damaged parts should be replaced and the wooden parts should be treated with an antiseptic.
To convert the attic you will need to carry out additional work, such as:
- Sound insulation of the floor, when laying penoplex with a layer thickness of at least 3 cm and screeding the floor with laying laminate or linoleum and then installing skirting boards. As a flooring, you can also use boards or fiberboard sheets with a thickness of at least 15 mm, followed by painting.
- Heating a room in the attic. For this purpose, you can use an electric radiator or a fireplace heated with wood.
- Communications such as ventilation shafts or plumbing pipes, needs to be moved or hidden.
- Lighting – electrical wiring is installed in strict compliance with fire safety rules.
- Finishing the walls of the attic can be done using lining, moisture-resistant plasterboard or fiberboard sheets by fastening with countersunk screws. After this, the walls are puttied and painted desired color or paste over with wallpaper.
![]()
The attic may contain:
- bedroom;
- living room;
- children's;
- dining room;
- gym;
- billiard room;
- study;
- wardrobe;
- workshop.
Children's room in the attic

You can even equip a children's room for sleeping and playing in the attic. Natural, environmentally safe products are best suited for this purpose. clean materials. The interior of the attic can be decorated in a bright color scheme, and in light pastel colors. Furniture must be safe, without sharp corners and securely fastened. This could be a small sofa and a table for games and activities. And an indispensable attribute of the nursery are, of course, toys. As flooring can become a rug or carpet runners.
Bedroom arrangement

Due to its location, the attic has a special cozy atmosphere. Therefore, it is convenient to equip a bedroom for adults, teenagers or a guest room. To design a bedroom that is comfortable for sleep and relaxation, you will need to arrange sleeping areas, as well as areas for storing bedding and linen.
From furniture you can use the necessary minimum - a bed, a mirror, soft poufs. Lighting plays an important role in the bedroom interior. Soft diffusion of light can be achieved using wall sconces or a floor lamp.
Office option

The attic space is ideal for creating a comfortable office. The interior of such a room is best done in light colors. To create a business environment you will need comfortable table, an armchair, a small closet or several shelves and office equipment. And you should definitely take care of high-quality lighting workplace. Such a relaxed atmosphere can set the mood for fruitful work.
Living room interior

There is nothing unusual about setting up a living room in the attic. As a result of proper refurbishment, the attic space can become a place for receiving guests or family gatherings over a cup of tea or aromatic coffee. And large windows in the attic with a beautiful view of the river or garden will turn your vacation into a real pleasure.
Upholstered and cabinet furniture for the living room should be chosen low - a sofa and armchairs with a small coffee table and low cabinets or shelves.
Decoration of the rest room

For a comfortable stay with friends, you can organize a billiard room. For this purpose, you need to place a billiard table in the center of the room, and light wicker furniture is quite suitable for relaxation. It is necessary to provide sufficient lighting above the pool table using lamps.

Movie lovers will love the idea of setting up a home theater. To do this, upholstered furniture is placed around the perimeter of the rooms.
To prepare drinks and cocktails, you can also use a table or bar counter and install a small refrigerator.

A small attic without windows can be turned into a dressing room for storing, depending on the season, outerwear or, conversely, umbrellas, swimsuits and slates. Combined spot lighting ceiling lamps and built into spot niches or glued to boxes LED strips will make the interior modern and fashionable.
By dividing the attic into zones, you can create a multifunctional room.
As you can see, a once uninhabitable, empty room can be perfectly used to implement a wide variety of design solutions. Main principle− do not miss a single square centimeter of useful living space. And then the interior of the once useless attic will be excellent.
Video
This video shows how you can arrange the attic space:
See how you can make a Moroccan-style loft-living room:
Photo


Construction of a wooden house will be the best option for people who value environmental friendliness, fast construction time and low cost.
A private house has one significant advantage - the possibility of completion. And sooner or later, every family thinks about how to make their home a little more spacious. You can increase the area not only by adding an extension to the side of the house, but also from above: by adding second floor . It may be a complete copy of the first one, or it may be an attic with cozy interior and an unusual sloping ceiling.
First of all, you need to study what the second floor of the house could be like. Depending on the structural type highlight:
- A house with full two floors. At the same time, the second floor completely repeats the layout of the first. In addition, they have the same wall height.
- The house is 1.5 floors. The project for this option will be similar to: The room will be under a straight roof, or rather the roof will be in the form of a truncated pyramid. Positive aspects This option is that the area of the upper rooms will be the same as that of the lower rooms. But, at the same time, the cost of a meter of such premises on the second floor will be more affordable compared to the first option.
- House with an attic. This option is possible in most buildings with gable roof. The attic is considered the simplest solution in country house. Depending on the shape of the roof, the size of the room will depend. With the truncated type, the room will have the appearance of a truncated pyramid. If we are dealing with a sloping roof, then the room will ultimately have rectangular shape. The area of the attic is always smaller than the area of the first floor.


Wooden house with attic floor
The entire subsequent technological process and the amount of financial costs depend on which type is chosen.
Full or attic floor? Exploring the Pros and Cons
Before choosing a particular project, it is necessary to consider all the positive and negative aspects of the options. The most commonly used criteria for such assessment are:
- Room dimensions. If you make a full second floor. Then the area of the room will be as large as possible. In addition, there will be no beveled corners. At the same time, the attic can also become multifunctional and spacious if the bevels are made away from the floor surface.
- Purpose is the second question that owners of a summer house or country house should ask themselves. The second floor can serve as a cozy nursery or bedroom for parents, a cinema or even a spacious bathroom. In this case, the attic would be a good option. But, if you plan to move the bathroom and kitchen to the second floor and create a large dining room, it is better to still choose the option of a project to build a full floor.
- The financial side of the issue. It's no secret that construction is far from the cheapest process. Therefore, preliminary cost calculations are always considered in conjunction with constructive solutions. In practice, the attic will be cheaper.
- Exterior of the building. If you add a full second floor, the appearance of the house will be quite austere and monumental. The attic makes it possible to slightly diversify the image: on the second floor you can make an unusual veranda with small tubs with flowers and plants or a small cozy balcony, add decorative accents and use non-standard solutions in design.

A two-story country house provides even more advantages and opportunities for relaxation
The design of the upper part of the house can be realized according to various technologies. This largely depends on which room will be located on the second floor, as well as on personal preferences and financial capabilities.
What to pay attention to when building an attic?
The attic is the simplest solution for a country house or small private house. Its design is not only somewhat simpler, but the construction itself will be cheaper compared to other options.
To make the task as easy as possible, there are several recommendations that you should pay attention to:
- Prefabricated structures greatly simplify the construction process.
- Wood is one of the “favorite” materials among owners of private houses. However, it is worth remembering that it lasts a long period, you need to take care of special treatment with an antiseptic and insect repellent.
- Waterproofing must be done efficiently, since the “protective” attic space will now be absent and any precipitation may end up on the ceiling of the room and ruin the interior.
- In addition to waterproofing, you need to take care of air ventilation. Usually a rough ceiling is installed, where there is an air gap between the insulation layer and the beams.


Basic elements of a log house with an attic
Should I not be? Risk assessment
Once a decision has been made about what the second floor will be like, it is recommended to proceed to a risk assessment. An important point is technical condition buildings in general. This conclusion can be done by specialized enterprises that can conduct an assessment and make a conclusion regarding:
- the condition of the foundation, walls and ceilings under the attic;
- bearing capacity foundation;
- possible options for strengthening the bearing capacity of the foundation.
The initial question that worries the owners is: “will the foundation of the dacha (or private house) support another floor?” If the safety margin identified by experts turns out to be sufficient, then construction can safely begin. If not, then you first need to strengthen the walls and foundation.
It is worth noting separately that the attic, compared to a full second floor, requires a smaller margin of safety. But this largely depends on the existing foundation and the choice of materials for construction. A project for adding a full second floor almost always requires strengthening the base and walls.


Unusual wooden architecture two-story house
Analysis of strengthening methods
Strengthening is not a very simple and at the same time expensive process. There are many options for strengthening walls and foundations, and each of them has its own characteristics and nuances.
Foundation replacement
This method involves partial or complete (if there are reasons for this) replacement of the worn-out part of the foundation of a summer house or private house. The technology is not too complicated and it is quite possible to do it yourself if you have some skills. Of course, it is not possible to do this alone, but two or three strong men should be able to cope with replacing the foundation.


Raising a house before repairing the foundation
Step-by-step instruction:
- The house is completely freed from heavy objects (furniture, equipment).
- The doors are removed.
- The floor is being dismantled.
- The building is raised using hydraulic jacks.
- A new pile or strip foundation is laid (in the case of partial replacement of the foundation in a wooden private house, most often only one side of the support is replaced).
Construction of an armored belt
An armored belt is a solid belt, which is a closed reinforced concrete strip that follows the contours of the building. His the main task – additional protection foundation from additional load.
To make such a tape, you must follow the following instructions:
- a trench is dug along the walls of the house, along the entire perimeter;
- the width of the trench should be 0.5 m;
- the depth should be 80 cm greater than the level of the old foundation;
- sand, crushed stone and gravel are laid on the bottom of the tape, which make up the so-called “cushion”;
- a sheathing is constructed (you can use plywood and boards);
- the original foundation must be cleaned and primed;
- pins are driven into the old base in a horizontal position every 0.25 m;
- after all the pins are driven in, they must be welded to the reinforcement;
- A metal mesh is laid on top of the reinforcement, after which everything is filled with concrete mortar.


The process of strengthening the foundation - fastening reinforced belt to the wall with rebar anchors
Important!
However, this method of strengthening has some caveats: after its construction, repair or strengthening work cannot be carried out for a year, since the foundation may still shrink.
Also, there are cases when such an armored belt is not made around the entire perimeter of the house, but only in the corners. This applies to situations where the second floor is made of timber or other “light” material. In this case, a trench 1 m long is dug from the corner in both directions. The depth should be more than 0.5 m from the old base. The width should be 0.5 m (as in traditional version with a trench around the entire perimeter).
Reinforcement and formwork of shallow strip foundation
Frame - as a method of unloading the base
The frame method is based on unloading the existing foundation by transferring the load to additional load-bearing elements. The strengthening project can be either external or internal.
The external method involves the construction of an additional foundation around the perimeter of the building. The function of load-bearing structures will be performed by single-span beams. Thus, on the second floor there will be communications with ground floor, however, this is the only way they are connected. The second floor has its own foundation and does not add pressure to the foundation of the first.
The interior of the building can also be used for frame reinforcement. In this case, additional supporting structures are erected directly in the house. Communications will be carried out on the second floor, however, unlike the external method, the load from the upper part of the house will be transferred to the old foundation and a new reinforcing frame.
Since strengthening is often quite expensive, some experts suggest another way out of the situation. If it is not possible to carry out strengthening, but the construction of a second floor is necessary, it is best to pay attention to frame and prefabricated material for the construction of walls. This is due to the fact that they are light in weight and do not put a serious load on the base.

Construction of an additional floor: choice of technology
After the project has been prepared, you can proceed directly to the construction technology top floor. Experts distinguish several types of it:
- masonry;
- use of reinforced concrete structures (in particular, polystyrene concrete);
- use of wood (timber);
- use of frame-panel technology;
- use of prefabricated structures.
Each of these technologies has its drawbacks. For example,construction from brick or reinforced concrete is possible only after preliminary strengthening of the walls and foundation of the building. At best you can use frame method unloading the old foundation by erecting additional supports and a new foundation around the perimeter of the house. At the same time, using wood will mean that you will have to wait at least one year for finishing.
Construction technology has become the most popular recently frame second floors. This is the best option for a small country house or cottage, which does not require too much financial investment. In addition, such panels are lightweight and in some cases reinforcement is not required at all.


Frame structure of the second floor in a wooden house
The main advantages of this technology are:
- light weight;
- more low cost materials compared to other technologies;
- possibility of construction regardless of weather conditions;
- fire safety.
If you choose based on convenience and practicality, then it is worth noting glued structures of a curved type, which are attached to each other in a hinged way. However, in the construction of private houses they are used extremely rarely due to the fact that the price of such elements is very high.


Frame houses are fast, reliable, profitable and environmentally friendly
General procedure for working with frame panels
The frame method is most often used in domestic construction. The main elements are panels, which you can buy ready-made or build yourself.
To make a panel with your own hands, you will need only three basic materials
- wooden beams that will serve as clamps and also hold the shape of the panels;
- chipboard sheets with which the panels themselves will be covered;
- thermal insulation material 1.5-1.6 cm thick (the most common option is mineral wool or polystyrene foam).
In general, the process goes like this: wooden beams are used to build the frame. After it is securely fixed, with outside attach a sheet of chipboard. Then, insulation is placed inside and covered with a second sheet of chipboard.


Forming the frame of a wooden house
Step-by-step detailed instructions have the following steps:
- you need to “part with” the roof of the house: it is dismantled first. The roof is completely removed, rafters and beams are removed.
- Using a winch or small crane, the panels and beams are lifted onto the construction site.
- Installed end walls and are attached to each other by longitudinal elements. Additionally, to ensure greater structural strength, vertical elements are used.
- The rafters are attached to the longitudinal elements.
- In areas where window openings are designed, vertical beams are fixed.
- The end cladding of the walls is made from chipboard and thermal insulation material.
- Lathing is installed on the roof frame. The roof pie is being laid.
- The final stage is the installation of the floor, installation of windows, finishing walls (wallpapering, painting, etc.), ceiling installation.
Thus, the construction process is not too complicated. It is quite possible to implement it yourself with several helpers.


A frame house is a complex engineering structure in which there are no details and everything is subordinated to achieving the main goal - high quality of the house
The project for the construction of the second floor is enough complicated thing, which requires thinking about all the little things. In particular, in addition to all the nuances presented above, you must also remember the following points:
- There may be partitions on the second floor. In order not to put unnecessary load on the foundation, it is best to do these interior walls from plasterboard.
- A staircase is something without which an attic would be useless. You need to think about its construction in advance, because there are quite a few options for its placement (outside or with inside building).
- You can arrange any rooms on the second floor, however, if the safety margin is not large or no reinforcement has been done at all, it is best not to load the room with heavy equipment and furniture. The best option It will be possible to make a bedroom there in a minimalist style or a spacious home theater with light furniture.
Private houses have a huge advantage: if you have the desire and opportunity, they can always be expanded. And this can be done not only in the horizontal direction, but also in the vertical direction - by adding another floor.
However, this decision must be conscious, since every little detail needs to be thought through: from conducting a survey of the existing building, choosing materials, the need for reinforcement, to the location of the stairs, window openings and partitions.
Second floor extension
No matter how comfortable and spacious your home is, sooner or later it will become too small for a growing family, and now you are thinking that it would be nice to increase its area by adding a room on the second floor. The size of the plot does not always allow you to add one or more rooms to it, and is this really necessary? A suitable way out of this situation is to add a second floor.
The floor superstructure can be either a “regular” floor or an attic (attic floor)
It is much more profitable to build a second floor above the house, which will help you not need an additional room. Moreover, use it as a basis for additional area an existing building is faster, easier and cheaper than making a new one. After all, you already have half the house! Along with all communications and engineering networks connected to the main water supply, gas pipeline, electrical network, etc.
In addition, you don’t necessarily have to lead to the second floor, for example, gas pipe or plumbing if you plan to place an office, bedrooms or living room there!
The second floor superstructure can be either a “regular” floor or an attic (attic floor).
Be careful - excess weight!
How to build a second floor without overloading the foundation of the house?
To determine whether your home can handle another floor, you need to have it inspected. Technical expertise will determine the safety margin load-bearing elements, foundation, attic floor and communications. You don’t want the house to sag right during construction or for the wiring and pipes in the walls to start to break?
Depending on the condition of the supporting structures and communications of the house, you can either simply “build up” an additional floor on it, or you will have to first strengthen its walls and foundation and only then begin construction work on the second floor.

To build a second floor, you need to have some knowledge in construction
On buildings whose walls and ceilings have a sufficient margin of safety (houses with thick stone or brick walls), it is possible to add a second floor without strengthening its structure and using any of the known house construction technologies.
It could be:
- Masonry;
- Construction using reinforced concrete structures(polystyrene concrete and other lightweight materials);
- Second floor extension using wooden structures;
- Construction of a superstructure using frame (frame-panel) technology.
In a house with a weak foundation, initially designed for only one main floor, it is possible to add additional floors in a permanent way only after reconstructing the house.
Strengthen the walls and foundation so that they can withstand, for example, masonry, It's hard enough. If you do not have the time or opportunity to reconstruct the house, the second floor superstructure will have to be built either from lightweight frame structures or, to put it simply, “on stilts.”
External reinforcing structures
In order to relieve the load on the foundation and walls of a house during a superstructure, several technologies are used:
"Internal frame"
Additional supporting structures are installed inside the house along its contour. The layout when adding a second floor during reconstruction is linked to the old load-bearing walls and is consistent with the elements of the reinforcing frame inside the building (the columns are installed on their own foundations).
In this case, on existing structures only some of the load is transferred. The main part of it comes from new load-bearing elements in the house.
"External frame"

Staircase with skylights to the second floor
The columns are installed along the contour of the building and rest on independent foundations. Between them and the walls of the house you can build balconies or loggias.
In essence, such a superstructure is a collection of columns and single-span beam-walls placed around the building: they simultaneously play the role of partitions and load-bearing structures. The built-on floor rests on its own “piles” and is not structurally connected in any way with the built-on house. In fact, it is not a second-floor superstructure, but an almost independent one-story house built on top of an old house. They are connected only by communications.
Frame (frame-panel) technologies
Modern industry offers quite a lot of durable and reliable structures for increasing the number of storeys, while they are light in weight and do not particularly burden the house. Therefore, the construction of the second floor in an individual house is most often carried out using frame technology.
Compared to reinforced concrete, frame structures:
- They weigh a little;
- Fireproof;
- They have a low cost;
- They allow construction to be carried out in any weather and at any time of the year.
However, if you are planning to build a second floor in country house, you can totally get by on our own by making its elements with your own hands.
We are building the second floor
First of all, prepare the panels from which you will mount the end walls. This homemade panel is a frame made of wooden beams, which is lined with chipboard on both sides. The sandwich is filled inside thermal insulation material(the thickness of the insulating layer is 16 mm).
Work order
- Disassemble old roof: first the tiles are removed, then disassembled rafter frame. Before continuing work, you need to remove the beams and removed roofing material from the upper floor;
- Using a crane or winch, lift the wall element onto the work site;
- Install end walls. After installation, they are fastened together by longitudinal beams connected for reliability by vertical elements;
- Now secure the rafters to longitudinal beams. Where there will be windows, vertical ones are attached to the longitudinal beams;
- Now it's time to sheathe the walls of the superstructure inside and out. Use the same chipboard sandwich panels with sealant as those from which you installed the end walls (then the walls will be plastered);
- Attach the sheathing to the roof frame and roofing sheets and insert windows;
- Having finished arranging the room, you can start working on the interior, wiring communications and installing electrical equipment.
The final stage
If desired, you can divide the built-in room into several rooms using plasterboard partitions. Since this is a fairly light material, walls or partitions made of plasterboard will not significantly increase total weight add-ons.
And don’t forget to make a staircase opening in the ceiling of the upper floor! If your add-on will serve as a full-fledged residential floor, the staircase is installed in the hallway or in the living room, and you can climb into the attic of a summer country house from the veranda.
Having mastered the technology of frame-panel construction using the example of arranging such a superstructure, you can, if necessary, build a second floor above the house, using industrial frame structures and ready-made wall panels instead of wooden beams.
Construction of an attic floor
Construction of the second floor on the building mansard type It is considered the simplest and most common type of construction of this type. It is possible to carry out such construction work without moving out of the house that is subject to reconstruction. In order to make the second floor of the attic type, you can use semi-ready structures, which can be purchased in disassembled form.
For this type construction work They use various building materials, the most common of which are metal, wood and concrete. All these building materials can be used individually or in combination, if the supporting structure and the price ratio of building materials allows it. The superstructure of this type itself is considered quite economical.
If you compare the living space added to a house with a new building, then its cost will be half cheaper than the cost of building a new residential building with the same dimensions.
In addition, the construction of the second floor does not require the use of the same building materials that were used for the construction of the residential building itself, which makes it possible to use more cheap materials. As a rule, the height of the completed floor should be about 2.7 meters, taking into account the space for organizing the attic floor.
You can even make an attic-type second floor out of wood. building material, which is quite acceptable according to building codes.
The use of such an inexpensive and relatively lightweight building material significantly increases the possibilities of construction of this type. The only downside to wooden second floor can be considered the fact that a structure made of lumber is not stable in operation and has a short service life compared to brick or concrete structures.
But with the help of special antiseptic solutions and simple drying oil, you can quite easily increase the service life of wooden structures, as well as increase the resistance of wooden building materials to atmospheric influences, which lead to rotting of lumber.
Prefabricated structures
The fairly large popularity of construction work on the second floor has led to the emergence of construction market prefabricated second-floor structures, which consist of individual prefabricated structures that are assembled directly on the construction site.
Such prefabricated structures can be made from different building materials, which makes it possible to select the desired type of structure of a given type. The most common prefabricated structures are those that consist of wooden trusses and similar frames connected to each other using keyed connections.
This type of structures and connections allows not only to quickly and efficiently construct the second floor, but also to diversify the manufactured form of such a superstructure in the upper zone, which will help make a rather original and attractive design of the second floor.
Finished frames and trusses are sold disassembled, which helps reduce the cost of transporting these building elements and does not require heavy crane equipment to lift such a truss up. All this affects not only the speed of construction, but also the savings in the construction budget.
After the structure of frames and trusses on the wooden second floor has been assembled and secured, you can begin to insulate it using mineral wool, and also organize the sheathing according to wooden trusses and sew it up with any chosen roofing material. Do not forget that on wooden attic floor You can make two-level rooms.
Considering the fact that the building will be equipped with a prefabricated structure strapping belt made of any building material, it becomes quite possible to individually plan the resulting internal space, starting from the angle of inclination of wooden trusses.
As a rule, for such solutions special trusses are used, which are made using a combination of metal and wood. Such supporting structures have a fairly low weight, high strength and simple assembly, which directly affects the speed and cost of installation of this element load-bearing structure roofs.
Ready-made disassembled trusses consist of an upper wooden belt made from a 4-centimeter thick board and a lower strapping belt made of a metal reinforced structure.
The two parts of the finished truss have a fairly simple connection, which is carried out using bolts and metal plates. Bottom part finished design is connected using a special tightening device, which is included in the truss structure kit. The lower chord of such trusses can be used as a basis for interfloor ceiling, if such an overlap is planned to be made of lumber.
In private construction, a huge number of options are used for using lumber to create attic-type structures.
Industrial type technology involves the use of glued wooden frames bent type, which are hinged in 2-3 places. Similar truss structures, which are made of straight elements, have a higher manufacturability of assembly and installation.
By all indicators, glued structures are more reliable and practical, but at the same time they have a cost that is several times higher than the cost of simple wooden structures.
This leads to the fact that the use of such building elements is used only in mass construction, when at least 5 houses of a similar type can be reconstructed. Among the most common truss and frame structures, it is worth noting those that are made of metal.
The only disadvantage of metal frames and trusses is the fact that it is almost impossible to lift some elements of the finished structure manually, which leads to the use of heavy construction equipment, which negatively affects the construction budget.
Roof
Just like simple mansard roof, the construction of the second floor can be covered with almost any roofing material that will fit the organized type of sheathing.
Making such a sheathing is quite simple, given the two slopes of the roofing system. In addition, in order to make the lighting in the room more correct and attractive, you can equip the roof with special windows, which will not only supply more daylight, but will also give the room an attractive appearance.
2015-05-13 1

Contents
Second floor in the apartment- this is a great opportunity to increase usable area almost doubled, but this can not be done in every apartment. The good thing about a private house is that you can easily dismantle the roof and add another floor; in an apartment, this scenario is simply impossible. Owners of townhouses are very lucky with multi-level apartments, for example, as on this site, they will certainly be able to realize the dream of a full second floor in an apartment.
If you dream of a second floor, then you need to carefully approach this issue, because repairs (whatever they may be: major or cosmetic) are a costly and time-consuming undertaking.
We are developing a plan for the second floor in the apartment

Start with a plan. A properly drawn up plan will not only save you energy and time, but will also protect the family budget from unreasonable spending. And the first point in this regard should be technical capabilities. A full second floor can only be created in an apartment with high ceilings, otherwise you will create two whole floors, which will be uncomfortable for the whole family to live on.
It is necessary to measure the height of the ceilings, correlate possibilities with desires. So, for example, with a ceiling height of 4 meters or more, you can safely plan your second floor. If your ceilings are lower than this figure, then you need to think about what to do with your dream.
We are making a full second floor in the apartment

If your ceilings have passed the “height test” and are excellent for creating a second floor, then you need to decide on what area you will create a second floor. Some people do it over just one room, others prefer to use all the available space. Any method has its advantages and disadvantages. First of all, you need to think about where the staircase will be located, since it will occupy a certain place on the ground floor.
If you want to make a second floor above your apartment, then take into account the fact that some furniture may not fit below (cabinets higher than 2 meters) or may look awkward (shelves near the ceiling). It is also important to know that low ceilings will change the perception of the rooms - the space will seem small, a little uncomfortable. But on the second floor you can make several rooms (it all depends on the size of the apartment) and place the necessary things.

The option of adding an extension to only part of the apartment helps to avoid the feeling of low ceilings. Designers advise using it. This way you can achieve an increase in area without losing stylish look lower floor. But, unfortunately, the size of the apartment will not change as significantly as in the first case.
What materials are needed to create a second floor in an apartment?

In order to build a second floor, you must have a solid foundation. That is why when planning you need to take into account the walls to which the ceiling will be attached. They must be load-bearing; drywall and plasterboard are not the materials on which you can “lean”.
After you draw up a plan and double-check it carefully, you can start purchasing. You need to calculate the amount of materials needed.

Usually to create a second floor use timber. It becomes the basis, the frame, fixed on load-bearing walls. We recommend that you purchase laminated veneer lumber; it is much easier to work with. The frame will be complemented by beams that guarantee the strength of your floor. And only boards can be attached to the beams. The base for the floor is ready. This whole structure is quite heavy, add to it the weight of the furniture and the inhabitants of the apartment. Check fastening systems carefully.
How to make a staircase to the second floor in an apartment

Choosing a staircase for the second floor in an apartment is not an easy task. You will have to choose between convenience and free space. A flight of stairs is considered the most comfortable way to move between floors. It has railings, and even elderly or sick people can climb these steps. However, it takes up a lot of space; for example, such a staircase will not be suitable for small studio apartments (the space that you get on the second floor will be occupied by the staircase on the first).

A spiral staircase is an excellent compromise between space and convenience. Climbing these steps is not very difficult, and the staircase takes up much less space. The only drawback is the rise time, which increases noticeably, and the danger for children and the elderly. The fact is that the steps on such a staircase have different depths different places, so it’s easy to trip and fall.
The most economical and, perhaps, the most inconvenient way is an attached “attic” ladder. It can only be used in apartments where only young and healthy people live. However, if you are making a second floor only in the nursery, then such a staircase is an excellent “simulator” for children.
Don't forget about restraints, since the risk of falling from the second floor is very high. You can make absolutely any railings on the second floor, it is important that they are high enough.
Finishing the second floor in the apartment

So that your second floor does not look like separate apartment, and as part of it, it is necessary to create a unified design. You can decorate the second floor in the same style that is already on the first floor, or completely remodel the entire apartment. Try to use light colors to decorate ceilings and walls to eliminate the feeling of “low ceilings.” Consider lighting both on the second floor and on the first (in the part where the superstructure is located). Ventilation deserves special attention. It will always be warmer on the second floor than on the first floor. Think it over correct location air conditioner so that it does not blow directly on the bed or sofa, but cools the apartment.
Recently, the construction of a country house is often not limited to one floor. In order to expand the space, a second one is built or the attic room is insulated and brought into a condition suitable for comfortable living. This means that you can’t do without a staircase in the interior of the first floor.
The staircase to the second floor can easily be assembled from ready-made kit, which can be purchased from companies specialized in the development and manufacture of this interior functional element. In the catalogs offered, you can choose a staircase that will ideally fit into the decor of both floors, and will be comfortable and safe for all family members to ascend and descend.
You can try to build a staircase yourself, but in this case it is necessary to do so, since if the design is not well thought out, a familiar element of the house may well become a traumatic “simulator”.
In addition, you need to decide what role the staircase will play in the interior. It can be completely invisible and not be a decorative decoration of the room, but it can become the center of the composition around which the entire design of the room will be built.
Therefore, to choose a suitable instance, it is better though would schematically draw the staircase you wanted would see in your home, but you can already find ready-made option and adapt it to a specific room.
Before choosing a staircase model, you need to know how it is designed and how to calculate its correct parameters.
The main components of the stairs
The design of a staircase has many components, some of them are mandatory, while others may not be included in the design of some types of this structure.

So, a staircase cannot do without steps and the supports that support them - these are the main elements of the simplest designs of interfloor stairs.
- The step itself consists of two parts - vertical and horizontal. The first of them is called riser, and the second is called gait. The riser is a support for the step, but sometimes they do without it.
- Supports can be of two types:
— the bowstring is a beam that supports the steps from their ends;

- stringer - a beam supporting the steps from below.
- Railings are also an important element of the staircase, although they are not present on all types. But if there are children or elderly people in the house, then there is no way to do without them.
- Balusters are vertically installed supports for railings, which most often become not only a functional part of the staircase, but also its decorative decoration. This element can be made from different materials and have different forms.
Since there are different types of stairs, each of them may have parts that are necessary specifically for a particular design.
- Stand - this element is used to construct a spiral staircase. Steps of a special shape are attached to the rack with a certain pitch, which form a spiral rising from the first to the second floor.

- Bolts are special bolts, which are also elements supporting the steps; they are attached to the wall and directly to the steps themselves. They do not apply to everyone, but only to individual species stairs
Types of stairs
Having found out what elements the stairs consist of, you need to understand in more detail what each type of these structures looks like, installed between floors.
Marching staircase
This type of staircase is popular for any type of private home. It consists of one or more straight flights, equipped with evenly spaced steps. It is convenient to go down and up, but the disadvantage of this model is that it requires a lot of space in the room.
 The most common are flight stairs
 If the staircase consists of several flights, then each of them must have at least 3 ÷ 4 and no more than 15 steps. Failure to comply with this standard may make climbing stairs uncomfortable. Typically, the number of steps in each flight is 8 ÷ 11 pieces, and special platforms are installed between flights. Their sizes are multiples of the average step length.
- Marching stairs can be closed or open. The first of them have risers in the design of the steps, and the second are installed without them. Open option convenient in cases where the steps are not wide enough.
- Marching stairs can have steps attached to stringers or bowstrings. For these parts, boards with a thickness of at least 45 ÷ 50, and better yet, even 60 ÷ 70 mm are selected.
- If a straight staircase without turns has more than 8-9 steps, then for strength it is also recommended to divide it with a platform.
- In the case when the staircase is built with a slight turn, it is called a turning one, and sometimes in this area, instead of a landing, steps are installed, which are called winders.
 Winder steps quarter of a reversible staircase
 - In addition to the above types, flight stairs can be:
— quarter turn– the angle of which when turning is 90 degrees, and they are located mainly at the junction of two walls;
- half-turn - their rotation has an angle of 180 degrees;
- circular models - marches successively form a 360-degree turn.
Design of staircases on rails
The name of these stairs on the rails comes from German word"bolzen", which means bolt. So it's a bolted ladder. In fact, it is a fastener in the form of a pin with threads at its ends. With their help, steps and fences are fastened together and mounted in the wall. Thanks to these devices, the design looks light and airy. The absence of risers also contributes to this.

In addition, such a model can be stretched over a certain section of the wall, or it can look quite compact. Despite the apparent lightness, the design is reliable and durable, it can withstand hundreds of kilograms, which is why ladders on bolts are becoming increasingly popular.
 Despite the “airy” appearance, the ladder on the rails is very reliable
 Naturally, such a structure cannot be located in the middle of the room, since it must be attached to the wall; the main condition for installation is the strength of the material from which it is built.
It is quite difficult to calculate a staircase with rails on your own, but you can purchase it as a kit or order it from professionals to make it, depending on the specific conditions of the house.
Video: installation of a wooden staircase on rails
The installation of this structure is quite complicated, and it is better to entrust it to qualified craftsmen who can assess the possibility of its installation. Therefore, before purchasing a kit, it is best to first consult with specialists.
Spiral interfloor staircase
This design is more difficult to install, but has the advantage that it occupies the most minimum area of all existing options, therefore ideal for rooms with small area. In addition, such a staircase can be installed in any convenient place in the room and, if desired, made it the center of the interior composition, since the design has a fairly aesthetic appearance.
 Spiral staircase - saves space, but is not always convenient for carrying large objects
 Can be different types, but for a two-story house, a model consisting of a rack and wedge-shaped steps is best suited. For the rack, choose a metal pipe or a wooden support.

- The rack itself is fixed to the floor of the first floor and in the interfloor or attic ceiling.
- The steps are attached to it with the narrow side and rotated so that the overall structure resembles a spiral.
- Balusters are installed on the wide side of the steps, the upper part of which is fixed in the handrail, repeating the spiral direction of the entire structure.
Video: installation of a spiral staircase
What is inconvenient about such a model is the fact that it will be difficult to lift or lower down some massive piece of furniture. In addition, when choosing such a model for installation, you need to know that the smaller the opening for it in interfloor covering, the steeper and more inconvenient the stairs will be.
Calculate screw design not difficult. To do this, determine the area in the room where it will be installed, and calculate its center - this will be the location where the rack will be installed. Next, the distance from the post to the border is measured - this will be the span width, i.e. length of steps.
For comfortable walking on such stairs, the size of the middle step should be at least 200 mm, and the widest part should be no more than 400 ÷ 420 mm.
It is quite possible to make and assemble such a structure yourself, if you have skills in working with wood and the ability to calculate the loads on the selected material. However, if you do not have confidence in your abilities, then it is better to entrust the work to a specialist, as it is incorrect arranged structure very dangerous.
Requirements for the design of stairs
Before you begin, you need to know the requirements for the staircase design.

Safety is perhaps the most important thing important condition. In order for it to be fully implemented, it is very important to accurately calculate all the parameters:
— the angle of inclination, the width and height of the steps, the method of fastening the first and last of them are calculated;
- if the staircase is not located between two walls, a fence must be installed, and its height must be at least 800 ÷ 850 mm;
- if there are small children in the house, the balusters supporting the handrail of the fence should not be located further from each other than 100 ÷ 120 mm;
— the width of the steps should be 200 ÷ 300 mm;
- the ladder must withstand sufficiently large loads - for residential buildings they are 300 ÷ 350 kg/m²;
- the steps must not be slippery - the texture of their outer covering must be carefully thought out;
— the entire structure must be securely and rigidly fixed between floors;
— it is undesirable to install the structure at an elevation angle of more than 45 degrees;
— the width of the spans cannot be made less than 850 mm, but the optimal option is 1000 ÷ 1200 mm;
- the staircase will be less dangerous if it is divided into two or three parts by platforms;
— fastenings for structural elements must be made of high-quality material, so you cannot skimp on them;
- If wooden parts are processed independently, then you need to bring them to perfect evenness and compliance with the dimensions established by the drawing or patterns.
Video: mistakes in the design and construction of stairs
Calculation of staircase parameters and production of parts
Since for self-made and installation, a marching design with steps laid on a stringer is the most affordable, as well as convenient and safe to use, so it is worth considering.
The first thing to do is to calculate the location, number and size of steps, as well as the width of the staircase span.
Calculation of staircase parameters
The calculation of the design of the flight of stairs is carried out as follows:
- The height of the room and the length of all or part of the wall - the space allocated for installing the stairs - are taken as a basis. Having reduced these values to scale, draw a right triangle, in which the staircase itself will be the hypotenuse, and the legs will be the height of the rise and the floor.
An angle of 45 degrees is considered ideal for installing a staircase, but it can be changed depending on the wishes of the home owner and the area of the room.
- A comfortable tread width should be at least 200 mm, so the leg of the floor, based on its natural length, is divided by this value. The resulting number of steps is marked on the drawing.
- The height of the risers, convenient for movement, should not exceed 100 ÷ 120 mm. To calculate them, you need to divide the height of the total rise by the selected height of the risers and also transfer it to the drawing.
- Thus, you can calculate the dimensions of the stringer for laying the steps.
- The width of the stairs will depend on the preferences of the residents and the size of the room.
Video: example of calculating an interfloor staircase
Manufacturing of staircase parts
In order to correctly manufacture parts, you need to accurately transfer the dimensions from the drawing made to the material and select high-quality, well-dried wood.

- The most difficult thing is to cut the stringers perfectly evenly, since the reliability and strength, as well as the aesthetics of the structure, will depend on this. For these load-bearing elements, choose a solid board without cracks and numerous large knots, with a thickness of at least 45 ÷ 50 mm.
- The width of the treads can be 1.5-2 cm greater than the space provided for them on the stringers, plus the thickness of the risers. The steps should be perfectly smooth with neat rounded edges, and this is also very important to take into account. For them, a board with a thickness of 30 ÷ 35 mm is selected.
- If it was planned to make the staircase closed, with risers, then they must also be done carefully. For these elements, you do not need to take a board of great thickness, since basically the entire load will fall on the stringers, and the risers will play a role supporting the structure. A thickness of 15 ÷ 20 mm is sufficient.

- It would be better to purchase balusters and handrails ready-made along with fastenings. If there are children in the house, then, for safety reasons, it is worth installing two balusters on each step. In the case when the children have already grown up, then one element supporting the handrail is enough.
Prices for various types of staircase elements
Elements of stairs
Installation of stairs
Installation of the stairs is the most crucial moment after the manufacture of all structural elements, and it must be approached with the utmost responsibility.

- The stringers are installed first according to pre-established marks. On the floor they are fixed to a fixed in the right place support beam, and in the upper part they are installed in the cut gaps in the floor beam. Sometimes, to secure the upper part of the stringers, metal supports are used, mounted on a beam covering the ceiling. The fastenings for these load-bearing elements are anchor bolts.
To ensure that the parts are installed perfectly evenly, during the installation process they are constantly aligned with a plumb line and the building level.
- If risers are provided, then they are screwed before laying down the tread surface.
- Then the tread panels are secured on top of the stringers and risers with self-tapping screws.

The fastening of risers and steps occurs in a complex, and proceeds down up.

- Then, when the steps are ready, you can proceed to installing the balusters.
On both sides, that is, on the floor of the first floor and at the top of the stairs, support posts are installed, which will become the boundary for the overall structure of the handrail (railing). They will also play both a supporting and decorative role.

Balusters can be different sizes, and are made of different materials, so they can be attached in different ways. Some of them are simply installed in drilled holes in steps and handrails, others are screwed with self-tapping screws, and the mounting points are closed with decorative plugs.
- , they are covered on top with handrails, which are fixed to the supporting outer posts. If necessary, another support post can be installed in the middle of the stairs.
- If three or even four racks are installed, then instead of balusters, two or three even boards (planks) fixed parallel to the course of the stairs can serve as a reliable fence.
- When the entire structure is assembled, you can proceed to surface treatment using a grinder and sandpaper. Preparation is carried out before applying protective and decorative paint coatings.
- The first layer that is applied to the wood is antiseptic compounds. They will protect the wood from rotting, mold or mildew, and from domestic insects. After this, the structure is allowed to dry completely.

- Next, the staircase can be coated in several layers with varnish (preferably water-based), hot wax or paint.
- If it is necessary to darken the wood, it is first coated with stain or other tinting compounds, and then, after drying, a varnish coating is applied on top of them.
After drying paint coating, the staircase will be ready for use.
Photo instructions for creating a wooden staircase
 Step 1 - drawing of the future design


Video: another interesting option for installing stairs to the second floor
If you need to install it in your house, you need to carefully calculate every step of your work and approach it with all responsibility and accuracy.