How to make a house with a garden out of cardboard. How to make a beautiful cardboard house
Read also
If you set out to organize a nursery play area at the dacha, you will probably like our selection of fun and exciting ideas for repurposing cardboard boxes. Using unwanted cardboard containers, you can make a house, a castle for a princess, or even a plane for a young pilot!
In most cases, making such a toy will take no more than half an hour, and the child will play and enjoy the new product for more than one day. It’s great if the baby gets involved not only in the game, but also in the process of creating a new toy.
1. Cardboard boxes are wonderful and available material to create a house or castle. The appearance of the “structure” will depend only on your imagination and the wishes of the child. You can decorate such a “dwelling” by painting it with paints, pasting it with decorative tape, or with shapes made of colored paper.
If you take several boxes of the same or different sizes, you can build a two- and three-story palace, which will have a door, windows, roof, and towers.
You can make a simple house out of a huge box in just a couple of minutes.
The top wall of the box can be designed as a roof, or even cut off, leaving the house open. It will be interesting for the baby to look out of the windows of the house, which can be easily cut into the side cardboard walls. Lay a blanket on the floor of your new home.
Decorate the walls of the cardboard house, both inside and outside, together with your child. It will be interesting if you hang a garland from the ceiling. Such a house will captivate a child both in the country and in a city apartment.
If space allows, don’t be lazy to build an entire cardboard town on the street. Such a play area will become a field for all kinds of stage games.
Little girls will surely be happy new kitchen or a cardboard store counter.
2. You can please your little traveler with a car, airplane or bus from cardboard box.
Most a simple typewriter You can really make one out of cardboard in a few minutes. Take a box and cut off its lid. Cover the walls of the future car with colored paper. Wheels can be imitated using plastic plates by gluing them to the sides of the vehicle.
And since you have decided to make a car, then, continuing the transport theme, make a traffic light for the game road. Place inside the box cylindrical shape, for example, a rolled up roll of thick paper. Turning the box into different sides, you can change the colors at the traffic lights.
3. If you doubt your crafting abilities, or you don’t have large boxes at hand, then you can take on smaller projects. Together with your child, build figures for games (animals, people, plants) or objects home decor(bed for a doll).
You can put not only a doll, but also your favorite toy in a cardboard bed. Boys will surely love a brand new guitar with wire or lace strings.
Making a guitar out of cardboard is very easy. Cut out several blanks for the front and glue on top of each other! Attach or draw strings and decorate as desired.
4. Baby Bed Canopy – Here’s another idea for using a cardboard box for a craft! Any parent can make such a decoration, because it is very simple. Make a window on the side of the canopy; you can hang a curtain or decorate it with a garland.
5. Cardboard box – excellent material to create a house from 4 open zones.
Both boys and girls will like the house. Decorate it according to the child’s wishes, design it in the form of a castle, palace, farm, residential building.
Looking at the picture, you will understand that it is very simple to make.
Cut out two squares or rectangles from thick cardboard. Make holes in them to secure the parts of the house to each other. Please note that to decorate one room, you need to decorate not just one prepared square, but half of both squares. Then each of the four rooms will be unique in its own way.
7. Crafts made from cardboard will be useful even for very small children. For example, you can make a huge sorter out of a box and conduct exciting educational activities. Or you can make a bright, colorful mobile for the crib.
Not only huge boxes will come in handy, but also regular milk packaging. You can make them out of them unique crafts– a garage for a children's car park, a doll house, a bird feeder.
8. Giant racing play area - what could be more fun for boys? Take a large box, cut off its top, leaving only low sides around the perimeter.
Use colored markers to draw road markings, depict railway. Place plastic or cardboard animals along the curbs. Rolls from toilet paper or paper towels – great option to create tunnels on the road. This wonderful game will appeal to children of any age.
If you are creating a play area for girls, try dividing the area into rooms using small cardboard partitions or strips of colored tape, draw or arrange toy furniture, and place dolls in the “rooms.”
9. Don't throw away cardboard rolls of paper towels and toilet paper. Such rolls are an excellent material for creating a unique fun - lowering cars. By making a multi-level slide, you will captivate both boys and girls with this activity.
Attach the roll halves with glue to the back wall of the box.
10. A young artist will love this easel for drawing.
Drawing supplies - pencils, markers, erasers, etc. - can easily fit inside the easel.
11. Another practical use of cardboard is making interesting framework for photographs. The shape, size, design of the frames depends only on you. To get the frame right, first cut a hole for the photo, and only after that start decorating the edge of the frame.
12. A fascinating tunnel made of many boxes will arouse genuine interest in a child. The tunnel can be made long or short, straight or with branches.
And finally, the easiest way to captivate a child is with a cardboard box. Before throwing the box away, allow your child to color it to his heart's content!
Every girl dreams of a house for her dolls. Now there are a huge number of them on store shelves. But such pleasure is not cheap, and the assortment is the same.
We offer to please your child with a handmade gift. This will allow you not only to save money, but also to make the house one of a kind.

In addition, this will be a wonderful pastime for the whole family during leisure time.

There are many special training programs for making doll houses with your own hands. You can use a wide variety of Construction Materials: boards, plywood, chipboard, laminate, cardboard, etc.

As a rule, the front wall on dollhouses is not made, or it is made removable or opening so that your child can put dolls there, change the decor in the rooms, and tidy up.

Choose the material - and we will teach you how to make it Dollhouse with your own hands!
Dollhouses made of plywood and laminate
These are the most popular materials. Distinctive feature from “brothers” - stability and longevity. It is easy to decorate both outside and inside. But making such a house requires male strength.

If you try, such a house will be indistinguishable from the store version.

Diagrams and drawings can be found on the Internet, but if you have technical inclinations, you can try to draw it yourself. There are also photos of finished dollhouses on the Internet.

To make a house we will need:

- thicker plywood (from 7 mm);
- electric jigsaw;
- glue;
- self-adhesive floor;
- pieces of wallpaper;
- tape measure or ruler;
- pen;
- scheme;
- a little imagination and patience.

Let’s get to work, having first decided on the dimensions of the dollhouse (they will depend on the dimensions of the “tenants”):

- we cut out the walls of the future house from plywood or laminate;
- we cut out windows and doors in them;
- glue the walls together, it is also fashionable to use construction nails or staples;
- we make a roof, it can be either flat or sloping. For a real look, you can use corrugated cardboard and then paint it;
- We fasten the resulting structure to the foundation - a sheet larger than the house itself. On an unused area you can make flower beds, sidewalks, a platform, and a parking lot;
- we glue wallpaper and lay floors;
- furnish the house with furniture;
- you can also add curtains made from pieces of fabric, bedspreads, rugs, etc.
Dollhouses made of plasterboard
Many household parents, after renovations, leave the remaining building materials to gather dust on the balcony in the hope that they will come in handy someday. Their time has come! Drywall can make an excellent dollhouse.

The good thing about a house made from this material is that it is very light and easy to assemble. But, at the same time, it will need to be handled more carefully - it will be quite fragile.

The layout of such a house is no different from a product made of plywood or laminate. But assembling such a house is much easier, and there are many more layout options - with the help of partitions you can divide the rooms between each other.

Foam houses
To assemble such a house we will need:

Note!

- sheet foam;
- glue;
- canape sticks;
- rulers;
- bamboo sticks;
- cardboard;
- pieces of wallpaper and fabric;
- dye;
- sponge for washing dishes;

Pieces of plinth for the ceiling
Let's get started:

- make a diagram;
- cut out walls from foam plastic;
- we make doors and windows in them;
- we connect the walls using toothpicks, then glue the walls together;
- to make the roof stronger, we first install bamboo sticks on top of the walls, and only then glue the roof to the walls;
- from wooden rulers or use the same polystyrene foam to make a staircase;
- You can also use toothpicks for railings;
- in addition, if desired, you can also make a balcony, massandra or even a terrace from polystyrene foam;
- painting the house;
- We decorate the house inside as in the previous description.
Houses made from bookshelves and cabinets
House from old furniture it won’t be difficult to do - after all, the walls are already ready.

All that remains is to cut windows and doors in them, and think about what to make the roof out of, if necessary.

It can also be made from the materials described above. We arrange the furniture, let the cat in - happy housewarming!

Cardboard houses
For this design we will need:
Note!


- cardboard;
- house detail templates;
- scissors and stationery knife;
- gouache or watercolor paints.

We are building a house:

- If you have a large piece of cardboard, then do not cut it, but bend it in places according to the diagram, and then glue its component parts.
- install interior partitions made of cardboard, they will serve not only to delimit space, but also to fasten the frame structure.
- Let's get started with renovations and furnishings!

House made of boxes
The simplest and quick option. All you have to do is pick required quantity boxes (depending on the number of rooms), we fasten them together using a stapler, having previously placed them on their sides so that the top of the box serves as an exit.
This will allow right moment open the front wall to rearrange, tidy up, etc.

We cut out windows and doors. Let's start designing the frame.

Note!

House made from paper folders
It requires four folders. We cover them from the inside with wallpaper or printed sheets with decorative items and household appliances in a plane.

We cut out windows in the folders, install the folders vertically, and fasten them with the help of clips that are included with each folder. Your house is ready.

Fabric house
This option is good because it takes up virtually no space and can even be folded up.

Using a thick piece of fabric we make the back wall - it will serve as the foundation. We sew a rectangular base for the house. We make pockets to which the cardboard for the floors will then be attached. We attach ribbons to both corners of the pockets.

All that remains is to sew the pockets with a rectangular base on one edge so that the ribbons are on the reverse side. Floors using tapes and sew the tapes with back wall. Let's decorate the house and start playing!

You can make houses from other materials - the main thing is to show your imagination! It will also be a wonderful gift for a boy - after all, you can build a garage, parking lot, etc.
Photo of a dollhouse with your own hands


Every little girl dreams of the biggest and most beautiful dollhouse for Barbie. And every domestic cat dreams of his own house made of cardboard, where he can retire without getting in the way of his owners. By learning how to make cardboard houses with your own hands, you can not only please your children and pets, but also decorate the interior in an original way. This article shows the most requested do-it-yourself cardboard house plans with MK.


Necessary materials
Materials and tools do not require additional costs; everything you need can be found in the household of any family:
- cardboard boxes different sizes;
— glue gun or super glue;
- knife and scissors;
- pencils, felt-tip pens, markers;
- watercolor paints, gouache;
- sparkles and other decorations.

Helpful Tips:
— when creating a box, it is better to use corrugated cardboard;
— only adults should cut cardboard;
— for the stability of the product, it is better to take cardboard pipes;
— in a house for children, it is advisable to make a door that opens outward. It will be so more space for games;
- do not throw away small cardboard boxes.
Shelter for a cat
A cardboard house for cats can be built by the whole family in a very short amount of time. The first thing to do is to draw doors and windows using templates.

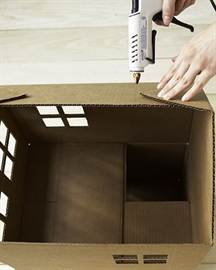
Start assembling the bottom of the box. Bend the opposite flaps, apply glue to them and fold the remaining flaps on top. Press them together until the glue dries. At the top end of the box, cut off two wide flaps. Next, cut half of the remaining sash and bend it. Do the same thing from the second whole sash. Secure them with glue in this position.

The next stage is creating the roof. On the top of the second box, on the small flap, draw lines from the center of the top to the bottom corners. Do the same with the second flap. Then cut out one large flap. Cut the edge along the first drawn line and fold the second one. Repeat the same steps with the second leaf.

At the bottom of the second box, cut off the wide flaps, and from the first smaller one, cut off exactly half so that when gluing the two boxes there is a hole. Glue the boxes together. Then take the first wide cut flap and glue it to the bottom of the second tier to strengthen it.
The second box will be used to make the roof. To do this, cut a piece measuring 45 by 115 centimeters. Bend it in half along the long side. Apply glue to the triangles of the small flaps on the top of the second box and glue them to the wide flap. Apply glue on top and glue only the first side of the roof so that the cat can look out from under it.
The house is ready!

Dollhouse
This wonderful gift for children you can make it yourself from ordinary cardboard boxes.
The house will consist of two floors and two rooms. First, connect the boxes together. Glue another sheet of thick cardboard to the bottom, side and sides. Strengthen the structure of the house with tape and let the glue dry.
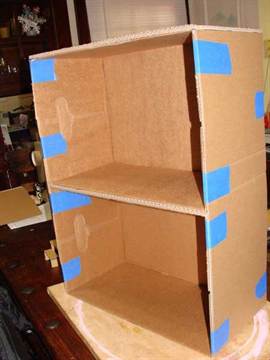
To make the structure more durable, strengthen the walls with thin cardboard.
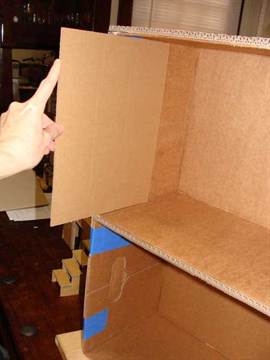
The next stage is decorating the rooms and appearance house. Decorate the walls with colored paper applications, add mirrors, window curtains, and toy furniture. In order for the dolls to “climb” to the second floor, the house will need a staircase, which will consist of two parts.
Cut steps from thin paper for the end of the stairwell. Make the same cut out of cardboard. Select the desired width and height of the steps.

Cut out a couple more pieces from a thick sheet of cardboard. You will need a couple of rectangles for the steps and the bottom.

Glue the side parts of the ladder together and press them together with your hands to make them more dense.
Need unusual gift wrapping? Do you need a craft in the form of an architectural structure? If you like to do creative things with children, you can make a cardboard house together. The execution technologies will be similar, but choose the size and design in accordance with your individual idea.
Beautiful houses: options and ideas
A cardboard house can be made in the following options:
- A play structure for children of such a size that they can go inside (an alternative to expensive plastic complexes).
- A small architectural form for dolls with a removable or missing front wall and a detailed interior of the rooms.
- Crafts on a New Year theme, for example, Santa Claus's house.
- Gift box of unusual shape.
As you can see, there are several possibilities. Choose suitable option. Make children's play more interesting and educational using accessible means.

What you need
To make a house from you need to prepare the following:
- Cardboard (corrugated for frame, decorative for decoration).
- Part templates, diagrams and developments.
- Pencil.
- Ruler.
- Eraser.
- Scissors.
- Glue or heat gun.
- for registration.
- Textile.
- Paints.
- Brushes.
- Markers.
- Suitable decoration elements (pebbles, flowers, beads, seed beads).
The set and quantity of materials will depend on what kind of house you will be making and for what purposes. A growth structure requires a strong frame, and thin cardboard or thick paper. The packaging design can be completely designed on a computer or a ready-made template can be printed. Big house you'll have to do it by hand.

How to make a diagram
If you want to make a small cardboard house with your own hands, it is better to use ready-made template, which can be printed directly on the product sheet. It would be better to draw a blank on thick cardboard. It is easy to build a small house like a box from a whole sheet of cardboard with fold lines.

If you are going to make a large sized house for children, it is better to cut out all the parts separately, although if the size of the material allows, it is easy to make a blank in the form of a development, as for a box. The diagram is quite suitable as a sample small house. It is enough to increase the size of the constituent elements proportionally. If you have a large box of the right size, it's good to use it. Then you just need to cut out the doors, windows, possibly strengthen the structure, build a roof on top (a gable roof is more convenient) and, of course, decorate the frame.
Manufacturing technology
This section contains the general sequence of steps. In every specific case there will be some nuances. So, to make a cardboard house with your own hands, work as follows:
- Prepare the base material and draw on it a diagram of the house or its component parts.
- Cut out the elements.
- If there are fold lines on the workpieces, draw along them with the corner of a ruler or other similar object. So, you will make grooves that will help you fold the thick cardboard evenly and neatly along the line.
- Make the folds.
- Tape the seams.
- If interior partitions are supposed to be inside the house, glue them in using a hot glue gun (hot glue can be applied to the ends of cardboard blanks) or regular glue. In the second case, it is better to use additional connecting parts in the form of strips bent in half. One edge is like this paper tape will go on the right joining wall, the other on the left.
When the entire structure is assembled, start decorating. Internal walls, especially if the joining elements are visible, it is better to cover it with decorative paper or fabric. It is enough to paint the outer walls of the house.

Although you can lay out the lower part from pebbles or appliqué elements (paper parts). In a word, arrange all the decor at your discretion. The main thing is that it is appropriate, and it is important to securely fasten it so that during the game the house does not immediately lose attractive appearance.
made of cardboard
The technology for manufacturing the frame will be similar to that already described. The only difference is that the facade wall is either not made at all, or is made to open like a door on hinges. This can be done on tapes or cardboard strips. When creating a plaything, it is important to make it in proportions suitable for the dolls, commensurate with them, so that they fit there and feel comfortable (sitting, standing).

Particular attention is paid to organization and design internal space. Be sure to create several partition walls between rooms. They will also play a role load-bearing structure. It is important to make furniture (or place purchased doll furniture). Pay attention to the wall decoration. If you think through everything properly, the house will turn out to be very realistic, and the design process itself will turn into an interesting activity for young craftswomen.
New Year's houses made of cardboard
This option will have some features. If you are just creating a craft for a competition or interior decoration, it is enough to make it using a cardboard box. Such a product may not be opening, but the design (windows, doors) will be drawn or made in the form of an appliqué.
If you want to make gift wrapping like a cardboard house, the design of the product should be such that there is an opening part. It should be convenient to remove the contents of the gift, and the packaging should not be deformed. The roof of the house box can be removed, one of the roof slopes can be opened, and the base can be removed or moved.

So, do it beautiful house You can make it from cardboard with your own hands both for play purposes in a natural size that is comfortable for a child, and as a souvenir gift (packaging or doll house).
Useful tips
Sooner or later, everyone ends up with cardboard boxes on their balcony, storage room or dacha.
Not all of these boxes should be thrown away, as you can make many interesting and even useful crafts from them.
One of these crafts is playhouse for children.
Such a house can be built and decorated together with children, who will be very interested in joining something new.
Folding cardboard house

1. Start with an empty box. Turn it on its side so that the open part is perpendicular to the floor.

2. Cut off the top of the box and save it - this will serve as half of the roof later.

3. Use wide tape to secure some parts of the box.

4. Cut a piece from another cardboard that will be the second half of the roof.
5. Tape the roof halves together.
6. Connect the roof and the house and secure them with tape.


7. Make the house foldable. Place the house face down and cut down the middle of the back and bottom of the house. Also cut where the bottom and back of the house meet.


8. Add tape to the places where you made the cuts. Make sure the bottom and back of the house fold in the right direction. Secure with tape the areas that you feel are loose.


DIY cardboard house with pipe and door

You will need:
Hot glue with a glue gun
Stationery knife
Scissors
Several cardboard boxes.
The large box will be the main part of the house, and small boxes will be needed for small things such as a pipe and window frames.

1. Cut off the pieces of the large box that form the lid - these will be used to create the roof.
2. Turn the box upside down. Cut out the door by making a large "L" shaped cut.
3. Cut out the squares for the windows using a utility knife.

4. Glue 2 parts from the cut box lid. Repeat the same with the other two parts of the lid. You will get 2 halves from which you can make the roof of the house.
5. For windows, you can cut out 2 wide cardboard strips and glue them to the window. You can also cut several strips to create a window frame.
6. To glue the roof to the house, you must first connect the roof halves using small L-shaped cardboard pieces. Next, use the same parts to glue the roof to the house.

7. Now we make a small roof. You will need a sheet of cardboard of the appropriate size. Divide it in half (or just bend it) and glue it to the house in the same way as big roof, i.e. L-shaped parts.

8. You can make a window in the door and, if desired, glue a cardboard window frame to it.

9. Optional : If you want to make a pipe for a house, you will need a small box or 4 cardboard pieces of the same size, which you need to glue into a small box.

10. Mark on a small box the places that need to be cut so that the pipe will lie flat on the roof of the house. To make this easier, lean the box against the roof exactly on the side and draw lines with a pencil. Once you have glued the pipe to the roof, you can cover it cardboard cover and glue a cardboard toilet paper cylinder.
11. Optional: you can add a handle to the door. Use any old pen and stick it to the door. You can also make a handle from cardboard.

How to make a house out of cardboard with your own hands

You will need:
Large cardboard box
Wide tape (adhesive tape)
Stationery or construction knife
Metal ruler (to make straight cuts)
Black marker
Double-sided tape (if necessary)
Fabric for curtains (if necessary).

1. Disassemble the box and turn it inside out so that the house will later be brown and plain, and all the drawings on the boxes will be hidden.

2. To make the house larger, those parts that form the lid of the box on one side need to be lifted and secured in vertical position using adhesive tape (adhesive tape). Place the box on its side so that there is an “entrance” to the house on one side.
3.Optional: to make a diagonal roof for the house, use a stationery (or construction) knife to cut diagonally ( small angle) the upper part of the future house (the part that is now at the top, after you turned the box over).

Cut triangular pieces from a cut piece of cardboard and tape the roof back to the house.
4. Bottom part cut off the house (the floor opposite the roof), fasten it with tape if necessary, and attach it to the open part of the box (“entrance”, which was obtained in step 2).

5. Now it’s time to cut out the cardboard house windows and doors.
If you wish, you can use a marker to draw window frames, bricks and other details. You can also cut out a small handle in the door (a semi-oval at the edge of the door).