How to make it out of friendship. Chainsaw moped “Friendship. Homemade sawmill from a household chainsaw
Read also
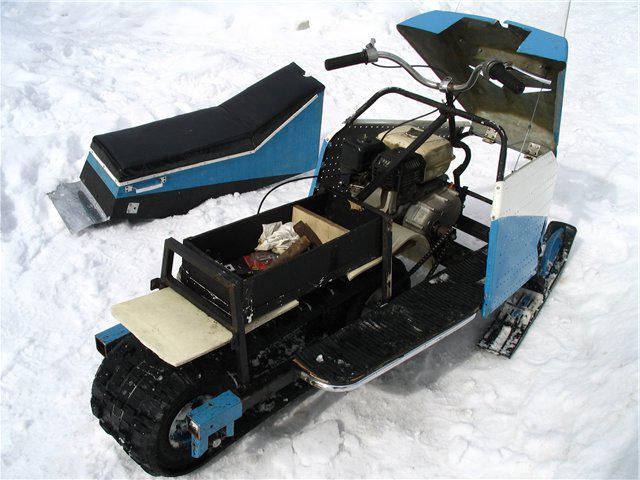
A snowmobile is a very necessary vehicle for residents of the northern latitudes of Russia. Road conditions do not always allow you to get close to, for example, a fishing spot or a remote village. Some people buy ready-made snowmobiles, while others make a homemade snowmobile. From a chainsaw you can take an engine, the power of which will be quite enough to move the entire structure at high speed. In addition, you can seat several people on it and put a couple of suitcases. How to make a homemade snowmobile with your own hands?
Saw selection
In fact, the brand of engine is not important for a device such as a snowmobile. Whether the unit is imported or domestic does not matter, the main thing is that it pulls well. There is practically no big difference between whether a homemade snowmobile is made from a Shtil chainsaw or a Russian Ural.
How good should it be?
The most important element in this device is the engine. All other details, such as a chain or tire, do not play a significant role in the design of such a vehicle, so the main thing is to monitor and control the operation of the motor. If it is in good working order, the snowmobile will always be on the move. If you decide to take the engine from imported chainsaws, you don’t have to purchase a new device under warranty in the store. A used option is also quite suitable.
The only part in a chainsaw that must also be in working order along with the engine is the gearbox. It will also be useful to us in our work.

Making a Ural chainsaw: drawings
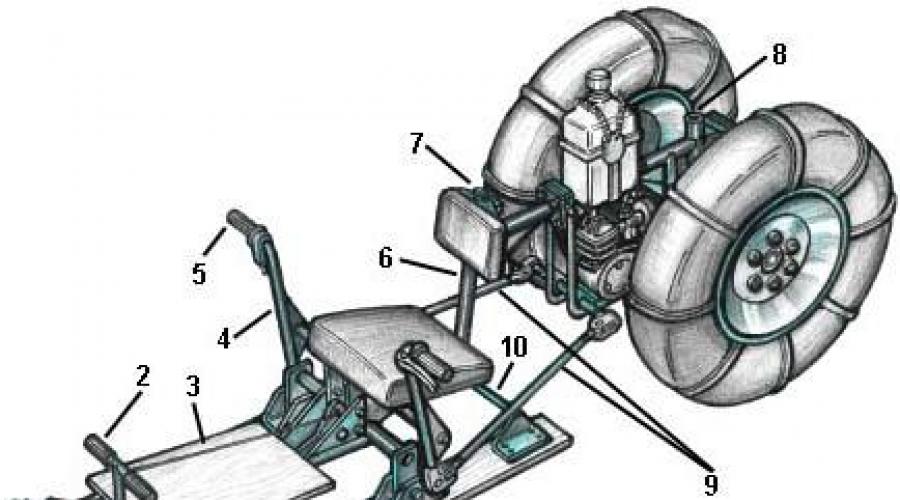
You should also take care of the diagrams. On paper you need to draw the location of such important components and assemblies, such as:
- Engine.
- Transmission.
- Skis.
- Caterpillar.
You don’t have to design the last part from scratch, but take an old one from the Buran snowmobile. The same goes for skis - tools from a children's snow scooter are quite suitable.
How to make a homemade snowmobile from a chainsaw?
First we make the frame. Here we will need several measuring 50 x 36 millimeters and two steel plates, each 2 mm thick. To add rigidity to the sheets, it is necessary to wrap the edges at an angle of 90 degrees. Make through holes in each of the plates. In the front it is needed under the drive track shaft, and in the rear it is needed under the axis of the guide tension gears. The latter devices must be mounted at both ends of the spar.
Weld several additional brackets from the bottom to the frame, maintaining equal intervals between their locations. Mount the axle of the track rollers into the grooves open on the bottom side. There should be a total of 18 rollers. They should be placed on 5 axes (in the center in a checkerboard pattern). Rollers can be made of nylon and “shod” with rubber tires. You can take a simpler route and take a ready-made part from a potato sorting machine.
The axis of the rollers can be borrowed from a potato digger. Their ends need to be released a little. This is done so that the axles can be machined and threads of 10 mm can be cut. When making a homemade snowmobile from a chainsaw, do not forget about the spacer bushings. They should be placed directly on the axes of the unit. It is best to take bushings made of duralumin pipe. Next, the axles are secured using fastening bolts or a locknut. Using the same principle, a homemade snowmobile is assembled from a Druzhba chainsaw.
Racks
At the next stage, it is necessary to weld 3 racks made of steel angle to the spar. The best option would be corners measuring 30 x 30 mm. They also need to be connected with steel crossbars. This way the structure will form a small portal. Between the front part and the middle on the right side, make a platform - weld a 2 mm steel sheet. After this, place the chainsaw gearbox and the intermediate chain drive shaft here.
A box can be installed in the space between the rear portal and its middle part. For what? It will serve as a support for the seat, which must be welded there at the final stage.
The front part of the frame must connect to the front axle crossmember. As a beam, you can use a regular water pipe with a diameter of at least 30 mm.
Weld steering ski bushings to the ends of this pipe. Attach a stand in the middle of the beam that will serve as a motor subframe. All these parts also need to be made from pipe, and at the joints on the posts and beams, gussets from a 2 mm steel sheet should be additionally welded. This way the structure will become strong and, accordingly, reliable.
Caterpillar
Those who made homemade mini-snowmobiles from a chainsaw take the tracks from the old Buran. However, for it to function normally, it needs to be shortened slightly (by 500 mm) and sewn together with transport tape. make it from a 15 mm nylon sheet.
Drive shaft
It will be tubular type with a diameter of 28 mm. A round flange with holes for the gears should be put on it. Press and weld solid pin tips into the ends of the drive shaft. The latter must be machined for bearings.
It should be noted that the left tip should be slightly shorter than the right one. On the extension, make a keyway to fit the driven sprocket of the second stage of the chain drive. This part is also called the track drive shaft sprocket and is secured with a 14 mm nut. The appropriate thread must first be made on this part.
The dimensions of the tension shaft tips must be the same and fastened similarly to the drive devices.

About the engine
It is best to make a homemade snowmobile from a Ural or Druzhba chainsaw. Although the imported Shtil is also suitable (though it costs the same as 5 of our domestic devices). So, how to make a homemade snowmobile? The power unit must be mounted on a sub-engine stand, on which the gas tank should then be placed. This entire structure is welded to the cross beam. As for the gearbox, it will be rotated 180° in the opposite direction and secured together with the “speed reducer” on the platform of the two-stage chain transmission. The latter represents the entire gearbox.
Asterisks
The driven star of the first transmission stage must have the largest number of teeth. On Ural chainsaw engines this value is exactly 38 units. The second stage drive sprocket has 10 teeth. The pitch of these devices is the same - 15.875 mm. By the way, the same pitch is installed on the Minsk motorcycle.

Steering
It will consist of steering support skis and be connected by rigid rods to the bipod of the steering shaft. The steering wheel itself can be taken from any Soviet motorcycle. The main thing is that it is 3-lever. Near the right handle, install a shifter - a small lever that performs the same functions as the gas pedal on a car.
It doesn’t matter whether you are making a homemade snowmobile from a Shtil or Ural chainsaw, there must be a shifter, as it is an integral part in the design of this device.
Brake system
It is not necessary to install it, since in most cases a homemade snowmobile made from a chainsaw does not develop high speeds and stops on its own. However, for safety, you can make brakes, but this will significantly complicate its design.
The legendary Druzhba 4M Electron chainsaw is an excellent example of how a good old garden tool with more than 2 years of history can easily outperform modern high-tech units these days. What are the advantages of the Soviet chainsaw and where is it used? Let’s look at it in more detail.
The structure of the Druzhba chainsaw - a detailed description of the design
The design of the famous Soviet chainsaw is based on a powerful 2-stroke single-cylinder MP-1 engine with an air cooling system, which has an increased service life and good endurance. The engine is lubricated using oil, which is diluted in gasoline to prepare the fuel mixture. The air supplied to the carburetor is cleaned using a foam air filter. A reliable and durable starter is responsible for starting the engine.
The saw accessories are connected to the motor using flange connections, which are fixed with a clamp attached to the handles of the chainsaw. Thanks to this unusual arrangement, the operator is able to rotate the bar and saw chain at any angle required for work. In addition, this method of connecting saw accessories and a motor makes it possible to use the latter in cases where there is a need to make various home-made household units.

The preparation of the fuel mixture in the design of the Druzhba 4 chainsaw is handled by a carburetor consisting of two chambers. Electronic ignition and a spark plug are responsible for producing the spark necessary to ignite the fuel. The chainsaw has a standard muffler, the function of which is to reduce the noise level when working with the tool.
To transmit and convert the torque of the motor, a gearbox is provided in the design of the Druzhba chainsaw. It is highly reliable and rarely requires repairs, even when operating the chainsaw in difficult conditions.
Technical characteristics of the Druzhba chainsaw

The Druzhba 4 chainsaw has excellent technical characteristics, which makes it stand out among modern professional models. Among the design parameters of the Soviet instrument, the following should be highlighted:
- Engine power – 3.5 l. s./2600 Watt;
- The recommended tire size for work is 45 cm;
- Saw chain pitch – 0.325 “;
- Reservoir for filling fuel – 550 ml;
- Lubricant tank – 260 ml;
- Weight – 7 kg.
Representatives of the 4th generation of Druzhba chainsaws have the highest technical characteristics among the entire line of chainsaws of this brand. By the way, their predecessor, the Druzhba 2 chainsaw, has a power of 2.8 liters. pp., which significantly reduces the ability of the instrument in practical use.
Repair and maintenance of Druzhba chainsaw

Reliable spare parts and durable mechanisms of the Druzhba chainsaw are not able to protect the tool from damage. Most often, the causes of tool malfunction are improper handling or simple wear and tear of the mechanisms.
To reduce the risk of premature breakdown of the chainsaw, you should use high-quality gasoline of at least AI-80 grade to refuel it, in which oil for 2-stroke engines should be diluted. The proportion of gasoline and oil should be 1:25, that is, 40 ml of motor oil should be diluted in 1 liter of fuel.
The oil used to lubricate the chain must also be of high quality. Under no circumstances should you pour waste material into the oil tank of your Druzhba chainsaw, otherwise this will lead to damage to the tool’s lubrication system. To prevent the chainsaw chain from subjecting to excessive friction, use only fresh oil from trusted manufacturers.
It should be noted that the use of a high-quality fuel mixture and lubricant does not guarantee the constant uninterrupted operation of the Druzhba chainsaw. However, even if you discover a malfunction, you should not get upset right away. Some breakdowns are quite easy to fix with your own hands. Below we list typical malfunctions of domestic tools and ways to eliminate them yourself.
Adjusting the Druzhba chainsaw carburetor
If you notice that the Druzhba chainsaw starts and stalls, the reason for this most likely lies in a violation of the factory carburetor settings. In this case, the carburetor must be adjusted immediately. The procedure will require the use of 3 adjusting screws marked “H”, “L” and “T”. As the operating instructions indicate, you need to adjust the carburetor in the following order:
- To find the highest engine speed in idle mode, you must slowly turn the screw marked “L” clockwise. Once you find the maximum RPM, turn the same screw back ¼ turn. If after this the chain on the bar continues to rotate, then turn the screw marked “T” counterclockwise until the saw element stops completely;
- Turning the screw marked “H” will allow you to adjust the required power and speed. To do this, you need to connect a tachometer to the Druzhba chainsaw and by turning the “H” screw, find the optimal number of revolutions indicated in the instructions. Immediately after this, turn screw “H” ¼ turn counterclockwise;
- Then you need to fine-tune the engine idle speed. To do this, screw “T” should be turned until the saw chain begins to rotate. Immediately after this, turn the screw “T” in the opposite direction until the chain stops completely.
Carburetor adjustment carried out according to the instructions will allow you to reduce the fuel consumption of your Druzhba chainsaw and protect its parts from excessive wear.
How to set the ignition on a Friendship chainsaw?
If there is no spark on the Druzhba chainsaw when starting the engine, then, first of all, you need to check the condition of the spark plug. If traces of oil and carbon deposits appear on it, the part must be thoroughly cleared of blockages and the space under it must be cleaned. If after this the Druzhba chainsaw does not start, then you need to check the position of the magneto in the adapter. Initially, there are marks on both the adapter and the magneto of the Druzhba chainsaw. If the magneto is correctly installed in the adapter, then the position of the marks coincides and the chainsaw works properly. However, if the position of the marks is violated, then the chainsaw will not start.
To properly repair a tool, you need to carefully study its operating instructions. As the repair instructions for the Druzhba chainsaw indicate, to install the ignition, you need to remove the cover to which the starter is attached and turn the magneto so that the marks on it and the adapter coincide. After this chainsaw, friendship will be much easier to make.
What can you make from a Friendship chainsaw with your own hands?
Not only the Druzhba chainsaw itself is very popular among people, but also homemade products made from it. Let's look at what homemade products from the Friendship chainsaw can be made at home, and what may be required for this.
Do-it-yourself snowmobile from a Druzhba chainsaw

To make a snowmobile based on the Druzhba chainsaw, first of all, you need to prepare and carefully study the drawings. Having a diagram at hand, you will understand in what sequence the parts of the unit should be installed, and complete the work many times faster.
The design of a snowmobile made from a Druzhba chainsaw should include a strong, durable frame on which the tracks, motor and steering controls will be mounted. In addition to tracks, the unit requires skids, clutch and gas levers to move. Due to the fact that the chainsaw does not have a transmission, a centrifugal clutch can be installed on a snowmobile from the Friendship chainsaw.
In order to increase the comfort of movement, shock absorbers should be installed on a snowmobile. You can use an old bicycle or, even better, a moped as a “donor” for steering controls. Its steering wheel should be redone so that the axis in the center of the steering wheel turns the snowmobile skis.

To make your own winch, you will need a drive from a Druzhba chainsaw. The higher the power of the tool's motor, the better the winch's pulling force will be. This figure can also be increased significantly by using an additional block.
The winch design must also include belts, hooks and a pull-out block. All of the above elements are secured using powerful anchor bolts.
Homemade sawmill from Druzhba chainsaw

To make this structure from a Friendship chainsaw, you will need a strong steel frame, to which the saw is attached via a rigid connection. In the middle of the frame opposite the chainsaw, you need to secure guides in the form of rails along which the wood will flow to the bar and chain of the Druzhba chainsaw.
The finished design can cut thick logs into 3-4 longitudinal parts. The advantage of such a sawmill will be its compactness and efficiency.

To make this unit yourself, you will need a screw, at the end of which screws will be attached. To transmit torque from the Druzhba chainsaw motor to the auger, you will need a gearbox. The gear ratio should be 2:1.
The finished unit is capable of accelerating a boat with two adult passengers to a speed of 20 km/h. Fuel consumption will be no more than 1 l/h.
Friendship bracelets, made from colored threads, can be considered a classic symbol of friendship. Gift these bracelets to your best friends or make them for yourself to expand your own jewelry collection. If your bracelets turn out to be particularly crafty, you might even be able to trade them! To get started, first learn the basic braiding technique, and only then expand your capabilities by decorating your bracelets with braids, charms and beads.
Steps
Part 1
Getting started on the bracelet- 4–6 threads will make a narrow bracelet, and 8–10 will make a wider one. The more weaving threads you use, the wider the bracelet will be.
-
Measure and cut the first strand of floss. Measure a piece of thread slightly longer than the distance from your fingertips to your shoulder, and then cut it off. This will give you a thread that is long enough for a bracelet to fit around your wrist. It's better to have a longer thread than too short one, so cut it a little longer if you're in any doubt.
Use the first strand of floss to cut all the other threads along it. Your task is to make a nice, even bracelet. Therefore, take the first thread of floss, attach it to all the other threads and cut them exactly to the same length.
Tie the threads in a knot at one end and pin the knot securely to a stable surface. You can pin the knot to your own trousers, to a pillow or to another stable textile surface that will not be damaged by this. If you can't find a safe enough surface to work on, don't look any further than your own toes! Tie the ends of the threads to the big toe to ensure they are securely attached.
- You can also attach the threads to any surface with tape or simply clamp the knot with a desk drawer. However, a pin will be preferable to tape as it will prevent the bracelet from moving out of position.
-
Place the threads in the correct order. Before you start weaving using knots, distribute the threads so that they are arranged in the order in which you want the striped bracelet pattern to be obtained. To prevent the end of the bracelet with a knot from becoming too bulky, try not to cross the threads again.
Place the first thread over the second to tie the first knot. It would be more correct to call this knot a “half knot.”
- First, fold the first thread over the second. Make sure that a little of the length of the first thread remains on the left side and a loop is formed.
- Bring the first thread behind the second and thread it through the loop.
- Hold the second thread firmly as you tighten the first. In this case, the formed knot will rise to the very top of the second thread. So, the first weaving knot is ready. Not bad, isn't it?
-
Repeat the same knot on the same threads. Having completed the second knot on the first and second threads, it will be necessary to use the first thread to make two knots on the third thread, then on the fourth, and so on. Continue working until there are two knots on each thread.
Part 2
Continuation of weavingStart again with the leftmost thread. You can already be congratulated on finishing the first row of weaving! Further work should be continued in the same way. The leftmost thread will become the new first thread. Each successive first thread will end at the far right, and each time you will start over with a different color thread. Always continue to knit two knots with the first thread, moving with it from left to right until this thread is on the far right.
Continue weaving until the bracelet is long enough to fit around your wrist. You've done an amazing job, so you need to make sure the bracelet you receive is the right size for you. The bracelet should be loose enough that you (or whoever will be wearing it) can comfortably slip a couple of fingers under it, in addition to the thickness of the wrist.
Tie a knot at the other end of the bracelet. Make sure that the knot does not take away from the bracelet the length needed to fit on your wrist.
Trim off any excess thread length. If you still have excess thread ends, you can trim them with scissors.
Tie the ends of the bracelet together. Now that there are knots on both ends of the bracelet, all that remains is to tie the ends of the threads protruding from the knots together, and the bracelet can already be worn! If you want the bracelet to fit snugly on your hand, ask a friend to tie it directly on your wrist.
Part 3
Decorating a bracelet with a simple braid and beadsDecorate the bracelet with a simple braid. If you want to give your bracelet a slightly unique look, try incorporating a simple braid into it. The braid should be present at both ends of the bracelet, so it will be necessary to start braiding with the braid before moving on to the main part of the knots. Gather adjacent strands into groups of two or three to create three main strands for braiding (left, center and right).
-
Start braiding and cross the right one of the three strands over the center one. Take the strand that is on the right and cross it over the center strand. Now the right strand will become the new center strand. Then take the strand that is on the left and also throw it on top over the central strand. Now it will become the new central strand.
- Then just repeat these steps! Continue to follow the given pattern (consistently bring the right and left strands into the center) until you get a braid of the desired length, which should be about 2.5 cm or less.
Choose several options for embroidery floss in different colors. In this work you are the artist, so it’s up to you to decide. Choose as many different thread options as you like. The main thing is that there are three or more of them. Lean toward color combinations that can create a cute weave pattern. Get creative! If you take only one color of floss, you will not be able to create a pattern.
A backpack-type helicopter made from a chainsaw. A chainsaw sawmill that can be made using a metal frame. The chainsaw is rigidly attached to this frame.
In the hands of craftsmen, an ordinary chainsaw, originally intended for sawing wood, becomes a truly multifunctional device. There are various types of special attachments on sale that significantly expand the capabilities of chainsaws. But, despite this, many craftsmen remake chainsaws on their own, using scrap materials.
The basis of almost any homemade chainsaw is its use as a universal drive that can be used for a huge number of different devices. Realize the potential capabilities of a chainsaw using a variety of accessories and attachments. The tool, made from a chainsaw, is distinguished by its tightness, so it can be used in almost any position.
Cultivator with a chainsaw engine
A winch that uses a chainsaw drive. A boat motor made from a chainsaw is an excellent alternative to buying an expensive engine. A chainsaw motor is attached to its frame. A portable power station made from a chainsaw can provide energy in any place remote from the power grid.
A homemade snow blower can be made from a saw with a power exceeding 3 kW. For it, it is necessary to mount a screw assembly with blades made of durable but elastic material.
A homemade snowmobile made from a chainsaw is a little more complex in design than a sawmill. A snowmobile consists of a frame, engine, track and steering. You should also consider a shock-absorbing suspension system for the supporting frame. Since the chainsaw does not have a transmission, the clutch on a homemade snowmobile is installed with a centrifugal one. A solid forged knife from a chain can be made by people familiar with blacksmithing. To do this, first of all, old chains are divided into pieces, which are then welded into blanks.
The chainsaw is very popular among home craftsmen because it is a universal drive for original homemade designs. Anyone who can confidently work with a welding machine, an angle grinder, and, if necessary, can even use a lathe, can make interesting homemade products from a chainsaw with their own hands. The first thing that comes to mind when you think about what can be done with a chainsaw is its use as a sawmill.
A sawmill using a chainsaw will also work on boards without problems, only in this case there will be too much waste, since its cutting chain is several times thicker than the saw of a band sawmill.
The winter line of homemade vehicles will be complemented by snowmobiles made from a chainsaw, which are structurally simpler than a snowmobile. A significant limitation for the cross-country ability of such a machine is the low power of the chainsaw. The basis for the design is usually my grandfather’s old Druzhba chainsaw and an equally ancient bicycle, with which you can conduct any experiments on converting the frame for mounting the drive. This chainsaw moped is equipped with a gearbox with a gear ratio of 18:1 and a CVT transmission, which allows you to comfortably move on it at the speed of a regular bicycle.

It is difficult to make a full-fledged walk-behind tractor from a chainsaw due to lack of power and traction. The chainsaw motor doesn’t care whether it rotates the cutting chain or the auger mechanism of a snow blower. The most daring inventors have long been eyeing the possibility of using a chainsaw as an engine for an aircraft. Since the ice auger operates at low speeds, to adapt the chainsaw motor, it is connected to the auger through a reduction worm gear.
Bicycle with a chainsaw motor
It consists of a frame, an engine with a gear reducer, a control panel, a generator and connecting electrical cables. If you understand the nuances of heat treatment of metal, you can make a solid forged knife from a chain that has served its purpose.
Below are various options for devices made from chainsaws. Almost anyone can assemble a motorized cultivator from a chainsaw. Almost anyone with a little knowledge of technology can make homemade chainsaws with their own hands.
To make a walk-behind tractor from a Druzhba chainsaw with your own hands, it is recommended to study the operating principle of the unit used. Experts include the following advantages of a universal drive:
- light weight;
- powerful engine;
- compactness.
Step-by-step instruction
When making a walk-behind tractor from a Druzhba chainsaw with your own hands, you will need metalworking and turning skills. A diagram and drawings of the future apparatus are drawn up in advance. The speed of the resulting unit (in 1st gear) will be 2.5 km/h, and the engine power will be 4 hp. With.
A homemade walk-behind tractor made from a chainsaw is presented in the form of a steel flange RU-32 with a shaft. The last part is dismantled from the UAZ bridge (diameter 30 mm). To increase the distance from the bridge to the ground, a chain and 2 stars from the VAZ are used. To make a walk-behind tractor with a frame, you will need metal corners (32x32). The engine is mounted at the top of the frame. The fuel tank is installed on the brackets. The intermediate shaft struts are installed on the front supports. To fix the running shaft bearings, supports and longitudinal angles are used.
 The walk-behind tractor, made on the basis of the Druzhba chainsaw, is equipped with wheels, a diaphragm carburetor, and a sealed fuel supply system. The gearbox and gearbox are made from a motor from a Karpaty moped. The center of gravity of the unit is above the supporting surface of the wheel. A load is installed in front of the frame. To operate the equipment manually, a pipe (diameter 30 mm) is used.
The homemade walk-behind tractor is equipped with 2 sprockets, dismantled from the Chinese Delta moped:
- presenter;
- on the intermediate shaft.
Experts attribute the advantages of the resulting design to the lack of demands on lubricants and hot materials and autonomous operation. The latter characteristic allows you to use a homemade walk-behind tractor in any terrain.
When selecting the gear ratio between the drive and intermediate shafts, the operating conditions of the homemade chainsaw are taken into account. When using the walk-behind tractor, it is recommended to follow safety precautions.
Additional devices
Before deciding what can be made from a chainsaw, it is recommended to study the diagrams of other units. Experts advise assembling a cultivator and a sawmill at the Druzhba base. In the latter case, it is recommended to firmly fix the chainsaw to a frame that moves along a guide profile. With the help of the resulting device, the worker will be able to carefully and motionlessly saw logs. To set the thickness of the sawn timber, you will need to equip the mobile carriage with 4 lifting screws.
Snowmobiles are homemade chainsaws of complex design, the manufacture of which requires the throttle and clutch to be connected to the steering wheel. When assembling this unit, special attention is paid to the shock-absorbing suspension of the supporting frame. Before making the tracks, you will need to prepare drawings. Since the chainsaw does not have a transmission, the snowmobile is equipped with a centrifugal clutch with a chain and a serpentine belt.
To increase traction on the drive shaft, a special gear is installed. Its diameter must exceed the dimensions of the Druzhba drive sprocket. The steering mechanism for a snowmobile can be removed from a bicycle or scooter. Otherwise, the device is modified (to move the rod, which ensures the turn of the ski). The power of the power unit must exceed 5 liters. With. Therefore, it is better to remove the engine from the Ural chainsaw.
If necessary, you can make a snowmobile at the Druzhba base. Their design, unlike a snowmobile, is simple. The driving force is transmitted by a large diameter screw, which ensures the rotation of the gasoline engine. The disadvantage of snowmobiles is the low power of the power unit. Therefore, the resulting unit can only be operated on a flat surface, well-packed with snow. You can ride such a snowmobile on the ice of a frozen river or lake. To drive across the field, you will need a 12 hp engine. With. It is recommended to do the same when making a backpack-type helicopter from a chainsaw. Such a machine will need to be equipped with 2 motors operating in the same mode.
Assembling a moped
To assemble a moped yourself, you will need mechanical skills, a set of keys, and a tester. This vehicle is made from a Druzhba chainsaw and a bicycle. From the last unit you will need to remove the frame, which will be converted into a drive. The power in such a moped will be transmitted through a gear pair of a bicycle chain, and the start will be reminiscent of preparing to cut wood.
To make a modern moped, you will need a “Druzhba” and a mountain bike equipped with a good shock absorption system and reliable brakes. The resulting vehicle is additionally equipped with a gearbox (gear ratio 18:1) and a CVT transmission. This moped assembly technology ensures a comfortable ride at the speed of a regular bicycle.
To make a motor for a boat, you will need to transfer torque from the Druzhba chainsaw engine to the propeller. In this case, the first unit does not require installation of a transmission. To make a reliable adapter you will need a lathe. The propeller can be removed from the factory boat power unit. If necessary, the device is equipped with a gearbox that changes the angle of rotation of the shaft by 90°. A simple outboard motor will work well without it. In this case, the engine is fixed on the boat so that the shaft is immersed in the water at a slight angle.
Additional units
Before making a light motor cultivator, you will need to prepare drawings of this unit. The design of the manufactured machine is simple: the engine rotates the gears, transmitting increased traction force to the drive wheel.
To make a snow blower, it is recommended to decide on the design and loads that will be placed on the machine. If you need to clear a small area of snow, then a homemade snow blower can be equipped with a motor from Druzhba. To assemble a more powerful unit, you will need a Shtilev engine (power 3 kW). To create a simplified model, ordinary sled runners are used.
When carrying out the above work, special attention is paid to the screw unit. It begins to move due to a gear pair and chain. Thick cord rubber is used to make the blades. The intake device can be made of galvanized steel. For easy operation of the resulting machine, a sewer pipe is installed under the snow thrower.
When making and operating homemade chainsaws, it is recommended to follow safety precautions.