How to make a lantern for an airplane. Cabin glazing. Civil aviation: custom windshields for airplanes and helicopters
Technology for manufacturing aircraft models from various materials and instructions for their processing.
Everyone enjoys prefabricated airplane models, but they are not always affordable yet. This circumstance may seem annoying to some, but this is only at first glance. A rather interesting and original tabletop model of an airplane can be made even from paper, and if you use wood or plastic, you can learn to make models no worse than “branded” ones, because no one requires them to fly.
This approach greatly simplifies the matter for those who decide to devote their leisure time to the design and manufacture of desktop replica models. The main thing is to ensure that the model looks authentic on the outside, and what it is made of inside does not matter. Therefore, when working on a tabletop “air show”, a variety of materials will find their use: cardboard and paper, wood, plywood and polystyrene waste, various polystyrene food packaging.
First, try making a bench model of the famous Soviet Pe-2 dive bomber of the Great Patriotic War on a scale of 1:72. Figure 6 shows its main projections, templates for manufacturing the body and wing, and Figure 7 shows the manufacturing technology. In order to make a model, it is best to use soft wood: aspen, linden, poplar or small-grained spruce.
The fuselage is made of a solid wooden block, but if you want to make it hollow, then make the blank from two bars, which are glued with thick paper (Fig. 7, a). This is necessary so that the finished fuselage can be separated and hollowed out from the inside.
Start your work by transferring the projections of the model fuselage onto tracing paper. Then paste this tracing paper onto the workpiece and process it along the contour. In the same way, transfer the top view to the workpiece (Fig. 7, b). During final processing, check the correctness of the fuselage sections A-A, B-B, B-C (see Fig. 6) using templates (Fig. 7, c).
The wing is made of a solid board. If there are no boards of suitable sizes, then glue several bars together. Process the resulting workpiece in the same way as the fuselage. When profiling the wing, use the templates of sections G - D and D - D. To give the wings a transverse V, saw the joint of the center section and consoles, and then glue them at the required angle. Make the engine nacelles and tail surfaces in the same way. The cockpit canopy can also be made from wood. In this case, paint all glazed surfaces with black paint.
Let's take a closer look at making a transparent plexiglass lantern. It is transparent and almost does not change color when exposed to sunlight. As the temperature rises, plexiglass becomes plastic, which allows parts of various shapes to be pulled out of it. The most favorable temperature for processing is 110-135°C. At higher temperatures, bubbles appear on the surface of the plexiglass, which leads to defective work.
The drawing method (Fig. 7, d) consists of drawing heated plexiglass in a wooden mold consisting of a blank punch 1 and a pass-through matrix window 2. The punch is cut from a piece of hard wood (beech) according to the drawing. Then it is coated with casein glue, dried and thoroughly cleaned with fine sandpaper so that the wood is not exposed. Casein glue can be replaced with epoxy resin or enamel, but in this case the glue is left only in microcracks, and the punch itself is completely cleaned to a shine.
Matrix 2 is cut out of 3...4 mm plywood so that the hole is 1.5 mm larger than the dimensions of the punch. The edges of the matrix must be carefully rounded and processed with sandpaper. Wooden blocks 3 are nailed to the matrix from below.
Plexiglas 1 mm thick should be approximately 3 times larger than the hole in the matrix. It is heated over a closed fire (electric stove) until softened. Then the workpiece is placed on the die and the punch is pushed into the die hole with a quick continuous movement. The force is removed after the plexiglass has cooled. The finished lantern is removed and excess materials are trimmed. In order to prevent wrinkles from forming on the lantern, it is necessary to make a clamping matrix 5 and, during drawing, press the workpiece against the main matrix. Sometimes imprints of unevenness of the punch or wood structure remain on the finished lantern. These irregularities are treated with fine sandpaper and then polished.
When assembling the model, special attention should be paid to the symmetry of the parts and their correct orientation. After the model is assembled, you need to carefully fill all the gaps between the parts. It is better to use epoxy putty, nitro putty
АШ -22 or АШ -30 or oil putty PF002. But you can prepare the putty yourself. To do this, the lumpy chalk must be wiped on a grid and diluted on enamel until the desired thickness is obtained. For a softer putty, you can add some nitro paint. Before painting, the entire model is covered with a layer of primer, then putty again and carefully treated with sandpaper.
This model is made from polystyrene in almost the same way. The necessary parts, say a wing, can be cut out of sheet polystyrene 2...3 mm thick, and then “finished” with needle files and sandpaper. The fuselage is glued together from a package of polystyrene plates. To cover the surface of the model, it is very good to use thin sheets of polystyrene from food packaging or glossy coated paper. Polystyrene finishing allows you to show the smallest details on the surface of the model, including even rivets. They are perfectly “stamped” (pierced with a dull needle) on workpieces from the inside. You can imitate the joints and seams of the skin, glue hatches and fuel fillers onto it, make blinds and radiator grilles, and covers for pilot lights. The small thickness of polystyrene makes it possible to effectively use it for fins of bombs and missiles.
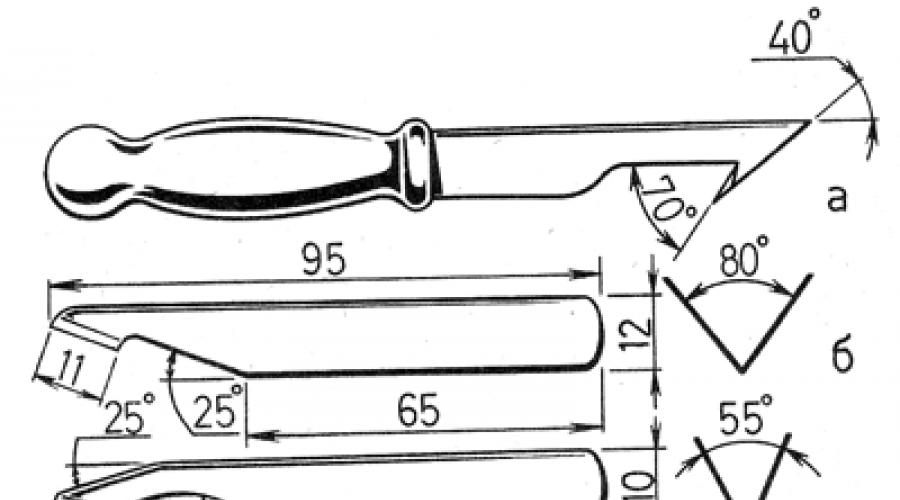
Cutting sheets of sheathing can be done directly on the finished product, especially if you prepare cutters for polystyrene, shown in Figure 8. The largest of them (a) is very convenient to use a metal ruler to draw straight lines on the surface of polystyrene, along which it easily breaks into pieces.

It is advisable to make several such cutters, made from fragments of a hacksaw blade for metal (b, c, d) for each type of work separately. For example, to make a thin, shallow “joint”, the cutter needs to be sharpened at an angle of 30°, and for deeper and wider ones – at an angle of 55° and 80°. Particular attention should be paid to the precise penciling of the cutting lines that appear in the drawing. Round “joint” elements (for example, hatches) can be easily made using tubes of various diameters sharpened at the edges. When you lightly press the tube, a faint mark remains on the polystyrene; to obtain the required depth, you need to turn the tube 2-3 turns.
After all the cutting has been completed, the surface of the model is treated with fine-grained sandpaper, and individual defects are repaired using putty. Having completed all this work, you can begin painting the model, once again carefully reading our recommendations for performing this important operation.
One or two models made using this technology (drawings for this work are regularly published in such magazines as “Wings of the Motherland”, “Model Designer” and “Young Technician” along with an appendix) - and you will become a real model-copyist, and your “air show on the table” will begin to be replenished quite quickly with new aircraft models, chosen solely at your request.
At the same time, turning to various kinds of reference books, encyclopedias and special magazines will make you a real specialist in the field of aviation.
And a few words about organizing your work. In our opinion, it is rational, for example, to make several blanks of the same type at the same time, when the appropriate tool has been adjusted and manufactured, as they say, for this operation. This makes it very convenient to turn wheels, make propeller blades and stamp cabins. If there are several models, then it is more convenient to paint them: the work is simplified, the final finishing time is reduced, and paint is saved.
This article describes the detailed process of making a hood for an airplane model from nylon tights and epoxy glue. Many people have old tights, but if you are a convinced bachelor and don’t wear tights, then you can buy any at the supermarket.
I would like to warn you right away - the process of making one hood or canopy may take several days, since the epoxy takes quite a long time to dry. In my opinion, it is better to start the cowl and canopy at the initial stage of fuselage production, rather than at the end of the model's construction.
And one more small note (my own experience): it is better to work with epoxy in a warm and dry room. When I made the hood in the rain on a cold balcony, the epoxy absorbed so much moisture that it did not dry for almost a week. I had to warm up the hood in the oven.
Materials:
- Penoplex
- Ceiling tiles
- Nylon tights
- Epoxy glue (not fast-curing)
- Ceiling glue
Tools:
- Sharp stationery knife
- Disc marker
- Sandpaper
- Square
- Wand
- Plastic cards
- Wire
- Glass or jar
- Mini drill
Step 1. Drawing templates
We draw the nose part, the engine and the spinner on cardboard, not forgetting the thickness of the fuselage skin, and draw out the shape of the hood in three projections.

Cut out the templates. A circle with a diameter slightly larger than the base of the spinner is needed to give a more streamlined shape to the hood and to more easily determine the location of the future hole.

Step 2. Gluing the workpiece
On a sheet of penoplex we mark rectangles slightly larger than the template. The number of rectangles directly depends on the size of the future hood.

We glue them into a large block with ceiling glue. Since penoplex is smoother and does not absorb glue, I recommend letting the coated parts dry first.

Step 3. Cutting out the blank
We draw the contours of the future hood on the finished block according to the template. Then we draw perpendiculars along the square to more accurately draw the contours on the back side.

We draw the side contours in the same way.

Using a sharp utility knife, cut out the side profile and draw a line (axis of symmetry).

We apply a template along this axis, draw the contours and, based on the contours on the other side of the blank, cut out the front profile.

We cut out the third profile and glue a circle from the ceiling.

We process the block with sandpaper to obtain a smooth surface.

Step 4. “Epoxy” work
We wrap the blockhead in a plastic bag (to make it easier to remove the finished hood later) and pull tights over it in one layer.

We twist the bottom of the tights so that all the folds go away, secure them with wire and glue two blocks of foam foam onto the ceiling glue, so that later the blockhead can be placed evenly.

We dilute epoxy in a glass and begin to coat the blockhead with it using a plastic card.

The process is not quick, because you need to make sure in good lighting that the epoxy saturates the tights evenly and does not cause strong smudges in the lower part. Once the block is completely coated with epoxy, it can be placed on a cabinet to dry.

After the epoxy has dried, cut off the excess tights from the bottom and tear off the penoplex bars.

We can start Step 4 first, but the package is no longer needed. For normal strength, you need at least three layers of tights, that is Step 4 must be done three times.

Step 5: Final Steps
After the third layer of epoxy dries, we get a very strong and smooth hood.

Now all that remains is to remove the blockhead. To do this, draw a line along the bottom edge with a marker and use a mini drill (if you don’t have such a tool, you can use a hacksaw or a needle file) cut off the excess along it. The work is very dusty, so I advise you to use protective equipment (respirator and goggles).

Cut a hole for the motor.

We squeeze the block through the hole and separate the film in which it was wrapped from the hood.
Quite often modelers are faced with a very unpleasant moment. Need to make a new onecabin glazing (flashlight).
Since the one in the set is either lost, broken or cracked, or is of the wrong shape or of poor quality. Manufacturinglantern, and indeed transparent elements of the model, is a rather important moment. Since transparent parts cannot be puttied or built up if they are not manufactured accurately. The part must be done immediately and as accurately as possible. There are several ways to make lanterns. I want to focus on the classic, time-tested more than once. Pullcabin glazing made of plexiglass using a punch and a matrix. First we make a matrix, exactly along the contour of the cabin. You can make a small margin of 0.1-0.2 mm for subsequent adjustment, cleaning and polishing. For this I use pieces of getinax, fiberglass or something similar.


Afterwards, from a type of wood, such as beech, so that there are no fibers and it is quite hard, we make a punch. Moreover, all punch dimensions must be reduced by thickness cabin glazing. But it’s better to increase the height a little so that the lower edge of the lantern is above the plane of the matrix when the punch is inserted into it. It is also better to mark on the punch, for example with a pencil, the lower edge of the lantern plus a small margin for cutting.


For large scales, 1mm thick plexiglass may be suitable, but for something like 1:72, you need to look for something much thinner or reduce the thickness yourself.

By the way, thickness is one of the reasons why some companies, especially when producing models using LND technology, for the manufacture cabin glazing films are used. Nowadays, from a huge number of packages, you can select a blank of the required thickness. Personally, for a number of reasons, I don’t like these films, and I use plexiglass to make lanterns. But let's return to our manufacturing process. To reduce the thickness, I grind down one of the sides of the workpiece to the required thickness on a piece of sandpaper. Usually new plexiglass is protected with film on both sides. Therefore, we remove it on one side and leave the other side alone for now, so as not to scratch it during the grinding process.

After obtaining the required thickness of 0.5-0.6 mm, remove the film. If necessary, if you want to make the lantern open, it can be made thinner. The side on which the film was placed will be the inner side, as it is smooth and without scratches. Now, near the heat source, where we will heat the workpiece, for ease of work, you can make something like this kind of slipway.


Then we move on to the pulling process itself. cabin glazing. To do this, hold the plexiglass blank with tweezers or something similar and heat it until it begins to bend easily under its own weight. It is better to heat over an electric stove or over a gas stove so that the plexiglass does not fall into the flame, but is heated above it. After heating, you need to very quickly place the workpiece with the polished side on the matrix and press on the smooth side with a punch.

You may not succeed the first time. Therefore, another advantage of plexiglass is that it can be heated again and it will take its original shape. Then you can try again. Of course, this cannot be done indefinitely. After obtaining the desired result, hold the punch for several seconds until the plexiglass cools completely. Then we remove the workpiece from the matrix and carefully begin to cut out the lantern.


If you have previously marked the punch, then along the marking lines, using a file, for example from a blade or a special one, we cut out the desired part.

Then we adjust the lantern in place. Since the outer side was not processed after grinding, now you can slightly adjust the lantern to its shape. If necessary, sharpen the edges, because during the drawing process, sharp edges collapse. Then we clean the lantern with waterproof sandpaper of different grits. Afterwards we polish it with GOI paste. I’ll say right away that this process is not easy, but after training you can get parts of excellent quality.

This article shows the manufacturing process cabin glazing made of plexiglass for the LaGG-3 aircraft manufactured by Roden on a scale of 1:72. This is what the lantern ended up looking like. And this is how it looks on the model.


Hello, dear and beginning modelers.
While reading the articles, I noticed that many modellers have problems making cockpits for their models. Often the cabins in the photo are either missing, or cut out from a bottle, and do not have a very aesthetic appearance. Modellers do not want to make a mold for the manufacture of this very cabin, considering this work to be labor-intensive and not necessary for the manufacture of one model. I want to convince you of the opposite - everything is very simple. And it's not expensive at all.
We will need: a hair dryer, a pine block, a hacksaw, a plane and an empty plastic bottle.
We start by making templates for the future form. First we make the template for the top part.
.
Next is a side view template.
. .
.
Well, and of course, a template for the front and back of our future form. We place these templates at angles according to the side view.
. .
. .
.
We're done with the templates, let's start making the mold.
We take a block, or maybe a package of boards connected with screws or glue, and transfer our side view onto it. Cut off the excess.
. .
.
We transfer the front and rear views to the corresponding planes.
.
. .
.
For ease of work, we attach a block to the bottom of the mold. We clamp it in a vice and remove all excess with a plane.
. .
. .
. .
.
Our form is almost ready, all that remains is to process it with sandpaper. We spent two hours on everything.
.
It's all about the bottle. I advise you to use blue or colored ones - transparent ones look worse. We stuff our form into a bottle and heat it with a hairdryer. If necessary, secure the bottle to the mold with screws.
.
Cut it out and try it on.
 .
.
Everything fits. We secure the cabin with aluminum tape. Using a thin tube we imitate rivets.
.
. .
.
As I said, it's simple.
Good luck to everyone in the buildings and flights.
How to make a cockpit canopy at home and at minimal cost?
I thought that this topic had not been relevant for a long time, but if you take into account the number of questions received, I understand that I got excited. Therefore, I decided to devote a separate article to how I make lanterns on a model from a plastic bottle. What is pleasing about this process is that business is combined with pleasure. And the costs are really minimal and come down to the cost of the drink, the plastic bottle from which will be used as a material. I don’t know about anyone, but for some reason I like lanterns made from beer bottles the most. However, let's get down to business...
Actually, there’s not so much to do, you need to make a blank. To do this, we take a block, I used linden, it is more uniform and easier to process. First we process the side surfaces to obtain the desired shape of the bottom surface. Dimensions can be taken from the drawing, from the top view, or by directly measuring the fuselage. It should look like a trapezoid. Then, on a piece of whatman paper or cardboard, I copy the profile of the future booth from the drawing and make a pattern. I use it to mark the blank with an allowance along the length and bottom:
After this, naturally, the top of the blank is processed along the contour. There are many ways, first you can do this:

and then like this:

After 20-30 minutes you get something like this:

We apply markings to the ends of the workpiece:
 ,
, 
I copied the contours directly from the fuselage onto the same Whatman paper and made patterns.
After this, I pre-processed the back of the blank:
 ,
, 
Then he tore off the front:

Now all that remains is to refine our clumsy (in the literal sense of the word) work and give it a finished look. 20 minutes of sanding and we get a cool blank:

Now you will have to put your work aside for a while and rest a little, especially since this is simply necessary to continue working.
Having assessed visually (and maybe even instrumentally) the dimensions of our blank, we head to the store, where the largest possible range of drinks in large plastic packaging is presented. I don’t know why, but I prefer brown-tinted booths, so I was “forced” to look for a lantern blank in the beer section. The 2.5 liter bottle of Bolshaya Kruzhka beer was almost perfect in both form and content. Having used the contents of the workpiece for its intended purpose, carefully cut off the bottom and stuff the blank into it. To avoid having to shrink the plastic a lot, we somehow fix the blank inside the workpiece.