How to make an overpass for car repairs with your own hands, drawings and standard dimensions. Do-it-yourself mini-overpass assembly: wooden and metal do-it-yourself timber overpass
Read also
Almost every motorist needs an inspection hole. With its help, you can perform a routine inspection of the car and its partial repair. Such a structure is especially important if there are no service stations nearby.
Why is the structure needed?
As already mentioned, if you have a car, then there may be certain problems with the mechanisms. Not all breakdowns can be fixed right in the garage. Sometimes you have to climb under the car. Naturally, doing repairs lying down is not very convenient. This is precisely why the overpass was invented.
It is not difficult to make such a structure with your own hands. You just need to decide on the design and collect all the necessary materials. It should be noted that to build the structure you can use everything that is on your farm. For example, an overpass for car repairs can be made of metal stairs (above-ground version), bricks, or simply dug in the form of a hole (underground version).
What tools might you need?
It is quite simple to construct such a structure. You must first draw a diagram on paper, calculate its dimensions, and also select the necessary tool:
- Welding (if a metal version is built).
- Grinder (for cutting materials).
- Shovel (if you want to make a hole or fix overhead posts).
- Brick and sleepers.
- Cement (to prevent the product from “driving”, it should be fixed with concrete mortar).
From this list you choose what you will need depending on the materials.

How to make the simplest design option?
It is a structure on which a car can drive only with its rear wheels or only with its front wheels. This type of overpass for a car consists of identical structures that can be made of metal or wood. Please note that the width of such products should not be less than 40 cm. Otherwise, they may be unstable or too narrow.
This structure can be welded from corners. In this case, the cross-section of the elements is about 2.5 cm. To prevent the car from sliding off the overpass, limiters must be fixed on the racks. Their height is at least 7 cm. After all welding work is completed, sharp corners must be removed using a grinder. In order for the product to last as long as possible, it must be coated with a special anti-corrosion compound or painted. Please note that one element of such a structure will have quite a lot of weight.

How to make a structure from stairs?
A similar overpass can also be done quite quickly with your own hands. It is a more advanced option than the previous one. To work, you will need two metal ladders at least 3 meters long, a welding machine and corners.
First you need to treat all components with an anti-corrosion compound. Next, you need to weld 4 vertical supports to the edges of the stairs, on which they will stand (like benches). Their length should be sufficient so that it can be partially dug into the ground. Naturally, in this case it is better to choose corners or pipes. In any case, these elements must be strong enough to support the weight of the car.
After the main structure is assembled, it is necessary to fix it in the garage. Place the future overpass so that it is convenient for you to drive onto it. The posts in the ground must be fixed with concrete mortar. In order for the car to drive onto the structure, 4 more corners (on both sides) need to be welded to the stairs at an angle. It is better to unite them together with crossbars.

Features of the inspection pit arrangement
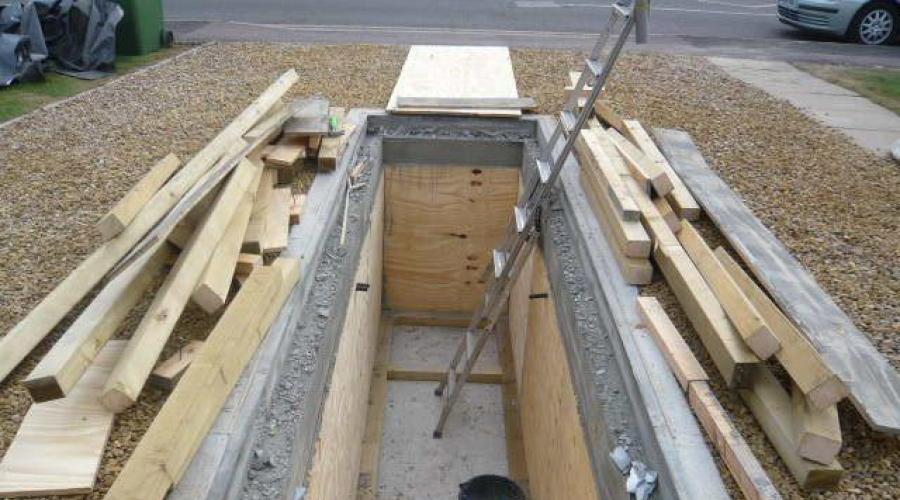
The construction of an overpass of this type is the most common. However, it is possible under one condition: you have a lot of free space. Such an inspection hole must have a depth of at least 1 meter. This parameter depends on the height of the person who will be repairing or inspecting the car. To prevent the earth from crumbling inside, it is better to cover the walls of the structure with boards. To make it convenient to go down into the hole, you need to either dig steps or install a ladder. Please note that the steps should be equipped with anti-slip pads.
Please note that the edges of such an overpass should be slightly above ground level. The length of the pit must correspond to the size of the machine. In this case, after driving in, the car should not block the descent stairs. As for the width of the ditch, it is about 1 meter. Safety flanges must be added to this distance.
As you can see, a do-it-yourself overpass can be built quite quickly. You just need to draw a diagram in advance and select materials.

Arrangement of the overpass
Naturally, the workplace must be arranged accordingly. For example, there should be a workbench with all the necessary tools nearby. Everything you need for repairs should be within arm's reach.
You will also need to arrange good lighting. It is better to use LED or fluorescent lamps. Inside the inspection pit, you can make additional shelves on which tools will be placed. Please note that they must be secured as well as possible, and at a level so that if any products fall, they cannot harm you.
The inside of the pit can be lined with bricks. It's better to build a foundation. The surface on which the car will stand must also be secured as much as possible. It is better to install it on pipes dug deep into the ground.
If you need a trestle, you can make it yourself in just one day.
The car periodically requires inspection of the chassis. An overpass is used for this. The design is used at maintenance points. If the car owner does not want to spend money on the work of auto repairmen, he can inspect the car himself by raising it above the ground on an overpass. This is an alternative way to the inspection hole to gain access to the bottom. Assembling the overpass yourself will save money.
Based on the type of construction, there are two types of overpasses for cars:
- Full-size ones allow you to repair a machine that is completely raised above ground level by 1 meter. They are bulky and require a lot of space. Suitable for both passenger cars and trucks.
- Mini overpass. It consists of two small, independent from each other, beveled on one side of the podium. The auto overpass allows you to lift the car from the front or rear wheels. Used for partial inspection of the bottom. The disadvantage of this design was the need for the driver to have pinpoint precision when driving on it.
Stationary
Full-size overpasses are of the stationary type. They are installed along highways, on roadsides, and at service stations. The platform is raised high above the ground and allows for a detailed inspection of the car from the bottom and for carrying out repair work. Designed to support the weight of cars and trucks.
The strongest and most durable structure is made of metal. To create an observation deck, brick, wood, pipes and channel are used.
Advice! If the garage is built for 2 cars, but there is only one there, then the free space can be allocated for your own overpass.
Collapsible
The collapsible overpass has smaller dimensions. It fits easily in the garage and, if necessary, is quickly assembled. Designed for inspection of a passenger car.
The design includes:
- 4 stands for supports;
- 2 pairs of platforms with a stopper to prevent the car from rolling away;
- 2 pairs of horizontal ramps for inclined access;
- several stiffening ribs for fixing parts relative to each other.
They are built from metal. The thicker and more durable the material chosen, the longer the structure will last.

General requirements
Making an overpass is not a complicated process, but you need to remember a few nuances:
- The height of the full-size version is up to 1 meter, and the mini version allows you to raise the car by 0.3-0.7 meters.
- The width of the structures is determined by the width of the vehicle. To make it easy to access, the ramps and platforms are made 0.4 meters wide. These dimensions are sufficient for most wheels.
- The safety margin determines the service life. In the mini model it is not so critical, and when building a stationary overpass they do not skimp on materials.
The overpass, assembled independently, should fit in ordinary garages. When creating a drawing, take into account how much free space there is to store it.

Stages of preparatory work
Carrying out the work yourself, from the design stage to final assembly, is not difficult. To do this, you need to decide on the type of construction, the preferred and available material, make a drawing, calculate the dimensions and number of parts, make an estimate for the purchase of material, and rental of equipment.
Calculation of dimensions and drawing up drawings
Start creating a drawing by selecting the type (stationary or portable) and material. Each person will have their own preferred shape of the product. General dimensions:
- height – up to 1 meter;
- width – about 0.4 meters;
- lifting length – about 1 meter;
- the length of the flat platform is from 0.3 meters.
An overpass is a pair of identical structures. On the side of the diagram, its shape resembles a rectangular trapezoid. A pair of slides can be additionally fixed to each other to avoid displacement while the machine is being lifted onto it.

Preparation of materials and tools
Depending on the material, tools are selected for the overpass. A structure made of sleepers or metal is assembled using:
- welding machine;
- Bulgarians;
- bolts, nuts.
The main material is reinforcement and a 40 mm corner. The finished structure is coated with anti-corrosion paint on top.
A wooden overpass is created from:
- wooden blocks with a square cross-section with a side of 0.2 meters;
- wooden blocks or boards;
- nails, screws;
- saws;
- screwdrivers.

DIY metal structure
The most popular is a mini overpass made of metal. This product has a number of advantages:
- easy to move;
- ease of assembly - does not require special skills;
- reliability and durability.
Although a do-it-yourself overpass can last for decades, over time any structure wears out. If you properly care for it and treat it against rust, its service life will increase significantly.

Welding of the structure proceeds as follows:
- a corner is cut and two rectangular trapezoids are assembled;
- connect them together with a corner;
- using scraps and remnants of the corner on the sides, additional stiffening ribs are formed;
- the reinforcement is cut and welded onto the upper base and inclined plane;
- clean with a wire brush and paint with metal paint.
The procedure is repeated for the second part of the trestle pair. You can make a limiting side on the upper platform to prevent the car from passing further. It is convenient to store it vertically.

Instructions for making a wooden mini trestle
Wooden construction has a low cost of materials. The advantages also include:
- simplicity of design. It does not require special tools and equipment; it can be made using available materials;
- the mobile overpass has a relatively light weight;
- mobility - easy to set up and remove.
The disadvantages include a small margin of safety. Over time, the timber overpass will rot and be undermined by insects. Special treatment will help increase service life.

There are two types of portable wooden overpass:
- One piece. Take a beam with a cross-sectional side of at least 0.2 meters. Connect it with nails to another cut. A bevel is cut off from one edge. The height of such an overpass is small, but it is lightweight and can be stored in the trunk of a car.
- Stepped. It is created from blocks and 50 mm boards. The pads are cut into pieces. Depending on the height, some are cut off from one edge. The structure is assembled in layers: a board, on it, with a certain step, several blocks are nailed, and again the board. Each tier is shorter than the previous one. Stops at the required height. A motion limiter block must be placed on top. The smaller the angle of inclination, the easier it is for the car to drive. But this lengthens the overpass and makes it heavier.

Technology for creating a brick structure
A type of stationary structure is a brick product. For construction it is necessary to allocate a plot of land. A homemade overpass is no different in shape from metal or wood. All parts are built from brick.
The construction method involves creating classic brickwork with cement mortar. The advantage of this automotive alternative to the inspection pit is its strength. It can withstand the weight of even a truck.
The disadvantages include:
- the need to allocate a sufficiently large plot of land for it;
- installation, as well as dismantling, requires a lot of time;
- Over time, the masonry collapses and requires its hollow demolition.
Such a structure is more suitable for garages in villages and outside the city, where there is a lot of free space. The brick is chosen to be as durable as possible. Construction work is best carried out in the warm season.
Transport periodically needs to have its chassis checked. For this it is convenient to use an overpass. Design used at service stations.
If the owner of the car does not want to spend money on the services of car mechanics, he can carry out the inspection on his own by lifting it using an overpass.
This method is a worthy competitor to the inspection pit in terms of ease of access to the lower part of the machine. Installing the overpass yourself will help save money.
Some types
Based on the type of device, there are two types of overpasses for road transport:
- Full size.
- Mini overpass.
- Mobile - the design is discussed in detail in this article; it is a collapsible overpass with small dimensions. It can be easily located in the garage and, if necessary, can be quickly installed. Designed for inspection of passenger vehicles.
The device includes:
- four stands for supports;
- two pairs of track with a lock to prevent the car from rolling;
- two pairs of inclined ramps for entry;
- a sufficient number of stiffening beams to fasten the parts to each other.
They build a structure from steel.
Stages of preliminary work
Creation begins with a diagram and selection of the type of structure (stationary or portable) and the material from which the work will be performed.
General dimensions:
- height – up to one meter;
- width - about two meters;
- the length of the ride is one meter;
- the length of the horizontal platform is from a third of a meter.
The overpass is two symmetrical combined structures. From the side in the drawing it is a rectangular trapezoid. The tracks must be fixed between each other to resist displacement when a car drives onto it.

The steel structure is mounted using:
- Bulgarians;
- nuts, bolts.
- welding machine;
As a frame, reinforcement and a forty-millimeter corner are used. The assembled structure is painted on top.
Steel structure
The most common of the manual ones is a mini overpass made of metal.
This solution has some advantages:
- high mobility;
- ease of installation – does not require special skills;
- safety and durability.
Although a self-made overpass can last for decades, over time each structure wears out. If you maintain it properly and treat it against corrosion, its service life will increase significantly.
Welding of the overpass proceeds as follows:
- a corner is prepared and two rectangular trapezoids are mounted;
- combine them with each other using a corner;
- additional stiffening ribs are formed from the remains and trimmings of the corner from the sides;
- prepare the reinforcement and weld it to a horizontal base and onto an inclined plane;
- clean with a metal brush, open with a paint coating for metal.
The technique is repeated for the symmetrical part of a pair of tracks. On the main platform, you can make a limiter side so that it is impossible to cross the permitted mark.

It is convenient to store it in a vertical position.
A good help in car repair for its owner will be a do-it-yourself overpass in the garage or next to it. But such a design is bulky and takes up a lot of space, and visiting a service station for minor repairs is not always cost-effective. In the absence of large areas for servicing a personal car, a car repair overpass can be made in another version.
How to make a mini-overpass with a partial collision?
The purpose of such a device is to facilitate access to the suspension and underbody of the car. In this case, only the front or rear pair of wheels is raised to a small height above the ground. During inspection and repair, stops must be placed under the other to prevent accidental rolling off an inclined surface.
The simplest option for making an overpass is ladders. To make them, wood or metal thick enough to support the weight of the machine is suitable. You will need:
- a board with a thickness of at least 5 cm or a metal corner 4x4 with a thickness of 4-5 mm;
- timber (thickness depends on the height to which it is convenient to raise the car);
- grinder and welding machine for working with metal;
- saw, nails for working with wood;
- roulette.
To make it, you need to calculate the length of the board or metal bridge for the wheels to run over so that, when positioned horizontally, this part does not damage the bottom of the car. Making wooden ladders comes down to sawing off 4 pieces of timber for the base and a board for the bridge. The width of the bridge must be sufficient for the wheels to move freely (at least 30-35 cm). Nail the pieces of timber to the boards in the position shown in the figure: in the middle of the ladder and at its edge.
When making a bridge from metal, you need to cut off a corner with a length equal to the estimated length of the bridge (4 pcs.). Connect these parts in pairs with short sections of the same angle or reinforcing bar 15-17 mm in diameter. The resulting “ladders” are able to withstand the weight of a passenger car. On the lower side of the bridges, weld the base from the corner in the form of a U-shaped structure. The height of the base is selected individually. The base posts should be positioned in the same way as in a wooden structure. When hitting the ramp up to the first support of the base, under the weight of the car, the automobile overpass comes to a horizontal position, and its rear part rests on the second support of the base.
There is another option for a mini-overpass. These are 2 small home-made welded structures from a 4x4 corner 5 mm thick in the form of a fixed bridge with inclined entries for lifting one pair of wheels. The length, height and width of each part can be calculated individually, depending on the make of the car. During manufacturing, it is necessary to weld 4 rectangular frames from a corner, connecting them in pairs with crossbars at the bottom. Weld onto the top part pieces of rod or angle along the width of the bridge.

The inclined entrances are welded in the form of “ladders” supported by the front part of the horizontal bridge. The relatively lightweight metal structure can be stored in the garage without taking up much space. If necessary, it can be quickly installed at any suitable site for inspecting the machine.
Full collision with an overpass
This portable design means that the car will be in a horizontal position at a certain height above the ground. This provides greater comfort for the owner of the car during preventative and repair work.
The distance from the surface of the site to the bottom can reach 1 m or more. As an example of how to make an overpass, you can use the drawings in Fig. 3 or develop your own. You will need:
- steel corner 5x5 cm, thickness 10 mm;
- reinforcing bar with a diameter of 17 mm;
- Bulgarian;
- welding machine, electrodes;
- roulette.
Cut the corner for the supporting structures according to the dimensions indicated in the diagram. The sections for the outer side of each support should be 10 cm longer than those that will be under the bottom of the machine when the collapsible mini overpass is installed in its working position. This will provide support for the bridges and wheels of the car, preventing their possible drift to the side. 2 supports must also be equipped with transverse stops for wheels at the point farthest from the entrance to the overpass.
Weld 2 trapezoidal structures for each support: with and without the ends of the corner extending above its upper edge. Connect the trapezoids with crossbars about 60 cm long, welding them in the corners of the structures. Having assembled 4 supports, make transverse supports on those that will be installed at the far ends of the overpass.
The length of the bridges and entry inclined parts is determined by personal needs, depending on the size of the car. Their width should be sufficient for convenient passage of the machine on inclined and horizontal surfaces. The bridges need to be welded in the form of “ladders”, connecting the sections of the corner with crossbars of the required length from a rod.
To ensure the reliability of the prefabricated structure, it is necessary to provide holes for fastening with bolts and nuts at the intersection of the bridges with the upper parts of the supports and at the points of attachment of the inclined entrances to them. To bring the overpass into working condition, it is enough to install 4 supports, lay horizontal bridges and install inclined ramps for lifting the car. After completing the inspection and repair, the homemade mini-overpass can just as easily be disassembled into its component parts and can be stored without taking up much space in or near the garage.
With a little skill in working with a welding machine and metal, a do-it-yourself overpass can be made in about a week. The convenient and space-saving design will last for decades. Given approximately the same parameters of passenger cars of different models, it will be useful both when the owner himself changes the car, and for helping a friend if necessary.
“The presented material will show you how to independently make a mini-overpass for repairing your car in the garage. Car owners know very well that as they operate, they often have to repair the car and carry out an inspection; it is best to do this in a warm and well-lit garage with an inspection pit. But often modern garages do not have one, because there is a huge number of different car services and workshops. This is of course good, but you will have to pay for the services, and the cost of a car today is already affordable. So, in order to save money and repair the car yourself, you need to make a mini-overpass. The base will be a 50x50 mm corner, crossbars made of 12 mm reinforcement with a pitch of 75 mm.
This overpass is installed to the width of the vehicle track and is driven onto it by the front or rear wheels. Attention! When installing the car on an overpass, be sure to put the handbrake on and place a kickback or stop under the wheel.
What will you need to create a mini overpass for cars?
Materials
- corner 50x50 mm
- reinforcement 12 mm
- dye
Tools
- welding machine
- grinder (angle grinder)
- roulette
- brush
Step-by-step instructions for making a mini-overpass.
And so, first of all, let's get acquainted with the detailed drawing that the author compiled. Next, according to the dimensions of the drawing, this structure was welded, for which a 50x50 mm corner and 12 mm reinforcement were used.  The second part is made in exactly the same way.
The product is then painted bright yellow. 
After the paint has dried you can test it 😉  This mini-overpass is very convenient to store in the garage.
  It is so compact that you can even store it at home.