How to make drainage in a summer cottage - the simplest way and something more complicated. Budgetary site drainage and storm sewer systems from portal users When is it better to do drainage on a site
Experienced builders and suburban residents know well that “extra” water on the site is bad. Excess water leads to flooding of the foundation and basement floor, washout of the foundation, flooding of beds, swamping of the area, etc. As a result, in spring, autumn and even summer you cannot walk around your summer cottage without rubber boots.
In this article we will look at:
- How to arrange water drainage on the site.
- How to make a budget storm drain with your own hands.
- Drainage device. How to make inexpensive drainage and drain a wetland.
What kind of water interferes with the life of a developer and a country homeowner?
About the types of surface and ground water, as well as drainage and system storm sewer you can write a separate book. Therefore, we will leave beyond the scope of this article a detailed listing of the types and causes of groundwater occurrence, and will concentrate on practice. But without minimal theoretical knowledge, start independent arrangement drainage and storm sewer - throwing money away.
The point is that even an improperly designed drainage system functions for the first few years. Then, due to clogging (silting) of a pipe wrapped in geotextile, which was placed in clayey, loamy, etc. soil, drainage stops working. But money has already been spent on drainage construction and, most importantly, drainage construction involves a large volume of earthworks with the use of technology.

Therefore, simply digging up and relaying a drainage pipe 3-5 years after it was laid is difficult and costly. The site has already been inhabited, landscaping has been done, a blind area has been arranged, a gazebo, a bathhouse, etc. have been installed.

You will have to rack your brains on how to redo the drainage so as not to ruin the entire area.

From here - drainage construction should always be based on geological soil survey data(which will help you find a waterproof layer in the form of clay at a depth of 1.5-2 m), hydrogeological surveys and clear knowledge of what kind of water leads to flooding of a house or waterlogging of an area.

Surface waters are seasonal in nature, associated with the period of snowmelt and abundance of rain. Groundwater is divided into three main groups:
- Capillary water.
- Ground water.
- Verkhovodka.
Moreover, if surface water is not drained in time, when infiltrated (absorbed) into the ground it turns into underground water.
Volume surface waters usually exceeds the volume of groundwater.
Conclusion: surface runoff must be drained by storm drainage system, and not try to do surface drainage!

Storm drainage is a system consisting of trays, pipes or ditches dug in the ground, discharging water from drains outside the site + competent organization of the relief on the personal territory. This will allow you to avoid stagnant zones on the site (lenses, pools), where water will accumulate, which simply has nowhere to go, and further waterlogging.
The main mistakes that are made when independent device drainage:
- Failure to maintain the correct slope of laid drainage pipes. If we take an average, then the slope is maintained in the range from 0.005 to 0.007, i.e. 5-7 mm per 1 running meter of drainage pipe.

- Using a drainage pipe in a geotextile wrap on “wrong” soil. To avoid siltation, pipes in geotextiles are used on soils consisting of clean medium- and coarse-grained sands.

- Using cheaper crushed limestone instead of granite, which is washed away by water over time.
- Saving on high-quality geotextiles, which must have certain hydraulic properties that affect the quality of drainage. This effective size pore 175 microdistrict, i.e. 0.175 mm, as well as transverse Kf, which should be at least 300 m/day (with a single pressure gradient).

Inexpensive do-it-yourself storm drain
The first thing that comes to mind in order to equip a budget option for storm drainage on a site is to lay special trays.

Trays can be made of concrete or plastic, but they are expensive. This makes our portal users look for more cheap options arrangement of storm drainage and drainage systems from the site.

Denis1235 FORUMHOUSE Member
I need to make an inexpensive storm drain, about 48 m long, along the edge of the fence, to drain the melt water that comes from the neighbor. The water must be drained into a ditch. I was wondering how to drain the water. At first it occurred to me to buy and install special trays, but then they would be left with “extra” grates, and I don’t need any special aesthetics for the storm drain. I decided to buy asbestos-cement pipes and saw them lengthwise with a grinder, thereby getting a homemade tray.

Despite the budgetary nature of this idea, the user was not attracted to the need to cut asbestos-cement pipes on his own. The second option is the opportunity to buy gutters (plastic or metal) and lay them on a prepared base in a concrete layer of about 100 mm.
Portal users dissuaded Denis1235 from this idea in favor of the first option, which is more durable.
Hooked on the idea of an inexpensive storm drain, but not wanting to deal with cutting pipes on my own, Denis1235 found a factory that produces asbestos cement pipes, where they will immediately be cut into pieces 2 m long (so that the 4-meter one does not crack during transportation) and ready-made trays will be brought to the site. All that remains is to develop a scheme for laying the trays.
The result is the following “pie”:
- Soil base in the form of a bed.
- A layer of sand or ASG about 5 cm thick.
- Concrete about 7 cm.
- Tray made of asbestos-cement pipe.

When installing such a storm drain, do not forget to lay metal mesh(for reinforcement) at the joints and leave a deformation gap (3-5 mm) between the trays.

Denis1235
As a result, I made a budget rain shower at the dacha. It took 2 days to dig the trench, another two days to pour concreting and install the route. I spent 10 thousand rubles on trays.

Practice has shown that the route “overwintered” well, did not crack and intercepts water from its neighbor, leaving the area dry. Also interesting is the option of rain (storm) sewerage for the portal user with the nickname yury_by.

yury_by FORUMHOUSE Member
Because The crisis doesn’t seem to be ending, then I started thinking about how to install a storm drain to drain rainwater away from the house. I want to solve the problem, save money, and do everything efficiently.
After some thought, the user decided to make a storm drain for water drainage based on flexible double-walled corrugated pipes (they cost 2 times less than “red” sewer pipes), which are used for installation power cables underground. But, because the depth of the drainage route is planned to be only 200-300 mm with a pipe diameter of 110 mm, yury_by I was afraid that the corrugated pipe might break in the winter if water got between the two layers.

Eventually yury_by I decided to take a budget “gray” pipe, which is used when installing internal sewerage. Although he had concerns that the pipes, which were not as rigid as the “red” ones, would break in the ground, practice has shown that nothing happened to them.

yury_by
If you step on the “gray” pipe, it turns into an oval, but there are no significant loads in the place where I buried it. The lawn has just been laid and there is foot traffic. Having laid the pipe in the trench and sprinkled it with soil, I made sure that they kept their shape and the storm drain was working.

The user liked the option of installing an inexpensive storm drain based on “gray” sewer pipes so much that he decided to repeat it. All the nuances of the process are clearly demonstrated by the following photographs.
We dig a hole to collect water.

Level the base.
We install a concrete ring.

The next stage is to fill the bottom of the well with gravel of fraction 5-20.

We cast a homemade well cover from concrete.


We paint the manhole cover.


We make an insert into the well with drainage plastic “gray” sewer pipe, maintaining a slope of the route of 1 cm per 1 linear meter.

We spill the pipe with a mixture of sand and water so that there are no voids left between the walls of the trench and the pipe.

To prevent the pipe from floating, it can be pressed down with a brick or board.
We put the lid on, install the hatch and fill everything with soil.

This completes the production of the budget rain shower.
Construction of low-cost drainage and drainage of wetlands
Not everyone gets the “right” plots. In SNT or in new cuts, the land may be very swampy, or the developer may have a peat bog. Build a normal house for permanent residence on such land, not an easy one summer cottage- both difficult and expensive. There are two ways out of this situation - sell/exchange the plot or start draining and putting the plot in order.
In order not to deal with various expensive alterations in the future, users of our portal offer budget options for drainage and drainage of the territory based on car tires. This option allows you to save your family budget.

Yuri Podymakhin Member of FORUMHOUSE
Peat soil is characterized by a high groundwater level. On my site, the water is almost level with the surface, and after rain it does not go into the ground. To drain the top water, it must be thrown outside the site. I didn’t spend money on buying special pipes for drainage, but made drainage from car tires.

The system is installed as follows: a ditch is dug, tires are placed in it, and the tires are covered with polyethylene on top so that the earth from above does not fall inside. Polyethylene can also be additionally pressed with pieces of slate that are “unnecessary” in the household. This will increase the overall rigidity of the structure. Water enters the “tire” pipeline and is then discharged outside the site.


But there are also “harder” places where much more needs to be done.


Seryoga567 FORUMHOUSE Member
I have a plot in SNT, with total area 8 acres. There is a building on the site that I plan to complete and expand. The place is very low. Because drainage grooves for drainage in SNT they are in a deplorable state, where they are buried, littered or clogged, then the water does not go anywhere. The water level is so high that you can draw water from the well with a bucket, holding it by the handle. In the spring, the water in the dacha sits for a long time, the area actually turns into a swamp and, if it dries out, it is only in the summer when it is very hot. Nobody wants to put the drainage ditches in order, so everyone floats. Therefore, I decided that it was useless to fight with my neighbors. You need to raise your site and find a way to dispose of all the “unnecessary” water from the site.
Excessive soil moisture in the area can lead to big trouble, starting from stagnant puddles and ending with rotting plant roots, as well as the rapid destruction of the foundation of buildings. This happens if the site is located in a lowland, where rain or melt water falls and stagnates, as well as when the groundwater level is high. If you got just such a plot, do not rush to change it to another, less problematic one. Installing drainage on the site will help solve your problem, which you can do yourself, without resorting to the expensive services of specialists. We will tell you in detail how to make drainage on the site in this article.
Drainage of the site - drainage and its types
Drainage is a system of interconnected trenches or pipes located in the garden or along the perimeter of the structure. the main task This system is the removal of excess moisture beyond the boundaries of the site.

This is how the individual components of the drainage system work
Based on their type and functions, drainage systems are divided into surface and deep. Surface ones are intended to drain excess rain or melt water outside the drained area, and deep ones reduce soil moisture by reducing the groundwater level. One of these types of drainage, or both, located in parallel or combined into a single system, can be created on the site.
Surface drainage is most often open and consists of a system of trenches dug at a certain angle and passing in places of greatest accumulation of rain and melt water, as well as along the perimeter of the entire site. Initially, water will be collected through water intake trenches into one main ditch, and then flow into a water intake (storm drain, river, ravine).

The pipe drains water into a special trench
let's consider simplest project surface drainage using the example of a hypothetical site diagram. So, before us is a standard area where, after rain, water stagnates in three places (1,2,3). We do not take into account a few small puddles. The level here drops away from the road towards the far left corner. Thus, the main trench (4) should run along the far border of the site, and auxiliary ditches (5 and 6) will discharge water from puddles into it. Water is directed into trenches (6 and 8) from drainpipes from the roof of the house. If the path running along the house and utility block crosses a trench, then it must be equipped with a bridge (7).

The drainage design shows the location of areas with excess moisture and trenches on the site
Determining the slope of the drainage system
As already mentioned, trenches must be dug with a certain slope so that the water flows by gravity towards the water intake. In this case, the minimum slope is 0.002 in clay soils, and 0.003 in sandy soils. In practice, for the best flow, a slope in the range of 0.005-0.01 is provided.
Installation of surface drainage
It is not difficult to arrange open surface drainage on the site. First, according to a previously determined pattern, trenches 0.5 m wide are dug to a depth of approximately 0.7 m. To make it easier for water to flow into the ditch, its walls are formed at an angle of 30°. Passing through open trenches, the water eventually enters the inlet, which is located below the surface drainage level.
![]()
Such drainage very effectively intercepts and removes excess water during rain or snowmelt, and also slightly lowers the groundwater level, but open trenches do not look aesthetically pleasing. In addition, the slopes of ditches can collapse, which makes this type drainage is short-lived.
Such ground movement forces site owners to build all kinds of supports for walls or to concrete them. To get around this problem, crushed stone filling is sometimes used. In this case, the lower layer of the dug ditch is filled with a large fraction of crushed stone, and the upper layer with a fine fraction. Next, the backfill is covered with a layer of turf, which makes surface drainage invisible. Naturally, the walls of the trenches do not collapse with this method, however, the system itself becomes less effective.

Crushed stone filling will help prevent soil movement
However, there is a more modern and practical way to solve this problem– use a system of trays placed in trenches and covered with gratings on top. Trays protect the walls of the trench from soil sliding, and grates protect from debris. Trays can be made of plastic, concrete or polymer concrete. Plastic products are considered the most durable, which are also lightweight and exceptionally wear-resistant. As for the gratings, they can be metal or plastic - choose what is most suitable for the design of your site. A system using trays and grates will allow the drainage system to work long and efficiently.

Select grates taking into account the design of the rest of the area
How to make deep drainage of a summer cottage?
Deep drainage is intended to reduce soil moisture. It is necessary in cases where the site is low-lying, swampy, located near bodies of water, or the space under the house is intended to be used, for example, as an underground garage or basement. Ordinary trenches are no longer sufficient here. You will need special perforated pipes(drains) and roll materials.
Scheme of deep drainage of the site
Below is a diagram of the drainage system. It can be seen that the water first enters the collecting drains (1), then into the main drain (2), from where it flows into the catchment well (4) and is discharged into the water intake. The drainage system must also include inspection wells(3). When installing drainage, one of the main problems is the removal of collected water. Ditches along roads, ravines, storm sewer systems, rivers or streams can be used as water intakes.

An example of laying out a deep drainage system with a lake as a water intake
Determining drainage depth
In order for deep drainage to perform its intended function, it is necessary to place pipes below the groundwater level. And it is impossible to identify this level on your own without special knowledge. At this stage of creating a deep drainage system, it is necessary to contact surveyors and hydrogeologists, who, after taking the necessary measurements, will issue detailed plan area with groundwater level.
As a last resort, if deep drainage is required not to protect the foundation of the house from washing out, but for the normal life of plants, you can resort to a more simplified option for determining the depth of the pipes. On mineral soils the depth of the trenches varies from 0.6 to 1.5 m. At the same time, for flower beds, lawns and flower beds it is 0.6-0.8 m, for forest species trees - about 0.9 m, for fruit trees– 1.2-1.5 m. If the soil on the site is peat, the depth of the trenches will be greater – from 1 to 1.6 m. This is due to the fact that peat soils quickly settle.
Pipes for deep drainage
To install deep drainage, special perforated pipes are used, on the surface of which there is a network of holes with a diameter of 1.5-5 mm. Even in the recent past (until the mid-80s), drainage pipes were exclusively ceramic or asbestos-cement. They quickly became clogged and needed frequent washing.
Modern technologies made it possible to simplify drainage works, thanks to the advent of polymer pipes for irrigation and drainage with a diameter of 50-200 mm. Some brands of pipes are equipped with a filter casing, which protects the drainage holes from clogging with sand and soil particles.
Installation of deep drainage
 Installation of deep drainage begins with digging trench-channels about 40 cm wide, the depth of which depends on the depth of groundwater. After this, a sand cushion and a layer of crushed stone are poured onto the bottom, on which, in turn, a drainage pipe is laid. After this, the pipe is again covered with crushed stone and sand. These layers, together with the pipe, should occupy about half the height of the trench; the remaining space is filled with compacted loam, on top of which they pour fertile layer soil. Often a layer of geotextile is placed between the gravel and sand to prevent the layers from mixing.
To monitor the drainage process, as well as to clean clogged pipes, round or round inspection wells are provided in the drainage system. rectangular shape. Wells are made from reinforced concrete rings or piece waterproof products. If the depth of the drainage system does not exceed three meters, you can use plastic smooth or corrugated pipes large diameter(300-500 mm). There is no need to cover the wells with waterproofing and make them airtight, since the task of these structures is to monitor the flow of water in the system, as well as to supply water under pressure to flush clogged pipes.

A drainage well is used to flush pipes and monitor the condition of the drainage system
The distance between wells along a straight line of the trench should not be more than 40-50 m. It is advisable that the well is also located at each turn or connection of the trenches.

An example of high-quality installation of a deep drainage system
The closed deep drainage system is arranged in such a way that after completion installation work, becomes almost invisible. It is camouflaged from view, does not create interference on the site, while performing its main function - draining the site, protecting the foundations of buildings from washing out and ensuring the normal development of plants.
Drainage of ground and storm water from the foundation will significantly increase the service life and capital building, And country house building. An easy-to-use drainage system will protect underground concrete structures from gradual erosion, and basements from watering. But it is extremely important to prevent the destruction of the very foundation of the structure, right?
A well-designed drainage diagram around the house will help to build an efficient collection and disposal system natural water. We invite you to familiarize yourself with carefully selected and verified information based on regulations and real experience of builders of low-rise buildings.
We will tell you in detail about the types of drainage systems, the features of their design, and the specifics of operation. We will give reasons in favor of choosing a certain type of drainage. The useful information offered to your attention is supplemented with photos, diagrams and video instructions.
When designing a drainage system, the goals that are planned to be achieved are first determined. They may consist of draining the entire area, protecting the foundation and basement of the house from excess moisture.
Of the existing drainage systems, two main types can be distinguished - open and deep (closed). The first one can be used for needs Agriculture, for drainage from cultivated areas. Closed drainage is used to drain water in dacha and cottage areas, to protect buildings from negative impact high groundwater level.
Organization of a drainage system is necessary with a high mirror groundwater, which is especially evident during the flood period. Drainage to protect from underground water aggression concrete foundation and reduce the hydraulic load
Combined drainage systems are also used. They are often supplemented with storm sewer lines designed for recycling atmospheric water. Provided they are properly designed, they can significantly save on the construction of each system separately.
Image gallery
The first and main sign that site owners need to arrange drainage is stagnation of water during the snowmelt period. This means that the underlying soils have low filtration capacity, i.e. do not allow water to pass through well or not at all
Drainage is necessary in areas with pronounced signs of soil erosion: cracks that appear during the dry period. This is a manifestation of soil erosion by groundwater, ultimately leading to destruction
Collection and drainage of water is required if, during the period of snowmelt and heavy rainfall, groundwater rises to the level of utility lines.
Drainage systems are constructed in areas with a characteristic slope. But in this case they are needed for a balanced distribution of water and retention of it on elevated areas
Flooding of the area during snowmelt
Erosion and erosion of soil under the foundation
Water at the level of utility lines
Suburban plot with slope
#1: Open drainage device
Open drainage is the simplest and most economical method of draining water, which can be used subject to the following conditions:
- the underlying soil layer is clayey, poorly permeable to water, which is why the fertile layer, located 20–30 cm from the surface of the earth, is waterlogged;
- the site is located in a lowland into which rainwater naturally flows during periods of heavy rainfall;
- there is no natural slope in the terrain of the site to ensure the movement of excess water towards the street.
Open drainage is arranged in areas with high groundwater level, the elevation of which is most often determined by the location of the land plot in a lowland or the clayey composition of the soil, which does not or very weakly transmit water into the underlying layers.

A drainage system designed to drain excess groundwater works perfectly in tandem with a storm drain, whose job is to collect and drain precipitation (+)
Planning a drainage scheme is best done at the design stage of a house. This will allow you to tie up the work and place the rainwater inlet under the gutters before installing the blind area.
Open drainage It is considered the simplest and does not require drawing up a diagram. It consists of trenches 0.5 m wide and 0.6-0.7 m deep. The sides of the trench are positioned at an angle of 30°. They encircle the perimeter of the territory and direct wastewater into a ditch or pit, into a storm drain.
Areas sloping towards the street are easier to drain. To do this, a drainage ditch is dug in front of the house, across the slope, which will retain water from the garden. Then they dig a ditch, it will direct the wastewater towards the street, into the ditch.
If the site has a slope in the opposite direction from the road, then a transverse drainage ditch is dug in front of the fence facade and another longitudinal one is made to the end of the site.
The disadvantage of such drainage is its low aesthetics and the need to regularly clean the gutters from silt and dirt that periodically accumulate in them. This type of drainage is not recommended to be installed under the road surface, as it leads to subsidence of the soil and deformation of the road surface.
The length of lines for water drainage, the number of wells and sand collectors depends on the area of the site, its topography, and the intensity of precipitation in a particular area.
Drainage ditches can be strengthened from erosion using reinforced concrete slabs, stone paving, turf with crushed stone bottom
If the site is considered more or less flat, and its level of swampiness is not too high, then you can get by with the installation of a simple drainage system.
Along the foundation of the fence, in the lowest place of the site, they dig a ditch 0.5 m wide, 2-3 m long and 1 m deep. Although such a drainage system will protect against high groundwater levels, it will also cope well with precipitation.
To prevent the edges of the ditch from collapsing, it is filled with crushed stone, broken glass and brick. Having filled it, they dig the next one, it is also filled and compacted tightly. The excavated soil is used to fill low-lying areas on the territory
Over time, this simple drainage system may become ineffective due to gradual silting. To prevent this from happening, it can be protected with a geo-textile. It is laid on the ground, and after filling the ditch, the drainage layer is overlapped with it. From above, to hide the ditch, it is sprinkled with a layer of fertile soil.
#2: Construction of an effective storm drain
Storm drainage is necessary for the accumulation and removal from the site of water falling in the form of precipitation. It is equipped with point and linear drainage devices.
Image gallery
Storm sewer systems are designed to collect atmospheric water and prevent its penetration into the soil and then into the underlying soils
Based on the type of water intake devices, storm sewer systems are divided into point and linear. The former are built in areas with organized drainage, the latter - with unorganized
Linear water intakes have a much larger collection area than point ones. They are installed next to houses with unorganized drainage and on areas paved with a waterproof coating
In linear storm drains, water is both collected and transported through a network of channels covered with metal or plastic grating. In point systems, water is drained through a system of pipes laid in the ground
Storm sewer with point water intake
Point storm drainage channels
Linear water intakes
Structure of trays with gratings
The first type of water collectors is installed under the risers of an organized drainage system. The second type of water collectors is located under the slopes of roofs with unorganized drainage.
Water entering the catch basin moves through an open or closed pipeline. It is diverted either to a common catchment well or to a collector well, from which it is transferred to a centralized sewer network or drainage ditch.

A storm inlet is a container for collecting water, equipped with outlets for connecting pipes of a linear drainage system. The devices are made of durable plastic or cast iron (+)
Elements storm system With point water collectors there are also drainage systems, ladders, and dampers. Some manufacturers provide the possibility of connecting storm water inlets to roof gutters, as well as to underground drainage systems.
In addition, ready-made production models include sand traps and waste bins to simplify system maintenance.
The device with installed decorative grille should be located 3-5 mm lower than the level of the path or ground
This is a system of drainage gutters made of plastic or concrete, which are installed on the site in those places where water accumulation is most likely, but extremely undesirable.
For a drainage well, choose the most distant place from the house, well, or cellar. If there is a natural or artificial reservoir nearby, then water can be drained into it
When designing with linear water intakes, the first step is to plan the placement of a catchment or collector well. Next, determine the location of the rotary and inspection wells. Their placement will depend on the placement of stormwater inlets, gutters and closed sewer branches.
To prevent water from the street from entering the yard, gutters are installed along the line of gates leading into the yard, garage doors, and also in the area of the gate. When choosing system elements that will be installed on the roadway, the future load on them is taken into account.
To prevent moisture from getting inside the building, the slope of the coating in the garage is made towards the water intake grille. So water, when washing a car or thawing snow on vehicle, will flow into the gutter.
Drainage trays must be installed on the porch, around the pool. They are also installed along the blind area, garden paths platforms lined with facing material
To give the storm drain a neat appearance, special trays made of polymer concrete and plastic are used, which are covered with metal or plastic gratings. When entering the house, use a special tray to clean shoes.
The grate for the gutter installed near the pool is chosen to be plastic, white to avoid burns on a hot summer day.
For intensive use, drainage trays are mounted on concrete base. The higher the load class on the roadway, the thicker the concrete base should be (+)
The gutters and water intake points are connected to the drainage tank. Inspection wells are provided at the junctions of gutters and pipes. They are designed to facilitate access to the system and clean it from possible clogging.
Inspection wells are made mainly of plastic. In order to obtain the required depth, their design provides for the possibility of extension using special extension elements.
The placement, slope and length of storm sewer pipes - all these characteristics are very individual and depend on many conditions on the site
A wide range of system elements allows you to design the most rationally, which will be optimal from a technical and financial point of view.
Main elements linear drainage are gutters made of concrete, polymer concrete, plastic, point receivers, sand traps, gratings (+)
#3: Construction of closed drainage options
Underground, closed drainage is used if the device open system will take up too much space on the land plot or it absolutely does not fit into the landscape picture of the territory. The conditions for constructing a closed drainage system are similar to those for organizing a network of open drainage ditches and ditches.
Closed drainage schemes are used to protect foundations and basements from the effects of groundwater and increase their service life. By analogy with open ones, they are used for drainage suburban area from excess groundwater
It is imperative to organize underground drainage on the site if:
- it is located in a lowland, wetland area;
- there is a natural pond near the buildings;
Underground drainage can be divided into two types:
- wall drainage;
- trench (stratal) drainage.
Both types of underground drainage are carried out at the construction stage of the building. If it was decided to begin the problem of drainage after the construction of the house, then they use a trench ring system. There are also limitations to the use of trench drainage. It can be used if the house does not have a basement.
The fact is that, after filling the pit with sand or soil, it creates a looser environment between the bedrock and the foundation. As a result, high water penetrates into this environment and then even the presence of a clay castle does not protect the building from moisture.
Therefore, if the house has a basement floor, for effective drainage it is best to install wall drainage. It is used for drainage to drain groundwater directly from the foundation of a building, to protect basements, cellars, ground floors from flooding.
Trees and shrubs should not be planted near the drain. The distance to the planted tree can be at least two meters and to the bush at least one meter
The wall one limits the rise in water level, preventing it from rising above the line where the drainage pipes are located - drains. It is believed that a drainage pipe 1 m long is capable of draining an area of about 10-20 m2.
When installing wall drainage, the pipe is laid around the perimeter of the building. The depth of the drains cannot be below the base foundation slab or the base of the foundation. If the foundation is very deep, then laying the pipe slightly above its base is allowed (+)
The distance from the drainage pipe to the foundation depends on the location. They are laid in each corner (or through one corner) of the building, as well as in places where pipes turn and connect.
Inspection wells are also located in places where there is a large difference in the level of the site and when long length pipes - the distance between wells should be no more than 40 meters.
In an inspection well, the pipe cannot be solid; it breaks. This is done so that if the pipeline becomes clogged, it remains possible to flush it using a high-pressure hose
The entire system closes to the last well. It should be located in the lowest place. The water then flows into a regular sewer or open reservoir. If it is not possible to drain water from the house by gravity, then install pump equipment and it is forcibly pumped out.
To ensure gravity drainage of water, the pipes are laid to the side of the collecting manifold. The slope should be two centimeters per meter of drainage pipeline. The depth of the pipe must be greater than the freezing depth of the soil.
The pipe is covered with drainage material - gravel, small crushed stone or sand. The minimum layer that will ensure the flow of water into the drain is 0.2 m
To save on geocomposite materials and prevent them from mixing with the soil, geotextiles are used. It freely passes water to the drains and at the same time retains particles that lead to siltation. The pipe itself must also be wrapped in protective material before backfilling. Some drain models are produced with ready-made geotextile filters.
You can increase the efficiency of wall drainage using profiled polymer membrane, which can be two or three layers. One of its layers is a polyethylene film with formed protrusions, the second layer of the membrane is geotextile fabric.
The three-layer membrane is equipped additional layer smooth polyethylene film. The membrane helps filter water from the soil while also serving as a waterproofing layer for the building's foundation.
Closed trench-type drainage protects the structure from flooding and moisture. It is a filter layer that is poured into a trench at a distance of 1.5-3 m from the wall of the house.
It is better that the depth of the drain be 0.5 m deeper than the base of the foundation - this way the water will not exert pressure on it from below. Between the trench with drainage and the foundation of the house there remains a layer of clay soil, which serves as a so-called clay castle.
As with the installation of a wall drainage system, drains are laid on a layer of gravel or small crushed stone. Both the pipes and the gravel layer are protected from clogging by geotextiles.
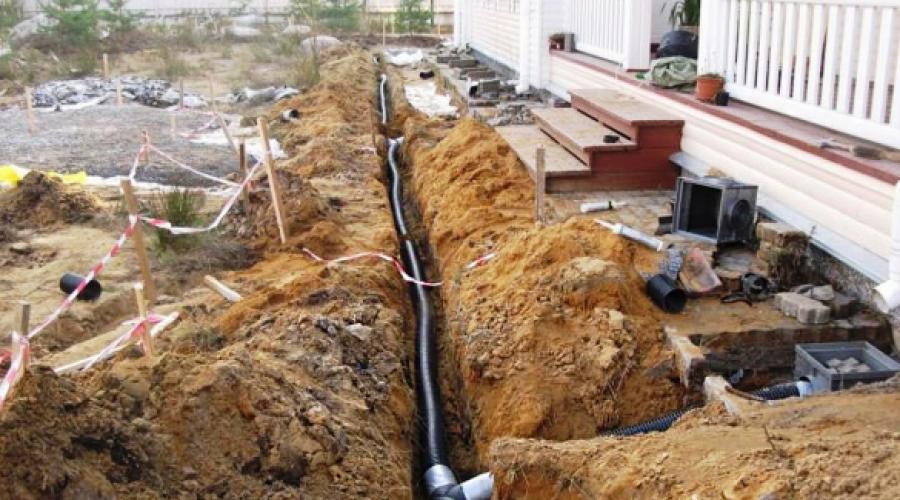
#4: Construction of wall drainage step by step
In order to get a clear idea of the process of installing drainage around country house, let's look at an example. The area shown in it required the installation of a groundwater drainage system, because Under the soil-vegetative layer lie loams and sandy loams, which are extremely poorly permeable to water due to their low filtration capacity.
Image gallery
To install drainage, we develop a trench around the house. Since the work was carried out with a mini-excavator, we retreated 1.2 m from the walls so as not to damage the building. If you save manually, you can do it closer. The bottom of the excavation is 20-30 cm below the foundation
The branches of the trench formed around the house must have a slope towards the common trench intended for the pipe for draining collected water to the collector well
Cover the bottom of the trench with sand. We compact it and form a slope of 2-3 cm per linear meter. We direct the slope towards the common trench, the bottom of which is also filled and tamped. In the case of communications crossing the trench, take into account that the drainage pipes must pass below them
We prepare drains, perforated polymer pipes, for installation in the trench. We wrap them in geotextile, which will prevent clogging of the system and filter groundwater
We cover the compacted bottom of the trench with a second layer of geotextile, pour gravel on it and lay drains
We lay channels for draining water from storm sewers and the drainage system in one trench. It is permissible to divert the water collected from them into one collector and use common inspection wells
Having wrapped the gravel backfill together with the drainage pipe with a second layer of geotectile, we fill the trench with quarry sand. We do not use soil dumped during the development of the trench; sand will better allow water to pass through to be collected by drainage
The dream of a well-maintained suburban area may well become a reality. Local area with luxurious lawns, beautiful garden, productive vegetable garden, gazebos, patios, alpine coaster- all this today can be developed on soil of any quality and land of any geodetic complexity, the main thing is to approach the solution correctly and not forget about such a procedure as site drainage.
This system is expensive, so in order not to get into trouble and not pay twice, you should figure out whether the existing landscape needs drainage, and if so, what type.
Why is drainage needed on the site?
What are the functions of drainage? The objectives of the system are as follows:
1. Collection of melt water.
2. Rainfall drainage.
3. Removal of groundwater beyond the boundaries of the territory.
It is not always advisable to comprehensively drain the soil by laying deep and surface drainage at the same time. Deep drainage systems are required only for swampy soil and those lands where the groundwater level is high. Linear drainage will not be superfluous anywhere. Seasonal flooding is typical for any climate zone. In addition, the quality of our soil generally leaves much to be desired. Clay soils have poor permeability, which also provokes the formation of puddles.
Linear drainage to prevent puddles
Flooded areas are death not only for plants, but also for wooden buildings, and decorative structures. At best, they will have to be seriously repaired. At worst, demolish and install new ones. Both situations are financially costly, and if you consider that without drainage on the site there is a prospect of carrying out global reconstructions regularly, then it makes sense to think about preventing water stagnation.

Site deep drainage system
When site drainage is required
You will have to organize drainage from the land provided that the dacha area is located on a steep slope. To prevent storm flows from carrying away the fertile part of the soil, it will be necessary to create a surface, but not a point, but a linear drainage system with transversely broken channels capable of intercepting water and redirecting it to the storm sewer.

Drainage of a site on a slope
The reason to start installing drainage on the site with your own hands would be to place it in a lowland. In this case, it is initially a reservoir for collecting water flowing to it. In this option, drainage elements are located along the perimeter of the territory.

Drainage of a site located in a lowland
No less of a scourge are flat areas where water is poorly absorbed by the soil. This is where you need to design an entire system of point or linear drainage systems covering the entire area.
Collecting and standing puddles for a long time will tell you that the area needs to be drained. Inspect the lawn. Assess the condition of the bushes. Check if the soil is rotting. These tips are effective in already inhabited areas. On virgin lands, you will have to focus on what is happening in the area. Have the neighbors prepared a pit for the house and dug holes for the fence supports? Fabulous! Check them out. If there is an accumulation of water inside, try to figure out where it is flowing from. Ask the old-timers about the level of water in the wells over the past few years. If it turns out that groundwater lies less than a meter from the surface, then it is most likely impossible to do without installing drainage on the site.

Point drainage system
Surface drainage
“Drainage can be done with linear or point drainage”
The simplest solution. Surface system ensures the collection of water from drains and the site area. By providing rainfall with free flow paths, it relieves the soil from waterlogging.

Surface drainage ensures the collection of water from the site
To arrange such site drainage with your own hands, you do not need to involve specialists. There will be no large-scale work here. Drainage can be done with linear or point drainage. Point drainages are responsible for local moisture collection. This could be runoff from roofs or water from irrigation taps. To drain large areas, it is correct to lay out a linear drainage system.

Point drainage responsible for local moisture collection
Surface drainage methods
An open drainage system can consist of either randomly generated grooves or parallel grooves. Each scheme has side inlets that carry water that enters the drainage to the central drain. Which type of surface drainage device is preferred should be chosen based on the type of soil and topographical conclusions.

Open drainage channel
Drainage in a random area
The ditches of such storm drains are adapted to collect water from soil of low permeability, where there are extensive low-lying areas of stagnation, the elimination of which by smoothing the surface is impossible or unprofitable.
By by and large, random linear drainage is the prerogative of the fields. The ditches scattered across the field are not very large. Most often they are quite small and do not intersect with the main drainage lines.
The purpose of the random grooves is to ensure the outflow of moisture accumulated in low-lying islands. To make random drainage of a site with your own hands, simply dig small grooves with the appropriate slope angle. The soil extracted in this case can be used to fill small lowlands.

Linear drainage will ensure the outflow of accumulated moisture
Field stormwater channels should follow through the main mass of depressions towards the natural slope of the site. This is the only way to ensure complete drainage of the area.
Drainage in a parallel area
It is rational to equip this type of drainage on flat, difficult-to-dry soils with numerous small depression flaws. The parallelism of the grooves does not mean they are equidistant. The walking distance depends on the soil conditions.
Closed drainage

Deep drainage helps reduce groundwater levels
Closed drainage structures are universal. They are no less effective than surface drainage and can remove melted and storm water. Since the system is hidden underground, it does not interfere with landscaping, which makes it quite popular among gardeners.
Vertical drainage
The main elements of this type of drainage system are wells, traditionally installed near the house. The outflow of water accumulated in them occurs using pumps.
Drainage of a site of this type is carried out only according to a professionally drawn up project. Without engineering knowledge and specific skills, it is not worth taking on the installation of drainage on the site with your own hands. Carrying out the work will require the use of specific hydraulic equipment, so leave the solution to this task to those who know exactly how to do it.

Vertical site drainage system
Do-it-yourself site drainage: main nuances
The choice of the type of drainage system is mainly influenced by the cause of flooding of the area. Clay soils, which are characterized by retention of melt and atmospheric water, can be brought into order by arranging surface drainage. Open-type drainage grooves will be quite sufficient to quickly remove excess moisture from the serviced area.
If the cause of basement flooding, erosion of the foundation, and swelling of the soil is groundwater, then the problem will have to be solved with a thorough approach, that is, by deep drainage of the soil. Both options for installing drainage on the site are available as standalone options.
Point drainage
To create a local open drainage network, drawing up a design diagram is not necessary. Its arrangement is logical in the case when flooding of the site occurs only at certain points and only when there is excessive rainfall. Sloping areas are most often susceptible to flooding: the area near the porch, gazebos. Water is guaranteed to accumulate in relief irregularities.

Places for installing point drainage
In the case where the problem area is located near the very boundaries of the land, to ensure drainage, it is rational to complete the drainage on the site with a regular dug trench that extends beyond its boundaries.
In steel cases, having noticed places of stagnation of water, they are equipped with dug-in water intakes or closed tanks. The water collected in them can later be used to water the garden.
Linear drainage
“Ensuring the uninterrupted operation of the surface drainage system occurs by calculating the correct slope of the drainage ditches”
Digging ditches across the entire site or certain corners of it - the best way drain clay soils. Here it won’t hurt to sketch out a rough plan of the future system, on which to mark all the drainage branches and location drainage well, to which it is planned to reduce them.

Example of a linear drainage plan
Ensuring the uninterrupted operation of the surface drainage system occurs by calculating the correct slope of the drainage ditches. The process of arranging linear drainage systems will be greatly facilitated by the presence of a natural slope at the site. On flat surfaces you will have to create an inclination angle artificially. This condition is mandatory. Ignoring it will cause stagnation of collected water in drainage channels.

For linear drainage on a flat surface, create a slope angle
The quantity of channels to be laid is determined according to the absorbency of the soil. The more clayey it is, the denser the drainage network is branched. The depth of the trenches dug for drainage of the site with your own hands is about half a meter. The width of the groove depends on its distance from the storage tank. The widest will be the main branch of the drainage system, where water flows from all parts of the site.
After the drainage system on the site has been dug, they begin to check the quality of its functioning. To do this, a strong flow of water is launched through the watering hoses through the channels. Correctly supply water from several points at the same time.
The assessment takes place “by eye”. If water flows slowly and accumulates somewhere, you will have to adjust the slope and perhaps even widen the groove.
After making sure that the drainage is ideal, you can start decorating the drainage of the area. The appearance of open ditches is not aesthetically pleasing. When working on a drainage system on a site with your own hands, the easiest way is to decorate it with different fractions of crushed stone. You can put larger elements of stones at the bottom of the grooves and sprinkle small ones on top. If desired, the last layer is made from marble chips.

Decorating linear drainage
If this is not available, replace the material with decorative gravel. What does this mean? Having selected a part of the fine gravel, it is painted in blue colors, available in different shades. By pouring it into the channels of linear drainage systems, you will get the illusion of running water. For a complete association with streams, plant the banks of the ditches with flowering plants. This way you will get not just a functional drainage system, but also a luxurious design element.
Channels dug along the perimeter of the site are often covered with a decorative lattice.

Decorative grating for drainage channel
Filling surface drainage with gravel is not only a matter of aesthetics. In fact, this is also an opportunity to strengthen the walls of the ditches, preventing them from collapsing, and also protect the bottom from washing out. Therefore, by using gravel backfill, you will extend the operational life of your drainage system.
Service Features
When caring for surface drainage Special attention pays attention to the cleanliness of the output channels. Even small growths on the walls and bottom can cause a decrease in operating efficiency. Drains are inspected after every rainfall. All obstacles that appear in the way of the drain must be removed.

The drainage system needs regular cleaning
The second point will be to control the slope angle of the linear drainage elements. When smoothing it, you will have to adjust the bottom of the channel by digging or adding.
Point drainage is cleaned manually.
Do-it-yourself deep drainage of the site
If the waterlogging problem is not great clay soil, and in nearby groundwater, you will have to be puzzled by the development of a closed drainage system. Types of work are arranged in the following order:
1. Understand the depth of laying drainage pipes on the site. This indicator is affected by the density of the earth. The higher its numbers, the less deep the drainage. Let's look at an example. Drainage pipes are immersed in sandy soil by at least a meter; for loams this parameter is already 80 cm. In clay soils, pipes are placed no deeper than 75 cm. Why can't drains be installed higher? In addition to soil density, there is another indicator. We are talking about the depth of its freezing. The drains you lay should lie below this mark, then the pipes will not be deformed.

An example of a deep drainage device
2. Select the type of pipes. If surface drainage can be installed without any specific conductors, then for deep drainage of the area, drains will have to be purchased. What does the modern assortment offer? The drainage elements of the system are manufactured:
– made of plastic;
– ceramics;
– asbestos.
Ceramic pipes are quite expensive for installing drainage on a site, but they will last for centuries. There are estates where the closed drainage area made of ceramics has been functioning for 150 years. Asbestos-cement products, although durable, are practically not used today due to their environmental unsafety.
Inexpensive and practical perforated plastic is at the peak of popularity. As a component of deep drainage of the site, pipes from it will need additional protection from clogging with small soil particles. If this is not taken care of initially, then after a very short time the drains will become clogged and will stop letting water through.

Perforated plastic pipes for drainage
It is good to use geotextiles to insulate the drainage pipes of the site. It is only possible to avoid wrapping drains with filter material in clay soil. Here it will be enough to lay the pipe on a twenty-centimeter layer of gravel. This option will not work in loams. The pipes will have to be wrapped in geotextile fabric. The worst thing will happen to owners of sandy plots. Here, the components included in the deep drainage system of the site will have to not only be wrapped in geotextiles, but also covered on all sides with a thick layer of gravel.
Not all owners of suburban plots are “lucky” with ideal hydrogeological conditions. It is often only during the process of cultivating the land or building that they realize that groundwater lies high and that during flood periods there are puddles for a long time. There is no need to worry, drainage will solve this problem. Agree, building it is much easier than looking for a perfect site.
Drainage system will relieve the soil and plant layer of excess moisture, thereby ensuring the normal growth of cultivated green spaces. It will divert underground water from the foundation in case of contact, protect the basement and inspection hole garage from flooding.
Those wishing to arrange drainage garden plot With your own hands or through the efforts of a team of landscape workers, you will find detailed answers to all sorts of questions. Our material describes in detail the options for groundwater drainage systems and methods for their construction.
A drainage system that collects and drains excess groundwater is necessary in the following cases:
- The plot is flat, i.e. there are no conditions for spontaneous movement of water downhill.
- Groundwater is noted at a level close to the earth's surface.
- The site is located in a lowland, river valley or drained swamp area.
- The soil-vegetative layer develops on clay soils with low filtration properties.
- The dacha was built on a slope, not far from its foot, which is why when precipitation falls on the site and around it, water accumulates and stagnates.
Installation of drainage is almost always necessary in areas with underlying soil clay soils: sandy loam, loam. During periods of heavy rainfall and melting snow, this type rocks allows water to pass through its thickness too slowly or does not allow it to pass at all.
Stagnation of water at the level of soil development is associated with waterlogging. In a humid environment, the fungus actively multiplies, infections and pests (slugs, snails, etc.) appear, which leads to diseases of vegetable crops, rotting of the roots of bushes, perennial flowers and trees.
Due to stagnation of water, the soil-vegetative layer becomes waterlogged, as a result of which plants die in a water-saturated environment and the deterioration of appearance plot. The drainage system allows you to eliminate moisture instantly, preventing its long-term impact on the ground
If the problem of waterlogging of the soil is not addressed, erosion of the soil may occur over time. In frosty weather, soil layers containing water will swell, which can cause damage to the foundation, paved paths and other landscaping facilities.
To check whether drainage is necessary, you need to find out throughput soil layers on the site. To do this, dig a small hole 60 cm deep and pour water into it to the maximum.
If the water is absorbed within a day, then the underlying soil has acceptable filtration properties. In this case, there is no need for drainage. If after two days the water does not go away, it means that clay rocks lie under the soil and plant layer, and there is a risk of waterlogging.

Due to the heaving of water-saturated rocks, the walls of residential structures may crack, as a result of which the building may become unsuitable for permanent residence
Image gallery
Owners of land in a lowland or on a steep slope are faced with a problem when water stagnates in the lowest place, when the water intake may be located higher. In this case, in the lower part of the territory it is necessary to build a storage well into which it is necessary to introduce drainage pump. With its help, water is pumped upward and discharged into a ditch, ravine or other water receiver.
If it is planned to build a absorption well on the site to utilize the collected water, then the work on its construction is carried out in the following sequence:
Image gallery