How to prevent floors from squeaking: getting rid of inconvenience. The floor is creaking, possible causes and methods for eliminating the creaking. Boards on the floor are creaking, what to do?
Read also
Often moving around wooden floor, you can hear the terrifying creak of the floorboards. It irritates those around you, distracts you from important matters, excites you, gets on your nerves, and puts you on guard. It will not be possible to quietly sneak out of the house without disturbing its inhabitants. At night, the unexpected sound of creaking floorboards will wake up almost all the sleepy residents of the apartment. Today we will tell you what to do if your wooden floor creaks.
What is a wooden floor
 First of all, let's figure out what it is wood covering.
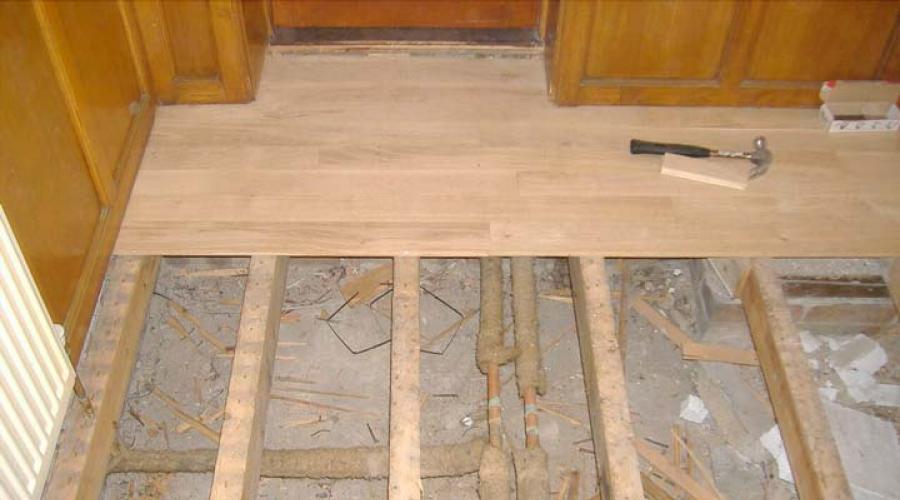
They are nailed onto bars 150 cm long and 50 cm thick (joists) wooden floorboards. This is how floors were made in Soviet times. There is another option wooden floors.
The subfloor, which is plywood or planks, is screwed onto the joists with self-tapping screws. You can put small pads under the joists. A finished floor in the form of parquet, laminate, or solid board is laid on top of the leveled rough base.
Why does a wooden floor squeak?
We often ask ourselves the question: “Why do the wooden floors in the house creak?” Today we will try to find out.
Causes of squeaking:

How to repair squeaky wood floors
First of all, you need to determine the cause by listening to which floorboard is creaking.
But this can be done by removing laminate, linoleum and other finished floor coverings. Walk through subfloor. If it does not squeak, then you will have to re-lay the finished floor. If the creaking continues, we continue to look for creaky floorboards.
Entire groups of floorboards can also creak. They need to be removed and replaced with new ones. The lack of material, time, money dismisses this method of removing squeaks.
What to do if a wooden floor creaks without disassembling it
 Let's look at the simplest means and methods of getting rid of squeaking boards.
Rub a wax candle over the seams between wooden floorboards. This method will help you stop unpleasant sound.
Eliminate creaking in the apartment without dismantling the floor, on long time dowels will help. At an angle of 45 degrees, at a distance of 50 cm from each other, drill holes with a diameter of 8 mm along the seam. Insert dowels into them, securing them with adhesive. The pins will provide the floor with a stable and strong foundation.
 To prevent wooden floors from creaking, it will help cementing loose lumber. Because of our weight, the boards beneath us sag and become loose. Cavities appear between the concrete floor and them. If you fill them, the squeak will disappear.
Let's find the board that causes the unpleasant sound, drill a hole in it and pour liquid cement through it with a syringe.
In order for the cement to harden firmly, you need to pump it under the floor gradually, in portions. Perform this action until the cement stops entering the hole. Plaster or cover with mastic on top.
 It will also help to strengthen the wooden floor so that it does not creak. pumping foam into the hole. It swells and spreads across the empty plane, filling it. As a result, the floor becomes hard and the creaking stops. But not for long. Moving along the floor, we act on the polyurethane foam and destroy it. The plane turns out to be empty again.
 IN wooden house and can be used in the countryside metal anchors, if the base under the floor is concrete. The anchor is a hex bolt. Inserting it into the drilled floor, turn the dowel head. It begins to open the petals below, getting stuck firmly in the hole. The logs become sandwiched between the anchors. Unable to move, the wooden floorboards are also firmly attached to the base.
This is very reliable way, but expensive. Each anchor can support no more than 30 kg. To secure the entire floor you need about 200 dowels, each of which costs more than 50 rubles. So calculate how much it will cost to secure the floor with anchors!
 You can get rid of creaking lumber by hammering wooden wedges in the cracks between the floorboards. To make the wedges stick better, coat them with glue. Process the wedges antiseptic. To prevent the wooden wedges from moving away from the boards, we drive the wedges at a distance of 50-80 cm from each other. You can drive the wedges further. To do this, use a chisel to move the floorboards away, lifting them. You can drive a wedge into the gap between the boards to a depth of 3-5 mm.
 If the wooden floor in your apartment creaks, you can pour graphite powder with talc into the cracks. If the floor is old, made of rotten boards, then this method is ineffective.
But you can also use sealant based on sawdust, varnish and paint. This mixture will firmly connect the boards together. The sealant is sold in the store. Self-production Such sealant is also possible. Mix the ingredients (4:1:1) and pour to the base of the floor.
 If the floorboards of a wooden floor are creaking, then the cracks can be seal with a cord coated with PVA glue. We put such a cord between the cracks, and cover the top with sawdust mixed with glue. Sawdust should be placed in cracks above floor level. When the glue dries, cut off these bulges.
 If the floor is flat, there are no bulges or rotten boards, but the creaking is still heard, we'll cover wooden boards plywood, which we will fix at a distance of 15 cm from each other. The plywood must be thick, at least 12 cm. The places where the plywood is fastened must be on the joists.
The most profitable and easiest way is to secure the boards with self-tapping screws instead of nails. They just need to be screwed to the boards that are loose.
How to rotate a wooden floor so it doesn't creak

To prevent wooden floors from squeaking, it is important to choose the right screws.
 They should have threads up to the cap. By screwing such screws into the board, we connect it to the joist.
The gap between the block and the floorboard will disappear, the absence free space between the joist and the board will not allow the floorboard to move, there will be no creaking.
If you take a self-tapping screw, where the thread is at a certain distance from the head, then, already fastened to the joist, the board will still move along the surface of the screw from the head to the beginning of the thread, making nasty sounds.
 But these methods can be used if the squeak is minor. To better secure the floor, it is better to use plastic dowels with screws. Drills into defective boards deep holes by diameter
ru dowels, going 40 mm inside the concrete base. Then dowels are inserted into it and screws are tightened.
 If you knock on boards that have already been tightened, you will hear a loud, ringing sound; with loose floorboards, the sound is dull when you knock. By tightening the floor with self-tapping screws, you will eliminate the creaking of the floorboards. At the dacha, in the bathhouse, you can freely use this method. IN apartment building Be careful not to damage the wiring of your downstairs neighbors.
Floor creaks wood floor repair
Let's see how to tighten a wooden floor so it doesn't creak.
If you decide to re-lay the wooden flooring, then look through all the boards, replace the rotten ones where necessary, secure them with self-tapping screws, drowning the caps and covering the recesses with mastic.
 If there are a lot of rotten boards, then the rough covering should be dismantled. The floors do not need to be dismantled immediately. First, we will lift 3-5 boards located near the wall and tear them off the floor. Let's look at the logs and what condition they are in.
We will inspect the boards and replace the rotten ones. After replacing the logs, we put the first torn board back in place.
 We fix it, then tear it off one board at a time, repairing and replacing the joists and boards. Tearing off the board, we put the old one in place on the other side, fastening it with screws to the joist.
Number the boards so as not to get confused. Pay attention to the joists to see if they are cracked.
Replace the bars with new ones, try moving the logs. If they wobble or move, they need to be secured with wedges.
 The wedge is a block sharpened at an angle of 30 degrees. Its length ranges from 30 to 40 cm, and its thickness from 30 to 60, depending on the size and thickness of the log.
Drive a wedge into the joists. Usually two wedges are driven in on each side to keep the joists firmly on the concrete base. To fasten the joists, you can also use metal corners. The boards need to be held together using metal staples, driving them into joists and wedges.
 If there are no staples, then you can use scraps of boards, attaching them to the joists with self-tapping screws. Instead of metal wedges, it is enough to use wooden spacers. It is best to use tongue and groove boards for flooring. You can secure the boards together using self-tapping screws, inserting them into the wood at an angle. To keep the boards tightly together, you need to tap the board with a hammer.
Some craftsmen coat the grooves with glue before laying the next board to tightly fasten the boards.
When laying the first board, do not forget to step back from the wall by 15-20 mm. Under the influence of temperature changes and moisture, the board can expand and rest against the wall, destroying and warping the entire floor structure if there is no gap with the wall. The screws near the wall will be covered with baseboards.
How much does the work cost? Wooden floors squeak
The price for eliminating creaking wooden floors in Moscow is 200 rubles per square meter.
We told you about what to do if your wooden floor creaks. We hope that our tips will help you get rid of the annoying sound. We don’t know which method you will choose. But we believe that you will find the most effective one depending on your conditions, desires, capabilities and time.
The annoying creaking of wooden floors does not have a calming effect at all and very rarely evokes childhood memories of summer vacation by Grandma. Therefore, to save your own nerves, find out what to do if wooden floors squeak.
Certainly, perfect option The solution to this problem is to take advantage of the opportunity and begin a long-planned renovation with a complete replacement of the floors.
If such a solution does not suit you, then you will have to start restorative repairs of the floor. This is a troublesome matter, and besides, you may not be able to completely get rid of the squeak. However, it’s still worth a try, since no specialist will give you a guarantee of the result or lack thereof.
Causes of squeaking
Wooden floors squeak in two situations, depending on the material your floor is made from:
- if the floorboards (or any other floor covering, such as chipboard) do not fit very tightly to the joists (or wooden beams);
- if the parquet does not adhere tightly to the surface of the base on which it is laid.
In both cases, there is only one way to get rid of the squeak - remove the space that has appeared between the floor covering and its base. However, in these cases you will have to act differently.
Floor on joists

The only way to solve the question of what to do if wooden floors squeak when they are laid on joists (wooden beams) is to screw the floor covering to them more carefully.
For this you will need:
- long wood screws,
- screwdriver or drill with a screwdriver attachment.

The process of eliminating the squeak itself will look like this:
- Find the most creaking places on the floor (so as not to “lose” them later, mark them with chalk).
- Next, determine where the joists (beams) go in the floor. If the floor has been painted several times, the paint will have to be scraped off to find the nails that secure it to its base. In the case when the floor covering is made of boards, you can remove the outer boards to find the joists under them (the joists always run perpendicular to the wall at a constantly maintained distance from each other). At the same time, you can look under the floor structure and see the condition of the joists. If from under the boards you “smell” of mustiness, dampness and mold, then instead of cosmetic restoration of the floors, you should still completely replace it.
- Now you need to screw self-tapping screws into the logs (beams) so as to press the boards (or chipboard) to them as tightly as possible. The pitch of the screws in this case may vary depending on the intensity of the squeak, but still should not be more than 15 centimeters. Be careful not to hit the nails with the screw, as this will cause it to break and you may be injured.
Parquet

Creaking parquet can cause no less inconvenience. And since in this case the creaking occurs due to its deformation individual elements(not all flooring), then, first of all, it will be necessary to find them, since the defect will have to be eliminated pointwise.
To get rid of the squeak you will need:
- drill with a drill with a diameter of 6-8 mm,
- ordinary cement (about 20 g for each creaking plank) - if you don’t have it, then a mixture for plastering work is suitable,
- a very large syringe without a needle.
Having prepared everything necessary for the repair, you can proceed to the main action:
- Carefully drill a hole in the middle of the creaking parquet strip.
- Prepare cement mortar, the consistency of which should resemble regular milk.
- Fill in cement mixture into a syringe. Make sure you can squeeze it out without it getting stuck in the syringe. If the mixture is too thick, dilute it with water. If the mixture is too liquid, you will have to add a little cement.
- Insert the syringe into the hole and pour the solution into it in small portions. Remember that after each “dose” of the solution, another portion of air should come out from under the parquet. Take your time - neither cement nor plaster mixture do not harden instantly.
- The hole must be filled with the mixture until it stops accepting solution.
- Wait for the solution to harden and make sure that the parquet no longer creaks.
- Fill the hole in the parquet strip with a special putty (or mastic) for wood.
You should not immediately try to get rid of all deformed parquet planks from squeaking. First, it’s better to do a “test” repair and only after making sure that this decision The problem helped you, continue to get rid of other squeaky places. If the creaking does not go away, you will most likely have to re-lay the entire parquet, along the way renewing the surface of the subfloor and replacing damaged planks.
Video
Here you can see an example of work to eliminate the creaking of a wooden floor:
In many old houses, the floor consists of boards that are nailed to the joists. Over time, such a floor begins to loosen and creak. You can often get rid of the nasty squeak without disassembling the boards.
Let's figure out why floors squeak?
To do this, you need to understand how the floor structure in your apartment works. Popular designs come in two types.
- The first one consists of a floorboard laid on logs in increments of about 40 cm. The boards are secured with nails.
- The second one lies on the logs upper layer from chipboard/plywood sheets.
Logs are bars about 4 centimeters thick, which are located horizontally and serve as the basis for the cladding. They are not secured to the base in any way; they are held in place by being attached to the sheathing. The logs create a technological retreat from the concrete, which allows the floor to breathe and insulates it.
Since the sheathing is nailed to the beams using regular nails, they become loose over time. The boards begin to sag and creak when walked. The logs themselves can also become loose and shake.
Eliminating squeaks
You can remove the creaking of wooden floors yourself and without high costs.
Cheapest and effective way- scrolling with self-tapping screws. You don't need to disassemble the floor for this. Old nails will need to be duplicated with strong screws. The creaks will mostly go away if the lags are in good condition, did not crack or move out of place.
A radical way is to replace the floors. This is an expensive option, since you will have to change the flooring in the entire apartment, but everything will be reliable and for a long time. Here the choice depends on your budget and preferences: make a new floor using joists or replace only floorboard, make dry, semi-dry or wet screed. The screed will slightly increase the height of the ceilings, and all the doors will need to be replaced. But on the screed you can easily lay tiles, porcelain stoneware, and install heating. If you want to make a screed and maintain the current floor level, the missing thickness is compensated by a layer of expanded clay or extruded polystyrene foam, which will add additional heat and sound insulation. When installing a screed, you need to clarify what constant load the floor slabs in your home can withstand; in old houses this is at least 150 kg per square meter. m.
Scrolling the floor

We will not describe the process of replacing the floor, but will tell you how to fix the squeak even without removing the boards.
- Determine at what distance the floorboards lie from concrete slabs. To do this, drill a hole and measure the depth using a wire.
- Buy wood screws of the required length so that they fit together with the head and do not stick out.
- Find the places where the logs are. They can be identified by the nails in the floor - they run in rows along them. If the nails are not visible, dismantle the baseboard and look at the joists through the gap along the wall, there is a special indentation of about 1 centimeter.
- Drill a hole 1-2 millimeters smaller than the diameter of the screw.
- Tighten the screws with a screwdriver until they stop, slightly recessing the head.
- Repeat this with each board, screwing it to all the joists.
- There is another option - tighten screws of the same length as the distance to the concrete. You must first blunt their tip so that they do not destroy the concrete over time. In this case, they will serve as additional support and will prevent the boards from sagging. This method also helps in places where scrolling does not remove the squeak (for example, a cracked joist).
Attach the logs to concrete base undesirable, it will reduce sound insulation.
Video on eliminating creaking wooden floors in Khrushchev:
Sometimes the cause of squeaking lies in the friction of the boards among themselves. This problem can be solved by driving wooden wedges between them.
Now that we have eliminated the creaking in the apartment, the floor needs to be leveled before laying a new covering. It is best to do this in 2 layers of plywood with offset joints. Each sheet is screwed to the floorboard in 15 cm increments.
Example). After repairing the floor from that article, 4 years have passed, and not a single squeak has appeared.
Photo: upon request from Yandex and Google
Not only residents of old houses face the problem of squeaky floors. Poorly laid out new laminate can also annoy you with hateful sounds. We suggest that you do not tolerate or tiptoe around the apartment when someone close to you is sleeping, but that you radically solve this problem. There are a lot of options for eliminating squeaking - choose yours.
Why do floors creak?
- The boards are not firmly fixed to the underground crossbars. As a result, inevitable loosening occurs, which is why the floor creaks;
- The simplest and most natural reason is that the tree has dried out. Unfortunately, with natural material this happens when the floor serves you for a very long time;
- Special wooden linings sank;
- Nails and screws have become loose;
- The ends of the boards move when walking on the floor;
- There is insufficient clearance between the wall base and the floor.

The floors in the apartment squeak: we offer several options for eliminating the problem
Option 1: polyurethane foam
We can’t say that this method will help one hundred percent, but if the squeak is not very big, it really works. An ordinary one is used polyurethane foam, which is carefully blown into the underground. This is done quite easily, which means that even a beginner can cope with eliminating the squeak.
The indisputable advantage of this option is that there is no need to remove the boards from the floor. It is enough to drill a certain number of neat holes and blow foam into them. It can also be poured into the cracks between the boards. The principle of operation is simple: the poured foam will harden and expand, as a result of which the floorboards will be pressed down and the creaking will disappear. 
However, this option also has two obvious disadvantages. Firstly, this method is quite expensive. You will need a lot of foam, and good material from a trusted manufacturer is not cheap. Secondly, fragility. Unfortunately, after some time the creaking will return again, because the foam is destroyed and pressed through. However, this may not happen, because it all depends on how much stress your floor experiences every day. If we're talking about, for example, about an office where people are constantly moving, then the creaking will definitely return. But in an apartment this method will be much more durable. Read the following answers to the question why the floor creaks.

Option 2: driving wedges
If your wooden floor is creaking, then wedges will come in handy. This option is more durable than polyurethane foam and is significantly less expensive. True, you will have to work hard. 
Ideally, if you have the opportunity to work with the “lower” floor (for example, in a country house or in a house). In this case, wedges need to be placed between the boards and beams themselves. Each wedge should first be lubricated with high-quality glue.
If you can’t get to the subfloor, then simply drive wooden wedges into the gaps between the floorboards. There may be a lot of such gaps, and the work will be quite painstaking, but believe me: it’s worth it. Your working tools are a cone-shaped hammer and a regular hammer. Keep in mind that the approximate distance between the 2 wedges should be approximately 0.17-0.22 millimeters. The wedges must be tapped in such a way that the upper part under no circumstances goes beyond the top of the board. Now you know what to do to prevent the floor from squeaking. But that’s not all: what if you like the next option better?

Option 3: self-tapping screws
Another practical answer to the question of what to do if the floors in the apartment creak. True, there is one “but”: you will have to work with self-tapping screws only if the floor made of boards, which is mounted on concrete base. The essence of the method is simple: each place from which an unpleasant sound comes is “stretched” with self-tapping screws. The huge advantage of the work is that you will forget about the squeak for a really long time. 
Let's start with a definition problem areas and searching for beams/joists (they should be marked on the floor, for example, with chalk). It is not difficult to determine the area where the joist is located: as a rule, these are the heads of screws or nails. With their help, the floorboards are attached to the beams. Then it is worth making sure that in no case do any communications, wires, etc. pass through the found places.
Next, we will need a drill: in the place of the creaking, we drill a hole through the board, after which, using thin wire We accurately measure the distance to the concrete surface. Let's say you get a distance of eight centimeters. In this case, you need to use self-tapping screws with a length of at least nine to ten centimeters. All that remains is to screw in the screws through the contact points of the boards and joists. We do this all the way until we feel that we have touched the concrete. In most cases, it takes two to four screws per problem squeaky spot. As a result, thanks to the screws, additional support is created to support the beams. The floor seems to rise in the “sick” place, and the unpleasant sound disappears. It is only important to check that each screw head is well recessed. As you can see, it’s easy to eliminate the squeak without opening the floor!

Option 4: plywood
So, your chipboard floors are squeaking. To forget about this sound forever, just attach it over the material plain plywood. Please note that the plywood used should be no thinner than twelve millimeters. The plywood must first be cut into squares. small size. After this, make sure that the base of your floor is completely dry. The plywood is secured to the floor using screws or special glue. Between the “squares” you need to leave gaps of nine to ten millimeters. For more information on how to eliminate creaking floors in an apartment, see the video below:
Option 5: anchor method
Now let's try to remove the unpleasant creaking of the floor using special metal anchors. The reliability of the result of such work is one hundred percent. But there is also a significant disadvantage: this is the most expensive and labor-intensive option. 
So, if you decide not to change the floor, then you will have to work according to the so-called through installation principle. Its essence is that the metal anchor must pass through the flooring. First, using a hammer drill, you need to drill a small hole in the concrete through the cross beams and the floor. Next, a special outer metal shell is installed. It is into this that you need to screw the anchor directly. This way you will secure the lag for them.
Keep in mind that the top of the anchor should not protrude above the deck. To do this, the entrance of the hole must first be drilled using a nozzle of a slightly larger diameter. Ideally, you can install such anchors around the perimeter of the entire room.
On a note! Optimal distance between anchors - ninety centimeters. Based on this, plan how many fasteners you will need. Now you know what to do if the floors in your house creak!
What to do if the floor in your apartment creaks, then you have found this article. This can and should be dealt with, but you will find out how in this article.
The harmony of silence when walking on the floor can be disrupted by many factors, such as: improper installation of the floor covering, low quality materials, drying out of wood, splitting of planks, uneven screed, which leads to curvature at the joints. Something needs to be done about this problem immediately, because the first signs of wear on the floor covering begin with a squeak. As the proverb says, “A good squeak will soon come out.”
First option the most affordable and simplest. You just need to replace the entire floor with a new one, maybe even best quality than the previous one. There's an analogy here with an old and a new car. Old car it has to be constantly repaired, but a new one drives several tens of thousands of km without serious breakdowns. When replacing with a new floor, the creaking will definitely disappear, and if you replace the old floor with a new material from balsa wood, then walking along it will be much more pleasant.
Option two simple, you need to cover the old creaky floor with a large and soft carpet. There are a large variety of these carpets on the market and you can choose a beautiful carpet that matches the decor of your room. The carpet has a soundproofing effect, while reducing the load on the floor. But this option is not suitable for everyone. The skip may remain or become a little quieter.

Third option transfer. It involves relaying the boards, but only specialists can do such work. Perhaps you once had a flood in your apartment, and the boards picked up excess moisture, so they swelled and began to rub against each other. The drying option will not work, the boards have already come apart and the fastenings have weakened. The boards must be removed, dried, and then reinstalled with the correct fit. The process is certainly long, but effective.

Fourth option is the process of filling the cracks between the boards with a mixture of graphite powder and talc. Thus, you can reduce the volume of the squeak to a minimum, but this option will not give a complete ideal. The creaking will still appear over time, this is only a temporary result.

Fifth option- this is foaming with polyurethane foam in order to forget such a problem as the floor creaking. After drying, the foam creaks all rubbing boards. But if your floor creaks, then that too temporary option repair. Over time, when walking on the floor, an amplitude of vibration occurs and the polyurethane foam will still fall off.

Sixth method. Everyone knows so magical construction tool like screws or self-tapping screws. With its help you can create miracles. The same with the floor, if it creaks, you can make a strong floor with a screw and a screwdriver. In places where the floor creaks a lot, you can screw in screws, you just need to know where the joints are.

Seventh option will not save you from the creaking that appears; it is intended more to prevent it. During the flooring process, fabric is laid along the entire length of the room. In the future, the fabric will dampen all vibrations and noise.
